Polaroid Play+ 3DPen User manual

1
www.polaroid3d.com
3D-FP-PL-2005-00
User Guide
3D Pen

2
CONTENTS
Certications And Compliance
FAQ’s And Troubleshooting
15
16
Manufacturer’s Guarantee 14
Stencil Library 13
3D Filament 12
3D Pen Filament 11
Using your dierent speed settings 10
How to create your models 9
How To Use 8
Technical Specications 7
Safety Instructions 7
Introduction 3
Box Contents 4
Operating Instructions 5
Product Features 6

3
INTRODUCTION
The following User Guide will provide you with all of the information you will need to know
to get started with your Polaroid Play+ 3D Pen.
It will guide you through how to use your pen, starting from getting it out of the box and
setting it up, through to using all of the amazing features and techniques to get you creating
awesome 3D models to impress your friends and family with!
Within this User Guide you will nd information on all the dierent lament materials and
colours that are available for use with your Polaroid Play+ 3D Pen, including Premium
PLA, Deluxe Silk, Glow-in-the-Dark, Multi-Colour and P-Wood.
The Polaroid 3D team hope that you have many happy hours drawing and creating with
your Polaroid Play+ 3D Pen. If you have any questions or queries regarding your pen,
please don’t hesitate to contact us via polaroid3d.com/contact where a member of the
team will be happy to assist you.

BOX CONTENTS
1
3
2
4
5
2
1
3
4
5
1 x Polaroid Play+ 3D Pen
1 x 3D Pen Holder
1 x Quick Start Guide
3 x 15g (5m) / 0.5oz (16.4ft)
PLA plastic lament packs
(assorted colours)
1 x 1.5m / 4.9ft USB cable
(USB Power Adapter not included)
4

5
OPERATING INSTRUCTIONS
Start Button
Filament
Loading Point
USB Cable
Entry Point
Nozzle
Power Button
Speed Control
Button
LED Indicator
Light
LED Speed
Indicator Lights
Filament is inserted
into the pen here.
A 5.0 Volt DC,
2 Amp power adapter
(5.0VDC 2.0A)
MUST be used.
The lament
will extrude
from here.
DO NOT
TOUCH!
When ready
to use, the
nozzle will
be hot.
Red light indicates
the pen is heating
up.
Blue light indicates
the pen is ready to
use.
Press the ‘Power Button’ to turn
the pen on and o.
Hold the power button for 2
seconds to automatically retract
the lament from the pen.
These will show the speed
at which the lament will
extrude from the pen:
1 light shows the
speed is set to ‘Fine’
and the lament will
extrude slowly from
the pen.
2 lights show the
speed is set to
‘Normal’ and the
lament will extrude
steadily from the pen.
3 lights shows the
speed is set to ‘Rapid’
and the lament will
extrude quickly from
the pen.
3 speed settings:
Rapid, Normal, Fine.
Manual Extrusion:
press and hold to extrude
lament from the nozzle,
and release to stop.
Auto Extrusion:
click once to start extruding
lament from the nozzle,
and click again to stop.

6
PRODUCT FEATURES
• Create your own freehand 3D models, including drawing into the air or tracing a template and
using the pen to assemble the parts together!
• Designed for both right and left handed users with the Start button positioned on the top panel
of the pen.
• 3 optimised speed settings (Rapid, Normal, Fine).
• Powered via a USB C connection, it can be used with the most up-to-date mobile technology
charging cables.
• Compatible with ALL Polaroid PLA-based Universal Filaments; PLA, Deluxe Silk, Multi-Colour,
Glow-in-the-Dark and even our P-Wood.
• Automatic retraction of the lament and power-o after 8 minutes of inactivity, for added safety.
• Filament removal by pressing and holding the power button for 2 seconds.
• Manual or Automatic Extrusion.
• 3 lament reels included in the box, giving you everything you need to get started.

7
SAFETY INSTRUCTIONS
WARNING
WARNING - BURN HAZARD:
Parts of this product get very hot during use
(approx. 180 - 200°C / 356 - 392°F).
DO NOT
touch the tip of the pen, the
surrounding area (where you see this sign ), or the melted plastic as
it could cause a
BURN
.
Before storage always allow the product to completely cool after use.
This product
IS NOT A TOY.
This product is suitable for ages 14+ unless under adult supervision.
Please read this Quick Start Guide carefully before use.
If switched on, always put the pen back in its holder when not in use.
TECHNICAL SPECIFICATIONS
Play+3D Pen
Model No.
Power Requirement
Pen Size
Filament
USB Cable
Guarantee
Safety
3 Speed Settings
3D-FP-PL-2005-00
A 5.0 Volt DC, 2 Amp (minimum) power adapter
(5.0VDC 2.0A) MUST be used. IMPORTANT: Using an
incorrect power adapter will result in the Pen not working
correctly.
168 (l) x 24 (w) x 33 (d) mm
6.61 (l) x 0.94 (w) x 1.29 (d) inch
PLA, Deluxe Silk, Multi-Colour, Glow-in-the-Dark, P-Wood.
Type-C to USB-A 1.5m / 4.9ft
12 Month Manufacturer’s Guarantee (this may dier by state/
country according to minimum statutory requirements).
Auto Turn-o after 8 mins, for added safety.
Rapid, Normal, Fine

8
HOW TO USE
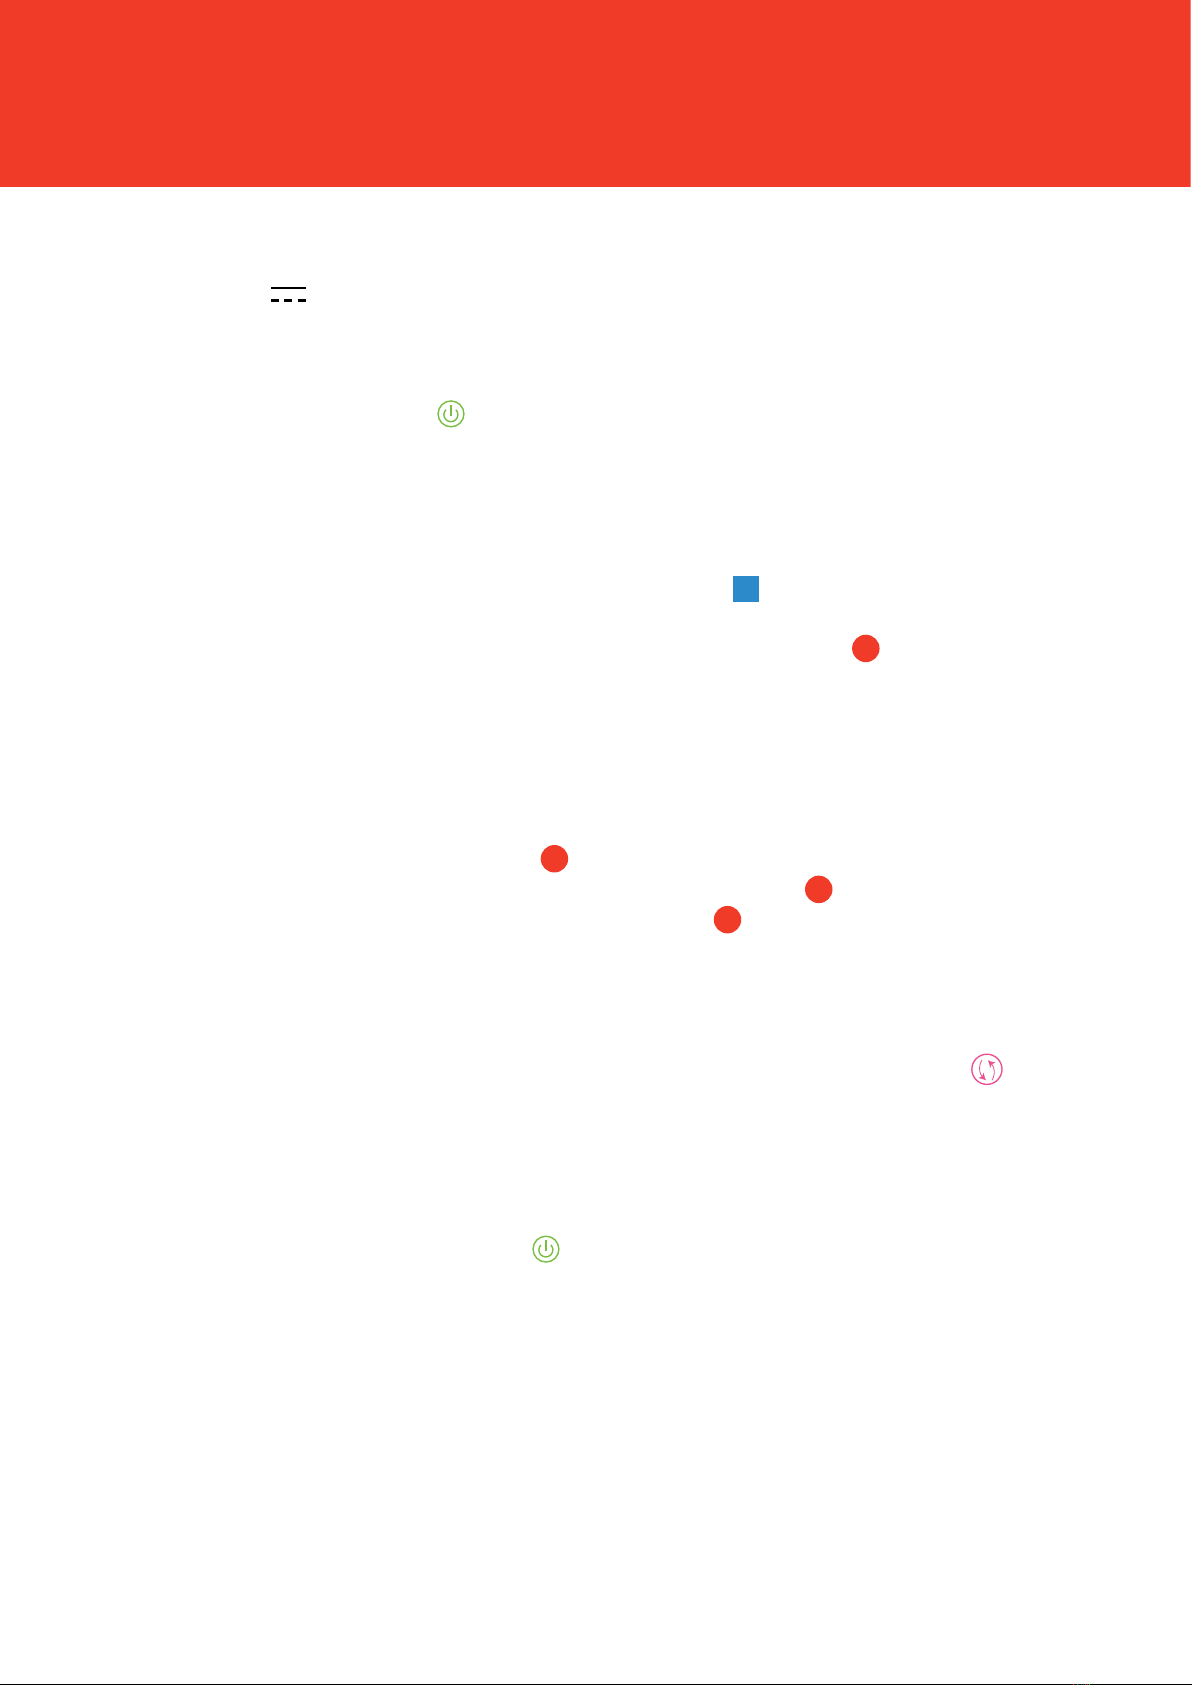
Use the USB cable provided to connect to a 5.0 Volt DC, 2 Amp power adapter
(5.0VDC 2.0A).
Press the Power Button ( ). The light will ash red to indicate that the Polaroid Play+ 3D
Pen is heating up.
When the light turns blue it means the Pen is ready for use. Insert one end of your PLA
material into the loading hole at the top of the pen ( ). Please ensure that the end of
the lament is at across the end (cut carefully with scissors if not) before inserting. Insert
the lament gently until it stops. Press and hold the Start button ( ) and you will feel the
lament being gently guided into the Pen. Please keep this button pressed until you see
lament appear from the end of the nozzle. NOTE this may take a few minutes. DO NOT
TOUCH any part of the nozzle at this point as it will be VERY HOT.
Click and release the Start button ( ) for continuous printing (the pen will start extruding
automatically). Whilst in this mode pressing the Start button ( ) again will pause printing.
For manual printing press and hold the Start button ( ); releasing your nger in this mode
will immediately stop the printing.
To speed up or slow down the extrusion of the lament press the ( ) button.
NOTE: there are 3 speed settings.
To retract the current lament material (either to change colour or to remove completely),
press and hold the Power button ( ). You will hear and see the lament being removed
from the Pen. Please note that full retraction may take a few minutes. NOTE: The 3D pen
will automatically retract if the Pen is not being used for approximately 8 minutes.
1
2
3
4
5
6
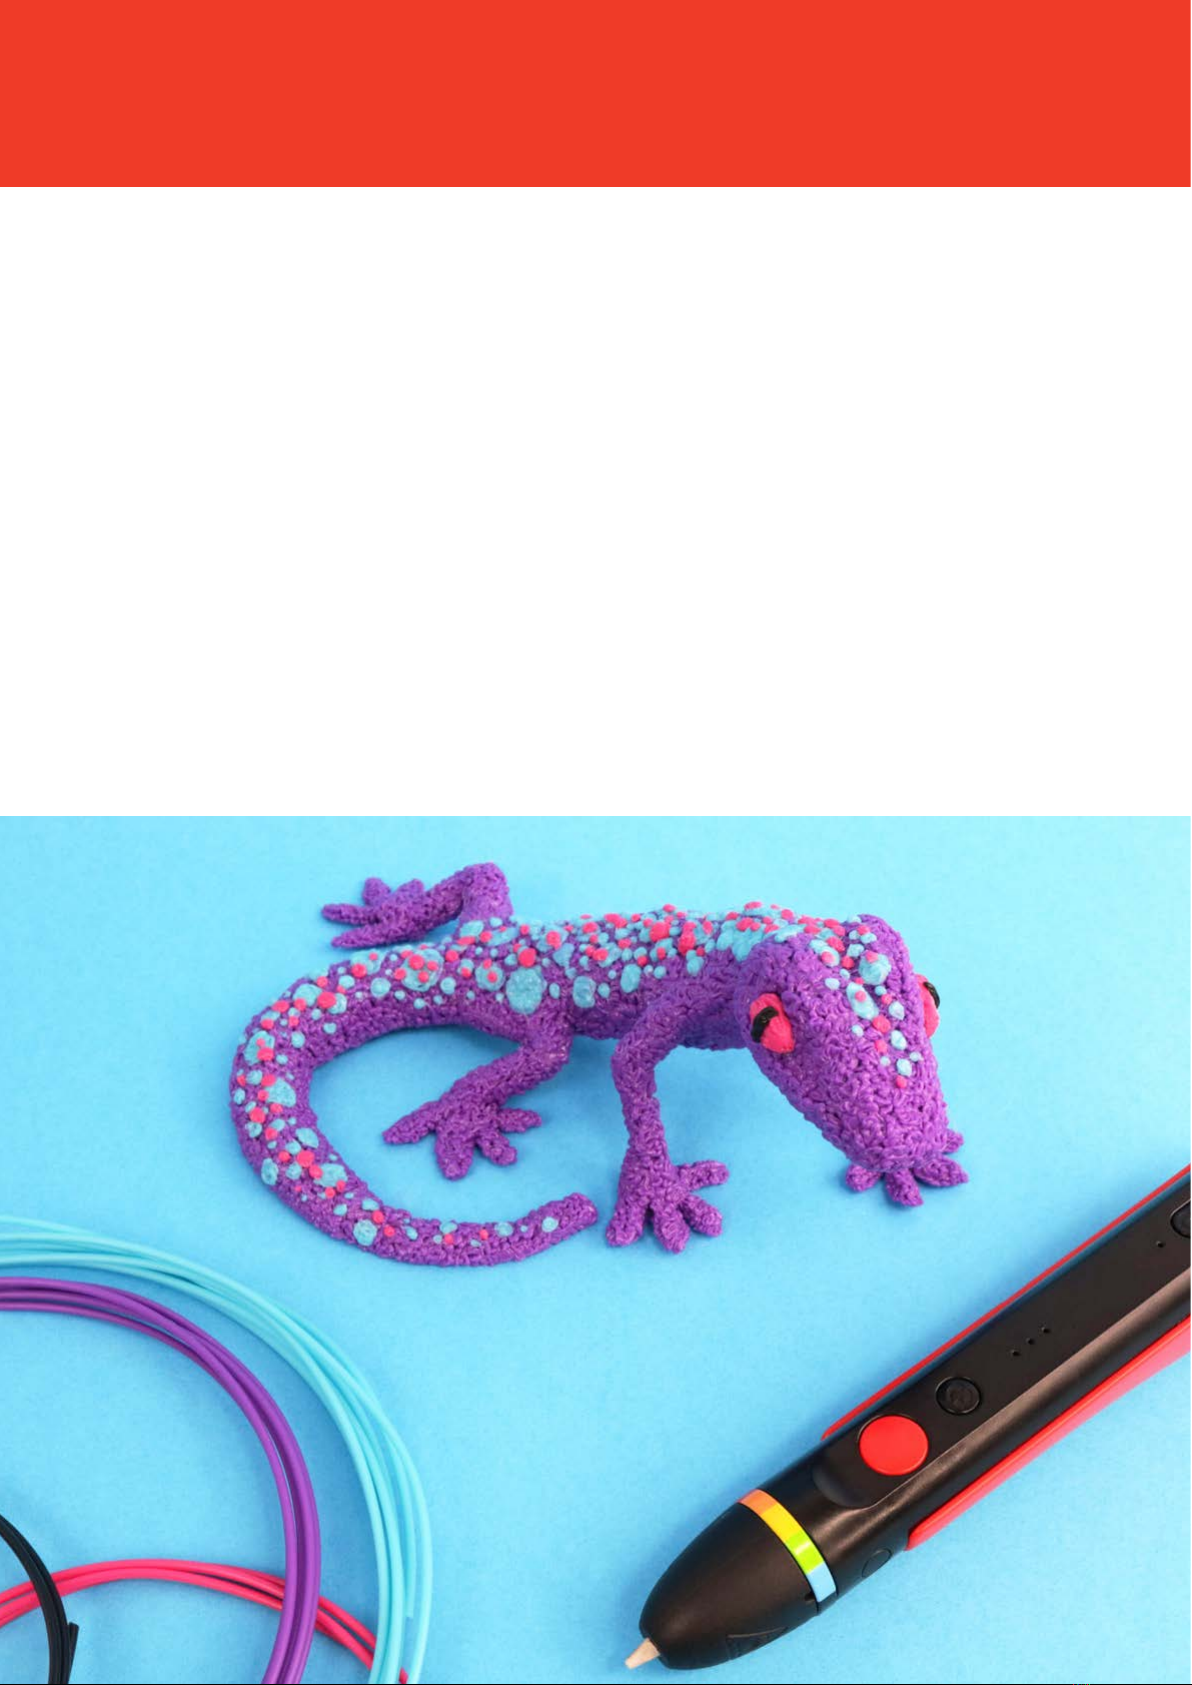
NOTE: The Polaroid Play+ 3D pen should only be used with original Polaroid 1.75 mm
PLA lament. Use of third party lament could cause damage to your pen. This may
invalidate your warranty.

9
HOW TO CREATE YOUR MODELS
Whether you are an expert or a rst-time user, there is something for everyone to make with the
NEW Polaroid Play+ 3D Pen. Follow the tips below to create 3D models that will wow family,
friends and colleagues!
Use a template to trace around and
then simply ll in the various parts of
your model, as you would if using a
colouring pen. You can then use the 3D
pen itself to join these pieces together,
creating a 3D model.
Beginner
Once you have mastered the tracing
technique, you can start to create more
complex models using real objects
as your template instead! Cups, hats
and shoes are good examples but it’s
important to ensure they can withstand
the heat of the lament rst.
The most advanced way to use the pen
is to create models from scratch. This
can be achieved by drawing up into the
air, by layering lament to build a model
or by creating a scaold to draw over!
Intermediate
Expert

10
USING YOUR DIFFERENT SPEED SETTINGS
The Polaroid Play+ 3D Pen has three optimised speed settings to provide you with the ability to
tailor the ow of the material through the pen depending on your desired output.
Minimises the time it takes to cover an area when you are creating larger models, as well as
providing you with an increased ow rate. To use the Rapid speed setting, press the speed
control button until three LED speed indicator lights are showing.
Rapid
Normal
Fine
Provides a comfortable level of output ensuring ease-of-use from the outset,
as well a steady continuity, minimising the need for regular starting and
stopping. To use the Normal speed setting, press the speed control button
until two LED speed indicator lights are showing.
Optimised for creating intricate
designs and providing the ability to
free draw vertically. To use the Fine
speed setting, press the speed
control button until one LED speed
indicator light is showing.

11
3D PEN FILAMENT
The Polaroid Play+ 3D Pen works with the new 3D pen laments. The box contains 22 vibrantly
coloured PLA lament reels including 2 reels of the new Deluxe Silk lament, completely free!
The fantastic colour spectrum oers the opportunity to create and build models in many dierent
colours with two unique nishes.
Product Features
• Each box contains 20 x 15g (5m) PLA plastic lament packs in 20 fantastic colours, plus 2
extra FREE Deluxe Silk laments.
• Each 15g pack lasts approximately half an hour of continuous drawing.
• PLA plastic is an environmentally friendly bio-compostable plastic made from corn starch.
• Each 15g pack contains standard 1.75mm diameter material.
• Box includes fantastic uorescent colours for creating models that glow under UV light.
• The Polaroid 3D laments can be used with ANY suitable 3D Pen that uses PLA lament.
PLA
Deluxe Silk
White
ChocolateG reyP urpleD ark
Green
Dark
Blue
Transparent Blue Gold
BlackY ellowR ed Silver Orange Pink Green
Fluorescent
Green
Fluorescent
Yellow
Fluorescent
Red
Fluorescent
Blue Silver
Blue
*colours may vary

12
The Polaroid Play+ 3D Pen is also compatible with all of the PLA based Universal Polaroid laments,
including the 1kg Polaroid Premium PLA lament (available in 20 colours), the 1kg Polaroid Glow-
in-the-Dark lament, the 500g Polaroid Multi-Colour lament, and the 250g Polaroid Deluxe Silk
lament (available in 7 colours).
Premium PLA - 1Kg
Glow-in-the-Dark - 1Kg
Deluxe Silk - 250g
White
Blue
Brown
Bronze
Black Light
Blue
Red
Gold
Skin Silver
Silver
Glow-in-the-Dark
Gold
Blue
Green
Purple
Pink
Yellow
Light
Green
Magenta
White
Dark
Green
Transparent
Purple
Transparent
Blue
Transparent
Red
Pink
Orange
Transparent
Yellow
Multi-Colour - 500g
Multi-Colour
3D FILAMENT

13
Download and print from our selection of templates and start creating your own amazing 3D models!
Templates can be found on our website: polaroid3d.com/stencils
STENCIL LIBRARY

14
MANUFACTURER’S GUARANTEE
The manufacturer guarantees this pen against any defects in both material and workmanship for
a period of 12 months (unless minimum statutory requirements state otherwise) from the date of
purchase. It is based on fair use with regular maintenance and excludes normal wear and tear.
Should any defect(s) be discovered, please rst visit our online troubleshooting support page at
polaroid3d.com/support. However, if a problem occurs during the 12-month period that cannot
be rectied remotely or on site by the manufactures technical team then you may be requested to
return the pen. The following information outlines the process you must follow in order to return your
pen for repair.
Your serial number and proof of purchase will be required in order to process your claim.
Please ensure you include a copy of your sales receipt when you return the product.
A Simple Return Process
1. Contact the manufacturer’s customer service team by visiting polaroid3d.com/contact. If a
return is required, you will be provided with a Returns Transfer Number (RTN) or advised to return
to point of purchase.
2. Clearly write the RTN on the outside of the box or packaging, next to the shipping label (where
applicable). The manufacturer will not be responsible for non-traceable packages or packages sent
without a valid RTN on the outside of the packaging.
3. Once your item arrives, the technical team will review and either repair or replace the item.
Please note: If upon return and inspection your product is deemed not faulty or to have been damaged
due to misuse or negligence you may be liable for any associated shipping and handling costs.
All implied guarantees, including any implied guarantee of tness for any particular purpose, are
limited in duration to 12 months from the date of original purchase. In no event will the manufacturer
be responsible for consequential damages resulting from the use of this product.
The above limitation or exclusion may not apply to you to the extent that applicable law may not
allow the limitation or exclusion of liability for incidental or consequential damages.
Using third party products with this pen without the express permission of the manufacturer may
invalidate this guarantee in the event of damage subsequently being caused to the pen.
Tampering with the pen in any way may invalidate the guarantee. Please contact the manufacturers
technical team if you have any enquiries.
AFTER SALES SUPPORT
The manufacturer has a dedicated team of specialists that are available to help with any issue
or question you may have regarding your Polaroid Play+ 3D Pen. Please contact our team via
the contact form at polaroid3d.com/contact.
MAINTENANCE
Your Polaroid Play+ 3D pen must be kept clean to obtain the best output from the pen.

15
CERTIFICATIONS AND COMPLIANCE
The Polaroid Play+ 3D Pen is compliant under the following applicable EU certications:
FCC: The FCC Declaration of Conformity or the FCC mark is a certication mark employed
on electronic products manufactured or sold in the United States which certies that the
electromagnetic interference from the product is under limits approved by the Federal
Communications Commission.
Proposition 65: (Safe Drinking Water and Toxic Enforcement Act of 1986) requires products
to be clearly marked with warning signs if they include any chemicals which have been
deemed to potentially cause cancer, birth defects or other reproductive harm. This product
has been tested and does not contain any chemicals which require this warning mark.
CE Marking: Following all of the above required legislation and certication enables each of
the Polaroid Play+ 3D Pens to proudly carry the CE Mark which conrms that they have been
approved under each of these Directives.
UKCA Marking: The UKCA (UK Conformity Assessed) marking is a new UK product marking
that is used for goods being placed on the market in Great Britain (England, Wales and
Scotland). It covers most goods which previously required the CE marking.
RoHS Directive 2015/863/EU: This is the Restriction of Hazardous Substances Directive. Its
purpose is to restrict the use of hazardous materials in the manufacture of various types of
electronic and electrical equipment. Each individual component of the equipment has been
tested in order to ensure that the Polaroid Play+ 3D Pens are approved under this Directive.
WEEE Directive: The Polaroid 3D Pen team is WEEE compliant in all applicable EU countries
in which the product is supplied. This ensures that responsibilities are fullled in regards to
the electronic waste that is generated through the sale of the Polaroid Play+ 3D pens and
consumables within this territory.
Green Dot Packaging Waste Directive - 94/62/EC: This directive ensures that manufacturers
whose products use packaging are responsible for either recovering their own packaging
waste, or contributing to the cost of recovery and recycling of such waste. The Polaroid
3D team is registered and compliant against this directive across the applicable European
countries.

16
Customer feedback on our Play+3D Pen has been extremely positive. If however you
are experiencing any challenges, please take a look at our FAQs and Troubleshooting
questions below or check our tutorial videos.
What is the power requirement for the pen?
The pen can be powered either by plugging the USB C cable into a suitable USB power adapter
which then plugs directly into the wall or by using an adequate power bank. Both of these must
be a 5.0VDC – 2.0A source.
Do I need to keep the Start button pressed when loading a new lament?
No, you do not need to keep the Start button pressed when loading a new lament.
To load new lament, rstly make sure the pen is turned on and the LED light is blue. Then place
the lament into the loading hole at the top of the pen (the one next to where the power cable is
inserted). Make sure the end of the lament is at across the end before inserting (cut carefully
with scissors if not). Insert the lament gently until it stops. Then simply press the Start button
once and you will feel the lament being gently guided into the pen automatically. Wait for the
lament to be pulled all the way through the pen until you see it appear from the end of the nozzle.
You can speed up this process by pressing the ‘Speed Control’ button, until 3 green LED lights
are showing indicating the extrusion speed is set to rapid.
The light on my pen doesn’t light up at all/I have no power to my pen
Firstly, please double check that you are using an adequate power supply. This must be a
5.0VDC – 2.0A source. If your supply is less than this then insucient power is being pulled into
the pen which could cause the pen to not power up correctly.
If you have conrmed that you are using the correct power supply and the pen is still not working,
please try using an alternative power source (power bank, USB power adapter etc.) to ensure
that this isn’t the cause of the challenge.
If the pen still does not work then please double check that the cable is inserted into the top of the
pen correctly and if so, that by moving it around inside the tting in the top of the pen you still do
not see the light come on at all.
If none of the above resolves the situation then please contact the Polaroid 3D support team and
they will be able to help nd a solution for you.
My pen doesn’t heat up/the light doesn’t turn from red to blue
Firstly please double check that you are using an adequate power supply. This must be a
5.0VDC – 2.0A source. If your supply is less than this then insucient power is being pulled into
then pen which could cause the pen to not heat up to the correct temperature meaning the light
will not turn to blue.
If you have conrmed that you are using the correct power supply and the pen is still not heating
up, please contact the Polaroid 3D support team and they will be able to help nd a solution for
you.
FAQs AND TROUBLESHOOTING

17
My pen is not extruding
Firstly, please check that you have adequate power to your pen (5.0VDC – 2.0A) and that your
pen is heated to the correct temperature ready for use (the LED light is blue).
Next, make sure that your lament is inserted correctly into the pen. If you already have lament
loaded please unload completely from the pen (by pressing and holding the Power button for a
couple of seconds and waiting for the lament to be completely retracted). Once removed, please
ensure that the end of the lament is at across the end (cut carefully with scissors if not) before
re-inserting into the Loading Point in the top of the pen (next to where the power cable is inserted).
Please re-load the lament by pressing the Start button once and you will feel the lament being
gently guided into the pen automatically (you can increase the speed at which the lament is
pulled through by pressing the ‘Speed Control’ button, until 3 green LED lights are showing
indicating the extrusion speed is set to rapid). This time, gently apply a small amount of pressure
by pushing the lament slightly as it feeds into the top of the pen. Wait for the lament to be pulled
all the way through the pen and this time you should see it appear through the end of the nozzle
and the pen will be ready to use.
If however you are still not seeing anything extruded, please contact the Polaroid 3D support
team and they will be able to help nd a solution for you.
I am using a power bank to power my pen but its seems to be slowing
down
If you are seeing your pen slow down when using a power bank, this is generally due to the power
bank itself running out of charge. This means that there is insucient power to run the pen as it
needs to and this results in a slowing down of the extrusion. Please check your power bank is fully
charged and try using the pen again.
If your power bank is fully charged and you are still having problems with the pen slowing down,
please try an alternative power source to rule out any other technical challenges with the power
bank itself. We suggest using a USB power adapter and plugging the pen straight into a socket
in the wall.
If you have tried both of the above and the pen is still slowing down, please contact the Polaroid
3D support team and they will be able to help nd a solution for you.
I have hardened lament on the nozzle of my pen, how do I remove it?
Please turn on the pen and allow it to heat up. Even before the pen reaches its optimum temperature
(when the light is blue) the plastic around the nozzle will have started to soften. Please take a
pair of tweezers and gently remove the softened plastic. DO NOT try to remove this by hand as
the nozzle will be starting to get hot. To prevent this build-up from happening in the future please
always remove any residual plastic from the nozzle whilst the pen is still warm.
FAQs AND TROUBLESHOOTING

18
When I use certain colours the lament seems to be too soft and
sometimes even bubbles
Dierent colours of lament melt at slightly dierent temperatures and therefore for those with a
slightly lower melting temperature you may nd that the extruded lament is softer than you have
previously seen. If this happens, try slowing down your extrusion speed slightly as this means
the melting temperature is slightly lower and therefore the lament shouldn’t be as soft when it is
extruded. This should also help to prevent any bubbling in the lament.
It is important to always use Polaroid 3D Pen Filament with your Polaroid Play+ 3D Pen as these
have been specically designed to work in conjunction with each other which means challenges
such as this are minimised.
I can only get the pen to work by pressing and holding the Start button,
can I not just click it once to start?
To start extruding with the pen you can either, press and hold the Start button or you can simply
click-and-release (rapidly) the Start button. Please refer to our instructional video for more
information on this.
If you want automatic extrusion then simply ‘click’ the Start button once. PLEASE NOTE that
this must be a ‘click’ (a quick ‘click-and-release’ of the button) and not a ‘press’ of the button as
pressing it will start the Manual extrusion process, and therefore when you release the button the
extrusion will stop.
Once the button has been clicked, the Automatic extrusion will continue until the button is clicked
again which will then stop the process.
Pressing and holding the Start button will start manual extrusion; the pen will keep extruding until
you release your nger at which point it will automatically stop.
Loading new lament into my pen takes a long time
If you are trying to load or unload lament and this is taking some time then you can speed up this
process by pressing the ‘Speed Control’ button, until 3 green LED lights are showing indicating the
extrusion speed is set to rapid.
The process of changing a colour is as follows. Firstly, to change the colour of the lament you are
using, you need to unload any lament that is already in the pen. To do this, press and hold the Power
button for a couple of seconds. You will see the LED light on the front start to ash from red to blue and
you will hear the motor start to unload the lament. You will also see and be able to feel the lament
moving as it is retracted from the pen. If you gently hold the end of the lament you will feel when it
has come loose from the pen and it can then be removed completely.
To load new lament, rstly make sure the pen is turned on and the LED light is blue. Then place the
lament into the loading hole at the top of the pen (the one next to where the power cable is inserted).
Make sure the end of the lament is at across the end before inserting (cut carefully with scissors if
not). Insert the lament gently until it stops. Then simply press the Start button once and you will feel
the lament being gently guided into the pen. This process will then continue automatically. Wait for
FAQs AND TROUBLESHOOTING

19
the lament to be pulled all the way through the pen until you see it appear from the end of the nozzle.
You can speed up this process by pressing the ‘Speed Control’ button, until 3 green LED lights are
showing indicating the extrusion speed is set to rapid.
My pen keeps turning o/stopping
Firstly please double check that you are using an adequate power supply. This must be a
5.0VDC – 2.0A source. If your supply is less than this then insucient power is being pulled into
the pen which could cause this intermittent stopping.
If you have conrmed that you are using the correct power supply and the cable is inserted
correctly and you are still seeing this problem then it could relate to the power cable itself. If so,
please contact the Polaroid 3D support team and they will be able to help nd a solution for you.
My pen is extruding slowly, how do I speed it up?
Firstly please double check that you are using an adequate power supply. This must be a
5.0VDC – 2.0A source. If your supply is less than this then insucient power is being pulled into
the pen which could cause the pen to not heat up to the correct temperature and the light will not
turn to blue.
If you have conrmed that you are using the correct power supply and the pen is still not heating
up, please contact the Polaroid 3D support team and they will be able to help nd a solution for you.
The speed of extrusion seems to change even though I am not changing
the speed settings
Firstly please double check that you are using an adequate power supply. This must be a
5.0VDC – 2.0A source. If your supply is less than this then insucient power is being pulled into
the pen which could cause this unwanted speed change.
If you are using a power bank, please check that there is still sucient charge to be able to power
the pen. If unsure, please re-charge and then try using your pen again.
If you have tried both of the above and the speed is still changing, please contact the Polaroid 3D
support team and they will be able to help nd a solution for you.
I have some stringy lament when I move my pen away from the model
I am creating
When making a model, please ensure that you press or release (depending on if you are using
Auto or Manual extrusion mode) the Start button in order to stop extrusion before moving from
one area of your model to the next. If you pull the pen away before it has completely stopped
extruding then this could leave some stringy residual lament.
You may also nd that this happens more with certain colours of lament than others. This is because
dierent colours melt at slightly dierent temperatures and therefore for those with a slightly lower
FAQs AND TROUBLESHOOTING

20
melting temperature you may get small amounts of lament still being extruded from the nozzle
momentarily after the Start button has been pressed/released (this being the residual lament in the
nozzle that had already been melted). If this happens, please either gently remove the unwanted
stringy lament whilst still warm (and therefore soft) by pulling it swiftly away from the model, or wait
until the lament has hardened and then remove carefully using a pair of scissors.
You can also try slowing down your extrusion speed slightly as this means the melting temperature
is slightly lower, which in turn may mean you see less of the ‘stringiness’.
It is important to always use Polaroid 3D Pen Filament with your Polaroid Play+ 3D Pen as these
have been specically designed to work in conjunction with each other which means challenges
such as this are minimised.
I sometimes see a small amount of smoke from the nozzle of the pen
when it is heated up
If you are seeing a small amount of smoke when you turn on your pen, this will be because there
is a small amount of old, residual, solid lament in-or-around the nozzle area from the last time
it was used. After a few seconds of extrusion once the pen has been turned back on this smoke
should subside as the old lament has been re-melted and therefore extruded through, and away,
from the nozzle along with the new lament.
To prevent this from happening in the future please always remove any residual plastic from the
nozzle whilst the pen is still warm.
My reel of lament is broken into small pieces
All due care and attention has been made to ensure that the lament reaches you in optimum
condition, however, on very rare occasions you may nd that there are some breaks in the lament
reel that you receive.
If this happens and the lengths of the lament are still at least double the length of the pen then
these can be used as you would do normally. If the pieces are smaller than this, please send a
photograph of the reel as it was received inside its packaging to the Polaroid 3D support team at
polaroid3d.com/contact and they will be able to help nd a solution for you.
For any points not answered in this User Guide, or on our website,
please contact our team at polaroid3d.com/contact detailing your
enquiry and one of the team will be in touch.
FAQs AND TROUBLESHOOTING
This manual suits for next models
1
Table of contents
Other Polaroid Accessories manuals

Polaroid
Polaroid PS220 User manual

Polaroid
Polaroid PPWC1005 User manual

Polaroid
Polaroid ROOT Play PL-2002-00 User manual

Polaroid
Polaroid New Polaroid Play+ User manual

Polaroid
Polaroid Polaroid PRO 3D Pen User manual

Polaroid
Polaroid PLAY PL-2000-00 User manual

Polaroid
Polaroid CandyPlay User manual

Polaroid
Polaroid CandyPlay 3D-FP-PL-2004-00 User manual

Polaroid
Polaroid PLAY User manual

Polaroid
Polaroid Root PLAY User manual