manuals.online logo
Brands
  1. Home
  2. •
  3. Brands
  4. •
  5. Polarstart
  6. •
  7. Remote Starter
  8. •
  9. Polarstart PS-5505TW User manual

Polarstart PS-5505TW User manual

NOTES
INTRODUCTION
The PS-5505TW is a state-of-the-art combination of an alarm and remote car starter
with command confirmation. It represents a breakthrough in vehicle convenience
technology, and remote starter systems.
USER SELECTABLE OPTIONS
The PS-5505TW was designed with flexibility and OEM integration in mind. The unit
can be customized and used in almost every possible application.
With the integration of Timed, Latched, or ON/OFF outputs, this unit can single-
handedly control virtually any electrical system in your car.
NOTE: The programming of your system should be left to a professional. Changing
any of the settings may effect the operation of your PS-5505TW.
Please have your installer program the following options:
•IGNITION CONTROLLED DOOR LOCKS
This feature will LOCK all doors once the brake pedal has been pressed for the
first time after starting the vehicle. When the key is turned to the OFF position,
the doors will be UNLOCKED.
•REMOTE START RUN TIME
The PS-5505TW can be programmed by your installer to run the engine for 4, 15
or 25 minutes. The default run time is 15 minutes.
TRANSMITTER FUNCTIONS
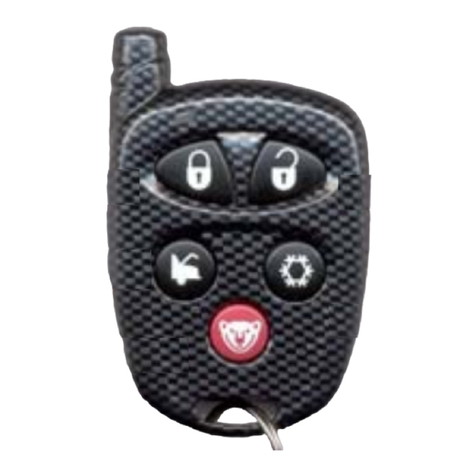
Your PS-5505TW is equipped with a 5 button, 15 channel remote transmitter. It can
operate two independent Polarstart equipped vehicles. (See Multi-Car Operation for 2nd
car transmitter functions.)
The transmitter functions are as follows:
81
DISARM/
UNLOCK
ARM/LOCK
STOP
START
System Status
display Screen
TRUNK
T
TR
RA
AN
NS
SM
MI
IT
TT
TE
ER
R
D
DI
IS
SP
PL
LA
AY
Y
P
PA
AN
NE
EL
L
I
IC
CO
ON
N
D
DE
ES
SC
CR
RI
IP
PT
TI
IO
ON
N
The transmitter display panel has 6 icons that will flash in red to display the successful
operation of the command that has been requested.
The 6 icons are displayed on the remote as follows:
TRANSMITTER DISPLAY PANEL EXPLANATIONS
Condition Display Panel Icon Flashes Beeps
Cold Weather Timer
ON (Press & Hold
STOP button)
STOP
then
START & SIREN
1
then
2
1
Cold Weather Timer
OFF (Press & Hold
STOP button)
STOP
Then
STOP & SIREN
1
then
21
Shock Sensor Alert LOCK &
STOP & SIREN Flashing for 10
seconds
*Beeps for 10
seconds
Silent for 10 seconds
State of Alarm
(Siren is ringing) All Icons flashing Flashing for 10
seconds
*Beeps for 10
seconds
Silent for 10 Seconds
Engine Running START 22
* Will keep beeping until a button is pressed or for a total of 2 minutes.
SYSTEM OPERATIONS
This unit is a state-of-the-art combination of a vehicle alarm and remote starter system.
Start by familiarizing yourself with the alarm functions of the unit before using the remote
starter functions. This is especially recommended if your unit is set in Passive Arming
Mode.
BEEPS DISABLED
You can disable the transmitter confirmation beeps by pressing the TRUNK button 5
times (1 beep confirms that the beeps are disabled). To re-enable the beeps, press the
TRUNK button 5 times again within 3 seconds (3 beeps confirm that the beeps are
enabled).
NOTE: The 2 beeps confirming that the engine is running during the Status Request
are not disabled by this option.
VEHICLE STATUS REQUEST
The two-way transmitter has a built in feature that will allow the user to contact the
vehicle by remote and get a report of it’s current condition displayed on the remote’s
information panel.
To request a status check, press and hold the LOCK & STOP buttons simultaneously.
Condition Icon Flashes Beeps
Engine OFF / Cold
Weather Timer OFF None None 2
Engine ON / Cold
Weather Timer OFF START 22
Engine OFF / Cold
Weather Timer ON SIREN 22
Engine ON / Cold
Weather Timer ON SIREN & START 22
Valet Mode STOP & START 22
Armed/Locked LOCK 11
Disarmed/Unlocked UNLOCK 11
LOW BATTERY WARNING
The transmitter uses one 1.5 volt AAA battery that should be replaced when the Low
Battery warning occurs. If the battery voltage is getting weak, the remote will give a
warning when transmitting. All the icons on the display panel will flash 3 times to
indicate that the battery should be replaced.
E
EX
XT
TE
EN
ND
DI
IN
NG
G
R
RE
EM
MO
OT
TE
E
B
BA
AT
TT
TE
ER
RY
Y
L
LI
IF
FE
E
To extend remote battery life, the system can be placed in battery saver mode by
pressing the STOP and UNLOCK buttons simultaneously for approximately 5 seconds.
The TRANSMIT icon on the display panel will become constant. To take the system
out of battery saver mode, press the STOP and UNLOCK buttons simultaneously until
the TRANSMIT icon is flashing.
NOTE: Placing the system in battery saver mode will disable the ability of your
remote to receive the confirmation of an alarm condition from your vehicle.
27
Transmitting icon
Lock Icon
Unlock Icon
Stop Icon
Start Icon
Siren Icon
COLD WEATHER TIMER
The PS-5505TW comes equipped with a Cold Weather Timer. When programmed, it will
start and run the engine every 2 hours for 5 minute intervals during a period of 24 hours.
PROGRAMMING THE COLD WEATHER TIMER
To program the Cold Weather Timer, press and hold the STOP button for approximately 5
seconds until the parking lights flash 3 times.
EXITING THE COLD WEATHER TIMER
You can exit the Cold Weather Timer by doing any of the following:
•Press the brakes
•Open the hood
•Start the vehicle by remote
•Turn ignition on
•Press and hold the STOP button for approximately 5 seconds
NOTE: You must program the Cold Weather Timer each time you want to use it.
TEMPORARY CHIRP DELETE
This feature is useful if you want to avoid the siren chirps in a quiet neighborhood when
arming or disarming the system.
•Press the TRUNK button. The SIREN icon on the display panel will flash once, and
the transmitter will beep once.
•Within 3 seconds, press the LOCK or UNLOCK button to disarm
The chirps will still occur when arming and a zone is unprotected or when disarming and an
entry was attempted.
NOTE: Your installer can program the Chirps Disabled feature if you want the chirps to be
permanently disabled.
REMOTE DOOR LOCKS
Your system can (if installed) lock or unlock your vehicle’s doors by remote. To unlock,
press and hold the UNLOCK button. The parking lights will flash twice. To lock your
doors, press and hold the LOCK button. The parking lights will flash once.
REMOTE TRUNK RELEASE
The system has the option of being able to control the trunk release by remote. If this
option was installed, you can press the TRUNK button 2 times consecutively or press and
hold the TRUNK button. The parking lights will flash once, and your trunk will pop open.
ALARM FUNCTIONS –To be programmed by your installer
Your system can be programmed in Passive or Active Arming Mode. In either mode,
you can arm or disarm your alarm system using your remote control. And, if your
system was installed with remote door locks, you can lock or unlock your doors at the
same time!
NOTE: When armed, your vehicle benefits from high security protection at all times,
whether the engine is running under the remote or not.
ACTIVE ARMING MODE
ARMING AND LOCKING DOORS
To arm the system and lock the doors in Active Arming Mode, press and hold the
LOCK button until the siren chirps once. The parking lights will flash once, and the
LED will flash slowly, confirming that the system is armed.
DISARMING AND UNLOCKING DOORS
To disarm the system and unlock the doors in Active Arming Mode, press and hold the
UNLOCK button until the siren chirps twice. The parking lights will flash twice and
the LED will turn off, confirming that the system is disarmed.
PASSIVE ARMING MODE
ARMING AND LOCKING DOORS
Passive Arming Mode works the same way as Active Arming Mode. However, the
system will automatically arm itself 35 seconds after the last door is closed.
NOTE: The system will not arm automatically if a door is left open, or if you re-open
a door within the first minute.
DISARMING AND UNLOCKING
To disarm the system and unlock the doors, press and hold the UNLOCK button until
the siren chirps twice. Make sure you open the door within 35 seconds or the system
will automatically re-arm itself. Once inside the vehicle, you have 35 seconds to turn
the key to the ON position, or once again, the system will arm itself. If you want to
remain in the vehicle, leave your key switch in the ON position.
IMPORTANT NOTE: If the system re-arms itself or if there’s an alarm condition,
simply press the UNLOCK button to disarm the system.
STARTER KILL
This feature (if installed) will immobilize the vehicle when the system is armed. A
relay physically interrupts the vehicle’s starter wire and prevents the hot-wiring of your
vehicle. The vehicle will not start with the key unless the starter kill has been disabled.
The starter kill is automatically enabled or disabled when the system is armed or
disarmed. If you place your unit in Valet Mode (See Valet Operation), the starter kill
will be disarmed. 36
SYSTEM LED FLASH RATE
The PS-5505TW system comes with a full status LED to be mounted on your dash. The
LED displays the status of the system. When you press the UNLOCK button, the LED state
will inform you of any alarm situations while you were away from your vehicle, and will let
you know in which area the alarm was set off.
LED State Flashes System Status
OFF None Disarmed/Normal
ON Solid (No Flashes) Disarmed/Valet Mode
Flashing Constant Flashing Armed
Flashing Pause & 1 Flash Panic Mode
Flashing Pause & 2 Flashes Hood
Flashing Pause & 3 Flashes Shock Sensor
Flashing Pause & 4 Flashes Door Intrusion
REMOTE STARTING
To start the car by remote, ensure that the system is NOT in Valet Mode, and then press the
START button for approx. 1 second. The parking lights will come on, informing you that
the unit has received your signal. Approx. 5 seconds later, the engine will start. The parking
lights will remain on during the pre-programmed run time.
If the vehicle doesn’t start the first time, the system will shut off, wait a few seconds, and
try to start the engine again. It will try to start the engine the amount of programmed times
(2, 3 or 4) before giving up.
DRIVING-OFF
With the vehicle running under remote control, press the UNLOCK button to DISARM and
UNLOCK the doors.
Enter the vehicle and do the following:
•Turn the ignition key to the ON position. (Do not turn the key to the “START”
position with the engine running. This will cause the starter motor to re-engage.)
•Press the brakes to disengage the remote starter unit. You are now ready to drive off.
PANIC MODE
In a panic situation, you can activate the Panic Mode. This will disable the Valet Mode, shut
down the engine, unlock the doors, disarm the starter kill and sound the siren for 1 minute.
To activate Panic Mode, press and hold the LOCK button for approximately 4 seconds until
the siren goes ON and the parking lights flash.
The Panic Mode will automatically shut off after 1 minute.
NOTE: If you want to stop the Panic Mode before the 1 minute delay, press the UNLOCK
button for approximately 4 seconds.
REMOTE STARTER VALET MODE
The system can be placed in Remote Starter Valet Mode. This disables the remote
starting capabilities while maintaining the alarm and door locking/unlocking functions.
This is recommended if the vehicle needs to be serviced.
To ENABLE the Starter Valet Mode, set the valet switch ON. The remote starter is
now disabled.
To DISABLE the Starter Valet Mode, set the valet switch OFF. The remote starter is
now in normal operation.
ALARM VALET MODE
The system can be placed in Alarm Valet Mode. This disables the alarm functions and
the starter kill feature, while maintaining the remote starting capabilities and door
locking/unlocking functions. You can also use the Alarm Valet Mode to stop an alarm
condition.
To ENABLE the Alarm Valet Mode, turn the ignition ON. Slowly set the valet switch
from OFF to ON. The LED will turn ON indicating that the Alarm Valet Mode is
enabled. Then, turn the ignition OFF.
To DISABLE the Alarm Valet Mode, turn the ignition ON. Slowly set the valet switch
from ON to OFF. The LED will turn OFF indicating that the Alarm Valet Mode is
disabled. Then, turn the ignition OFF.
IDLE MODE
Idle Mode allows you to remove they keys and leave the vehicle running for the pre-
programmed run time. This is great for those short pit stops when you would rather not
shut off the engine.
ENABLING IDLE MODE
•With the vehicle running, press the UNLOCK or START button on the
transmitter until the parking lights come on
•Remove the key, exit the vehicle and lock the doors
Regardless of whether you return to your car, it will shut off by itself when the run
time expires.
MULTI-CAR OPERATION
This feature allows the owner of two PS-5505TW systems in two of their vehicles to
control both systems with one transmitter. To control the second vehicle’s system,
press and hold the TRUNK button and select the command button desired. (The
TRUNK button acts like the shift key on a computer).
LOCK = START =
UNLOCK = STOP =
45

Other Polarstart Remote Starter manuals

Polarstart PS-4660 TW User manual

Polarstart

Polarstart PS-4660 TW User manual

Polarstart PS-3185SH User manual

Polarstart

Polarstart PS-3185SH User manual

Polarstart PS-4600TW User manual

Polarstart

Polarstart PS-4600TW User manual

Polarstart PS-7020 TW User manual

Polarstart

Polarstart PS-7020 TW User manual

Polarstart PS-3155 User manual

Polarstart

Polarstart PS-3155 User manual

Polarstart PS-2600 User manual

Polarstart

Polarstart PS-2600 User manual

Polarstart PS-3175E User manual

Polarstart

Polarstart PS-3175E User manual

Polarstart PS-3135 User manual

Polarstart

Polarstart PS-3135 User manual

Polarstart PS-5505 SH User manual

Polarstart

Polarstart PS-5505 SH User manual

Polarstart PS-3085 SH User manual

Polarstart

Polarstart PS-3085 SH User manual

Polarstart PS-3175E User manual

Polarstart

Polarstart PS-3175E User manual

Polarstart PS-3185SH User manual

Polarstart

Polarstart PS-3185SH User manual

Polarstart PS-3125SH User manual

Polarstart

Polarstart PS-3125SH User manual

Polarstart PS-3025 SH User manual

Polarstart

Polarstart PS-3025 SH User manual

Popular Remote Starter manuals by other brands

idatastart ADS-BZ1 installation guide

idatastart

idatastart ADS-BZ1 installation guide

Omega Research & Development Excalibur RS-130-DP Operation guide

Omega Research & Development

Omega Research & Development Excalibur RS-130-DP Operation guide

TriMark e-ASK UM06 Consumers manual

TriMark

TriMark e-ASK UM06 Consumers manual

MEGATRONIX RS 110 manual

MEGATRONIX

MEGATRONIX RS 110 manual

Tyrell Chenergy HH399 user manual

Tyrell Chenergy

Tyrell Chenergy HH399 user manual

AMiO 02523 user manual

AMiO

AMiO 02523 user manual

Iso PRP19 quick start guide

Iso

Iso PRP19 quick start guide

Avital AVISTART 4501 installation manual

Avital

Avital AVISTART 4501 installation manual

Vector Power City VEC028AC owner's manual

Vector

Vector Power City VEC028AC owner's manual

AstroStart DSP611 owner's guide

AstroStart

AstroStart DSP611 owner's guide

DEI 450ESP owner's guide

DEI

DEI 450ESP owner's guide

Viper 791 XV installation guide

Viper

Viper 791 XV installation guide

APA 16442 operating instructions

APA

APA 16442 operating instructions

Linear Digital Keyless Entry System Installation and programming instructions

Linear

Linear Digital Keyless Entry System Installation and programming instructions

Digital Guard Dawg iKEY-M manual

Digital Guard Dawg

Digital Guard Dawg iKEY-M manual

LOCKEY 2230 installation instructions

LOCKEY

LOCKEY 2230 installation instructions

Black & Decker JUS300B instruction manual

Black & Decker

Black & Decker JUS300B instruction manual

NOCO Genius Boost Max GB500+ user manual

NOCO Genius

NOCO Genius Boost Max GB500+ user manual

manuals.online logo
manuals.online logoBrands
  • About & Mission
  • Contact us
  • Privacy Policy
  • Terms and Conditions

Copyright 2025 Manuals.Online. All Rights Reserved.