POLTI CIMEX ERADICATOR User manual

INSTRUCTION MANUAL
MANUEL D’INSTRUCTIONS
MANUAL DE INSTRUCCIONES
REGISTER YOUR PRODUCT
ENREGISTREZ VOTRE PRODUIT
REGISTRA TU PRODUCTO
www.polti.com

ig. A ig. 1 ig. 2
ig. 4
ig. 3
ig. 7ig. 5 ig. 6
H
G
D
C
I
A
B
L
K
J
E
P
Q
M
NO
T
SR
U
5
4
3
6
7
2
1
17
18 19
ig. 11 ig. 14
ig. 12 ig. 13
O
ON
ig. 8 ig. 9a
ig. 9b
ig.10

CIMEX ERADICATOR
3
17
15
13
10a
10a
14a
14
14a
10a10
16b
10a 16a
9
S
R
U
9c
9a
9b
16
OPTIONAL STEAM CLEANING ACCESSORY KIT
KIT OPCIONAL DE ACCESORIOS PARA LA LIMPIEZA A VAPOR
KIT OPTIONNEL ACCESSOIRES DE NETTOYAGE VAPEUR
11
10a
12

4
CIMEX ERADICATOR

CIMEX ERADICATOR
5
ENGLISH
CONGRATULATIONS
Dear Customer,
Thank you for purchasing our product.
The Polti Cimex Eradicator provides an innovative and effective method to eliminate the pro-
blem of bedbugs. Laboratory tests and field trials have shown that a Cimex Eradicator treat-
ment with dry saturated steam heated up to 356° (180°C) is able to eliminate 100% of eggs
and more than 90% of adult and nymphs after just one treatment*.
The Cimex Eradicator is a Polti invention and is protected with worldwide patents. The unique
ability to kill such persistent pests is based on the type of steam which after being generated
inside the boiler of Cimex Eradicator, is further super heated inside the “Steam Disinfector”
nozzle.
Super heated steam created with just ordinary water has the ability to naturally kill these pests
within seconds from heat shock; no harsh chemicals or insecticides are needed. The Cimex
Eradicator achieves this using just ordinary tap water.
Our team of experts, including steam engineers, pest-control experts in both the laboratory
and in the field have contributed to the success of the Cimex Eradicator including important
features that makes your work safer and more efficient. These include:
• The Polti patented Safety Cap, a unique feature, that prevents opening while any residual
pressure remains in the system.
• The steam boiler is made of a stainless steel 18/10 which resists lime scale and corrosion and
extends the life of your appliance.
• Variable steam pressure allows you to modify the steam flow during operation.
• Safety Valve and dual Safety switch for extra protection against dry running.
• All components and accessories are built with high-quality, heat-resistant materials.
• HPMed, a detergent, that makes clean up easier and more efficient.
Today, this product is considered the most valuable tool by specialist who have successful
track records in eliminating this most difficult-to-remove pest and remarkably without chemi-
cals and pesticides.
* According to the tests carried out by Pest2000 & Pest3000, Pest Control Management Services, Milan,
Italy and independent laboratory tests in the nited States.
Copyright © 2013: The documents supplied with the machine, including this manual, are the
property of POLTI S.p.A. All rights reserved.
Polti S.p.A. reserves the right to change equipment or accessory specification without prior
notice.
SAVE THESE INSTRUCTIONS
or your safety and to fully enjoy the advantages of this product, please take a few minutes to
read all the important safeguards and care instructions. Keep this manual handy for your refe-
rence. Any use which does not comply with these instructions will void the warranty.

CIMEX ERADICATOR
6
ENGLISH
TECHNICAL SPECI ICATIONS
IDENTI ICATIONS
The rating label of the machine with cMETus compliance mark is placed on the bottom of the
product. When asking for information and/or technical assistance, always specify the model
and the serial number stamped on the rating label.
BOILER TANK MATERIAL STAINLESS STEEL
Max water capacity fl oz
l
77
2.2
Max pressure psig
bar
58
4
POWER SUPPLY
Voltage V 120
requency Hz 60
Boiler power W 1000
Total max power W 1500
PROTECTION DEGREE IPX4 (Splash Proof)
Temperature inside the boiler tank °C
°
144
291
Temperature at the nozzle °C
°
180
356
WEIGHT
Approx net without water
lb
Kg
12.12
5.5
SIZE (LxHxW) in
cm
Ø 12.6 x 13.4
Ø 32 x 34

CIMEX ERADICATOR
7
ENGLISH
IMPORTANT SA ETY INSTRUCTIONS
PLEASE READ ALL INSTRUCTIONS AND WARNINGS AND MAKE SURE
YOU UNDERSTAND THEM BE ORE USING THE STEAMER.
These safety messages will indicate the potential hazard and how to reduce the possibility of
injury, and the risks if you do not follow the instructions.
SAVE THESE INSTRUCTIONS OR UTURE RE ERENCE
Any use which does not comply with these instructions will void the warranty.
SA ETY ALERT SYMBOL: This symbol indicates that a potential
risk of injury exists. The safety messages will follow the safety
alert symbol with the words “DANGER”, “WARNING” or
“CAUTION”
CAUTION SIGN: Indicates a potentially hazardous situation
which, if not avoided, may result in a minor or moderate injury,
and to alert against unsafe practices.
WARNING SIGN: Indicates a potentially hazardous situation
which, if not avoided, could result in death or serious injury. It
highlights conditions that are a serious risk for personal safety.
DANGER SIGN: This sign indicates an imminently hazardous
situation which, if not avoided, will result in death or serious
injury.

SA ETY IN ORMATION
This product is intended for household use only.
GROUNDING INSTRUCTIONS
This appliance must be grounded. If it should malfunction or breakdown, grounding provides a
path of least resistance for electric current to reduce the risk of electric shock. This appliance
is equipped with a cord having an equipment-grounding conductor and grounding plug. The
plug must be inserted into an appropriate outlet that is properly installed and grounded in ac-
cordance with all local codes and ordinances.
IMPROPER CONNECTION O THE EQUIPMENT-GROUNDING CONDUCTOR CAN RESULT IN
A RISK O ELECTRIC SHOCK, WHICH CAN CAUSE INJURY OR DEATH. CHECK WITH A
QUALI IED ELECTRICIAN OR SERVICE PERSON I YOU ARE IN DOUBT AS TO WHETHER
THE OUTLET IS PROPERLY GROUNDED. DO NOT MODI Y THE PLUG PROVIDED WITH THE
APPLIANCE - I IT WILL NOT IT THE OUTLET, HAVE A PROPER OUTLET INSTALLED BY A
QUALI IED ELECTRICIAN.
This appliance is for use on a circuit having a nominal rating of 120 volts and is
factory-equipped with a specific electric cord and plug to permit connection to a proper
electric circuit. Make sure that the appliance is connected to an outlet having the same
configuration as the plug. No adaptor should be used with this appliance. If the appliance must
be reconnected for use on a different type of electric circuit, the reconnection should be made
by qualified service personnel.
To reduce the risk of fire, electric shock, or injury:
• Not for space heating purposes
• To provide continued protection against risk of fire of electric shock, connect to properly
grounded outlet
• or household use only
• To reduce the risk of electric shock – Use indoor only
• Do not put any object into openings. Do not use with any opening blocked; keep free of dust,
lint, hair, and anything that may reduce air flow.
• Do not use extention cords.
ENGLISH
8
CIMEX ERADICATOR

PRECAUTIONS
IMPORTANT SA ETY INSTRUCTIONS
TO REDUCE THE RISK O ELECTRIC SHOCK, IRE OR INJURY:
Read all instructions carefully before using the appliance.
•Connecting the appliance to improper voltage may cause injury of fire or result in damage
to the appliance.
Before connecting the appliance, make sure that the voltage is the same as the voltage
indicated on the data label of the appliance. No adapter should be used with this appliance.
• If the appliance is left unused, disconnect it from electrical outlet. Never leave the appliance
unattended with the cord plugged-in.
• Always make sure the that appliance is unplugged before performing maintenance work of
any kind, including adding water or cleaning the appliance.
• Always turn off the appliance using the on/off switch before unplugging it.
• Do not unplug by pulling on the cord. Grasp the plug to avoid damaging the socket and
risking a short-circuit.
• Do not allow the power cable to be twisted, crushed, stretched, or come into contact with
sharp or hot surfaces.
• Do not use the appliance if the power cable or other parts of the appliance are frayed or
damaged, and do not attempt repairs. If the supply cord is damaged, it must be replaced by
the manufacturer, its service agent or similarly qualified persons in order to avoid a hazard.
• Avoid touching the appliance with soaking wet hands or feet with the cable plugged into
electric outlet.
• Do not use the appliance when barefoot.
• Do not use the appliance near sinks, bathtubs, showers or containers full of water.
• Never immerse the appliance, the cable or the plugs in water or another liquid.
• Use appliance only for its intended use as described in this manual. Do not use as a space
heater or for any other purposes not specified .
• While refilling with water, switch off and unplug the appliance.
• Do not use a flammable or combustible liquid to clean a floor or other surface
• Do not use the appliance where there is a danger of explosion.
• Use indoors only.
• Do not place the appliance near any other electrical appliance that is currently in use or near
any heat source.
• Store the appliance in a dry place. Do not expose to temperatures under 32° (0°C) or over
104° (40°).
• Do not direct the steam jet at electrical and/or electronic equipment or at the appliance
itself.
• Keep the appliance out of children’s reach. It contains small parts which may be a choking
hazard.
• The appliance is not intended for use by persons (including children) with reduced physical,
sensory or mental capabilities. Do not use before reading and understanding these
instructions.
• High-pressure steam jets can be dangerous if used improperly.
ENGLISH
9
CIMEX ERADICATOR

IMPORTANT SA ETY INSTRUCTIONS ABOUT USING STEAM
• Do not direct the steam jet at electrical equipment or the appliance itself.
• Do not direct the steam jet at people, pets or pile of debris .
• Never place your hands or any body parts in the steam jet.
• Before plugging-in the appliance, ensure that the safety button is activated.
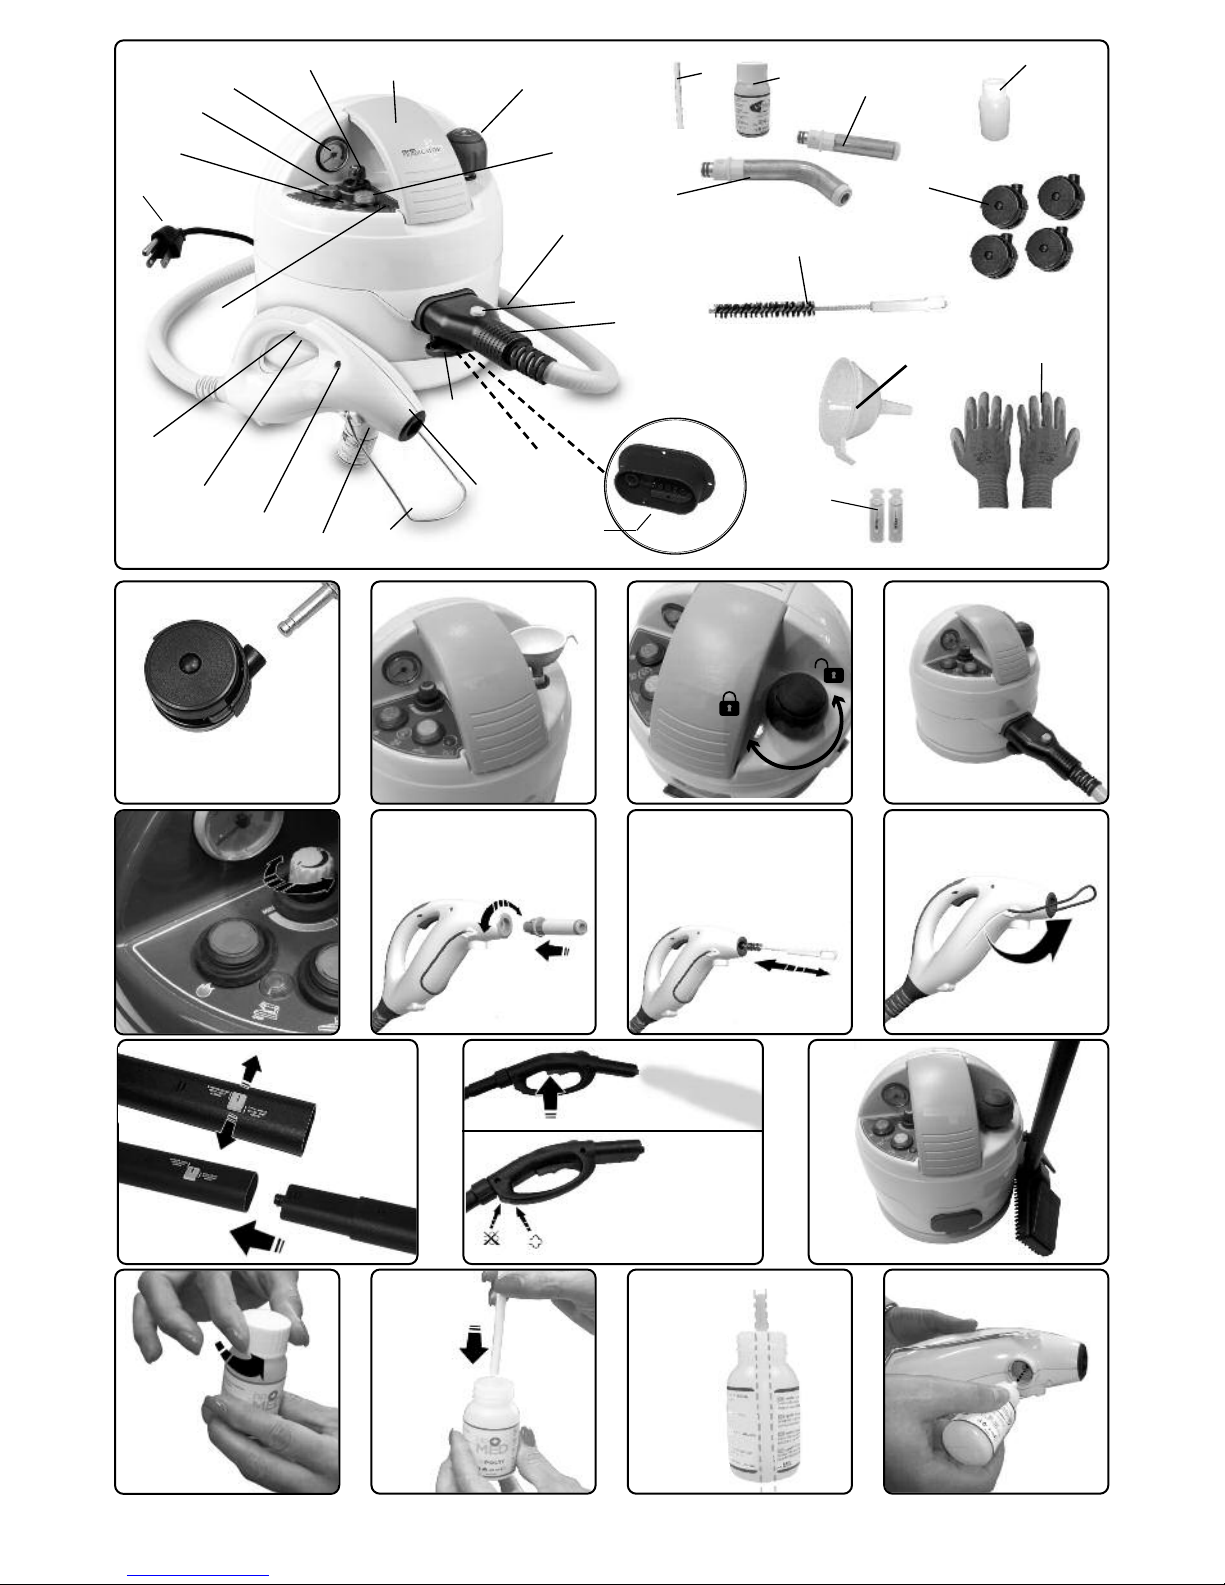
• Before refilling the appliance when it is hot, turn it off, unplug it, unscrew the safety cap and
allow it to cool for at least 7 minutes to avoid scalding.
• Keep your face and any body parts away if you fill the boiler when it is still hot, as a few
drops of water can evaporate on contact with the hot boiler, causing a jet of steam.
• Do not empty the appliance when the water inside the boiler is still hot.
• Do not unscrew the cap when the appliance is in operation.
• Do not use to treat clothes being worn on the body.
• Always rest the appliance on a stable surface. When cleaning stairs, ensure that the
appliance is securely placed on a step before operating. Do not lay on steps that are
narrower than the size of the appliance. Use extra care when cleaning on stairs.
• Do not wind the power cord around the appliance, especially when the appliance is still hot.
• Care should be used to arrange the cord so as not to trip over it. Safely put the cord in its
compartment and put in storage after each use to prevent tripping accidents.
• Steam through the hose will cause it to get hot. Avoid contact with hot areas.
• Always keep the appliance in horizontal position during operation.
• If the appliance has been dropped, damaged, or immersed in water, or leaks, do not use and
contact the customer care team as the internal safety features may have been affected.
• In case of breakdown or malfunction switch off the appliance and never attempt to
disassemble it, but contact the customer care team.
• This appliance is equipped with safety devices which are to be replaced only by a qualified
technician.
• Regularly check the status of the safety cap and seal, replace with original parts as
necessary.
• Let the appliance cool down before cleaning it or carrying out any maintenance.
• Before storing the appliance make sure that it has completely cooled down.
IMPORTANT SA EGUARDS USING THE APPLIANCE:
• Water contains magnesium, mineral salts and other deposits that may cause the formation of
scale. To prevent these deposits from damaging the appliance, we recommend periodically
adding Kalstop P2003 in the boiler tank, a natural descaling agent specifically formulated
to prevent formation of scale and protect your appliance. or any queries please visit
www.polti.com web site. Alternatively, use a mixture of 50% tap water and 50% distilled
water or bottled spring water.
• Never use 100% distilled water or bottled spring water but always mix them with 50% tap
water.
• Never use water from clothes dryers, scented water, water from refrigerators, batteries or air
conditioners or rain water.
• Do not put any detergent or chemical substance in the boiler tank.
• or best results, use original Polti products only, as products of other brands may not be
Steam may cause serious injury if in contact with body parts. Always allow
the steamer to cool down before handling
ENGLISH
10
CIMEX ERADICATOR

suitable for use in Polti appliances and could cause damage.
• Press the buttons only with a finger, without excessive force and avoid using pointed objects
such as a pen or a screwdriver.
• To avoid compromising the safety of the appliance use only original spare parts.
• Do not overfill the boiler tank.
• Do not place the hot appliance on heat-sensitive surfaces.
SAVE THESE INSTRUCTIONS
DO NOT SWALLOW
Keep out of the reach of children. The Kalstop P2003 supplied
with the appliance contains vegetable origin tannic complex, in
alkaline aqueous solution. Avoid contact with the eyes and skin. In
case of contact with the eyes, flush with cold water for 15 minutes.
In case of contact with skin, wash with water. If irritation persists,
call a doctor or a poison control center.
ENGLISH
11
CIMEX ERADICATOR

KEY
GENERATOR
A) Patented Safety Cap
B) Generator on/off switch
C) Accessory on/off switch
D) Central connector block with splash
proof cover
E) Lock-in aperture for central connector
) Power supply cable
G) Carrying handle
I) Steam flow regulation control
J) “Out of water” indicator light
K) Steam pressure indicator light
L) Pressure indicator
STEAM DISIN ECTOR
DELIVERY DEVICE
H) Safety switch
M) Steam delivery push-button
N) Heating lamp
O) Nozzle for HPMed
P) Spacer bracket / support
Q) Delivery nozzle
R) Connector assembly
S) Press down connector button
T) Monotube (steam - power cord)
U) Locking tab
ACCESSORIES
1) Straight extension accessory
2) Curved extension accessory
3) Wheels
4) Brush
5) iller funnel
6) Protective gloves
7) 2 vial of Kalstop P2003
17) HPMed disposable bottle
18) Wick
19) Empty bottle
OPTIONAL ACCESSORIES:
CLEANING KIT
8) Spare washers for accessory connections
9) Steam gun
9a) Steam request lever
9b) Safety switch
9c) lexible hose
10) Extension tubes
10a) Accessories locking button
11) Round brush
12) Steam concentrator
13) Small brush
14) Large brush
14a) Cloth retaining clips
15) Cotton cloths
16) Window squeegee tool
16a) Small blade for window tool
16b) Large blade for window tool
H
G
D
C
I
A
B
L
K
J
5
E
ENGLISH
12
CIMEX ERADICATOR
P
Q
MN
O
T
S
R
U
3
4
6
9
S
R
U9c
9a
9b
10a
10
13
10a
15
10a
14a
14
14a
16b
10a 16a
16
8
OPTIONAL ACCESSORIES:
CLEANING KIT
11
10a
12
7
2
1
17
18 19

CORRECT USE O THE PRODUCT
This appliance is intended for home use as a
steam generator as described and in accor-
dance with the instructions provided in this
manual. Please read these instructions care-
fully and keep them, as you may find them
useful in the future.
POLTI DECLINES LIABILITY OR ANY DAM-
AGE OR ACCIDENT DERIVED ROM ANY
USE O THIS APPLIANCE WHICH IS NOT IN
CON ORMITY WITH THE INSTRUCTIONS
CONTAINED IN THIS BOOKLET.
IMPORTANT
Before leaving our factory all our products
are rigorously tested. or this reason, your Ci-
mex Eradicator may contain some residual
water in the boiler from the testing.
SET UP
Before using Cimex Eradicator for the first ti-
me assemble the pivoting wheels as indicated
in ig. A.
HPMED
HPMed is a cleaning product for surfaces.
Contains <5% non-ionic surfactant.
Keep HPMed out of the reach of children. Do
not ingest. In case of contact with eyes, rinse
with plenty of water and seek medical advice.
HPMed is a detergent.
Adding it to the steam flow delivered by Ci-
mex Eradicator allows easier removal of eggs,
organic traces due to bedbug feces and the
complete elimination of the characteristic
bedbug odor from surfaces.
or any queries please visit www.polti.com.
INSTRUCTIONS OR USE:
• Remove the empty
bottle from Steam Di-
sinfector. Simply un-
screw it as shown.
• Unscrew the cap of
the disposable bottle
(17).
• Insert the wick (18) in-
to the disposable bot-
tle, until it rests on the
base of the bottle.
• Ensure that the wick
stays as straight as
possible.
• Screw the bottle into
Steam Disinfector, as
shown, taking care to
ensure that the wick
enters the hole inside
the fitting perfectly,
without bending.
Switch on the machine following the “Prepa-
ration or Use” section.
If you do not want to use HPMed
cleaning solution, keep inserted the empty
bottle (19) in the opening where the HPMed
bottle should go. When using the empty bot-
tle, do not insert the wick.
WARNINGS:
• Do not screw HPMed bottle to the gun
without the wick.
• If no consumption of HPMed is seen during
use of the product, this means that the stop-
per has not been inserted correctly, or has
folded within the bottle.
Unscrew the bottle and repeat the insertion
procedure, taking care to position it correctly.
• Do not refill the disposable bottle.
ENGLISH
13
CIMEX ERADICATOR

PREPARATION OR USE
Steam may cause serious injury if in con-
tact with body parts. Always allow the
steamer to cool down before handling.
To reduce the risk of personal injury
unplug the power cord from the elec-
trical outlet and let the appliance and
the accessories cool down completely before
handling
Always make sure that the appliance
is unplugged before performing
maintenance work of any kind, inclu-
ding adding water or cleaning the appliance.
1. Unscrew the patented safety cap (A) and
fill the boiler with about 65 fl oz (2 L) of
water using the filler funnel (5) making
sure that it does not overflow ( ig.1).
Normal tapwater can be used. However,
since tap water can contain limescale,
which may cause a build-up limescale in
the tank, in hard water areas we
recommend periodically adding our
natural-base decalcifier KALSTOP in the
boiler tank. Pour half vial of Kalstop into
the boiler containing the recommended
quantity of water. If your water supply is
particularly hard, you may want to use
more (such as 1 vial for 34 fl oz / 1 liter of
water).
Alternatively, use a mixture of 50% tap
water and 50% distilled water or bottled
spring water.
Never use 100% distilled water or bottled
spring water but always mix them with
50% tap water.
2. Carefully screw on the safety cap tightly
( ig. 2). Make sure the patented safety
cap (A) is fully and correctly screwed on,
otherwise steam may escape from around
the cap.
3. Connect the power supply cable ( ) to a
grounded outlet of the correct voltage.
Do NOT under any circumstances put or
leave the filler funnel in the water filling
aperture of the appliance when the appliance
is connected to the electricity supply. Doing
so may cause burns!
INSTRUCTIONS OR USE
• Press down the generator on/off switch (B)
and the accessories on/off switch (C) which
will light up together with the pressure
indicator light (K).
• Wait until the steam pressure indicator light
(K) goes out. Cimex Eradicator is now ready
for use.
• Open the cover of the central connector
block (D); insert the central connector (R)
pressing the connector button (S) taking
care that the locking tab (U) is correctly
positioned in the lock-in aperture (E) on the
block ( ig. 3).
• Wait until the heating lamp (N) turns off.
• Adjust the steam flow by turning the knob
(I) to medium. (see “Steam Regulation
eature” section).
• Press the steam delivery push-button (M) to
start steam flow.
Note:
• The handle is fitted with a safety switch (H)
to prevent the accidental activation of
steam delivery by children or people
unaware of its function. Should the
appliance be left momentarily unattended,
move the safety switch (H) to the off
position. To continue steam delivery, move
the switch back to its original position.
• The first burst of steam may contain some
water droplets, due to imperfect thermic
stabilisation inside the flexible hose. This is
normal. Therefore the first jet of steam
should be directed onto a rag until a
constant pressure of steam is obtained.
• During use, the delivery lamp (N) and the
steam pressure indicator light (K) will light
up and turn off. This indicates that the
electrical resistor is starting to work to keep
the temperature in the delivery device
steady. This is a normal occurrence, and it is
therefore possible to continue standard
operations.
• BE ORE TREATING SUR ACES, DIRECT
THE IRST JET O STEAM ONTO A RAG
OR DOWNWARDS OR APPROXIMATELY
30 SECONDS. THIS WILL BRING THE
STEAM TO OPTIMUM TEMPERATURE AND
PRESSURE.
ENGLISH
14
CIMEX ERADICATOR

TIPS OR USE
• Before treating delicate or unusual
surfaces with the steam system, consult
the manufacturer’s instructions and
always carry out a test on a hidden part or
on a sample of the material.
Allow the steamed part to dry to make
sure that no changes in color or
deformations have occurred.
• Bring the delivery device into a position
perpendicular to the surface to be treated
and keep it at the distance provided by
the spacer bracket / support (P). Avoid
direct contact in case of delicate material
( ig. 7).
• Deliver the steam using continuous, even
strokes to cover the surface being
treated. In this way the flow of dry steam
at a high temperature will kill the bugs
and their eggs on all treated surfaces.
Cimex Eradicator delivers dry saturated
steam at a high temperature that will dry
without leaving residues within 30
seconds to 1 minute, depending on
environmental conditions.
• Before use, make sure that the treated
material is resistant to high temperatures.
STEAM REGULATION EATURE
Cimex Eradicator is equipped with a steam
regulator control (I) ( ig. 4). You can increase
the steam flow by turning the control coun-
ter-clockwise. Turning it clockwise reduces
the steam flow.
PRESSURE INDICATOR
Cimex Eradicator is equipped with an indicator
(L) displaying operating pressure.
PATENTED SA ETY CAP /
’’WATER OUT’’
Steam may cause serious injury if in
contact with body parts. Always allow
the steamer to cool down before
handling.
The appliance is equipped with a patented
safety cap, which prevents opening of the
generator boiler tank as long as there is any
pressure remaining inside. This is an
important and indispensable safety device.
ollow the procedure here below when
re-filling the boiler tank.
The ‘water out’ is indicated by a warning light
(J).
When you have used up all the water in the
boiler, proceed as follows:
• Switch off the machine at the generator
on/off switch (B).
• Operate the steam request switch (M) of
the Steam Disinfector until the steam flow
ceases.
• Switch O the accessory on/off switch
(C).
• Unplug the power supply cable ( ) from
the electrical outlet.
• When all pressure has subsided in the
generator, you will be able to unscrew
(counter clockwise) the patented safety cap
(A).
• Wait for at least 7 minutes to allow the
generator tank to cool down.
• When cool, proceed to carefully refill the
tank as described in paragraph 1 of the
section “Preparation”. If refilling the gen-
erator when not completely cooled, cover
exposed skin and face while filling and
carefully pour only very small quantities
of water at a time into the boiler tank, so
as to avoid spitting from the boiler tank.
CONNECTION O ACCESSORIES
Use the connection accessories to narrow
and concentrate the steam jet.
Proceed as follows:
Straight extension accessory (1)
Curved extension accessory (2)
Bring the accessory chosen in line with the
delivery device nozzle (Q) and rotate the ac-
cessory until it locks into place ( ig. 5).
or normal treatments, use the straight exten-
sion accessory (1).
Use the curved extension accessory (2) to ac-
cess hard-to-reach points.
STORING THE DEVICE
When you have finished using the device,
store indoors in a clean and dry place after di-
sconnecting it from the electrical outlet. Keep
it away from sources of heat.
ENGLISH
15
CIMEX ERADICATOR

MAINTENANCE
Always unplug the device from the electrical
outlet and allow it to cool down before
carrying out any maintenance.
• Clean the outside of the device with a
damp cloth. Do not use solvents or deter-
gents as these could damage the surfaces.
•If the monotube is torn, it must be replaced
by an authorized service center.
CLEANING O THE DELIVERY
NOZZLE
Clean the delivery nozzle every 10-15 hours of
use using the brush (4) included in the sup-
ply. Slide the brush inside the tube to remove
any residues of scale ( ig.6).
KALSTOP P2003
Water contains magnesium, mineral salts and
other deposits that may cause the formation
of scale. To prevent these deposits from
damaging the appliance, we recommend
periodically adding Kalstop P2003 in the
boiler tank, a natural descaling agent
specifically formulated to prevent formation
of scale and protect your appliance. Pour half
vial of Kalstop into the boiler containing the
recommended quantity of water. If your
water supply is particularly hard, you may
want to use more (such as 1 vial for 34 fl oz / 1
liter of water).
or any queries please visit www.polti.com
website.
OPTIONAL CLEANINIG KIT
Cimex Eradicator can turn into an excellent
green cleaning system, thanks to its optional ac-
cessory kit.
USING OPTIONAL ACCESSORIES
All Cimex Eradicator accessories can be con-
nected directly to the steam gun or extension
tubes as follows ( ig. 8):
• Bring the locking button (10a) (on each
accessory) to the OPEN position.
• Attach the desired accessory to the
handle or extension tube.
• Bring the button (10a) to the CLOSED po-
sition.
• Check the connection.
To connect the flexible hose to Cimex Eradi-
cator, follow the same procedure used for the
connection of the Steam Disinfector.
THE OPTIONAL CLEANING ACCES-
SORY KIT CONSISTS O :
STEAM GUN (9)
The steam gun can be used directly on all ar-
eas requiring a more intense treatment with-
out connecting the brushes. The more resis-
tant the stain, the closer you should hold the
gun since, the steam pressure and tempera-
ture are higher at the source. Always wipe
with a dry cloth (or a slightly abrasive sponge
if the spot is difficult to remove) after using
the gun. The steam gun is particularly effi-
cient at:
• breaking down rug and carpet stains be-
fore they are treated with the large brush;
• cleaning stainless steel surfaces, window
panes, mirrors, enamelled surfaces;
• cleaning hard-to-reach corners, such as
stairs, window sills, door frames;
• cleaning cooking top knobs;
• cleaning window shutters, non electric
heaters, car interiors;
• spraying plants (from a distance);
• removing odors and wrinkles from clothes.
To reach high areas, the steam gun can be
connected to one or both extension tubes.
The steam gun (9) has a safety switch (9b)
that prevents accidental start of steam deli-
very.
With the button (9b) in the “O ” position,
the lever that controls steam delivery is
locked ( ig.9b). If you were to leave the flex
momentarily unattended while the appliance
is running, it is recommended to bring the sa-
fety switch to the “O ” position.
To start dispensing steam, press button (9b)
to “ON” and turn the steam request com-
mand lever (9a) ( ig. 9a).
EXTENSION TUBES (10)
The two extension tubes are perfect for hard
to reach areas.
STEAM CONCENTRATOR (12)
The steam concentrator (which can be
connected directly to the gun or together
with the extension tubes) allows you to
concentrate a powerful jet of steam to
otherwise inaccessible locations, such as
radiators, door posts, sills and shutters, as
well as for sterilizing toilet bowls. It’s a very
useful and indispensable tool.
Adding the round brush (11) you can clean small
surfaces.
ENGLISH
16
CIMEX ERADICATOR

SMALL BRUSH (13)
The small brush is used whenever the big
brush is too big or not practical.
The small brush can be connected directly to
the steam gun or to the extension tubes. The
small brush can be used on:
• upholstery fabrics (after testing on a small
hidden area)
• car interiors (not pile surfaces), car windows
(not in freezing temperatures)
• small window surfaces
• tile and other small surfaces
To clean wood (door frames, floors, etc.) do
not apply the steam directly but cover the
brush with a folded cotton cloth. or
furniture cleaning, direct the steam jet onto a
dry cotton cloth, and then start the cleaning.
The warm moisture on the cloth traps dust,
stains and the static electricity so that the
furniture stays clean longer.
LARGE BRUSH (14)
To clean floors, put a clean, dry cloth under
the brush and pass it back and forth without
applying any pressure. Use the other side of
the cloth when the first one is impregnated
with dirt. Use the brush directly without the
cloth on particularly dirty or encrusted areas
and in spaces between the tiles: swing the
brush sideways to detach the dirt. Difficult
stains may require a steam gun treatment
before the brush and cloth are used. The
same procedures apply to ceilings and verti-
cal surfaces, like wallpaper. The cloth can ea-
sily be fastened around the brush and held in
place by the 4 clips (14a) on the brush itself.
Smooth cotton cloths are suitable for the
treatment of glass surfaces: fasten the cloth
around the brush then pass it over the win-
dow pane (or mirror) to remove the greasy
film. inally, spray the surface with the steam
gun and wipe dry with a clean cloth. In cold
weather, window panes will require pre-hea-
ting with the steam gun (from a distance of
1.6 ft (50 cm)), prior to the actual cleaning
with the brush. CIMEX ERADICATOR is ideal
for both synthetic and wool rugs as well as
for all types of carpets. Its use ensures total
hygiene, revives colors and restores the origi-
nal brilliance of the pile. old a cotton cloth
over 2 or 3 times (according to the length
and resistance of the pile) and fasten it onto
the brush. Move the brush rapidly in all direc-
tions without applying any pressure. The sur-
face will dry quickly. You should avoid linge-
ring in the same place, as this may soak the
area. Particularly dirty rugs may need several
treatments. Difficult stains may require the
use of the steam gun (from a distance of 0.15
- 0.3 ft (5-10 cm)) prior to treatment.
WINDOW SQUEEGEE TOOL (16)
DO NOT USE STEAM ON GLASS IN REEZING
TEMPERATURES
In particularly cold weather, pre-heat the
windows by applying steam from a distance
of about 1.6 ft (50 cm) from the surface to be
cleaned to avoid shattering glass.
The window squeegee tool allows you to
clean all glass surfaces effectively and
rapidly without using detergents. Your glass
will remain cleaner longer thanks to the ab-
sence of the film normally left behind by
chemical cleaning products which attracts
dust and grease. The accessory is equipped
with two spatulas: short spatula (16a), long
squeegees (16b).
Glass is cleaned in two stages:
• steam the surface to be cleaned to dissolve
the dirt, using the steam command lever (9a);
• use the squeegees to remove dirt, without
applying the steam.
To clean especially large glass surfaces, at-
tach the window squeegee tool to the exten-
sion tubes (10).
PRECAUTIONS OR DELICATE
SUR ACES
• Before treating leather, special fabrics and
wood surfaces, consult the manufacturer’s
instructions and always carry out a test on
a hidden part or on a sample of the mate-
rial. Allow the steamed part to dry to make
sure that no changes in colour or deforma-
tions have occurred.
• Please pay careful attention when cleaning
wooden and treated terracotta flooring as
prolonged use of steam may damage the
wax, polish or colour of the surfaces to be
cleaned. We therefore recommend adjust-
ment the steam to minimum (if your ap-
pliance has steam adjustment) and never
direct the jet of steam directly on the sur-
face, but cover the brush with a cloth. Do
not keep spraying steam in the same place.
or wooden surfaces (furniture, doors,
ENGLISH
17
CIMEX ERADICATOR

ENGLISH
18
CIMEX ERADICATOR
etc.), we recommend cleaning with a cloth
which has been steamed previously.
• Also on particularly delicate surfaces (e.g.
synthetic materials, lacquered surfaces
etc.) it is recommended to always cover
the brushes with a cloth and to use steam
to a minimum.
• If cleaning glass surfaces in particularly low
temperatures preheat the glass using the
hand gun from about 1.6 ft (50 cm) di-
stance from the surface to be cleaned.
• or care of your plants vaporise at a mini-
mum distance of 1.6 ft (50 cm).
TIPS
Here are some tips for using the steam con-
trol:
•Strong steam: to remove scale, stains,
grease and disinfect;
•Regular steam: to clean carpets, rugs, win-
dows, floors;
• Gentle steam: to steam plants, clean deli-
cate fabrics, wall coverings, sofas, etc.
USE O THE ACCESSORIES
HOLDER
The accessories holder allows you to attach
the tube with the brush mounted on it to the
appliance body.
Repositioning the tube on the appliance
body: slide the groove on the back of the
brush into the guide of the accessories holder
on the appliance ( ig. 10).
CARE O YOUR
CIMEX ERADICATOR
• Before carrying out any maintenance on
the device, always unplug it from the
power source making sure that the product
has cooled down before proceeding.
• After using the brushes, we recommend
letting the bristles cool down in their natu-
ral position, in order to avoid any deforma-
tion.
• To clean the body of the appliance, simply
use a moist cloth.
•Regularly check the status of the coloured
washer located in the connector assembly
(R). If necessary, replace with the appro-
priate spare part (8), as described below.
- Remove the damaged washer.
- Insert the new washer, placing it on the
steam nozzle and pushing it until it is in its
place. See ( ig. B).
- Lubricate the gasket with silicone grease or
Vaseline® or alternatively with small quan-
tities of vegetable oils.
Make the same check also on the connec-
tion washers of the extension tubes (10)
and of the steam gun (9). If necessary, re-
place with the appropriate spare part (8),
as described below.
- Remove the damaged washer.
- Insert the new washer, placing it on the
steam nozzle and pushing it until it is in its
place. See ( ig. C).
- Lubricate the gasket with silicone grease or
Vaseline, or alternatively with small quanti-
ties of vegetable oils.
TIPS
ig. B
ig. C

CIMEX ERADICATOR
19
ENGLISH
TROUBLESHOOTING
PROBLEM SOLUTION
The appliance does not
switch on
Check that the appliance is correctly plugged into a suitable
current socket.
Ensure that the appliance has been turned on using the
ON/O switch (B).
“Out of water” indicator
light (J) is on
There is no water in the boiler.
ill according to the instructions given in this manual.
No HPMed consumption
during use
Check that the wick has been inserted correctly into the hole of
Steam Disinfector.
If problems persist or are not listed above, please contact our Polti Customer Services.
USA: 1-888-99-POLTI (1-888-997-6584)
Monday - riday: 8am - 6pm EST

CIMEX ERADICATOR
20
ENGLISH
LIMITED WARRANTY
WHO IS COVERED:
This product is warranted to the original purchaser or the person receiving the product as a
gift, it is warrented against defects in materials and workmanship as based on the date of
original purchase from an Authorized Dealer. The original sales receipt showing the product
name and the purchase date from an authorized retailer is considered proof of the date of
purchase.
WHAT IS COVERED:
Subject to the exclusions contained below, Polti USA, Inc. warrants this product to be free
from defects in materials and workmanship for a period of 1 (one) year from the date of
purchase.
At its option, Polti USA, Inc. will either repair the product at no charge, using new or
refurbished replacement parts; exchange the product with a product that is new or which has
been manufactured from new, or serviceable used parts and is at least functionally equivalent
to the original product in current inventory; or refund the original purchase price of the
product. Polti USA, Inc. warrants replacement products or parts provided under this warranty
against defects in materials and workmanship from the date of the replacement or repair for
the remaining portion of the original product's warranty. When a product or part is exchanged,
any replacement item becomes your property and the replaced item becomes Polti USA, Inc.’s
property.
When a refund is given, your product becomes Polti USA, Inc.'s property. Replacement
products can only be sent if all warranty requirements are met. ailure to follow all
requirements can result in delay or denial of warranty.
WHAT IS NOT COVERED EXCLUSIONS AND LIMITATIONS:
This limited warranty does not cover defects due to incorrect use or use other than that is
identified in the instruction manual, which is an integral part of the contract of sale for the
product. The limited warranty does not cover parts that are subject to normal wear and tear
(consumables such as filters, brushes, etc.),
Defects or damage that result from (a) the use of non-Polti original accessories, spare parts or
consumables, (b) improper operation, storage, misuse or abuse, accident or neglect, such as
physical damage (cracks, scratches, etc.) to the surface of the product resulting from misuse,
(c) use of the products for commercial purposes; (d) subjecting the product to abnormal
usage or conditions, (e) limescale build-up, and (f) chance (fire, short circuit) which are not the
fault of Polti USA, Inc., are excluded from coverage.
Polti will accept no responsibility for any injury to people or animals or damage to property
directly or indirectly resulting from failure to follow the instructions provided in the instruction
manual, including, without limitation, warnings and product maintenance instructions.
The limited warranty does not cover damage caused by service performed by anyone other
than an Authorized Service Location, to a product or a part that has been modified without
written permission, if the recommended maintenance of the product is not correctly
performed or if any product’s serial number has been removed or defaced.
THIS LIMITED WARRANTY DOES NOT COVER:
• Product repair and/or part replacement because of improper use or maintenance,
connections to improper voltage supply, power line surge, lighting damage, unauthorized
repair or other cause not within the control of Polti USA, Inc..
• Damage from mishandled shipments or transit accidents when returning product.
• A product that requires modification or adaptation to enable it to operate in any country
other than the country for which it was designed, manufactured, approved and/or authorized,
or repair of products damaged by these modifications.
• Product lost in shipment and no signature verification receipt can be provided.
• ailure to operate in accordance with the Instructions Manual.
Other manuals for CIMEX ERADICATOR
4
Table of contents
Languages:
Other POLTI Kitchen Appliance manuals