manuals.online logo
Brands
  1. Home
  2. •
  3. Brands
  4. •
  5. Polygroup
  6. •
  7. Artificial Pine Tree
  8. •
  9. Polygroup TG90P4474P00 User manual

Polygroup TG90P4474P00 User manual

1
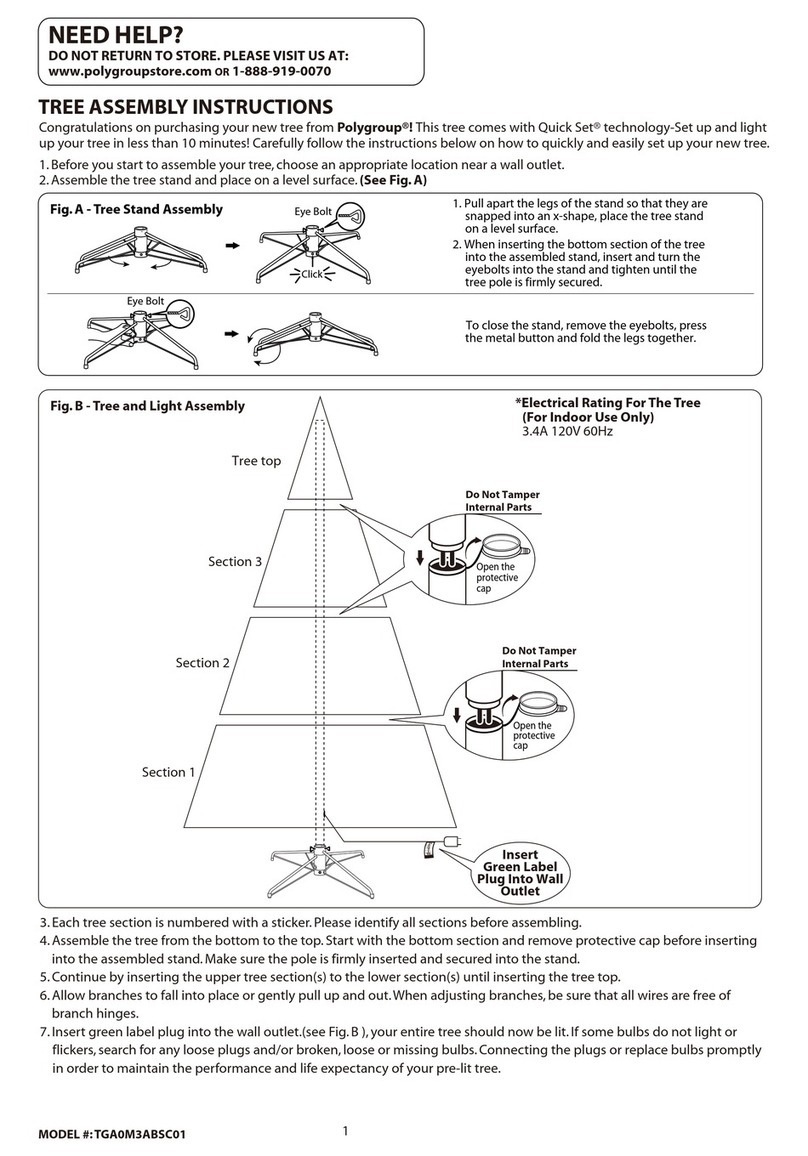
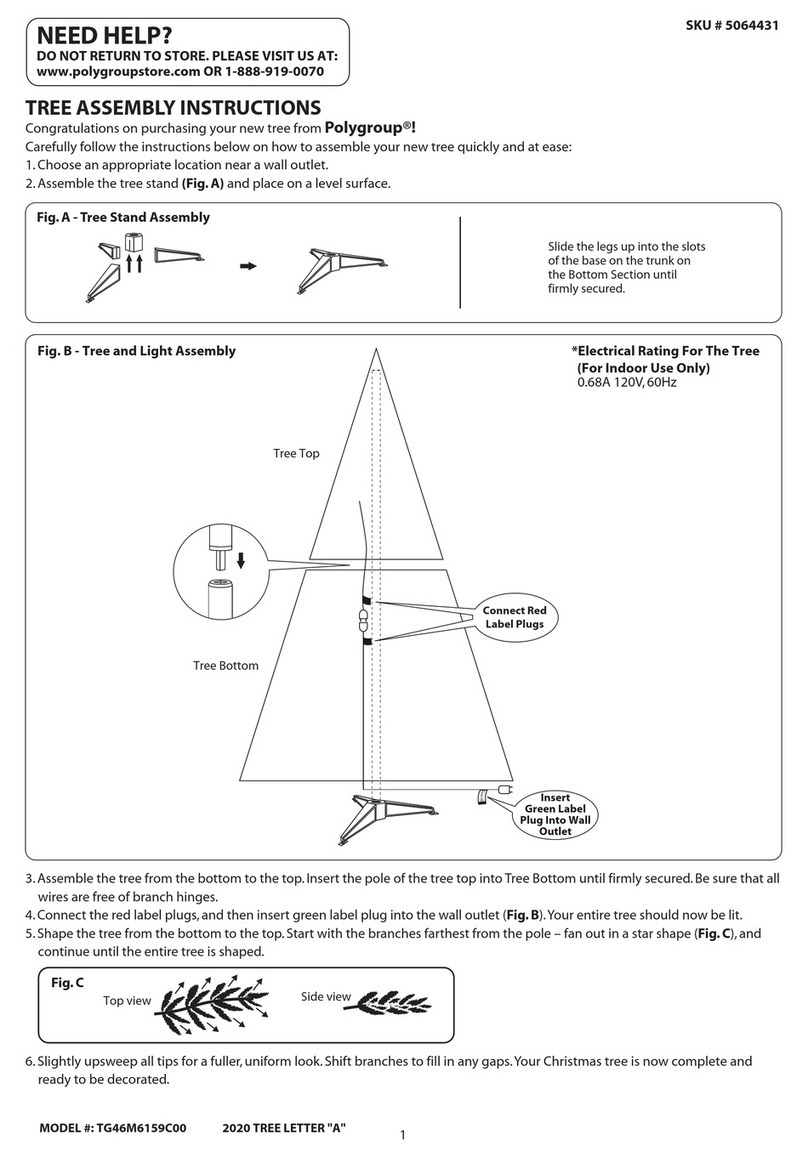
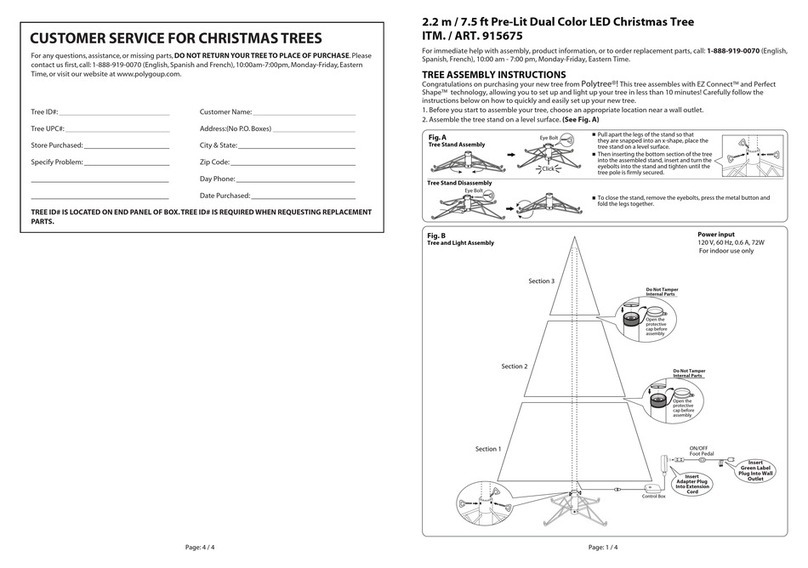
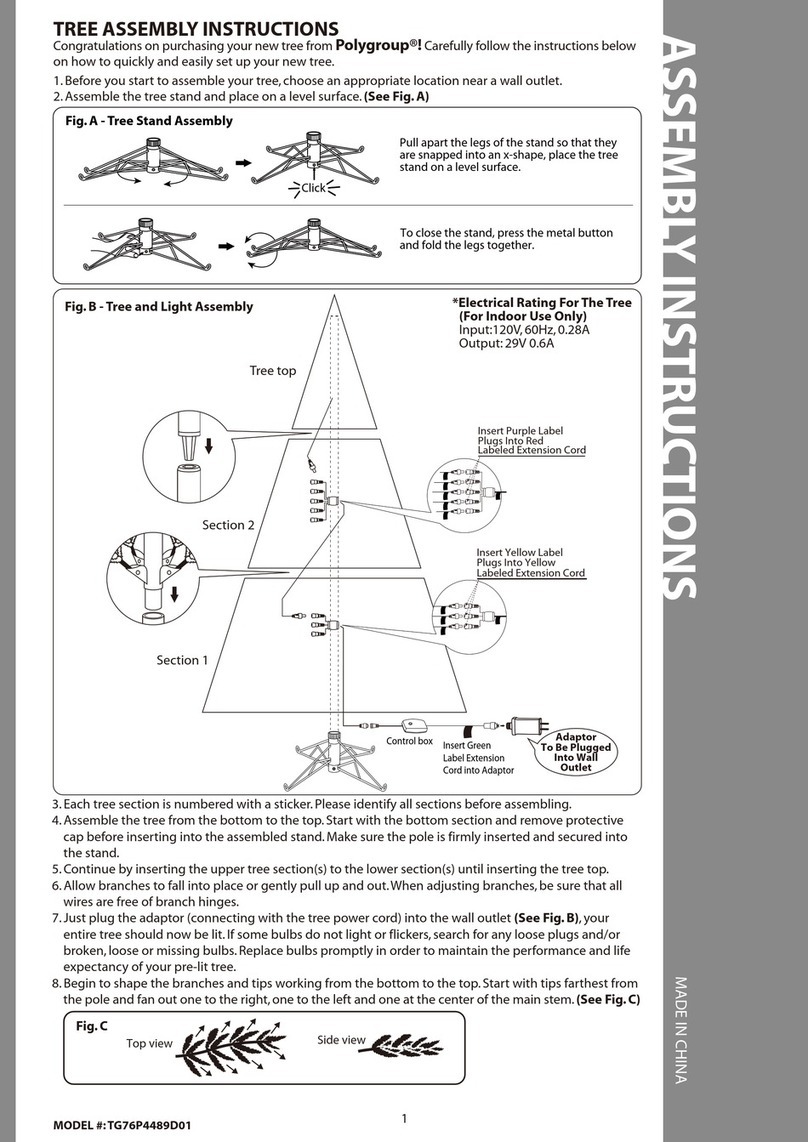
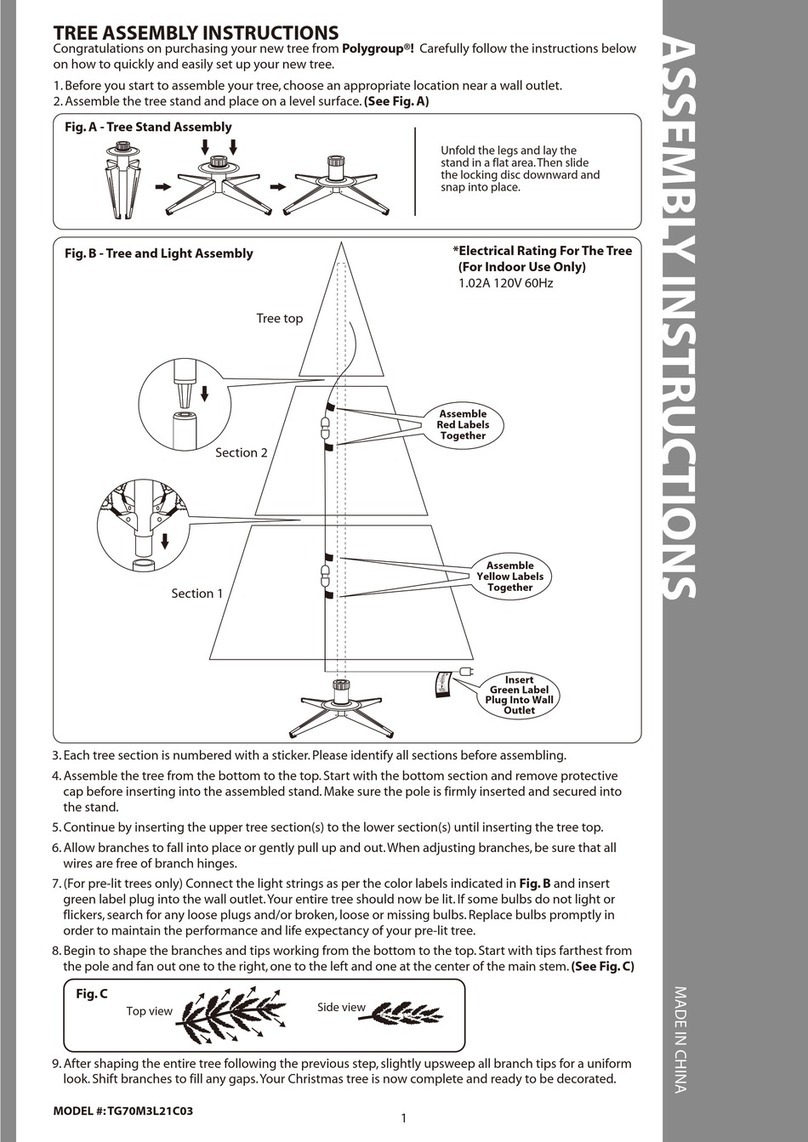
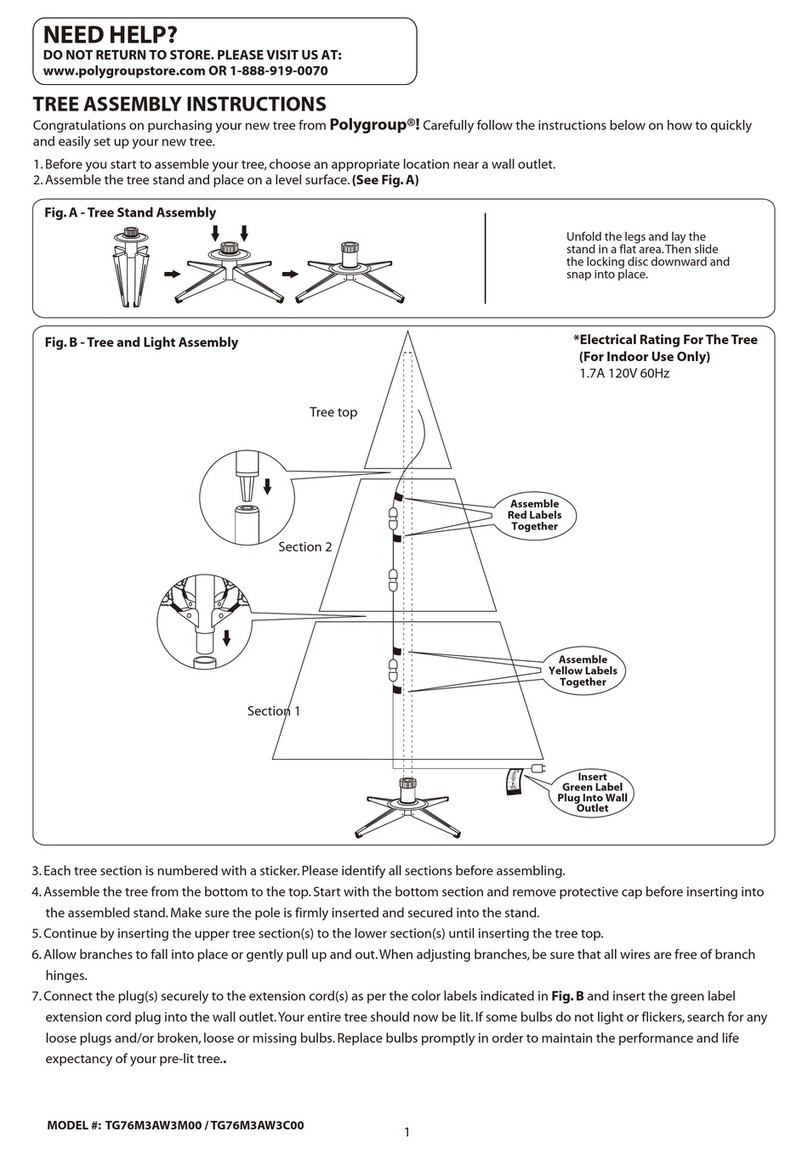
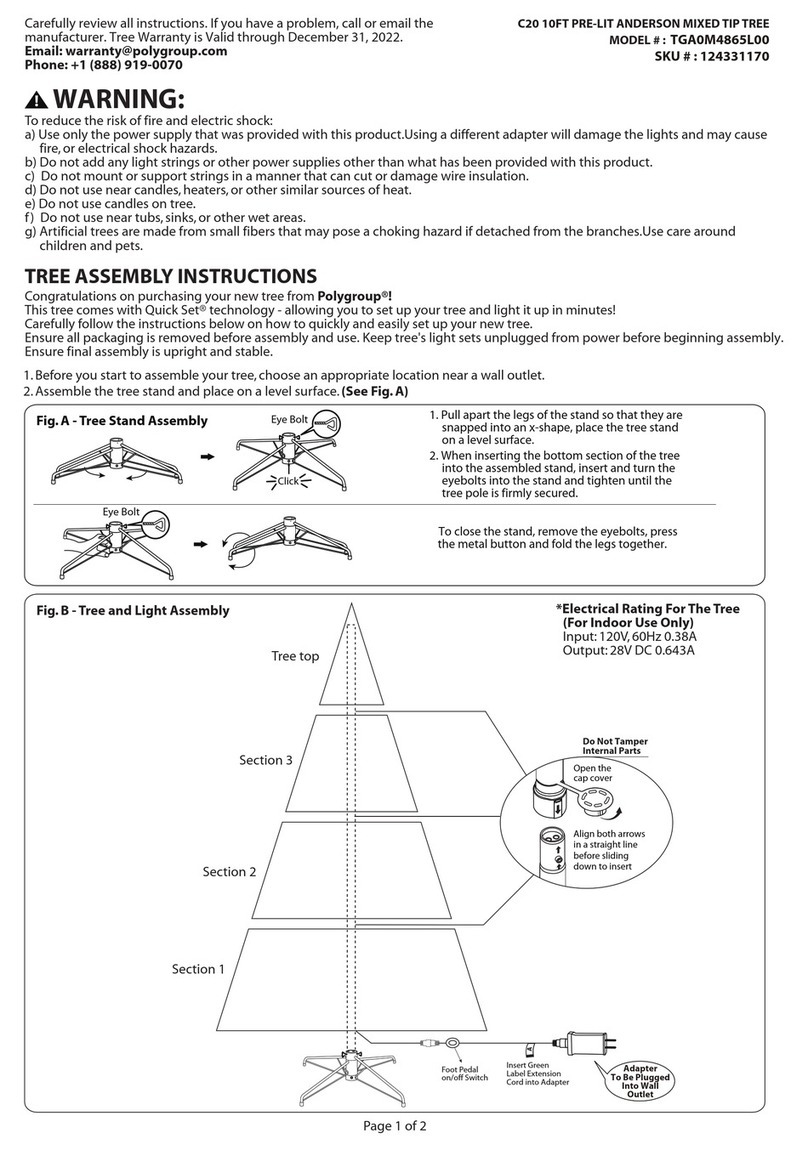
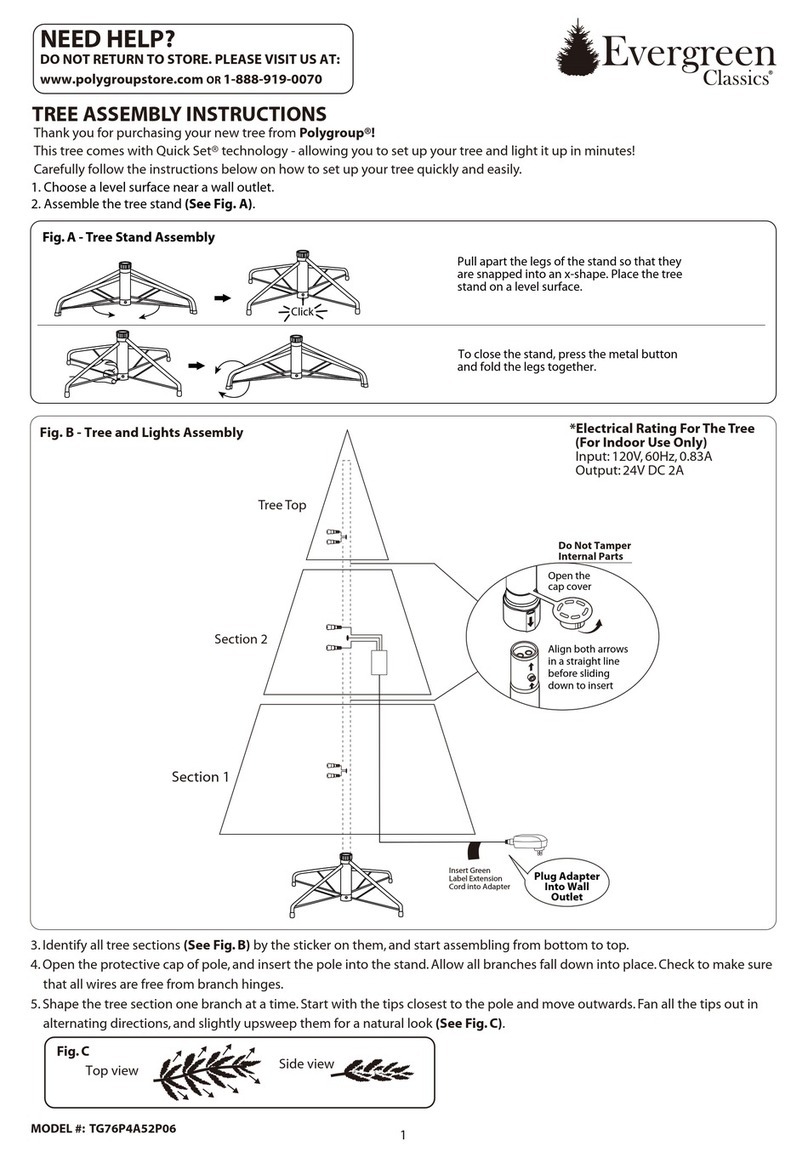
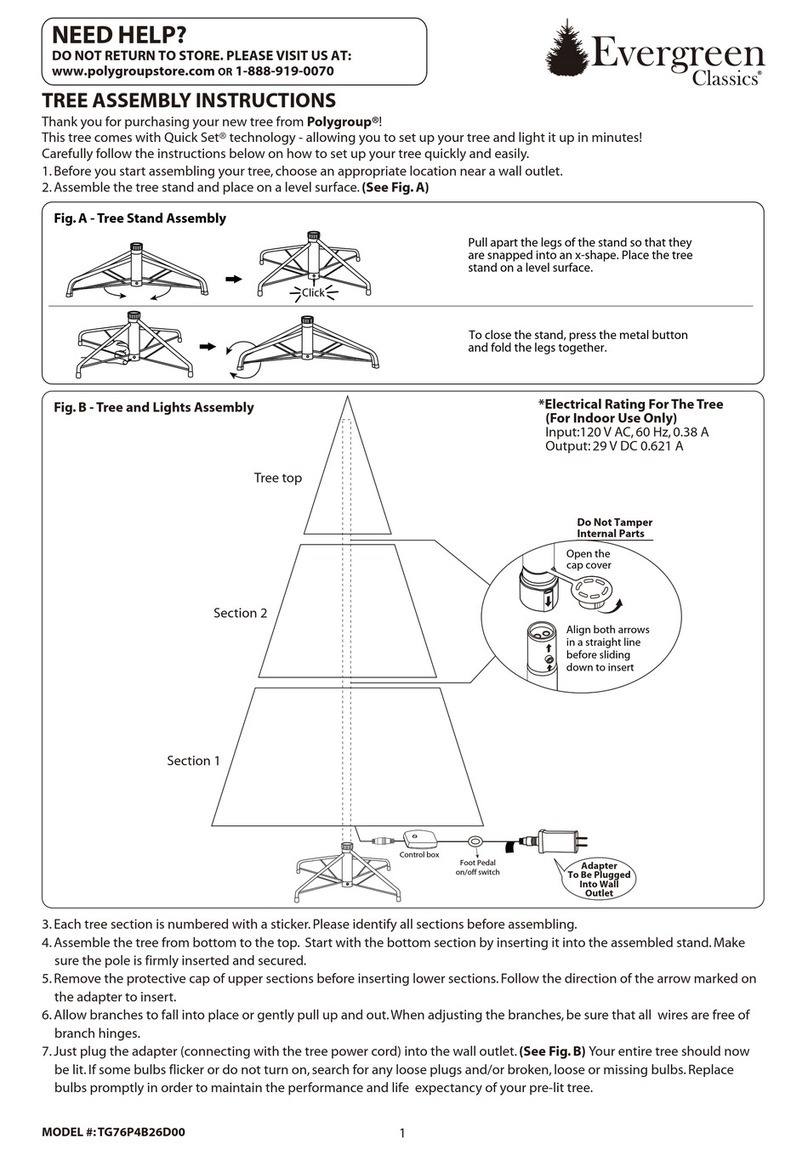
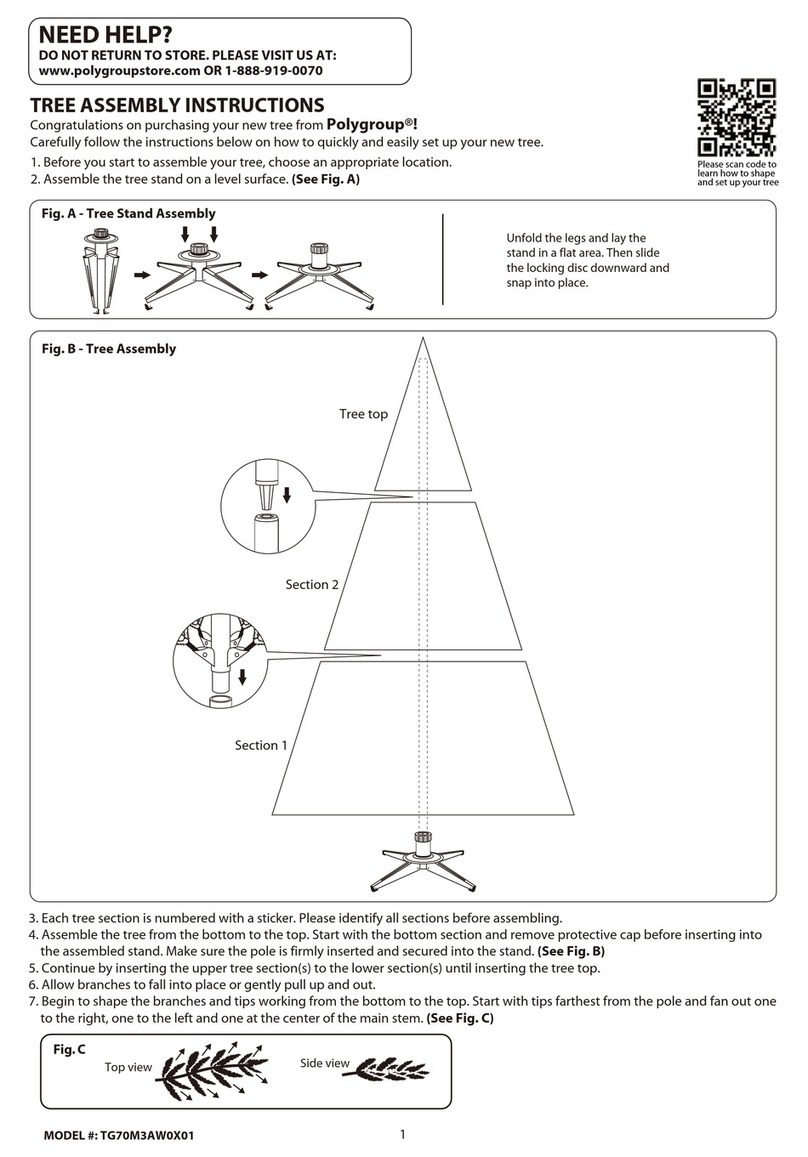
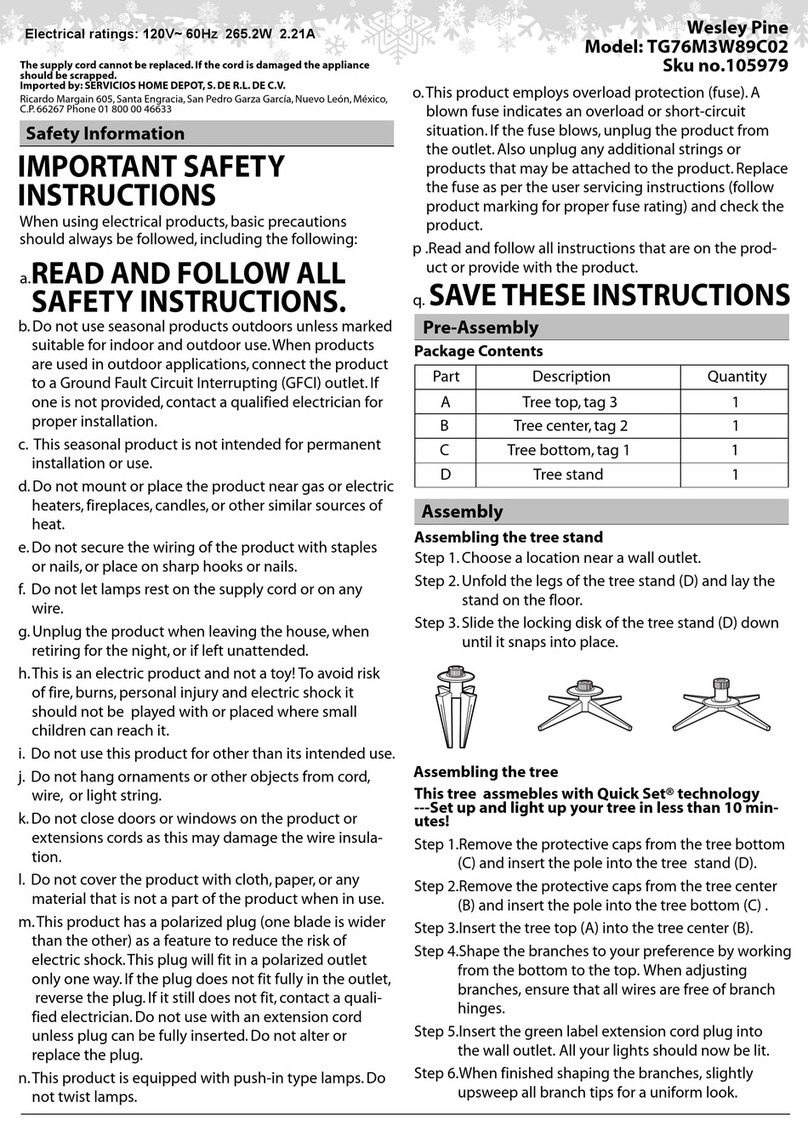
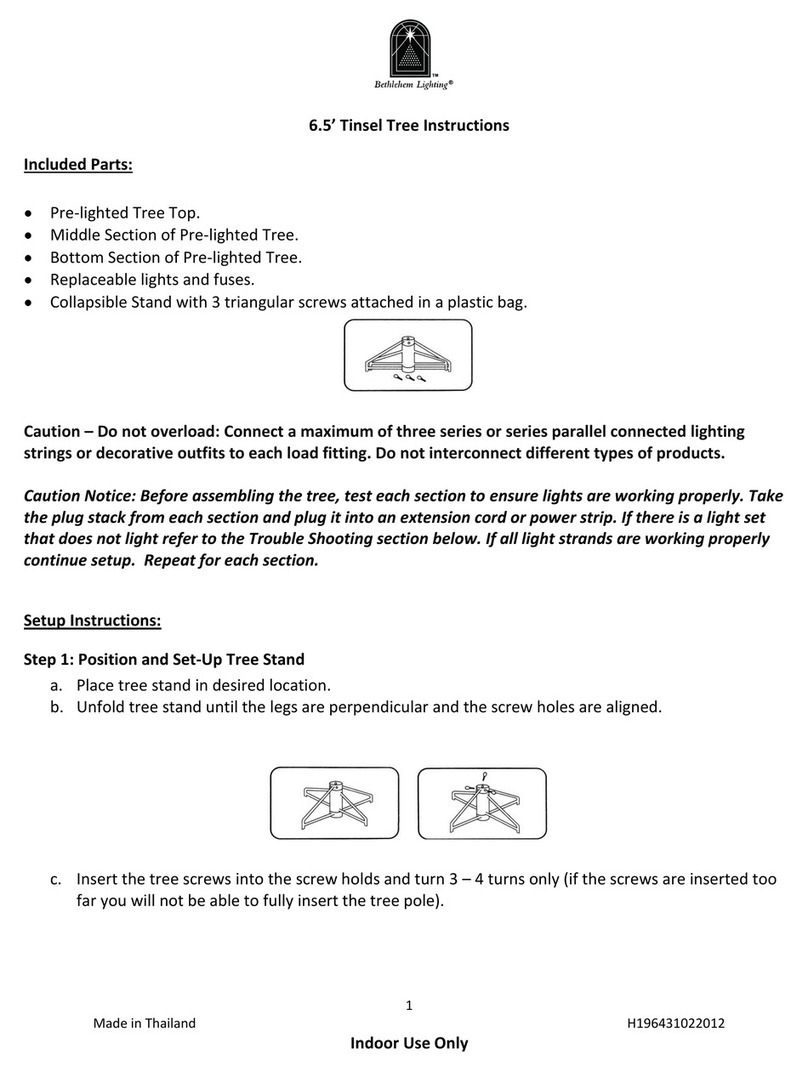
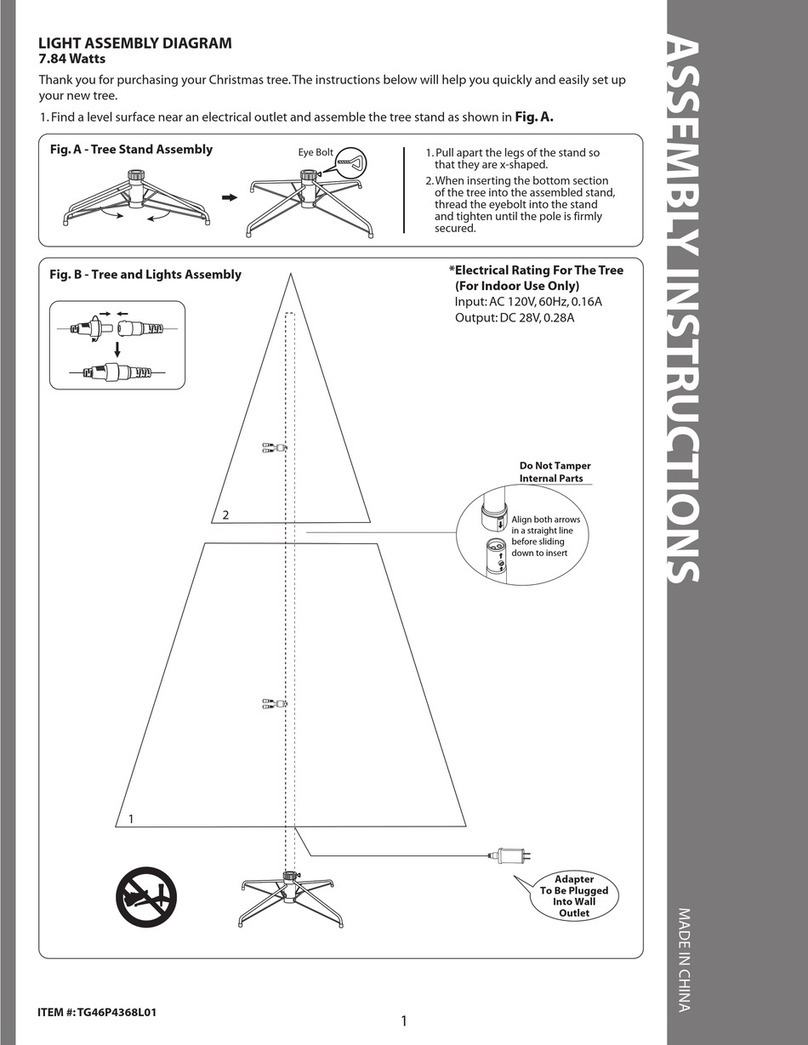
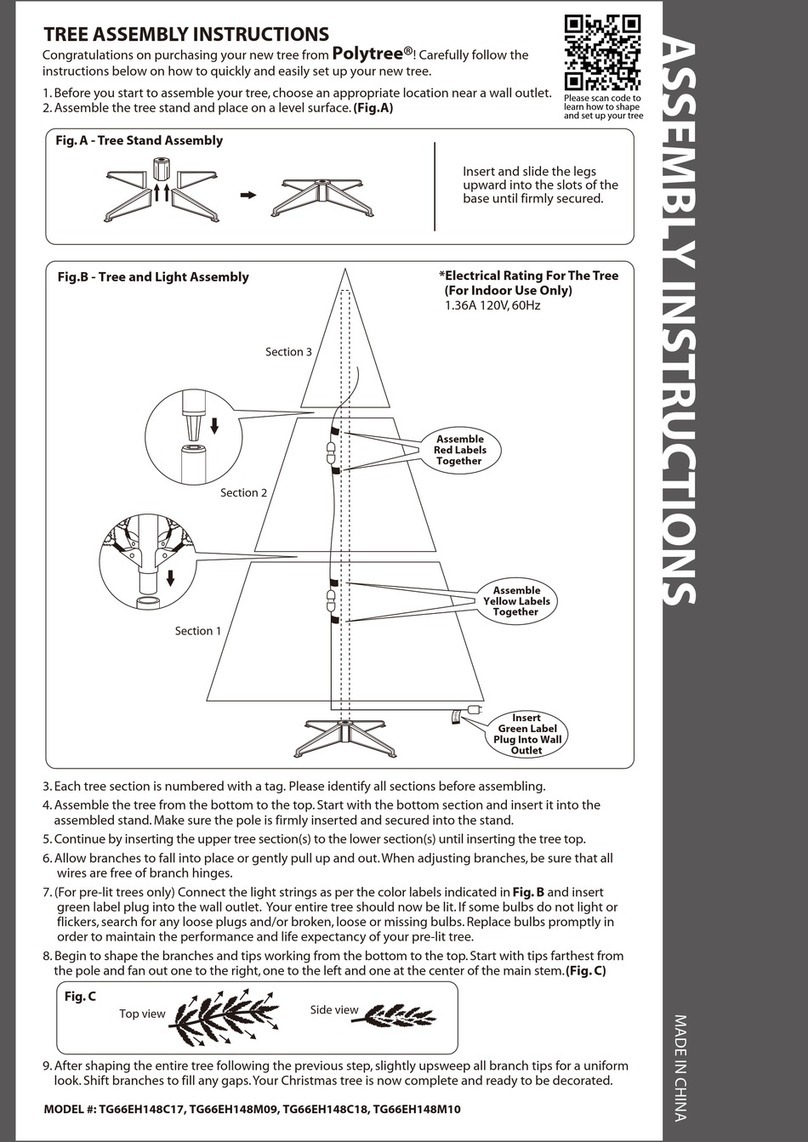
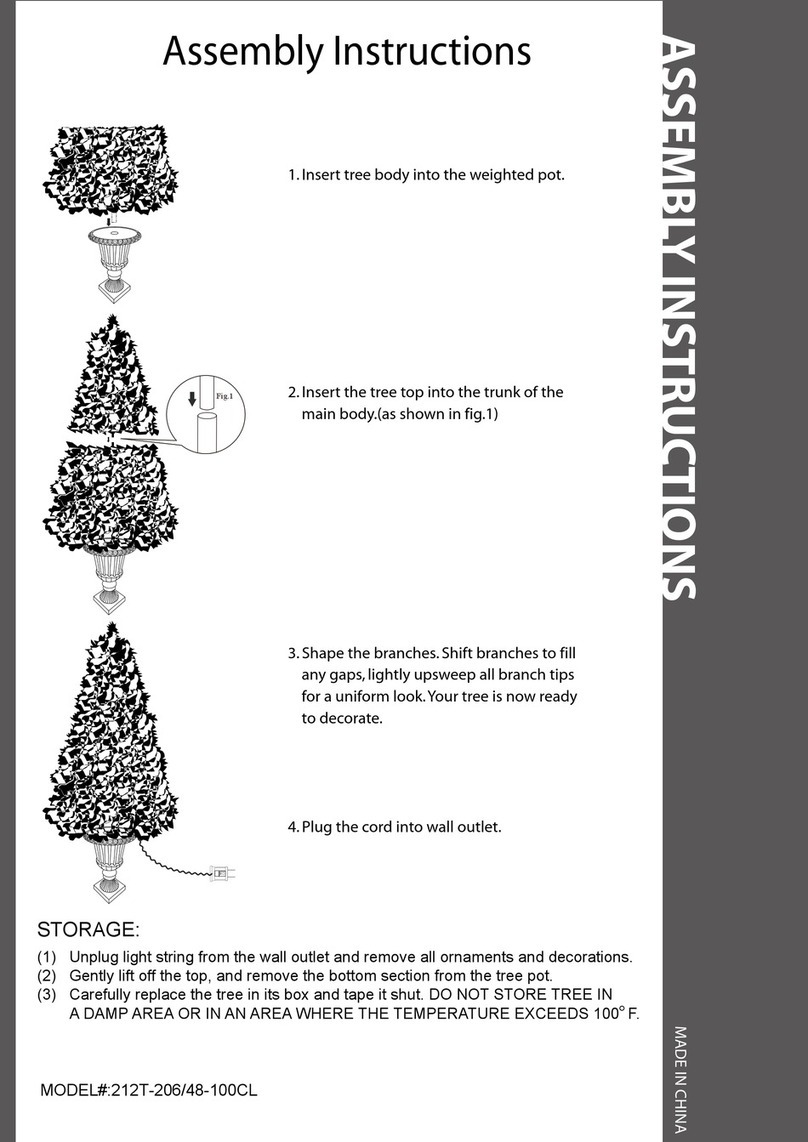
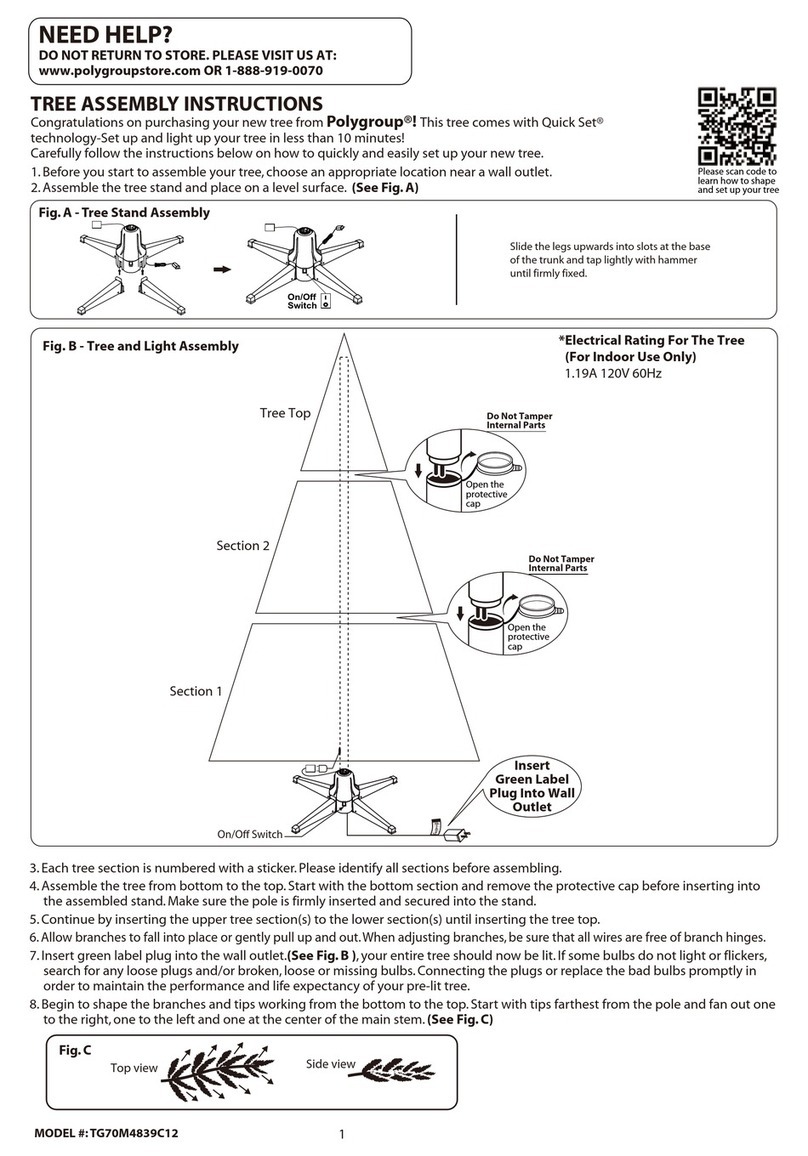
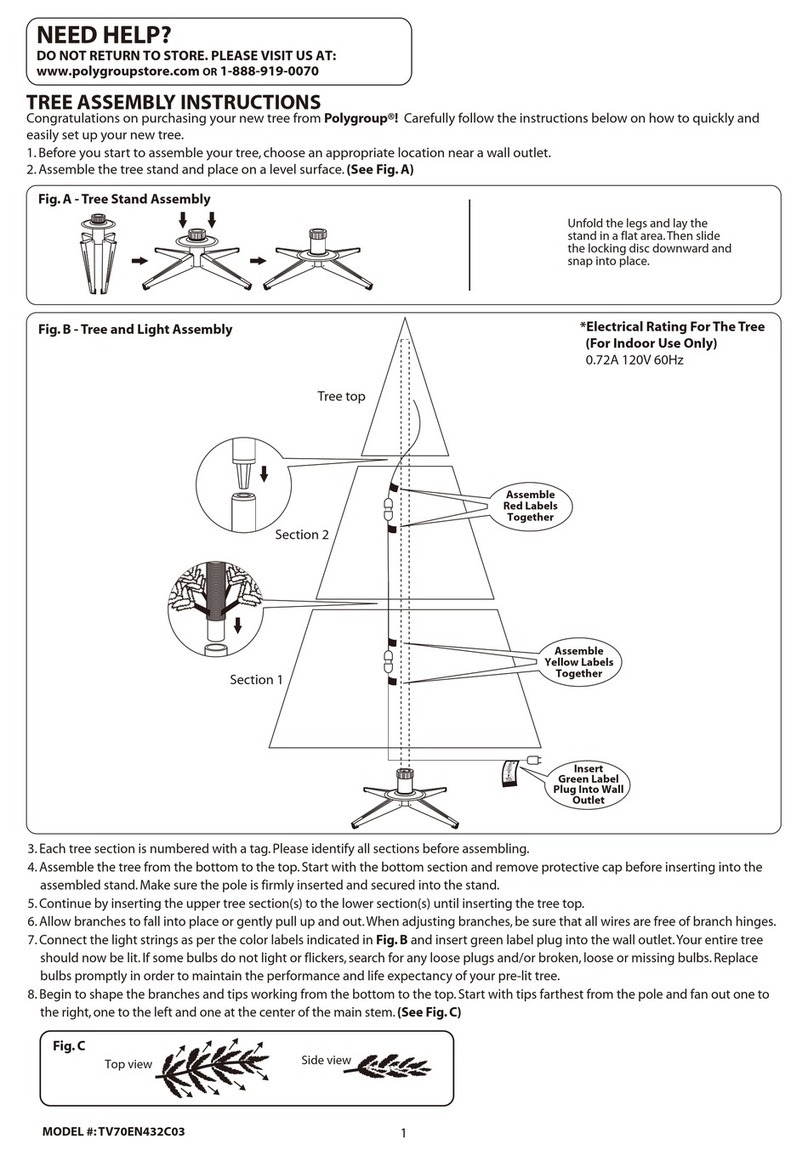
1. Choose a level surface near a wall outlet.
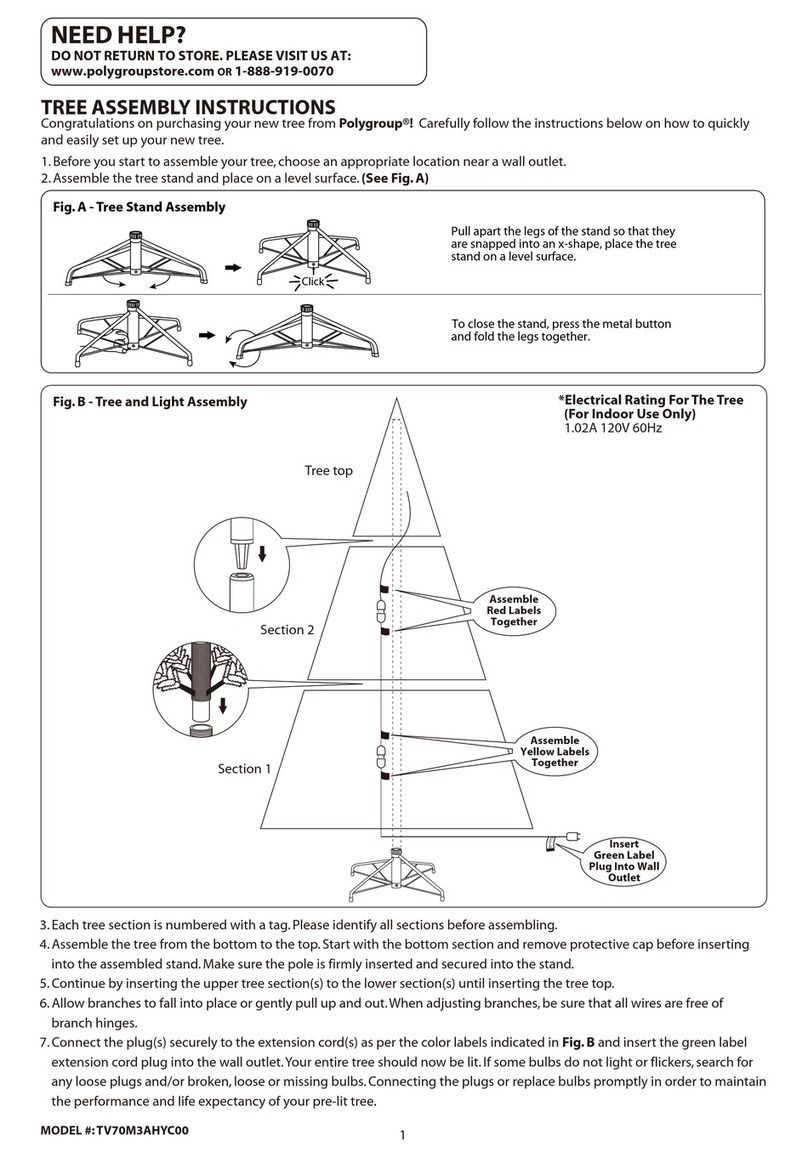
2. Assemble the tree stand (See Fig. A).
MODEL #: TG90P4474P00 SKU: 094-213
3. Identify all tree sections (See Fig. B) by the sticker on them, and start assembling from bottom to top.
4. Open the protective cap of pole, and insert the pole into the stand. Allow all branches fall down into place. Check to make sure
that all wires are free from branch hinges.
5. Shape the tree section one branch at a time. Start with the tips closest to the pole and move outwards. Fan all the tips out in
alternating directions, and slightly upsweep them for a natural look (See Fig. C).
Top view Side view
Fig. C
TREE ASSEMBLY INSTRUCTIONS
Thank you for purchasing your new tree from Polygroup®!
This tree comes with Quick Set® technology - allowing you to set up your tree and light it up in minutes!
Carefully follow the instructions below on how to set up your tree quickly and easily.
Fig. B - Tree and Lights Assembly *Electrical Rating For The Tree
(For Indoor Use Only)
Input: 120V, 60Hz, 0.83A
Output: 24V DC 2A
Tree Top
Section 2
Section 1
Plug Adapter
Into Wall
Outlet
Insert Green
Label Extension
Cord into Adapter
Align both arrows
in a straight line
before sliding
down to insert
Open the
cap cover
Do Not Tamper
Internal Parts
DO NOT RETURN TO STORE. PLEASE VISIT US AT:
www.polygroupstore.com OR 1-888-919-0070
NEED HELP?
Fig. A - Tree Stand Assembly
Unfold the legs and lay the
stand in a flat area.Then slide
the locking disc downward and
snap into place.
2
This tree includes sets of hinge pins & washers, and spare bulbs.
If extra parts are needed, please contact our customer service center.
SPARE PARTS
STORAGE INSTRUCTIONS
TROUBLESHOOTING TIPS
1. Unplug from power source, and detach plug from adapter. Remove all ornaments and decorations.
2. Disassemble the tree from top to bottom. Gently lift pole straight up to remove from the lower
section, and fold all branches toward the pole.
3. Close the protective caps on the poles to avoid damaging the internal parts (See Fig. D).
4. Place the disassembled tree into the shipping box and tape it shut.
5. Store your tree in a cool, dry place away from sunlight.Exposure to excessive heat or humidity
may damage your tree.
If Tree Does Not Illuminate / Some Bulbs Do Not Light or Flicker
1. Please check to make sure that all plugs are properly connected and adapter is plugged into the wall outlet.
2.Turn the poles gently to make sure pole to pole sections are connected properly
3. Check for loose connection between light string plugs and extension cords.
4. Check for loose, broken or missing bulbs, and replace as needed (See LAMP REPLACEMENT).
1. Place the branch into the hinge bracket (See Fig. E).
2. Insert a new hinge pin all through the holes of bracket,
and secure with a washer (See Fig. E - close up).
Loose Hinge Pin
Fig. E
6. Repeat Step 4 and 5 for the upper tree section(s) until tree top is installed and shaped.
7. Connect plug with adapter, and plug it in to the wall outlet as indicated in Fig. B.
8. Step back and view your tree. Shift branches to fill any gaps.Your Christmas tree is now ready to be decorated.
For any questions, assistance, or missing parts, Do Not Return To Place Of Purchase. Please contact us at 1-888-919-0070
or visit our website at www.polygroupstore.com.One of our customer service representatives will be happy to assist you.
CUSTOMER SERVICE FOR CHRISTMAS TREES
Tree ID#:
Tree UPC#:
Store Purchased:
Specify Problem:
Customer Name:
Address:(No P.O. Boxes)
City & State:
Zip Code:
Day Phone:
Date Purchased:
TREE ID# IS LOCATED ON END PANEL OF BOX. TREE ID# IS REQUIRED WHEN REQUESTING REPLACEMENT PARTS.
CAUTION:
To reduce the risk of fire and electric shock:
a) Use only the power supply that was provided with this product.Using a different adapter will damage the lights and may cause
fire, or electrical shock hazards.
b) Do not install on trees having needles, leaves or branch covering of metal or materials which look like metal.
c) Do not mount or support strings in a manner that can cut or damage wire insulation.
Lamp Replacement
Step 1.
Unplug from power source, by pulling out the adapter itself - do not pull on the power cord.
Step 2. Lift up the lamp lock tab, and
pull the bulb and its plastic base
straight out from the lampholder.
(For reference only)
Step 3. Replace with a new
spare LED lamp (included).
Fig. D
3
REMOTE CONTROL INSTRUCTIONS
Multi Color Steady Glow
Color Wheel
Faster Light Effect For
Preset Motion
Slower Light Effect For
Preset Motion
Previous Preset Motion Effect
Tap or to select from the
10 preset motion effects:
• Warm White Twinkle
• Color Twinkle
• Fading
• Multi Ball
• Color Switching
• Collision
• Wave
• Waterfall
• Rainbow Shower
• Rainbow
Customizable color selection
1. Slide open the battery cover.
2. Replace with a new CR2032 button cell battery with
correct polarities (+/-) as indicated.
3. Slide the battery cover closed.
In case the light motion effects keep switching to the next one every 30 seconds
and continues to cycle, this means the Demo mode is on.
To cancel the Demo mode, simply press and hold the (Brightness Down) button
and the (Slower Speed) button together for 10 seconds.
Battery Replacement
NOTE:
ON/OFF
Warm White Steady Glow
Brightness Up
Next Preset Motion Effect
Brightness Down
Remove insulation
tab before use.
Battery Cover
WARNING
1. Small parts, keep away from children.
2. Do not expose the product to moisture.
3. Remove batteries when not used for an extended period of time,
or when depleted.
4. Dispose of used batteries properly, and local laws and
regulations regarding the disposal of hazardous waste.
5. Use only CR2032 batteries for the remote controller.
6. Clean the battery contact surfaces gently prior to battery installation.
7. Do not dispose of batteries in fire. Batteries may explode or leak.
8. This product is powered by a lithium battery. Due to their small size,
lithium batteries can easily be swallowed by children. Ingestion of
such batteries has been known to cause death.
9. This is a lithium battery which if swallowed has been known to cause death.
WARNING: This product may potentially trigger seizures for people with photosensitive epilepsy when using the motion
effect light modes.
Tap to display all lights in
multi color steady glow
Tap to display all lights in
warm white steady glow

This manual suits for next models

1

Other Polygroup Artificial Pine Tree manuals
Polygroup TM3000NSQM00 User manual

Polygroup

Polygroup TM3000NSQM00 User manual

Polygroup TG90P3499C00 User manual

Polygroup

Polygroup TG90P3499C00 User manual

Polygroup TG7000MZAC00 User manual

Polygroup

Polygroup TG7000MZAC00 User manual

Polygroup TG76M6010X00 User manual

Polygroup

Polygroup TG76M6010X00 User manual

Polygroup Home Heritage TG90M3W92D00 User manual

Polygroup

Polygroup Home Heritage TG90M3W92D00 User manual

Polygroup C21 User manual

Polygroup

Polygroup C21 User manual

Polygroup TGC0P3499C11 User manual

Polygroup

Polygroup TGC0P3499C11 User manual

Polygroup TG50P3D94L00 User manual

Polygroup

Polygroup TG50P3D94L00 User manual
Polygroup TG76M3G06C00 User manual

Polygroup

Polygroup TG76M3G06C00 User manual

Polygroup TGC0M3L21C01 User manual

Polygroup

Polygroup TGC0M3L21C01 User manual

Polygroup H208532 User manual

Polygroup

Polygroup H208532 User manual

Polygroup TG66M3ABAD00 User manual

Polygroup

Polygroup TG66M3ABAD00 User manual

Polygroup TG70M2Y43L02 User manual

Polygroup

Polygroup TG70M2Y43L02 User manual

Polygroup TGA0M4865L00 User manual

Polygroup

Polygroup TGA0M4865L00 User manual

Polygroup Home Heritage TG80P2763D00 User manual

Polygroup

Polygroup Home Heritage TG80P2763D00 User manual

Polygroup TG7600NVQC03 User manual

Polygroup

Polygroup TG7600NVQC03 User manual

Polygroup TG46M4E28D00 User manual

Polygroup

Polygroup TG46M4E28D00 User manual

Polygroup TG76P4B16P02 User manual

Polygroup

Polygroup TG76P4B16P02 User manual

Polygroup Home Heritage TG70M3W92D00 User manual

Polygroup

Polygroup Home Heritage TG70M3W92D00 User manual

Polygroup TV66M2U56C00 User manual

Polygroup

Polygroup TV66M2U56C00 User manual

Polygroup TV40M4F63C03 User manual

Polygroup

Polygroup TV40M4F63C03 User manual

Polygroup Home Heritage TG70CH119P00 User manual

Polygroup

Polygroup Home Heritage TG70CH119P00 User manual

Polygroup TG70CN207C07 User manual

Polygroup

Polygroup TG70CN207C07 User manual

Polygroup TGC0M4907L02 User manual

Polygroup

Polygroup TGC0M4907L02 User manual

Popular Artificial Pine Tree manuals by other brands
GE Holiday Classics Flocked Laurel Pine 22003 Assembly instructions

GE

GE Holiday Classics Flocked Laurel Pine 22003 Assembly instructions

Costway CM23492 user manual

Costway

Costway CM23492 user manual

Mon Sapin Woody MSW2000 quick start guide

Mon Sapin Woody

Mon Sapin Woody MSW2000 quick start guide

Home Accents Holiday TG66M3W89D13 quick start guide

Home Accents Holiday

Home Accents Holiday TG66M3W89D13 quick start guide

EKVIP 021651 operating instructions

EKVIP

EKVIP 021651 operating instructions

Home Accents Holiday TV66M3ACDC08 quick start guide

Home Accents Holiday

Home Accents Holiday TV66M3ACDC08 quick start guide

GE Brown Winterberry 23651 Use & care guide

GE

GE Brown Winterberry 23651 Use & care guide

Home Accents Holiday TY207-1614-2 Use and care guide

Home Accents Holiday

Home Accents Holiday TY207-1614-2 Use and care guide

Polytree TG76P4371C01 Assembly instructions

Polytree

Polytree TG76P4371C01 Assembly instructions

Home Accents Holiday 1001 539 383 quick start guide

Home Accents Holiday

Home Accents Holiday 1001 539 383 quick start guide

CASARIA 104006 instructions

CASARIA

CASARIA 104006 instructions

Home Accents Holiday TG76P4969L07 manual

Home Accents Holiday

Home Accents Holiday TG76P4969L07 manual

Home Decorators Collection TG90P4B33L06 quick start guide

Home Decorators Collection

Home Decorators Collection TG90P4B33L06 quick start guide

NOMA CTI1515594 instruction manual

NOMA

NOMA CTI1515594 instruction manual

Home Accents Holiday 691824 manual

Home Accents Holiday

Home Accents Holiday 691824 manual

Home Accents Holiday 1004363934 Package Contents

Home Accents Holiday

Home Accents Holiday 1004363934 Package Contents

Mr. Christmas Alexa 68329 instruction manual

Mr. Christmas

Mr. Christmas Alexa 68329 instruction manual

Home Accents Holiday TG70M3BDSL00 quick guide

Home Accents Holiday

Home Accents Holiday TG70M3BDSL00 quick guide

manuals.online logo
manuals.online logoBrands
  • About & Mission
  • Contact us
  • Privacy Policy
  • Terms and Conditions

Copyright 2025 Manuals.Online. All Rights Reserved.