DESCRIPTION AND FEATURES
Your PondMAX pump has been
manufactured with advanced technology to
provide you with the best quality pump for
your hydroponic, aquaponic or aquarium
setup.
• PondMAX pumps are suitable for use in
many dierent applications including;
fountains, water features, small ponds and
hydroponics.
• Your PondMAX pump has a single moving
part (an impellor set) therefore enabling
easy cleaning
and maintenance.
• The motor and electrical components are
encapsulated in epoxy resin, ensuring safe
operation under water.
INSTALLATION
1. If required, have a qualified electrician
install weather proof power point near
to the pond or waterfeature, (within the
cable length of the pump).
2. Place the pump in desired location, ensure
the pump is on a stable surface that is
free of sludge, sand and other debris and
connect tubing to the outlet or attach
fountain kit.
3. Ensure pump is submerged then plug in
power cord and switch on.
MAINTENANCE
Disconnect power cord from the power
supply before performing maintenance.
Never lift the pump by the power cord. The
only serviceable item is the impellor set.
The motor unit of the pump is encapsulated
with epoxy resin and does not need
lubrication.
All PondMAX submersible pumps are
water cooled; if pump becomes restricted
it will overheat and could cause permanent
damage. Ensure pump does not become
blocked or restricted.
The power cord cannot be replaced,
if the cord is damaged, the pump must
be discarded.
The impellor set is a wearing consumable
part. Regular inspections, cleaning and
maintenance of impellor is necessary to
ensure longer impellor life.
If the impellor set becomes worn or
damaged it should be replaced (available
from your dealer or special orders). Failure
to do so may cause serious damage to
pump.
1. Disconnect the power cord from the power
supply before performing maintenance.
2. Remove the pump from water, detach
tubing/ fountain kit and remove front cage
from pump.
3. Remove the impellor locking ring/ cover
by either turning anti-clockwise and
pulling out.
4.Gently remove the impellor and shaft, use
long nose pliers if needed. Take care not to
break ceramic shaft (if applicable) because
they are brittle.
5. Clean impellor, checking for any signs of
wear or damage.
6.Reinstall the shaft, and then carefully slide
the impellor onto the shaft. The impellor
will pull itself in by magnetic force, this
is normal. (Take care not to pinch your
fingers).
7. Replace the impellor cover making sure
the shaft is located properly on the
impellor cover.
8.Replace the front cage.
9.Re-attach tubing/fountain kit, submerse in
water, connect to power supply and turn
on.
HP550 HP850 HP1100
MAXIMUM FLOW (L/H) 550 850 1200
MAXIMUM HEAD HEIGHT (m) 0.95 1.50 1.90
RECOMMENDED OPERATING HEIGHT (m) 0.60 1.00 1.30
POWER (W)* 10 14 24
VOLTAGE (V) 220 - 240 220 - 240 220 - 240
OUTLET Ø (mm) 12 12 19
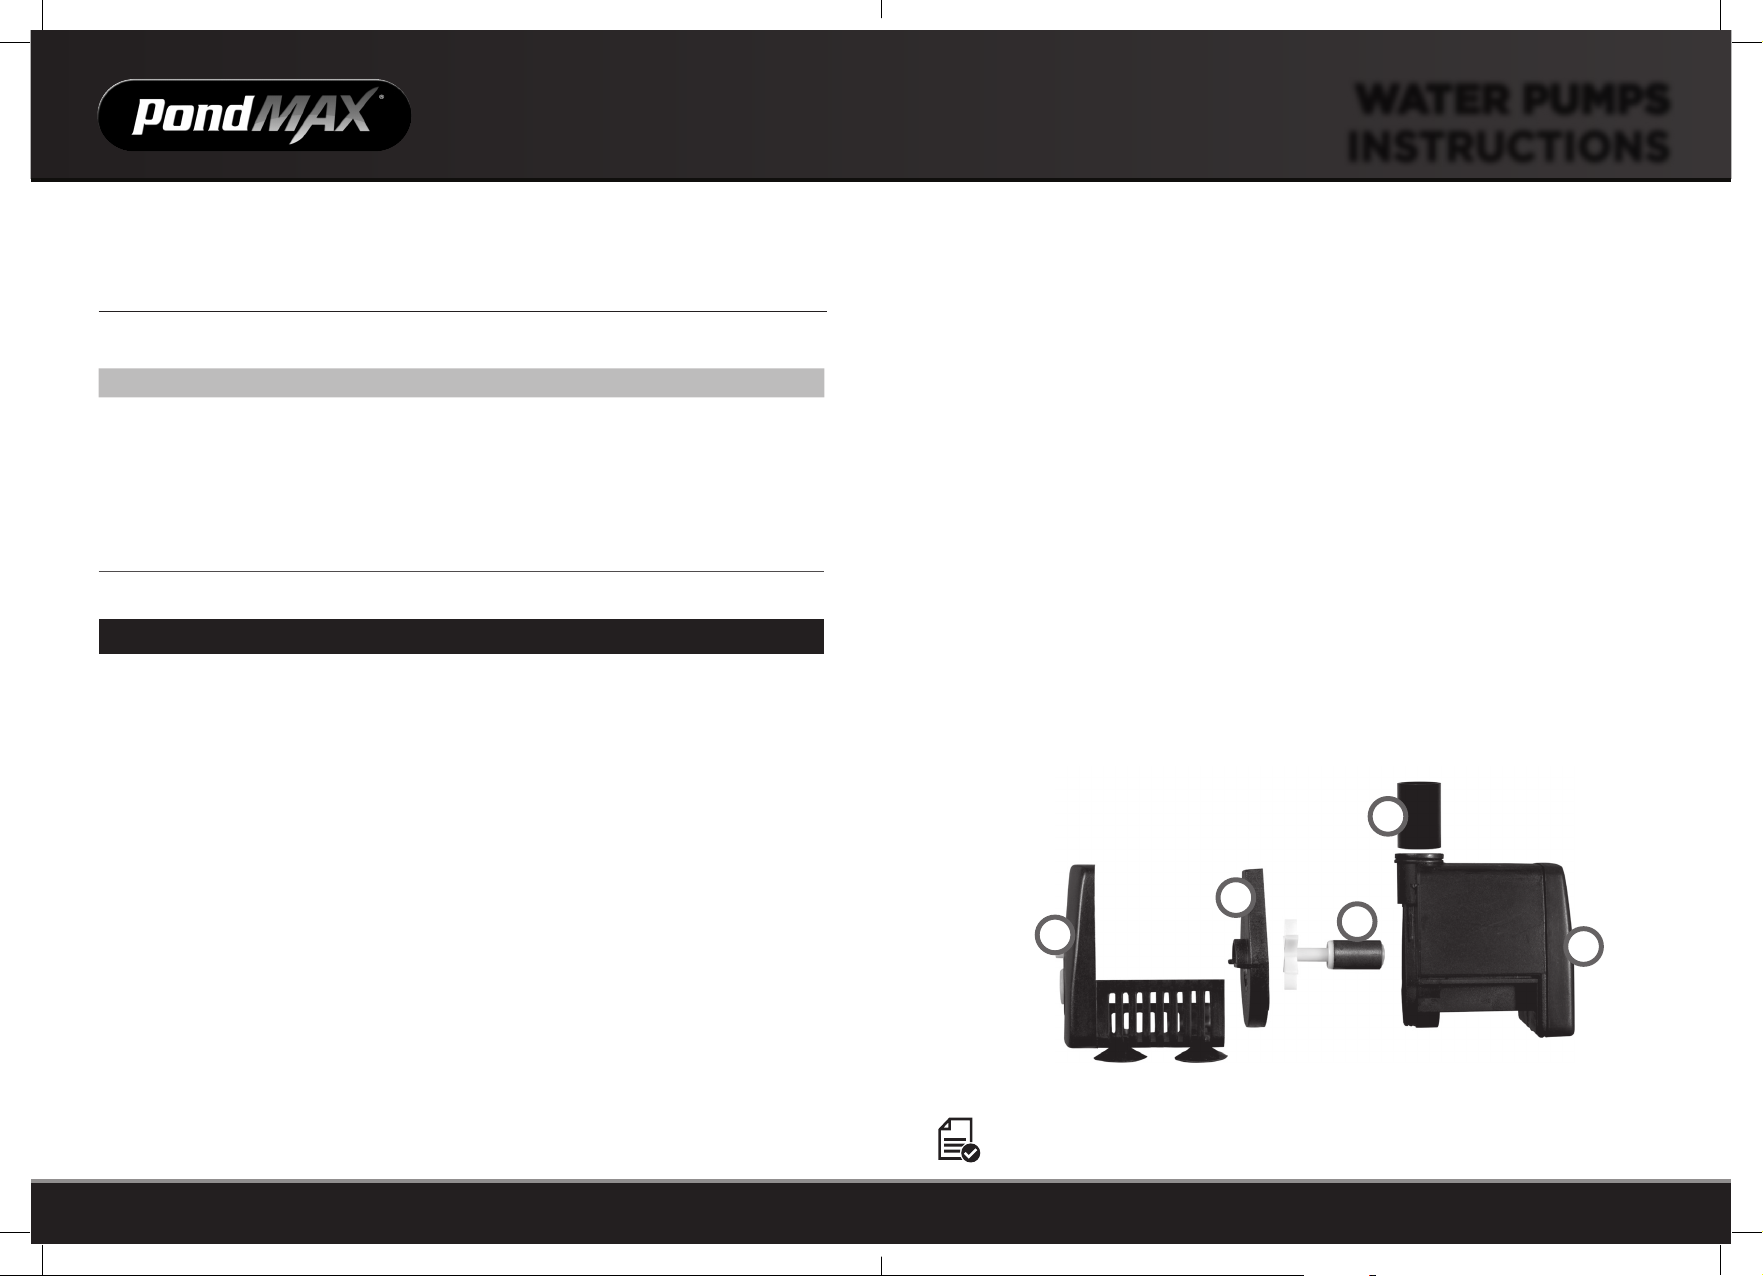
1Front Cover
2Impellor Cover
3Impellor
4Hose Connector
5Motor Body
HP550 Model shown. Picture
for illustration purposes only.
* Subject to variation according to load.
Before using your pump, please read the following instructions carefully.
Operation Steps
CONGRATULATIONS ON YOUR PURCHASE OF THIS
PRODUCT BY PONDMAX, FOR GARDENS THAT GO
THE EXTRA YARD.
PONDMAX.COM.AUPONDMAX.COM.AU
WATER PUMPS
INSTRUCTIONS
NOTE: Parts and features dier from model to model. All images used are for illustrative purposes only. Not all features depicted
apply to all models in the range and these are subject to change.
IMPORTANT
These accessories and attachments are recommended for use with your PondMAX product specified in this manual. The use of any other accessories or attachments
might present a risk of injury to persons. Only use the accessory or attachment for its stated purpose.
1
2
3
4
5
PMAX Hydro Water Pump Instructions.indd 3-4PMAX Hydro Water Pump Instructions.indd 3-4 20/12/2021 1:50 pm20/12/2021 1:50 pm


