Poolguard PGRM - 2 Instruction Manual

OPERATING INSTRUCTIONS MANUAL
English • Español • Français
IMPORTANT
HELPFUL HINTS & TIPS
This product has been designed to aid in the detection of unwanted intrusions into
unsupervised pools. POOLGUARD IS A SAFETY ALARM SYSTEM AND NOT A
LIFE SAVING DEVICE. “This device is not intended to replace any other safety
consideration - i.e., adult supervision, lifeguards, fences, gates, pool covers, locks, etc.,
and some devices may not detect gradual entry.”
85dB Horn at 10 Feet
MEETS ASTM SAFETY STANDARD FOR POOL ALARMS
MODEL PGRM - 2

2
GENERAL
POOLGUARD is the result of quality design and manufacturing techniques that are a standard at
PBM Industries, Inc.; a company dedicated to high quality products. POOLGUARD is a result of that
dedication and we guarantee and stand behind the POOLGUARD alarm system. POOLGUARD pool
alarms are verified by ETL to the ASTM safety and performance standard for pool alarms, ASTM
F2208. POOLGUARD is an electronic monitoring system that automatically sounds an alarm when
children or pets fall into your unsupervised pool. POOLGUARD pool alarms are designed to detect
intrusions similar to a one year old child weighing 18 pounds and up. POOLGUARD is a portable,
self-contained, lightweight unit that is safe and simple to operate. Entry into the pool will be detected
by the unit’s electronic sensor, triggering a loud pulsating alarm and an internal RF transmitter. The
remote receiver will receive the transmitted signal and sound an alarm within the home.
INSPECTION
POOLGUARD is packaged in a shipping carton that minimizes the chance of damage due to han-
dling. Check for damage and confirm that the contents of the carton include the following items:
• POOLGUARD Unit
• Handle
• Remote Receiver and Power Supply
• Operating Instructions Manual
• Warranty and Registration Card
If an item is missing, contact either the place of purchase or PBM Industries, Inc. for replacement.
CARE AND HANDLING
POOLGUARD is constructed from sturdy plastic to withstand the adverse moisture environment of a
swimming pool. Care needs to be taken when handling to ensure against being dropped,
kicked, etc. Also, be sure to remove the pool unit and set it away from activity in the upright
position when the pool is being used. (See Figure 1)
If the pool unit accidentally falls into your pool, remove it immediately and drain the water from it.
Take the unit apart as indicated in the Battery Replacement Procedure and remove the battery. Tip
and shake unit and remove all excess water from inside the unit and the battery, and the circuit
board area with a paper towel or cloth. Completely test unit before each use as described in manual
to ensure proper operation. (Remember to always remove the pool unit from the pool while
swimming and set it aside away from pool activity).
ATTACHING HANDLE
The two handle screws are located in the top of the alarm, remove them and attach the handle,
(See Figure 1)
INSTALLING YOUR ALARM
RESET/SLEEP SWITCH (SEE FIGURE 1)
RESET: When the pool unit is installed in the pool and the horn is sounding; press the reset/sleep
switch once to silence the alarm.
SLEEP MODE: When the pool unit is removed from the pool and the horn is sounding; press and
hold the reset/sleep switch for 3 seconds to silence the alarm. The pool unit will automatically wake
up when it is installed into the pool. THE POOL UNIT WILL NOT GO INTO SLEEP MODE ONCE IT
IS INSTALLED IN THE POOL!

3
SILENT INSTALLATION AND REMOVAL FEATURE
• The poolguard system will sound an alarm (Horn will sound) when you install or remove the pool unit
from your pool. If you would like the poolguard system not to sound an alarm (horn will not sound)
when you install or remove the pool unit from your pool, follow the directions below.
1.SILENT INSTALLATION (HORN WILL NOT SOUND)
• Press and hold the reset/sleep switch for 3 seconds, until you hear the pool units horn chirp. Release
the reset/sleep switch, you now have 15 seconds to gently install the pool unit into your pool without
the horn sounding. Note: This feature allows the pool unit’s sensor to move one time without the
alarm sounding. If the pool unit is not installed gently the alarm may sound.
POOLGUARD WILL INSTANTLY BE MONITORING YOUR POOL FOR AN INTRUSION.
2. SILENT REMOVAL (HORN WILL NOT SOUND)
• Before removing the pool unit from your pool. Press and hold the reset/sleep switch for 3 seconds,
until you hear the pool units horn chirp. Release the reset/sleep switch, you now have 5 seconds to
remove the pool unit from your pool without the horn sounding. IMPORTANT: THIS DOES NOT TURN
POOLGUARD OFF, IF THE POOL UNIT IS NOT REMOVED IT WILL CONTINUE TO MONITOR
YOUR POOL FOR AN INTRUSION.
3. POOLGUARD HAS DESIGNED THIS FEATURE FOR “ONLY”THOSE WHO HAVE THE
RESPONSIBILITY OF INSTALLING OR REMOVING THE ALARM FROM YOUR POOL!
BATTERY INSTALLATION / REPLACEMENT
(Battery not included)
POOLGUARD is powered by a standard 9 -volt alkaline battery. To install or replace the battery:
• Remove the screw from the bottom of the unit, refer to Figure 1.
• Carefully slide out electronics assembly; do not pull or jerk on internal hook up cable. (If necessary,
gently shake unit to remove assembly.)
• Remove old battery and check for leakage or corrosion. (Remove any leakage or corrosion if present
before installing new battery.)
• IMPORTANT: WHEN A 9V BATTERY IS FIRST INSTALLED IN THE POOL UNIT, THE HORN WILL
SOUND. TO SILENCE THE ALARM PRESS AND HOLD THE RESET/SLEEP SWITCH FOR 3
SECONDS. THIS PLACES THE POOL UNIT IN SLEEP MODE. THE POOL UNIT WILL
AUTOMATICALLY WAKE UP WHEN IT IS INSTALLED INTO THE POOL.
• Install new battery by attaching snap connection and sliding into battery holder.
• Slide electronics assembly into pool unit (Refer to Figure 1 to make sure the electronic assembly is
installed correctly); do not pinch internal hookup cable.
• Replace the screw, hand tighten until screw is all the way in and flush against the pool unit.
To prevent possible damage, battery should be removed whenever storing the alarm, for an extended
period of time.
LOW BATTERY FUNCTION
The POOL UNIT AND THE REMOTE RECEIVER will beep once approximately every 20 seconds to
alert you that the battery is low in the pool unit and needs to be replaced.

PLACEMENT IN YOUR POOL
Figure 2 illustrates locations best suited for detecting intrusions
from any area of the pool. If your pool is larger than 800 square
feet, if you have more than 2 return lines, any concerns about the size, or if you have an irregular
shaped pool, please call customer service to clarify the recommended number of alarms and loca-
tions for alarms: 1-800-242-7163. Poolguard pool alarms have been tested and certified by ETL, to
the ASTM Standard Specifications for Pool Alarms (F2208), in a 16’ X 32’ pool. POOLGUARD alarms
can be used in pools up to 20’x40’ or 800 square feet.
FIGURE 2
Pools 800 Square Feet and Smaller.
POOLGUARD automatically compensates for variations in pool levels within the unit’s operating
range. The unit utilizes a sensing throat which projects into the water and is designed to operate in
most pools with an in-wall skimmer. The sensing throat cannot be less than 2 inches, (See Figure 3),
and not more than 7 inches into the water, POOLGUARD recommends that the sensing throat be
approximately 4” in the water POOLGUARD can be used with SOLAR BLANKETS on the pool.
POOLGUARD can also be used in spas.
SENSING THROAT CANNOT BE LESS
THAN 2” IN THE WATER,POOLGUARD
RECOMMENDS THAT THE SENSING
THROAT BE APPROXIMATELY 4” IN
THE WATER
4

5
IMPORTANT
POOLGUARD may not function properly if your pool’s water level is not maintained within the
required levels of your alarm. Also, the unit may not operate effectively while certain types of
automatic pool cleaners are in operation.
Some irregular shaped decks may not provide a level foundation for the unit by the pool’s edge.
This minor problem can be overcome by appropriately supporting the unit (See Figure 3).
STABILIZING YOUR POOL ALARM
The Alarm Stabilizing Pin (ASP) is factory installed onto your pool alarm. Tools needed to install your
alarm are: One 5/16” masonry drill bit that can be found at your local hardware store, a drill, a pencil,
a tape measure or yard stick.
1. Position your pool alarm so that the sensing throat is in the water and the ASP is touching the
deck, (Be sure to leave a small space between the sensing throat and the edge of your deck),
Refer to Figure 4.
2. Mark with a pencil the spot where you wish to drill the hole for the ASP.
3. With the 5/16” masonry drill bit, drill a hole 2 1/4” inches deep, as straight as possible.
4. Clean off the debris and install the alarm by placing the ASP into the
5/16” diameter by 2 1/4” deep hole.
5.Your Pool Alarm is now ready for use. If you have any questions or need
help with installation, please give us a call at 1-800-242-7163.
6. Be sure to keep your ASP hole clean from debris and dirt so that your
alarm will always lay flat on the pool deck when installed.
REMEMBER THAT THE POOL UNIT MUST BE REMOVED FROM POOL
BEFORE SWIMMING!
Sensing throat cannot be less than 2” in the water, POOLGUARD
recommends that the sensing throat be approximately 4” in the water.

TEST BEFORE USING
To ensure effectiveness, test POOLGUARD every time you place it into the pool by performing the
following procedure:
• POOLGUARD DOES NOT HAVE AN ON/OFF SWITCH When the alarm is in the pool it is always
in the ON position and cannot be turned off. When the alarm is out of the pool it is always
in the OFF position.
• To test your alarm push an object of appropriate volume and weight off the deck edge at the
farthest location from the alarm. (A four (4) gallon jug of water or 3-one (1) gallon jugs of water tied
together are ideal for testing.) The alarm should sound when the water action caused by the
intrusion reaches the unit. It may take a few seconds for the alarm to react to the water action.
• After resetting the alarm and allowing time for the water action to settle, repeat the procedure
from another point in the pool until you are confident of detection performance.
• POOLGUARD includes a timer function which automatically resets the unit after the alarm
has sounded for approximately 5 minutes.
ADJUSTING YOUR RETURN LINE FITTINGS
The POOLGUARD unit should not be placed too close to a return line from the filter area.Water tur-
bulence may be too strong and falsely set the alarm off. If you have more than 2 return lines please
call customer service at 1-800-242-7163. It is very important in pools to adjust all the eyeball fittings
on your return lines so they will not interfere with your pool alarm. It is not necessary to point your
eyeball up for your pool to circulate properly. If the water is swirling on top of the pool this makes the
pool to turbulent for your alarm to work properly. Point the eyeball down and your pool will still circu-
late properly and allow your alarm to function properly. If you point the eyeball fitting up, your
alarm may not function properly. (See Figure 5)
FIGURE 5
CORRECT INCORRECT
6

POOLGUARD REMOTE RECEIVER
The POOLGUARD REMOTE RECEIVER has been integrated with the standard POOLGUARD unit
to provide a wireless remote alert operating at distances of up to 200 feet. The POOLGUARD
REMOTE RECEIVER sounds an alarm in the house when the POOLGUARD unit is activated at
the pool.The remote system consists of the following functional elements:
• A coded pulse receiver (Remote Receiver). Figure 6
• A standard wall outlet power supply. Figure 6
The REMOTE RECEIVER is a compact unit powered by a UL and CSA approved AC/DC power
supply, for Europe the power supply is CE approved and RoHS compliant. The REMOTE RECEIVER
can be placed on a table or a counter top inside the house. The pulse coded radio frequency signal
is transmitted from the pool unit and is received and decoded to sound the remote receiver. The
remote receiver will sound for an additional 3 seconds after the pool unit has been silenced. If
the REMOTE RECEIVER beeps once approximately every 20 seconds, it is indicating that the
9v battery in the pool unit is low and needs to be replaced. After you have purchased your
POOLGUARD alarm and you wish to add another remote receiver to your alarm system you can
acquire one from PBM Industries, Inc. Contact PBM by phone or mail or contact your place of
purchase.
FIGURE 6
POWER SUPPLY
REMOTE RECEIVER
85dB Horn at 10 feet
TO OPERATE YOUR REMOTE RECEIVER
Try to locate your REMOTE RECEIVER in a convenient part of your house close to the pool. Avoid
steel walls or any other large metal objects or obstructions that might interfere with the signal recep-
tion. The REMOTE RECEIVER has to be placed on the same level or a level above the pool in the
house (do not place receiver in an underground basement). The ideal location for your REMOTE
RECEIVER would be by a window overlooking your pool. Test your REMOTE RECEIVER in different
locations in your house to find the best working place for your receiver. Connect the power supply
and check that the red indicator light is on.Your REMOTE RECEIVER unit is now ready to receive a
transmission from your POOLGUARD unit. DO NOT USE YOUR REMOTE RECEIVER OUTDOORS.
7

SWIMMING POOL SAFETY TIPS
• Supervise children at all times.
• Never permit swimming alone. Never leave a child alone, even to answer the telephone.
• Always remove the entire solar cover from a pool before swimming.
• Remember that alcohol and water safety do not mix.
• Have your pool area fenced and the gate locked to prevent unauthorized entry to the
pool, and install a gate alarm.
• Lock and secure all doors in the house which permit easy access to the pool, and
install a door alarm.
• Have a responsible adult teach swimming and water safety to your children.
• Maintain clean, clear water in the pool.
• Do not swim during electrical storms.
• Do not permit bottles, glass, or sharp objects to be used around the pool.
• Ask your pool dealer how you can improve your pool safety – they will be glad to
assist you.
• Above all: remember that common sense, awareness, and caution will allow you
to enjoy your pool.
WARRANTY AND REPAIRS
POOLGUARD is sold with a limited warranty to cover defects in parts and workmanship for three
years from date of purchase, (retain proof of purchase). If POOLGUARD exhibits a defect, please
call Customer Service at 1-800-242-7163. Unauthorized returns will not be accepted. Proper repair
is only ensured when the unit is returned to the manufacturer.
SEND CORRESPONDENCE TO:
PBM INDUSTRIES, INC.
P.O.BOX 658, NORTH VERNON, IN 47265
1-800-242-7163
This product has been designed to aid in the detection of unwanted intrusions into unsupervised pools.
POOLGUARD IS A SAFETY ALARM SYSTEM AND NOT A LIFE SAVING DEVICE. “This device is not intended
to replace any other safety consideration - i.e., adult supervision, lifeguards, fences, gates, pool covers, locks, etc.,
and some devices may not detect gradual entry.”
REV. 3/2006
8

HELPFUL HINTS AND TROUBLESHOOTING
FALSE ALARMS
All pool alarms will false alarm on occasion for different reasons. False alarms can be minimized;
however, it is important to remember that a false alarm is better than no alarm at all. WEATHER &
WIND––POOLGUARD sets stationary on the deck of the pool so the wind will not effect the alarm
unit itself.Wind may trigger a false alarm if it is strong enough or steady enough that it causes the
water in the pool to rock or bounce up and down the pool wall. When the water in the pool moves up
and down the POOLGUARD sensing throat, it may finally cause the alarm to sound. On extremely
windy days when the pool water is rocking it is advised to remove the POOLGUARD from the pool.
Light wind or rain will not effect the POOLGUARD alarm.
Another false alarm occurs when the pool owner tries to install the alarm too soon after swimming.
After swimming, the water in the pool will rock or bounce up and down the pool wall for some time
depending on the size of the pool and the type of swimming activity. Before installing the alarm,
after swimming, the pool must be given time to calm. Time will vary (around 10 to 30 minutes);
once the pool owner sees that the pool water is no longer rocking up and down the pool wall, it is
time to install the alarm.
Certain automatic cleaners may set the POOLGUARD unit off in some cases. If the cleaner head
or the cleaner hose hits the POOLGUARD alarm it may cause it to false alarm. Solutions to this
problem are to use your cleaner at night and your alarm during the day. Another option would be
to find a place around the pool where the cleaner does not interfere with the alarm.
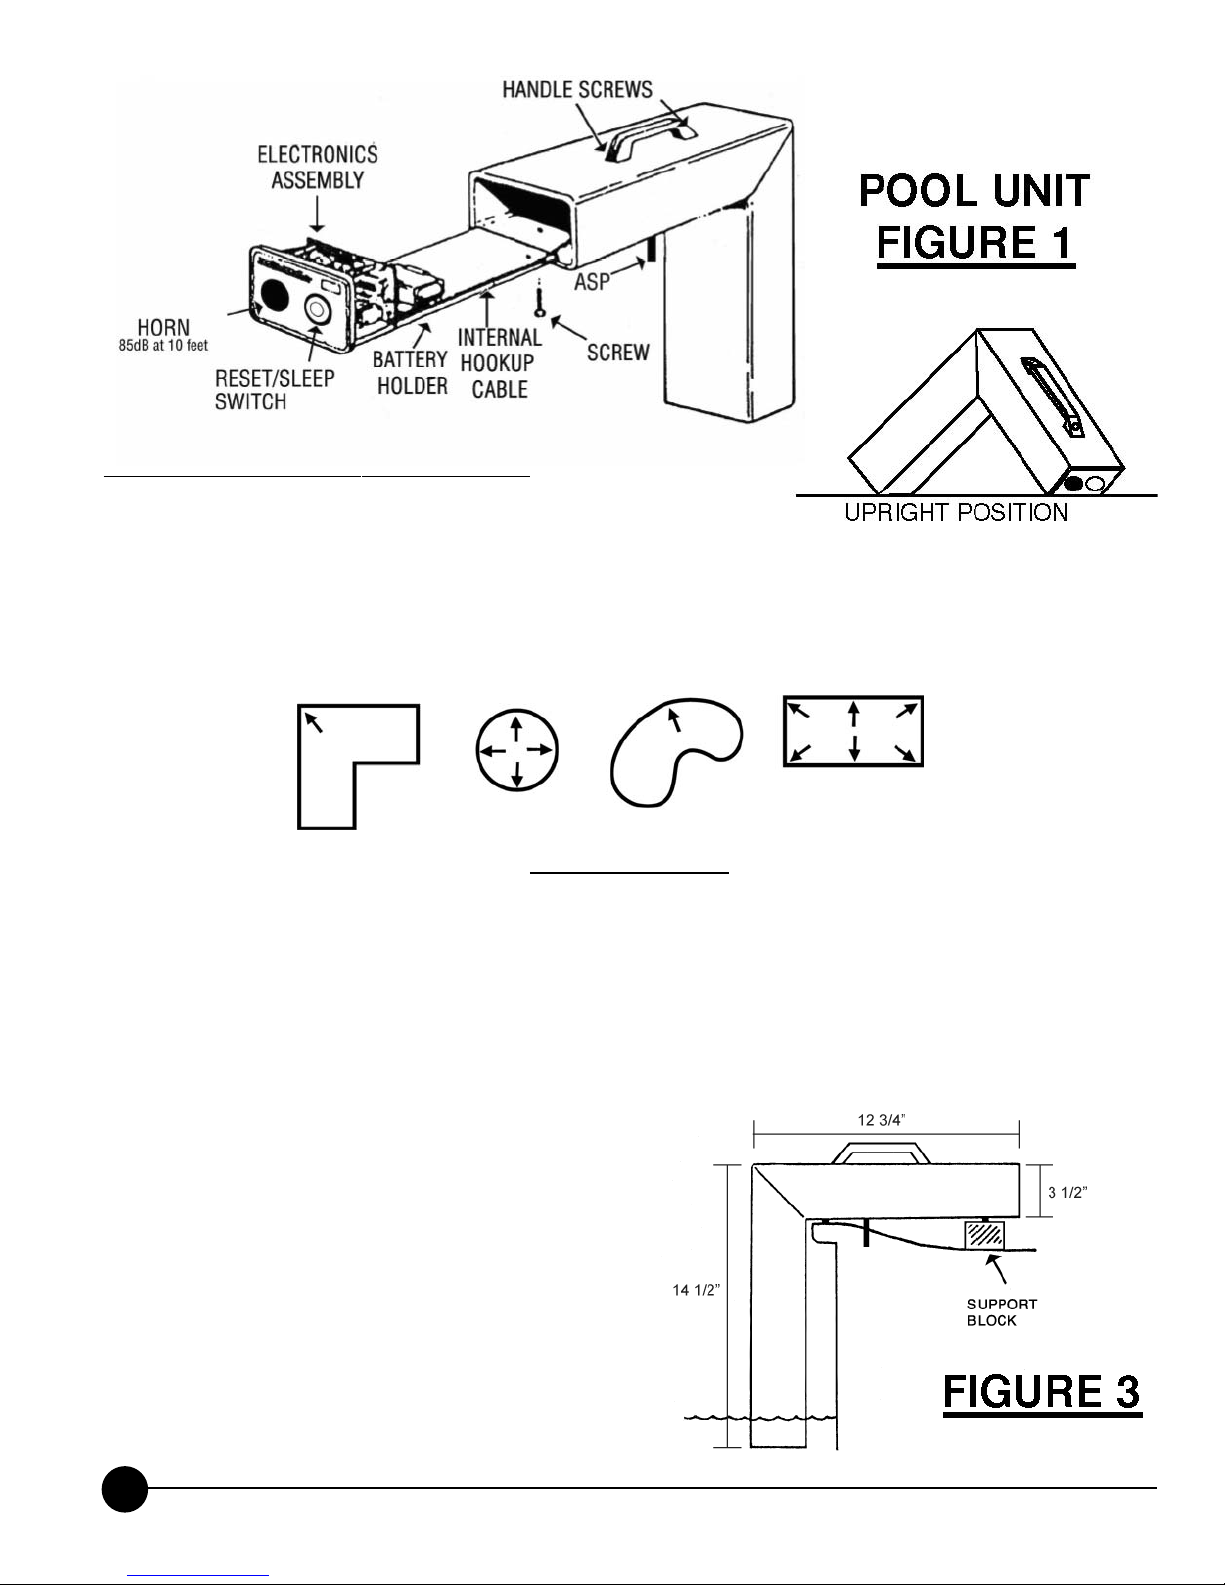
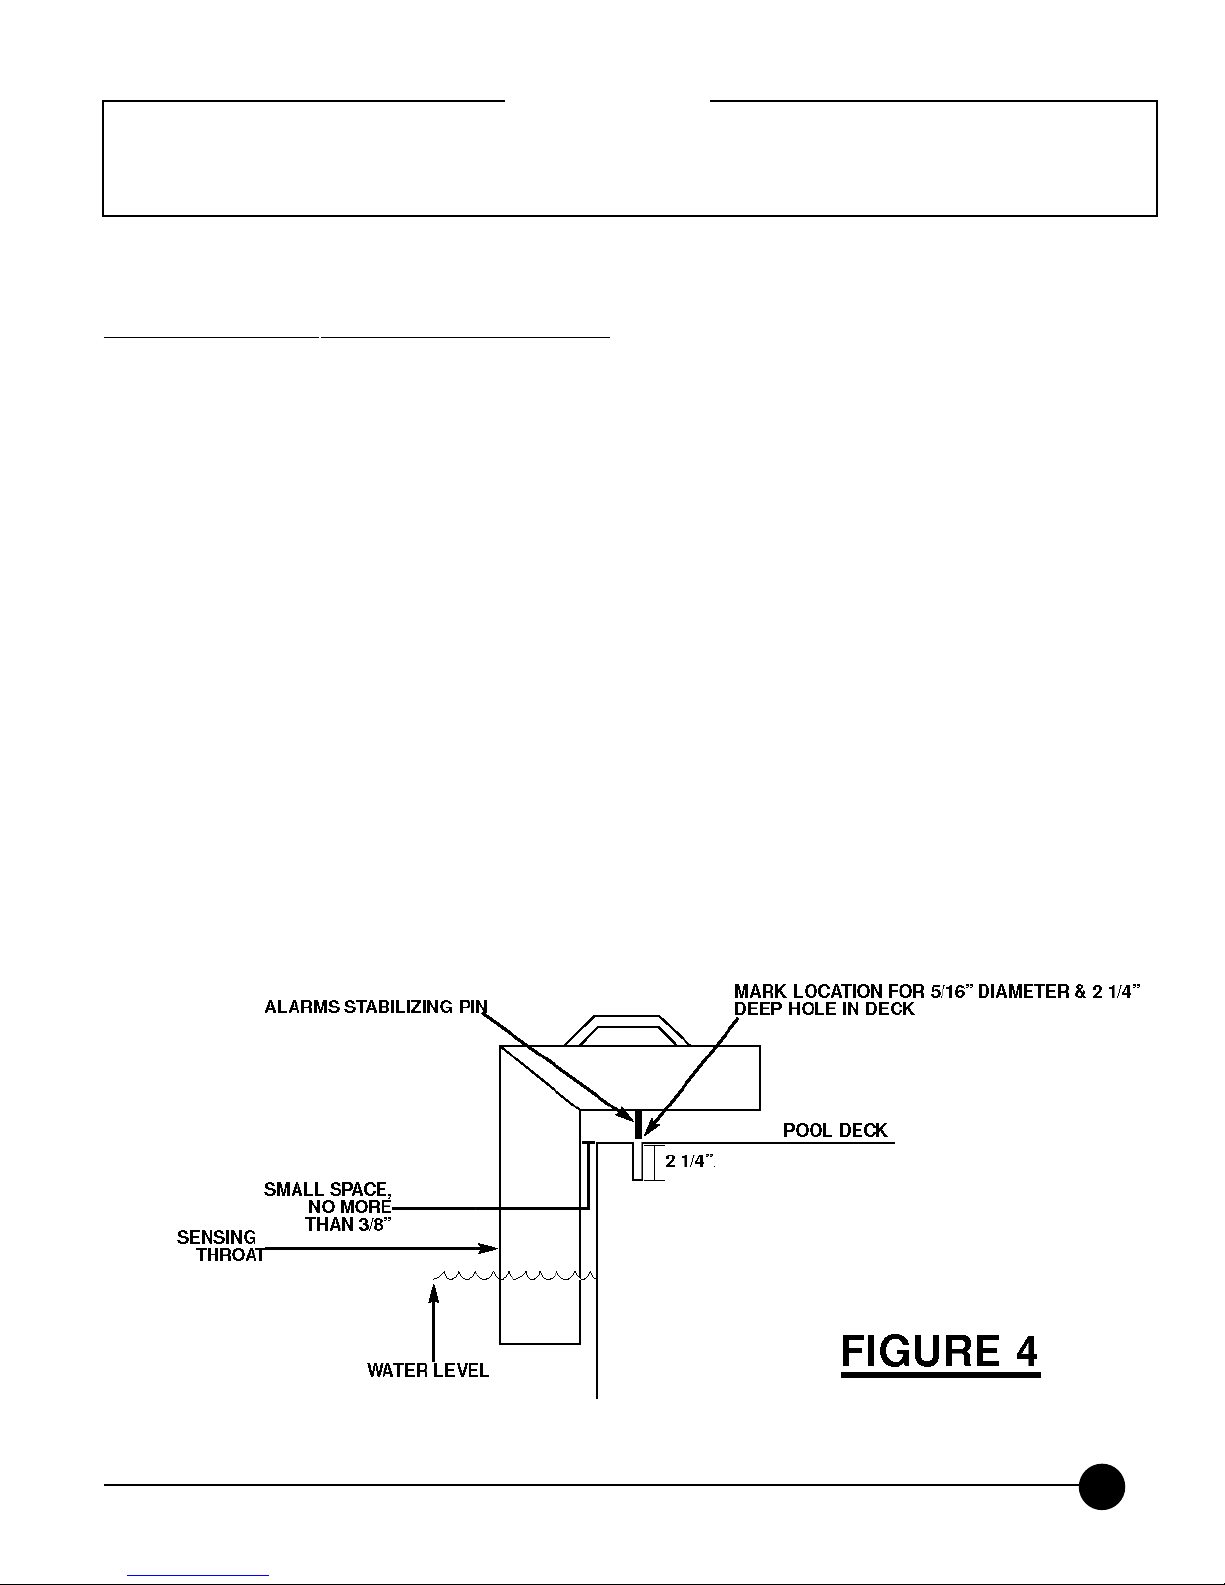
ALARM PLACEMENT
The alarm should be on a flat, solid surface for best results. The throat of the unit is designed to
work in most pools with an in-wall skimmer. The water level up on the throat is important and should
be checked. The sensing throat cannot be less than 2 inches in the water, and not more than 7 inch-
es into the water. POOLGUARD recommends that the sensing throat be approximately 4 inches in
the water. POOLGUARD can be used with a solar cover; however, before removing the cover, the
alarm should be taken out so it does not get pulled into the pool.
ALARM TESTING
Drop something of approximate size, weight and volume of the family’s smallest child, the farthest
point away from the alarm. A four (4) gallon jug of water or 3 one (1) gallon jugs of water tied togeth-
er are ideal for testing. Remember, when testing you must wait about 15 minutes between
tests for the pool to calm.
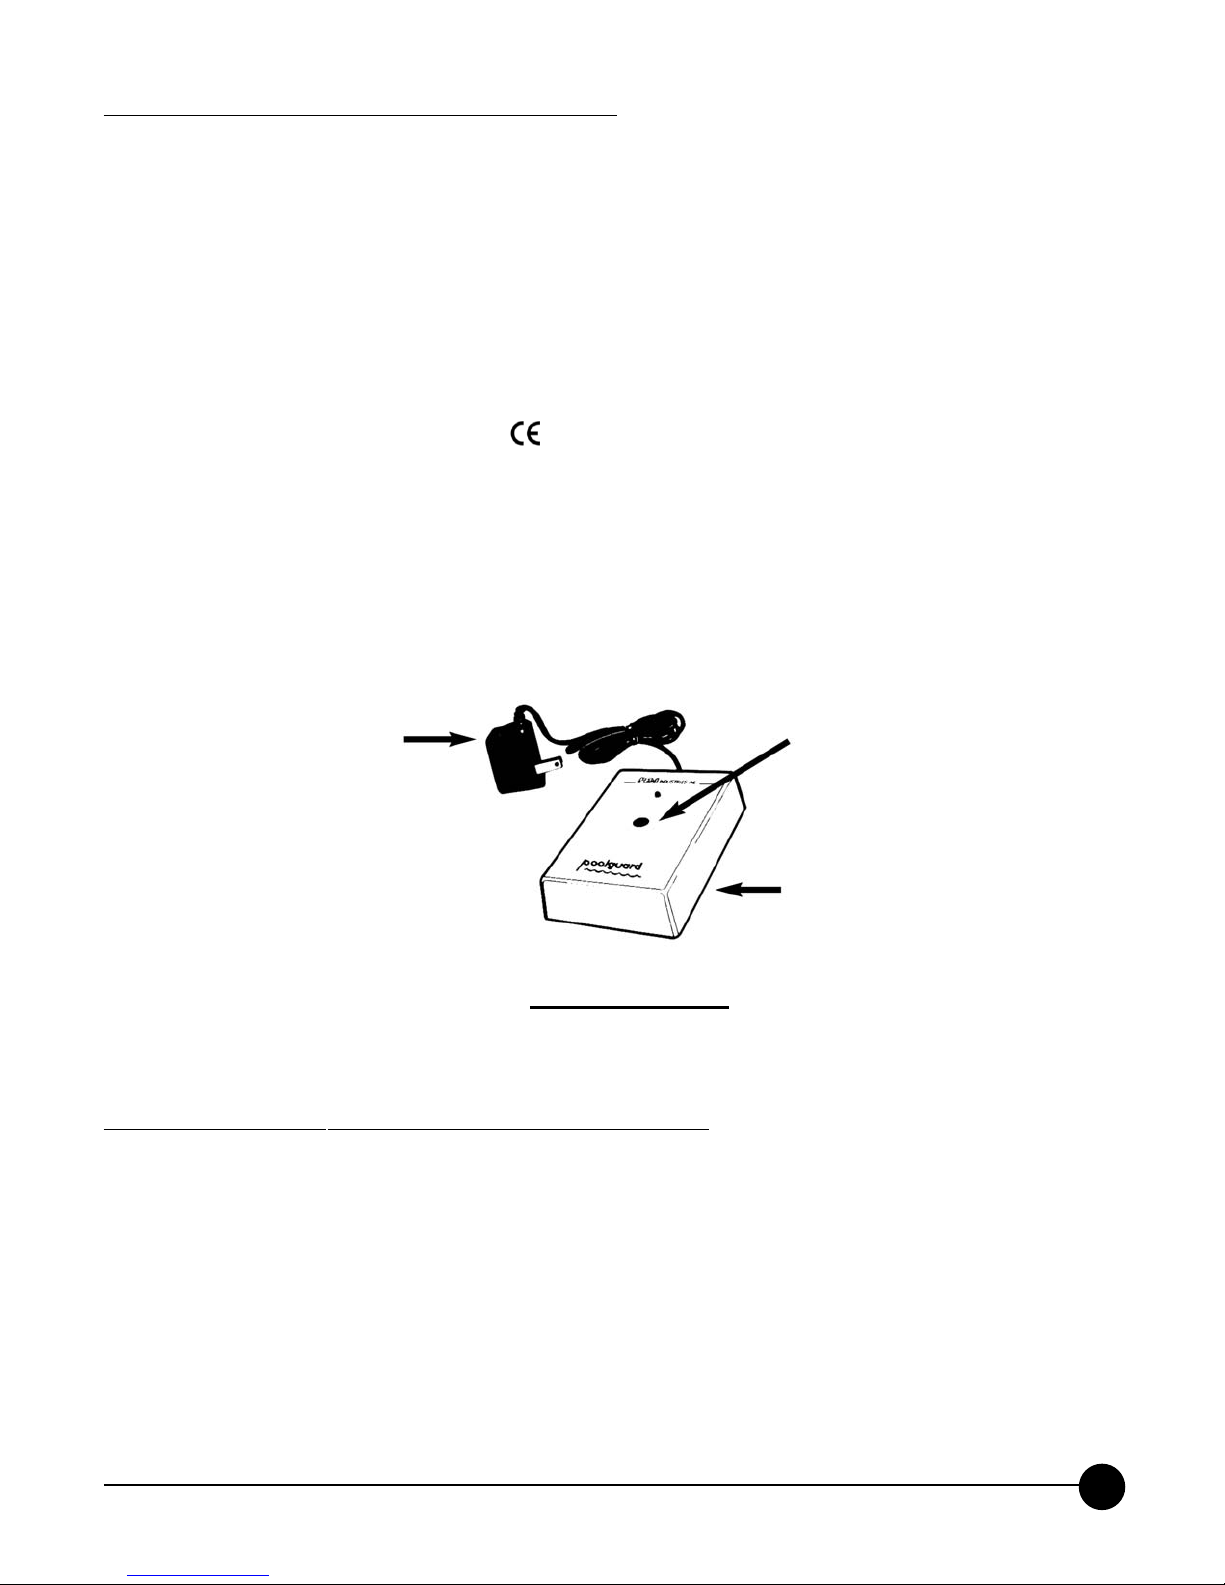
ALARM WILL NOT SOUND
Be sure that a 9 volt battery has been installed properly. If you are testing and POOLGUARD does
not alarm, be sure you are testing properly – putting your feet in the pool, splashing with your hands,
making waves with a leaf skimmer, or dropping something into the pool that does not have the prop-
er size, weight and volume will not set the POOLGUARD alarm off! Testing is very important and
should be done correctly.
9

CARE AND HANDLING
POOLGUARD is made of sturdy, rigid vinyl PVC - UV rated. Because the alarm is electronic and
mechanical great care should be taken not to drop the unit; like any other appliance, it may break.
Sun and rain will not hurt the alarm. POOLGUARD is weatherproof but not waterproof. Great care
should be taken not to knock the alarm into the pool. If the alarm goes into the pool there are direc-
tions in the manual on how to dry it out, but more than likely it will have to be returned to the factory
for service. Always remember to remove the alarm before using the pool.
REMOTE RECEIVER
When the unit at the pool alarms, the remote receiver will sound. Maximum Range for the remote
is 200 feet from the poolside unit. Avoid placing remote in basements or close to metal walls. Be
sure that the red light on the remote is on. Remember the poolside unit must be beeping (alarming)
for the remote to work.
If your remote receiver is not getting a clear signal or no signal from the poolside unit, try the follow-
ing: Before plugging in the power supply, be sure to stretch out the cord; do not leave it tied in a
bow as packaged. When you first plug in the remote it will give one short loud beep then stop.
Your Remote Receiver is similar to a small portable radio. If your remote is not sounding when the
poolside unit is sounding–move the remote to different locations and stand back for a few seconds
for the remote to pick up the signal.You may only have to move your remote a little to the left or right
to bring in the signal–in some cases you might have to move the remote to a different location or
another room. If you cannot get a signal on your remote receiver CALL CUSTOMER SERVICE AT
1-800-242-7163
• DO read the manual carefully
• DO install a 9 volt battery
• DO untie the bow on the power supply
• DO test the alarm properly
• DO carry your alarm by the handle
• DO remove alarm before swimming
• DO hold on to your red customer service card
with our 800 service number
• DON’T leave alarm in pool while swimming
• DON’T drop your alarm, it may break
• DON’T knock or let your alarm fall into the pool
• DON’T install your alarm immediately after swimming
• DON’T use your alarm on extremely windy days
QUICK DO’S AND DON’TS
10

MANUAL DE INSTRUCCIONES PARA EL
FUNCIONAMIENTO
IMPORTANTE
CONSEJOS Y SUGERENCIAS ÚTILES
Este producto ha sido diseñado para permitir la detección de intrusiones indeseadas
en las piscinas sin supervisión. POOLGUARD ES UN SISTEMA DE ALARMA DE
SEGURIDAD Y NO UN DISPOSITIVO SALVAVIDAS. "Este dispositivo no fue diseñado
con la intención de reemplazar ningún otro método de seguridad, por ej.: supervisión
por parte de un adulto, salvavidas, cercas, rejas, cubiertas para piscinas, cerraduras,
etc., y puede que algunos dispositivos no detecten una entrada gradual."
Bocina de 85dB a 3,04 m.
CUMPLE LAS NORMAS DE SEGURIDAD DE ASTM (SOCIEDAD
ESTADOUNIDENSE DE PRUEBAS Y MATERIALES) RELATIVAS A LAS
ALARMAS PARA PISCINAS
MODELO PGRM-2E
CUMPLE LA
NORMA F2208 DE
ASTM

12
GENERAL
POOLGUARD es el resultado del diseño de calidad y de las técnicas de fabricación estándares de
PBM Industries, Inc.; una compañía dedicada a ofrecer productos de gran calidad. POOLGUARD es
el resultado de dicha dedicación y garantizamos y suscribimos el sistema de alarma POOLGUARD.
Las alarmas para piscina POOLGUARD son inspeccionadas por el laboratorio de pruebas ETL para
el cumplimiento de la norma de seguridad y funcionamiento F2208 de ASTM para alarmas de pisci-
nas.POOLGUARD es un sistema de control electrónico que suena automáticamente cuando cae a
la piscina un niño o una mascota en una piscina sin supervisión. Las alarmas para piscina POOL-
GUARD son diseñados para detectar intrusiones parecidas a un niño de un año que pesa 18 libras.
POOLGUARD es una unidad portátil, autónoma y ligera fácil y segura de manejar. El acceso a la
piscina es detectado por el sensor electrónico de la unidad, el cual dispara una alarma con sonido
alto e intermitente y transmisor interno de RF. El receptor remoto recibirá la señal transmitida y hará
sonar la alarma dentro del hogar.
INSPECCIÓN
POOLGUARD viene embalada en una caja de cartón para envío que reduce las posibilidades de
daños durante su manipulación. Revise que no haya daños y confirme que el contenido de la caja
incluya los siguientes artículos:
• Unidad POOLGUARD
• Asa
• Receptor remoto y suministro de corriente
• Manual de instrucciones para el funcionamiento
• Garantía y tarjeta de registro
• Si falta algún artículo, póngase en contacto con el lugar donde lo compró o con PBM Industries, Inc.,
para su reemplazo
CUIDADOS Y MANIPULACIÓN
POOLGUARD está fabricado con plástico duradero para resistir el ambiente húmedo y hostil de la
piscina. Tenga cuidado cuando lo manipule para evitar que la unidad se caiga, reciba golpes,
etc. Asegúrese también de trasladar la unidad y colocarla en posición vertical lejos de la
piscina, cuando ésta esté siendo utilizada. (Véase figura Nº 1) Si la unidad cae accidentalmente
en la piscina, sáquela inmediatamente y vacíe el agua. Desarme la unidad siguiendo las indica-
ciones descritas en el Procedimiento de Sustitución y saque la pila. Incline y agite la unidad y elim-
ine todo el exceso de agua contenido en la unidad, en la pila y en la zona de la placa del circuito
con un paño o una toalla de papel. Pruebe la unidad antes de su uso, según se describe en el man-
ual, para garantizar su funcionamiento correcto. (No se olvide de sacar la unidad de la piscina y
guardarla lejos de la misma cada vez que vaya a nadar.)
PARA UNIR EL ASA
Los dos tornillos para el asa están ubicados en la parte superior de la alarma, retírelos y atornille el
asa, (Véase figura Nº 1)
INSTALACIÓN DE LA ALARMA
INTERRUPTOR DE REINICIO/PAUSA (VÉASE FIGURA Nº 1)
REINICIO: Cuando la unidad esté instalada en la piscina y esté sonando la bocina; presione y man-
tenga apretado durante 3 segundos el interruptor de reinicio/pausa para silenciar la alarma. MODO
PAUSA: Cuando retire la unidad de la piscina y suene la bocina; presione y mantenga apretado
durante 3 segundos el interruptor de reinicio/pausa para silenciar la alarma. La unidad de la piscina
se activará automáticamente cuando se instale nuevamente en la piscina. ¡LA UNIDAD DE LA
PISCINA NO PODRÁ PONERSE EN MODO PAUSA UNA VEZ INSTALADA EN LA PISCINA!

13
CARACTERÍSTICA DE INSTALACIÓN Y RETIRADA SILENCIOSA
• El sistema poolguard activará una alarma (sonará una bocina) cuando instale o retire la unidad de la
piscina. Si no desea que la alarma se dispare (no sonará la bocina) cuando instale o retire la unidad
de su piscina, siga las instrucciones descritas a continuación.
1. INSTALACIÓN SILENCIOSA (LA BOCINA NO SONARÁ)
• Presione y mantenga apretado durante 3 segundos el interruptor de reinicio/pausa, hasta oír que la
bocina de la unidad emite un chirrido. Suelte el interruptor de reinicio/pausa, a partir de ese momento,
tiene 15 segundos para instalar con delicadeza la unidad en su piscina sin que suene la bocina.
Nota: Esta característica le permite al sensor de la unidad desplazarse una vez sin que suene la alar-
ma. Si la unidad de la piscina no se instala con delicadeza la alarma sonará. POOLGUARD
COMENZARÁ A REVISAR INSTANTÁNEAMENTE SU PISCINA EN BUSCA DE INTRUSIONES.
2. RETIRADA SILENCIOSA (LA BOCINA NO SONARÁ)
• Antes de retirar la unidad de su piscina, presione y mantenga apretado durante 3 segundos el inter-
ruptor de reinicio/pausa, hasta oír que la bocina de la unidad emite un chirrido. Suelte el interruptor
de reinicio/pausa, y a partir de este momento tendrá 5 segundos para retirar la unidad de su piscina
sin que suene la bocina. IMPORTANTE: ESTO NO APAGA EL POOLGUARD, SI LA UNIDAD NO SE
RETIRA DE LA PISCINA, ÉSTA CONTINUARÁ REVISANDO SU PISCINA EN BUSCA DE INTRU-
SIONES.
3. ¡POOLGUARD HA DISEÑADO ESTA CARACTERÍSTICA "ÚNICAMENTE" PARA AQUELLOS
QUE TIENEN LA RESPONSABILIDAD DE INSTALAR O RETIRAR LA ALARMA DE LA PISCINA!
INSTALACIÓN/REEMPLAZO DE LA PILA
(Pila no incluida)
POOLGUARD funciona con una pila alcalina estándar de 9 voltios. Para instalar o retirar la pila:
• Saque el tornillo de la parte inferior de la unidad, véase figura Nº 1.
• Deslice cuidadosamente hacia afuera el ensamblaje electrónico; no tire del cable de conexión inter-
na. (En caso de que sea necesario, agite suavemente la unidad para retirar el ensamblaje).
• Saque la pila usada y revise si gotea o está oxidada. (Elimine cualquier gota u óxido que esté pre-
sente antes de instalar la pila nueva).
• IMPORTANTE: CUANDO INSTALE POR PRIMERA VEZ UNA PILA DE 9 VOLTIOS EN LA
UNIDAD DE LA PISCINA, SONARÁ LA BOCINA. PARA SILENCIAR LA ALARMA PRESIONE Y
MANTENGA APRETADO EL INTERRUPTOR DE REINICIO/PAUSA DURANTE 3 SEGUNDOS.
ESTO CAMBIARÁ EL ESTADO DE LA ALARMA AL MODO PAUSA. LA UNIDAD DE LA PISCINA
SE ACTIVARÁ AUTOMÁTICAMENTE CUANDO SE INSTALE EN LA PISCINA.
• Instale la pila nueva presionando la conexión e introduciéndola en el compartimiento para pilas.
• Deslice el ensamblaje electrónico en la unidad de la piscina (refiérase a la Figura 1 para asegurarse
de que el ensamblaje electrónico esté correctamente instalado); no pellizque el cable de conexión
interna.
• Vuelva a colocar el tornillo, apriete manualmente hasta que el tornillo quede completamente ajusta-
do y parejo con la unidad de la piscina.Para evitar posibles daños , quite la pila si va a guardar la
unidad por un período de tiempo prolongado.
INDICADOR DE PILA BAJA
La UNIDAD DE LA PISCINA Y EL RECEPTOR REMOTO sonarán aproximadamente cada 20 segun-
dos para avisarle que la pila de la unidad de la piscina está baja y necesita ser reemplazada.

COLOCACIÓN EN LA PISCINA
La figura Nº 2 ilustra las mejores ubicaciones para detectar intrusiones desde cualquier zona de la
piscina. Si la piscina tiene un tamaño superior a los 74,3 metros cuadrados, si tiene más de 2 líneas
de retorno, si tiene dudas sobre el tamaño, o si tiene una piscina con una forma irregular, llame a
nuestro servicio de atención al cliente para saber el número recomendado de alarmas y los lugares
dónde colocarlas: 1-800-242-7163. Las alarmas para piscinas Poolguard han sido probadas y certifi-
cadas por el ETL para el cumplimiento de la norma de seguridad y funcionamiento de alarmas para
piscinas (F2208) de ASTM, en el caso de piscinas de 4,9 m. x 9,8 m. Las alarmas POOLGUARD
pueden ser utilizadas en piscinas de hasta 6,1 m x 12,2 m. ó de 74,3 metros cuadrados.
FIGURA 2
Piscinas de 74,3 metros cuadrados o más pequeñas.
COLOCACIÓN EN LA PISCINA
POOLGUARD compensa de forma automática las variaciones en los niveles de la piscina dentro del
rango de funcionamiento de la unidad. La unidad utiliza un dispositivo sensor que proyecta hacia el
agua y que ha sido diseñado para funcionar en la mayoría de las piscinas con un limpiador de
residuos integrado en la pared. El dispositivo sensor no puede ser menor de 5,1 cm. (Véase figura
Nº 3), ni mayor de 17,8 cm. en el agua. POOLGUARD recomienda que el dispositivo sensor se sitúe
a 10,2 cm. en el agua. POOLGUARD puede ser utilizado en la piscina con MANTAS SOLARES.
POOLGUARD también puede ser utilizado en los balnearios.
EL DISPOSITIVO SENSOR NO
PUEDE SER COLOCARSE A
MENOS DE 5,1 CM. EN EL AGUA,
POOLGUARD RECOMIENDA QUE
EL DISPOSITIVO SENSOR SE SITÚE
A 10,2 CM. EN EL AGUA.
UNIDAD DE LA
PISCINAFIGURA 1
POSICIÓN VERTICAL
ENSAMBLAJE
ELECTRÓNICO
TORNILLOS DEL ASA
BOCINA
85dB a 3,04 m.
INTERRUPTOR DE
REINICIO/PAUSA
COMPAR-
TIMIENTO
PARA PILAS
CABLE DE
CONEXIÓN
INTERNA
ÁSP
TORNILLO
FIGURA 3
14
32,38cm
8,89cm
36,83cm
BLOQUE DE
SOPORTE

IMPORTANTE
Puede que el POOLGUARD no funcione adecuadamente si el nivel de agua de su piscina no se
mantiene dentro de los niveles requeridos de la alarma.La unidad tampoco podrá funcionar ade-
cuadamente mientras estén en funcionamiento ciertos tipos de limpiadores automáticos de piscinas.
Algunas piscinas con formas irregulares no ofrecen una base uniforme para su nivelación con el
borde de la piscina. Este pequeño problema puede ser resuelto mediante un apoyo adecuado para
la unidad. (Véase figura Nº 3)
COMO ESTABILIZAR LA ALARMA DE LA PISCINA
La clavija estabilizadora de la alarma (ASP) viene instalada de fábrica en la alarma de la piscina.
Las herramientas necesarias para instalar la alarma son: una broca para albañilería de 8 mm
disponible en su ferretería local, taladro, lápiz, cinta métrica o metro de madera.
1. Coloque la alarma de la piscina de manera tal que el dispositivo sensor quede en el agua y la
ASP quede apoyada en la plataforma, (asegúrese de dejar un pequeño espacio entre el dispositivo
sensor y el borde de la plataforma). (Véase Figura 4).
2. Marque con el lápiz el lugar donde desea hacer el agujero para la ASP.
3. Con la broca para albañilería de 8 mm, perfore un agujero de 5,7 cm de profundidad; lo más recto
posible.
4. Limpie los residuos e instale la alarma, colocando la ASP en el agujero de 8 mm de diámetro por
5,7 cm de profundidad.
5. La alarma de la piscina está lista para usarse uso. Si tiene alguna pregunta o necesita ayuda para
la instalación, llámenos al 1-800-242-7163.
6. Asegúrese de mantener limpio el agujero para la ASP para que cuando coloque la alarma, ésta
quede siempre situada horizontalmente sobre la plataforma de la piscina.
¡RECUERDE QUITAR LA UNIDAD DE LA PISCINA ANTES DE NADAR!
El dispositivo sensor no puede estar a menos de 5,1 cm en el agua. POOLGUARD
recomienda colocar el dispositivo sensor aproximadamente a 10,2 cm en el agua.
Marque en la plataforma el lugar para el agujero de 8 mm
de diámetro por 5,7 cm de profundidad.
CLAVIJA ESTABILIZADORA DE
ALARMAS (ASP)
ESPACIO
PEQUEÑO NO
INFERIOR A 1CM.
DISPOSITIVO
SENSOR
NIVEL DEL AGUA
PLATAFORMA DE LA PISCINA
5,7 CM
15

PRUEBAS ANTES DE SU USO
Para garantizar un correcto rendimiento, pruebe el POOLGUARD, cada vez que lo coloque en la
piscina, de la siguiente manera :
• POOLGUARD NO TIENE INCORPORADO UN INTERRRUPTOR ON/OFF (DE ENCENDIDO Y
APAGADO). Cuando la alarma está en la piscina, está siempre en la posición ON (Encendido) y no
puede apagarse. Cuando la alarma está fuera de la piscina, está siempre en posición OFF
(Apagado).
• Para probar si la alarma funciona, arroje, desde el borde de la plataforma, un objeto considerable-
mente pesado lo más lejos posible de la alarma. (Para realizar la prueba, se aconseja utilizar un
bidón de cuatro (4) galones de agua o 3 bidones atados de 1 galón de agua cada uno.). La alarma
sonará cuando el movimiento del agua, provocado por la intrusión, alcance la unidad. Puede que
pasen unos minutos hasta que la alarma reaccione al movimiento del agua.
• Antes de reiniciar la alarma y después de que el agua se calme, repita el procedimiento desde otro
lugar de la piscina hasta que esté seguro del rendimiento de detección.
• POOLGUARD incluye un temporizador que automáticamente reinicia la unidad después de que la
alarma haya sonado durante aproximadamente 5 minutos.
COMO AJUSTAR LOS CONECTORES DE LÍNEA DE RETORNO
La unidad POOLGUARD no debe colocarse demasiado cerca de la línea de retorno de la zona del
filtro. La turbulencia del agua puede ser muy fuerte y activar la alarma equivocadamente. Si tiene
más de 2 líneas de retorno, llame al Departamento de servicio de atención al cliente al 1-800-242-
7163. Es muy importante ajustar todos los dispositivos de detección en las líneas de retorno para
que no interfieran con la alarma de la piscina. No es necesario orientar el dispositivo de detección
hacia arriba para que la piscina funcione sin problemas. Si el agua está demasiado turbulenta en la
superficie de la piscina no permitirá que la alarma funcione correctamente. Oriente el detector de
detección hacia abajo y el agua en la piscina circulará sin problemas, lo que permitirá que la alarma
funcione correctamente. Si orienta el dispositivo de detección hacia arriba, puede que la alarma no
funcione correctamente. (Consulte la Figura 5).
FIGURA 5
CORRECTO INCORRECTO
16

RECEPTOR REMOTO POOLGUARD
El RECEPTOR REMOTO POOLGUARD está integrado en la unidad estándar POOLGUARD para el
funcionamiento de la alarma remota inalámbrica desde una distancia máxima de 61 metros . El
RECEPTOR REMOTO POOLGUARD activa la alarma en la casa cuando la unidad POOLGUARD
se activa en la piscina. El sistema remoto contiene los siguientes elementos funcionales:
• Un receptor de impulsos codificado (Receptor remoto). Figura 6
• Una toma de corriente mural estándar para el suministro de energía. Figura 6.
El RECEPTOR REMOTO es una unidad compacta impulsada por un suministro de energía AC/DC,
UL y CSA aprobado. Para Europa el suministro de energía tiene la aprobación de y conforma
con la norma RoHS. Puede colocar el receptor remoto sobre una mesa o una repisa ubicadas en el
interior de la vivienda. La señal de frecuencia radial codificada de impulsos es transmitida desde la
unidad de la piscina, recibida y decodificada, activando así el receptor remoto. El receptor remoto
sonará durante otros 3 segundos después de que la unidad de la piscina haya sido desacti-
vada. Si el RECEPTOR REMOTO suena aproximadamente cada 20 segundos indica que la pila
9 voltios de la unidad de la piscina está baja y necesita ser reemplazada. Si después de haber
comprado la alarma POOLGUARD, desea añadir otro receptor remoto a su sistema de alarma,
puede obtener uno contactando con PBM Industries, Inc. Contacte con PBM por teléfono o correo
electrónico, o contacte con la tienda donde compró el sistema.
FIGURA 6
SUMINISTRO DE
ENERGÍA
RECEPTOR REMOTO
85dB Bocina a
3 metros
COMO OPERAR EL RECEPTOR REMOTO
Coloque el RECEPTOR REMOTO en un lugar accesible en la vivienda, cerca de la piscina. Evite las
paredes de acero, objetos metálicos de gran tamaño u obstrucciones que puedan interferir con la
recepción de la señal. El RECEPTOR REMOTO debe ubicarse al mismo nivel o a un nivel superior
a la piscina de la vivienda (no coloque el receptor en el sótano). El lugar ideal para el RECEPTOR
REMOTO es cerca de una ventana con vistas a la piscina. Pruebe el RECEPTOR REMOTO en
diferentes zonas del hogar hasta determinar el mejor lugar para el mismo. Conecte el suministro de
energía y revise que la luz roja del indicador esté encendida. El RECEPTOR REMOTO está listo
para recibir la transmisión de la unidad POOLGUARD. NO UTILICE EL RECEPTOR REMOTO
AFUERA.
17

SUGERENCIAS DE SEGURIDAD PARA NADAR EN LA PISCINA
• Vigile a los niños en todo momento.
• Nunca los deje nadar solos. Nunca deje a un niño solo en la piscina, ni para ir a
contestar el teléfono.
• Retire siempre la cubierta solar de la piscina antes de nadar.
• Recuerde que no es seguro beber alcohol y meterse a la piscina.
• Coloque una cerca alrededor de la piscina y mantenga la puerta cerrada para evitar
el acceso de personas no autorizadas a la piscina. Instale una alarma en la puerta.
• Asegúrese de que un adulto responsable enseñe a sus hijos las medidas de
seguridad y a nadar.
• Have a responsible adult teach swimming and water safety to your children.
• Mantenga el agua de la piscina limpia y transparente.
• No nade durante tormentas eléctricas.
• No permita el uso de botellas, vidrios u objetos afilados alrededor de la piscina.
• Pregúntele a su distribuidor de piscinas como puede mejorar la seguridad de la
piscina; estarán encantados de ayudarle.
• Recuerde que si utiliza el sentido común, es consciente y precavido podrá
disfrutar de la piscina.
GARANTÍA Y REPUESTOS
POOLGUARD incluye una garantía limitada que cubre la mano de obra y las piezas defectuosas
durante tres años a partir de la fecha de compra. (Conserve el comprobante de compra).
Si POOLGUARD presenta algún defecto, llame al Departamento de servicio de atención al cliente al
1-800-242-7163. No se aceptarán devoluciones no autorizadas. Se garantiza la reparación adecuada
sólo cuando se devuelva la unidad al fabricante.
ENVÍE LA CORRESPONDENCIA A: PBM INDUSTRIES, INC.
P.O.BOX 658, NORTH VERNON, IN 47265
1-800-242-7163
Este producto ha sido diseñado para permitir la detección de intrusiones indeseadas en las piscinas sin super-
visión. POOLGUARD ES UN SISTEMA DE ALARMA DE SEGURIDAD Y NO UN DISPOSITIVO SALVAVIDAS. "Este
dispositivo no ha sido diseñado con la intención de reemplazar ningún otro método de seguridad, por ej.: super-
visión por parte de un adulto, salvavidas, cercas, rejas, cubiertas para piscinas, cerraduras, etc., y puede ser que
algunos dispositivos no detecten una acceso gradual."
REV. 3/2006
18

SUGERENCIAS ÚTILES Y RESOLUCIÓN DE PROBLEMAS
FALSAS ALARMAS
Todas las alarmas para piscina se activarán erróneamente por razones diferentes. Puede minimizar
el número de falsas alarmas; sin embargo, es importante recordar que es mejor una falsa alarma
que no tener una alarma. EL CLIMA Y EL VIENTO: POOLGUARD se fija en la plataforma de la
piscina para que el viento no afecte la unidad. El viento puede activar una falsa alarma si es
demasiado fuerte o constante ya que ocasionaría que el agua en la piscina se agite u oscile contra
la pared de la piscina. Cuando el movimiento oscilante del agua de la piscina haga contacto con el
dispositivo sensor POOLGUARD, puede que éste se active y haga sonar la alarma. Los días
extremadamente ventosos, en que el agua se mueve fuertemente, se recomienda retirar el POOL-
GUARD de la piscina. La lluvia o el viento leve no activarán la alarma POOLGUARD.
Otra manera de activar una falsa alarma es cuando el propietario de la piscina intenta instalar la
alarma tan pronto como deja de nadar. Después de nadar, el agua en la piscina se mantiene agita-
da o revuelta durante un tiempo, dependiendo del tamaño de la piscina y del tipo de actividad
acuática que se haya realizado. Antes de instalar la alarma, y una vez que haya terminado de
nadar, debe esperar un momento hasta que el agua se calme. El tiempo variará (aproximada-
mente entre 10 y 30 minutos); y una vez que el usuario de la piscina vea que el agua está tranquila
podrá instalar la alarma.
Ciertos limpiadores automáticos pueden activar la unidad POOLGUARD en determinadas oca-
siones. Si el cabezal o la manguera del limpiador choca contra la alarma POOLGUARD puede que
la haga sonar. La mejor solución a este problema es utilizar el limpiador durante la noche y la alar-
ma durante el día. Otra opción sería encontrar otro lugar circundante a la piscina donde el limpiador
no interfiera con la alarma.
COLOCACIÓN DE LA ALARMA
Para obtener mejores resultados, debe colocar la alarma en una superficie sólida y llana. El cuello
del dispositivo ha sido diseñado para que funcione en la mayoría de las piscinas con un limpiador
de residuos integrado en la pared. Es muy importante que revise el nivel del agua sobre el cuello del
dispositivo. El dispositivo sensor no puede estar a menos de 5,1 cm ni a más de 17,8 cm en el agua.
POOLGUARD recomienda colocar el dispositivo sensor aproximadamente a una altura de 10,2 cm
en el agua. POOLGUARD puede utilizarse con una cubierta solar; sin embargo, antes de quitar la
cubierta, debe sacar la alarma para que ésta no caiga a la piscina.
PRUEBA DE LA ALARMA
Arroje, desde el lugar más lejano a la alarma, un objeto que tenga el tamaño, peso y volumen del
niño más pequeño de la familia. Para realizar la prueba, es ideal utilizar un bidón de cuatro (4)
galones de agua o 3 bidones atados de 1 galón de agua cada uno. Recuerde que cada vez que
quiera realizar la prueba deberá esperar aproximadamente 25 minutos hasta que el agua se
calme.
LA ALARMA NO SONARÁ
Asegúrese de que se haya instalado correctamente una pila de 9 voltios. Si cuando realiza la prue-
ba, el POOLGUARD no suena, asegúrese de estar realizándola correctamente. El colocar los pies
en la piscina, el salpicar con las manos, el crear olas con el limpiador de hojas, o el arrojar un obje-
to con un tamaño, peso y volumen inapropiado no activará la alarma POOLGUARD. Es muy
importante que realice la prueba y que lo haga correctamente.
Suministro de energía
Receptor remoto
19

CUIDADO Y MANIPULACIÓN
La unidad POOLGUARD está fabricada con vinilo PVC rígido y resistente, clasificada UV. Preste
mucha atención en no dejar caer la unidad ya que presenta un sistema electrónico y mecánico; y al
igual que cualquier otro artefacto, puede romperse. Ni el sol ni la lluvia afectarán la alarma. POOL-
GUARD es resistente a la intemperie pero no impermeable. Preste mucha atención en no dar
golpes a la alarma en la piscina. Si la alarma se cae a la piscina, consulte la sección de instruc-
ciones sobre como secarla, descritas en el manual. Sin embargo, lo más seguro es que deba
devolver la unidad a la fábrica para ser reparada. Recuerde siempre quitar la alarma antes de
usar la piscina.
RECEPTOR REMOTO
Cuando suena la unidad en la piscina , el receptor remoto también lo hace. El alcance máximo del
receptor remoto es de 61 metros desde la unidad situada en el lateral de la piscina. Evite colocar
el receptor remoto en sótanos o cerca de paredes metálicas. Asegúrese que la luz roja en el remoto
esté encendida. Recuerde que la unidad situada en el lateral de la piscina debe sonar (dar la alar-
ma) para que funcione el receptor remoto.
Si el receptor remoto no recoge una señal clara o no recibe señal alguna de la unidad situada en el
lateral de la piscina, intente lo siguiente: antes de enchufar el suministro de energía, asegúrese de
estirar el cable; no lo deje enroscado como viene en el paquete. Cuando enchufe por primera vez el
remoto, éste emitirá un sonido corto y fuerte y luego se callará.
El receptor remoto es similar a una radio portátil pequeña. Si su remoto no suena cuando la unidad
situada en el lateral de la piscina esté sonando, traslade el remoto a una zona diferente y espere
unos segundos para que pueda coger la señal. Quizás tenga que mover el remoto un poquito a la
izquierda o a la derecha para que pueda captar la señal; en algunos casos puede que tenga que
trasladarlo a una zona diferente o a otro cuarto. Si el receptor remoto no capta la señal, LLAME AL
DEPARTAMENTO DE SERVICIO DE ATENCIÓN AL CLIENTE AL 1-800-242-7163.
• Lea el manual atentamente
• Instale una pila de 9 voltios
• Desate el lazo del suministro de energía
•
Realice la prueba para establecer el correcto funcionamiento de la alarma
• Traslade la alarma por el asa
• Quite la alarma antes de acceder a la piscinag
• Conserve la tarjeta roja con el número gratuito del servicio de
atención al cliente.
• No deje la alarma en la piscina mientras esté nadando
• No arroje la alarma, puede romperse
• No golpee ni deje caer la alarma en la piscina
• No instale la alarma inmediatamente después de nadar
• No utilice la alarma en días extremadamente ventosos
LO QUE DEBE Y LO QUE NO DEBE HACER
20
Table of contents
Languages:
Other Poolguard Lighting Equipment manuals