Porter-Cable 837 User manual

Instruction
manual
The Model and Serial No. plate is located on the main
housing of the tool. Record these numbers in the
spaces below and retain for future reference.
Model No. ______________________________________
Type ___________________________________________
Serial No. _______________________________________
IMPORTANT
Please make certain that the person who is
to use this equipment carefully reads and
understands these instructions before
starting operations.
ESPAÑOL: PÁGINA 19
FRANÇAISE : PAGE 35
To learn more about Porter-Cable
visit our website at:
http://www.porter-cable.com
Copyright © 2005 Porter-Cable Corporation
Part No.908936 - 01-06-05
MODEL 837
Quik-Change™Blade Clamp
MODEL 8923
Battery Pack
MODEL 8924 Charger
Cordless
Reciprocating Saw

2
Read and understand all warnings and operating instructions
before using any tool or equipment. When using tools or equipment, basic
safety precautions should always be followed to reduce the risk of personal
injury. Improper operation, maintenance or modification of tools or equipment
could result in serious injury and property damage. There are certain
applications for which tools and equipment are designed. Porter-Cable strongly
recommends that this product NOT be modified and/or used for any application
other than for which it was designed.
If you have any questions relative to its application DO NOT use the product
until you have written Porter-Cable and we have advised you.
Online contact form at www.porter-cable.com
Postal Mail: Technical Service Manager
Porter-Cable Corporation
4825 Highway 45 North
Jackson, TN 38305
Information regarding the safe and proper operation of this tool is available from
the following sources:
Power Tool Institute
1300 Sumner Avenue, Cleveland, OH 44115-2851
www.powertoolinstitute.org
National Safety Council
1121 Spring Lake Drive, Itasca, IL 60143-3201
American National Standards Institute, 25 West 43rd Street, 4 floor, New York,
NY 10036 www.ansi.org ANSI 01.1Safety Requirements for Woodworking
Machines, and the U.S. Department of Labor regulations www.osha.gov
SAVE THESE INSTRUCTIONS!
IMPORTANT SAFETY INSTRUCTIONS . . . . . . . . . . . . . . . . . . . . . . . . . .2
SAFETY GUIDELINES . . . . . . . . . . . . . . . . . . . . . . . . . . . . . . . . . . . . . . . .3
GENERAL SAFETY RULES . . . . . . . . . . . . . . . . . . . . . . . . . . . . . . . . . . .4
ADDITIONAL SPECIFIC SAFETY RULES . . . . . . . . . . . . . . . . . . . . . . . .7
SAFETY RULES FOR BATTERIES AND CHARGERS . . . . . . . . . . . . . . .8
CHARGING THE BATTERY . . . . . . . . . . . . . . . . . . . . . . . . . . . . . . . . . .10
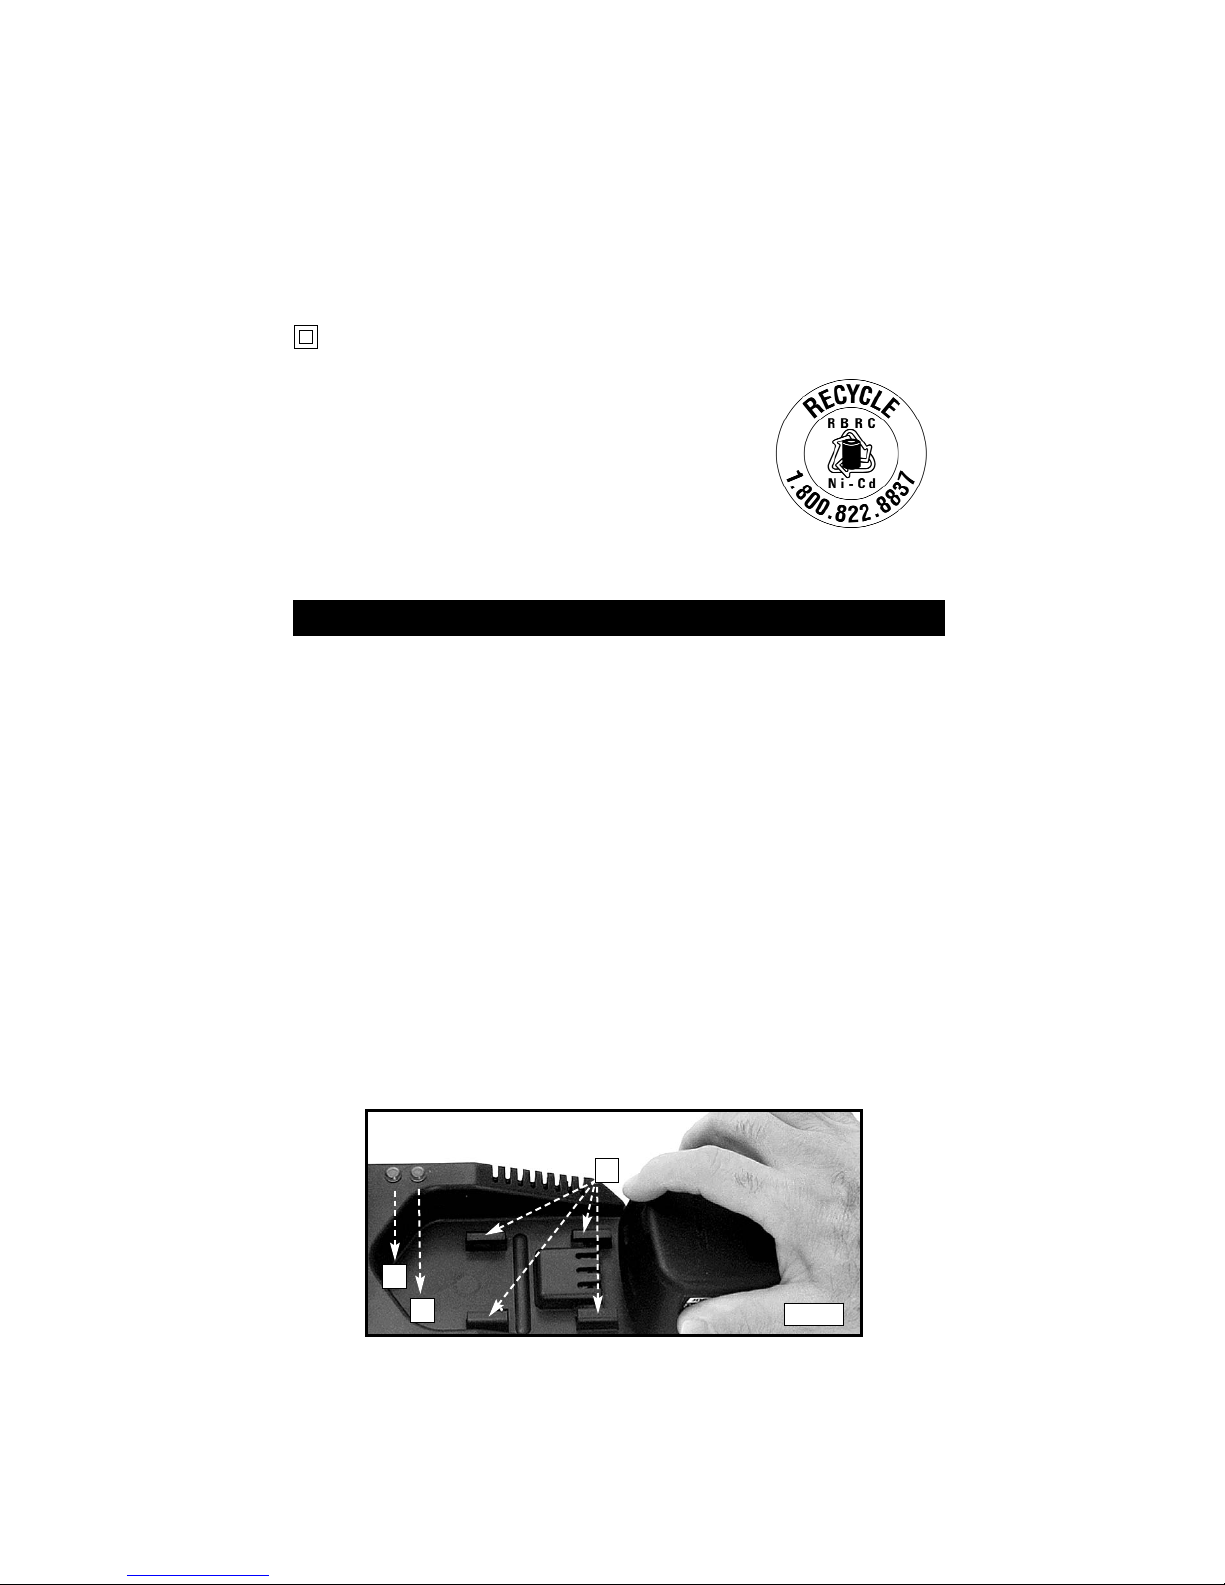
REMOVING THE BATTERY . . . . . . . . . . . . . . . . . . . . . . . . . . . . . . . . . .11
DIAGNOSTICS . . . . . . . . . . . . . . . . . . . . . . . . . . . . . . . . . . . . . . . . . . . . .11
CARTON CONTENTS . . . . . . . . . . . . . . . . . . . . . . . . . . . . . . . . . . . . . . .11
FUNCTIONAL DESCRIPTION . . . . . . . . . . . . . . . . . . . . . . . . . . . . . . . .11
ASSEMBLY . . . . . . . . . . . . . . . . . . . . . . . . . . . . . . . . . . . . . . . . . . . . . . .11
OPERATION . . . . . . . . . . . . . . . . . . . . . . . . . . . . . . . . . . . . . . . . . . . . . .15
TROUBLESHOOTING . . . . . . . . . . . . . . . . . . . . . . . . . . . . . . . . . . . . . .16
MAINTENANCE . . . . . . . . . . . . . . . . . . . . . . . . . . . . . . . . . . . . . . . . . . . .16
SERVICE . . . . . . . . . . . . . . . . . . . . . . . . . . . . . . . . . . . . . . . . . . . . . . . . .17
ACCESSORIES . . . . . . . . . . . . . . . . . . . . . . . . . . . . . . . . . . . . . . . . . . . .17
WARRANTY . . . . . . . . . . . . . . . . . . . . . . . . . . . . . . . . . . . . . . . . . . . . . . .18
ESPAÑOL . . . . . . . . . . . . . . . . . . . . . . . . . . . . . . . . . . . . . . . . . . . . . . . .19
FRANÇAISE . . . . . . . . . . . . . . . . . . . . . . . . . . . . . . . . . . . . . . . . . . . . . . .35
SERVICE CENTER LOCATIONS . . . . . . . . . . . . . . . . . . . . . . .back cover
TABLE OF CONTENTS
IMPORTANT SAFETY INSTRUCTIONS

3
Some dust created by power sanding, sawing, grinding, drilling,
and other construction activities contains chemicals known (to the
State of California) to cause cancer, birth defects or other reproductive harm. Some
examples of these chemicals are:
●lead from lead-based paints
●crystalline silica from bricks and cement and other masonry products
●arsenic and chromium from chemically-treated lumber
Your risk from these exposures varies, depending on how often you do this
type of work. To reduce your exposure to these chemicals: work in a well
ventilated area, and work with approved safety equipment, always wear
NIOSH/OSHA approved, properly fitting face mask or respirator when using
such tools.
indicates an imminently hazardous situation which, if not
avoided, will result in death or serious injury.
indicates a potentially hazardous situation which, if not
avoided,could result in death or serious injury.
indicates a potentially hazardous situation which, if not
avoided,may result in minor or moderate injury.
used without the safety alert symbol indicates potentially
hazardous situation which, if not avoided, may result in
property damage.
It is important for you to read and understand this manual. The
information it contains relates to protecting YOUR SAFETY and
PREVENTING PROBLEMS. The symbols below are used to help
you recognize this information.
SAFETY GUIDELINES - DEFINITIONS
CALIFORNIA PROPOSITION 65

4
Read all instructions. Failure to follow all
instructions listed below may result in electric shock, fire and/or
serious injury. The term "power tool" in all of the warnings listed
below refers to your mains-operated (corded) power tool or
battery-operated (cordless) power tool.
SAVE THESE INSTRUCTIONS
1) Work area safety
a) Keep work area clean and well lit. Cluttered or dark areas invite
accidents.
b) Do not operate power tools in explosive atmospheres, such as in the
presence of flammable liquids, gases or dust. Power tools create
sparks which may ignite the dust or fumes.
c) Keep children and bystanders away while operating a power tool.
Distractions can cause you to lose control.
2) Electrical safety
a) Power tool plugs must match the outlet. Never modify the plug in any
way. Do not use any adapter plugs with earthed (grounded) power
tools. Unmodified plugs and matching outlets will reduce risk of electric
shock.
b) Avoid body contact with earthed or grounded surfaces such as
pipes, radiators, ranges and refrigerators. There is an increased risk of
electric shock if your body is earthed or grounded.
c) Do not expose power tools to rain or wet conditions. Water entering a
power tool will increase the risk of electric shock.
d) Do not abuse the cord. Never use the cord for carrying, pulling or
unplugging the power tool. Keep cord away from heat, oil, sharp
edges or moving parts. Damaged or entangled cords increase the risk
of electric shock.
e) When operating a power tool outdoors, use an extension cord
suitable for outdoor use. Use of a cord suitable for outdoor use reduces
the risk of electric shock.
3) Personal safety
a) Stay alert, watch what you are doing and use common sense when
operating a power tool. Do not use a power tool while you are tired
or under the influence of drugs, alcohol or medication. A moment of
inattention while operating power tools may result in serious personal
injury.
b) Use safety equipment. Always wear eye protection. Safety equipment
such as dust mask, non-skid safety shoes, hard hat, or hearing
protection used for appropriate conditions will reduce personal injuries.
c) Avoid accidental starting. Ensure the switch is in the off-position
before plugging in. Carrying power tools with your finger on the switch
or plugging in power tools that have the switch on invites accidents.
GENERAL SAFETY RULES

5
d) Remove any adjusting key or wrench before turning the power tool
on. A wrench or a key left attached to a rotating part of the power tool
may result in personal injury.
e) Do not overreach. Keep proper footing and balance at all times. This
enables better control of the power tool in unexpected situations.
f) Dress properly. Do not wear loose clothing or jewelry. Keep your
hair, clothing and gloves away from moving parts. Loose clothes,
jewelry or long hair can be caught in moving parts.
g) If devices are provided for the connection of dust extraction and
collection facilities, ensure these are connected and properly used.
Use of these devices can reduce dust-related hazards.
4) Power tool use and care
a) Do not force the power tool. Use the correct power tool for your
application. The correct power tool will do the job better and safer at the
rate for which it was designed.
b) Do not use the power tool if the switch does not turn it on and off.
Any power tool that cannot be controlled with the switch is dangerous
and must be repaired.
c) Disconnect the plug from the power source before making any
adjustments, changing accessories, or storing power tools. Such
preventive safety measures reduce the risk of starting the power tool
accidentally.
d) Store idle power tools out of the reach of children and do not allow
persons unfamiliar with the power tool or these instructions to
operate the power tool. Power tools are dangerous in the hands of
untrained users.
e) Maintain power tools. Check for misalignment or binding of moving
parts, breakage of parts and any other condition that may affect the
power tools operation. If damaged, have the power tool repaired
before use. Many accidents are caused by poorly maintained power
tools.
f) Keep cutting tools sharp and clean. Properly maintained cutting tools
with sharp cutting edges are less likely to bind and are easier to control.
g) Use the power tool, accessories and tool bits etc., in accordance
with these instructions and in the manner intended for the
particular type of power tool, taking into account the working
conditions and the work to be performed. Use of the power tool for
operations different from those intended could result in a hazardous
situation.
GENERAL SAFETY RULES continued

6
5) Battery tool use and care
a) Recharge only with the charger specified by the manufacturer. A
charger that is suitable for one type of battery pack may create a risk of
fire when used with another battery pack.
b) Use battery tools only with specifically designated battery packs.
Use of any other battery packs may create a risk of injury and fire.
c) When battery pack is not in use, keep it away from other metal
objects like paper clips, coins, keys, nails, screws, or other small
metal objects that can make a connection from one terminal to
another. Shorting the battery terminals together may cause burns or a
fire.
d) Under abusive conditions, liquid may be ejected from the battery.
Avoid contact. If contact accidentally occurs, flush with water. If
liquid contacts eyes, seek additional medical help. Liquid ejected
from the battery may cause irritation or burns.
e) Ensure the switch is in the off position before inserting battery pack.
Inserting the battery pack into power tools that have the switch on invites
accidents.
6) Service
a) Have your power tool serviced by a qualified repair person using only
identical replacement parts. This will ensure that the safety of the
power tool is maintained.
GENERAL SAFETY RULES continued
SAVE THESE INSTRUCTIONS!

7
SAVE THESE INSTRUCTIONS!
ADDITIONAL SPECIFIC SAFETY RULES
1. Hold power tool by insulated gripping surfaces when performing an
operation where the cutting tool may contact hidden wiring or its own
cord. Contact with a "live" wire will make exposed metal parts of the tool
"live" and shock the operator.
2. Use clamps or other practical way to secure and support the
workpiece to a stable platform. Holding the work by hand or against your
body is unstable and may lead to loss of control.
3. Keep blades sharp. Sharp blades will do the job better and safer.
4. Keep hands away from cutting area. When sawing never reach
underneath or behind the material being cut for any reason.
5. When you have finished a cut be careful not to come into contact with
the blade. Turn off the motor immediately.
6. Exercise extreme caution when blind cutting. Be certain
that there are no foreign objects such as electrical wire, conduit, plumbing
pipes, etc., that may come into contact with the blade.
7. Wear eye and hearing protection. Always use safety glasses. Everyday
eyeglasses are NOT safety glasses. USE CERTIFIED SAFETY
EQUIPMENT. Eye protection equipment should comply with ANSI Z87.1
standards. Hearing equipment should comply with ANSI S3.19 standards.
8. Use of this tool can generate and disburse dust or
other airborne particles, including wood dust, crystalline silica dust
and asbestos dust. Direct particles away from face and body. Always
operate tool in well ventilated area and provide for proper dust removal.
Use dust collection system wherever possible. Exposure to the dust may
cause serious and permanent respiratory or other injury, including silicosis
(a serious lung disease), cancer, and death. Avoid breathing the dust, and
avoid prolonged contact with dust. Allowing dust to get into your mouth or
eyes, or lay on your skin may promote absorption of harmful material.
Always use properly fitting NIOSH/OSHA approved respiratory protection
appropriate for the dust exposure, and wash exposed areas with soap
and water.

8
SYMBOL DEFINITION
V ........................ volts
A ........................ amperes
Hz ........................ hertz
W ........................ watts
kW ........................ kilowatts
F ........................ farads
µF ........................ microfarads
l ........................ litres
g ........................ grams
kg ........................ kilograms
bar ........................ bars
Pa ........................ pascals
h ........................ hours
min ........................ minutes
s ........................ seconds
n0........................ no-load speed
…/min or …min-1......... Revolutions or reciprocations per minute
or d.c. ................ direct current
or a.c. ................ alternating current
2........................ two-phase alternating current
2N ........................ two-phase alternating current with neutral
3........................ three-phase alternating current
3N ........................ three-phase alternating current with neutral
........................ rated current of the appropriate fuse-link in amperes
........................ time-lag miniature fuse-link where X is the symbol
for the time/current characteristic, as given in IEC 60127
........................ protective earth
........................ class II tool
IPXX ........................ IP symbol
SAVE THESE INSTRUCTIONS!
SAFETY INSTRUCTIONS
FOR CHARGER AND BATTERIES
1. SAVE THESE INSTRUCTIONS. This manual contains important safety
and operating instructions for Porter-Cable Battery Charger.
2. Before using a battery charger, read all instructions and cautionary
markings on (1) battery charger, (2) battery pack, and (3) product using
battery.
3. To reduce risk of injury, a Porter-Cable charger should only
be used to charge a Porter-Cable battery pack. Other types of batteries
may burst causing personal injury and damage. Do not charge a Porter-
Cable battery pack with any other charger.
4. Do not expose charger to rain, snow or frost.

9
5. Do not abuse cord. Never carry charger by cord or yank it to
disconnect from receptacle. Pull by plug rather than cord when
disconnecting charger. Have damaged or worn power cord and strain
reliever replaced immediately. DO NOT ATTEMPT TO REPAIR POWER
CORD.
6. Make sure cord is located so that it will not be stepped on, tripped
over, or otherwise subjected to damage or stress.
7. Do not use an extension cord unless absolutely necessary. Use of
improper extension cord could result in a risk of fire and electric shock.
If an extension cord must be used, make sure:
A. That the pins on plug of extension cord are the same number, size
and shape as those of plug on charger.
B. That the extension cord is properly wired and in good electrical
condition.
C. Wire Size of cord is at least as specified in following chart:
D. If an extension cord is to be used outdoors it must be marked with
the suffix W-A or W following the cord type designation. For example –
SJTW-A to indicate it is acceptable for outdoor use.
8.
Do not operate
charger with damaged cord or plug – have them replaced
immediately, to avoid a hazard. DO NOT ATTEMPT TO REPAIR POWER CORD.
9. Do not operate charger if it has received a sharp blow, been dropped, or
otherwise damaged in any way; take it to a qualified serviceman.
10. Do not disassemble charger or battery pack. Take it to a qualified
serviceman when service or repair is required. Incorrect reassembly may
result in a risk of electric shock or fire.
11. Unplug charger from outlet before attempting any maintenance or
cleaning – to reduce risk of electric shock.
12. Charge the battery pack in a well ventilated place, do not cover the
charger and battery pack with a cloth, etc., while charging.
13. Do not store the charger or battery pack in locations where the
temperature may reach or exceed 122°F (50°C) (such as a metal tool
shed, or a car in the summer), which can lead to deterioration of the
storage battery.
14. Do not charge battery pack when the temperature is BELOW 40°F
(4.4°C) or ABOVE 104°F (40°C). This is very important for proper
operation.
15. Do not incinerate battery pack. It can explode in a fire.
16. Do not charge battery in damp or wet locations.
17. Do not attempt to charge any other cordless tool or battery pack with
the Porter-Cable charger.
18. Do not short across the terminals of the battery pack: EXTREMELY
HIGH TEMPERATURES COULD CAUSE PERSONAL INJURY OR FIRE.
LENGTH OF CORD IN FEET 25 50 100 150
AWG SIZE OF CORD 18 18 18 16

10
19. Double insulated tools are equipped with a polarized plug (one
blade is wider than the other). This plug will fit in a polarized outlet only
one way. If the plug does not fit fully in the outlet, reverse the plug. If it
still does not fit, contact a qualified electrician to install a polarized
outlet. Do not change the plug in any way. Double Insulation
eliminates the need for the three wire grounded power cord and
grounded power supply system.
20. Dispose of expended batteries properly. The
Porter-Cable Battery Packs contains rechargeable,
nickel-cadmium batteries. These batteries must be
recycled or disposed of properly. Drop off expended
battery packs at your local replacement battery
retailer, your local recycling center, or at a Porter-
Cable Service Center (see list on back page of this
manual). Applicable fees for the collection and
recycling of these batteries (in the United States), have
been paid to the RBRC™. For further information, call:
1-800-8-BATTERY.
RBRC™ is a Trademark of
the Rechargeable Battery
Recycling Corporation.
CHARGING THE BATTERY
Before using your cordless tool for the first time, fully charge the battery
pack. If the battery pack is installed, remove it by following instructions
under "INSTALLING OR REMOVING BATTERY PACK".
NORMAL CHARGING
Make sure that the power circuit voltage is the same as that shown on the
charger specification plate. Connect the charger to the power source. The
red and green lights will flash once to indicate that the power is connected
properly and the charger is ready for operation.
Position the battery pack on charger, align the rails on the battery pack (A)
Fig. 2 with the four tabs (C) Fig. 1 on the charger. Slide the battery forward
on charger until it stops.
The green light (A) Fig. 1 should begin to flash rapidly indicating that the
battery pack is receiving a “fast charge”. [If the green light does not flash or
if the red light (B) illuminates, see DIAGNOSTICS]. After approximately one
hour, the “Fast Charge” indicator light should glow continually, indicating
that the battery pack is fully charged and that the charger is now in a
“Maintenance Charge” mode. The battery pack can be left on “Maintenance
Charge” until you are ready to use it.
Depending on room temperature, line voltage, and existing charge level,
initial battery charging may take longer than one hour.
Disconnect the charger from the power source when not in use.
Fig. 1
A
B
C

Always set the trigger switch to the locked "OFF" position
when installing or removing the battery pack.
TO REMOVE BATTERY PACK:
Depress the battery release button
(B) Fig. 2, and pull battery pack out
of tool.
TO INSTALL BATTERY PACK:
Align rails (A) Fig. 2, on battery
pack with slots on tool and push
battery pack onto tool until it locks
in place.
DIAGNOSTICS
The Model 8924 Charger is equipped with a diagnostic system that
automatically checks the battery pack each time a pack is inserted into the
charger. If no problems are found, the charger will automatically switch to
“Fast Charge” mode as described in "NORMAL CHARGING".
Make sure that the power circuit voltage is the same as that shown on the
charger specification plate. Connect the charger to the power source. The
red and green lights will flash once to indicate that power is connected
properly and the charger is ready for operation.
The charger indicator lights will indicate the following problems:
●If the green light flashes slowly after battery pack is inserted in
charger, the battery pack temperature is either too high or too low
for charging. If left alone, the charger will continue to monitor the
battery pack temperature and will begin charging when the
temperature reaches an acceptable level.
●If the red light flashes continuously, the battery pack has failed
(pack is not chargeable and requires replacement).
As a battery pack approaches the discharged state, you will notice a sharp
drop in tool performance. When the tool is unable to perform, recharge the
battery pack. Recharging the battery pack before this condition is reached
will reduce the total work life of the pack. Discharging the pack beyond this
point can damage the pack.
NOTE: Battery temperature will increase during and shortly after use.
Batteries may not accept a full charge if they are charged immediately after
use. Allow the battery pack to cool to room temperature before charging for
best results.
11
Fig. 2
A
The battery charger may rest on the four pads provided on the bottom of the
case or be mounted on a wall by utilizing the two key hole slots provided.
Do not obstruct the vent slots in the top and bottom of
charger. Do not charge battery when temperature is BELOW 40°F(4.4°C) or
ABOVE 104°F (40°C).
CARTON CONTENTS
The Model 837 Cordless Reciprocating Saw comes with a carrying case, a
battery pack, a charger, a 3/16" hex wrench, a bi-metal blade, an
instruction manual, and a parts list.

A
SELECTING THE BLADE
For best performance, longer blade life, and smoother cut, select the proper
blade for the job. When cutting metal, always select a blade that will allow at
least three teeth to be engaged in the thickness of workpiece.
INSTALLING THE BLADE
1. Fully extend the reciprocating shaft to permit access to the Quik-
Change™blade release collar (A) Fig. 3. If necessary, gently squeeze the
trigger switch to move the reciprocating shaft to its outermost position
(Fig. 5).
REMOVE THE BATTERY.
Avoid contact with the blade teeth to prevent personal injury.
2. Move the guide shoe (B) Fig. 3 forward to access the blade clamp.
3. To open the blade clamp, rotate and hold the blade release collar (A)
Fig. 4 counterclockwise (viewed from the front of the saw).
4. Insert the blade into the clamp until it bottoms. Allow the release collar
to rotate clock-wise to lock the blade in place (see Fig. 5).
5. To remove the blade, first remove the battery. Then reverse steps 2
through 4, and pull the blade from the blade clamp while holding the
release collar in the open position.
Fig. 4
BA
Fig. 3
12
FUNCTIONAL DESCRIPTION
NOTE: This tool is shipped completely assembled. No assembly time or
tools are required.
ASSEMBLY
FOREWORD
The Porter-Cable Cordless Reciprocating Saw is designed for cutting wood
up to 12" thick, metal up to 3/4" thick, and various other materials, such as
plastics, fiberglass, hard rubber, etc.
Fig. 5

13
NOTE: If the blade clamp collar resists rotation, work the blade up and
down while rotating the clamp (in a counterclockwise direction).
If the blade breaks, leaving nothing to
grasp (to pull it from the clamp), use
another blade as a tool to remove the
broken piece (Fig. 6). While holding
the release collar in the open
position, use the tip of another blade
to “hook” the broken piece and pull it
from the clamp. (A thin, fine-toothed,
metal-cutting blade works best.)
Periodically clean the blade clamp
with dry compressed air. DO NOT
lubricate the blade clamp. Lubricant
will cause contamination.
Wear ANSI Z87.1 safety glasses while using compressed air.
HOW TO HOLD THE SAW
Exposed metal parts
of the tool may be made live if the
blade cuts into live wiring within a
wall. Hold the saw as shown in Fig.
7.
Fig. 7
FLUSH
BREAK
Broken
Blade Broken
Blade
Fig. 6
RECESSED
BREAK
TO START AND STOP THE SAW
1. Make sure that the battery pack voltage is the same as that shown on
the specification plate on the tool. Connect the battery pack to the tool.
2. Hold the saw firmly. Squeeze the
trigger switch (A) Fig. 8 to start
the motor. Release the trigger
switch to stop the motor.
Fig. 8
A

14
SWITCH LOCK-OUT
Lock the switch in the "OFF" position when not in use (A)
Fig. 9. To unlock the switch, slide the switch forward (B) Fig. 10. Unlocking
the switch allows the tool to be turned "ON". Squeeze the trigger switch to
start the motor.
The saw is equipped with a variable speed control (0 to 2900 SPM). As the
switch trigger is squeezed, the speed of the saw blade increases.
Use the lower speeds for most metal cutting, and the higher speeds for
wood. A few practice cuts at various speeds (on scrap material), will aid you
in choosing the best speed for obtaining the desired results on your
application.
The guide shoe (A) Fig. 11 serves as a rest while making a cut. It pivots,
allowing you to gradually raise the saw handle so that the blade is per-
pendicular to the work.
VARIABLE SPEED
Fig. 9 Fig. 10
Fig. 11
AB
Use the supplied hex wrench to adjust the pivoting guide shoe. Loosen the
two hex screws located on the bottom of the front gear housing (A) Fig. 12.
Loosen both screws enough to allow the pivoting guide shoe to move freely.
Adjust to the desired position and securely tighten both screws.
NOTE: Do not adjust the pivoting guide shoe out so far that it loses contact
with the back screw. Doing so will cause the guide shoe to be unstable.
After adjusting, securely tighten both screws.
Fig. 12
A
B
ADJUSTING THE PIVOTING GUIDE SHOE
A

15
OPERATION
BEFORE YOU START TO WORK
Select the blade best suited for the workpiece. For greatest economy, use
the shortest blade suitable for the thickness of the workpiece.
Be sure that the workpiece is rigid. Securely clamp small workpieces in a
bench vise or to the work table. As the work progresses in scroll or curved
cut-out pieces, adust the material to accommodate the movement of the
saw. If the workpiece is large enough, you can hold it only by hand across
saw horses. The saw cuts freely with only slight feed pressure. Forcing the
saw will not make it cut faster.
PLUNGE CUTS
The Cordless Reciprocating Saw can be used for plunge cutting wood,
plywood, wallboard, and plastic materials. DO NOT attempt to plunge cut
metal.
Clearly mark the line of cut on the workpiece. Grasp the front housing with
one hand and the rear handle with your other hand.
To start the cut, rest the saw on the shoe bracket, align the blade with the
marked line of cut. (Fig. 13). Prevent the blade from touching the workpiece.
Start the saw. Using bracket as a pivot point, roll the saw forward by raising
the rear handle (Fig. 14) When the blade cuts through the workpiece,
continue raising the rear handle until the saw is perpendicular to the work
surface. Move the blade along the line of cut.
SAWING WOOD
The Cordless Reciprocating Saw is used much the same as a hand saw in
that it is moved toward you during the cutting operation. However, since the
blade cuts on the up-stroke (instead of the down-stroke as in the case of the
hand saw), the good or finish side of the work should face down during the
cutting operation.
Fig. 13 Fig. 14
USING THE SAW
SAWING METAL
When cutting angle, H-beam, I-beam, channel, etc., start the cut on the
surface where the greatest number of teeth will contact the work. To make a
pocket cut, drill a starting hole first. To extend blade life, cutting oil can be
applied to the work surface along the line of the cut.

16
MAINTENANCE
For assistance with your tool, visit our website at www.porter-cable.com for a
list of service centers or call the Porter-Cable help line at 1-800-487-8665.
TROUBLESHOOTING
KEEP TOOL CLEAN
Periodically blow out all air passages with dry compressed air. All plastic parts
should be cleaned with a soft damp cloth. NEVER use solvents to clean plastic
parts. They could possibly dissolve or otherwise damage the material.
Wear ANSI Z87.1 safety glasses while using compressed air.
FAILURE TO START
Should your tool fail to start, check to make sure the prongs on the cord plug are
making good contact in the outlet. Also, check for blown fuses or open circuit
breakers in the line.
LUBRICATION
This tool has been lubricated with a sufficient amount of high grade lubricant for
the life of the unit under normal operating conditions. No further lubrication is
necessary.
BRUSH INSPECTION
For your continued safety and electrical protection, brush inspection and
replacement on this tool should ONLY be performed by an AUTHORIZED
PORTER-CABLE SERVICE STATION or a PORTER-CABLE•DELTA FACTORY
SERVICE CENTER.
At approximately 100 hours of use, take or send your tool to your nearest
authorized Porter-Cable Service Station to be thoroughly cleaned and inspected.
Have worn parts replaced and lubricated with fresh lubricant. Have new brushes
installed, and test the tool for performance.
Any loss of power before the above maintenance check may indicate the need
for immediate servicing of your tool. DO NOT CONTINUE TO OPERATE TOOL
UNDER THIS CONDITION. If proper operating voltage is present, return your tool
to the service station for immediate service.

17
A complete line of accessories is available from your Porter-Cable•Delta
Supplier, Porter-Cable•Delta Factory Service Centers, and Porter-Cable
Authorized Service Stations. Please visit our Web Site www.porter-cable.com
for a catalog or for the name of your nearest supplier.
Since accessories other than those offered by
Porter-Cable•Delta have not been tested with this product, use of
such accessories could be hazardous. For safest operation, only
Porter-Cable•Delta recommended accessories should be used
with this product.
ACCESSORIES
REPLACEMENT PARTS
When servicing use only identical replacement parts. For a service parts list or
to learn more about Porter-Cable visit our website at www.porter-cable.com
SERVICE AND REPAIRS
All quality tools will eventually require servicing, or replacement of parts due to
wear from normal use. For assistance with your tool, visit our website at
www.porter-cable.com for a list of service centers or call the Customer Care
Department at 1-800-487-8665. All repairs made by our service centers are fully
guaranteed against defective material and workmanship. We cannot guarantee
repairs made or attempted by others.
Should you have any questions about your tool, feel free to write us at any time.
In any communications, please give all information shown on the nameplate of
your tool (model number, type, serial number, etc.).
SERVICE

18
PORTER-CABLE LIMITED
ONE YEAR WARRANTY
Porter-Cable warrants its Professional Power Tools for a period of one year from the date of original
purchase. We will repair or replace at our option, any part or parts of the product and accessories
covered under this warranty which, after examination, proves to be defective in workmanship or
material during the warranty period. For repair or replacement return the complete tool or accessory,
transportation prepaid, to your nearest Porter-Cable Service Center or Authorized Service Station.
Proof of purchase may be required. This warranty does not apply to repair or replacement required
due to misuse, abuse, normal wear and tear or repairs attempted or made by other than our Service
Centers or Authorized Service Stations.
ANY IMPLIED WARRANTY, INCLUDING THE IMPLIED WARRANTIES OF MERCHANTABILITY AND
FITNESS FOR A PARTICULAR PURPOSE, WILL LAST ONLY FOR ONE (1) YEAR FROM THE DATE
OF PURCHASE.
To obtain information on warranty performance please write to: PORTER-CABLE CORPORATION,
4825 Highway 45 North, Jackson, Tennessee 38305; Attention: Product Service. THE FOREGOING
OBLIGATION IS PORTER-CABLE’S SOLE LIABILITY UNDER THIS OR ANY IMPLIED WARRANTY
AND UNDER NO CIRCUMSTANCES SHALL PORTER-CABLE BE LIABLE FOR ANY INCIDENTAL
OR CONSEQUENTIAL DAMAGES. Some states do not allow limitations on how long an implied
warranty lasts or the exclusion or limitation of incidental or consequential damages, so the above
limitation or exclusion may not apply to you.
This warranty gives you specific legal rights and you may also have other legal rights which vary
from state to state.
WARRANTY

The following are trademarks of PORTER-CABLE
•
DELTA (Las siguientes son marcas registradas de PORTER-CABLE
•
DELTA S.A.) (Les
marques suivantes sont des marques de fabriquant de la PORTER-CABLE
•
DELTA): Auto-Set®, BAMMER®, B.O.S.S.®, Builder’s Saw®,
Contractor’s Saw®, Contractor’s Saw II™, Delta®, DELTACRAFT®, DELTAGRAM™, Delta Series 2000™, DURATRONIC™, Emc²™, FLEX®, Flying
Chips™, FRAME SAW®, Grip Vac™, Homecraft®, INNOVATION THAT WORKS®, Jet-Lock®, JETSTREAM®, ‘kickstand®, LASERLOC®, MICRO-
SET®, Micro-Set®, MIDI LATHE®, MORTEN™, NETWORK™, OMNIJIG®, POCKET CUTTER®, PORTA-BAND®, PORTA-PLANE®, PORTER-
CABLE®&(design), PORTER-CABLE®PROFESSIONAL POWER TOOLS, PORTER-CABLE REDEFINING PERFORMANCE™, Posi-Matic®, Q-
3®&(design), QUICKSAND®&(design), QUICKSET™, QUICKSET II®, QUICKSET PLUS™, RIPTIDE™&(design), SAFE GUARD II®, SAFE-LOC®,
Sanding Center®, SANDTRAP®&(design), SAW BOSS®, Sawbuck™, Sidekick®, SPEED-BLOC®, SPEEDMATIC®, SPEEDTRONIC®, STAIR EASE®,
The American Woodshop®&(design), The Lumber Company®&(design), THE PROFESSIONAL EDGE®, THE PROFESSIONAL SELECT®, THIN-
LINE™, TIGER®, TIGER CUB®, TIGER SAW®, TORQBUSTER®, TORQ-BUSTER®, TRU-MATCH™, TWIN-LITE®, UNIGUARD®, Unifence®,
UNIFEEDER™, Unihead®, Uniplane™, Unirip®, Unisaw®, Univise®, Versa-Feeder®, VERSA-PLANE®, WHISPER SERIES®,
WOODWORKER’S CHOICE™.
Trademarks noted with ™ and ® are registered in the United States Patent and Trademark Office and may also be registered in other countries.
Las Marcas Registradas con el signo de ™ y ® son registradas por la Oficina de Registros y Patentes de los Estados Unidos y también pueden
estar registradas en otros países. Marques déposées, indiquées par la lettre ™ et ®, sont déposées au Bureau des brevets d’invention et
marques déposées aux Etats-Unis et pourraient être déposées aux autres pays.
PORTER-CABLE • DELTA SERVICE CENTERS
(CENTROS DE SERVICIO DE PORTER-CABLE • DELTA)
(CENTRE DE SERVICE PORTER-CABLE • DELTA)
Parts and Repair Service for Porter-Cable
•
Delta Power Tools are Available at These Locations
(Obtenga Refaccion de Partes o Servicio para su Herramienta en los Siguientes Centros de Porter-Cable
•
Delta)
(Locations où vous trouverez les pièces de rechange nécessaires ainsi qu’un service d’entretien)
Authorized Service Stations are located in many large cities. Telephone 800-487-8665 or 731-541-6042 for assistance locating one. Parts and
accessories for Porter-Cable
•
Delta products should be obtained by contacting any Porter-Cable
•
Delta Distributor, Authorized Service
Center, or Porter-Cable
•
Delta Factory Service Center. If you do not have access to any of these, call 888-848-5175 and you will be directed to
the nearest Porter-Cable
•
Delta Factory Service Center. Las Estaciones de Servicio Autorizadas están ubicadas en muchas grandes ciudades.
Llame al 800-487-8665 ó al 731-541-6042 para obtener asistencia a fin de localizar una. Las piezas y los accesorios para los productos Porter-
Cable
•
Delta deben obtenerse poniéndose en contacto con cualquier distribuidor Porter-Cable
•
Delta, Centro de Servicio Autorizado o Centro
de Servicio de Fábrica Porter-Cable
•
Delta. Si no tiene acceso a ninguna de estas opciones, llame al 888-848-5175 y le dirigirán al Centro de
Servicio de Fábrica Porter-Cable
•
Delta más cercano. Des centres de service agréés sont situés dans beaucoup de grandes villes. Appelez au
800-487-8665 ou au 731-541-6042 pour obtenir de l’aide pour en repérer un. Pour obtenir des pièces et accessoires pour les produits Porter-
Cable
•
Delta, s’adresser à tout distributeur Porter-Cable
•
Delta, centre de service agréé ou centre de service d’usine Porter-Cable
•
Delta. Si
vous n’avez accès à aucun de ces centres, appeler le 888-848-5175 et on vous dirigera vers le centre de service d’usine Porter-Cable
•
Delta le
plus proche.
PC7.2-0105-164
CANADIAN PORTER-CABLE •DELTA SERVICE CENTERS
ALBERTA
Bay 6, 2520-23rd St. N.E.
Calgary, Alberta
T2E 8L2
Phone: (403) 735-6166
Fax: (403) 735-6144
BRITISH COLUMBIA
8520 Baxter Place
Burnaby, B.C.
V5A 4T8
Phone: (604) 420-0102
Fax: (604) 420-3522
MANITOBA
1699 Dublin Avenue
Winnipeg, Manitoba
R3H 0H2
Phone: (204) 633-9259
Fax: (204) 632-1976
ONTARIO
505 Southgate Drive
Guelph, Ontario
N1H 6M7
Phone: (519) 767-4132
Fax: (519) 767-4131
QUÉBEC
1515 Ave.
St-Jean Baptiste, Suite 160
Québec, P.Q.
G2E 5E2
Phone: (418) 877-7112
Fax: (418) 877-7123
1447, Begin
St-Laurent, (Mtl), P.Q.
H4R 1V8
Phone: (514) 336-8772
Fax: (514) 336-3505
ARIZONA
Tempe 85282 (Phoenix)
2400 West Southern Avenue
Suite 105
Phone: (602) 437-1200
Fax: (602) 437-2200
CALIFORNIA
Ontario 91761 (Los Angeles)
3949A East Guasti Road
Phone: (909) 390-5555
Fax: (909) 390-5554
San Diego 92111
7638 Clairemont Blvd.
Phone: (858) 277-9595
Fax: (858) 277-9696
San Leandro 94577 (Oakland)
3039 Teagarden Street
Phone: (510) 357-9762
Fax: (510) 357-7939
COLORADO
Arvada 80003 (Denver)
8175 Sheridan Blvd., Unit S
Phone: (303) 487-1809
Fax: (303) 487-1868
FLORIDA
Davie 33314 (Miami)
4343 South State Rd. 7 (441)
Unit #107
Phone: (954) 321-6635
Fax: (954) 321-6638
Tampa 33609
4538 W. Kennedy Boulevard
Phone: (813) 877-9585
Fax: (813) 289-7948
GEORGIA
Forest Park 30297 (Atlanta)
5442 Frontage Road,
Suite 112
Phone: (404) 608-0006
Fax: (404) 608-1123
ILLINOIS
Addison 60101 (Chicago)
400 South Rohlwing Rd.
Phone: (630) 424-8805
Fax: (630) 424-8895
Woodridge 60517 (Chicago)
2033 West 75th Street
Phone: (630) 910-9200
Fax: (630) 910-0360
MARYLAND
Elkridge 21075 (Baltimore)
7397-102 Washington Blvd.
Phone: (410) 799-9394
Fax: (410) 799-9398
MASSACHUSETTS
Franklin 02038 (Boston)
Franklin Industrial Park
101E Constitution Blvd.
Phone: (508) 520-8802
Fax: (508) 528-8089
MICHIGAN
Madison Heights 48071 (Detroit)
30475 Stephenson Highway
Phone: (248) 597-5000
Fax: (248) 597-5004
MINNESOTA
Minneapolis 55429
5522 Lakeland Avenue North
Phone: (763) 561-9080
Fax: (763) 561-0653
MISSOURI
North Kansas City 64116
1141 Swift Avenue
Phone: (816) 221-2070
Fax: (816) 221-2897
St. Louis 63119
7574 Watson Road
Phone: (314) 968-8950
Fax: (314) 968-2790
NEW YORK
Flushing 11365-1595 (N.Y.C.)
175-25 Horace Harding Expwy.
Phone: (718) 225-2040
Fax: (718) 423-9619
NORTH CAROLINA
Charlotte 28270
9129 Monroe Road, Suite 115
Phone: (704) 841-1176
Fax: (704) 708-4625
OHIO
Columbus 43214
4560 Indianola Avenue
Phone: (614) 263-0929
Fax: (614) 263-1238
Cleveland 44125
8001 Sweet Valley Drive
Unit #19
Phone: (216) 447-9030
Fax: (216) 447-3097
OREGON
Portland 97230
4916 NE 122 nd Ave.
Phone: (503) 252-0107
Fax: (503) 252-2123
PENNSYLVANIA
Willow Grove 19090 (Philadelphia)
520 North York Road
Phone: (215) 658-1430
Fax: (215) 658-1433
TEXAS
Carrollton 75006 (Dallas)
1300 Interstate 35 N, Suite 112
Phone: (972) 446-2996
Fax: (972) 446-8157
Houston 77043
4321 Sam Houston Parkway, West
Suite 180
Phone: (713) 983-9910
Fax: (713) 983-6645
WASHINGTON
Auburn 98001(Seattle)
3320 West Valley HWY, North
Building D, Suite 111
Phone: (253) 333-8353
Fax: (253) 333-9613
Other manuals for 837
1
This manual suits for next models
4
Table of contents
Other Porter-Cable Cordless Saw manuals

Porter-Cable
Porter-Cable 90562807 User manual

Porter-Cable
Porter-Cable 845 User manual

Porter-Cable
Porter-Cable 837 User manual

Porter-Cable
Porter-Cable 735 User manual

Porter-Cable
Porter-Cable Cordless Reciprocating Saw User manual

Porter-Cable
Porter-Cable 90550119 User manual

Porter-Cable
Porter-Cable PCC650B User manual