BEFORE YOU START
•Please ensure that you check all the component parts for quantity and quality before you
commence building the product. Report any missing parts immediately. The manufacturer will
not accept any responsibility for damaged items once any part of the product has been fitted or
altered in any way.
•Timber is a natural material and will react to varying levels of moisture content - ie. will swell or
shrink. All of the Timber components are pressure treated green. However, should extra
protection be required, they should be treated using a wood preservative treatment, following the
manufacturers instructions.
HEALTH AND SAFETY
Do N
NO
OT
Toverstretch when working from the step ladder.
In order to reduce the risk of suffocation please keep all plastic bags and small parts away from children.
•When you are ready to start, make sure you have the right tools to hand, plenty of space and a
clean, dry area for assembly.
It is advisable for two people to erect the structure.
PREPARATION
Make sure the area where the Portico is to be positioned is clear and ready for building the structure.
Thank you for choosing this garden structure from Grange Fencing Ltd. In order to gain the most
benefit from it please read the following instructions carefully.
TOOLS REQUIRED (Not Supplied)
POWER SCREWDRIVER
TAPE MEASURE
STEPLADDER
SPIRIT LEVEL
METCRETE POST FIX CONCRETE
PARTS LIST
POSTS 4
SQUARE TRELLIS 2
RAFTERS 2
RAFTERS 4
HARDWARE PACK
SCREW 32
ASSEMBLY
INSTRUCTIONS
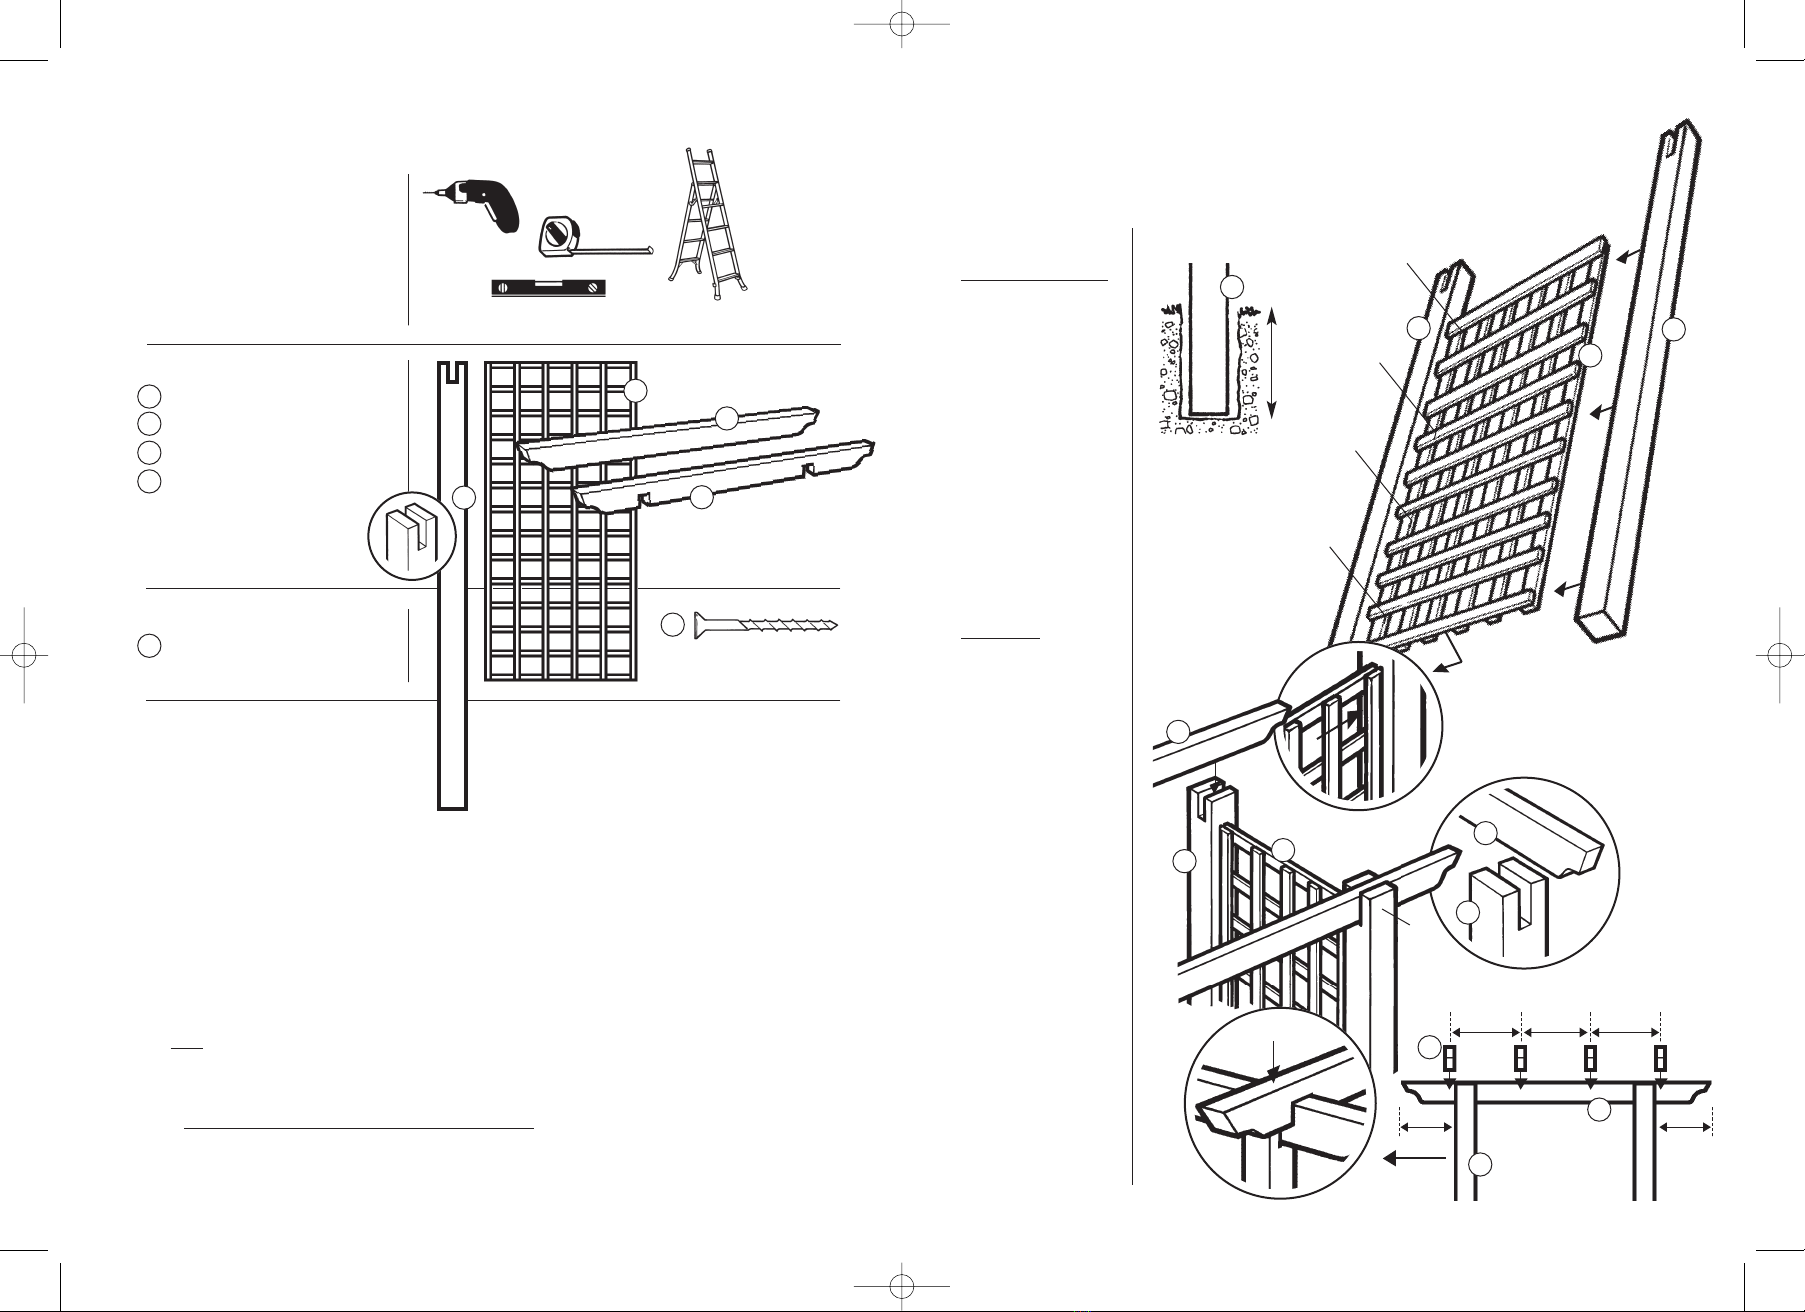
SITE PREPARATION
The Portico Pergola is
intended to be fixed into
the ground for stability.
There is some
adjustment available for
variations in path
widths. Determine the
width required and
mark out the area
where the structure is
to be sited using the
footprint shown right.
Excavate a hole for
each post to a depth of
300mm (see fig.1). This
will give your structure
adequate stability. (see
the note about fixing
your posts with
MetCrete (right).
ASSEMBLY
STEP 1
Take a Post (A) and
Trellis (B) and, using
four screws equally
spaced down the length
of the trellis, fix the
trellis to the post as
shown in Fig.2.
STEP 2
Fix a second post to the
other side of the trellis
in the same way.
STEP 3
Repeat for the second
trellis and two posts.
STEP 4
Site the two assemblies
into the prepared holes.
STEP 5
Fix one of the Rafters
(C) into the top of the
post slots as Fig.3 using
two screws through the
top of the post into the
rafter.
ENSURE THE POSTS
ARE VERTICAL AND
EQUALLY SPACED.
A
B
C
D
x
x
SITE
PREPARATION
300mm
A
B
D
C
Fig.2
Fig.1
A
B
x
x
x
x
A
D
C
AWe would
recommend that
you use MetCrete,
fast set post fixing
concrete to fix
your posts. Easy
to use, it sets in
just 10 minutes.
===
x
A
C
==
Fig.3
A
D
A
B
C
C
x
x
Portico Pergola Inst 8/7/11 10:35 Page 2


