POSBank A8 Prime User manual
www.POSBANK.com
WIFI/Bluetooth Interface Setting Manual
POS Thermal Receipt Printer
A8 PRIME/STANDARD
User Manual
(Revision 1.0.1)
2020-07-13

www.POSBANK.com
Table of Contents
1. Manual Information .................................................................................................................................................................... 3
2. Product Specification .............................................................................. 오류! 책갈피가 정의되어 있지 않습니다.
3. Configuration .............................................................................................. 오류! 책갈피가 정의되어 있지 않습니다.
3-1 Station Setting ........................................................................................................................................................................... 4
3-2. Bluetooth Setting .................................................................................................................................................................... 8
3-3. Firmware Update .................................................................................................................................................................. 10
4. Factory Reset .............................................................................................................................................................................. 14

www.POSBANK.com
1. Manual Information
This manual provides the information how to use WIFI/Bluetooth interface.
We at POSBANK maintain ongoing efforts to enhance and upgrade the functions and quality of all our products.
In following, product specifications and/or user manual contents may be changed without prior notice.
2. Product Specification
- WIFI :
802.11 b/g/n (802.11n up to 150MBps) / 2.4 ~ 2.5Ghz
Mode : SoftAP / Station
Security : WPA/WPA2/WPA2-Enterprise/WPS
Encryption : AES/RSA/ECC/SHA
Firmware Upgrade : Wireless OTA (Web Page)
Network Protocol : TCP/UDP/HTTP/ICMP
- Bluetooth : Bluetooth Classic 2.0 / SPP & RFCOMM Protocol

www.POSBANK.com
3. Configuration
3-1 Station Setting (When you see AP of “A8_PRINTER_XXXXXX” in WIFI networks listed on mobile or other devices,
you can ignore below procedures 1~5.)
1) Press and hold “Feed” button and press “Power” button once.
2) Keep pressed “Feed” button until “Setting Mode” is printed as below.
3) After below content is printed, press “Feed” button 18 times and select “Wireless Mode”.
4) After below content is printed, press “Feed” button once, select “WiFi SoftAP”.
5) When you search WIFI on the PC which WiFi Dongle is installed, you can see AP which is written as
“A8_PRINTER_XXXXXX”.
***
Setting Mode
***
1. Step by Step
2. Serial Baudrate
3. Serial Parity-bit
4. Serial Handshaking
5. Error Sound
6. Print Speed
7. Print Density
8. Auto Cut
9. Auto Cut Mode
10. Code Page
11. Int’ | Character Set
12. External Buzzer
13. Font System
14. USB Mode
15. Paper Width
16. Paper Type
17. DHCP Mode (for Ethernet)
18. Wireless Mode
19. Black Mark Mode
20. Auto Load Mode
21. Sensing Level
Setting
the Wireless Mode
1. WiFi SoftAP *
2. WiFi Station
3. Bluetooth
www.POSBANK.com
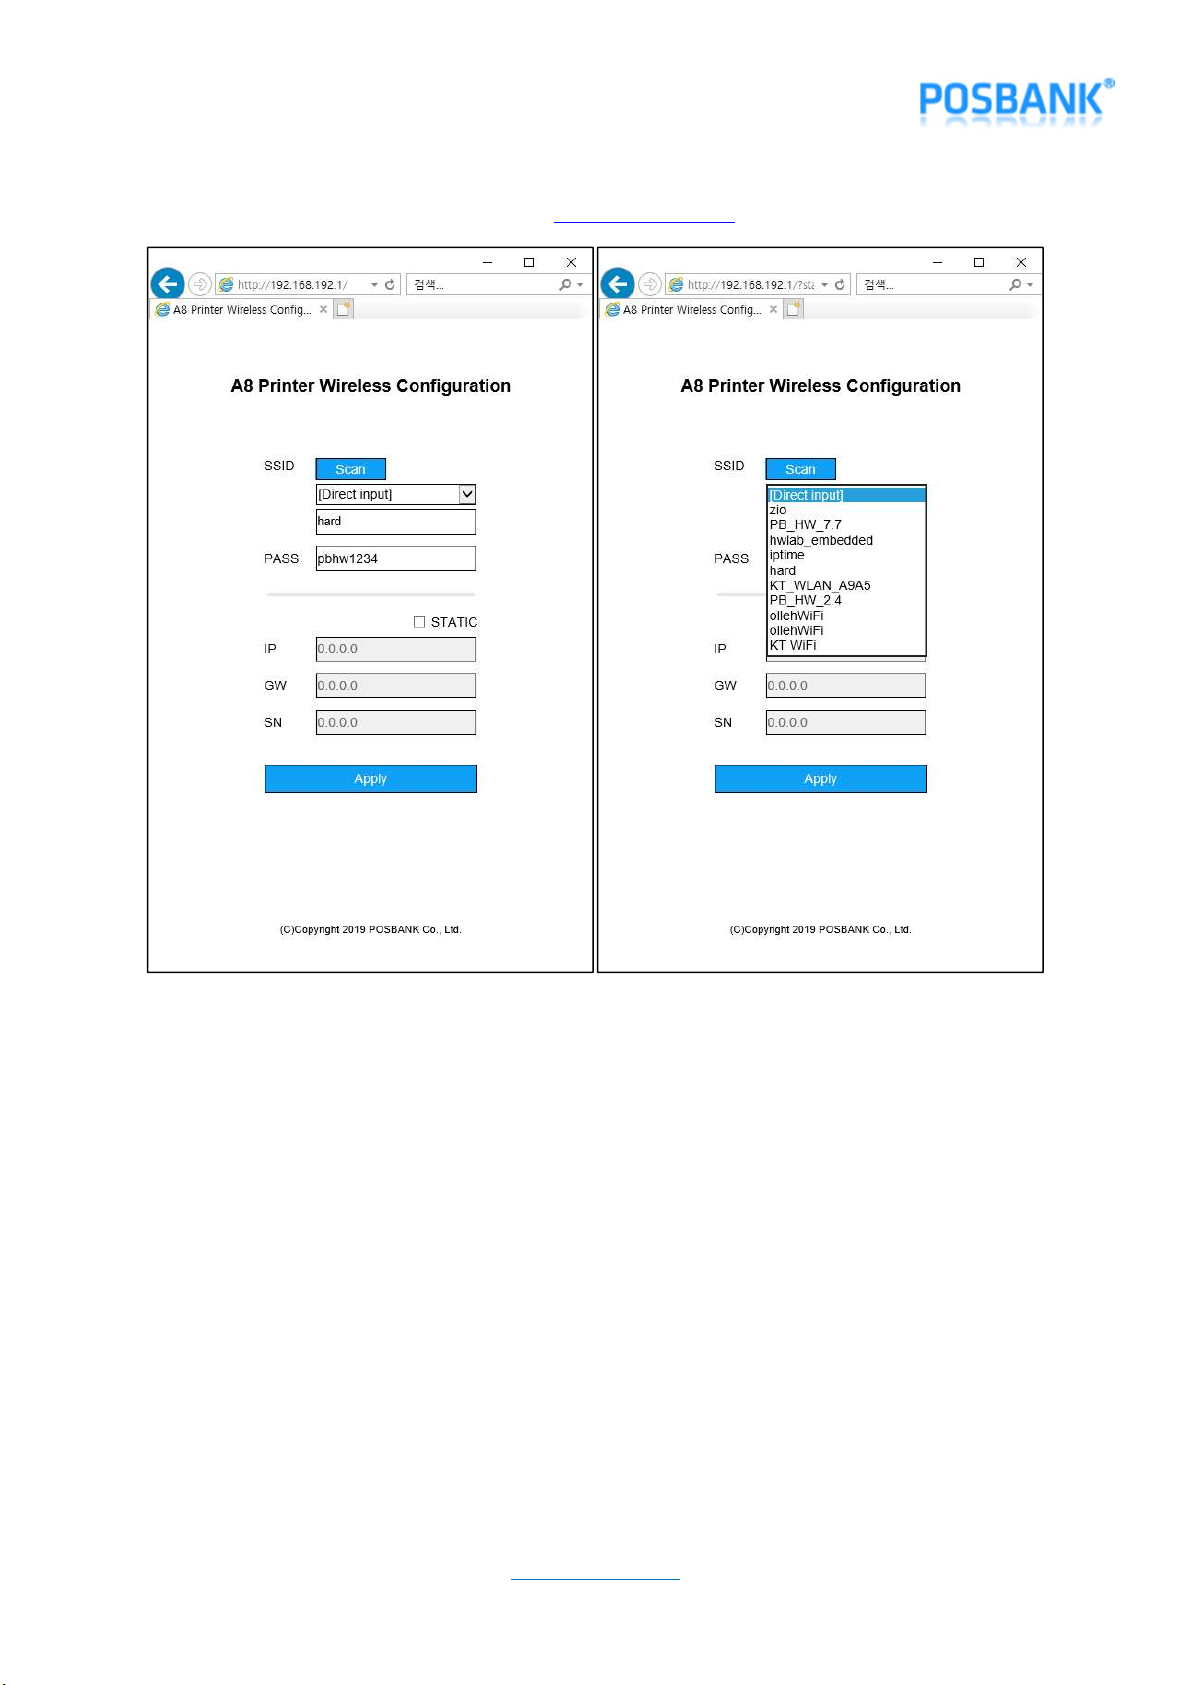
6) Open the Web browser, type the IP address http://192.168.192.1 and load setup page as below.
7) When you press “Scan” from the SSID list, 10 WIFI AP strongly sensed around you is searched within 5
seconds and registered to Combo Box. If you click Combo Box and select SSID of AP which you want to
access and enter “PASS” and download IP address information with DHCP server, uncheck “STATIC” and
enter “IP/GW/SN”.
8) If you access by entering SSID directly, select “[Direct Input]” on Combo Box and enter “SSID” and “PASS”
of AP. If you download IP address information with DHCP server, uncheck “STATIC” and enter “IP/GW/SN”.
9) After inputting all items, click “Apply”.
www.POSBANK.com
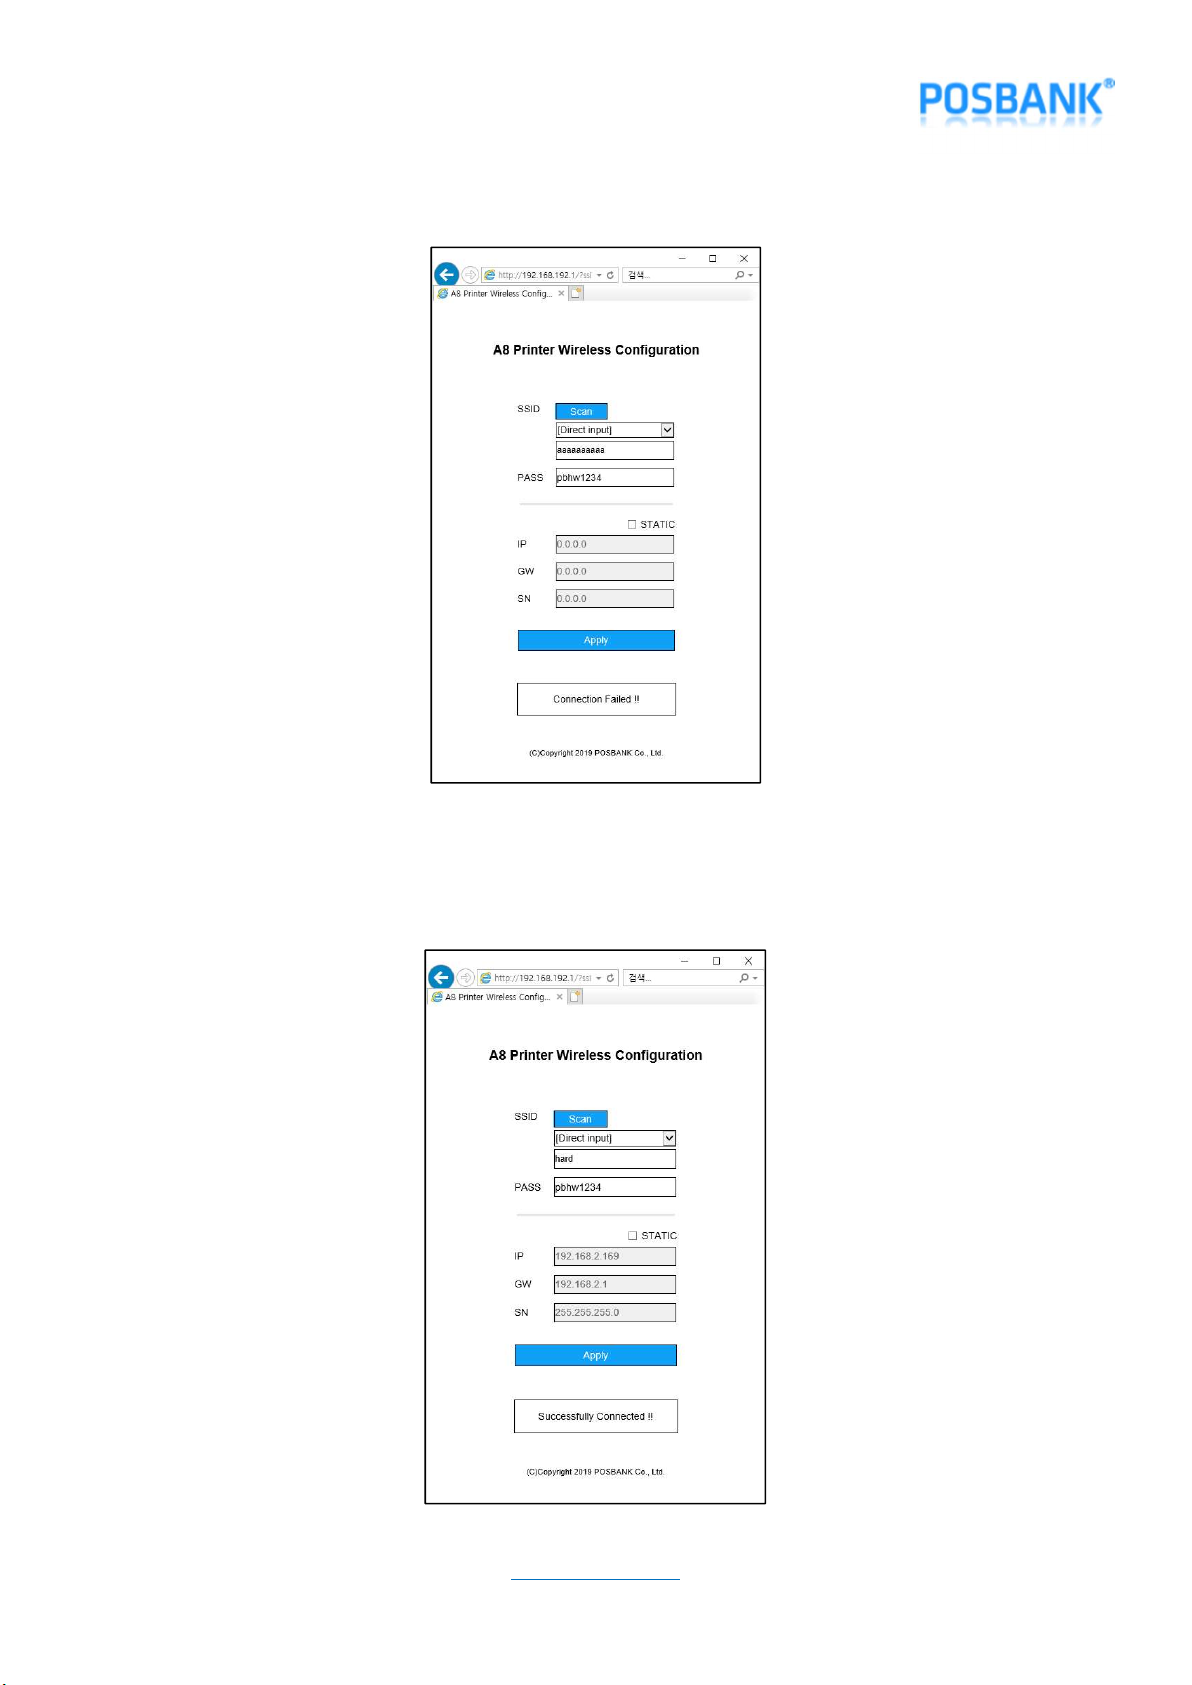
10) “Connection Failed!!” message pops up as below if you fail to access AP.
11) When the connection is succeeded, “Successfully Connected!!” message is displayed as below and it works
as “WiFi Station” mode from next time.
www.POSBANK.com
12) When you turn off and press “Feed” button and then press “Power” button, you can see the setting as
below.
( Model : A8 PRIME )
F/W P1.09-CAP06[2019/04/24]
****************************************************
…………..
[ USB Mode ] - - - - - - - - - - - - -> Actual USB
[ Paper Width ] - - - - - - - - - - - -> 80mm
[ Paper Type ] - - - - - - - - - - - - -> TF50KS-E2D
[ Black Mark Mode ] - - - - - - - - -> Disable
[ Auto Load Mode ] - - - - - - - - - -> Disable
[ Sensing Level ] - - - - - - - - - - - -> Level 7
[ Mark Range ] - - - - - - - - - - - - -> 169mm
-------------- Ethernet Configuration ---------------
[ DHCP mode ] : Disable (Static IP)
[ Static IP ] : 192.168.10.10
[ Gateway IP ] : 192.168.10.1
[ Subnet Mask ] : 255.255.255.0
[ Local Port ] : 9100
[ Inact. Time ] : 0
[ MAC Address ] : 60-04-17-30-00-00
-------------- Wireless Configuration ---------------
[ Mode ] : WiFi Station
[ SSID ] : hard
[ Password ] : pbhw1234
[ DHCP Mode ] : Enable (Dynamic IP)
[ IP Address ] : 192.168.2.169
[ Gateway IP ] : 192.168.2.1
[ Subnet Mask ] : 255.255.255.0
[ DNS Server 1 ] : 0.0.0.0
[ DNS Server 2 ] : 0.0.0.0
[ MAC Address ] : 24-6F-28-42-DA-90
[ Channel ] : 1
[ TxPower ] : 19.5dBm
[ RSSI] : 0dBm
******************************************************
If you want to continue
Please press the FEED button
www.POSBANK.com
3-2. Bluetooth Setting
1) Press and hold “Feed” button and press “Power” button once.
2) Keep pressed “Feed” button until “Setting Mode” is printed as below.
3) After below content is printed, press “Feed” button 18 times and select “Wireless Mode”.
4) After below content is printed, press “Feed” button 3 times and select “Bluetooth”.
***
Setting Mode
***
1. Step by Step
2. Serial Baudrate
3. Serial Parity-bit
4. Serial Handshaking
5. Error Sound
6. Print Speed
7. Print Density
8. Auto Cut
9. Auto Cut Mode
10. Code Page
11. Int’ | Character Set
12. External Buzzer
13. Font System
14. USB Mode
15. Paper Width
16. Paper Type
17. DHCP Mode (for Ethernet)
18. Wireless Mode
19. Black Mark Mode
20. Auto Load Mode
21. Sensing Level
Setting
the Wireless Mode
1. WiFi SoftAP *
2. WiFi Station
3. Bluetooth
www.POSBANK.com
5) When you turn off A8 Printer and turn on by pressing and holding “Feed” button, you can see the
configured Bluetooth information as below.
( Model : A8 PRIME )
F/W P1.09-CAP06[2019/04/24]
****************************************************
…………..
[ USB Mode ] - - - - - - - - - - -> Actual USB
[ Paper Width ] - - - - - - - - - -> 80mm
[ Paper Type ] - - - - - - - - -> TF50KS-E2D
[ Black Mark Mode ] - - - - - -> Disable
[ Auto Load Mode ] - - - - - - -> Disable
[ Sensing Level ] - - - - - - - - -> Level 7
[ Mark Range ] - - - - - - - - -> 169mm
-------------- Ethernet Configuration ---------------
[ DHCP mode ] : Disable (Static IP)
[ Static IP ] :192.168.10.10
[ Gateway IP ] :192.168.10.1
[ Subnet Mask ] :255.255.255.0
[ Local Port ] :9100
[ Inact. Time ] :0
[ MAC Address ] :60-04-17-30-00-00
-------------- Wireless Configuration ---------------
[ Mode ] : Bluetooth
[ Device Name ] : A8_PRINTER_######
[ PIN-Code ] : 0000
[ MAC Address ] : 24-6F-28-42-DA-90
[ Auth ] : 2
[ RSSI] : -42dBm
*****************************************************
If you want to continue
Please press the FEED button

www.POSBANK.com
3-3. Firmware Update (When you see AP of “A8_PRINTER_XXXXXX” in WIFI networks listed on mobile or other
devices, you can ignore below procedures 1~5)
1) Press and hold “Feed” button and press “Power” button once.
2) Keep pressed “Feed” button until “Setting Mode” is printed as below.
3) After below content is printed, press “Feed” button 18 times and select “Wireless Mode”.
4) After below content is printed, press “Feed” button once and select “WiFi SoftAP”.
5) When you search WIFI on the PC which WiFi Dongle is installed, you can see AP which is written as
“A8_PRIME_XXXXXX”.
***
Setting Mode
***
1. Step by Step
2. Serial Baudrate
3. Serial Parity-bit
4. Serial Handshaking
5. Error Sound
6. Print Speed
7. Print Density
8. Auto Cut
9. Auto Cut Mode
10. Code Page
11. Int’ | Character Set
12. External Buzzer
13. Font System
14. USB Mode
15. Paper Width
16. Paper Type
17. DHCP Mode (for Ethernet)
18. Wireless Mode
19. Black Mark Mode
20. Auto Load Mode
21. Sensing Level
Setting
the Wireless Mode
1. WiFi SoftAP *
2. WiFi Station
3. Bluetooth
Other manuals for A8 Prime
1
This manual suits for next models
1
Table of contents
Other POSBank Printer manuals


