Power Master IntelliCHARGER User manual

Powermaster IntelliCHARGER
Microprocessor Controlled Three-Stage 12V/16V
Automatic Battery Charger
P/N 1005
User Guide

Powermaster IntelliCHARGER
User Guide
Contents
About Powermaster
Powermaster designs and manufactures custom charging and starting solutions for street rods, racing
applications, custom car audio. These products include high performance starters, alternators, batteries,
and related accessories for the performance automotive industry.
Trademarks
Trademarks, registered trademarks, and product names are the property of their respective owners and
are used herein for identification purposes only.
Notice of Copyright
IntelliCHARGER User Guide © January 2006 by Powermaster. All rights reserved.
Disclaimer
UNLESS SPECIFICALLY AGREED TO IN WRITING, POWERMASTER:
(a) MAKES NO WARRANTY AS TO THE ACCURACY, SUFFICIENCY OR SUITABILITY OF ANY TECHNICAL OR
OTHER INFORMATION PROVIDED IN ITS MANUALS OR OTHER DOCUMENTATION.
(b) ASSUMES NO RESPONSIBILITY OR LIABILITY FOR LOSS OR DAMAGE, WHETHER DIRECT, INDIRECT,
CONSEQUENTIAL OR INCIDENTAL, WHICH MIGHT ARISE OUT OF THE USE OF SUCH INFORMATION.
THE USE OF ANY SUCH INFORMATION WILL BE ENTIRELY AT THE USER’S RISK.
The following conventions are used in this guide.
WARNING
Warnings identify conditions that could result in personal injury or loss of life.
CAUTION
Cautions identify conditions or practices that could result in damage to the charger or battery.
*Important*: These notes describe an important item that you must pay attention to.
IntelliCHARGER User Guide
Chapter 1, Introduction .........................................................................................p. 1-6
Quick Start Guide
Chapter 1 contains information on the features, the switches, and indicators
on the front panel of the IntelliCHARGER.
Chapter 2, Operation ............................................................................................p. 7-9
Chapter 2 explains how to operate the IntelliCHARGER correctly to charge a
performance battery.
Chapter 3, Troubleshooting ....................................................................................p. 10
Chapter 3 will help you identify and correct the common problems than can
occur with the IntelliCHARGER.
Appendix A, Specifications .....................................................................................p. 11
Appendix A lists the specifications for the IntelliCHARGER.
Appendix B, Battery Charging ...............................................................................p. 12
Appendix B describes battery charging in more detail.
FAQs .................................................................................................................... p. 13-14
Warranty .............................................................................................................. p. 15-16
Contact Information ...................................................................................................p. 17

1
2
IntelliCHARGER User Guide
Chapter 1
Important Safety Instructions
The IntelliCHARGER generates a low DC voltage and high DC current to the battery
being charged. Operating the IntelliCHARGER incorrectly or misusing it may damage
the charger or create hazardous conditions for the user.
Save these instructions. This guide contains important safety and operating instructions.
WARNING: Explosion hazard
• The IntelliCHARGER is designed to charge 12V and 16V lead acid batteries of
all types. Do not attempt to use with batteries of other voltages.
• Do not use this product where there are flammable fumes or gases.
• Do not use this product in an enclosure containing lead acid batteries. These
batteries vent explosive hydrogen gas, which can be ignited by sparks
from electrical connections.
• Never attempt to charge a frozen battery.
• Do not connect DC clamps to the carburetor, fuel lines, or sheet metal body
parts.
WARNING: Shock hazard. Keep away from children.
• Do not expose the IntelliCHARGER to water or rain.
• Do not open the IntelliCHARGER. There are no user serviceable parts inside
the unit. For service see the Returns policy in the back of this guide.
WARNING: Heated surface
• Ensure at least 2" (5 cm) air space is maintained on all sides of the
IntelliCHARGER.
CAUTION
• An extension cord should not be used unless absolutely necessary. Use of an
undersized extension cord will adversely affect the output of the product and
could prove to be dangerous. If an extension cord must be used, make sure that
pins on the plug of the extension cord are the same number, size and shape as
those of the plug on the charger. We recommend a minimum of a 16AWG cord
for lengths up to 50’ and a minimum of a 14AWG cord for lengths up to 100’.
We do not recommend cords over 100’. Do not use this product with an
ungrounded extension cord.
• Do not expose the IntelliCHARGER to temperatures over 104 °F (40 °C).
• Be sure AC and DC cords are not pinched or otherwise damaged by hoods,
doors, or other moving engine components.
• Observe battery polarity.
*IMPORTANT*
• If this charger is to be used with a portable generator, it should be equipped
with automatic voltage regulation to ensure consistent output of the product.

3
4
IntelliCHARGER User Guide
Chapter 1
Features of the IntelliCHARGER
The IntelliCHARGER is an advanced battery charger designed specifically for high
performance lead-acid batteries. This charger combines the reliability of a transformer
and MOSFET rectifier assembly with an advanced microprocessor control board to
create a battery charger that can rapidly and safely recharge 12V and 16V flooded,
maintenance free, deep cycle, gel-cell, and AGM (Absorbed Glass Mat) batteries in
several sizes. The front panel switches, LED indicators, and charge meter make the
IntelliCHARGER easy to use.
Three Stage Charging
At the heart of the technology in the Powermaster Performance battery charger are
the three distinct charging stages. During the first stage, called “Bulk” charging, the
current is fixed according to the charge rate switch on the front panel and the voltage is
allowed to float. During this stage, 80% of the battery’s capacity is restored.
When the battery’s cell voltage comes up to the correct level, the second stage called
“Absorption” charging is engaged. During this stage the voltage is fixed according to
the battery type and voltage switches on the front panel and the current is allowed to
float. The battery is brought to 100% during this stage and the cells are equalized.
The third stage is float charging. During this stage the voltage and current are reduced
to a level that will maintain the battery indefinitely.
Several microprocessors are used to tightly control the entire process. This is the same
technique that battery manufacturers recommend and use in the production of new
batteries and it is the fastest and safest technique for battery charging.
Compatible With All Lead Acid Batteries Including AGM
Lead acid batteries have different charging requirements based on their specific design.
Flooded and maintenance free batteries require a higher voltage per cell than do
sealed valve regulated types such as AGM and gel-cell batteries. Overcharging will
reduce the life of any battery as sealed valve regulated batteries are especially sensitive
to high charging voltages and overcharging. Overcharging an AGM or gel-cell battery
will cause permanent damage. The proper charging level can be selected by means of
a battery type switch on the front panel.
12V and 16V operation
This allows for one charger to cover two battery voltages.
Three Charging Levels
The user can select three different charging levels depending on the size of the battery
and the recharge time available. 2A, 15A, or 25A can be selected by one of the front
panel switches making the application of this charger very flexible.
Charge Rate Ammeter
The Battery Charger features an ammeter allowing the user to monitor the charging
progress.
Voltage Monitoring
The battery’s terminal voltage is measured every five minutes by the on-board
microprocessors and this information is analyzed in addition to the elapsed time to
dynamically control the Battery Charger for optimum charging performance.
Automatic Computer Analysis/Auto Shutdown
The microprocessors will analyze the battery when connected. If the battery’s voltage is
below 4V or the battery will not come up to the correct voltage in a ten-hour period the
charger will automatically shut off.
UL Approved Battery Cables
Six feet of durable battery cables are provided that are resistant to cuts and abrasion.
The copper plated battery clamps are compact and custom designed easy connections.
All clamp connections are soldered for maximum current flow.
Internal Cooling Fan
A cooling fan automatically operates during charging to keep the transformer and
other internal components at a constant safe temperature.
5
6
IntelliCHARGER User Guide
Chapter 1
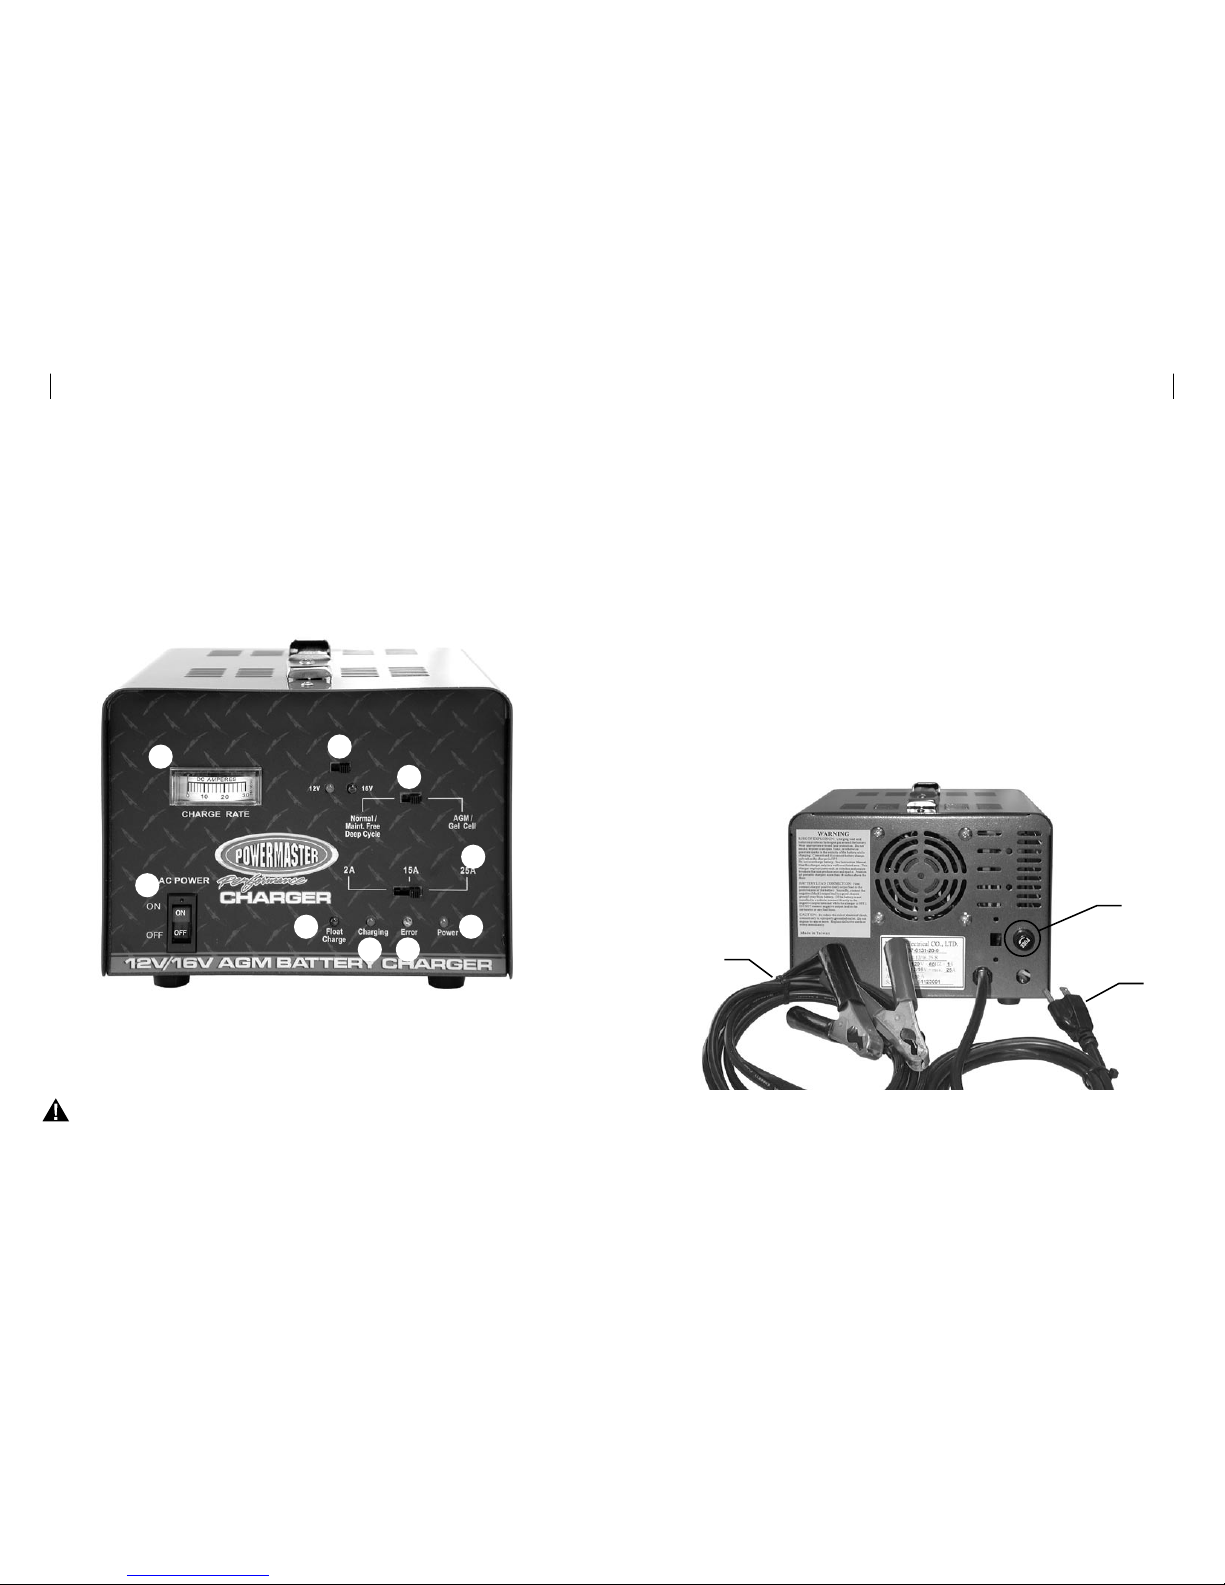
1) Charge Rate Ammeter: Displays the amount of current flowing into the battery.
During stage one or bulk charging this will be the selected charge rate. During
stage two or absorption charging, this rate will naturally fall to zero as the battery
percent of charge approaches 100%. During float charge, this will read close to
zero.
2) Voltage Select Switch: Allows the user to select the appropriate battery
voltage. LED indicators illuminate for either 12V (six cell) or 16V (eight cell)
batteries respectively.
3) Battery Type switch: Allows the user to select the appropriate battery type. One
setting is for Flooded, Maintenance Free, and Deep Cycle types and the other is for
AGM/Gel-Cell types.
CAUTION: It is important to select the correct battery type.
4) Charge Rate switch: Selects 2A, 15A, or 25A as the base rate for stage one or
bulk charging. In general, the charge rate should match the size of the battery.
See Appendix B for more detail.
Front and Rear Panel Switches and Indicators
10) Fuse holder: Contains a 10A fuse in case of overload.
11) AC cord: Grounded 3-pin 110V cord for use with grounded outlets only.
12) Battery clamps and cord: Allow for connection to the battery.
5) Power indicator: Illuminates when the input AC power is applied.
6) Error indicator: Illuminates when the battery cannot be completely charged in a
10-hour period at the selected charge rate. Switch the charger OFF and remove
the battery connections. Insure the battery polarity is correct, and if so, replace
the battery.
7) Charging indicator: Illuminates when the charger is in stage one bulk
charging or stage two absorption charging.
8) Float Charge indicator: Illuminates when the charger is in stage three or float
charge mode.
9) ON/OFF switch: Connects AC power to the charger.
10
12
11
1
3
4
2
5
6
7
8
9
Rear Panel

7
8
Operation
Charging Lead Acid Batteries
WARNING: Before you start to charge batteries read the “Important Safety
Instructions” on page v and take all safety precautions when working with batteries.
The IntelliCHARGER has been designed to provide fully automatic recharge of 12V or
16V flooded, maintenance free, deep-cycle, AGM and gel-cell batteries.
To charge your 12V or 16V battery:
1) If possible, disconnect all loads from the battery, by removing battery cables,
opening a disconnect switch, or switching loads off.
CAUTION!
Althoughthisisbest,inaracingenvironmentthismaynotbepossible. Supplimentalloads
suchasanelectricwaterpumporcoolingfansmaybeoperatedwhilechargingduring
stageone. Pleasenotethoughthatsupplimentalloadswillreducetheamountofamperage
availabletothebattery. Thechargerdetectsthatabattery is fully charged when its charging
currentdropsbelowapresetlimitinaspecificelapsedtime. Thepresenceofelectrical
loadsonthebattery will interfere with this process. Therefore when the charger is in stage
two-absorptionchargingitisnecessary for the batterytobeisolatedfromloads. The
IntelliCHARGERisinstage-twowhenthechargerateisdeclining.
3) Select the correct battery voltage.
4) Select the correct battery type.
5) Select the correct charging rate.
(The Powermaster Performance 16V AGM battery should be charged at 15A
when at the shop or 25A for rapid charging at the track.)
6) Connect the red positive (+) clip of the charger cables to the positive (+)
terminal of the vehicle battery.
7) Connect the black negative (–) clip of the charger cables to a solid chassis
ground. If this is not possible, connect it to the negative (–) battery terminal.
8) Flip the power switch on the front panel to ON.
The microprocessors will analyze the battery and then after a short delay, the “Charging
Status” indicator on the front panel will illuminate beginning the three-stage charging
sequence. During charging, the charging current can be reset to a different charge rate if
necessary.
Precautions When Working With
Lead Acid Batteries
Follow all instructions published by the battery manufacturer and the manufacturer of
the equipment in which the battery is installed.
1) Make sure the area around the battery is well ventilated.
2) Never smoke or allow a spark or flame near the battery(ies).
3) Use caution to reduce the risk of dropping a metal tool on the battery.
It could spark or short circuit the battery or other electrical parts and thereby
cause an explosion.
4) Remove all metal items, like rings, bracelets, and watches when working
with lead-acid batteries. Lead acid batteries produce a short circuit current
high enough to cause a severe burn.
5) Have plenty of fresh water and soap nearby in case battery acid contacts
skin, clothing, or eyes.
6) Wear complete eye protection and clothing protection. Avoid touching your
eyes while working near batteries.
7) If battery acid contacts skin or clothing, wash immediately with soap and
water. If acid enters your eye, immediately flood it with running cold water
for at least twenty minutes and get medical attention immediately.
8) If you need to remove a battery, always remove the ground terminal from
the battery first. Make sure all accessories are off to minimize the potential
of a spark.
9) Someone should be in the range of your voice or close enough to come to
your aid when working with a lead-acid battery.
10) Do not attempt to remove the vent covers on sealed lead acid batteries such
as the Powermaster 16V AGM battery. Sealed batteries operate on a slight
positive cell pressure. Venting this pressure will ruin the battery.
IntelliCHARGER User Guide
Chapter 2

9
10
CAUTION: Do not change the voltage type during charging.
CAUTION: Use the correct battery type at all times. Do not charge AGM & Gel-
cell batteries in the “Flooded” mode.
During stage one-bulk charging, the amperage shown on the charge rate
ammeter will match the charge rate selected. During stage two-absorption
charging the amperage will start to fall to zero as the battery comes up
to 100%. When the charging process is complete, the Charging indicator
light will go out and the Float Charge indicator will come on. The cooling
fan inside the charger will stop and the battery can be left in this state
indefinitely.
Note that the charger will automatically restart the charging sequence if the
charge current rises above a factory preset threshold.
9) When complete, flip the power switch to OFF.
10) Remove the black negative (–) clip and the red positive (+) clip from the
vehicle’s battery terminals.
IntelliCHARGER User Guide
Chapter 3
Chapter 3 will help you identify and remedy the common problems than can occur with
the IntelliCHARGER. Please read this chapter before calling Customer Service. If you
cannot solve the problem with the IntelliCHARGER, record the information asked for on
“Information About Your System” on the back page and then call Customer Service.
WARNING: Electric shock hazard
Do not disassemble the IntelliCHARGER. The IntelliCHARGER does not contain any
internal user-serviceable parts and attempting to service the unit yourself could result
in electrical shock or burn.
•Power light does not come on when the power switch is flipped to ON:
Check fuse.
Check cord and input power.
•Voltage LED will not illuminate for 12V or 16V:
The battery is not connected.
The battery is below 4.0V.
•Charge rate does not come up to the selected charge rate initially:
The battery charger has already moved into stage two charging.
Input voltage is below 120VAC.
The battery may be defective and resisting the charge current.
•“Error” indicator is illuminated:
This illuminates when the battery cannot be completely charged in a 10-hour
period at the selected charge rate.
To reset this error, switch the battery charger OFF and remove the battery
connections. Insure the battery polarity is correct. If you are charging a large
battery at the 2A rate, try a higher charge rate. If the error persists, replace the
battery.
Troubleshooting
Operation

11
12
Battery Charging
Appendix B
Appendix B describes battery charging in more detail.
The IntelliCHARGER charges batteries in a sequence known as three-stage charging.
The charging voltage delivered to the battery depends on the battery’s depth of
discharge.
The three automatic stages are:
• Stage One-Bulk
• Stage Two-Absorption/Equalization
• Stage Three-Float
Bulk Charge
In the first stage, known as “bulk” charging, the IntelliCHARGER delivers its full-rated
output current. This constant current is delivered to the batteries until the battery
voltage approaches its absorption voltage, either 2.5V per cell or 2.375V per cell
depending on battery type selected. The bulk charge stage restores about 75% of
the battery’s charge and this stage completes very quickly unless the battery is deeply
discharged. During this stage the charge rate current on the ammeter should be close
to the charge rate selected on the front panel switch.
Absorption/Equalize Charge
During the second stage, known as “absorption” charging, the charging voltage is held
constant near the gassing voltage, and the charging current is allowed to diminish
as the battery comes up to 100% charge. Complex algorithms considering the time,
voltage level, and charging current determine when the charger exits this mode and
goes to stage three, float charging. The length of time of this mode depends on the
battery and is not fixed.
Float Charge
The third stage, called “Float” charging is a maintenance mode in which the output
voltage of the charger is reduced to a lower level, typically about 2.22 V per cell to
maintain the battery’s charge without losing electrolyte through gassing. In the float
mode, the charger will initiate a new charge cycle if:
• AC power is disconnected and reconnected
• The current demand on the IntelliCHARGER exceeds the battery recharge current
setting.
Important: Specifications are subject to change without notice.
Physical Specifications
Dimensions 8 5/8” W x 7” H x 11 1/8” D
(219 mm W x 178 mm H x 283 mm D)
Weight 24.0 lbs (10.87 kg)
AC Input Connections 5.0’ (1.5 m) AWG 16
DC Output Connections 6.0’ (1.8 m) AWG 10
Electrical Specifications
Nominal Battery Voltage 12VDC or 16VDC (user selectable)
Operating Output Range 4.0 – 20.0 VDC
Charging Technique 3 stage
Rated DC Output Current 2/15/25 ADC (user selectable)
In the “Flooded/Maint. Free/Deep Cycle” mode
12V 16V
Absorption Voltage 15.0VDC 19.8VDC
Float Voltage at no Load 13.3VDC 17.7VDC
Maximum Output Voltage 15.3VDC 20.3VDC
In the “AGM/Gel-cell” mode
12V 16V
Absorption Voltage 14.3VDC 19.0VDC
Float Voltage at no Load 13.2VDC 17.6VDC
Maximum Output Voltage 14.6VDC 19.3VDC
AC Input Specifications
AC Input Voltage 120 VAC, 60 Hz
AC Input Current 7.0 A RMS fuse protected
Specifications
Appendix A
IntelliCHARGER User Guide

13
14
Figure B-1 Three-stage charging profile
FAQs
Can I change the clamps on the charger with quick disconnects?
Yes. We recommend soldering all electrical connections where possible.
Can I run my electric water pump and cooling fan while charging?
Yes with a word of caution. There are two issues. First the charger will only provide the amperage
selected with the charge rate switch. Any amperage being consumed by extra electrical loads (ie. electric
water pumps, etc.) will take away from the amperage available for battery charging. The battery
charge time will be increased. In addition, the battery charger monitors the battery voltage and time to
determine when the battery is at 100% charge. Extra electrical loads on the system will give the charger
false information and therefore will prevent the charger from properly exiting stage two.
Second, some electrical items can be damaged by high voltages. Data loggers, computers, and other
items may lose data or be seriously damaged if subjected to the 19.0~20.0VDC of charging voltage. We
do not recommend retrieving this information while charging. If in doubt about a particular component,
consult with its manufacturer concerning its maximum input voltage.
CAUTION: Data loggers, computers of all sorts, and light bulbs may be damaged by the
19.0~20.0VDC of input voltage during charging. Do not operate these items while charging. We
recommend disconnecting the battery from the system while charging.
Calculating External Battery Charging Time
Charging time will depend on the amp-hour capacity of your battery and on how deeply it is discharged.
The following equation calculates an approximate charging time:
Charging Time = CAP x DOD
CC x 80% where:
Charging Time = Battery recharge time in hours
CAP = Battery capacity in amp-hours
DOD = Battery depth of discharge in percent.
A fully discharged battery has 100% DOD.
CC = Charge current. The rated current output of the
charger in amps.
80% = Typical charging efficiency for lead-acid batteries.
Example:
A Powermaster Performance 16V AGM battery rated at 45 amp-hours is 60% discharged, that is, it has a
DOD = 60%. Charging time with an IntelliCHARGER unit is calculated as follows:
Charging time = 45Ah x 60% = 1.35 hours (1 hour, 21 minutes)
25A x 80%
Can I run this charger from a portable generator?
Yes with a word of caution. Since the output of the battery charger is directly proportional with the input
voltage, we recommend portable generators with automatic voltage regulation. The IntelliCHARGER is
calibrated at the factory assuming 120VAC, 60Hz. Deviations from this voltage will cause deviations in
the output voltage and overall performance.
How many batteries can I recharge at one time with the IntelliCHARGER?
This depends on the size of the batteries. All batteries in the bank must be of the same type and
size. In addition, the IntelliCHARGER is expecting the battery bank to be at full charge in ten hours
or less. Therefore the size of the batteries and their depth of discharge will play a role in the answer
here. Given they were all Powermaster Performance 16V AGM batteries with a size of 45Ah at 100%
discharged, you can charge up to four in parallel in ten hours.
IntelliCHARGER User Guide

15
16
Warranty and Return Information IntelliCHARGER User Guide
Warranty
We take great pride in our quality, value and performance and believe that this product should offer you
trouble free operation throughout its lifetime providing you take care to follow the simple instructions in
the product documentation.
If you experience any problems with your product, please read the warranty details listed below carefully.
LIMITED WARRANTY
Powermaster provides a one year warranty from the date of purchase, to the original purchaser. This
warranty covers manufacturing defects in material and workmanship only.
Powermaster does not cover damage or failure caused by abuse, misuse, faulty installation, improper
maintenance, or any attempted repairs not carried out by Powermaster.
There will be no obligations or liability on the part of Powermaster for consequential damages arising
from the use of the product or any indirect damages with respect to loss of property, revenue, or costs for
removal, installation, or reinstallation.
For warranty service, the product must be reported to Powermaster to receive a unique RGA number
(return goods authorization) and at that time you will be advised of where to send the faulty product.
All shipping charges for returns should be prepaid. If the requested repairs or service are within the
terms of this warranty then the item will be returned to you on completion without any charge. The unit
must be in its original packaging with any original accessories. Powermaster will not be responsible or
accept any liabilities for any loss or damage to additional items which are sent with returned product.
If the product is not covered under the terms of this warranty. Powermaster will advise you of the costs
to carry out any repairs necessary and the unit will be shipped to you on receipt of payment for the work
including the return freight charges.
Please allow 2 to 4 weeks for return of your product. Under normal circumstance we try to ensure we
carry out warranty repairs within 5 working days. We cannot be held responsible for delays in shipping.
Product
THIS LIMITED WARRANTY IS THE SOLE AND EXCLUSIVE WARRANTY PROVIDED BY POWERMASTER
IN CONNECTION WITH YOUR POWERMASTER PRODUCT AND IS, WHERE PERMITTED BY LAW, IN LIEU
OF ALL OTHER WARRANTIES, CONDITIONS, GUARANTEES, REPRESENTATIONS, OBLIGATIONS AND
LIABILITIES, EXPRESS OR IMPLIED, STATUTORY OR OTHERWISE IN CONNECTION WITH THE PRODUCT,
HOWEVER ARISING (WHETHER BY CONTRACT, NEGLIGENCE, PRINCIPLES OF MANUFACTURER’S
LIABILITY, OPERATION OF LAW, CONDUCT, STATEMENT OR OTHERWISE), INCLUDING WITHOUT
RESTRICTION ANY IMPLIED WARRANTY OR CONDITION OF QUALITY, MERCHANTABILITY OR FITNESS
FOR A PARTICULAR PURPOSE. ANY IMPLIED WARRANTY OF MERCHANTABILITY OR FITNESS FOR
A PARTICULAR PURPOSE TO THE EXTENT REQUIRED UNDER APPLICABLE LAW TO APPLY TO THE
PRODUCT SHALL BE LIMITED IN DURATION TO THE PERIOD STIPULATED UNDER THIS LIMITED
WARRANTY.
IN NO EVENT WILL POWERMASTER BE LIABLE FOR ANY SPECIAL, DIRECT, INDIRECT, INCIDENTAL
OR CONSEQUENTIAL DAMAGES, LOSSES, COSTS OR EXPENSES HOWEVER ARISING WHETHER IN
CONTRACT INCLUDING WITHOUT RESTRICTION ANY ECONOMIC LOSSES OF ANY KIND, ANY LOSS OR
DAMAGE TO PROPERTY, ANY PERSONAL INJURY, ANY DAMAGE OR INJURY ARISING FROM OR AS A
RESULT OF MISUSE OR ABUSE, OR THE INCORRECT OPERATION OF THE PRODUCT.
Exclusions
If this product is a consumer product, federal law does not allow an exclusion of implied warranties. To
the extent you are entitled to implied warranties under federal law, to the extent permitted by applicable
law they are limited to the duration of this Limited Warranty. Some states and provinces do not allow
limitations or exclusions on implied warranties or on the duration of an implied warranty or on the
limitation or exclusion of incidental or consequential damages, so the above limitation(s) or exclusion(s)
may not apply to you. This Limited Warranty gives you specific legal rights. You may have other rights
which may vary from state to state or province to province.
Disclaimer

17
As soon as you unpack your IntelliCHARGER, record the following information and be
sure to keep your proof of purchase.
Serial Number (on back panel) __________________________________
Purchased From ___________________________________________
Purchase Date ____________________________________________
If you need to contact Customer Service, please record the following details before calling.
This information will help our representatives give you better service.
Battery type, brand, and voltage _________________________________
Is this used with a portable generator?______________________________
Description of problem _______________________________________
_______________________________________________________
_____________________________________________________
Contact Information
Powermaster
7501 Strawberry Plains Pike
Knoxville, TN 37924
Telephone: 800.862.7223 (toll free North America)
Telephone: 865.688.5953
Fax: 865.281.9844
E-mail: [email protected]
Web: www.powermastermotorsports.com
Information About Your System
Table of contents
Other Power Master Batteries Charger manuals


