Power Stim Power Stim 15R User manual

Power Stim 15R
Product Manual
Ordering information
www.StimRx.com
www.FlexToneUsa.com

GETTING STARTED
When you open the box to your new PowerStim 15R you will nd:
• StimRX Flyer w/ Coupon Code
• The PowerStim 15R
• 4 2-dual pin Prong Cables
• 12v AC Adapter
• Ab Belt w/ Instructional Flyer and Attached Cloth Electrodes
• 8 oz conductive mist spray
• 10 x 4- Packs of Self-Adhesive Electrodes
STEP 1:
Remove the PowerStim 15R and all of the accessories from the box. You will need a
knife or scissors to remove the bubble wrap, the unit is very well wrapped and heavily
taped up, be careful as to not damage the unit.
STEP 2:
Lay all of the accessories out on a at surface and use the above checklist to make sure
that you have all of the accessories and cables. Take the black AC Adapter and plug it
into the wall. There is a green light on the top of it. It will take 3-5 seconds when you
rst plug it in for the light to come on, but once it does, the AC Adapter is ready to use.
Grab your PowerStim 15R and turn it around, you will see an AC Port and directly beside
it a circular object that says “FUSE.” Plug the AC Adapter into the AC Port. DO NOT
play with the circular electrical fuse.
STEP 3:
Make sure that the unit is off and all knobs are twisted to the far left. There are 4 Intensity
Knobs labeled Channel 1, Channel 2, Channel 3, Channel 4. Make sure that these 4
Channel knobs are all the way turned to the left to the OFF position. You will hear the
knob “Click” to be sure it is OFF. Open up the 4 cables, they will be in sealed baggies.
The cables will have a black 2-prong head on one end and 2 dual pin lead wires on the
back, these tips are red and black. Now open up the bag of electrodes and remove one of
the 4 packs of electrodes. You will notice on the electrodes there is a short “female” stem
coming out of each electrode, this is where you will connect the black and red “male” end
tips to the electrodes.
INTRODUCTION
Welcome to the world of Electronic Muscle Exercise. You have taken the rst step to
improving your muscles and overall physical well-being. The PowerStim 15R is a very
effective and easy to use exercise/therapy unit. It is a versatile and unique product that
has been designed to duplicate the effects of regular exercise and can be used in the
privacy of your own home or ofce. The PowerStim 15R is fully adjustable, there are
no preset programs; with this unit YOU are the program. You can adjust every bit of the
PowerStim 15R to t your body and get the results you are looking for.
Your PowerStim 15R was designed by our engineers working in collaborataion with
Electro Physiotherapy Departments and Exercise Science programs at major university
hospitals around the country. The device incorporates new techniques in micro-circuitry
and solid-state technology. This new design incorporates several functions that are found
in products that are used in hospitals that cost thousands of dollars.
EMS (Electronic Muscle Stimulation) training can be used in conjunction with resistance
training programs or aerobics programs. EMS training can be done every day using
alternate muscle groups every other day. The muscle groups should be stimulated 15-30
minutes every workout.
EMS can also be used as a warm-up 15 minutes before your resistance training or
aerobics routine. Using this technique will increase blood ow to the stimulated muscle
group and pre-exhaust the muscle; but not to the point of fatigue. You should then wait
10 to 15 minutes before working out that particular muscle group. And alternate to a
pre-workout is a post-workout. Using this technique allows you to remove the waste
products in your muscles (IE Lactic Acid) a lot faster than by normal methods. The
post-workout allows your muscles to recover much faster than they would with only a
physical, mechanical, or weight workout. Faster, more smooth recovery of the muscle
translates to increased growth, strength, and endurance in your muscle groups.
EMS training can be used to increase the benets of your cardiovascular and weight
training exercises.
CAUTION / WARNING
The PowerStim 15R is one of the world’s strongest EMS units, use with care.
When using the PowerStim 15R, start out on the lowest intensity setting and slowly
turn the intensity up. We suggest that you start out with the controls OFF, then turn the
machine on to level 1, and gradually increase power to a setting that is comfortable for
you. When using the Russian Stim feature, we suggest that you turn the intensity knobs
to level 1, and then ip (R2500 Hz) switch ON, you will feel a radical change in stimula-
tion. Give your body a few minutes to adjust to the Russian Stim and then slowly adjust
the intensity to your liking. This is an incredibly strong professional strength machine,
please proceed with caution.

STEP 4:
Take one of the cables and plug the 2-Prong connection into Channel 1 on the front of the
PowerStim 15R unit. Do the same thing with a second cable and plug it into Channel 2.
STEP 5:
Decide on which area of the body you would like to exercise. We recommend starting
on your bicep just so you get acclimated to the feeling of EMS; it is a unique sensation.
For tips on electrodes placement, please see our electrode placement chart in this manual.
Take the 2 electrodes that are plugged into Channel 1 and place them on the area you
want to exercise. Please note that 2 electrodes HAVE to be connected to the red and
black lead wires. The electrodes will not stimulate if you only have 1 electrode connect-
ed. Next, do the same thing with the 2 electrodes that are connected to the cable plugged
into Channel 2.
STEP 6:
The cable that is plugged into Channel 1 only controls those 2 electrodes at-
tached to that cable, so you can have different intensities on different electrodes.
Now make sure that the intensity knobs on Channel 1 and 2 are turned all the
way to the left, this means they are “Clicked” OFF Press the red button to acti-
vate and turn on the machine and you will see two red lights come on, now the
machine is active and ready to go. When you turn them on you will hear a short
“click” sound and this means you are now ON and at level one Intensity.
STEP 7:
Slowly turn the Intensity Knob on Channel 1 to the right and wait for the click,
you are now stimming. The more you turn the knob to the right the higher the
intensity gets. Find a level that is comfortable for you and then do the same for
Channel 2. As you begin work the muscle groups for no longer than 15 min-
utes and then stop for the day. Please note, turn the intensity knobs to off and
power the machine itself off before you remove the electrodes, if you touch the
electrodes while the machine is on you can sting your ngers. Take care to not
touch the bottoms of the electrodes and always store them on the clear sheet they
came on as this will prolong the life of them. Store everything in a safe place
at a standard room temperature and your PowerStim 15R will last a lifetime.
Welcome to the world of Electronic Muscle Stimulation.
Power Button Intensity Control Knobs
Power
Indicator Russian Wave Russian Stim
Frequency Control Knob Stim Time Control Knob Stimulation Indicator
red light indicates muscle
Relaxation Control Knob stimulation is on
The PowerStim 15R has 4 Intensity Control Knobs, 3 System Control Buttons, 3
Pulse Control Knobs, and 2 Red Light Indicators. Below is a description of the
functionality of each of these controls.
RED POWER BUTTON - It is located on the top left corner of the unit along-
side 2 other buttons. Once the AC Adapter is plugged into the back of the unit,
this button is pressed and it powers on the machine.
RUSSIAN STIMULATION- to activate ip up the Wave Button and the
R-2500hz Button. See Below
WAVE BUTTON - This button is located directly to the right of the red power
button and is labeled “wave.” Flip the wave button UP to activate and warm up
the Russian Stim.
RUSSIAN STIMULATION BUTTON – This is an advanced setting and
most people do not need it on a daily basis. This button is located directly to
the right of the “wave” button and is marked “R-2500HZ.” Again, this button
must be ipped up to be activated. Russian Stim is 2500 hertz at 50 pulses per
second. To Recap both the Wave button and the R-2500HZ buttons must be
ipped up to correctly activate the Russian Stimulation. The purpose of this
frequency is to allow deeper muscle penetration by the electrical pulses. Rus-
sian Stim is helpful for creating a stronger, deeper muscle contraction, more

strength, and a faster recovery time after the muscle has been fatigued or
injured. The 15R has one of the worlds longest contraction times. ( 100
seconds) It is quite strong and feels like an intense deep tissue massage. When
you rst activate it make sure the intensity controls are set to level 1 and then let
the program run for a few minutes so that your muscles can get used to the new
sensation. Use caution when you rst try it, the program will surprise you so be
sure to start off on the lowest possible settings..
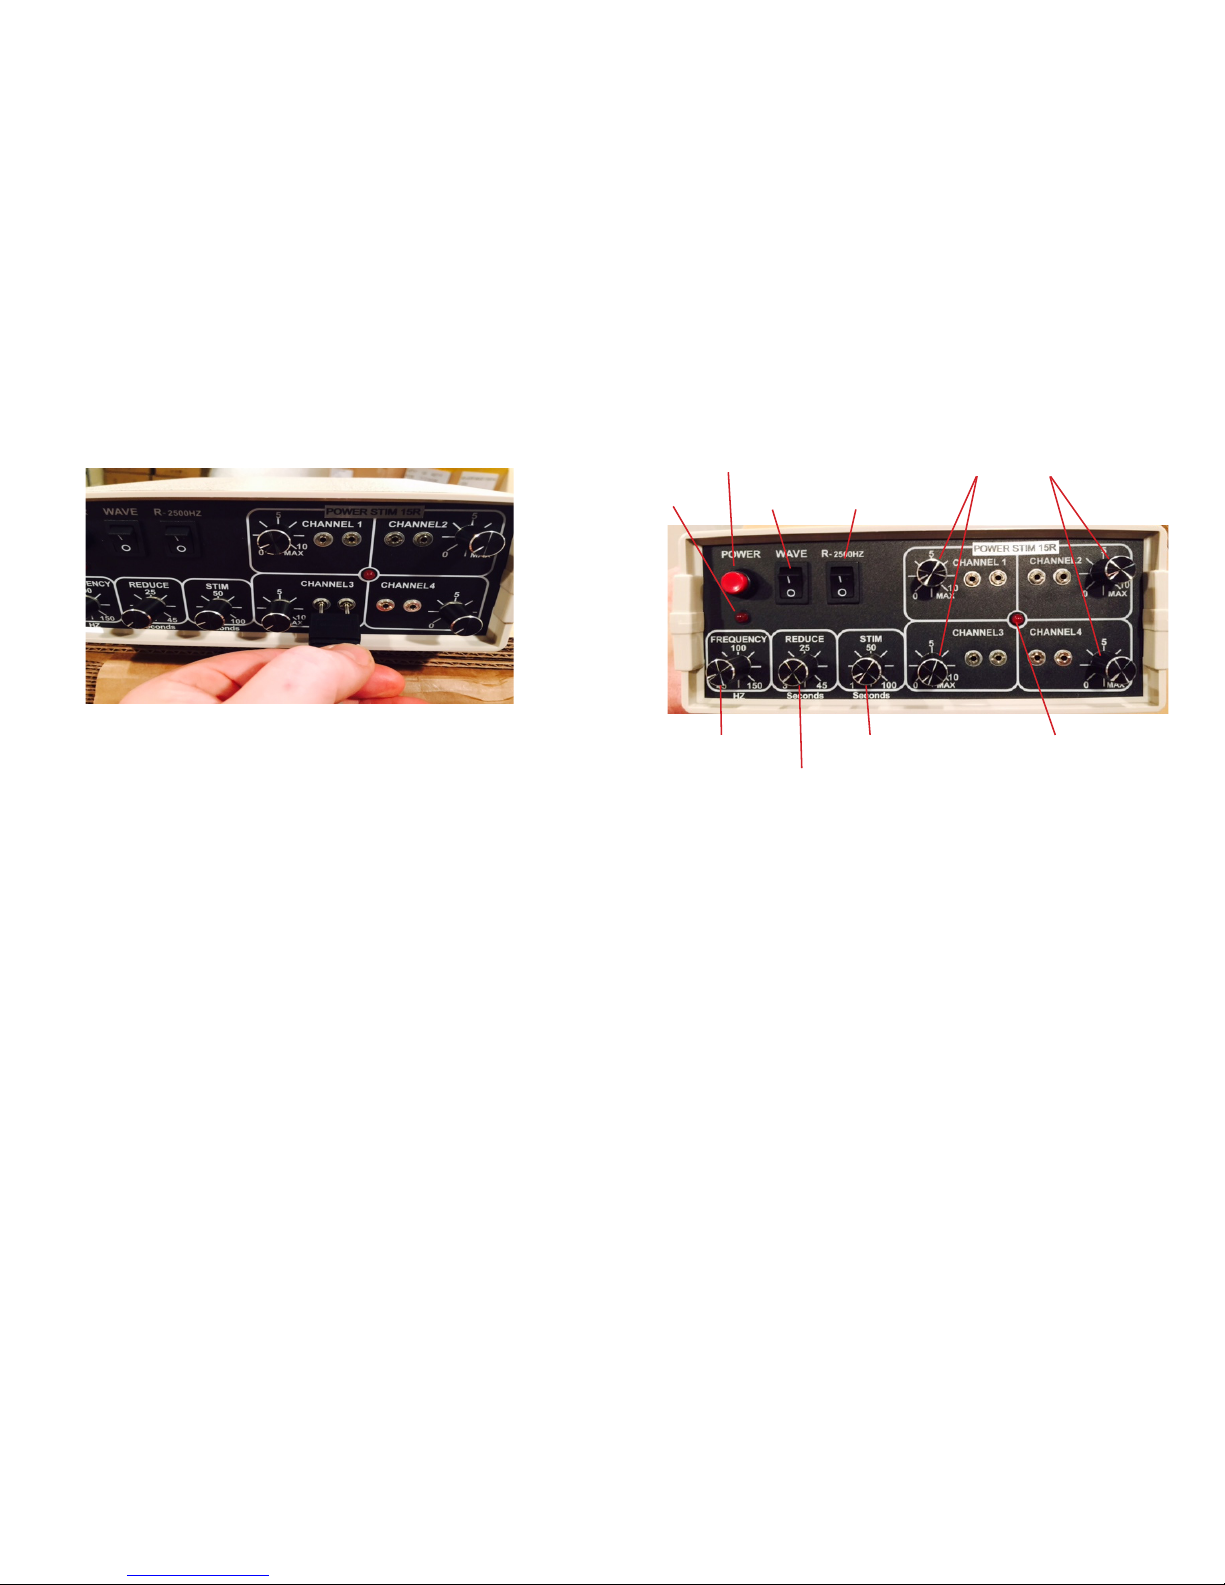
POWER INDICATOR LIGHT - A small light that is located on the center left
of the faceplate. The light is red and it will light up and stay that way for as long
as the PowerStim 15R is on. When the unit is turned off, the red light will also
be off.
STIMULATION INDICATOR LIGHT - This small light is located in the
middle of all of the “Channel Squares” on the middle right side of the faceplate.
The light itself is red and will blink on and off indicating when the PowerStim
15R is sending power to the channels. While the light is on, the machine will be
sending power to the channels thus stimulating your muscles. When it is off it
means the machine is resting and not sending power to the channels.
FREQUENCY CONTROL KNOB - Located on the bottom left hand side and
is labeled “FREQUENCY” above it. It can be adjusted from 45 to 150 Hertz.
The frequency of the pulse is basically how fast the pulse is stimulating your
muscles. In simple terms, think of the electronic stimulation pulse as someone
tapping on your muscles, the more you turn this knob up the faster the tapping
gets. Start on the lowest setting of 45Hz and slowly work your way up.
RELAXATION CONTROL KNOB - This knob is located directly to the right
of the “frequency” knob and is labeled “REDUCE” above it. It can be adjusted
between 3 and 45 seconds. What this knob does is give your muscles time to
relax in-between contractions. The more you turn it up, the longer the time gets
between stimulation. The machine simply takes a break and lets your muscles
relax for an adjustable period before continuing the contractions.
STIMULATION CONTROL KNOB - It is located directly to the right of the
“reduce” knob and is labeled “STIM.” It can be adjusted from 1 to 100 seconds.
What this knob controls is the muscle contraction time. The more you turn it up,
the longer of a time period your muscles will be constantly stimulated.
INTENSITY CONTROL KNOBS - There are 4 of these on the right side of
the faceplate and each of them controls a channel. Notice the squares on the
front of the unit with “Channel 1”, Channel 2”, “Channel 3”, and “Channel 4”
marked on them and in each square is an intensity control knob. These knobs
control ONLY that channel that they are located in the square with and can be
adjusted from 0-10 levels. These knobs control the power level for that channel.
Level 0 is off, and when you turn the knob to the right there will be a “click” and
you can adjust the power level from 1-10. When starting off stay on very low
settings and gradually turn the power up to a comfortable level.
USING THE CONTROLS PROPERLY
How to Firm, Tone, Repair and/or Build Muscle
In order to rm, tone, repair and/or build muscle you will want to eventually get
to the point where you have a longer stimulation time, a shorter relaxation time,
and a fairly high level of energy owing through the electrodes. However, it
takes a little time to reach optimum exercise levels and this conditioning time
will vary with each individual according to their body fat and muscle tissue
content.
Start slowly by setting the Stimulation Control Knob between 5-10 seconds.
This is how long your muscle will have a constant contraction until it gets a
rest period. Then set the Relaxation Control Knob at 10 seconds as well. This
will be the time your muscle will rest before the machine begins contracting
your muscle again. After that, set the Intensity Control Knob(s) to level 1 and
slowly begin to turn it up. Continue to adjust the intensity settings until you are
comfortable. If you feel the power is a little strong, turn it down. You do not
want to over-work or strain your muscles so that is why we recommend these
low settings when rst starting off. We want all users to be comfortable and
condent with the machines and have a pleasant experience. You can increase
your intensity as your muscles become stronger and can tolerate high levels of
stimulation.
When you are comfortable with the stimulation time of 10 seconds you should
gradually increase in 5 second intervals to the time that is most conducive to
your body. At this time keep the relaxation period at around 5-8 seconds. In
doing so you have lowered the ratio of time between muscle stimulation and
relaxation times. This is heading towards your ultimate goal of longer stimula-
tion times and shorter relaxation times. Again, use these settings at a comfort-
able level until the muscle movement tells you that you are ready to increase the
settings. During these increases in stimulation time you will gradually increase
the intensity of the energy owing through the electrodes by slowly turning up
the Intensity Control Knobs to comfortable levels.
YOUR ULTIMATE GOAL
• THE HIGHEST POSSIBLE STIMULATION TIME
• THE LOWEST POSSIBLE RELAXATION TIME
• THE HIGHEST POSSIBLE INTENSITY SETTING
• ALL CONSISTENT FOR THE MOST EFFECTIVE AND COMFORT-
ABLE WORKOUT
It takes time to reach the higher settings if you have done little or no exercise
recently. Soft muscle tissue can handle only short contractions and requires
longer periods of relaxation time when you rst start to exercise. As you use
your PowerStim 15R the muscles you exercise will continue to get stronger thus
allowing you to move up to longer stimulation times and higher intensity levels.

Over the course of this exercise program you may have some muscle soreness.
This is very normal for muscles that have not had regular exercise. This sore-
ness will wear off as your muscles become accustomed to the exercise. If, at
anytime during the workout, your muscles start to hurt, as opposed to being sore,
discontinue use of the machine and let yourself rest until the next day. This is
your body’s way of telling you that this muscle has had enough for today.
SUGGESTED FREQUENCIES
FITNESS GOAL FREQUENCY (Hz)
FIRMING & TONING 115 to 130 Hz
BODY BUILDING 65 to 100 Hz or RUSSIAN STIM
STRENGTH TRAINING 45 TO 75 Hz or RUSSIAN STIM
MASSAGE & REHAB 130 TO 150 Hz or RUSSIAN STIM
* Russian Stim (2500 Hz) is activated when the button is activated on the machine, this
will override the frequency control and allow you only to control the intensity. We sug-
gest using it once a week for body building, strength training, and massage and muscle
rehabilitation.
STIMULATION & RELAXATION TIMES
FITNESS GOAL STIMULATION RELAXATION
FIRMING & TONING 50 to 60 Seconds 10 to 20 Seconds
BODY BUILDING 50 to 100 Seconds 15 to 25 Seconds
STRENGTH TRAINING 25 to 50 Seconds 20 to 25 Seconds
MASSAGE & REHAB 60 to 75 Seconds 15 to 25 Seconds
* The above settings should serve as guidelines in helping you set your PowerStim 15R
unit. Each individual may vary depending on a variety of factors: body fat percentage,
sodium content, weight, gender, and workout experience all play a part in determining
which settings are ideal for you.
You can massage various muscle groups to relieve stiffness or to improve a
pulled muscle. The best massage is accomplished by working the muscles in a
way that increases blood circulation to the desired area without trying to build
or strengthen the muscle tissue. An ideal setting for massage is 5-10 seconds of
stimulation time and 5 seconds of relaxation time at an intensity level of 2. For
a more vigorous massage you can increase you stimulation time to 15 seconds
and maintain the 5 second relaxation time. Do this for 15-30 minutes to help
relieve soreness or stiffness.
HOW OFTEN AND HOW LONG SHOULD I USE THE POWERSTIM
15R?
You should exercise each muscle group you have selected for approximately 15
to 30 minutes at each session. All muscle groups except the abdomen should
start out with about 15 minutes of exercise. You should gradually increase this
time be about 5 minutes per week until you reach an exercise time of about 30
minutes. With all muscle groups, if the muscle begins to feel uncomfortable,
shorten the length of exercise time until the muscle becomes stronger and can
accept the longer workout time.
Abdominal muscles and the muscles at the side of the waist (commonly referred
to as the obliques) can be exercised daily for up to 60 minutes. As a general rule
of thumb, the calves and abs can be worked on everyday but all other muscle
groups should be done every other day.
MUSCLES AND INTENSITY CONTROLS - Different muscle groups usu-
ally require different levels of intensity or power. For example, the leg muscles
will usually require a greater level of power than any other muscle group. Turn
the Intensity Control Knob for each different channel to levels 1-2 and gradually
increase the power for each channel until you feel a comfortable contraction of
that muscle. At this point turn the knob forward 1/2 hash mark. If this does not
feel comfortable, turn the knob back to a more desirable setting. Increase the
power level to each muscle group gradually over a period of weeks always using
comfort as your guide.
The exercise process described above will require a certain amount of time to
produce results. This will differ with each person and is related to your body
makeup and physiology. Even though it will take some people longer than
others to reach optimum exercise levels, you will see and feel results within 30
to 60 days. Many of our customers report soreness right away and see muscle
toning within 10 workout sessions.
COMMON QUESTIONS
How does EMS work?
EMS (Electronic Muscle Stimulation) uses electrical current to stimulate the
muscles. This electrical current is similar to the electrical impulses produced by
the brain to move muscle tissue.
Is 45 minutes of EMS equivalent to a workout in the gym?
There is strong evidence that using EMS will replace time in the gym and stud-
ies have shown that EMS is effective for toning and strengthening unused mus-
cles, and as a training aid with resistance training. We can help you work out a
program that is very effective in developing your strength or toning your body.

What does it feel like?
People react differently to the use of EMS. Some people report a tickling feel-
ing and others compare it to a constant tapping on the skin.
Will it be comfortable?
Yes, it will, just a long as you follow the advice in this manual and start off
on the lowest settings and gradually work your way up. There are some cases
where people get a prickly or stinging sensation on their skin. This however,
is generally caused be misuse of the electrodes and improper placement. The
self-adhesive electrodes should be discarded after a solid month of use.
When should I use the PowerStim 15R?
The PowerStim 15R can be used before or after a workout in the gym. It can be
used at home or in the ofce while sitting in a chair, watching TV, or using the
computer; it can be used just about anywhere.
How long should I use the PowerStim 15R?
We recommend starting off each muscle group for 5 minutes and eventually
working your way up to 30 minutes per muscle group. You should always work
different muscle groups on alternate days. Give the muscle group you are work-
ing out a day off between workouts but you can exercise calves and abs every
day.
When will I notice a difference?
It will take about 2-4 weeks to see any real, noticeable improvement. The im-
provement could be a slimmer waistline or a tighter muscle group. You can ac-
tually see and feel the blood pumping into you muscle on the very rst session.
You may be sore after your rst workout.
Can I use the PowerStim 15R in the gym?
Yes, the PowerStim 15R can be taken to the gym to warm up or cool down
before/after a workout.
Will I grow muscle bulk using the PowerStim 15R?
Through a combination of EMS and resistance training you can develop your
muscle groups a lot further than by plain resistance training. Also, while EMS
devices themselves will not develop massive arms, they will tighten and tone
your current muscle groups.
PAD PLACEMENT PRECAUTIONS
PRECAUTIONS
Patients with the following should not use a muscle stimulator:
• Heart Disease
• Pacemaker Patients
• Pregnant Women
Never let the electrodes touch or overlap

ELECTRODE PLACEMENT CHART
The following electrode placement diagrams are provided as a starting recom-
mendation only. Our charts are to be used as a guide. There is no science to
electrode placement, similar to using the PowerStim 15R machine, use comfort
as your guide. The stimulation results will vary according to the individual.
Individual sensitivity to EMS varies greatly. EMS is a training, toning, and
rehabilitation tool and can be adapted to suit the individual. The ideal inten-
sity setting is achieved when the stimulus and muscle contraction is strongly
perceived but is not unpleasant or painful. The bottom line: use the placement
charts as a guide but don’t be afraid to move the electrodes around to get the best
contraction for your body. Leave 1/4 inch of space between electrodes or more.
Treat Sciatic Nerve Pain
With the Powerstim15R you can take the unit out of the box and relieve Hip,
Back and Sciatic Nerve Pain within 5 minutes
Expert pad placement is suggested below to manage Sciatic Pain

GENERAL PAD PLACEMENT
The Chest: refer to Chart #1
Place 1 pair of electrodes on each area of the upper chest muscle. They should
be placed about 3 inches down from the collarbone. Allow at least 1/4 inch be-
tween the electrodes. Follow the placement diagram which shows 2 electrodes
close to the center of the chest and 2 pads close to the right and left armpits.
The Abdominals: Refer to Chart #2
Follow the electrode placement shown in the chart, this will require 4 sets of
electrodes.
The Biceps & Forearms: Refer to Chart #3
The electrodes should be placed on the thickest part of the muscle towards the
top of the arm about a 1/2 inch between the electrodes where they come close to
each other. This exercise will require 2 pairs of pads for the biceps and another
2 pairs for the forearms. Both muscle groups can be exercised together.
The Triceps: Refer to Chart #4
Electrode placement for the triceps is similar to that of the biceps. However, the
electrodes are positioned towards the back of the largest part of the upper arm.
Laterals: Refer to Chart #5
Place the electrodes one above the other on each side as shown. Electrodes
should be slightly towards the front. Leave 1/4 inch space between electrodes
Front & Inner Thighs: Refer to Chart #6
Follow the electrode placement as shown in the diagram. This exercise will
require 4 pairs of electrodes.
Calves: Refer to Chart #7
Place the electrodes over the largest part of the muscle slightly towards the back
of the leg so that the electrodes come closer together in the back. Leave 1/4 inch
between the electrodes and this exercise will require 2 pairs of electrodes.
Back (Trapezes, Shoulders & Deltoids, Upper Laterals): Refer to Chart #8
Follow the electrode placement as shown in the diagram. This exercise will
require 2 pairs of electrodes.
Buttocks & Back Thighs: Refer to Chart #9
Follow the electrode placement as shown in the diagram. This exercise will
require 4 pairs of electrodes.
Back Chart #10(Alternate Exercise for the Shoulders and Lower Back):
This exercise will require 2 pairs of electrodes.

TROUBLESHOOTING
1. The Power Indicator Light does not come on.
Check to see that the AC Adapter is fully plugged into the unit and that the
green light is on. Make sure that wall socket is good by testing another
appliance on it.
2. The Stimulation Indicator Light is on but I don’t feel anything.
Make sure the cables are fully connected and that you have 2 electrodes
plugged into both a red and a black lead wire on the same cable. Test out
the same cable and electrodes on different channels. If that does not work
try another cable and a new set of electrodes. Check to make sure that the
“WAVE” button is not pressed, if you still feel nothing contact us.
3. I keep getting a prickly feeling on the skin.
This can be caused by a few different things but mostly:
• Electrode Placement, make sure that when you place electrodes on your
body that they DO NOT overlap.
• Change out the self-adhesive electrodes once the adhesion is gone, do
not try and hold them on your skin. Throw away the electrodes after a
month of continuous use.
4. My skin under the electrode looks red.
A little pinkish skin color under the pad can occur to people using the Pow-
erStim 15R, if the skin is red you will need to use more moisture under the
pad. Take a wet towel and rub the area you plan to exercise with it, pat the
area dry, and then stick the electrodes on.
5. I seem to be getting some kind of buildup under the electrodes. Is there
a way to clean them?
From time to time it will be necessary to clean off the electrodes as they
absorb moisture and oils from your skin. We recommend using plain hot
water and a washcloth, you can also use Isopropyl Alcohol. Rub the water
or alcohol on the electrodes with a washcloth until they are clean. DO NOT
use soap and water as this will leave a lm on the electrodes.
6. I don’t seem to be getting the same power out of each channel.
Different areas of the body have different skin resistances. This will make it
appear that the channels don’t have the same power. If you think a channel
is underpowered hook up 2 pairs of electrodes to the same area using a nor-
mal channel and the one you feel is underpowered. The stimulation should
feel identical from both channels.
7. One electrode seems to be stronger than the other.
Your electrodes may be improperly adjusted, turn the PowerStim 15R off
and readjust them. If the problem persists test the adhesive levels of the
electrodes. If the electrode does not stick well to your body, throw it away
and get a new one.
8. When I use the PowerStim 15R I seem to develop muscle soreness and
cramps.
You have probably tried to do too much and need to turn the Intensity
Control Knobs down to a less powerful level. This unit can overwork your
muscles, including the abdominals. Relax and do not use the PowerStim
15R for a minimum of 2 days, this will allow you muscles time to rest. Now
start on lower intensity levels and slowly build back up.
IN SUMMARY
1. Please follow these guidelines:
2. Follow the instructions in the manual for each muscle group.
3. MAKE SURE THE INTENSITY CONTROL KNOBS ARE TURNED OFF
BEFORE ANY SESSION.
4. Do not stimulate any area of the body other than stated in the manual.
5. Do not use the PowerStim 15R under the following conditions:
• While lifting weighted objects
• Near any water
• If using alcohol, drugs, or medication
6. Do not overlap the electrodes and make sure to keep them 1/4 inch apart
from each other.
7. Do not let children use this machine.
LIFETIME WARRANTY
It’s that simple, we offer the best warranty in the business.
Your product has a lifetime warranty, if you ever have a mechanical problem
with the unit, send it back to us and it will be repaired or replaced regardless of
whether you have had it for 1, 5, or 20 years!

ADDITIONAL
ACCESSORIES
Ordering information
www.StimRx.com
www.FlexToneUsa.com
AB BELT
$149.99
RUBBER ELECTRODES
$49.99
40 SELF-ADHESIVE
ELECTRODES TOTAL!
10 - 4 packs
$49.99
FACIAL TONER
$49.99
CONDUCTIVE SPRAY
8 oz
$11.99
CONDUCTIVE GEL
2 oz
$5.99

Table of contents
Popular Medical Equipment manuals by other brands

IceCure
IceCure FAP 7100000 Instructions for use

Dr. Trust
Dr. Trust ECG PEN User instructions

Johnson & Johnson
Johnson & Johnson Codman MedStream Surgical Technique Guide

ResMed
ResMed Mirage Swift II user guide

We Care Solar
We Care Solar Solar Suitcase installation guide

Calivita
Calivita BioHarmonex BH4 Product information & user guide