Powerfix Profi PLS 10 A2 Product information sheet


V 1.0
English.................................................................................................2
Română.............................................................................................18
Български .........................................................................................34
Deutsch..............................................................................................51

Powerfix PLS 10 A2
2 - English
Contents
1. Intended use...........................................................................................3
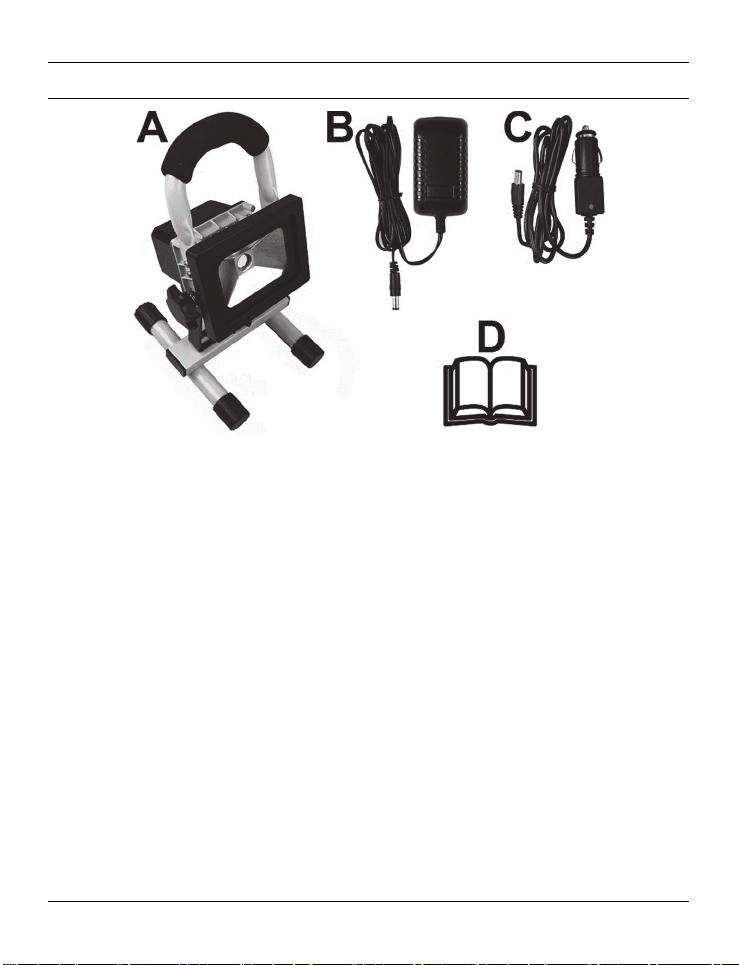
2. Package contents ...................................................................................4
3. Technical specifications ...........................................................................5
4. Safety instructions ..................................................................................6
5. Copyright ...............................................................................................9
6. Before you start....................................................................................10
6.1. Mounting.........................................................................................................................10
6.2. Charging the battery ......................................................................................................11
7. Getting started .....................................................................................11
8. 12/24 V car charger cable ....................................................................11
8.1. Replacing the fuse...........................................................................................................12
9. Maintenance / cleaning ........................................................................13
9.1. Servicing..........................................................................................................................13
9.2. Cleaning..........................................................................................................................13
9.3. Storage when not in use.................................................................................................13
10. Troubleshooting .................................................................................14
11. Environmental regulations and disposal information..........................14
11.1. Removing the battery ...................................................................................................14
12. Conformity notes ................................................................................15
13. Warranty and Service Information .....................................................16

Powerfix PLS 10 A2
English - 3
Congratulations!
By purchasing the Powerfix PLS 10 A2 battery LED emitter, hereinafter referred to as the
battery LED emitter, you have opted for a quality product.
The User’s Manual forms part of this product. It contains important information on safety,
usage and disposal. Before using the product, please familiarise yourself with all operating
and safety instructions. Only use the product as described and for the applications given. If
you pass the product on to someone else, make sure to give them all the relevant documents
with it.
1. Intended use
The battery LED emitter is suitable for domestic inside and outside use. The battery LED
emitter is not destined for commercial use. The battery LED emitter must be used with the
stand only; wall-mounting is not permitted. The device fulfils all relevant norms and standards
relating to CE conformity. Any modifications to the battery LED emitter other than
recommended changes by the manufacturer may result in these standards no longer being
met.

Powerfix PLS 10 A2
4 - English
2. Package contents
A 10 W Rechargeable Battery LED Working Light Powerfix PLS 10 A2
B Wall plug battery charger
C 12/24 V car charger cable
D These operating instructions (line-art illustration)
These operating instructions have a fold-out cover. On the inside of the cover is a diagram of
the battery LED emitter with the components numbered. The meanings of the numbers are as
follows:
1 Handle
2 10 W Rechargeable Battery LED Working Light
3 Mounting bracket
4 Knurled screw
5 Stand
6 LED charging indicator
7 Rubber cover (for DC-IN receptacle)
8 DC-IN receptacle
9 On/Off switch
10 Knurled screws

Powerfix PLS 10 A2
English - 5
3. Technical specifications
Battery LED emitter
Brand Powerfix
Model name PLS 10 A2
Operating voltage 12 – 24 V (Direct current)
Rechargeable battery Rechargeable Li-Ion battery 7.4 V / 5200 mAh
Battery charging time approx. 6 hours
Runtime with fully charged battery approx. 3 hours at around 80% of luminous flux
Power consumption
complete battery LED emitter
approx. 10 W
Safety class III, (Extra Low Voltage, ELV)
Degree of protection IP65 (protection against dust and jets of water)
Operating position vertical - emitter at the top, stand (5) at the
bottom
Max. area projected approx. 10m² if set up at 3 metre distance
Luminaire Citizen LED
LED power consumption approx. 8.5 W
Total luminous flux 700 lm +/-5% (with cover / glass window)
Colour temperature approx. 5000 K (neutral white)
Light beam aperture approx. 120°
Operating temperature -10°C to +45°C
Dimensions (W x H x D) approx. 11.4 x 8.6 x 10.5 cm
Weight approx. 1040 g

Powerfix PLS 10 A2
6 - English
Wall plug battery charger
Manufacturer Aurolite Electrical (Panyu Guangzhou) Limited
Model HV-T16VB-12100A
Input voltage 100 - 240 VAC, 50/60 Hz
Output voltage 12 V (Direct current), 1 A, Polarity
Safety class II,
Car charger cable
Manufacturer Powerfix
Model PLS 10 A2
Input voltage 12 V/24 V (Direct current)
Output voltage 12 V/24 V (Direct current), 1 A,
Polarity
Fuse T 3.15 A H 250 V
The technical specifications and design can be changed without prior notice.
4. Safety instructions
Before you use this battery LED emitter (A) for the first time,
please read and comply with these instructions and
warnings, even if you are familiar with handling electronic
devices! Keep these operating instructions in a safe place
for future reference. If you sell the device or give it away,
pass on the operating instructions at the same time. The
User Manual is part of the device.

Powerfix PLS 10 A2
English - 7
DANGER! This symbol and the word
“Danger” alert you to a potentially
dangerous situation. Ignoring it can lead to
severe injury or even death.
WARNING! This symbol and the word
“Warning” denote important information
required for the safe operation of the battery
LED emitter (A) and for the safety of its users.
The power adapter is only suitable for use in
dry inside spaces.
Short-circuit protected, sealed safety
transformer
Safety extra-low voltage with special
protection against electric shock
Independent operating device for use outside
lights without additional cover
CAUTION! Electrical devices are not suitable for
children. Do not allow children to play with electrical
devices when not under supervision. Children may not

Powerfix PLS 10 A2
8 - English
understand that they can be dangerous. Keep the
packaging materials out of the reach of children.
There is a risk of suffocation.
CAUTION! LED Radiation! Avoid damage to your
eyes! Never look into the LED beam. If you suspect
you have damaged your eyes, seek medical
attention.
CAUTION! If you notice any smoke, unusual noises
or strange smells, switch the battery LED emitter off
immediately. If this occurs, do not continue to use it
and have it checked out by an expert. Never inhale
smoke from a possible device fire. If you do
inadvertently inhale smoke, seek medical attention.
Smoke inhalation can be damaging to your health.
CAUTION! Never use optical instruments such as a
magnifying glass to look directly into the beam. This
could damage your eyes. If you suspect you have
damaged your eyes, seek medical attention.

Powerfix PLS 10 A2
English - 9
WARNING! Do not hang anything off the LED
emitter and do not place any objects on it. The casing
is not designed to support weights. This could
damage the battery LED emitter (A).
WARNING! Use the supplied wall plug battery
charger (B) and the supplied 12/24 V car charger
cable (C) to charge the buil-in battery of the battery
LED emitter (A) and never use it for continuous
operation like a power adapter. Never connect the
wall plug battery charger (B) or the 12/24 V car
charger cable (C) to other devices. Charge the built-in
battery of the battery LED emitter (A) with the
supplied wall plug battery charger (B) and the
supplied 12/24 V car charger
cable (C).
5. Copyright
All the contents of this user manual are protected by copyright and provided to the reader
for information only. Copying data and information without the prior explicit written consent
of the author is strictly forbidden. This also applies to any commercial use of the contents and
information. All texts and diagrams are up-to-date as of the date of printing. Subject to
change without notice.

Powerfix PLS 10 A2
10 - English
6. Before you start
Remove the battery LED emitter (A) and the accessories from the packaging.
Inspect the battery LED emitter (A) and the accessories for damage. If the battery LED emitter
(A) is damaged, do not use it.
6.1. Mounting
No tools are needed to mount the battery LED emitter (A). The battery LED emitter (A) is
delivered in two pieces (emitter with handle and stand). To start, you have to assemble them.
To do so, rotate the knurled screw (4) that secures the device for transport and is inserted on
the stand (5) counter-clockwise and remove it. Make sure not to lose the washer and the
retainer ring placed of the knurled screw (4) threaded pin. Next fold the mounting bracket
(3) downwards. Then insert the knurled screw (4) through the central bore hole of the
mounting bracket (3) from the top into the thread of the stand (5) and rotate it clockwise (see
the figure). Tighten the knurled screw (4) so the mounting bracket (3) firmly fixes to the
stand (5).

Powerfix PLS 10 A2
English - 11
6.2. Charging the battery
The DC-IN socket (8) is protected against humidity with a rubber cover (7). To release this
rubber cover (7), pull the red latch. Then connect the wall plug battery charger (B) charging
plug to the battery LED emitter (A) DC-IN socket (8), and connect the wall plug battery
charger (B) to an easy-accessible mains outlet. Before using the device for the first time, fully
charge the built-in Li-Ion battery. During charging, the charge indicator (6) lights red. When
the built-in Li-Ion battery is fully charged, the charge indicator (6) changes to green. Unplug
the wall plug battery charger (B) from the mains outlet and then disconnect the wall plug
battery charger (B) plug from the DC-IN socket (8). Close the DC-IN socket (8) with the
rubber cover (7). Now the battery LED emitter (A) is ready for use.
Note: If the charge indicator (6) flashes in red while using the battery LED emitter (A), the
built-in Li-Ion battery is almost empty. In this case, recharge the battery.
7. Getting started
You can use the two knurled screws (10) to adjust the vertical angle and therefore the beam
of the battery LED emitter (A). Release the knurled screws (10) by rotating them 360 degrees
counter-clockwise. Next adjust the vertical angle of the battery LED emitter (A) according to
your needs. Then tighten the two knurled screws (10).
Use the On/Off switch (9) to switch the battery LED emitter (A) on and off. The On/Off
switch (9) is protected against humidity with a rubber cover. You can recognize the position
of the On/Off switch (9) by looking at this rubber cover. In addition, the switch positions
(ON/OFF) are labelled.
8. 12/24 V car charger cable
In addition to the wall plug battery charger (B) you can also charge the built-in Li-Ion battery
of your battery LED emitter (A) using the 12/24 V car charger cable (C) supplied. To release
this rubber cover (7), pull the red latch. Then connect the wall 12/24 V car charger cable
(C) charging plug to the battery LED emitter (A) DC-IN socket (8) and connect the 12/24 V
car charger cable (C) to a suitable 12/24 V vehicle cigarette lighter. The green LED

Powerfix PLS 10 A2
12 - English
indicator on the 12/24 V car charger cable (C) plug indicates that it is ready for operation.
During charging the charge indicator (6) of the battery LED emitter (A) lights red. When the
built-in Li-Ion battery is fully charged, the charge indicator (6) changes to green. Unplug the
12/24 V car charger cable (C) from the vehicle cigarette lighter and then disconnect the
plug from the 12/24 V car charger cable (C) from the DC-IN socket (8). Close the DC-IN
socket (8) with the rubber cover (7). Now the battery LED emitter (A) is ready for use.
8.1. Replacing the fuse
If the 12/24 V car charger cable (C) is connected but the LED indicator of the 12/24 V car
charger cable (C) does not light, the fuse might be defective.
WARNING! If you need to replace the fuse,
make sure to use a fuse of the same type (see the
Technical Specifications).
To replace the fuse, proceed as follows:
Rotate the screw cap (d) counter-clockwise and remove it from the cigarette lighter plug
housing (a). If necessary, use a pliers.
Replace the fuse (b) with a new fuse of the same type. You can purchase a suitable fuse
from any electronics retail outlet.
First insert the fuse (b) into the cigarette lighter plug housing (a).
Insert the metal contact (c) into the screw cap (d).
Next insert the screw cap (d) with the inserted metal contact (c) over the fuse (b) and
then screw the cap (d) clockwise onto the cigarette lighter plug housing (a).

Powerfix PLS 10 A2
English - 13
9. Maintenance / cleaning
9.1. Servicing
The battery LED emitter (A) uses a long-life LED. This is not replaceable and requires no
maintenance.
The built-in battery pack is a non-standard battery and not available in retail stores. Therefore
it is not intended for the customer to replace the battery.
9.2. Cleaning
Make sure that no liquid gets into the housing. This
could damage the battery LED emitter (A).
To clean the battery LED emitter (A), use a soft, dry cloth. Never use any solvents or cleaners
that may damage the plastic housing. For more stubborn dirt, use a slightly damp cloth.
9.3. Storage when not in use
If the battery LED emitter (A) is not to be used for an extended period, store it in a clean and
dry place. To retain battery performance, recharge regularly if stored for extended periods.

Powerfix PLS 10 A2
14 - English
10. Troubleshooting
Battery LED emitter does not illuminate
Check the position of the On/Off switch (9).
The built-in battery may be discharged. Recharge it.
Battery does not charge
The wall plug battery charger (B) is defective. Check if you can charge it with the 12/24 V
car charger cable (C).
12/24 V car charger cable (C) defective. Verify if the green LED indicator on the 12/24 V
car charger cable (C) plug is on after inserting it into a powered cigarette lighter. If not,
replace the fuse of the 12/24 V car charger cable (C) as described in "Replacing the
fuse"
11. Environmental regulations and disposal information
Devices marked with this symbol are subject to the European Directive
2012/19/EU. All electrical and electronic devices must be disposed of
separately from household waste at official disposal centres.
Avoid damage to the environment and risks to your personal health by
disposing of the device properly. For further information about proper
disposal, contact your local government, disposal bodies or the shop
where you bought the device.
Dispose of all packaging in an environmentally-friendly manner.
Cardboard packaging can be taken to paper recycling centres or public collection points for
recycling. Any film or plastic contained in the packaging should be taken to your public
collection points for disposal.
11.1. Removing the battery
This battery LED emitter (A) contains a built-in battery pack. It must be removed before
disposing of the battery LED emitter (A).
To remove it, proceed as follows:

Powerfix PLS 10 A2
English - 15
1. Loosen the 4 Philips screws (arrows) on
the black cover on the battery LED emitter
(A) back panel.
2. Tilt the black cover over.
3. Disconnect the plug of the battery cable
(arrow) and remove the battery.
Dispose of the battery and the LED emitter separately.
Respect the environment. Old batteries must not be disposed of with
domestic waste. They must be handed in at a collection point for waste
batteries. Please note that batteries must be disposed of fully discharged
at appropriate collection points for old batteries. If disposing of batteries
that are not fully discharged, take precautions to prevent short circuits. To
prevent any short circuits, cover the battery cable plug with insulating
tape.
12. Conformity notes
This battery LED emitter has been approved for compliance with the basic
and other relevant requirements of the EMC Directive 2014/30/EU, the
Low-voltage Directive 2014/35/EU and the ERP Directive 2009/125/EC.
The complete EU Declaration of Conformity is available on request at:

Powerfix PLS 10 A2
16 - English
13. Warranty and Service Information
Warranty of TARGA GmbH
Dear Customer,
This device is sold with three years warranty from the date of purchase. In the event of
product defects, you have legal rights towards the seller. These statutory rights are not
restricted by our warranty as described below.
Warranty conditions
The warranty period commences upon the date of purchase. Please keep the original receipt
in a safe place as it is required as proof of purchase. If any material or manufacturing faults
occur within three years of purchase of this product, we will repair or replace the product
free of charge as we deem appropriate.
Warranty period and legal warranty rights
The warranty period is not extended in the event of a warranty claim. This also applies to
replaced and repaired parts. Any damage or defects discovered upon purchase must be
reported immediately when the product has been unpacked. Any repairs required after the
warranty period will be subject to charge.
Scope of warranty
The device was carefully manufactured in compliance with stringent quality guidelines and
subjected to thorough testing before it left the works. The warranty applies to material and
manufacturing faults. This warranty does not cover product components which are subject to
normal wear and which can therefore be regarded as wearing parts, or damage to fragile
components such as switches, rechargeable batteries or components made of glass. This
warranty is void if the product is damaged, incorrectly used or serviced. To ensure correct
use of the product, always comply fully with all instructions contained in the user manual. The
warnings and recommendations in the user manual regarding correct and incorrect use and
handling of the product must always be observed and complied with. The product is solely
designed for private use and is not suitable for commercial applications. The warranty is
rendered void in the event of incorrect handling and misuse, if it is subjected to force, and
also if any person other than our authorised service technicians interfere with the device. No
new warranty period commences if the product is repaired or replaced.

Powerfix PLS 10 A2
English - 17
Submitting warranty claims
To ensure speedy handling of your complaint, please note the following:
-Before using your product for the first time, please read the enclosed
documentation carefully. Should any problems arise which cannot be solved in
this way, please call our hotline.
-Always have your receipt, the product article number as well as the serial number
(if available) to hand as proof of purchase.
-If it is not possible to solve the problem on the phone, our hotline support staff will
initiate further servicing procedures depending on the fault.
Service
Phone: 020 – 70 49 04 03
Phone: 01 - 4370121
Phone: 027 78 11 03
Phone: 02 – 20 09 025
IAN: 280181
Manufacturer
Please note that the following address is not a service address. First contact the service point
stated above.
TARGA GmbH
Coesterweg 45
59494 SOEST
GERMANY

Powerfix PLS 10 A2
18 - Română
Cuprins
1. Destinația acestui produs......................................................................19
2. Conținutul pachetului ............................................................................20
3. Specificații tehnice ................................................................................21
4. Instrucțiuni privind siguranța................................................................22
5. Drepturi de autor..................................................................................25
6. Înainte de a începe ...............................................................................26
6.1. Asamblarea.....................................................................................................................26
6.2. Încărcarea bateriei .........................................................................................................27
7. Utilizarea..............................................................................................27
8. Încărcător auto 12/24 V .......................................................................27
8.1. Schimbarea siguranței....................................................................................................28
9. Întreținerea și curățarea.......................................................................29
9.1. Lucrările de reparare......................................................................................................29
9.2. Curățarea ........................................................................................................................29
9.3. Depozitarea ....................................................................................................................29
10. Remedierea problemelor....................................................................30
11. Normele ecologice și informații privind scoaterea din uz....................30
11.1. Scoaterea bateriei........................................................................................................30
12. Precizări privind conformitatea cu standardele ..................................31
13. Informații despre garanție și service...................................................32
Other manuals for PLS 10 A2
4
Table of contents
Languages:
Other Powerfix Profi Spotlight manuals