PowerLocus P2 Kids Princess User manual

USER MANUAL
For Warranty or Problems with
the product, please contact us!
Email Support:
PowerLocus
PowerLocus
P2 Kids Princess

1
78910
1. Power on /off
2. play/pause, answer/end calls, reject call,
last number redial
3. Volume up (Short Press)
Next song (Long Press)
4. Volume down (Short Press)
Last song (Long Press)
5. Multi-function button(pairing,auto search radio)
6. Headset jack
7. LED indicator
8. USB-C charging port
9. Microphone
10. Micro SD/TF card slot
Bluetooth Version: V5.3
Working Distance Range: 10M
Frequency Range: 20Hz-20kHz
Audio Drivers: Φ40mm
Charging Voltage: DC 5V
Charging Time: About 1.5 Hours
Talking/Music Time: About 20 Hours (50% Volume)
1. PRODUCT INDICATION
Impedance:
32 Ohms
Weight:
175g/0.39LBs
11

• POWER ON: Slide the switch right and the
headset said:the wireless is ready to pair ).
• POWER OFF: Slide the switch left and blue
indicator light will go off.
• Slide the switch right and the blue and red
wireless is ready to pair ).
• Turn on the bluetooth function of your phone
or other products.
• Search for the bluetooth devices and
select”P2 Princess”.(Enter the
code ‘0000’ if needed)
• If paring is successful,the blue light indicator
is connected successfully).
• Please make sure the headphone is working
before pairing.
• It will connect to the pre-set phone automati-
cally when turns on(Please make sure the
bluetooth function of your phone is working)
• If the pairing is not successful, please switch
2.POWER ON/OFF THE HEADSET
3. PAIR TO YOUR MOBILE
PHONE OR OTHER PRODUCTS
2

• When there is a call,short press button can
answer the call. After the call,press button
can hang up. If the other side hang up,no need
to press the button.
• reject call: long press button about 2-3sec.
• last number redial: press fast button 2
times
• When the phone call out or answer the call,if the
bluetooth headphone are playing the music,the
music will pause automatically and enter the
waiting state.After hang up,the music will
continue to play automatically.
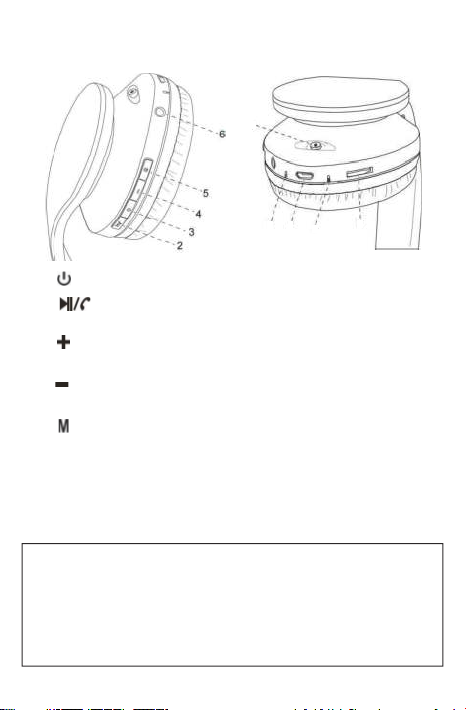
4. MP3/FM
• In power-on mode, insert the TF card,short press
button, MP3 will play automatically.
• If have not TF card, short press button, FM
radio will play automatically.
• (1) In power-on mode, short press button , FM
radio will play automatically. (2) Long press the
Play/Pause button to auto search all radio
station, (3) wait for 40sec to 1min for the
stations to be memorized, (4) then long press
or, you will listen to any radio station you like..
• If you are listening to FM radio,short press
button,it will be converted to the bluetooth
mode.And auto connected to your phone or
other products.
5. ANSWER/END CALLS, REJECT
CALL, LAST NUMBER REDIAL
(In thebluetooth mode)
3

• Insert USB charging cable into USB port which
have support 5V power (such as AC/DC USB
adapter or PC USB port). When the red light is
on, the headset is in charging. When the red light
will be off, the headset is fully charged. It takes
about 2-2.5 hours to charge the headset fully.
• The battery is rechargeable.Low-Voltage
alert:When the alert tone ‘low battery’ sounds
and the indicator turns into red indicate that the
battery has run out,need to be charged as soon
as possible.First time charging : please be sure
the battery has been charged fully before use.
6. CHARGING THE HEADSET
For any mode of headphone,you can connect one
side of 3.5 stereo sound supply extension line to
headphone audio jack,the another side connect to
Audio jack(such as mobile phone,computer,Ipad
etc).Then you will hear songs from other devices.
7. WIRED HEADPHONE FUNCTION
4
In order to change the volume sensitivity hold +
and – button at the same time till you hear the voice
prompt “85dB” or “94dB”.
8. Switch Mode –85dB / 94dB
9. HOW TO RESET THE
HEADPHONES?
Hold both Buttons for 4-7 secondsin
order to reset the bluetooth and enter
pairing regime again.

Warning:
This device complies with Part 15 of the FCC
Rules. Operation is subject to the following two
conditions: (1) this device may not cause harmful
interference, and (2) this device must accept any
interference received, including interference that
may cause undesired operation.
by the party responsible for compliance
could void the user’s authority to operate the
equipment.
NOTE: This equipment has been tested and
found to comply with the limits for a Class
B digital device, pursuant to Part 15 of the
FCC Rules. These limits are designed to
provide reasonable protection against harmful
interference in a residential installation. This
equipment generates, uses and can radiate radio
frequency energy and, if not installed and used
in accordance with the instructions, may cause
harmful interference to radio communications.
However, there is no guarantee that interference
will not occur in a particular installation.
If this equipment does cause harmful interference
to radio or television reception which can be
determined by turning the equipment off and
on, the user is encouraged to try to correct the
interference by one or more of the following
measures:
--Reorient or relocate the receiving antenna.
5

-- Increase the separation between the equipment
and receiver
--Connect the equipment into an outlet on a
circuit different from that to which the receiver is
connected.
--Consult the dealer or an experienced radio/TV
technician for help
NOTE: This device and its antenna(s) must not
be co-located or operation in conjunction with any
other antenna or transmitter.
The device has been evaluated to meet general
RF exposure requirement.
ISED Canada Statement:
This device contains licence-exempt
transmitter(s)/receiver(s) that comply with
Innovation,
Science and Economic Development Canada ‘s
licence exempt RSS(s). Operation is subject to
the following two conditions:
this device may not cause interference and
this device must accept any interference,
including interference that may cause undesired
operation of the device.
Radiation Exposure: This equipment complies with
Canada radiation
Exposure limits set forth for an uncontrolled
environment to maintain compliance with IC’s RF
Exposure guidelines. This equipment should be
installed and operated with minimum distance of
0mm the radiator your body. This device and its
antenna(s) must not be co-located or operation in
conjunction with any other antenna or transmitter.
6

Déclaration du Canada:
Ce dispositif contient un (S) émetteur (S)/
récepteur (S) exempté (S) de licence qui respecte
l’innovation,
Science et développement économique Canada
a exempté le ou les RSS de licence. L’exploitation
est soumise aux deux conditions suivantes:
1) cet appareil ne doit pas causer d’interférences
et
2) ce dispositif doit accepter toute interférence, y
compris toute interférence pouvant entraîner un
fonctionnement indésirable du dispositif.
Exposition au rayonnement: cet équipement est
conforme au rayonnement Canada
conformité avec les lignes directrices d’exposition
aux RF d’IC. Cet équipement doit être installé
et exploité à une distance minimale de 0mm
du radiateur de votre corps. Ce dispositif et
ses antennes ne doivent pas être co-localisés
ni fonctionner en conjonction avec une autre
antenne ou un autre émetteur.
7
Hereby GL Grup-2015 LTD declares that wireless
headphone PowerLocus P2 Kids is in compliance with
essential requirements and other relevant
conditions of Directive 2014/53/EU. The full text
of the EU declaration conformity is available at
the following internet address: (powerlo-
cus.com/doc)
Frequency: 2402-2480 MHz
Max radio frequency power: 100 mW (EIRP)
GL GRUP-2015 LTD.
36 VASIL LEVSKI STREET, 5370 DRYANOVO,
BULGARIA
CE

UK
please visit: https://powerlocus.com/doc-uk-p2kids
!
This symbol on a product means
that the product is covered by
European Directive 2012/19/EU.
Electrical products should not be
disposed of with household waste.
Please recycle them at the collect
points provided for this purpose.
Contact the local authorities or your
dealer for recycling advice. Proper
disposal of old appliances helps
preserve the environment and
health
8

BEDIENUNGSANLEITUNG
Bei Garantie oder Problemen mit
dem Produkt kontaktieren Sie uns bitte!
Email Support:
PowerLocus
PowerLocus
P2 Kids Princess

1
78910
1. Ein-/Ausschalten
2.
ablehnen, Wahlwiederholung
3. Lautstärke erhöhen (kurz drücken) /
Nächster Titel (länger drücken)
4. Lautstärke reduzieren (kurz drücken) /
Vorheriger Titel (länger drücken)
5. Multifunktions-Button
(Kopplung, automatische Radiosuche)
6. Kopfhörereingang
7. LED-Anzeige
8. USB-C-Ladebuchse
9. Mikrofon
10. Micro-SD/TF-Kartensteckplatz
Bluetooth-Version: V5.3
Drahtlose Reichweite: 10M
Frequenzbereich: 20Hz-20kHz
Audiotreiber: Φ40mm
Ladespannung: DC 5V
Ladezeit: ca. 1,5 Stunden
Gesprächs-/Musikzeit: ca. 20 Stunden(50% Lautstärke)
1. PRODUKTBESCHREIBUNG
Impedanz:
32 Ohm
Gewicht:
175 g
9

•Einschalten: Einfach den Schalter nach rechts
schieben.Anschließend blinktdieblaue und rote
LED-Anzeige (im Headset hören Sie: „The
wireless isready to pair“).
• Ausschalten: Schieben Sie denSchalternach
linksund die blaue LED-Anzeigeschaltetsich aus.
• Nachdem Sie den Schalter nach rechts gescho-
ben haben, blinken die blaue und rote LED (im
Headset hören Sie: “The wireless is ready to
pair”).
• Aktivieren Sie die Bluetooth-Funktion Ihres
Smartphones oder anderen Produkts.
• Suchen Sie nach verfügbaren Bluetooth-Geräten
und wählen Sie „P2 Princess“ aus (wenn
gefordert, geben Sie den Code "0000" ein).
• Wenn die Kopplung erfolgreich war, blinkt die
blaue LED-Anzeige (im Headset hören Sie: “The
wireless is connected successfully”).
• Bitte stellen Sie vor der Kopplung sicher, dass
der Kopfhörer funktioniert.
• Es wird automatisch eine Verbindung zu dem
vorher festgelegten Smartphone aufgebaut,
nachdem es eingeschaltet wurde (bitte stellen Sie
sicher, dass die Bluetooth-Funktion Ihres Smart-
phones funktioniert).
• Wenn die Kopplung nicht erfolgreich war, schalten
Sie den Kopfhörer zunächst aus und versuchen
Sie anschließend erneut eine Verbindung
aufzubauen.
2.DAS HEADSET EIN-/AUSSCHALTEN
3. MIT DEM SMARTPHONE ODER
ANDEREN PRODUKTEN KOPPELN
10

• Wenn Sie einenAnruf erhalten, drücken Siekurz
auf den Button, um denAnruf anzunehmen.
Anschließend könnenSiedenAnrufbeenden,
indemSie auf den Button drücken. Wenndie
Button nicht drücken.
•EinenAnruf ablehnen: HaltenSie den
4. MP3/FM
• Sobald der Kopfhörer eingeschaltet ist, legen
Sie die TF Karte ein, drücken kurz den Button
und es wird automatisch mp3 abgespielt.
• Wenn Sie keine TF Karte haben, drücken Sie
kurz den Button und das FM-Radio wird
automatisch abgespielt.
• (1) Sobald der Kopfhörer eingeschaltet ist, (2)
drücken Sie kurz den Button und das FM-Ra-
dio wird automatisch abgespielt. (3) Halten Sie
den Button länger gedrückt, um automa-
tisch nach allen Radiosendern zu suchen. (4)
Warten Sie 40 sekunden bis 1minuten die
Radiosender gespeichert sind (5) Drücken Sie
dann länger auf oder , damit Sie den
Radiosender hören können, den Sie möchten.
• Wenn Sie das FM-Radio hören, drücken Sie kurz
auf den Button, um in den Bluetooth-Modus zu
wechseln. Es wird automatisch mit Ihrem
Smartphone (oder anderem Produkt) verbunden.
5. ANRUFE ANNEHMEN, BEEN-
DEN ODER ABLEHNEN &
WAHLWIEDERHOLDUNG
(imBluetooth-Modus)
11

•Stecken Sie das USB-Ladekabel ineinen
USB-Anschluss mit 5V Stromversorgung (z. B.
einen USB-Adapter an einem Netzteil oder ein
USB-Anschluss am PC). Wenndie rote LED
leuchtet, wird das Headset aufgeladen.Sobald die
roteLED nicht mehrleuchtet, ist dasHeadset
des Headsetsdauert ca. 2 bis 2,5 Stunden.
•
niedrigemBatteriestand: Wenn der Warnton "Low
Battery" zu hören ist und die Anzeige rot wird,
bedeutet es, dass der Akku leer ist. Sie müssen
den Kopfhörer so schnellwie möglich aufgeladen.
dass der Akku vorm erstenGebrauch vollständig
aufgeladenwurde.
6. DAS HEADSET AUFLADEN
Für jeden Kopfhörermodus können Sie ein
3,5-Stereo-Verlängerungskabel mit der
Kopfhörerbuchse und der Audiobuchse eines
anderen Geräts (z. B. Smartphone, Computer, iPad
usw.) verbinden. Dann hören Sie die Musik über
die anderen Geräte.
7. KABELFUNKTION
DES KOPFHÖRERS
Buttonfür 2-3 Sekunden gedrückt.
• Wahlwiederholung: DrückenSieden
Button zweimal kurzhintereinander.
• Wenn Sie einen Anruf bekommen oder einen
Anruf annehmen, währendSieüber dieBluetooth
Kopfhörer Musik hören, pausiert die Musik
automatisch. Nachdem Sie aufgelegt haben, wird
die Musikautomatisch weiter abgespielt.
12

Hiermit erklärt GL Grup-2015 LTD, dass der
kabellose Kopfhörer PowerLocus P2 Kids den
grundlegenden Anforderungen und anderen
relevanten Bedingungen der Richtlinie 2014/53/EU
entspricht. Der vollständige Text der EU-Konfor-
mitätserklärung ist unter der folgenden Interne-
tadresse verfügbar: (powerlocus.com/doc)
Frequenz: 2402 - 2480 MHz
Maximale Hochfrequenzleistung: 100 mW (EIRP)
GL GRUP-2015 LTD.
36 VASIL LEVSKI STREET, 5370 DRYANOVO,
BULGARIEN
CE
13
die Tasten + und - gleichzeitig gedrückt, bis Sie die
Sprachansage "85dB" oder "94dB" hören.
8. SWITCH MODE – 85DB / 94DB
9. WIE SETZT MAN DEN KOPF-
HÖRER ZURÜCK?
Halten Sie beide Tasten 4-7 Sekunden
lang gedrückt,um die Bluetooth-Funk-
tion zurückzusetzen und die Kopplung
erneut zu starten.

Dieses Symbol auf einem Produkt
bedeutet, dass das Produkt der
europäischen Richtlinie 2012/19/EU
unterliegt. Elektroprodukte dürfen
nicht mit dem Hausmüll entsorgt
werden. Bitte entsorgen Sie diese
an den dafür vorgesehenen
Sammelstellen. Wenden Sie sich an
die örtlichen Behörden oder Ihren
Händler, um Ratschläge zum
Recycling zu erhalten. Die
fachgerechte Entsorgung von
Altgeräten schont Umwelt und
Gesundheit
!!!

MANUEL DE I'UTILISATEUR
Pour la garantie ou les problèmes
avec le produit, veuillez nous contacter!
Email Support:
PowerLocus
PowerLocus
P2 Kids Princess

1
78910
1. Power on /off
2.
rejeter l'appel, dernier numéro
3. L'augmentation de volume (presse) /
la prochaine chanson (le long de la presse)
4. De volume réduit (presse)/
Une chanson(le long de la Presse)
5. Bouton multifonction
(appariés, la recherche automatique deradio)
6. La prise d'écouteur
7. LED indicateur
8. USB-C charging port
Version Bluetooth:V5.3
Gamme de fréquences:
20Hz à 20kHz
Pilotes audio:Φ40mm
Tension de charge:
Temps de charge:
1. INDICATION DUPRODUIT
Temps de conversa-
tion/musique:
heures
9. Microphone
10. Micro SD/TF
card slot
14

•Chaussure: Le commutateur de coulissement,
-
•Arrêt: Un commutateurcoulissant vers la gauche,
l'indicateur de lumière bleue s'é teindra.
• Le commutateurde coulissement, indicateur
• La fonctionBluetoothouvretontéléphone ou
d'autres produits
• La recherche de dispositifs Bluetoothet de
sélectionner des P2 Princess (la saisie
d'unmot de passe" 0000 "si nécessaire)
•Si l'appariement de succès, l'indicateur de
lumièrebleueclignote, (casqueBluetooth
suggère: connexionréussie)
• Assurez - vous que l'écouteurdans l'apparie-
ment de fermeture avant
• Lorsqu'il est connecté au téléphone mobile
ce que la fonctionBluetooth du téléphone
mobileouvert)
•Si l'appariement n'est pas réussi, éteignez les
écouteurs, puis à l'appariement.
2. CHAUSSURE/ARRÊT
3. L'APPARIEMENT DE TON TÉLÉ-
PHONE OU D'AUTRES PRODUITS
15

•Lorsque l'appel,press boutonPeutrépondre à
l'appel.Au téléphone,press bouton Peuvent
être suspendus.Si l'appelantraccroche, Sans selon
bouton.
•Refuser de téléphone: Le long de la presse
button environ 2 secondes
•Rappel: La rapideparbouton 2 fois.
•Lorsqu'un appeltéléphonique ou d'un téléphone, si
l'écouteur Bluetoothesten train de jouer de la
musique, desconcertsde suspendreautomatique-
ment et entrer dansun état d'attente, après
pendaison, musiquecontinuera de jouerautoma-
tiquement.
4. MP3/FM
• Dans un mode de démarrage, d'insérer la carte
TF,press Bouton, Mp3 de diffusion automa-
tiquement.
• S'il n'y a pas de TF, press Bouton,La radio FM
à Lecture automatique.
• (1) De mode de démarrage, (2) Peu de touches
La radio M à Lecture automatique, (3)Le long de
la presse bouton recherche automatique de
toutes les stations de radio, (4) attendez 40sec à
1 min pour que les stations de radio soient
mémorisées, (5) ensuite le long de la presse
ou ,Tu vas écouter toute la radio vous aime.
• Si vous écoutez la radio FM,Presse bouton,Il
est converti en mode Bluetooth.Et la connexion
automatique à votre téléphone ou d'autrespro-
duits.
5. RECEVOIR / DE FIN D'APPEL,
L'APPEL EST REFUSÉ, LE DERNI-
ER NUMÉRO DE RAPPEL
(en modeBluetooth)
16
This manual suits for next models
1
Table of contents
Other PowerLocus Wireless Headphones manuals