manuals.online logo
Brands
  1. Home
  2. •
  3. Brands
  4. •
  5. PowerPoint
  6. •
  7. Oven
  8. •
  9. PowerPoint P05E2S1W User manual

PowerPoint P05E2S1W User manual

This manual suits for next models

5

Other PowerPoint Oven manuals

PowerPoint P22MSBL User manual

PowerPoint

PowerPoint P22MSBL User manual

PowerPoint P24EFSBL User manual

PowerPoint

PowerPoint P24EFSBL User manual

PowerPoint P24XBDSS User manual

PowerPoint

PowerPoint P24XBDSS User manual

PowerPoint P05C2SWH User manual

PowerPoint

PowerPoint P05C2SWH User manual

PowerPoint P25CKYLSS User manual

PowerPoint

PowerPoint P25CKYLSS User manual

Popular Oven manuals by other brands

Brandt FC 222 user manual

Brandt

Brandt FC 222 user manual

aumate TOA20M04N-1E instruction manual

aumate

aumate TOA20M04N-1E instruction manual

Maytag CWE4100AC - 24" Single Electric Wall Oven Dimension Guide

Maytag

Maytag CWE4100AC - 24" Single Electric Wall Oven Dimension Guide

Kernau KBO 1076 S PT B instruction manual

Kernau

Kernau KBO 1076 S PT B instruction manual

Bosch HB 37 N Series User manual and installation instructions

Bosch

Bosch HB 37 N Series User manual and installation instructions

Electrolux EOD5420AA user manual

Electrolux

Electrolux EOD5420AA user manual

Mx Onda MX-HC2183 instruction manual

Mx Onda

Mx Onda MX-HC2183 instruction manual

Daewoo F6EV19SM2 Service manual

Daewoo

Daewoo F6EV19SM2 Service manual

Blodgett MT3870 Specifications

Blodgett

Blodgett MT3870 Specifications

GE ZET2F owner's manual

GE

GE ZET2F owner's manual

GE JK3000DF3WW owner's manual

GE

GE JK3000DF3WW owner's manual

eka EKF 523 NT Operating and instruction manual

eka

eka EKF 523 NT Operating and instruction manual

AEG Electrolux E3191-5 user manual

AEG Electrolux

AEG Electrolux E3191-5 user manual

Pratica Rocket Express quick start guide

Pratica

Pratica Rocket Express quick start guide

Viking Professional VGSO260T user guide

Viking

Viking Professional VGSO260T user guide

FM RX203 instruction manual

FM

FM RX203 instruction manual

Bosch HBN331 9B Series instruction manual

Bosch

Bosch HBN331 9B Series instruction manual

NEFF B95M42N0MK Instructions for use

NEFF

NEFF B95M42N0MK Instructions for use

manuals.online logo
manuals.online logoBrands
  • About & Mission
  • Contact us
  • Privacy Policy
  • Terms and Conditions

Copyright 2025 Manuals.Online. All Rights Reserved.

Free Standing Electric Oven
60x60 cm
P05E2S1W / P06E2S1W / P05E2S1BL /
P06E2S1BL / T05E2S1W

Features
………………………………….…………………………………………………………
……. 3
Safety Instructions........................................................................................ 4
Installation ................................................................................................... 6
Fixing to the Wall
…………………………………………………………………….…………….… 8
Electrical Requirements
…………………………….…………………………….…………...... 9
Connecting the Mains Supply
Cable…….….………………………………..….………... 10
Using your Hob
…………………………………………………………………………………..…. 11
Using your Oven
……………………….……………………………………………….…….….… 12
Cleaning and Care …………………………………...................................................
13
Replacing the Bulb/Top Tips
……………….…………………….…...……………………… 15
Disposal of Appliance/Problem Solving ……..……..…................................... 17
Health and Safety ...................................................................................... 18
Technical Data/ Warranty
Information………………….……………………………….. 20
Customer Care
…………………………………………….……………….…….…………………. 22
5. Solid Hob
6. Cooker Section Led Lamp
7. Oven Section Led Lamp
8. Control Panel
9. Thermostat Knob
10. Function Knob for Oven
For illustration purposes only. Accessories provided with models P06E1S1W
/P06E2S1W
1 Cooking Tray & 1 Wire Grid, inner tray grid & Handle
The use of any electrical appliance requires the following common sense
safety rules. There is danger of injury or death to the person and damage to
the appliance.
Note: If the following instructions are not adhered to the warranty will not
Be applicable
●This appliance is not intended for use by persons (including children)
with reduced physical, sensory or mental capabilities unless there is a
person responsible for their safety present
●Never attempt to repair the appliance yourself
●This appliance is intended to be used in household and residential
type environments, it is not suitable for commercial use
●Keep the electrical cable of your cooker away from any heat source
and do not let the cable touch the appliance
●Ensure that the electric supply cable is not trapped or damaged during
Installation
●Prior to installation ensure that the electricity voltage and frequency
are compatible with your cooker
●In the event that the cable connecting your cooker becomes damaged,
it must be replaced by an electrician
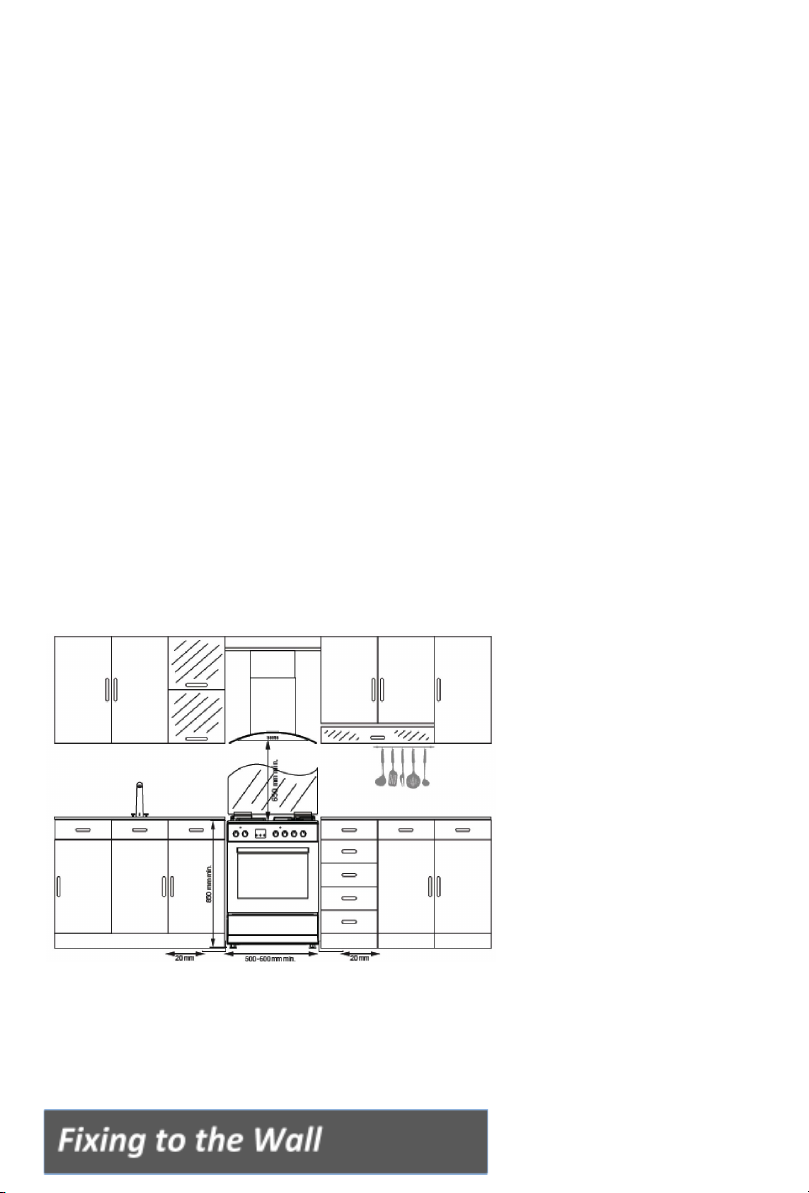
●The materials surrounding the appliance (cabinets) must be able to
withstand a minimum temperature of 100°C
●The appliance and its accessible parts become hot during use. Care
should be taken to avoid touching hot parts
●Cooking on a hob with fat or oil can be dangerous and should not be
left unattended
●NEVER try to extinguish a cooking fire with water. Instead switch off
the appliance and cover flame with a lid or a fire blanket
●The cooker may topple forward if a child climbs onto the door.
Children should be supervised in the kitchen at all times and this
Cooker must be secured to the wall using the fixing chain provided to prevent
accidents
●Do not allow children in the kitchen when cooking or while cooker
parts may still be hot. Many parts of the cooker will become hot
And present a considerable hazard to children
●When the oven is hot never touch the door
●Before starting to use your appliance ensure that curtains, paper or
flammable items are kept away from your appliance. Do not keep
flammable materials inside of or around your cooker
●Take care when closing the oven door that there is nothing
obstructing it from closing as this may break the glass door
●Position pans over the centre of the burners and turn handles to a
safe position where they cannot be knocked or grabbed
●Make sure the cooker control knobs are all in the off position when
not in use
●If you do not intend to use your cooker for a long period of time turn
off the electric supply to the cooker
●Ensure that the room where your cooker is installed is well ventilated
particularly while the cooker is in use. Keep natural ventilation holes
open and clear of obstructions or install an extractor hood. Prolonged
intensive use of your cooker may call for additional ventilation (by
opening a window)
●Do not try to lift or move this cooker by pulling on the door handle
●Ensure that the appliance is switched off before replacing the lamp to
avoid the possibility of electric shock
●Your appliance is produced in accordance with all applicable local and
International standards and regulations and must only be installed by an
authorized service technician
●Do not lean anything on the door while it is open as you may
unbalance your appliance or damage the door or its hinges
●Do not hang towels, dishcloths or clothes from the cooker or its
handles
●Do not operate the appliance using an external timer or remote
control system
●This cooker must be installed according to local regulations by a
suitably qualified technician
●Carefully unpack the cooker and check for any external visible
damage. Do not install or use if it is damaged
●Packaging materials should be collected together and disposed of
immediately as they may be harmful to children
●The appliance must be installed on a flat surface
●Surrounding furniture, cabinets and extractor fans should be
positioned in accordance with the diagram that follows
●If fitted, the extractor fan must be at least 65cm above the hob. If no
fan is fitted the minimum distance between the hob and any cabinet
or other structure must be 70cm
●This cooker should not be installed next to a refrigerator or freezer
●The height and level of the appliance can be adjusted by rotating the
feet underneath the appliance at each corner. Rotate in a clockwise
direction to decrease the height and anti-clockwise to increase the
height
●It is not recommended that the cooker is positioned below wall
cupboards, as the heat and steam may damage the cupboard and its
contents
●Keep all ventilation slots clear of obstruction
Before using the appliance fix it securely to the wall using the chain kit
provided. Fix to the wall at the back of the cooker. This will prevent the cooker
from toppling forward if excess weight is placed on the oven door. As the
chains must be attached to the wall using fixings suitable for your wall type,
the wall fixings are not supplied with the cooker. Fix the chain to the cooker
bracket with the nuts and bolts provided in the fixing kit. It is necessary to
ensure the chain is tight to avoid any movement of the cooker once it is
operational.
●All electrical connections should be made by a qualified Electrician
●Check that the voltage on the rating plate of your appliance
corresponds with your house electricity supply which must be A.C.
(Alternating Current)
●Ensure that the mains cable does not get damaged during installation
and that it never comes in contact with hot surfaces
●Do not let mains cables come into contact with the appliance door
Electrical details
Rated Voltage: 220 - 240 Vac 50 Hz
Supply Connection: 32 A (double pole switched fused outlet with3mm contact
gap)
Max Rated Inputs: 7.00 kW
Mains Supply Lead: 3 core x 6 mm² (not supplied)
For future reference please record the following information which can be
found on the rating plate and the date of purchase which can be found on
your sales invoice. The rating plate for your oven can be
The wires in the mains lead are coloured as follows:
GREEN AND YELLOW: EARTH
BLUE: NEUTRAL
BROWN: LIVE
●Release the cover plate by removing the cover screw
●Loosen the cable clamp
●Connect the mains supply cable to the terminal block on the cooker
using the colour code
●Secure the cable clamp
●Check the cable terminals for tightness and ensure that the terminal
links are in place, then replace the cover plate and cover screw
Control Panels
P06E1S1W
P06E2S1W

WARNING! There is a risk of burns from residual heat