PowerPoint P25CKYLSS User manual

Built-in oven
Instructions for use installation
Family use built-in oven
Model: P25CKYLSS
Thank you so much for purchasing this product.
This product is for domestic use only.
Please read this instruction manual carefully before using the product
to ensure the correct and safe use of this product.
Pay special attention to Safety Precautions. (Page 3-6).
Please safekeeping the Warranty Certicate and the User’s manual .

Safety precautions…………....................................... 3-6
use precautions.....................................................7-9
Initial use precautions.......................................9
Appliance parts and operation.......................9
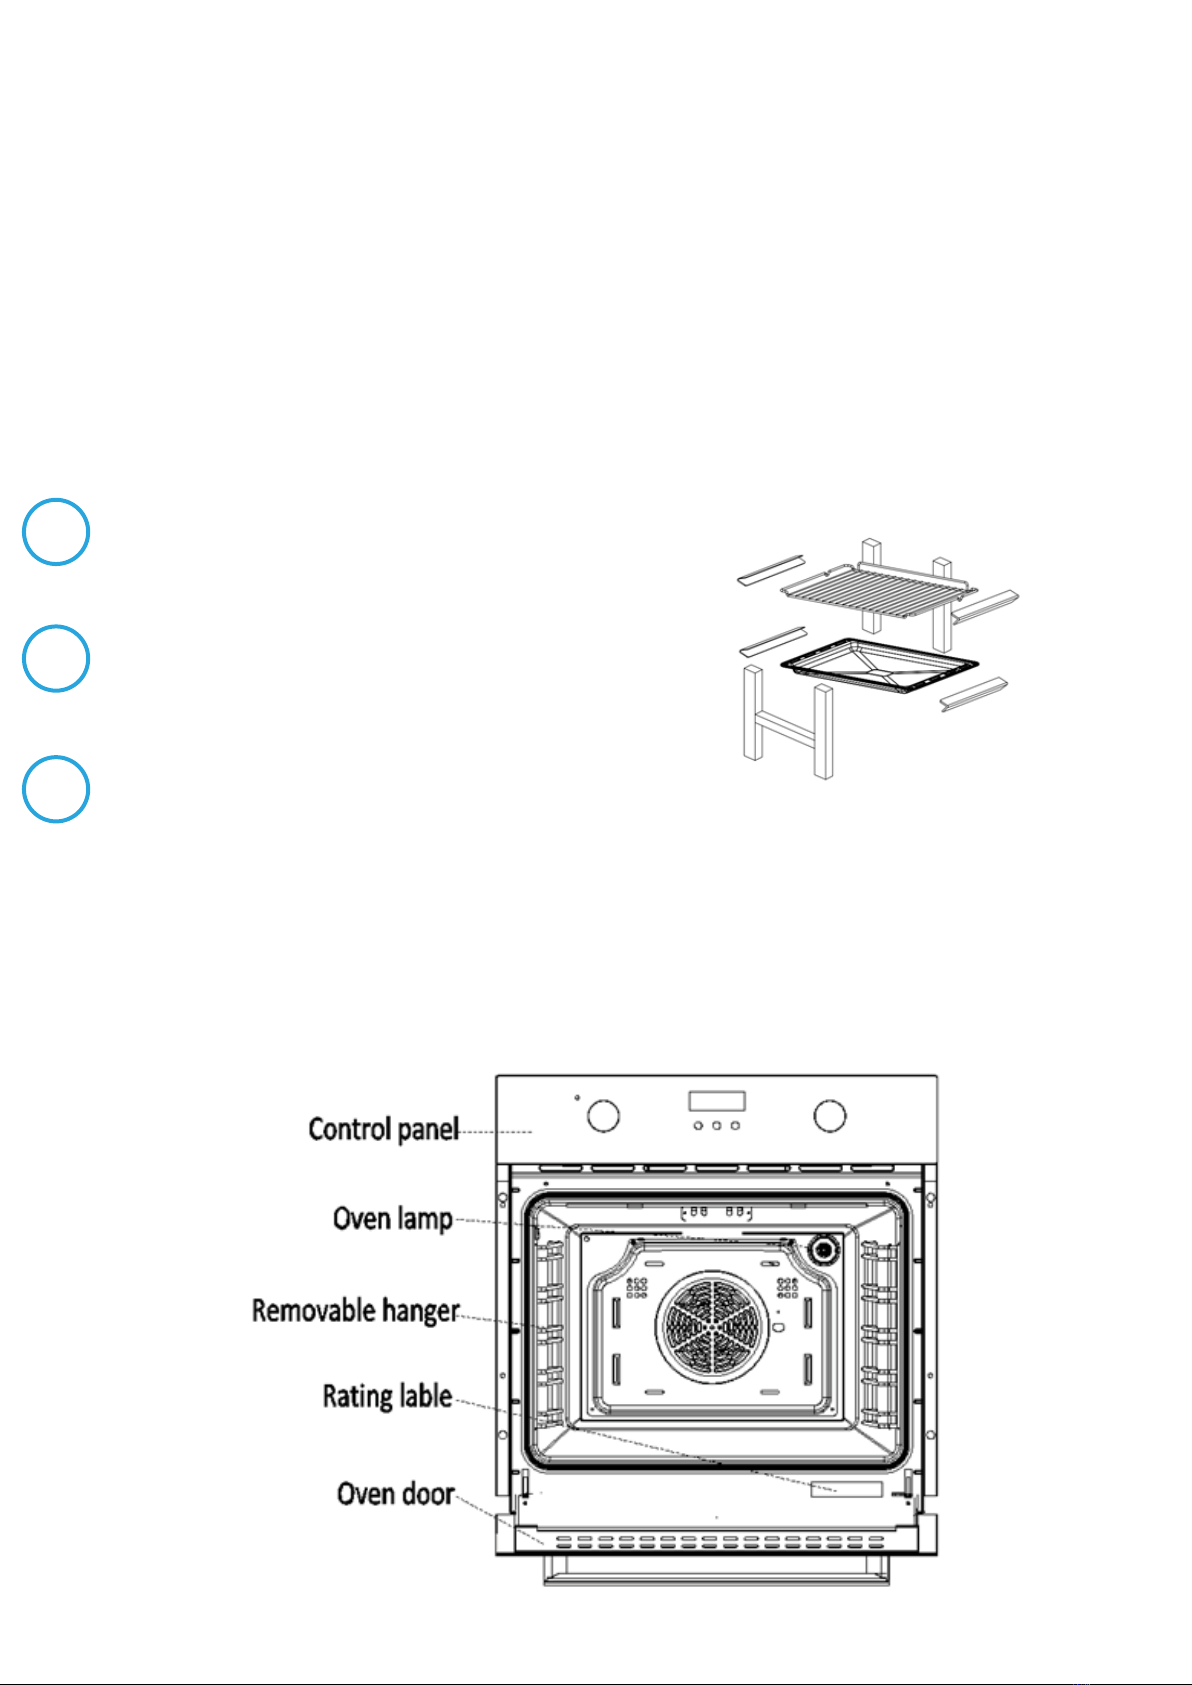
Oven component......................................................9
Accessories...................................................................10
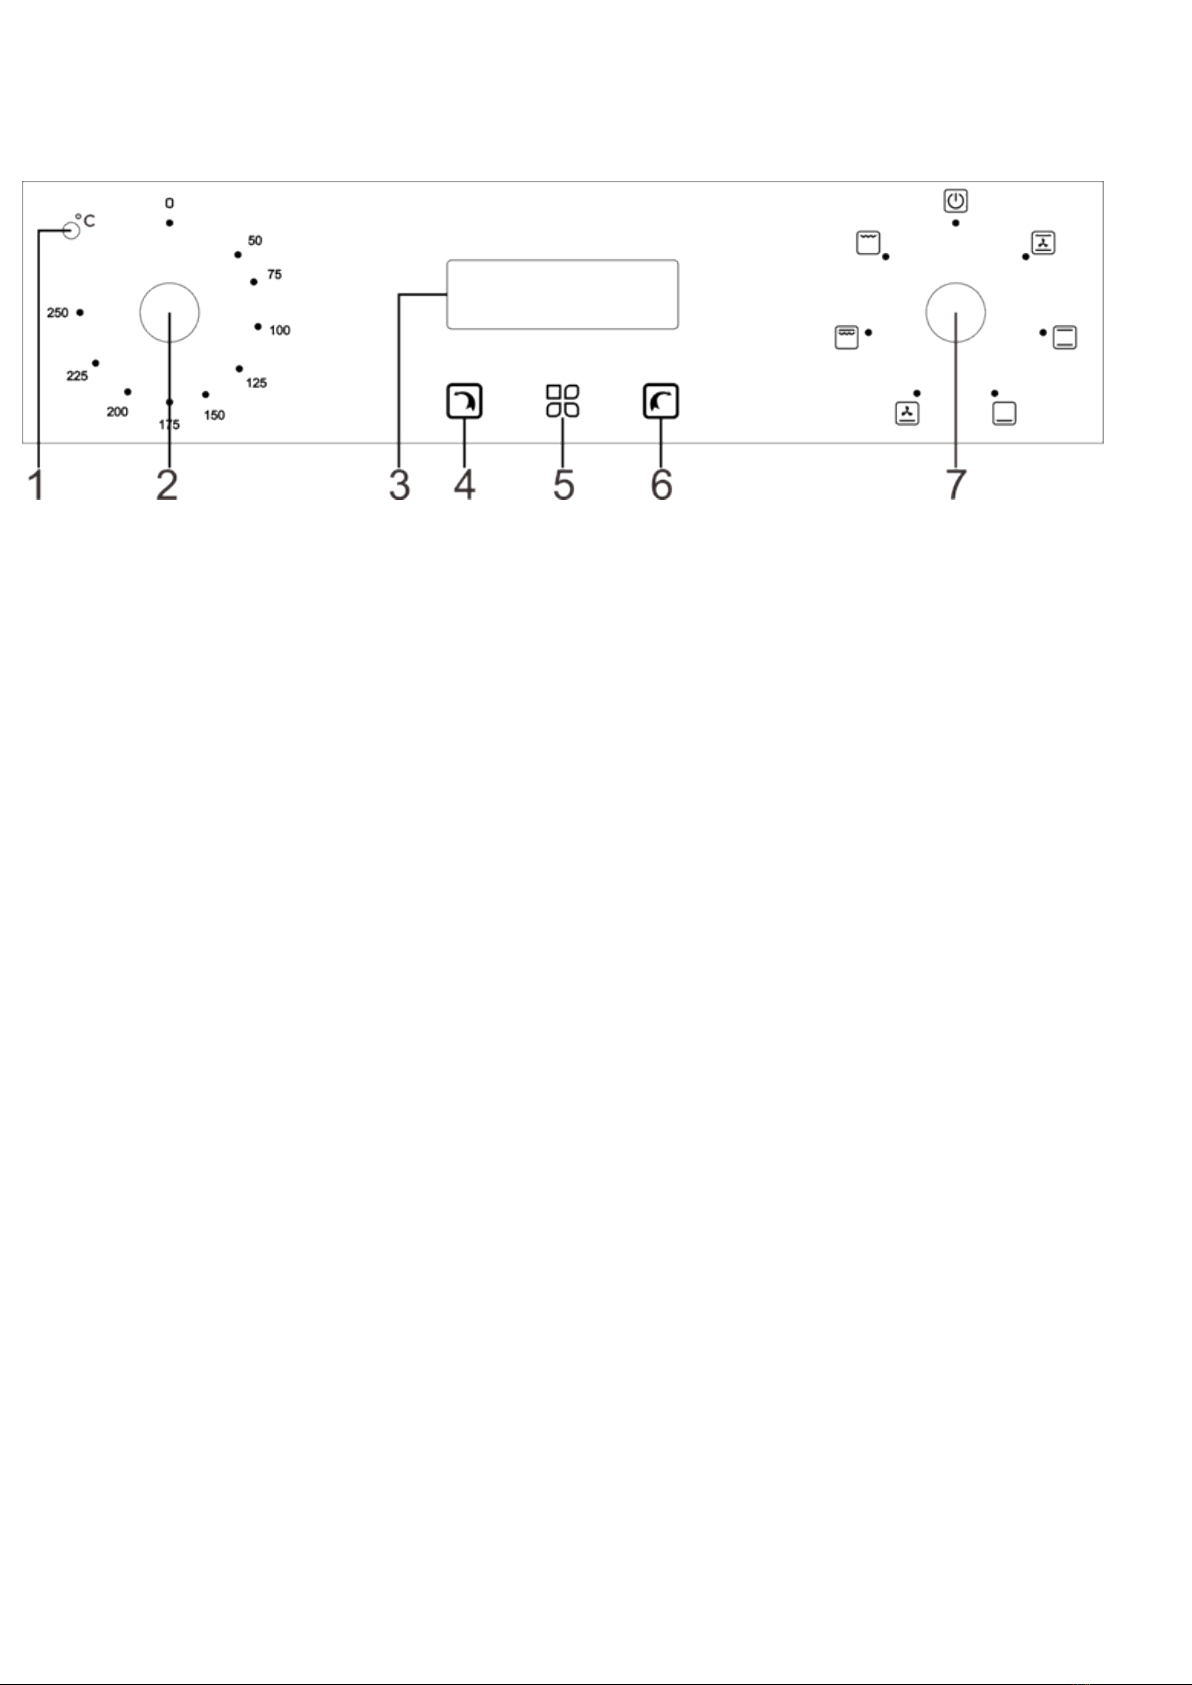
Control panel...............................................................11
Function settings......................................................12
Cooking knacks.........................................................13
Usage method...........................................................14
Cooking suggestion and instructions.......14
Energy saving tips....................................................14
Timer setting….................................................15
Clock setting....................................................15
Automatic programmer setting.........16
Cleaning and maintenance...................17
Oven interior /oven door........................17
Remove the oven door.............................18
Remove the slide-in racks.....................18
Oven light replacement...........................19
Sensor probe replacement...................19
Specifications..................................................10
Installation Instructions............................21-24
Warranty & after sales service............25
The classification and interpretation of icons are as follows.
This icon indicate that cannot be in progress, i.e. “Prohibited ”.
This icon indicate that it must be executed, i.e. .
Warning: Indicates a potential hazard that, if unavoidable, may result in death
or serious injury.
Note: Indicates a potential hazard that, if unavoidable, may result in death or
moderate injury.
To prevent the bodily injury and property damage, please be sure to observe the following
safety precautions.
•The following icons show the extent of damage caused by incorrect operations.
Contents
Safety Precautions Be sure to observe
3

Do not use the appliance if the power cord or the power plug has been damaged,
or the interface between the power sockets and the power plug is loose.
(To avoid electric shock or fire due to short circuit.)
If the soft wire of the power supply is damaged, in order to avoid danger, it must be
replaced by professionals of the manufacturer, its maintenance department or similar
departments.
Do not damage power cord or power plug.
- The following operations are absolutely prohibited:
Do not allow the cable to come in contact with high temperatures or move the product
by pulling on the cable.
(To avoid electric shock due to breakage of power cord and power plug, or fire due to
short circuit.)
Do not insert anything into the opening of the oven.
- Especially the metal objects, such as lead wire or electric wire.
(To avoid electric shock or injury caused by abnormal movements.)
Do not install the decorative door panels in front of the oven.
(To avoid the door panels become deformed caused by overheating.)
Keep away from the appliance while in use or just after use. Pay special attention to
children. (To avoid scalds)
Do not place objects other than heat-resistant pottery in this product.
(To avoid fire caused by high temperature melting.)
Prohibition example:
- Flammable objects such as plastic containers.
- Articles made of aluminium foil, etc.
Do not use this appliance to heat the room.
(To avoid causing fire and shortening product life.)
Do not use this appliance to heat unopened canned products.
(To avoid fire, scald or injury cause by explosion due to pressure accumulation.
Do not alter, disassemble or repair the product by yourself. (To avoid causing fire,
electric shock or injury.)
For repairs, please contact (Company name) Certification Maintenance Store for
consultation.
WARNING!
Contents
→
4

Do not clean the oven door glass with a rough scrubber or sharp scraper.
(In order to avoid scratches on the surface of glass, resulting in glass failure.)
Be sure to use AC power sockets with specifications of AC220V-240V/16A separately.
(In order to avoid fire caused by heating when used with other electrical appliances.)
Be sure to use the wiring boards with specifications of at least 16A.
Be sure to plug the power plug fully into the socket.
(In order to avoid causing smoke, fire or electric shock. )
This product should be properly connected to the grounding system in accordance with
national and local safety regulations.
(To avoid the risk of electric shock in case of malfunction or leakage.)
Users must test this basic security requirement. If there is any doubt, it should be tested
by a qualified electrican.
Make sure that the product is installed correctly and all electrical components are
installed correctly before use.
(To avoid causing fire or injury.)
This product is not suitable for following persons (including children) : persons with
reduced physical, sensory or mental capabilities or lack of experience and knowledge if
they have been given supervision or instruction concerning use of the appliance in a
safe way and understand the hazards involved. Children shall not play with the
appliance. Cleaning and user maintenance shall not be made by children without
supervision.
(To avoid burns, injuries or electric shocks.)
Dispose of all packaging materials to avoid danger to children.
Remove the plug if any fault occurs.
When installing, maintaining and repairing this appliance, make sure to disconnect the
power supply.
(To avoid electric shock or injury. )
Make sure to turn off the power supply before changing the light .(To avoid electric
shock.) Before the first use, please burn it empty to remove the odor. (See the appendix
[Initial use precautions])
(Not to affect the normal use of the appliance.)
Remove packing parts and cushioning materials before use.(To avoid fire causing by
temperature raising).
5

Safety
Precautions Be sure to observe
NOTE!
Do not put inflammable materials in the oven.
(So as not to cause a fire when accidentally turning on the oven)
Do not sit or lean on the open door.
Do not use abrasive, corrosive cleaners or sharp metal scrapers to clean glass doors of
oven.
(To avoid scratching the surface, or even causing glass to break.)
Do not use steam cleaner to clean this product.
(To avoid short circuit or product failure.)
Do not touch the bottom of the product after the power is turned on.
(To avoid scalds.)
During cooking the food with fat or oil release, be sure to be watched by someone.
(To avoid causing fire.)
When pulling out the power plug, make sure to hold the plug .
(To avoid electric shock or fire due to short circuit.)
Do not replace your hands on either side of the door when it closes.
(To avoid injuries caused by clamping fingers when closing the door.)
6

Use Precautions
Focus on product
Before the first use, please remove all the protective film on the product (except rating
label).
(To prevent the protective film from melting due to high temperature and scalding
after touching.)
Before first use, please remove packaging material from the oven.
(Grill, cardboard on both sides of the baking tray, cushioning foam in front and rear of
the grill and strapping tapes on the slide rail).
During operation, the oven become very hot, and heat-resistant gloves should be worn
when operating.
(To avoid scalds.)
During operation, the oven door must be closed and confirm there is no object stuck
on the oven door.
(To avoid affecting the cooking effect.)
Do not leave sugary food residues (such as jam) in the oven.
(To avoid damaging the enamel inside the oven.)
Do not use plastic products in the oven.
(To avoid the melting of plastic will damage the oven cause by high temperature.)
During using the oven, do not cover the bottom of the oven with aluminum foil, tin foil,
or place pans and baking tray at the bottom of the oven.(To avoid damaging the
enamel inside the oven.)
Do not add water to the drip tray if the oven is still hot.
(In order to avoid steam burn out or damage the enamel surface.)
Do not use spray cleaner.
(Avoid causing insulation aging ,thereby damaging the oven.)
7

Use Precautions
Slide-in racks Placement Warning
Removal of Packaging Components
and Cushioning Materials
In order to ensure the safe use of the grate or tray, it is necessary to insert in the right
direction and place the slide-in racks correctly.
In addition, you can also refer to the level number displayed in the front of the oven when
you open it. (There are five
levels altogether.)
This ensures that food does not
slip out of the back during careful
removal from the grate or tray.
Before closing the oven door, make sure that
the grate (baking tray) is in place and that the grate (baking tray) does not touch the glass
inside the oven door.
Remove packaging materials before use
Before the initial use, please remove the packing
material according to the drawing first, the other
operations can be carried out.
Please pay attention to remove the packing materials in the oven
8

Initial Use Precautions
Initial Use Operation
Appliance parts and operation
Oven Component
Note: When using oven for the first time, there may be a small amount of smoking and
odor, which is a normal phenomenon.
Please adjust the temperature of the empty oven to 250, and bake it with stereoscopic
function for 30 minutes before using it.
Remove all cushioning material
1
Operate the empty oven for about
30 minutes with top and bottom heat
mode and maximum temperature.
2
The resulting typical smell is unavoidable.
Please ventilate the room.
3
9

Accessories
Before first use, please clean all accessories and use soft cloth and neutral detergent to
clean the oven.
Only original accessories can be used.
Grate
Used for baking and barbecuing
Enameled baking tray
Used for cooking large amounts of food, such as damp cakes,
pastries, frozen foods, or for collecting fat/spills and gravy
Slide-in racks
When cleaning the oven wall, the racks on both sides can be
removed
Screw assembly
Screws (2) for fixing product
10

Appliance parts and operation
Control Panel
1. Indicator light
(indicates the heating process, i.e. the operation of one or more heating elements)
2. Temperature setting knob
Rotate the knob to select the desired temperature.
3. Main display screen
4. Decrease button
5. Timing/Clock button
6. Increase button
7. Function setting knob
Rotate the knob to select the desired function.
11

Appliance parts and operation
Function Settings
Turn the knob to the relevant icon and select the cooking functions required.
Conventional+fan
The combination of fan and two heating elements can provide more uniform
thermal penetration performance and save 30-40% energy. The outside of the
food is slightly brown but the inside is still wet.
Note: * This function is suitable for high temperature roasting or roasting large
pieces of meat.
Top and bottom heat
The top and bottom work together, and can be used for routine cooking
operations.
Radiant grilling
The upper inner ring heating element working. The temperature can be set in
the range of 50°C to 250°C.
Bottom heat+fan
The rear fan and the lower heating element can work at the same time. The
temperature can be set in the range of 50°C to 250°C.
Double grilling
The upper inner ring heating element and the outer ring heating element can
work at the same time. The temperature can be set in the range of 50°C to 250°C.
Bottom heat
The concealed element at the bottom of the oven provides more concentrated
heat without browning. This is suitable for slow cooking dishes, such as crisp
casseroles, stews, pastries and pizza.
ICONS FUNCTION DESCRIPTION
12

Cooking Knack
FOOD
BISCUIT
SANDWICH
SWISS ROLL
SPONGE CAKE
PIZZA
APPLE PIE
TOAST
HAMBURGER
SMALL CAKE
WEIGHT
(KG)
FUNCTION
SETTING
0.5
0.2
0.2
0.5
0.35
1.2
9pcs
1 5
0.3-0.4
TEMPERATURE
(IN °C)
200
180
180
175
200
185
240
240
185
FIRST FACE
(SECONDS)
10-15
15-20
10-18
30-35
10
50-60
1-2
10-20
20-25
SECOND FACE
(SECONDS)
-
-
-
-
-
-
-
5-10
-
ACCESSORY
BAKING TRAY
GRATE
BAKING TRAY
GRATE
BAKING TRAY
GRATE
GRATE
BAKING TRAY
BAKING TRAY
LEVEL
3
3
3
3
3
3
5
3
13

Usage Method
Cooking Suggestions and Instructions
14
Normal Suggestions
We suggest to preheat the oven before the food is put into the oven.
Normally , it is impossible to shorten the cooking time by increasing the
temperature (food may be well cooked outside, but not yet inside).
If cooking is done on a multi-layer grill, we suggest using a Conventional + fan
function so that uniform cooking can be achieved at all heights.
In order to achieve the best cooking effect, we suggest that the suitable ware
should be placed in the center of the grill or tray.
In order to prevent the formation of excessive condensation beads on the inner
glass, after cooking, hot food should not be placed in the oven for a long time.
Suggestions on meat cooking
The cooking time of food, especially meat, varies with the thickness and quality of
the meat and the taste of the user.
We suggest using meat thermometers when cooking meat. (The thermometer is
not supplied with the oven.)
If necessary, food can be wrapped in aluminum foil for cooking to make the food
more tender.
Suggestions on cake and biscuits cooking
Dark metal molds can absorb heat better when baking cakes.
Temperature and cooking time depend on the quality and consistency of the
mixture.
To check the cake is ripe or not, at the end of cooking time, insert the metal pole to
the top of the cake and cooked insert a knife if the blade comes out dry the cake is
cooked.
If the cake collapses when it comes out of the oven, the next you can extend the
time appropriately, if necessary, can also be reduced by about 10°C for baking.
In order to save energy in the use of ovens, the following instructions can be
followed:
1. The door must be completely closed for all cooking operations.
2. Please don’t open the oven door frequently while cooking, because it will let the
heat out of the oven.
3. Turn off the power completely when not in use.
4. Always keep the Oven interior clean.
Energy saving tips

Timer Setting
Clock Setting
Alarm Setting
Cooking Time Setting
15
Used for display the current time on the screen. Clock must be set before use.
1. When the power is turned on, the display screen shows "12.00" and the clock icon
flashes. At this time, the oven is not working.
2. Press or button to set the current time. After 5 seconds, the default setting is
finished and the clock icon is off.
For setting alarm functions on any function, the setting time range is:
1 minute< T < 23 hour and 59 minutes
1. Press the button until you see flashes on the screen, then set the alarm function.
2. Press or set the required alarm time (alarm time = current time + set time).
3. After 5 seconds, lighting, the setup is finished.
4. When the working time reaches the set time, the alarm function will be activated ,and
the will flash. At this time, press the , or button, the alarming sound will be
stopped and the goes off. If you do not press any button, the alarming sound will be
stopped after 2 minutes.
Used for cooking for a selected period of time , when the setting time comes, the oven
shuts off automatically , cooking time adjustment range: 0 < T < 10 hours; Press the
button until you see flashes on the screen, then set the cooking time.
1. Press the or to set the cooking time you want. When is constant lighting, that
means the setting is completed.
2. Adjust the oven function knob and temperature knob to your desired function and
temperature.
3. When the cooking time is over (cooking time = current time + set time), the oven stops
working. The bell rings and flashes. Pressing , or at this time will stop the bell
rings. If you don't press any button, the bell ring will stop after 2 minutes.
4. When the oven is shut off, the display screen shows the current time.

Cooking End Time Setting
16
The oven will be shut off automatically when the cooking end time is set.
The adjustable range of the end time: the end time ≤ current time + 10 hours, but the
maximum end time is not more than 24 hours.
1. Press the the button until you see flashes on the screen, then set the cooking
end time.
2. Press or button to set the end time you need. After 5 seconds, the default setting
is completed, and is constant Lighting.
3. Adjust the oven function knob and temperature knob to your desired function and
temperature.
4. When the cooking time is over, the oven stops working. The bell rings and flashes.
Pressing , or at this time will stop the bell ring. If you don't press any button, the
bell ring will stop after 2 minutes.
5. When the oven is shut off, the screen displays the current time.
Used for cooking for a selected time, and the oven will shut off at the end time you set.
After the function is set, the oven will automatically start up at the set time, and can cook
during set time, it will automatically shut off at the end time.
Satisfy this relationship: End time =Current time (display screen time) + Cooking time
1. Press the button until you see flashes on the screen, then set the cooking time.
2. Press or button to set the cooking time you need, will be constant lighting.
3. Press the button until you see flashes on the screen, then set the cooking end time.
4. Press or button to set the cooking end time you need, will be constant lighting.
5. Adjust the oven function knob and temperature knob to your desired function and
temperature.
6. Arrive at the set time, the oven will start up automatically and work according to the
set procedure.
7. When the end time of program comes, the oven stops working, the bell rings, and the
and are lighting at the same time.

Setting the child-proof lock (key lock)
Cleaning and Maintenance
Oven Interior/Oven Door
17
8. Press the , , , it will stop the alarm clock. If you do not press any button, the
alarming sound will stop after 2 minutes.
9. Turn the knob to the “0” position, the oven is turned off.
Your appliance is equipped with a child lock to prevent the appliance from being
switched on accidentally or settings from being changed unintentionally, e.g. by children.
When activated, the control keys are all locked.
1. To activate the key lock, press and hold the and keys for 3 seconds until the
icon is displayed. All the control keys are now locked.
2. To deactivate the key lock, press and hold down the and keys again for 3
seconds. The icon disappears from the display and you can ope-rate the appliance
normally again.
Oven door
Glass door should always be clean, to remove stubborn stains with kitchen absorbent
paper, wet sponges and
common detergents.
Do not use a steam cleaner to clean the oven.
Do not use detergents or corrosive detergents to clean glass door.
Do not use rough or friction materials or sharp metal scrapers to clean the oven glass
door, as they may scratch the surface.
Oven Interior
In order to maintain the oven better, after cooking, the oven should be fully cooled
before cleaning.
Take out all removable parts.
In order to facilitate cleaning, the oven door can be removed. ( Removal method refers to
"Remove the oven door" below.)
Steam cleaners should not be used when cleaning.
Used for cooking for a selected time, and the oven will shut off at the end time you set.
After the function is set, the oven will automatically start up at the set time, and can cook
during set time, it will automatically shut off at the end time.
Satisfy this relationship: End time =Current time (display screen time) + Cooking time
1. Press the button until you see flashes on the screen, then set the cooking time.
2. Press or button to set the cooking time you need, will be constant lighting.
3. Press the button until you see flashes on the screen, then set the cooking end time.
4. Press or button to set the cooking end time you need, will be constant lighting.
5. Adjust the oven function knob and temperature knob to your desired function and
temperature.
6. Arrive at the set time, the oven will start up automatically and work according to the
set procedure.
7. When the end time of program comes, the oven stops working, the bell rings, and the
and are lighting at the same time.

Remove the Oven Door
1
2
3
18
Removable oven door allows users to fully touch the oven interior, making maintenance
more convenient and fast.
Open the door to the maximum angle and pull the lock
back at the hinge of the door(Figure 1). There are two
locks on both sides of the oven door.
Close the oven door, at about 15 degree, then lift
the door, and slowly pull out from the oven.(Figure 2)
After cleaning, perform the above-mentioned
operations in the opposite steps to restore the
door to its original condition.
Note: After using a specific detergent, run the oven for
15-20 minutes with maximum heating settings to remove
residues in the oven. In this process, touchable parts may
be hotter than usual. Keep children away from the oven.
Remove the hanger to facilitate cleaning the side wall of the oven. Note: Operate this
process must by hand slightly, or it will damage the enamel.
1. Remove all accessories such as grate and baking tray.
2. Slightly push down the hook in racks at the clamping point as shown (A).
3. Swivel the rack inwards to an angle of approx. 45 degrees(B-C).
4. Unhook it at the top and carefully pull it out (C).
5. To reinstall after cleaning, follow the steps above in reverse order.
After cleaning, perform the above-mentioned operations in reverse steps to restore the
components to their original positions.

Oven Light Replacement
Sensor Probe Replacement
4
3
2
1
MODEL
VOLTAGE
RATED POWER
UPPER INNER HEATING PIPE
LOWER HEATING TUBE
RATED FREQUENCY
PRODUCT SIZE(WIDTH * DEPTH * HEIGHT)
RATED VOLUME
UPPER OUTER RING HEAT PIPE
P25CKYLSS
220-240V
2200W
1200W
1000W
50/60HZ
595(WIDTH)X565(DEPTH)X595(HEIGHT)
70L
1000W
19
The light used in oven is a special high temperature resistant light (AC220V/25W).
Therefore, it is necessary to purchase genuine light from authorized distributors.
The replacement steps are as follows:
Disconnect the power supply of the power socket.
Turn the glass cover counterclockwise.(Figure 5)
Remove the light and replace it with the same type.(Figure 6)
After replacing the light, screw the glass cover clockwise.
The probe used in the oven is a mechanical physical probe. Do not replace it without
authorization.
In case of abnormal temperature sensing of the sensor probe, please contact the
designated repair shop immediately for replacement.

Specifications
Specifications
20
The standby power is about 0.5W when the power supply of the product is "off".

Installation Instructions
Important note
Electrical Connectors
21
The kitchen cover must be suitable to ensure that the oven works properly.
The panel of kitchen equipment adjacent to the oven must be made of heat-resistant
materials. Kitchen equipment made of plywood shall ensure that the glue can withstand
a temperature of at least 120 degrees Celsius. When plastic or glue cannot withstand this
temperature, the equipment will melt and deform.
Once the oven is placed in the kitchen equipment, the electrical components must be
completely insulated. This is a statutory safety requirement.
All furnace covers must be firmly fixed in place and cannot be removed without using
special tools.
Remove the back of the kitchen equipment to ensure the full circulation of air around the
oven.
The oven rack must have at least 45 mm rear clearance.
Because oven handle and sheet metal parts are easy to cut, installers need to wear
gloves for installation.
The wiring of oven must be equipped with all-pole disconnection device according
to the wiring rules.
After installing the appliance, it is necessary to have other methods to disconnect
the power supply. The power supply is disconnected by a contactable plug or by a
fixed wiring switch that meets the wiring requirements.
WARNING!
Table of contents
Other PowerPoint Oven manuals