POWERSHADES BOND SIDEKICK 2 User manual

BOND SIDEKICK 2 GUIDE
1
PowerShades are only compatible with the Bond Sidekick Gen 2. You can tell you have a
Gen 2 Sidekick by checking the label on the back of the unit for “Gen 2”. The Gen 1
Sidekicks do not have any indication.
!
CHANNELS
STOP
DOWN UP
TECHNICAL DATA
Battery type CR2430 (3V)
Radio Frequency 433.92 MHz
Operating Temperature -10ºC to +50ºC
Range 2,500 ft 2
1xCover Plate
1xSidekick
1xWall Clip
2xPhillips Head Screw
2xDrywall Anchors
1x Battery
Back buttons
Press Tool
PACKAGE CONTENTS
1x
Sidekick is a 5-channel wireless keypad that can communicate with multiple motorized shade
technologies directly. For ease-of-use, it is designed to work very similarly to the motor manufacturer's
remote controls. This will guide you through the steps to pair a Bond Sidekick 2 to your PowerShades.
If you ever need any help throughout, reach out to us at (417) 553-0504 or contact Bond Support.
MENU PAIR
POWERSHADES
POWERSHADES

2
SIDEKICK 2 BASIC OPERATION
You may operate one or more channels at the same time. To deselect a channel, first select another
one. It’s not possible to have no channel selected.
CHANNEL SELECTION
RAISE, LOWER, AND STOP SHADE
Press desired
CHANNEL button
Press UP to raise shade.
It is not necessary to hold
the button while the shade
is moving.
The CHANNEL LED
will light up indicating
channel selection
Press selected
CHANNEL button
Button LED will
turn off
Select Channel Deselect Channel
Raise Shade
Press DOWN to lower shade.
It is not necessary to hold
the button while the shade
is moving
Lower Shade
Press STOP
while shade is moving
Stop Shade
POWERSHADES

3
SIDEKICK 2 SETUP
Separate the Sidekick covers using a screw driver. Once the back cover has been removed, insert the
battery with the + side facing up.
The Sidekick will need to be set to PowerShades technology to work with PowerShades. Use the
provided press tool to click (DO NOT HOLD) the MENU button on the back of the Sidekick. After the
MENU button has been clicked, proceed to click following button sequence. The button LEDs will
flash once successful.
STEP 1 : INSERT INCLUDED BATTERY
STEP 2 : SET THE SHADE TECHNOLOGY TO POWERSHADES
1 2
4 1
CLICK!
POWERSHADES

4
PAIR SIDEKICK TO SHADE USING MOTOR HEAD BUTTON
!The PowerShades remote being used in this step must already be paired to the desired
shade you are wanting to pair with the Sidekick.
If you have a preexisting PowerShades remote, you have the option to pair the Sidekick to your shade
using your remote, without having to press the motor head button. You are able to pair multiple
shades to a single channel or designate each shade to it’s own channel.
If you do not have a preexisting PowerShades remote, you can pair the Sidekick your shade using
the motor head button on the control-side of the shade. You are able to pair multiple shades to a
single channel or designate each shade to it’s own channel.
Press desired
CHANNEL button
Hold shade motor
button until it jogs
one time
Hold STOP until
shade jogs
PAIR SIDEKICK TO SHADE USING POWERSHADES REMOTE
Press desired
CHANNEL button
Click the PROGRAM (P)
twice. The shade will
jog when pressed
Hold STOP until
shade jogs
PT
POWERSHADES RF REMOTE
X2
POWERSHADES

5
SETTING SHADE LIMITS
Tap UP or DOWN to
jog your shade to the
top position
Hold UP and STOP
together to set top limit
Shade will jog
once top limit is set
5
SETTING BOTTOM LIMIT
SETTING TOP LIMIT
Tap UP or DOWN to
jog your shade to the
bottom position
Hold DOWN and STOP
together to set bottom
limit
Shade will jog once
bottom limit is set
5
!
It is recommended that limits are set for all shades before being grouped onto a channel.
If you try to set/adjust limits on a shade that is on a grouped channel, ALL shades on that
channel will be adjusted.
POWERSHADES

6
ADJUSTING SHADE LIMITS
Tap UP or DOWN to jog shade
to the new top position
Shade will jog
Hold UP and STOP together
to adjust top limit
5
Hold UP and STOP together
to set new top limit
5
Shade will jog once
new top limit is set
ADJUSTING BOTTOM LIMIT
ADJUSTING TOP LIMIT
Press desired
CHANNEL button
Tap UP or DOWN to jog shade
to the new top position
Shade will jog
Hold DOWN and STOP together
to adjust bottom limit
5
5
Hold DOWN and STOP
together to set new
bottom limit
Shade will jog once
new bottom limit is set
Press desired
CHANNEL button
POWERSHADES

Control just a single channel of shades with larger buttons. Enter the code below, and then install
the illustrated 3-button button set.
5 1 3 2
7
SINGLE CHANNEL MODE
!
Factory resetting the Bond Sidekick 2 will cause the Sidekick to revert back to factory
technology. To get it to work with PowerShades again you will need to set the technology
back to PowerShades. Refer back to page 3.
Sidekick is already configured in the 5-channel mode out-of-box. However, if you want to reset it back
to this mode, install the 5 button keys and enter the code below.
5 1 2 1
2
5-CHANNEL MODE
If for any reason you need to factory reset your Bond Sidekick 2, enter the code below.
FACTORY RESET
POWERSHADES

If you cannot control the shade with Sidekick due to range or technology limitations,
you may use Relay Mode to have Bond Bridge Pro transmit instead.
!
!
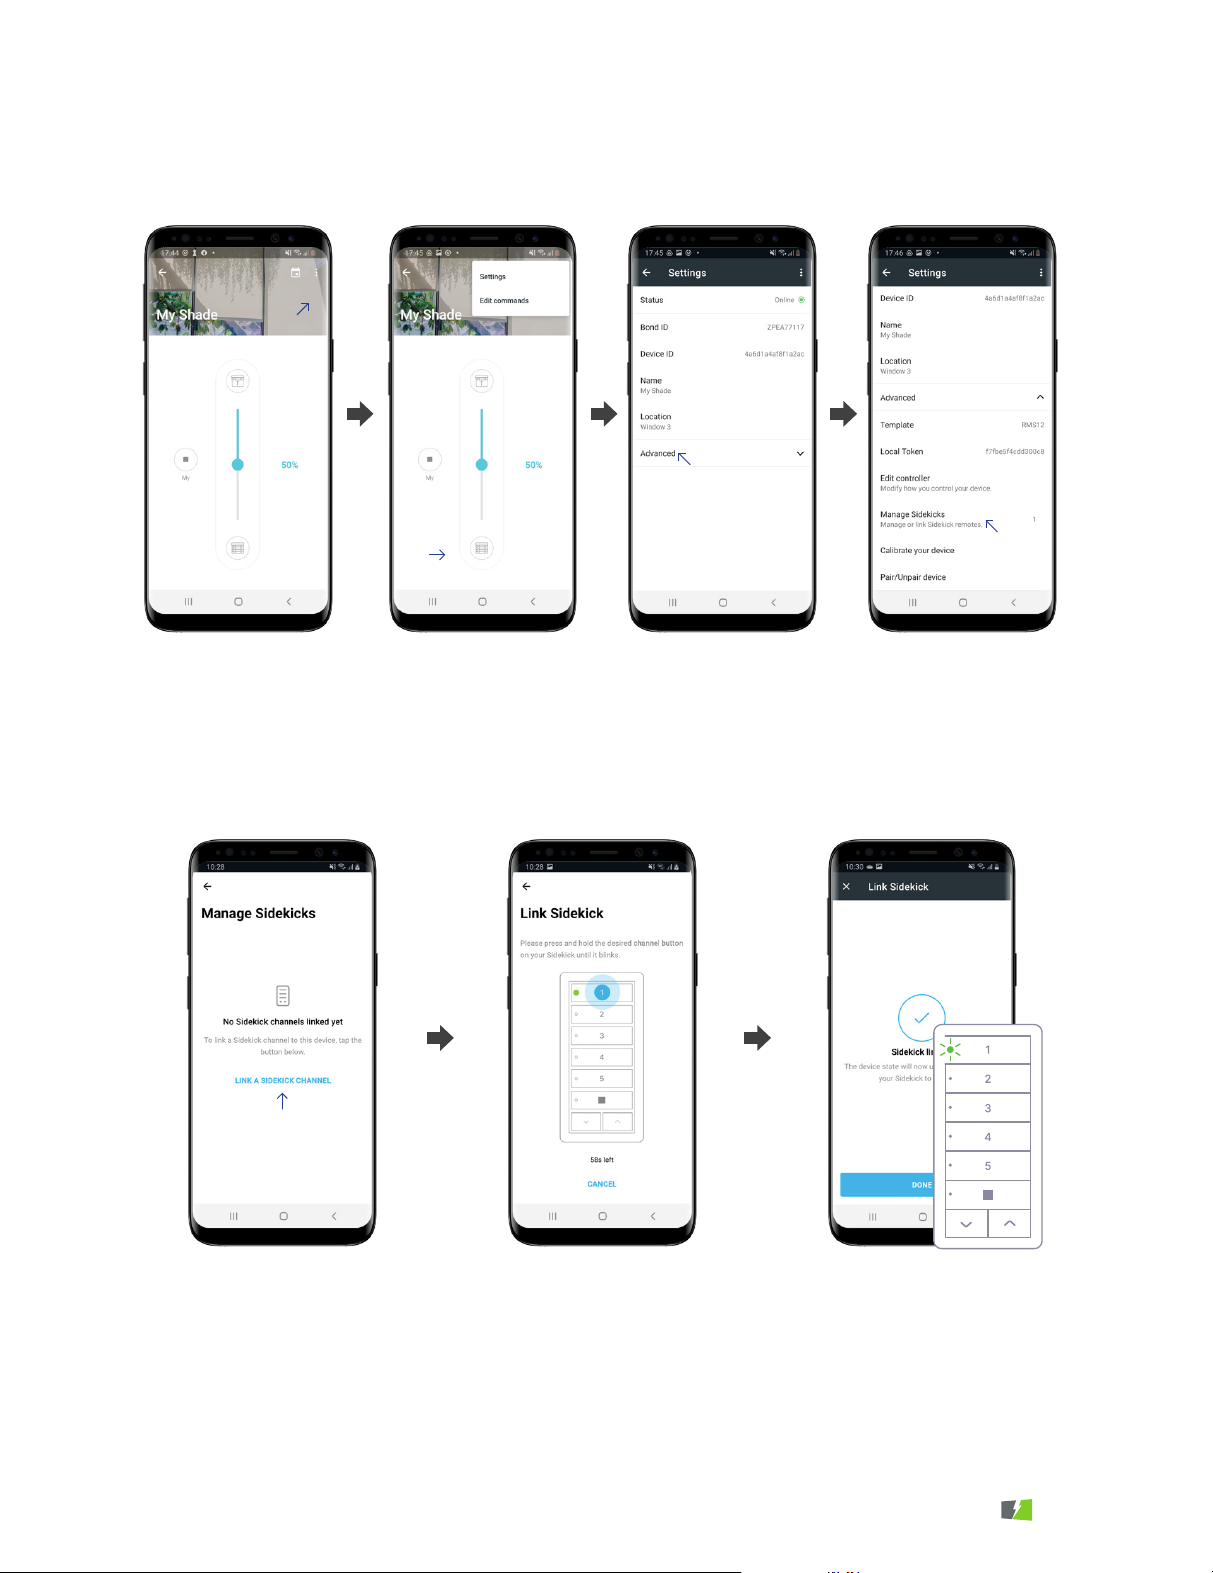
When paired with Bond Bridge Pro, Sidekick can update
the state of your shades in the Bond Home app. To turn
on this feature, link each Sidekick channel with the
corresponding shade or shades on the Bond Home app.
To link your Sidekick with your Bond Home app you need to make sure that:
In Relay Mode, the specified channels of Sidekick keypad will not transmit any signal directly, instead
relying on Bond Bridge Pro to send the signal to the shade. This is especially useful if you want
Sidekick to control an All Shades channel where some shades are out of range of the Sidekick,
because Bond Bridge Pro is usually in a more advantageous location for radio range.
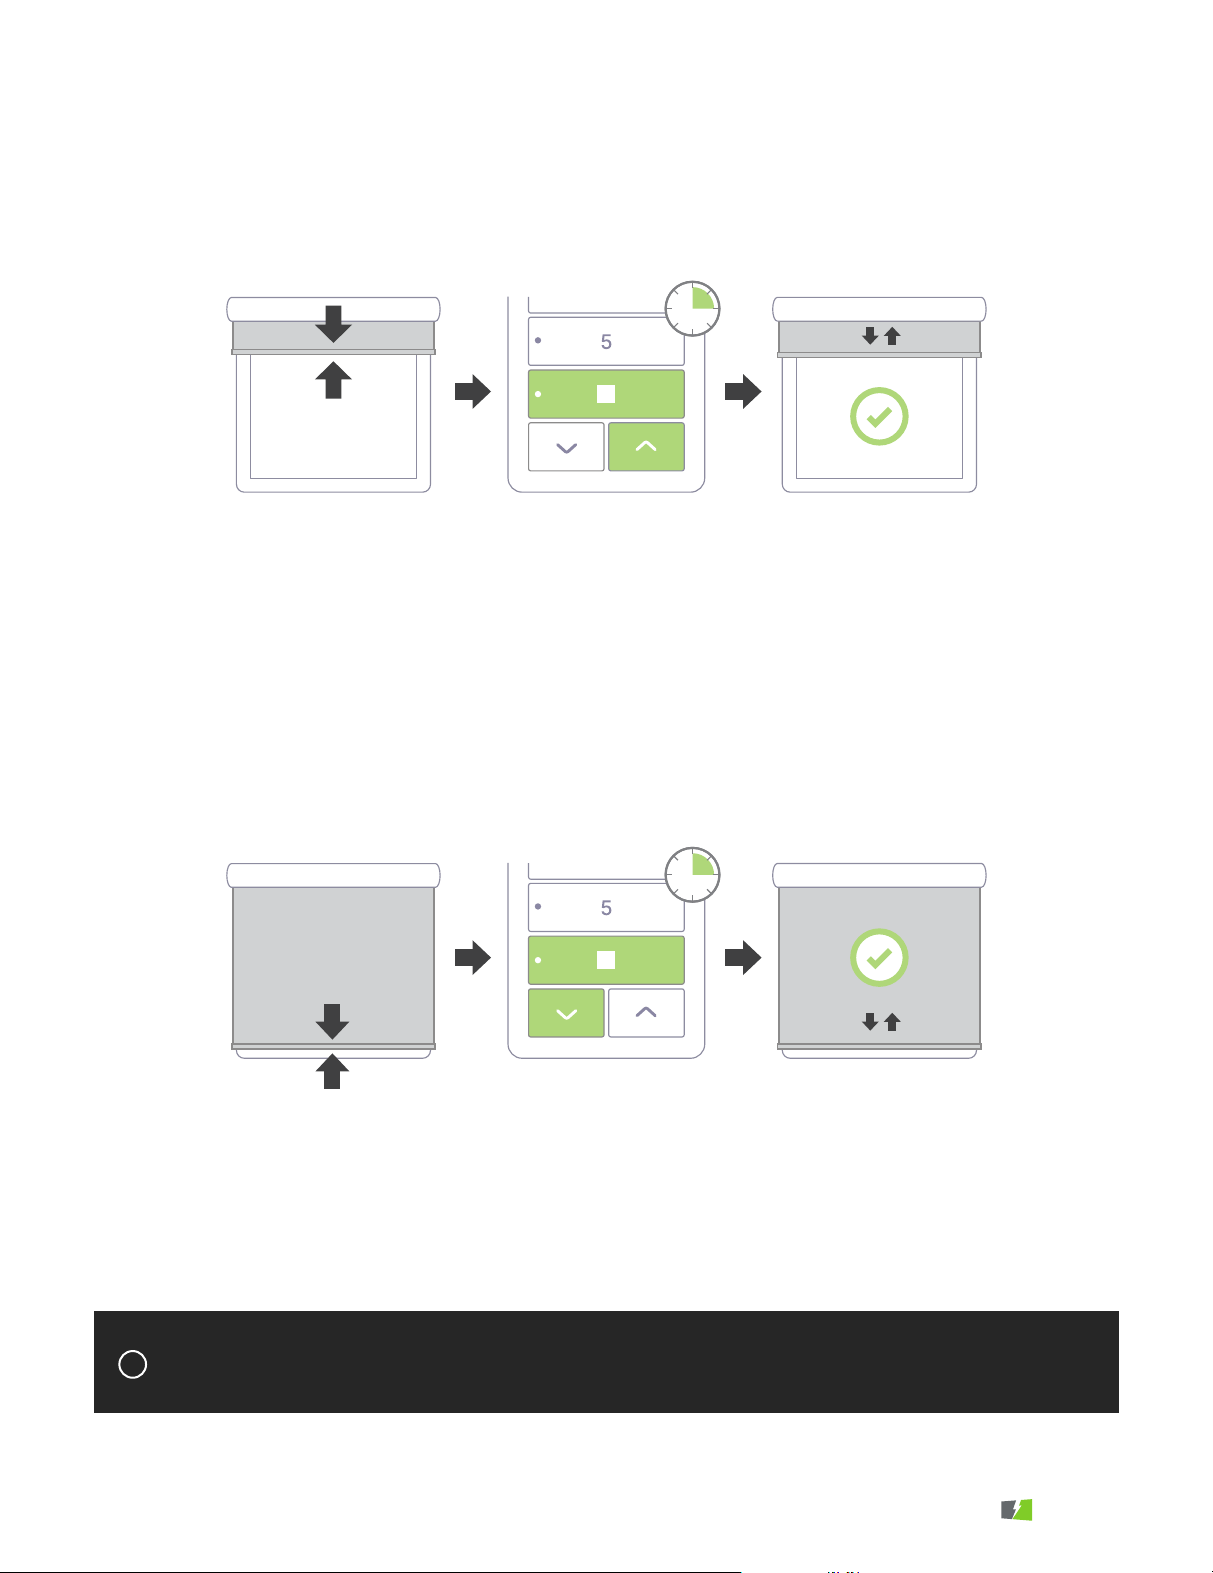
To enable relay mode on all channels:
To enable relay mode only on currently selected channels:
To exit Relay Mode for any channel, simply set the channel back to the desired direct technology.
1. Your Bond Bridge Pro firmaware is on version 3.1 or higher.
2. Your Bond Home app is updated to version 2.40.0 or higher.
3. You can control your shade from the Bond Home app.
4. You can control that same shade from the Sidekick*
4 3 4 5
4 1 3 4
RELAY MODE
LINKING WITH A BOND BRIDGE PRO
8
If your shade technology is supported by Sidekick, it is strongly recommended to operate
Sidekick in direct mode rather than relay mode.
POWERSHADES

LINKING WITH BOND BRIDGE PRO ON IOS
Go to the shade
you want to control
and tap (...)
Select DEVICE
SETTINGS
Select ADD A KEY
STREAM SIDEKICK
Follow on-screen
instructions
The channel LED will
blink and the app will
confirm link
Select ADVANCED
SETTINGS
Scroll down and select
MANAGE SIDEKICKS
9POWERSHADES

LINKING WITH BOND BRIDGE PRO ON ANDROID
10
Go to the shade
you want to control
and tap (...)
Go to SETTINGS
Select LINK A
SIDEKICK CHANNEL
Follow on-screen
instructions
The channel LED will
blink and the app will
confirm link
Select ADVANCED
SETTINGS
Scroll down and select
MANAGE SIDEKICKS
POWERSHADES
Table of contents
Popular Keypad manuals by other brands

Door-Gard
Door-Gard COMMAND AND CONTROL SERIES Programming guide

Teletek electronics
Teletek electronics LCD64 Operation manual

Vitrea
Vitrea VTouch-Plus Installation & configuration manual

Russound
Russound SaphIR K2 instruction manual

CYP
CYP CR-KP4-B Operation manual

Carefree
Carefree 1050A-2 owner's manual

Essex Electronics
Essex Electronics SKE-34B Installation and instruction manual

PXM
PXM PX723 user manual

Covid
Covid KP-100 user manual

Balcrank
Balcrank FUSION 3110-013 Operation, installation, maintenance and repair guide

fortessa
fortessa FTK5 instructions

Honeywell
Honeywell 6150 - Ademco Fixed - Display Keypad Installation and setup guide