premiere XH-2004 User manual

Slide Warmer with Cover
Model XH-2004
Model XH-2005
Operating Manual
Before using this product, please read this manual carefully to learn about the available features
to obtain the best results of this equipment.
Warning:To prevent fire or shock hazard, do not expose this unit to rain or moisture. Unless
labeled otherwise, this equipment should be used with AC 120V, 60Hz in the USA or Canada.
220V, 50Hz available as Model No. XH-2004-220 or XH-2005-220
Caution: No user-serviceable parts inside. Refer servicing to qualified service personnel.

1
1.1 Table of Contents
Section
•Table of Contents Page 1
•Safety Page 2
•Contents/Specifications Page 3
•Control Panel/Setup Page 4
•Operation Page 5
•Troubleshooting Page 5 - 6
•Warranty Page 7

2
2.1 Safety
1. Handle this device with the same care as any heating device:
•Do not touch the heating surface until it is cool
•Do not turn on the heating surface if it is empty
2. Be sure to place the device on a flat, level, heat resistant surface free from any debris. Also,
place it away from any edges where it could be accidentally pushed off.
3. When moving the device:
•Make sure the power cord has been unplugged
•Allow plenty of time for the device to cool before moving it
•Use both hands to move it to another flat, level, heat resistant surface
4. Store the device in a clean, dry, and secure place where there is no chance of it falling or
being damaged.
5. Only use the supplied power cord.
6. Be sure to unplug the device before changing the fuse.
7. If a problem occurs with the device, contact your dealer. Individuals that are not qualified to
repair this device should not attempt to do so; the result could be additional damage that
would not be covered under the manufacturer’s warranty. Do not discard the box or any
packaging material before the damage is inspected and documented by either your dealer or
a representative of the carrier.
8. Only operate this device if you are qualified to do so. Any misuse of this device could cause
injury.
9. The manufacturer and dealer are not responsible for any injury caused by the misuse of this
device.
10. Use proper safety attire and follow safe laboratory procedures while using this device in
order to prevent personal injury or damage to the equipment.
11. Never place any item on the Slide Warmer that can scratch or damage its surface.
12. Caution: Do not block the heat ventilating holes on the side of the Slide Warmer.

3
3.1 Contents
Number Name Qty Note
1 Slide Warmer 1 XH-2004 or XH-2005
2 AC Power Cord 1
3 Fuse 1 4 AMP
4 Operating manual 1
3.2 Specifications
XH-2004 (Large) XH-2005 (Small)
Dimensions (machine) 10.7 x 26.7 x 5 in. (27 x 68 x 13 cm) 9 x 11.5 x 4.5 in. (23 x 29 x 11 cm)
Net weight 23 Ibs 8 Ibs
Dimensions
(packaging)
29 x 13 x 7 in. (74 x 33 x 18 cm) 14 x 11 x 7 in. (36 x 28 x 18 cm)
Gross weight 23 10 Ibs
Capacity Approx. 66 slides Approx. 23 slides
Power 200 Watts 100 Watts
Voltage 110V, 60Hz
or
220V, 50Hz (Models XH-2004-220 and XH-2005-220)
Temperature Room temperature to 75˚ C; ±2˚ C
Quality Assured Firm ISO 9002
4
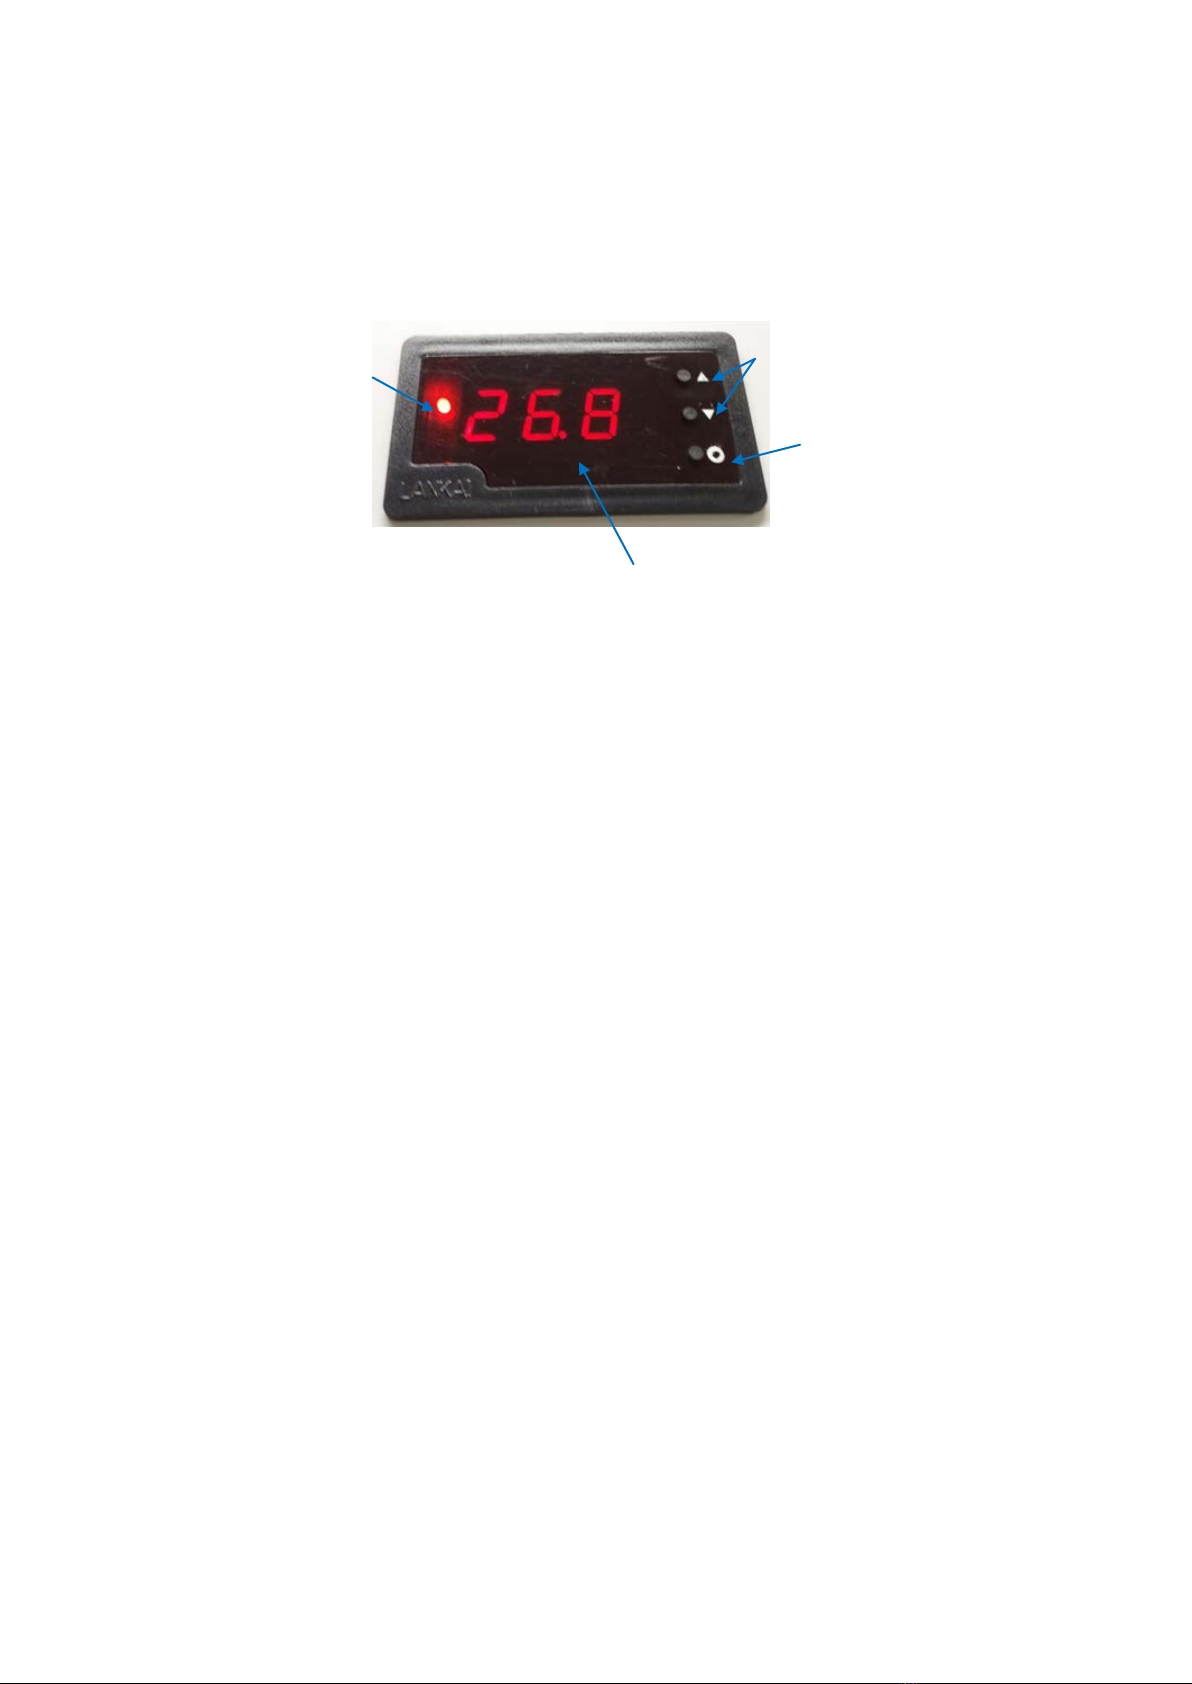
4.1 Control Panel
1) Temperature Control Buttons
4) Heating indicator lamp
2) Temperature Set
Button
3) LED Temperature Display
1. ▲▼ : Temperature control buttons
2. ○: Temperature set button
3. LED temperature display C°
4. ●: Heat indicator lamp
4.2 Setup
1. Open box and remove slide warmer from packaging
2. Place slide warmer onto flat surface
3. Plug AC power cord firmly into back of unit, connect plug to power supply, and your
slide warmer is ready for use.
4. If there is any damage to the power cord (i.e. tears, bent or damaged plug, or any
exposed wires), DO NOT USE. Contact your dealer immediately for a replacement.

5
5.1 Operation
1. Plug the Slide Warmer into an electrical outlet and turn on the power switch on the side of
the machine. The LED temperature display will turn on letting you know the machine is on
and is working.
2. Press the temperature “SET” button (#2) to see the current temperature setting.
3. Set the desired temperature (shown in degrees Celsius) by using the “▲” or “▼”
(temperature control) buttons (#1). The setting will appear in the LED temperature display
(#3).
4. Once you have entered your desired temperature setting push the temperature “SET” button
(#2). This will show the actual temperature of the heating surface.
5. Temperature range is from room temperature to 75˚C ±2˚C.
6. Place slides flat on the Slide Warmer surface to help warm more efficiently.
6.1 Troubleshooting
Calibration testing:
Turn the Slide Warmer on and allow it to warm up for 15 minutes. Then use a surface or infrared
thermometer to measure the average temperature between the edge of the heating surface and its
center. If the difference between the measured average temperature and the temperature shown
on the LED temperature display is more than 5°C, the Slide Warmer needs to be recalibrated.
How to recalibrate:
1) Adjust the difference between average surface temperature and displayed temperature:
Press and hold the “SET” button for 3 seconds. The LED temperature display will show “Sc”.
Press the “SET” button again and you will see the recalibration value begin to flash in the LED
temperature display. This value can be adjusted so that the LED temperature display value and
the measured average temperature of the heating surface are the same (the default value is 0.0).

6
Use the “▲” or “▼” buttons to set the value between “-9.9” and “9.9”.
For example, the measured average temperature of the heating surface is 30℃, but the LED
temperature display shows 25℃. Use the “▲” button to add 5℃(the difference in temperature
values). Then when you exit the settings selections (step 5) the LED temperature display will
read 30℃.
2) Press the “SET” button again and “E” will be shown in the LED temperature display. Press
the “SET” button again and “00.5” will be shown. DO NOT CHANGE THIS VALUE. It is
a factory preset and changing it will cause the Slide Warmer to malfunction.
3) Press the “SET” button again and “P” will be shown in the LED temperature display. Press
the “SET” button again and “15.0” will be shown. See step 6 for instructions on when to
adjust this value.
4) Press the “SET” button again and “c” will be shown in the LED temperature display. Press
the “SET” button again and “10.0” will be shown. DO NOT CHANGE THIS VALUE. It is
a factory preset and changing it will cause the Slide Warmer to malfunction.
5) Press the “SET” button again and your settings will be saved.
6) If the Slide Warmer does not maintain its recalibrated temperature:
Press and hold the “SET” button for 3 seconds until “Sc” is shown. Then press the “SET” button
4 more times and “P” will be shown in the LED temperature display. Press the “SET” button
again to see the value of “P”; this is the temperature control value. This value is equal to P/10°.
This value can be adjusted so that the heating surface maintains a steady temperature. Use the
“▲” or “▼” buttons to set the value between “0.00” and “99.9”.
For example, if the LED temperature display value is “50.0” and the value of “P” is “10.0” the
heater will turn off and on at P/10 = 10/10 = 1°C. So the heater will turn off at 51°C and heat
back up if it falls below 49°C.
If the temperature rises too slowly or it cannot reach the “SET” temperature increase the value of
“P”. If the temperature rises too fast or it surpasses the “SET” temperature decrease the value of
“P”.
7) Press the “SET” button again and the LED temperature display shows “c” (see step 4).
8) Press the “SET” button again to save your settings.
9) Monitor for 10 minutes and readjust values as necessary.
This manual suits for next models
1
Table of contents
Other premiere Food Warmer manuals


Popular Food Warmer manuals by other brands


Server
Server Serve Better Mix-N-Serve Red Lobster MNS manual

Birko
Birko 1040090 operating instructions

Thermador
Thermador WDC30E installation instructions

Steba
Steba WP 110 Instructions for use

Warmrails
Warmrails Heated Towel Shelf instruction manual

Morphy Richards
Morphy Richards MRFW15WT instruction manual