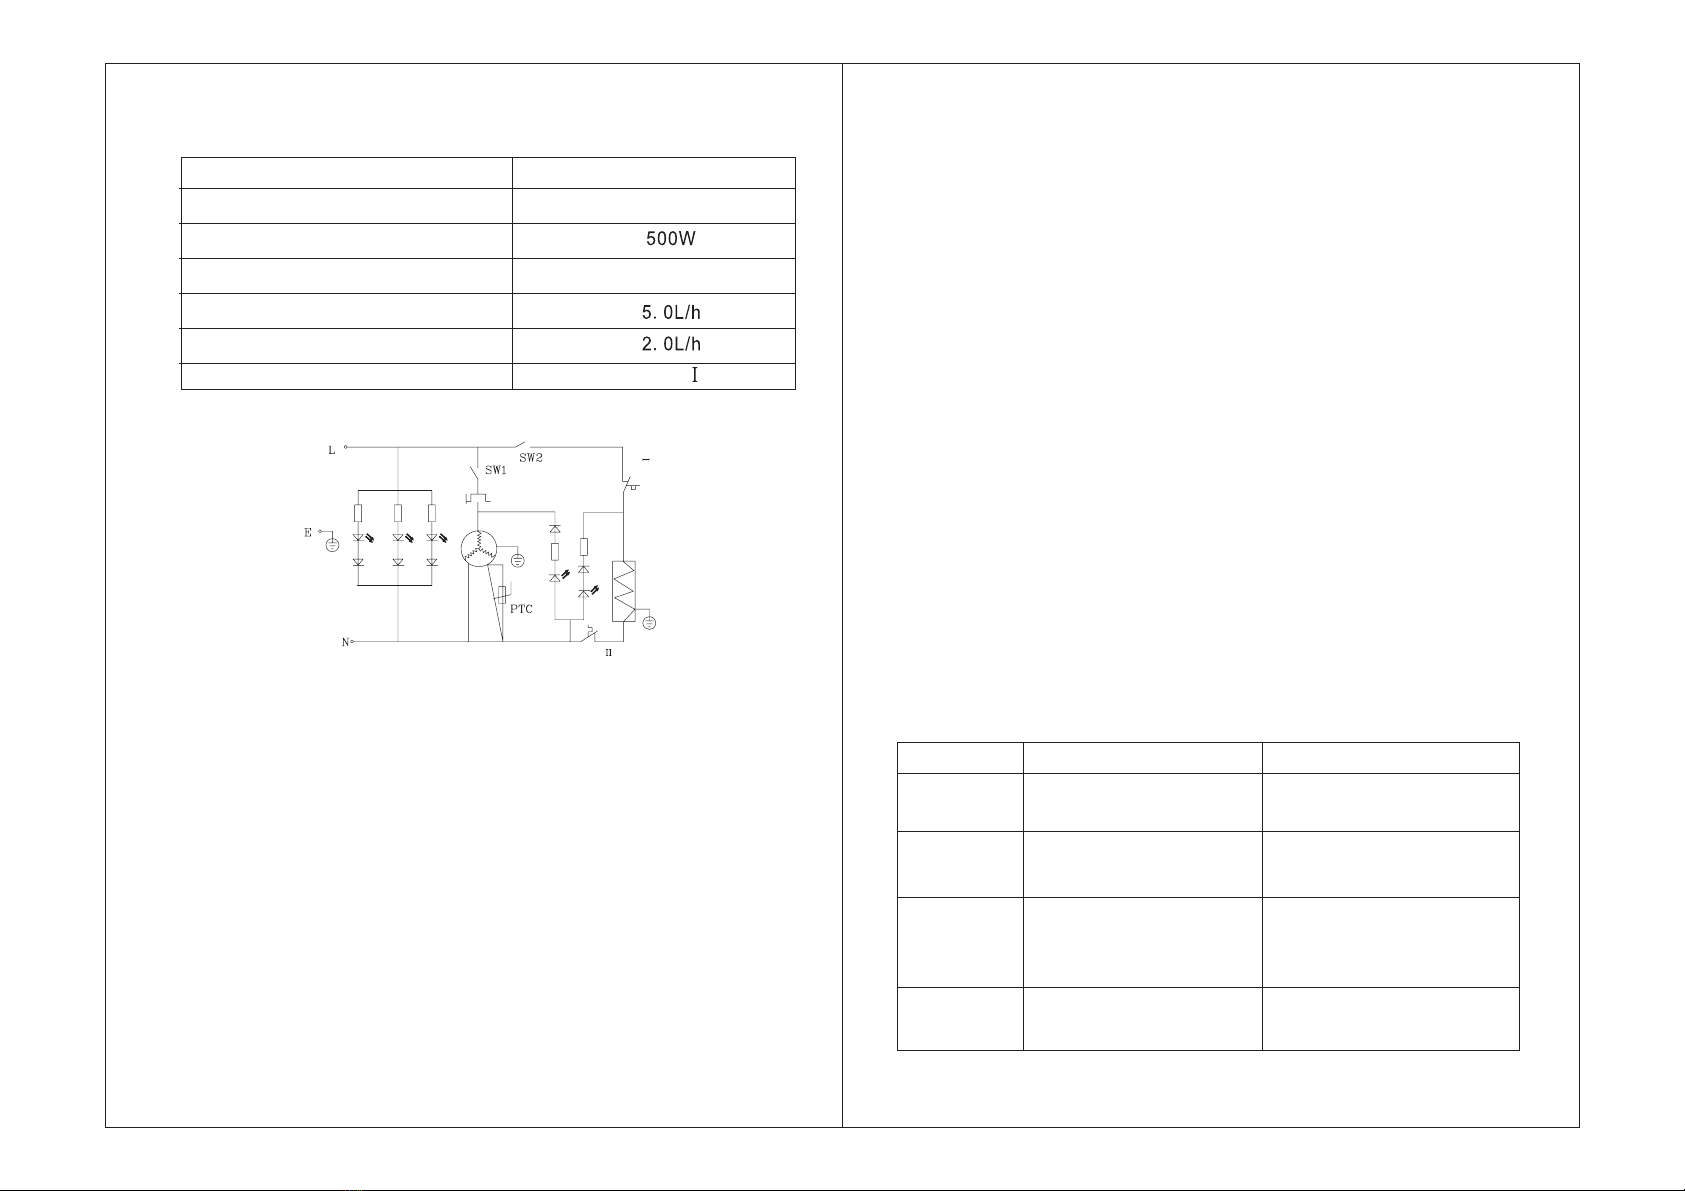
Premium PWC235RQ User manual

PWC235RQ
Water Dispenser
Dispensador DeAgua
doméstico únicamente

Features
1.Modern design.
2.Energy-saving, low noise, resistant structure and great stability. Suitable for use in
homes, hotels, schools, etc.
3.The plastic parts of this product are made of high quality and durable plastic.
4.Double security system, “temperature control " and "heating protection". Hot water
temperature is always between 80°Cand95°C,enough to make coffee or tea, or
other instant food.
5.The water dispenser's cooling system is durable and suitable for use during the
summer.
6.This product can be used with bottled water or a water purifier.
Parts scheme
Bottle Seat
Power Switch
Indicator Lights
Information Plate
Cold Water Faucet
Hot Water Faucet
DripTray
Drip Plug
Electric Power Cord
Note: The graphic is for reference only. The current may have
differences with the graphic. appliance
Mode of Operation
1.Insert the bottle vertically on the seat and press the water faucets until water flows
out of the red hot water faucet.
2.Insert the power plug to the wall socket and turn the electric switches to ON position
to start the appliance. DO NOT MOVE BOTH SWITCHESAT THE SAME TIME.
Cooling and heating indicator lights should light up. The appliance is designed to
provide hot or cold water whenever you need it. It will automatically turn on and off
when the water reaches the desired temperatures.
100W
110V~60Hz
PWC235RQ
Technical Information
Model
Voltage - Frequency
Heating power
Cooling power
Water Heating capacity
Water Cooling capacity
Prevention of electric shock
Circuit Illustration
Note: If technical data or the circuit graphic change, the information
sheet may not reflect those changes.
Attention
1.Make sure to have poured water from the hot water faucet before plugging and
switching the appliance ON to heat. If the dispenser is turned ON with an empty water
tank, it can be damaged.
2.When moving the water cooler, do not tilt more than 45º to avoid damage to the
compressor.
3.Always install the dispenser indoors, on a flat surface and at a distance no less than
15 cm from the back wall.
4.Keep this appliance away from high temperatures and in a dry and ventilated place.
5.Children should not use the red hot water tap.
6.If the appliance is not going to be used for a long period of time, unplug it and drain
all water in its interior.
7.Before the first use and after a long period of not using it, the water tank and water
pipes should be cleaned well. If possible, they should be disinfected and ,
and the first heated water must be discarded (switch the heating switch to OFF while
draining the system).
sterilized
Never install it in the open air or under rain or direct
sunlight.
0.17Cu.ft./h
0.07Cu.ft./h

Características
1.Diseño moderno
2.Ahorro de energía, bajo nivel de ruido, estructura resistente y gran estabilidad.
Adecuado para uso en hogares, hoteles, escuelas, etc.
3.Las partes plásticas de este producto plástico durable de alta
calidad.
4.Doble sistema de seguridad, “control de temperatura” y “protección de
calentamiento”. La temperatura del agua caliente siempre está entre 80ºCy95ºC,
lo suficiente para preparar café o té u otro alimento instantáneo.
5.El sistema de enfriamiento del dispensador de agua es resistente y adecuado para
su uso durante el verano.
6.Este producto puede ser usado con agua embotellada o con un purificador de agua.
son fabricadas con
Nombre de las Partes
Soporte para la Botella
Interruptor de encendido
Luces Indicadoras
Placa de Información
Grifo deAgua Fría
Grifo deAgua Caliente
Bandeja de Goteo
Tapón de Goteo
Cable de Conexión Eléctrica
Nota: El grafico es solo para referencia. El artefacto actual puede tener
diferencias con el grafico.
Modo de Operación
1.Inserte la botella verticalmente sobre el soporte y presione las llaves hasta que el
agua fluya y salga del grifo deAgua Caliente rojo (HOT).
2.Inserte el enchufe eléctrico al enchufe de pared y coloque los interruptores de
electricidad en posición de encendido (ON) para que el equipo arranque. NO MUEVA
LOS DOS INTERRUPTORESALAVEZ. Las luces de enfriamiento y calentamiento
deben encenderse. El equipo está diseñado para proveerle agua fría o caliente cada
vez que usted lo necesite.Automáticamente se encenderá y/o apagara cuando el
agua alcance las temperaturas deseadas.
Leaking
What to do in case of problems:
Problem Possible cause How to solve
Lights do
not lit
Not heating
Not cooling
8.Wash and disinfect the system every 3-6 months with a suitable cleaner and
according to its instructions for use.
9.Do not pull out the cable to unplug. Do not turn ON and OFF the appliance by
connecting it and disconnecting it from the source of electricity.
10. Do not clean the outside of the appliance with water to avoid electric shock. Clean
it with a soft cloth.
11.If you are not using the appliance for a long period of time , or even during the
night, you can turn it OFF to save energy.
12. Do not attempt to change the power cord by yourself if it has been torn. Contact
the manufacturer or specialized service personnel.
13.The equipment must be installed keeping easy access to the electrical plug.
14.WARNING - to avoid the risks of an unstable installation, the equipment must be
installed following its instructions.
15.WARNING - keep the ventilation openings at the back of the appliance uncovered
and unobstructed.
16. NOTICE - do not damage the refrigerant circuit.
17.The environmental temperature for this appliance should be between 10°Cand
38°C.
18.This equipment is not designed to be used by persons with reduced mental or
sensory abilities or without experience unless they are carefully supervised by
persons responsible for their safety during the use of the equipment. Supervise
children to make sure that they do not play with the appliance.
19.Do not place other appliances inside this equipment unless those are
recommended by the manufacturer.
20.Do not store explosive substances such as spray cans inside this appliance.
1.Cooling switch is damaged or
does not make contact
2.The electrical connection is loose
1.Heating switch is damaged or
does make not contact
2.The heating tank is burnt
3.The electrical connection is loose
1.The water container is broken
2.The water pipe is broken
3.The faucet is damaged
1.Appliance is not connected to the
electrical system
2.The switch is not ON
1.Make sure that the switch is ON and the
plug is connected
2.Turn the switch ON.
1.Replace the water container
2.Replace the water pipe
3.Replace the faucet
1.Replace the switch and check the
connections
2.Replace heating tank
3.Repair connections
1.Replace the switch and check the
connections
2.Repair connections
WARNING!Always disconnect dispenser from wall socket before repairing or
replacing parts.

100W
110V~60Hz
PWC235RQ
Información Técnica
Modelo
Voltaje frecuencia
Potencia de calentamiento
Potencia de enfriamiento
Capacidad de calentamiento
Capacidad de enfriamiento
Prevención de choque eléctrico
Gráfica del Circuito
Nota: Si los datos técnicos o la grafica del circuito sufren cambios, la
placa de información no informará al respecto.
Atención
1.Asegúrese de haber servido agua desde el grifo de agua caliente antes de enchufar
y encender para calentar. Si el equipo se enciende con el tanque para el agua
caliente vacio, este puede dañarse.
2.Cuando vaya a mover el dispensador de agua, no lo incline más de 45º ya que podría
dañar el compresor.
3.Siempre instale el dispensador en espacios interiores, en una superficie plana y a
una distancia no menor de 15 cm desde la pared posterior
.
4.Mantenga este equipo alejado de altas temperaturas y en un lugar seco y aireado..
5.Los niños no deben usar el grifo rojo del agua caliente.
6.Si el equipo no va a ser usado por un largo periodo de tiempo, desconéctelo de la
fuente de electricidad y elimine el agua de su interior.
7.Antes del primer uso y luego de un largo periodo en desuso, el tanque del agua y las
tuberías de agua deben limpiarse bien. De ser posible, deben desinfectarse y
esterilizarse, y el agua que se caliente debe desecharse (coloque inicialmente el
interruptor de calentamiento en posición de apagado OFF mientras drena el
Nunca lo instale al aire
libre o bajo la lluvia o la luz directa del sol
Goteo
Que hacer en caso de problemas:
Problema Causa posible Como resolver
Las luces no
encienden
No calienta
No enfría
sistema).
8.Lave y desinfecte el sistema cada 3-6 meses con un limpiador adecuado y según
sus instrucciones de uso.
9.No hale el cable para desenchufar. No encienda y apague el equipo conectándolo y
desconectándolo de la fuente de electricidad.
10.No limpie el exterior del equipo con agua para evitar choque eléctrico. Límpielo
con un paño suave.
11.Si no va a usar el equipo por un largo periodo de tiempo o durante las noches,
usted puede apagarlo para ahorrar energía.
12.No intente cambiar usted mismo el cable de poder si este sufre algún daño.
Contacte a un técnico especializado o al fabricante.
13.El equipo debe ser instalado de manera que el enchufe sea de fácil acceso.
14.AVISO Para evitar los riesgos que presenta una instalación inestable, el equipo
debe ser instalado siguiendo las instrucciones.
15.AVISO Mantenga los orificios de ventilación de la parte posterior del equipo
16.AVISO No dañe el circuito refrigerante.
17.La temperatura ambiental para este equipo debe estar entre 10ºCy38ºC.
18.Este equipo no ha sido diseñado para ser usado por personas con capacidades
mentales o sensoriales disminuidas o sin experiencia a menos que estas sean
supervisadas cuidadosamente por personas responsables de su seguridad
durante el uso del equipo. Supervise a los niños para asegurarse de que no
juegan con el equipo.
19.No coloque otros electrodomésticos dentro de este equipo a menos que sean los
recomendados por el fabricante.
20.No almacene sustancias explosivas como latas de aerosol dentro de este equipo.
descubiertos y sin obstrucciones.
1.El interruptor de enfriamiento está
dañado o no hace contacto
2.La conexión eléctrica esta floja
1.El interruptor de calentamiento está
dañado o no hace contacto
2.El tanque de calentamiento está
quemado
3.La conexión eléctrica esta floja
1.La botella de agua está rota
2.La tubería de transporte de agua
está roto
3.El grifo está dañado
1.No está conectado al sistema
eléctrico
2.El interruptor no está en posición de
encendido (ON)
1.Asegúrese de que el interruptor está en
posición ON y el enchufe está conectado
2.Coloque el interruptor en posición ON.
1.Reemplace la botella de agua
2.Reemplace la tubería de transporte
de agua
3.Reemplace el grifo
1.Reemplace el interruptor y verifique las
conexiones
2.Reemplace el tanque de calentamiento
3.Repare las conexiones
1.Reemplace el interruptor y verifique las
conexiones
2.Repare las conexiones
Tipo
Control de Temperatura
Rojo
Calentador
Verde
Control de Temperatura
Termostato
Compresor
Azul I
Azul II
Amarillo
ADVERTENCIA! Siempre desconecte dispensador de la toma de pared antes de reparar
o reemplazar partes.
Table of contents
Languages:
Other Premium Water Dispenser manuals
Popular Water Dispenser manuals by other brands

Haier
Haier WDQS015 installation instructions

Oasis
Oasis B1RRK Instruction guide

Follett
Follett 7CI100A Installation, operation and service manual

Halsey Taylor
Halsey Taylor SJ30 owner's manual

Greenway Home Products
Greenway Home Products GWD220W-2 Use & care guide

GE
GE GXSF30H Owner's Manual & Installation Instructions

NOVO
NOVO NVO465-100 operating manual

Lancaster Water Treatment
Lancaster Water Treatment ONE E3-M Installation and operation manual

Watsons water
Watsons water 8WS-SCB wats smart user manual

SHURflo
SHURflo RO 85-120 series Installation and operation instructions

Aqua Work
Aqua Work YL1447S operating manual

Pentair
Pentair FLECK 5800 SXT Installation