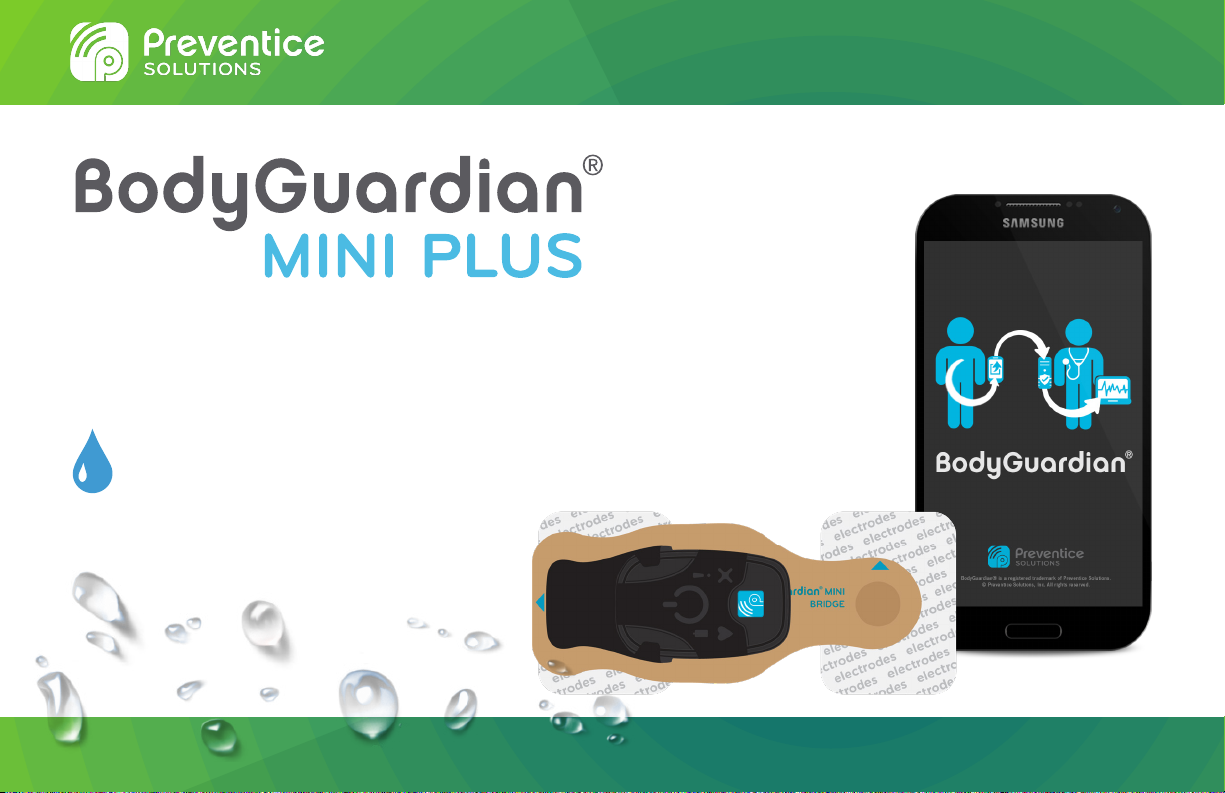
Preventice Solutions BodyGuardian MINI PLUS User manual

Patient Instruction Manual
FULLY WATERPROOF
Featuring a waterproof monitor safe for showering, bathing, and
submerging in water as deep as 3 feet.

2
INTRODUCTION
Caution: Federal law (USA) restricts this device to sale by or on the order of a physician.
Return your monitor on: ------------ / ------------ / ------------
Your physician has prescribed you the BodyGuardian Mini PLUS heart monitor and monitoring center service
provided by Preventice Services to detect irregular heart rhythms. You must wear the monitor for the length of
time your doctor has prescribed.
Welcome to
Remove BodyGuardian Mini PLUS as soon as your physician or qualified health care professional ends
your service. Any data or information transmitted or received by Preventice after your physician or qualified health
care professional has ended your service will not be processed, reviewed or analyzed by Preventice, and Preventice
shall have no liability for any such information or data.
When your study concludes
If you are receiving the monitor at home and require assistance, call Preventice Services at:
888.500.3522 (press 1, 2)
Did you receive your monitor at home?

3
CONTACT INFORMATION
3
Preventice Services is not an emergency response service. Contact your doctor immediately if your
symptoms worsen. If you are experiencing a medical emergency, dial 911.
The BodyGuardian phone cannot be used to make phone calls, including calls to 911, or perform other
smartphone functions. Viewing the phone is prohibited while driving, operating heavy machinery or in situations
that may jeopardize your safety.
General information
www.preventicesolutions.com/patients/body-guardian-mini
For the manufacturer’s Instructions for Use, visit: www.preventicesolutions.com/docs/MINIPLUS-IFU.pdf
Patient benefit quotes
888-747-4760
8:00 a.m. - 4:00 p.m. CST, M-F
patientbenefitquotes@preventice.com
Patient services
888.500.3522 (press 1, 1)
24 hours a day, 7 days a week
monitortroubleshooting@preventice.com
Returning your monitor
888.500.3522 (press 1, 5)
7:00 a.m. - 7:00 p.m. CST, M-F
monitorrecovery@preventice.com
Billing assistance
888.747.4701
8:00 a.m. - 5:00 p.m. CST, M-F
reimbursementinfo@preventice.com
Instructional videos with subtitles to help you use your monitor are available on the BodyGuardian
smartphone. On the BodyGuardian phone, tap Help & Settings → Videos

4
INTRODUCTION
Overview of your monitoring prescription
Always keep
phone within 10
feet of monitor
Charge phone
nightly
Always wear one
monitor on your
chest
Always have the
second monitor
connected to the
charger
Switch monitors
when the battery
is low
Record your
symptoms as
you feel them
Replace ECG
electrodes
when they lose
adhesiveness
Review the
Patient financial
obligations
and billing
information
(page 26)
Set up and
get started
monitoring with
BodyGuardian
Mini PLUS
Complete your
monitoring
prescription
Pack up
and return
BodyGuardian
Mini PLUS
equipment
123
FinishMonitoring periodStart

5
INTRODUCTION
Do not use your own
personal device chargers.
Only use the charger(s)
provided to charge
Preventice devices.
Equipment
BodyGuardian phone
BodyGuardian Mini PLUS
monitors (2)
standard ECG electrodes
Bridge
ECG electrodes
Charging cord
(equipment may differ from pictured)

6
GETTING STARTED
Prepare your skin
You can wear BodyGuardian Mini PLUS either
vertically or horizontally.
If hair is present, remove the hair where you
will place the monitor.
Use soap and water to clean the area.
Dry the area completely.
Do not apply lotions, oils, or perfumes.
Do not use alcohol wipes.
Do not abrade the skin.
Decide which chest placement you will use before
you prepare your skin.
Snap the ECG electrodes to the
Bridge
Preferred (vertical) Alternate (horizontal)
Press the ECG electrodes firmly onto the Bridge until
you hear a snap.

7
GETTING STARTED
Attach the monitor to the Bridge
Slide the monitor into the black molding on the
Bridge until the micro-USB connector is inserted
completely into the monitor.
Tips
• This is most easily accomplished on a flat
surface, like a table.
• To line up the micro-USB connector with the
port on the monitor, you may need to wiggle
the monitor slightly to align.
• To ensure a good connection, pinch together
with thumb and index finger:

8
GETTING STARTED
Attach to your chest
1. Peel away backing from the electrodes to
expose the adhesive.
2. Place on chest in one of the placement
locations (pages 9-10).
3. Press firmly around the surface of the electrode
to ensure adhesion to the skin.
Apply only to intact, clean skin. Do not apply over open
wounds, lesions, infected, or inflamed areas. If you have
skin allergies or hypersensitivities to adhesives, consult
your doctor to select the appropriate electrode option.

9
GETTING STARTED
patient right patient left
Preferred placement (vertical)
Place the top of the Bridge just below the jugular notch, at the base of the neck at the intersection of the collar bone.
patient right patient left
Ensure the arrow
at the top of the
Bridge on your
chest is pointing
up.

10
GETTING STARTED
patient right patient left
Alternate placement (horizontal)
Place the right side of the Bridge near the center of the chest over the sternum.
Ensure the arrow on the Bridge over your
left chest, near your left arm, is pointing
up.

11
GETTING STARTED
Success
Stay within 3 feet of
the phone, remain still,
and wait for the phone
to display a status of
Monitoring.
Turn on phone
Turn on monitor
Press and release the
center button on the
monitor once. As the
monitor successfully
powers on, it beeps
periodically as it
connects to the phone.
How do I know if the monitor is on?
An LED light on the monitor
blinks every 5 seconds. The
monitor is designed to be
unobtrusive, so the lights are
faint. They can best be detected
in a dark or dimly lit room.
Visual indicator
If you cannot detect the blinking LED light on the monitor,
press and release the center button. One beep indicates
that the monitor is on. Three beeps indicate that the
monitor was off, but is now powering on.
Audible indicator
Press and hold the Power key located on the right edge or the back of the
phone, depending upon the model. Once powered on, the phone displays the
ACTION REQUIRED screen.

12
DAILY USAGE
Keep the phone within 10 feet of the
monitor on your chest
Charge the phone nightly
Keep the phone with you at all times.
However, if (1) you get separated from the
phone or (2) the phone battery depletes,
the monitor will continue to collect data and
automatically send it to your health care
provider when the phone is back in range of
the monitor.
Ensure the phone is within 10 feet of the location where
you sleep. Leave the phone turned on and plug it into the
phone charger and into a wall power outlet.
The phone displays its battery status as pictured at left.
Note: If you don’t want to be disturbed by alerts while
sleeping or while at an event, tap Do Not Disturb on
the phone.
If the phone moves out of cellular
network range . . .
Your monitoring will continue uninterrupted,
but your data won't be sent to your health
care provider until you are back in cellular
range.
Move to a location with a better cellular
signal at your earliest convenience.
Tip The smartphone supports multiple languages. Tap Help and Settings → Settings → Change Language.

13
DAILY USAGE
Record your symptoms
If you begin to feel symptoms related to the reason your monitor was
prescribed such as dizziness, chest pain or shortness of breath, you
can manually record these events.
1. Press and release the center button on the monitor.
After pressing the button, it can take up to 60 seconds for
the symptoms prompt to appear on the phone.
2. Hold as still as possible for 60 seconds.
3. On the phone, select the symptoms you are feeling. You may select
up to 3 symptoms.
4. Tap Save.
You must
scroll to see
the full list of
symptoms.
1. On the home screen, tap Wi-Fi.
2. Ensure the Wi-Fi button is toggled to ON.
3. From the list displayed, tap a network that you trust, then enter the password (if required).
Wi-Fi
You can connect the phone to an available Wi-Fi network. This can be particularly useful if you find yourself in an area of
poor cellular coverage.

14
DAILY USAGE
continue
Switch monitors when battery is low
Switch the monitor on your chest when the battery is low. The phone will alert you when your monitor battery is low.
Always wear one of the monitors while the other monitor remains connected to the charger.
You do not need to remove the Bridge from your chest to switch monitors.
Firmly plug the charger into monitor
You must plug the charger into the
monitor you just removed from your chest
before you attach the other, fully-charged
monitor onto your chest.
Detach the monitor from the Bridge
on your chest
Do not pause or power off the monitor.
The monitor will automatically power off
when it is done transferring data and
charging. Do not use your own personal device
chargers. Only use the charger(s) provided.

15
DAILY USAGE
Attach the charged monitor to
the Bridge
(see page 7 for more detail)
Power on the monitor on your
chest
1. Press and release the center
button on the monitor.
Do not hold the button
down.
2. Remain near the phone when
attaching the fully-charged
monitor.
3. The phone will automatically
detect the new monitor.
Charging the monitor
When the monitor battery is low, the
phone will alert you (see page 18).
If this occurs, switch your monitors.
• While charging, the blue light on
the monitor will blink.
• Once fully charged, the blue light
will remain solidly lit.
Charging time: 2-3 hours
Do not use your own personal device
chargers. Only use the charger(s)
provided.

16
DAILY USAGE
Replacing the ECG electrodes
Change the ECG electrodes every 3 days OR when they no longer adhere to the skin.
Electrodes are disposable.
1. Remove the monitor and Bridge from your chest.
2. Slowly peel back and roll the adhesive on the back of the electrode away from your chest.
Tip: Dampen with water to ease removal from your skin or remove while in the shower.
3. Re-attach BodyGuardian Mini PLUS to your chest (see pages 8-10).
Do not rip or tear off the electrodes quickly. Improper removal may cause skin irritation.
Showering, bathing, swimming
The Bridge, monitor and ECG electrodes are waterproof and can safely be submerged in water as deep as 3 feet.
The phone is NOT waterproof. Keep away from water.
• You do not need to remove BodyGuardian Mini PLUS when showering or bathing.
• If you will be swimming in water deeper than 3 feet, remove the monitor.
After showering, bathing, swimming while wearing BodyGuardian Mini PLUS:
1. Pat the Bridge with a towel to dry it off.
2. Press and hold the electrodes against your chest to ensure good contact with your skin.

17
DAILY USAGE
Air travel
BodyGuardian Mini PLUS is safe to wear while traveling on aircraft. You do not need to remove the monitor.
If you will be traveling on aircraft:
1. Contact Preventice prior to departure to document dates of travel.
2. Power off phone after boarding.
3. Power on phone after landing.
MRI
MRI
BodyGuardian Mini PLUS cannot be worn while undergoing an MRI.
1. On the phone, tap Pause Monitoring.
2. Remove Bridge, monitor and electrodes from chest.
3. After the MRI, snap new electrodes to the Bridge and re-attach to your chest (see pages 8-10).
4. Tap Resume on the phone.

18
DAILY USAGE
Monitor indicators
Errors
Sounds Lights* What it means Caused by
and every 1 sec Poor skin contact. Monitor cannot detect good contact with skin to begin
monitoring.
none and every 5 sec Poor skin contact.
Monitor cannot detect good contact with skin during already
established monitoring session. If this persists for 30 minutes
or more, replace your Bridge or electrodes.
and every 5 sec Poor skin contact. Monitor has not detected good contact with skin for over 8
hours. Replace your Bridge or electrodes.
This section explains the sounds and LED lights on the monitor. The phone communicates
this same information and is the best method for understanding the status of your monitoring
session.
If you are curious about what the monitors sounds and lights mean, you can use this
information as a reference.
Note The monitor lights are faint. They can best be detected in a dark or dimly lit room.

19
DAILY USAGE
Warnings
Sounds Lights* What it means Caused by
and every 5 sec Monitor battery is low. Low monitor battery. Charge the monitor (page 15).
Informational
Sounds Lights* What it means Caused by
none every 5 sec Monitoring successfully.
none every 5 sec Monitoring successfully. Monitor is communicating with phone over Bluetooth.
and none Symptom marked. Press-and-release button push.
and Monitor is powering on. Press-and-release button push.
and
After 12 seconds, the monitor lights will flash once,
followed by a long beep.
Monitor is powering off.
Press-and-hold (12 sec) button push.

20
COMPLETING YOUR MONITORING
The phone will alert you when your prescription has ended.
When you see this message on the phone:
1. Remove the monitor on your chest, then place it near the phone.
Do not power off the monitor.
2. Power on the other monitor and leave it near the phone.
3. Wait for the monitors to power off. The monitors will power off automatically
once they are done sending data. You will know the monitor is off when none
of the four lights are lit.
4. Power off the phone.
5. Pack up and return your equipment (see page 21).
When your prescription ends
Other manuals for BodyGuardian MINI PLUS
1
Table of contents
Other Preventice Solutions Medical Equipment manuals

Preventice Solutions
Preventice Solutions BodyGuardian Heart User manual

Preventice Solutions
Preventice Solutions PER900 User manual

Preventice Solutions
Preventice Solutions BodyGuardian Heart User manual

Preventice Solutions
Preventice Solutions BodyGuardian MINI User manual

Preventice Solutions
Preventice Solutions BodyGuardian Verité User manual