PrimAster 55-410GB User manual

13.09.2021
Art. Nr. 55-410GB
Cellfast Sp. z o.o.
ul. W. Grabskiego 31
37-450 Stalowa Wola
Made in China
AUTOMATISCHE SCHLAUCHBOX
Bedienungsanleitung . . . . . . . . . . . . . . . . . . . . . . . . . . . . . . . . . . . . . 3
ENROULEUR DE TUYAU AUTOMATIQUE
Mode d’emploi . . . . . . . . . . . . . . . . . . . . . . . . . . . . . . . . . . . . . . . . . 9
AUTOMATIC HOSE REEL
User manual . . . . . . . . . . . . . . . . . . . . . . . . . . . . . . . . . . . . . . . . . . 15
Art. Nr. 55-410GB
Cellfast Sp. z o.o.
ul. W. Grabskiego 31
37-450 Stalowa Wola
Made in China
DE
FR
EN

2
(1)
(2)
(4)
(3)
(7)
(5)
(6)
(9)
(8)
(10)
(10)(11)
A B
C D
E F
(3)
(4)
(4)
(8)
(8)
(9)
(6)
(5)
(7)
(4.1)
(4.1)
(11)
(11.1)
(11.1)
(11.1)
(11.1)
(11)
8 mm
(.197")
15
STORAGE / WINTERIZING: Keep the automatic hose reel protected against freezing in winter.
WARNING! To avoid accidents and injury, mind the product weight (8.3 kg / 18.5 lbs) when
choosing the storage location.
NOISE EMISSION: the winding action of the product generates an average noise level of 85 dB.
EU DECLARATION OF CONFORMITY
Cellfast hereby declares that the product specified below has its concept, design and commercially
available production version in conformity with the prevailing requirements of the EU Directive
concerning health and safety. All alterations or modifications of this product not authorized by
Cellfast will void this declaration.
55-410GB - Automatic hose reel
Prevailing EU Durectives: 2006/42/EC
Applied harmonized standards: EN ISO 12100
The undersigned who act by authorization and commission of Cellfast Sp. z o.o. management.
Authorized personnel: Robert Kielar
Stalowa Wola, 2021.09.13
Cellfast Sp. z o.o.
ul. W. Grabskiego 31
PL 37-450 Stalowa Wola
www.cellfast.com.pl

14
WINDING THE HOSE: Approach the automatic hose reel with the free garden hose end and
release the reel winding lock by pulling a small length of the hose out. The hose starts winding up
on its own at a safe and steady speed controlled by the integrated winding brake. The reel winding
lock gear will click when unwinding and winding the hose. Before winding the hose back into the
automatic hose reel, undo all knots and kinks along the unwound length of the hose.
OPERATING CONDITIONS: The product can be operated between 10°C and 60°C of ambient tem-
perature and supplied with 6 bars of water pressure maximum. It is best to choose an installation loca-
tion away from direct sunlight for as long as possible to prevent unnecessary overheating of the product.
PRODUCT ADJUSTMENT (Fig. B): You can reposition the hose stop collar (4) if needed.
Caution! Hold the hose (3) when the hose stop collar (4); otherwise, the hose might be wound up
completely into the reel housing. If this happens, contact the nearest Cellfast authorized service.
1. Use a screwsdriver to release 2 bolts (4.1) on the hose stop collar (4). 2. Grasp and hold the
hose firmly while repositioning the hose stop collar (4). Retighten the 2 bolts (4.1) with the hose
stop collar in the new position.
MAINTENANCE: the product is maintenance-free.
TIP: Mind the hose winding action. Before winding the hose back into the reel, clean it of heavy
soil and dirt, otherwise the automatic hose reel might not wind the hose back properly.
AT THE END OF WORK WITH THE PRODUCT: Before winding the hose, close the water tap
valve and open the sprinkler attached to the hose end to release the water from the hose.
TROUBLESHOOTING: If the hose is difficult to wind into the automatic hose reel (because the
hose is knotted or kinked, etc.), close the water tap valve, unwind the full length of the hose,
remove all its knots and kinks, and try to wind the hose back in. If this does not help, contact the
nearest Cellfast authorized service. No spare parts are commercially available for this product
(except for quick connectors, the universal connector and the sprinkler). If the product requires
warranty or post-warranty repairs, contact the nearest Cellfast authorized service.
REPLACING THE HOSE: For safety reasons, have the gardening hose replaced by Cellfast’s
authorized service only.
TRANSPORT: Handling: Graps the carrying handles (10) and remove the wall bracket pin (9)
up while slightly twisting it left an right.
3
AUTOMATISCHE SCHLAUCHBOX
Zur Aufbewahrung des Gartenschlauchs und des Zubehörs.
Anwendung: Gartenarbeiten - Begießen.
Artikel-Nr. 55-410GB
Verwendete Richtlinien und Normen: 2006/42/EG und EN ISO 12100
Produktbeschreibung (Abb. A):
(1) Reinigungsspritze
(2) Schnellverbindungsstück Stopp 12,7 mm (1/2")
(3) Gartenschlauch 12,7 mm (1/2") - 20 m
(4) Schlauchstopper
(5) Anschlussschlauch 12,7 mm (1/2") - 2 m
(6) Schnellverbindungsstück Durchlauf 12,7 mm (1/2")
(7) Universal-Anschluss mit Innengewinde 21 mm (G1/2") / 26,5 mm (G3/4") / 33,3 mm (G1")
(8) Wandhalterung
(9) Griffbolzen
(10) Transportgriffe
(11) Automatische Schlauchtrommel
ALLGEMEINE HINWEISE: Die Bedienungsanleitung ist in der Originalfassung vor
der ersten Verwendung des Produkts durchzulesen, die darin enthaltenen Anweisungen
sind zu befolgen und das Dokument ist für spätere Verwendung bzw. für die nachfolgenden
Benutzer aufzubewahren.
GEFAHR! Das Gehäuse darf nicht geöffnet werden. Verletzungsgefahr durch die ge-
spannte Feder! In die Auslassöffnung des Wasserschlauchs darf nicht hineingegriffen
werden. Dabei könnte die Hand in der Öffnung eingeklemmt werden.
GEBRAUCH GEMÄSS DEM VERWENDUNGSZWECK: Dieses Produkt ist für den Gebrauch
in privaten Haushalten ausgelegt und nicht für gewerblichen Gebrauch bestimmt. Der Hersteller
übernimmt keine Haftung für Schäden, die auf einen dem Verwendungszweck fremden Einsatz
des Geräts bzw. eine nicht sachgemäße Bedienung bzw. Gebrauch zurückzuführen sind. Aus Si-
cherheitsgründen dürfen Kinder und Jugendliche unter 16 Jahren sowie Personen, die die Bedie-
nungsanleitung des Geräts nicht gelesen haben, dieses Produkt nicht verwenden. Körperlich oder
BEDIENUNGSANLEITUNGDE

4
geistig behinderte Personen dürfen das Produkt verwenden, sofern sie von einer kompetenten
Person beaufsichtigt werden oder von dieser ordnungsgemäß angewiesen wurden. Kinder sollten
unter Aufsicht bleiben, um sicherzustellen, dass sie nicht mit dem Produkt spielen. Den Was-
serstrahl nicht auf elektrische Geräte richten! Den Wasserstrahl nicht auf Menschen oder Tiere
richten! Nicht für Trinkwasserentnahme bestimmt!
UMWELTSCHUTZ: Die Verpackung wurde aus wiederverwertbaren Materialien herge-
stellt. Die Verpackungen sollten nicht in normalen Mülltonnen, sondern in den Mülltonnen
für wiederverwertbare Stoffe entsorgt werden. Gebrauchte Geräte enthalten wertvolle wiederver-
wertbare Rohstoffe, die recycelt werden sollten. Aus diesem Grund sollten abgenutzte Geräte über
geeignete Wiederverwertungssysteme entsorgt werden.
GARANTIE: In jedem Land gelten Garantiebedingungen, die vom Händler bestimmt werden,
der die Produkte des Herstellers vertreibt. Jegliche Produktmängel werden von uns während der
Garantielaufzeit kostenlos behoben, sofern diese durch einen Material- oder Produktionsfehler
verursacht wurden. Für Garantiereparaturen wenden Sie sich bitte mit dem Kaufnachweis direkt
an den Händler bzw. Hersteller.
SICHERHEITSHINWEISE: Das Gerät außerhalb der Reichweite von Kindern aufbewahren. Las-
sen Sie keine Dritten in die Nähe des Geräts während dessen Benutzung. An die Wandhalterung
ist keine zusätzliche Last anzubringen. Für die Montage wählen Sie einen Ort, von dem im Falle
eines Lecks kein Wasser ins Gebäude eindringen kann. Aus Sicherheitsgründen dürfen Reparatu-
ren und der Schlauchaustausch nur durch den Herstellerservice durchgeführt werden. Das Produkt
erfordert keine persönliche Schutzausrüstung.
WARNUNG! Die Nichtbefolgung der Sicherheitshinweise kann zu Produktschäden und gefährli-
chen Situationen für den Bediener bzw. andere Personen führen.
MONTAGEANLEITUNG: Für die Montage wählen Sie einen Ort, von dem im Falle eines Lecks
kein Wasser ins Gebäude eindringen kann. Bei der Auswahl des Einbauorts ist die Länge des An-
schluss-Schlauchs (5) zu beachten. Das Set enthält keine Wanddübel. Sie sind entsprechend dem
Wandmaterial und den Löchern in der Wandhalterung zu wählen.
Montage der Wandhalterung (Abb. C): 1. Mit Hilfe der Wandhalterung (8) sind die
Stellen für die Befestigungslöcher zu markieren. 2. Die Wandhalterung (8) ist mit 4 passenden
Schrauben und Dübeln an die Wand festzuschrauben (dabei wird die Verwendung von Unter-
legscheiben empfohlen).
13
waste bins. Waste products contain valuable recyclable materials which should be properly dis-
posed of. Have your product disposed of in an authorized waste disposal and recovery system.
WARRANTY: In each country, warranty conditions apply, which are determined by the dealer
who sells the manufacturer's products. Any product defects will be corrected by us free of charge
during the guarantee period, provided that they are caused by a material or production defect.
For warranty repairs, please contact the dealer or manufacturer directly with proof of purchase.
SAFETY PRECAUTIONS: Keep children away from the product. Keep bystanders away from
the product in operation. Do not place other loads than the product weight on the wall bracket.
Choose an installation location for the wall bracket which will prevent flooding indoor rooms if the
product leaks water. For safety reasons, have the gardening hose repaired or replaced by Cell-
fast’s authorized service only. This product requires no personal protective equipment to work with.
WARNING! Failure to comply with the safety precautions may cause damage of the product or
be hazardous to its user and/or people nearby.
ASSEMBLY INSTRUCTIONS: Choose an installation location for the wall bracket which will prevent
flooding indoor rooms if the product leaks water. The installation location should be within the reach of
the connection hose (5) connected to the product and the water tap. The product does not include any
wall plugs. Select the wall plugs which are suitable to the wall material and the wall bracket bolt hole size.
Wall bracket installation (Fig. C): 1. Place the wall bracket (8) against the wall at the selected
installation location and mark the bolt hole pattern on the wall. 2. Secure the wall bracket (8) to
the wall with 4 screws and wall plugs compatible with the bolt hole size and the wall material at the
marked locations (it is recommended to use washers between the bolt heads and the wall bracket).
Hang the automatic hose reel (11) on the wall bracket (8) secured to the wall (Fig. E). Do this
by releasing the lock tabs into the position shown in (Fig. D). Engage the lock tabs with the wall
bracket and secure with the wall bracket pin (9). If the wall bracket pin is difficult to insert, press
it inward while twisting it a little in either direction.
OPERATION (Fig. F): Connect the connection hose (5) to the water tap with the parts (6-7) or
another spout connector compatible with your water tap. Open the water tap valve.
UNWINDING THE HOSE: Unwind the hose from the reel to the required length. The reel
winding lock is engaged every 50 cm of hose length and a click is heard every time it is engaged.

12
Applied Directives and standards: 2006/42/EC; EN ISO12100
PRODUCT DESCRIPTION (Fig. A):
(1) Adjustable hose nozzle
(2) Hose quick connector - stop 12,7 mm (1/2“)
(3) Garden hose 20 m (65.6 ft) - 12,7 mm (1/2“)
(4) Hose lock
(5) Connection hose 2 m (6.56 ft) - 12,7 mm (1/2“)
(6) Hose quick connector - water flow 12,7 mm (1/2“)
(7) Multi-purpose connector with a female thread
21 mm (G1/2") / 26,5 mm (G3/4") / 33,3 mm (G1")
(8) Wall hanger
(9) Hanger pin
(10) Transport handles
(11) Automatic hose reel
GENERAL INSTRUCTIONS: Read the original User Manual before the first use of the
product and follow it. Keep the User Manual for future reference and pass it with the
product to the next user, if any.
DANGER! Do not open the housing of the hose reel. The force of the spring will be
released and may cause injury. Keep hands away from the hose port in the enclosure.
Hazard of pinching and entrapment of fingers.
INTENDED USE: this product is intended for personal, non-commercial home use. Do not
use it for commercial or industrial applications. Cellfast shall not be liable for any damage
caused by non-intended use of this product, its incorrect handling or assembly / installation.
For safety reasons, the product must not be used by children, youth less than 16 years of
age, or anyone who has not read and understood the User Manual. Mentally and/or phys-
ically challenged can operate the product under supervision of (or having been instructed
by) a competent, able-bodied individual. Mind the children. The product is not a toy and
children must never play with it. Do not direct the water jet at any electrical equipment! Do
not direct the water jet at people or animals! The product is not suitable as a potable water
drawing outlet!
ENVIRONMENTAL PROTECTION: All packaging materials of the product are recy-
clable. Do not discard the packaging to household waste bins. Use segregated recyclable
5
Der Schlauchaufroller (11)ist in der Wandhalterung (8) zu installieren (Abb. E). Dazu sind die
Riegel in die in der (Abb. D)gezeigte Position zu öffnen. Diese sind dann in die Wandhalterung
einzuschieben. Anschließend ist der Wandhalterungsbolzen (9) zu montieren. Falls beim Einsetzen
des Bolzens Probleme eintreten, sollte dieser bei gleichzeitigem Drücken etwas gedreht werden.
BEDIENUNG (Abb. F): Der Anschluss-Schlauch (5) ist mit dem Anschluss-Set (6-7)bzw. einem an-
deren passenden Montageset an einen Wasserhahn anzuschließen. Der Wasserhahn ist aufzudrehen.
AUSROLLEN: Der Schlauch ist auf die gewünschte Länge auszurollen. Die Sperrvorrichtung in der
Trommel kann in Abständen von 50 cm aktiviert werden, was durch hörbare Klicks signalisiert wird.
AUFROLLEN: Mit der Spritze zum Gerät gehen und durch ein kurzes Ziehen am Schlauch die
Sperrvorrichtung loslösen. Dank einer speziellen eingebauten Bremsvorrichtung wird der Schlauch
automatisch, sicher und gleichmäßig aufgerollt. Beim Aus- und Aufrollen ist das Klicken der Ver-
riegelungselemente zu hören. Die beim Einsatz des Schlauchs entstehenden Knoten sollten vor
Beginn des Aufrollvorgangs gelöst werden.
BETRIEBSBEDINGUNGEN: Das Gerät kann im Temperaturbereich von 10°C bis 60°C und mit
einem Wasserdruck von bis zu 6 bar betrieben werden. Für den Einbau wird ein Ort ohne direkte
Sonneneinstrahlung empfohlen, damit es zur Überhitzung des Geräts nicht kommt.
GERÄT EINSTELLEN (Abb. B): Bei Bedarf kann die Schlauch-Sperrvorrichtung (4) verschoben
werden. Achtung! Um ein vollständiges Aufrollen des Gartenschlauchs (3) zu vermeiden, sind der
Schlauch (3) und die Sperrvorrichtung (4) nicht gleichzeitig loszulösen. Wenn der Schlauch je-
doch vollständig aufgerollt ist, wenden Sie sich bitte an den Kundendienst des Herstellers (Cellfast).
1. 2 Schrauben (4.1) an der Sperrvorrichtung (4) sind mit einem Schraubendreher zu lösen.
2. Beim Bewegen ist der Gartenschlauch festzuhalten und die Sperrvorrichtung (4) zu verschie-
ben. Anschließend sind die beiden Schrauben (4.1) wieder festzuschrauben.
WARTUNG: Das Produkt erfordert keine Wartung.
HINWEIS: Es ist an die Rückbewegung des Schlauchs zu denken. Vor dem Aufrollen soll der
Schlauch keine starken Verschmutzungen haben, die die automatische Aufrollfunktion beeinträch-
tigen könnten.
BEENDEN DER ARBEIT: Vor dem Aufrollen des Schlauchs den Wasserhahn schließen, das Ventil
der Spritze öffnen und das Wasser abfließen lassen.

6
STÖRUNGEN: Falls Probleme mit dem vollständigen Aufrollen des Schlauchs auftreten, z. B.
wegen der Verknotung des Schlauchs, ist der Wasserhahn zu schließen, der Schlauch vollständig
auszurollen und das Aufrollen neu zu starten. Soll dieser Vorgang nicht helfen, wenden Sie sich an
den Kundendienst des Herstellers. Ersatzteile (außer Schnellkupplungen, Universalanschluss und
Spritze) sind im Handel nicht erhältlich. Für Reparaturen während der Garantielaufzeit und nach
deren Ablauf wenden Sie sich bitte an den Kundendienst des Herstellers.
AUSTAUSCH DES SCHLAUCHS: Aus Sicherheitsgründen kann der Schlauch nur vom Her-
stellerservice ausgetauscht werden.
BEFÖRDERUNG: Manuelle Beförderung. Das Gerät an den Griffen (10) halten, den Bolzen
(9) nach oben ziehen und dabei etwas drehen.
LAGERUNG / LAGERUNG IM WINTER: In der Frostperiode ist der automatische Garten-
schlauchaufroller an einem frostfreien Ort aufzubewahren.
ACHTUNG: Um Unfälle oder Verletzungen zu vermeiden, ist es bei der Auswahl des Lagerorts
auf das Gewicht des Geräts (8,3 kg) zu achten.
LÄRMEMISSION: Während des automatischen Aufrollens gibt das Produkt ein Geräusch von
durchschnittlich 85 dB ab.
EU-KONFORMITÄTSERKLÄRUNG
Der Hersteller erklärt, dass das nachstehend angegebene Gerät in Bezug auf Konzept, Aufbau
und die im Handel angebotene Version den geltenden Anforderungen der EU-Richtlinien in Bezug
auf Sicherheit und Gesundheitsschutz entspricht. Jegliche mit dem Hersteller nicht vereinbarten
Änderungen am Gerät haben das Erlöschen der Gültigkeit dieser Erklärung zur Folge.
55-410GB - Automatische Schlauchbox
Geltende EU-Richtlinien: 2006/42/EG
Angewendete Harmonisierte Normen: EN ISO 12100
Die Unterzeichneten, die im Auftrag und in Vertretung
der Geschäftsleitung von Cellfast Sp. z o. o. handeln.
11
DÉCLARATION DE CONFORMITÉ UE
Le fabricant déclare que le dispositif spécifié ci-dessous est conforme aux dispositions applicables
des directives de l'UE concernant les exigences de sécurité et de santé sur le plan de la conception,
de la construction et de la version commercialisée. Toutes les modifications apportées au dispositif
sans être convenues avec le fabricant entraînent l'annulation de la présente déclaration.
55-410GB - Enrouleur de tuyau automatique
Directives de l'UE applicables: 2006/42/CE
Normes harmonisées appliquées: EN ISO 12100
Les personnes soussignées agissant au nom et pour le comptede la direction de Cellfast Sp. z o.o.
Mandataire: Robert Kielar
Stalowa Wola, 2021.09.13
Cellfast Sp. z o.o.
ul. W. Grabskiego 31
PL 37-450 Stalowa Wola
www.cellfast.com.pl
AUTOMATIC HOSE REEL
For storage of a garden hose and its accessories.
Application: gardening – watering.
Art. no. 55-410GB
USER MANUALEN

10
relâchez pas simultanément la partie tuyau (3) et l'élément de verrouillage (4). Si, malgré tout,
le tuyau a été rétracté complètement, veuillez contacter le service après-vente du fabricant Cellfast.
1. À l'aide d'un tournevis, desserrez les 2 vis (4.1) situées sur l'élément de verrouillage (4).
2. Lors du glissement du tuyau d'arrosage, maintenez le tuyau, écartez l'élément de verrouillage
(4) et resserrez-le à l'aide des deux vis (4.1).
ENTRETIEN: Le produit ne nécessite aucun entretien.
CONSEIL PRATIQUE: n'oubliez pas le mouvement de retour du tuyau. Avant l'enroulement, le tuyau ne
peut pas être fortement sale, ce qui risquerait de gêner la fonction d'enroulement automatique.
FIN DES TRAVAUX: Avant d'enrouler le tuyau, fermez le robinet, ouvrez la vanne de l'arroseur
et laissez l'eau s'écouler.
PANNES: En cas de problèmes avec l'enroulement complet du tuyau, causés par exemple par
son enchevêtrement, fermez le robinet, déroulez complètement le tuyau, démêlez-le et redé-
marrez l'enroulement. Si le problème persiste, contactez le service après-vente du fabricant. Les
pièces de rechange (à l'exception des raccords rapides, du raccord universel et de l'arroseur) ne
sont pas disponibles à l'achat. Si vous avez besoin de réparations sous garantie et hors garantie,
veuillez contacter le service après-vente du fabricant.
REMPLACEMENT DU TUYAU: Pour des raisons de sécurité, les tuyaux ne peuvent être remplacés
que par le service du fabricant.
TRANSPORT: transport manuel. Tenez le dispositif par les poignées (10), tirez le boulon (9) vers le
haut tout en le tournant légèrement.
STOCKAGE / STOCKAGE EN HIVER: en période de gel, stockez l'enrouleur automatique
dans un endroit non exposé au gel.
AVERTISSEMENT: pour éviter les accidents ou les blessures, en choisissant l'endroit de stockage,
tenez compte du poids du dispositif (8,3 kg).
ÉMISSION DE BRUIT: Lors de l'enroulement automatique, le produit émet un bruit de 85 dB
en moyenne.
7
Bevollmächtigte Person: Robert Kielar
Stalowa Wola, 2021.09.13
Cellfast Sp. z o.o.
ul. W. Grabskiego 31
PL 37-450 Stalowa Wola
www.cellfast.com.pl
ENROULEUR DE TUYAU AUTOMATIQUE
Destiné au rangement du tuyau d'arrosage avec accessoires.
Destination: jardinage - arrosage.
Article n° 55-410GB
Directives et normes appliquées: 2006/42/CE et EN ISO 12100
DESCRIPTIF DU PRODUIT (fig. A):
(1) Lance d'arrosage
(2) Raccord rapide - stop 12,7 mm (1/2")
(3) Tuyau d’arrosage 12,7 mm (1/2") - 20 m
(4) Blocage tuyau
(5) Kit de raccordement 12,7 mm (1/2") - 2 m
(6) Raccord rapide 12,7 mm (1/2")
(7) Raccord universel avec collier de serrage
21 mm (G1/2") / 26,5 mm (G3/4") / 33,3 mm (G1")
(8) Support mural
(9) Goupille du support mural
(10) Poignées de manutention
(11) Enrouleur de tuyau automatique
MODE D’EMPLOIFR

8
INSTRUCTIONS GÉNÉRALES: Avant la première utilisation du produit, lisez le mode
d'emploi d'origine, suivez ses consignes et conservez-le pour une utilisation ultérieure
ou pour l'utilisateur successif.
DANGER! Ne pas ouvrir le boîtier de l'enrouleur. Il existe un risque de blessure dû à la
tension du ressort. Ne pas mettre les mains dans l'orifice de sortie du tuyau. Risque de
coincement de la main dans le trou.
DUTILISATION PRÉVUE: Ce produit a été conçu pour l'usage privé - il n'est pas destiné à un
usage industriel. Le fabricant décline toute responsabilité des dommages résultant d'un emploi du
produit non conforme à son utilisation prévue, d'une manipulation ou d'un montage incorrects. Pour
des raisons de sécurité, les enfants et les jeunes de moins de 16 ans, ainsi que les personnes non
familiarisées avec le mode d'emploi, doivent s'abstenir d'utiliser ce produit. Les personnes handica-
pées physiquement ou mentalement peuvent utiliser le produit à condition qu'elles soient supervisées
par une personne compétente ou qu'elles soient instruites au préalable par une telle personne. Les
enfants doivent être surveillés afin qu'ils ne jouent pas avec le produit. Ne pas diriger le jet d'eau
vers des appareils électriques! Ne pas diriger le jet d'eau vers des personnes ou des animaux! Ce
dispositif n'est pas un point d'alimentation en eau potable!
PROTECTION DE L'ENVIRONNEMENT: Les matériaux utilisés pour l'emballage
sont adaptés au recyclage. Les emballages ne doivent pas être jetés dans des poubelles
ordinaires, mais plutôt dans des conteneurs pour matières recyclables. Les articles en fin de vie
contiennent de précieuses matières qui doivent être recyclées. Pour cette raison, les déchets
d'équipements doivent être éliminés via des systèmes d'élimination appropriés.
GARANTIE: Les conditions de garantie définies par le distributeur des produits du fabricant s'ap-
pliquent dans tous les pays. Tous les défauts du produit seront supprimés par nos soins gratuitement
pendant la période de garantie, à condition qu'ils soient causés par un vice matériel ou une erreur de
production. Pour les réparations sous garantie, veuillez vous adresser au distributeur ou directement
au fabricant en présentant la preuve d'achat.
CONSIGNES DE SÉCURITÉ: Gardez le produit hors de portée des enfants. Ne laissez pas des
tiers s'approcher du dispositif lorsqu'il fonctionne. Ne placez pas de charges supplémentaires sur
le support mural. Choisissez un endroit de montage qui empêchera l'eau de pénétrer à l'intérieur
du bâtiment en cas de fuite. Pour des raisons de sécurité, toutes les réparations et le remplace-
ment du tuyau ne peuvent être effectués que par le service du fabricant. Le produit ne nécessite
pas l'emploi d'équipements de protection individuelle.
9
AVERTISSEMENT! Le non-respect des consignes de sécurité risque d'engendrer des dommages
au produit et des situations dangereuses pour l'opérateur ou d'autres personnes.
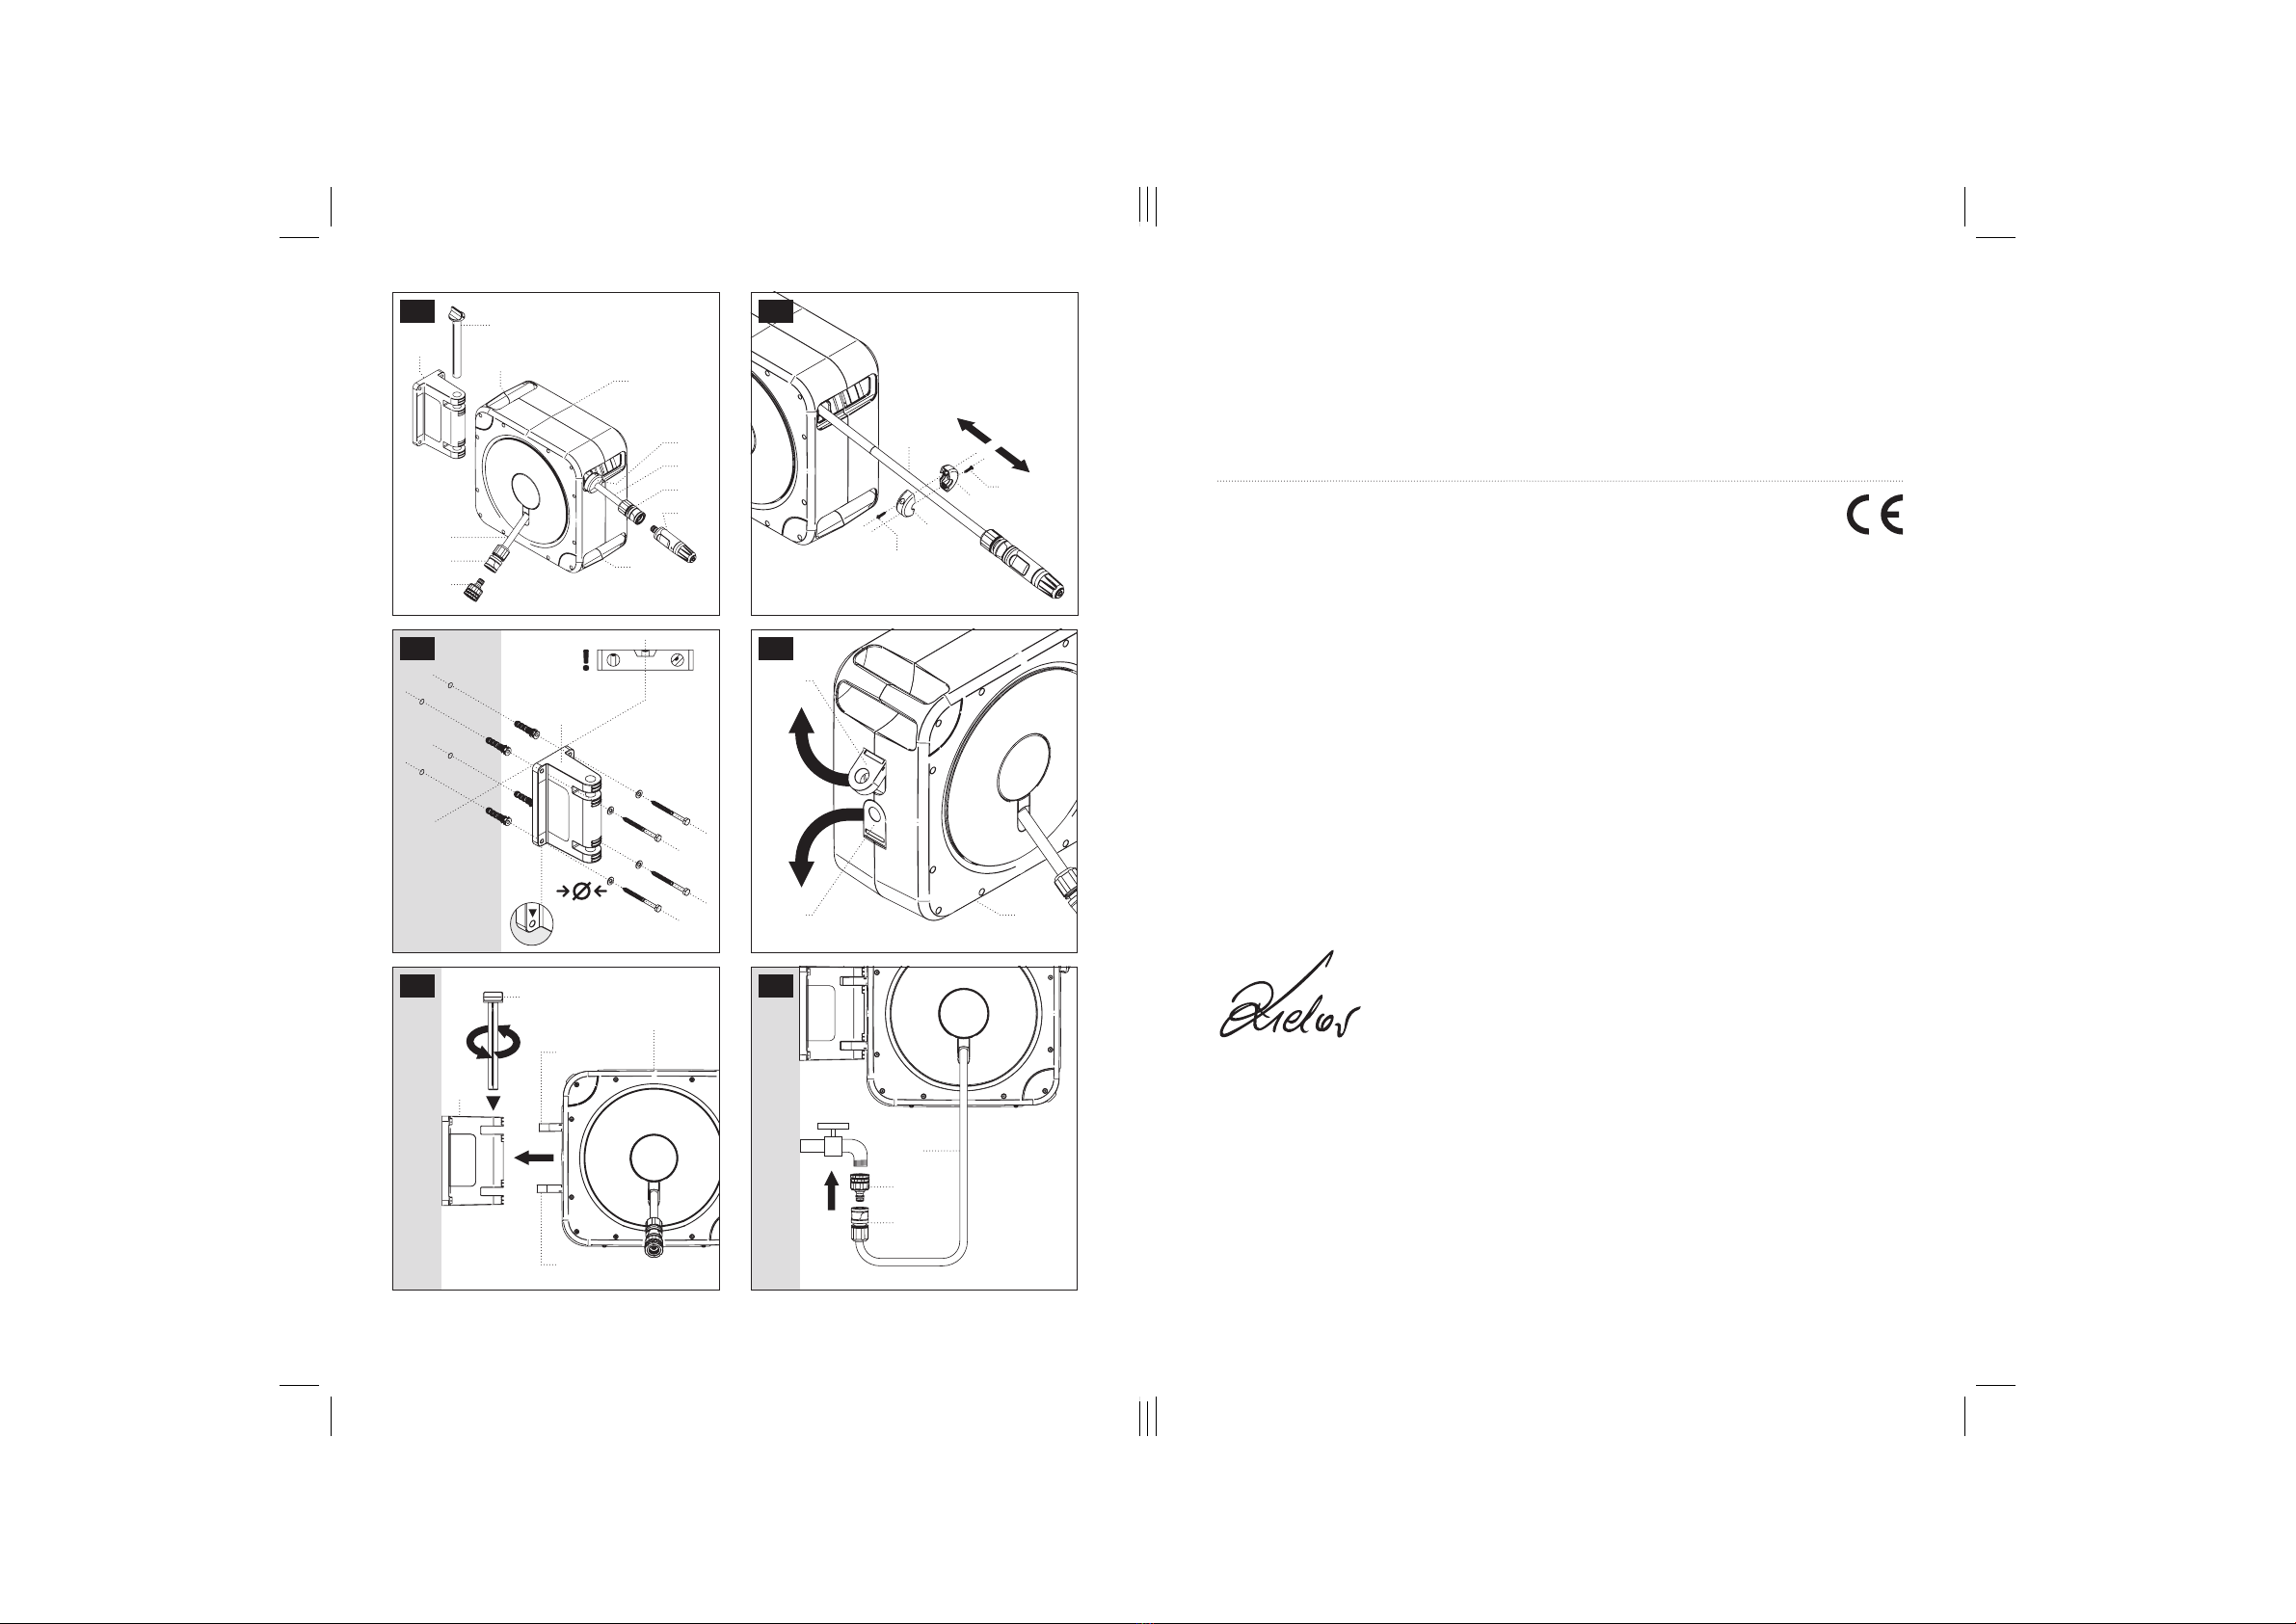
INSTRUCTIONS DE MONTAGE: Choisissez un endroit de montage qui empêchera l'eau de
pénétrer à l'intérieur du bâtiment en cas de fuite. Lors du choix de l'emplacement de montage,
prenez en compte la longueur du tuyau de raccordement (5) Le kit ne contient pas de goupilles
de fixation. Celles-ci doivent être sélectionnées en fonction du matériau du mur et des trous de
montage mural.
Montage du support mural (fig. C): 1. À l'aide du support mural (8), tracez l'emplacement
des trous de montage. 2. Vissez le support mural (8) au mur à l'aide des 4 vis et chevilles à
expansion adéquatement sélectionnées (il est également recommandé d'utiliser des rondelles).
Installation de l'enrouleur automatique sur le support mural (fig. E). Placez l'enrouleur automa-
tique (11) sur le support (8) monté au mur (fig. E). Pour ce faire, mettez les crochets en position
indiquée sur la (fig. D). Faites-les glisser dans le support mural et installez le boulon (9). En cas de
problèmes lors de l'insertion du boulon, tournez-le légèrement tout en appuyant dessus.
MANIPULATION (fig. F): connectez le tuyau de raccordement (5) au robinet à l'aide du kit
(6-7) ou d'un autre ensemble adapté à votre type de robinet. Ouvrez le robinet.
DÉROULEMENT: déroulez le tuyau à la longueur requise. Le dispositif de verrouillage dans le
tambour peut être activé jusqu'à tous les 50 cm, ce qui est signalé par des clics audibles.
ENROULEMENT: approchez-vous du dispositif en tenant l'extrémité et relâchez le verrou en tirant
brièvement sur le tuyau. Le tuyau s'enroule automatiquement, uniformément et en toute sécurité
grâce à un mécanisme de freinage interne spécial. Les éléments de verrouillage mécaniques cliquent
lors de l'enroulement et du déroulement. Les nœuds créés lors de l'utilisation du tuyau doivent être
démêlés avant de procéder à l'enroulement.
CONDITIONS DE FONCTIONNEMENT DU DISPOSITIF: Le dispositif peut fonctionner dans
une plage de températures de 10°C à 60°C, sous une pression d'eau jusqu'à 6 bars. Il est recom-
mandé de choisir un endroit de montage qui ne soit pas exposé à la lumière directe du soleil, afin
d'éviter la surchauffe du produit.
RÉGLAGE DU DISPOSITIF (fig. B): L'élément de verrouillage du tuyau (4) peut être déplacé
au besoin. Attention ! Pour éviter que le tuyau d'arrosage (3) ne soit complètement rétracté, ne
Table of contents