primatech Q900A User manual

Q900A
PNEUMATIC FLOORINGTOOL
OPERATING INSTRUCTIONS
PNEUMATICTOOLQ900A
The pneumatic EDGE nailer Q900Aisaprofessional
toolspeciallydeveloped for the installation of1/2"to
3/4"solidhardwood flooring.It isdesigned toblind nail
within2"ofverticalobstructionssuchasend walls,
stairways, cabinets, railings, and more.
The Q900Afeaturesthe PRIMPACT striking modulefor
easymaintenancewhere major components can be
accessed withinsecondswithoutthe need ofany tool.
The Q900Atoolalsofeaturesacamoperated height
adjuster.
The Q900Ausesspecialty1¾" EDGE nails. Do notuse
standard 18GA flooring nails.
Completedocumentation specifictoyour toolcan be
retrievedbyscanningtheQR-Codeappliedonthetool.
You will find updated information suchasOperation
Manual,Partlist, Schematicspecifics and Technical
Notesspecifictoyour toolas it was manufactured; as
well asusefulinformation for ordering replacement
parts.
Technicalsupport, information &
schematics at
http://ts.primatech.ca/900
SAFETY MEASURES
Theseimportantguidelinesshouldalwaysbe followed
toworksafelywiththe Primatechpneumatictool
Q900A:
•Read theseinstructions thoroughlybefore using this
tooland keep it handyfor referenceif necessary.
•Alwayskeep hands, feetor other bodyparts away
fromthe fastener ejection area.
•Never aimthe toolinanydirection other than the
working area.
•Alwayscarryor manipulatethe toolbyitshandle
whilethe airsupplyhoseis connected.
•Never hitthe head cap ofthe actuator ifthe plastic
baseis not sitting perfectlyon the working surface.
•Never leavethe toollaying downon its side whilethe
airsupplyhoseis connected; the toolshouldalways
be left on the floor, standing on its plastic base.
•Always disconnect the airsupply hosewhen the tool
is not inuseor when movetoanother work area.
•Never serviceor repairthe tool,clear obstructionsor
makeadjustmentswhilethe airsupplyhoseis
connected.
•Onlycompressed airshouldbe used topower this
tool; do not exceed 110 psi(7.6bar).
•Never useoxygen or anyother compressed gasasa
power sourcefor this tool. Explosion mayoccur.
•AlwayswearOSHA-requiredZ-87safetyglasseswith
side shields.
•Alwayswear proper ear and footprotection whilethe
airsupplyhoseis connected.
•Alwaysremovefastenersfromthe magazine before
servicing tool.
Eyeprotectionisrecommendedandshould
be worn bythe operator and other in
working area.Accidentalejection of
fastenersor wood debriscouldcause
severe eyeinjury.
Insomeenvironments,ear protectionmight
be required,asworking conditionmay
include exposure tohigh noiselevelswhich
lead tohearing damage.
Wearing safetyboots and safetyhatisalso
highlyrecommended.
Note:All the personalprotection
equipments must meetnationalstandards.
Printed in Canada v143 07/18
ADJUSTINGFOR HARDWOOD THICKNESS
TheQ900Apneumatictoolisfitted withacam
operated height adjustment base.
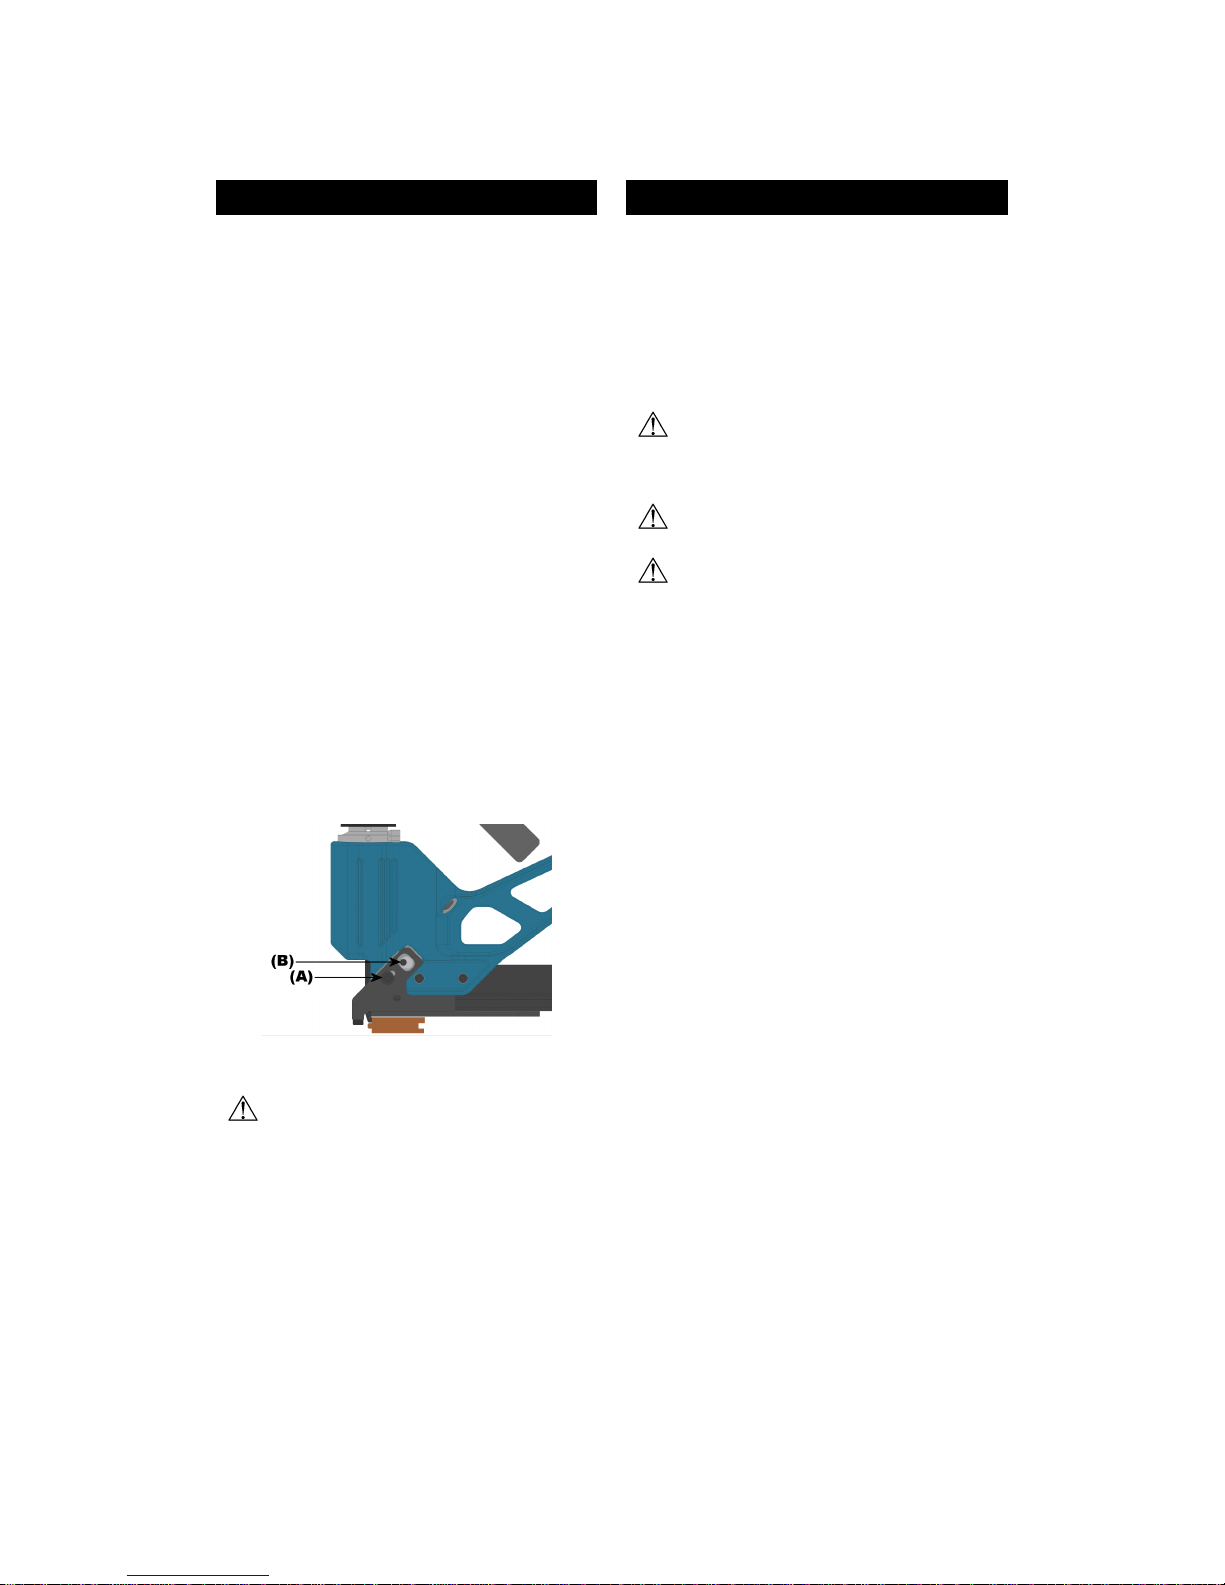
Adjusting the basefor flooring thickness:
•Using the supplied Allen wrench,loosen butdo not
removescrews (A); one on eachside of the tool.
•Withthe toolinan upsidedownposition,placea
shortpieceofflooring against the gate/foot
assembly(nail ejection area).
•Engage the Allen wrenchintothe opening ofthe
cam(B).The camhasarotation range ofless the
halfaturn.Do notapplyforcewhen alimitis
reached.
•Adjust the heightofthe basetoobtainasmall gap
between the nail efection area and the top side of
thetongue ofthe sampleboard.Agap of1/32"
shouldbe adequatefor most situations.
•Tighten bothscrews (A).
After completing the adjustmentprocedure,proceed
withthe installation of fewboards.
If the nail issettoo deep or the tongue isseverely
fractured,raisethe nail ejection area bylowering the
baseasdescribed above.If the nail isnotfullyset,
lower the nail ejection area byraising the base.
Check occasionallytoinsure thatall parts are secured
inplace.Toolmayloseadjustmentover timeifthis
procedure is not strictlyfollowed.
After adjusting the tool, fasten downfew
boards toascertainthat the toolis properly
adjusted.
CONNECTION&AIRSUPPLY
Thistoolrequiresclean&dryair.Theuseofafilterand
apressure regulator is recommended.
Useadetachablemalecoupler with3/8"NPTmale
treads. The useofa3/8"(1 cm)diameter airsupply
hoseisrecommended.Asmallerhoseorahoselonger
than 50'(15 m)couldcauseapressure drop when the
toolis activated repeatedly.
Always useafree-flowconnection for the
compressed airsupplytoprevent that the
toolstays charged after disconnecting the air
supplyhose.
Unload toolbefore connecting airtoprevent
accidentaldischarge.
Toprevent injuryor accidentaldamage tothe
finished surfaceof the installed floor, rest the
toolontothe subflooring when connecting air,
moving tooltoadifferent work area, loading
the toolor performing anymaintenancetothe
tool.
Dirt, dust, and other particlesinthe airsupplycan
causesluggishoperation or premature wear.Drain
water fromthe compressor tankregularly.The
compressorstart-stoplimitsshouldbesettodeliverthe
operating airpressure atall times. Consultthe
compressormanualor dealerforinstructionson howto
makethis adjustment.
At 80 psi(5.5bar) and 40 hits per minute,thistool
consumesapproximately1.5cu.ft (44 R)ofairper
minuteat70EF(21EC).Higher airpressure will
increasethe consumption of compressed air.
Thistoolisdesignedtobe operated withacompressed
airpressure of100 to110 psi(7.0-7.6bar).Air
pressure of100psi(7.0bar) isadequatefor most
situations, although occasionally,ahigher pressure
couldbe necessary.Never notuseacompressed air
pressure higher than 110 psi(7.6bar).
LOADING THE TOOL
The pneumatic EDGE nailer Q900Ausesspecialty 1¾"
EDGE nails. Do not use standard 18GA flooring nails.
Toload the tool:
•Insert astripof EDGE nails intothe magazine.
•Pull back the pusher until itengagesbehind the strip.
•Toremovefastenersfromthe magazine,simply
squeezethe pusher withyour thumband finger and
allowthe spring torecoil slowly.
Useonlyspecialty1¾" EDGE nails. The use
of standard 18GA nails will damage your floor
and causedeviation of the nail toward the
front ledge of the board, making it impossible
toproperlfit the following row.
PREVENTIVE MAINTENANCE
Thistoolrequiresminimallubrication.Use
onlydetergent-free oil suchasPrimatech
P-090.Fewdropsofoil weekly inthe airinlet
issufficient. Other typesoflubricantmay
degrade the seals.
Check periodicallytomakesure thatthe head
assemblyisfullyscrewedontothe mainbody.Aloosen
head will damage the threads.
OPERATION
Unload the tooland rest itontothe subflooring,
Connect the hoseand cycletoolonceor twicewithout
fastener. After loading the tool, it is readyfor use.
Load the toolwithastripof 1¾" EDGE nails.
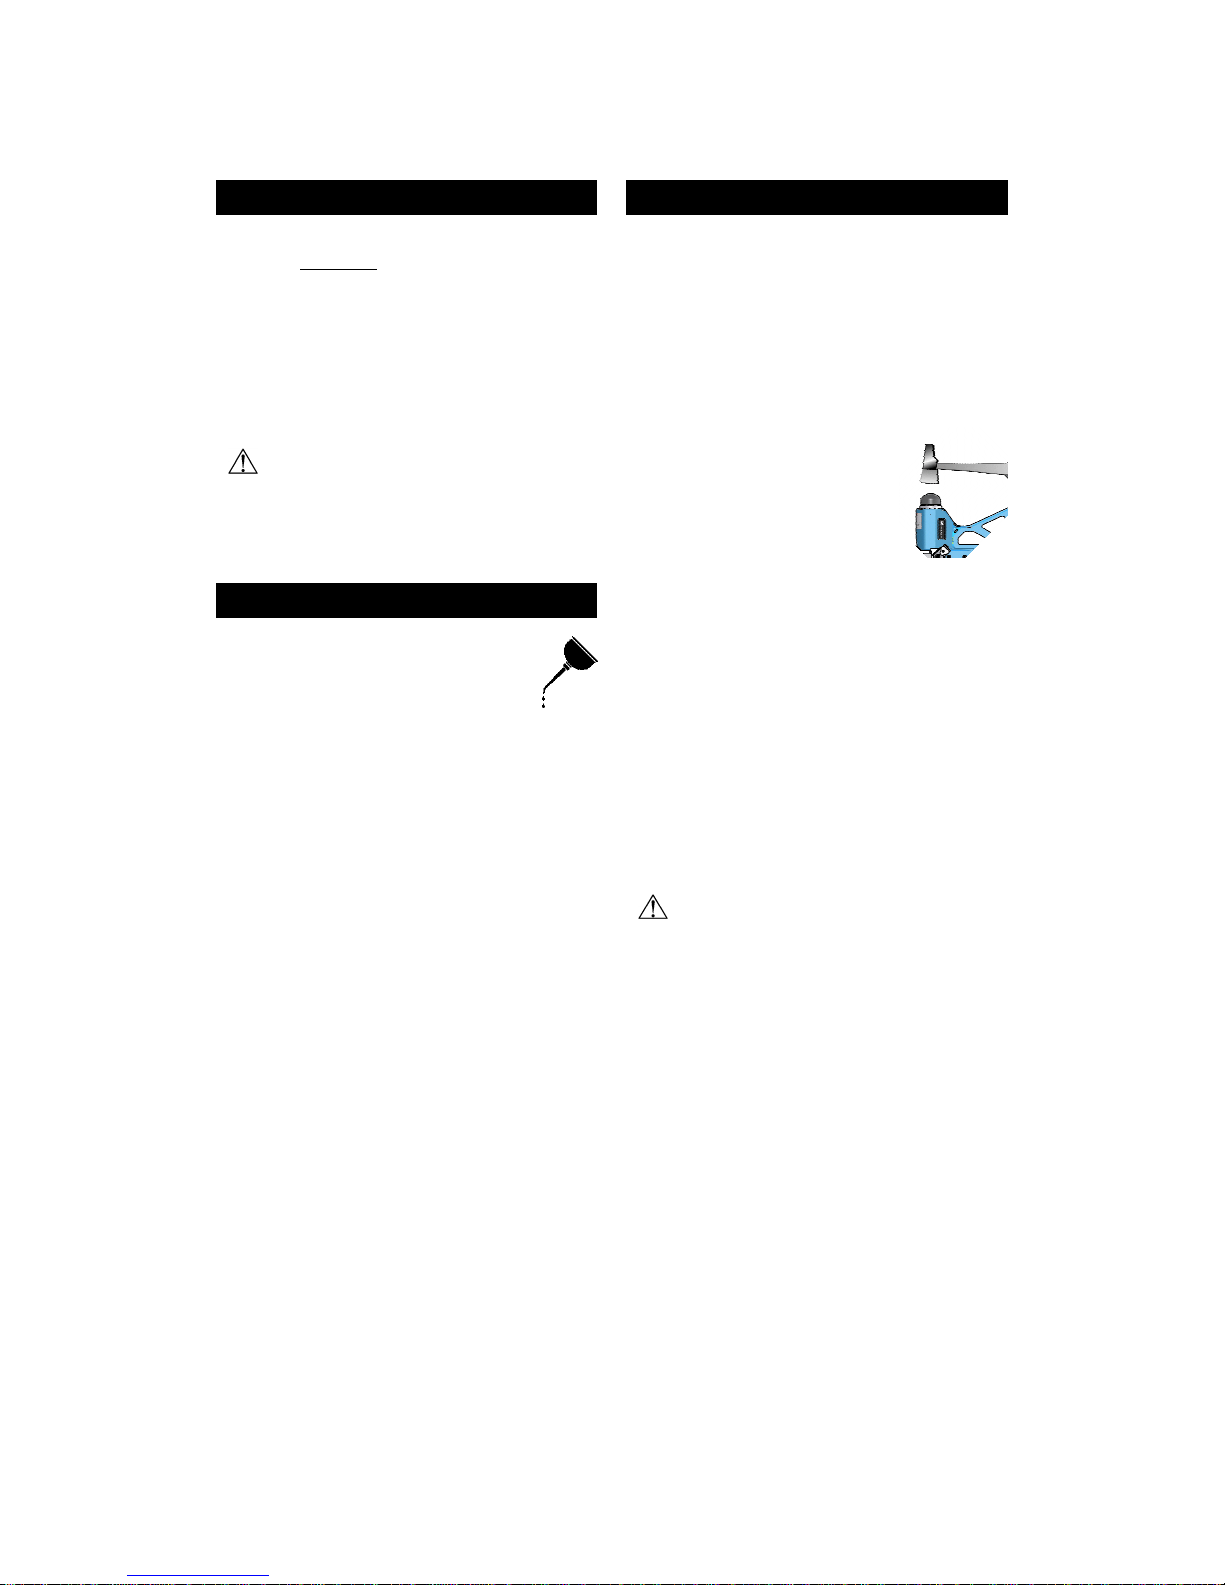
Useonlythe hammer supplied withthetool.Theuseof
other type ofhammersmayaffect performanceand
causepremature wear ofthe tool.The rubber faceof
the hammer can be used withcare tohelpposition the
boards.
Withthe flooring firmlyinplace,
position the tooltoengage the nail
ejectionarea ontothe frontedge of
the board.
Firmlyholdthe handleand applydownward and
backward pressure toensure proper seating ofthe
fastener.
Strikethe headcap withthe hammer toactivatethe
tool.
Use onlytherubberface ofthehammertoactivate
thetool. Using thesteelend will damagethetool
and voidthewarranty.
Neverstrikethe head cap when the toolisnotsitting on
the working surface.
Softcoresofengineeredproductsmaynotallowproper
deflection ef the edge nails.
Always fasten downfewboards toascertain
that the toolis properlyadjusted..

MAINTENANCE &REPAIR
Most adjustments tothetoolcan be made withthe
3/16" Allen wrenchsupplied withthe tool.
Disassemblyofthe toolmust be done inaclean
environment. Someparts can be easilydamaged if
disassembled withimproper toolsor byinadequate
methods. Maintenanceshouldonlybe performedby
trained personnel.Useonlygenuine Primatech
replacement parts.
Toprevent injury, ALWAYS disconnect the
airsupplyhosewhen servicing or
disassembling the tool.
When servicing the tool,do nottwistorforceanyparts.
Damage mayresultfromsuchabuse.Contact your
Primatechdistributor for more information.
When opening the toolfor maintenance,alwaysclean
all components ofdirt, grit, orparticles.Inspectthetool
carefullyfor brokenparts or excessivewear,and
replaceifnecessary.When ordering parts, be sure to
specify the rightpartnumber,aswell asthe toolserial
number.
After anymaintenancetothe tool, REMOVE
ALL Fasteners before connecting airand
actuatethe toolrepeatedlyover apieceof
wood or subflooring toinsure proper
operation.
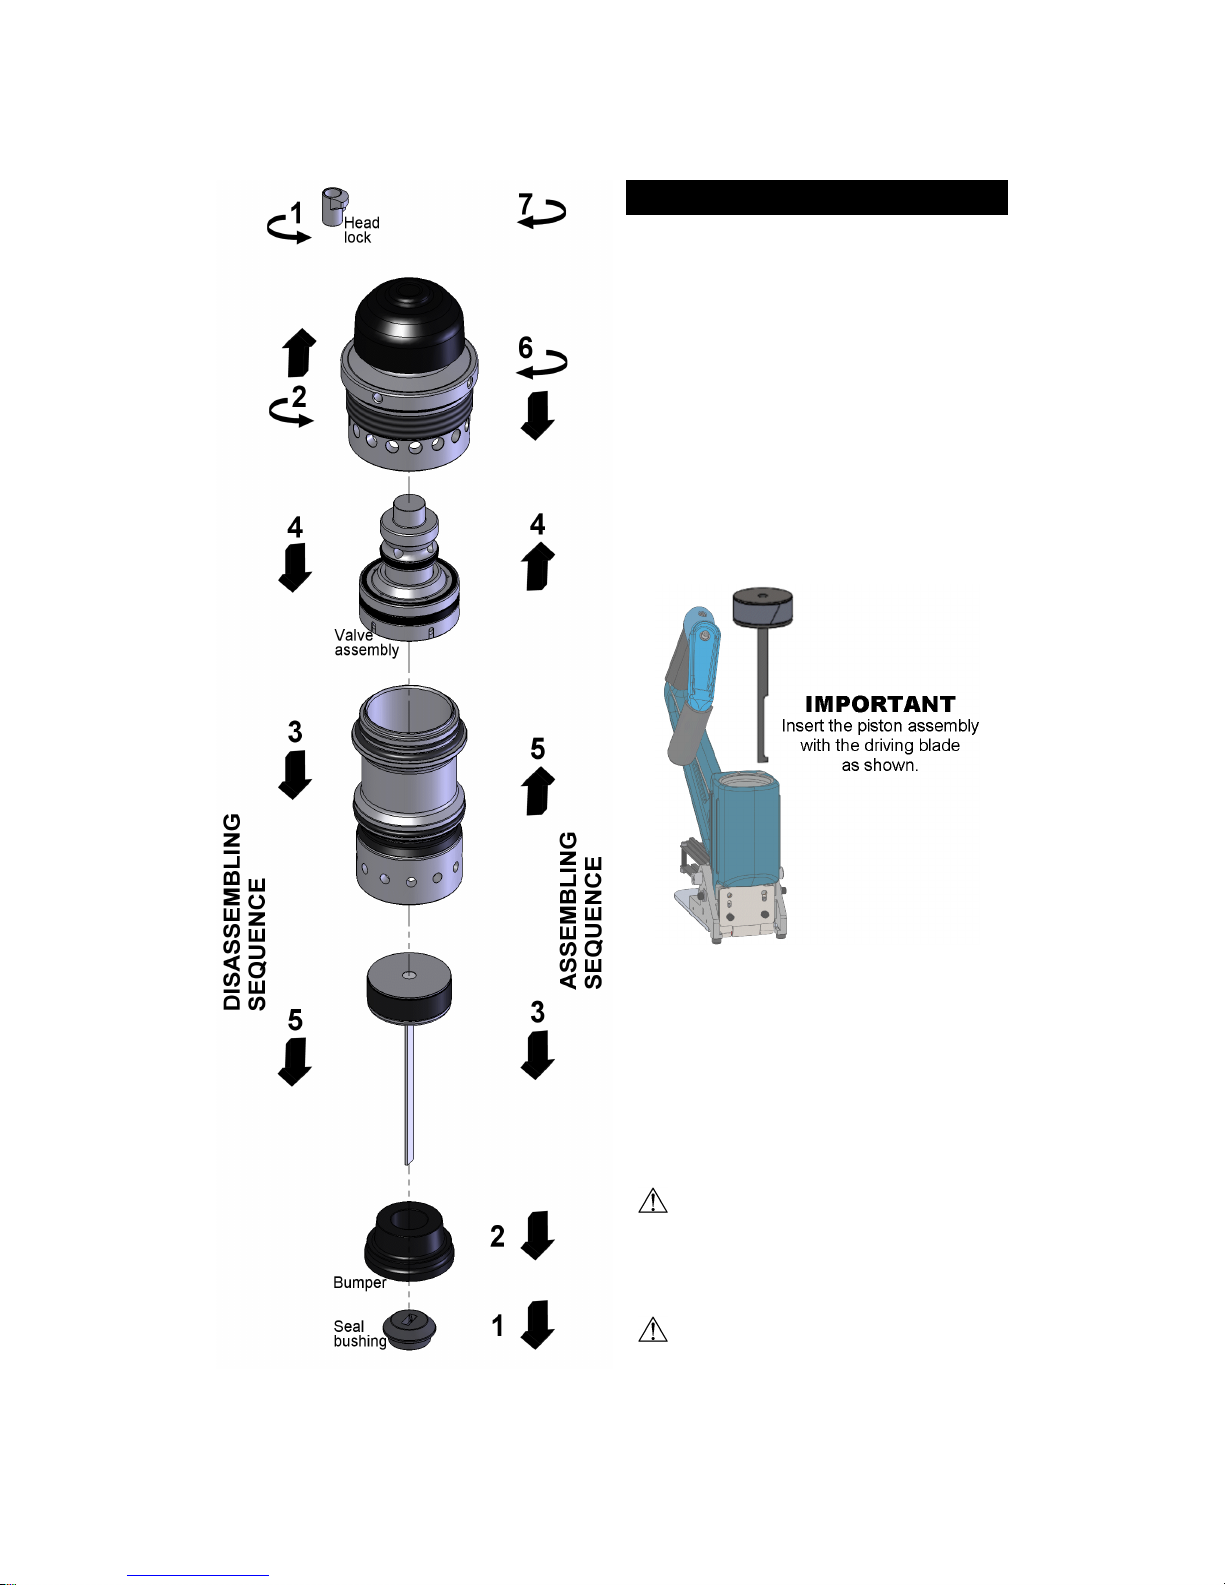
DISASSEMBLING THE TOOL
All pneumaticcomponents required are packed ina
moduleassemblywhichis simplyinserted & removed
fromthe tool.Thissection describeshowto
disassemblethetooltoaccessitsinternalcomponents.
[1]Loosen up the head lock and rotateit¼turn to
disengage it fromthe head.
[2]It isusuallynotnecessarytoremovethe head cap.
Simplyunscrewthe head completelyand takeout
the wholeassembly.You mayengage the long arm
ofthe Allen keyintoone ofthe side holesand use
it as alever.
[3]Pull outbyhand the cylinder fromthe head.Do not
usescrewdriver or vise.If the cylinder remainsinto
the mainbody, pull it out of it.
[4]Pull outthe valveassemblyfromthe head.Inspect
wear ring &lubricate.Do notattemptto
disassemblethe valveassembly.
[5]Pull outthe piston assembly;the bumper will also
comewithit. Inspect wear ring and lubricate.
Itisusuallynotnecessarytopull-outthesealbushing
for maintenance.
CLEANING THE VALVE
Ifthe toolbecomessluggishor doesnotsetthe
fastener correctly, it mayindicateexcessivedirt, dust,
other particles, or even water,inthe tool.The first step
introubleshooting is toclean up the head assembly.
•Disassemblethe head assemblyasdescribedin
previous section.
•Performavisualinspection ofthe valveassembly.
Ensure thatthe actuator issliding easily.Clean and
lubricatelightly.Do notattempttotakeapartthe
actuator assembly.
•Clean the inside wall ofthe head and lubricatelightly
withanon-detergentoil.Insertthevalveassembly
intothe head and ensure that it is sliding easily.
•Ensure the piston assemblyissliding easilyintothe
cylinder.It shouldoffer someresistance,butifit
movestoo easily,itmaybe required toreplacethe
piston wear-ring.
ASSEMBLING THE TOOL
Thissection describeshowtore-assemblethe tool
after maintenance.The following procedure assumes
thatthegate/footassemblyalongwiththeresting block
are alreadyinstalled.
[1]Insertthe sealbushing inthe lower section ofmain
bodyand engage itontothe upper portion ofthe
gate/footassembly.Aflatscrewdriver can help
locateitcorrectly.Usethe wooden handleofthe
hammertotapthesealbushingcompletelyinplace.
[2]Check &lubricatethe valveassembly.Insertinto
the head and ensure that it is sliding easily.
[3]Snap the cylinder ontothe head.Check thatthe
band-valveon the cylinder is properlyinstalled.
[4]Insertthe piston assemblyabout1"intothe bottom
end of the cylinder.
[5]Pushthe bumper intothe bottomend ofthe
cylinder.
[6]Withthe head lock loosened,engage thewhole
assemblyintothetool,withthe driving blade
engaged thru the opening ofthe sealbushing until
it engages completelyintogate/foot assembly.
Insertthe Alen keyintoone ofthe side holesand
screwthe head assemblycompletely.Takecare
not do damage the threads. Tighten byhand.
NEVERapplythreadlocker or adhesiveonto
head threads.
[7]Rotatethe head lock clockwiseand tighten with
moderateforcewiththe Allen key.
After reassembly, always actuatethe tool
repeatedlyWITHOUTFASTENERS against
apieceof wood toinsure proper operation.

TROUBLESHOOTING
TO PREVENTINJURY,ALWAYS
DISCONNECT THE AIR SUPPLY HOSE
WHEN ADJUSTING,SERVICING OR
DISASSEMBLING THE TOOL.
FIRST:CHECK THE COMPRESSED AIR SUPPLY
Manyofproblemscomefromafaultyor inadequate
compressed airsupply system.Before attempting to
repairthe tool,the following points shouldbe
checked:
•Checkthepressureattheoutputofthecompressor;
adjust to100-110 psi(7.0-7.6bar) as required.
•Checkthe tankpressureofthecompressor&adjust
the start/stop limits.
•Check the airdeliverysystem;a3/8"hoseis
recommended.
•Usefewer tools simultaneously;do not exceed the
capacityofthe compressor or ofthe delivery
system.
•Drainwater fromthe compressor.
SECOND:CHECK FOR AIR LEAKS
At rest, thistoolshouldnothaveanyairleaks. Before
attempting torepairthe tooland replaceparts, check
the following:
•Check all sealsinhead,valveand cylinder
assemblies; replaceif necessary.
•Check the top edge ofmaincylinder for burrsor
dents.
•Clean &lubricatethe head and valveassemblies;
re-assemblethe head assemblycarefully.
•Check the interior of the head for scratches.
A more comprehensivelist of tips and
hints at
http://ts.primatech.ca/tips
SCHEMATICS
Withyour toolSerialNumber at hand,
go toour support web sitetoretrieve
the schematic specific toyour tool:
http://ts.primatech.ca/900
For more information, contact technicalsupport:
byphone 1 (800) 363-1962
byemail support@primatech.ca
TOOL WARRANTYAND LIMITATIONS
Primatechwarrants thatnewlypurchased fastening
tools,partsandaccessorieswill be free fromdefectsin
materialand workmanship(excluding wear parts)for
the period shownbelow, after the dateof purchaseby
the originaluser asevidenced byavalidpurchase
invoice.
ONE-YEARLIMITEDWARRANTYwill applytoall
parts, except thosesubjected tonormalwear
SEVEN-YEAREXTENDEDLIMITEDWARRANTY
covers toolcasing.
WARRANTYSTATEMENT
Primatech‘ssoleliabilityhereunder will be toreplace
anypartor accessorywhichprovestobe defective
withinthespecifictimeperiod.Anyreplacementpartor
accessoriesprovided inaccordancewiththiswarranty
will carryawarrantyfor the remainder ofthe period of
warrantyapplicabletothepartitreplaces. When repair
or replacementofpartor toolisrequired,the complete
toolor part(s)must be returned toPrimatechoratsuch
authorized warrantyservicepointofPrimatech,
transportationprepaid,withacopyofproofofpurchase
evidencing thatthe partor tooliswithinthe warranty
period.Serial#must be intact and legiblefor warranty
toapply.
Thiswarrantyisvoidastoanytoolwhichhasbeen
subjected tomisuse,abuse,accidentalor intentional
damage,used withfastenersnotmeeting Primatech
specifications, sizeor quality,improperlymaintained,
repaired withother than genuine Primatech
replacementparts, damaged intransitor handling,or
which,inPrimatech‘ssoleopinion,hasbeen altered,
modified or repaired inawaythataffects or detracts
fromthe performanceof the tool.
PRIMATECHMAKESNOWARRANTY,EXPRESSED
ORIMPLIED,RELATINGTOMERCHANTABILITY,
FITNESS, OROTHERWISE, EXCEPTAS STATED
ABOVE, and Primatech‘sliabilityAS STATEDABOVE
AND AS ASSUMEDABOVE isinlieu ofall other
warrantiesarising outof, or inconnection with,the use
and performanceofthe tool,excepttothe extent
otherwiseprovided for byapplicablelaw.
PRIMATECH SHALL INNOEVENTBE LIABLE FOR
ANYDIRECT,INDIRECT,ORCONSEQUENTIAL
DAMAGES WHICHMAY ARISE FROMLOSS OF
ANTICIPATEDPROFITSORPRODUCTION,
SPOILAGEOF MATERIALS, INCREASEDCOSTOF
OPERATION,OROTHERWISE. Anyliability,ifany,
connected withthe useofthe toolshall terminateupon
the expiration of the warrantyperiod specified above.
Table of contents
Other primatech Nail Gun manuals


