PrimeCables Cab-CCS326 User manual

the cordless circular saw and save these instructions.
Please read the instructions carefully before operating
20V LITHIUM CORDLESS CIRCULAR SAW
ITEM: Cab-CCS326
T O O L S

2
CONTENTS
TECHNICALDATA
TECHNICAL DATA ............................................................................................
GENERAL SAFETY RULES ..............................................................................
SPECIFIC SAFETY RULES ...............................................................................
SAFETY PRECAUTIONS FOR THE CHARGER ...............................................
SAFETY PRECAUTIONS FOR THE BATTERY PACK .....................................
FUNCTIONAL DESCRIPTION............................................................................
OPERATION ......................................................................................................
MAINTENANCE .................................................................................................
PARTS LIST AND SCHEMATIC DRAWING ......................................................
P.2
P.3
P.4
P.5
P.6
P.6
P.7
P.11
P.12
Voltage: 20Volts DC
No load speed: 4000/min
Blade: 6-1/2"
Max cutting deepth: 2-1/8"
Battery: 1x20V 1.5Ah Li-ion Battery
Charger: 3-5 hours charger
Includes:
1Piece Circular saw
1Piece Ruler
1Piece Wrench
1Piece 20V Li-ion Battery
1Piece Battery Charger

3
GENERAL SAFETY RULES
!
1. WORK AREA
a. Keep work area clean and well lit. Cluttered and dark areas invite accidents.
b. Do not operate power tools in explosive atmospheres, such as in the
presence of flammable liquids, gases or dust. Power tools create sparks
which may ignite the dust or fumes.
c. Keep Children and bystanders away while operating a power tool.
Distractions can cause you to loose control.
2. ELECTRICAL SAFETY
a. Power tool plugs must match the outlet. Never modify the plug in any
way. Do not use any adapter plugs with earthed (grounded) power tools.
Unmodified plugs and matching outlets will reduce risk of shock.
b. Avoid body contact with earthed or grounded surfaces, such as pipes,
radiators, ranges and refrigerators. There is an increased risk of electric
shock if your body is earthed or grounded.
c. Do not expose power tools to rain or wet conditions. Water entering the
power tool will increase the risk of electric shock.
d. Do not abuse the cord. Never use the cord for carrying, pulling or
unplugging the power tool. Keep cord away from heat, oil, sharp edges
or moving parts. Damaged or entangled cords increase the risk of electric
shock.
e. When operating a power tool outside, use an outdoor extension cord
marked "W-A" or "W." These cords are rated for outdoor use and reduce the
risk of electric shock.
3. PERSONAL SAFETY
a. Stay alert, watch what you are doing and use common sense when
operating a power tool. Do not use a power tool while you are tired or
under the influence of drugs, alcohol or medication. A moment of inattention
while operating power tools may result in serious personal injury.
b. Use safety equipment. Always wear eye protection. Safety equipment such
as dust mask, non-skid safety shoes, hard hat, or hearing protection used for
appropriate conditions will reduce personal injuries.
c. Avoid accidental starting. Ensure the switch is in the off-position before
plugging in. Carrying power tools with your fingers on the switch or plugging
in power tools that have the switch in invites accidents.
d. Remove adjusting keys or switches before turning the tool on. A wrench
or a key that is left attached to a rotating part of the tool may result in
personal injury.
e. Do not overreach. Keep proper footing and balance at all times. This
enables better control of the power tool in unexpected situations.
f. Dress properly. Do not wear loose clothing or jewellery. Keep your hair,
clothing and gloves away from moving parts. Loose clothes, jewellery or
long hair can get caught in moving parts.
4. POWER TOOL USE AND CARE
a. Use clamps or other practical way to secure and support the workpiece
to a stable platform. Holding the work by hand or against your body is
unstable and may lead to loss of control.
WARNING: Read and understand all instructions. Failure to follow all instructions
listed below may result in electric shock, fire and/or serious personal
injury.

4
GENERAL SAFETY RULES
SPECIFIC SAFETY RULES
b. Do not force the power tool. Use the correct power tool for your
application. The correct power tool will do the job better and safer at the rate
for which it is designed.
c. Do not use the power tool if the switch does not turn it on and off. Any
power tool that cannot be controlled with the switch is dangerous and must be
repaired.
d. Disconnect the plug from the power source and/or the battery pack from
the power tool before making any adjustments, changing accessories,
or storing power tools. Such preventative safety measures reduce the risk
of starting power tools accidentally.
e. Store idle power tools out of reach of children and do not allow persons
unfamiliar with the power tool or these instructions to operate the power
tool. Power tools are dangerous in the hands of untrained users.
f. Maintain power tools. Check for misalignment or binding of moving
parts, breakage of parts and any other condition that may affect the
power tools operation. If damaged, have the power tool repaired before
use. Many accidents are caused by poorly maintained power tools.
g. Keep cutting tools sharp and clean. Properly maintained cutting tools with
sharp cutting edges are less likely to bind and easier to control.
h. Check for misalignment or binding of moving parts, breakage of parts
and any other condition that may affect the power tools operation. If
damaged, have the the tool serviced before using. Many accidents are
caused by poorly maintained power tools.
1. Do not start the saw with the blade in contact with any surface. The saw may
kickback suddenly and could cause injury.
2. Let the saw blade come to a stop before putting the tool down.
3. If abnormal noise or vibration occurs, turn off the saw immediately and have
the problem corrected before further uning the tool.
5. BATTERY TOOL USE AND CARE
a. Ensure the switch is in the off position before inserting the battery pack.
Inserting the battery pack into power tools that have the switch on invites
trouble.
b. Recharge only with the charger specified by the manufacturer. A charger
that is suitable for one type of battery pack may create a risk of fire when used
with another battery pack.
c. Use power tools only with specifically designed battery packs. Use of
any other battery packs may create a risk of injury or fire.
d. When battery pack is not in use, keep it away from other metal objects
like paper clips, coins, keys, nails, screws, or other small metal objects that
can make a connection from one terminal to another. Shorting the terminals
together may cause burns or a fire.
e. Under abusive conditions, liquid may be ejected from the battery; avoid
contact. If contact accidentally occurs, flush with water. If liquid contacts eyes,
additionally seek medical help. Liquid ejected from the battery may cause
irritation or burns.
6. SERVICE
a. Have your power tool serviced by a qualified repair person using only
indentical replacement parts.This will ensure that the safety of the power
tool is maintained.

5
SPECIFIC SAFETY RULES
9. Using a rip fence or straight edge guide when ripping.
10. Avoid cutting nails. Inspect for and remove all nails from lumber before cutting.
11. Do not run the saw while carrying it at your side.
12. Make certain the depth and bevel adjustments are tight and secure before
making cutting.
13. Do not use damaged or dull blades. Unsharpened or improperly set blades
produce a too-narrow kerf, causing excessive friction, blade binding, and
kickback.
14. Always use blades with correct-sized bore. Never use defective or incorrect
blade washers or bolts.
15. When the blade is pinched or bound tightly by the kerf closing down, the blade
stalls and the mottor reaction drives the unit rapidly back toward the operator.
16. If the blade becomes twisted or mis-aligned in the cut, the teeth at back edge
of the blade can dig into the top surface of the wood, causing the blade to climb
out of the kerf and jump back towards the operator.
17. Using dull blades or improperly supported work will increase the tendency for
kickback.
1. Before using the charger, read all instructions and cautionary markings on the
charger and batterypack as well as the instructions on using the battery pack.
2. Ensure that the power source conforms to the requirements stated on the
name plate of the charger. Only charge your batteries indoors as the charger is
designed for indoor use only.
3. The charger and the battery packs supplied with are specifically designed to
work together. Do not attempt to charge the battery pack with another charger
than the one supplied.
4. Pull on the plug to disconnect it from the power source. Do not pull the lead.
5. Do not use the charger if it has been subjected to a heavy knock, dropped or
otherwise damaged in any way. Take the charger to an authorised service
centre for a check or repair.
6. Do not disassemble the charger. Take it to an authorised service centre when
service or repair is required. Incorrect re-assembly may result in the risk of fire,
electric shock or electrocution.
DANGER: If the battery pack is cracked damaged in any other way, do not insert
it in the charger. There is a danger of electric shock or electrocution.
WARNING: Do not allow any liquid to come into contact with the charger. There
is a danger of electric shock.
!
!
SAFETY PRECAUTIONS FOR THE CHARGER
Keep hands away from cutting area and blades. NEVER place your
hand behind the saw blade since kickback could cause the saw to
jump backwards over your hand. Keep your body positioned to either
side of the saw blade.
DANGER:
4. Check lower guard for proper closing before each use.
5. Keep your free hand on the motor housing or the forward auxiliary handle,
not near the blade.
6. Support the work properly before starting and hold the saw firmly during the
cut to prevent loss of control, which could cause personal injury.
7. Making blind “pocket cuts” into existing walls or other hidden areas is
dangerous.
8. When cutting is interrupted, or blade is binding, release the trigger
immediately and hold the saw firmly in the material until the blade comes to
a complete stop.
!

6
FUNCTIONAL DESCRIPTION
A
B
C
D
E
F
G
H
I
J
K
. Motor Housing
. Spindle Lock Button
. Lower Guard
. Arbor Bolt
. Base Plate
. Shoft Grip
. Trigger Switch
. Lower Guard Lever
. Upper Saw Guard
. Cutting Depth Adjustment Lever
. Lock On Button
L. Cutting Angle Adjustment Knob
SAFETY PRECAUTIONS FOR THE BATTERY PACK
3. A small leakage of liquid from the battery pack may occur under extreme
usage or temperature conditions. This does not necessarily indicate the failure
of the battery pack. However, if the outer seal is broken and this leakage
comes into contact with your skin wash the affected area quickly with soap and
water. If the leakage gets in your eyes flush your eyes with clean water for a
minimum of 10 minutes and seel immediate medical attention, inform the
medical staff that the liquid is a 25-35% solution of potassium hydroxide.
4. Never attempt to open the battery pack for any reason. If the plastic housing
of the battery pack breaks open or cracks, immediately discontinue its use
and do not recharge it.
5. Do not store or carry a spare battery pack in a pocket or toolbox or any other
place where it may come into contact with metal objects. The battery pack
may be short-circuited causing damage to the battery pack, burns or a fire.
7. To reduce the risk of electric shock, unplug the charger from the power supply
before attempting to clean it. Removing the battery alone does not reduce the
risk.
SAFETY PRECAUTIONS FOR THE CHARGER
1. The battery pack for this tool has been shipped in a low charge condition. You
should charge the battery pack fully before use.
2. Do not incinerate the battery pack if it is seriously damaged or can no longer
hold a charge. The battery pack can explode in a fire. Contact your local
council for disposal advice.
8. This power unit is intended to be correctly orientated in a vertical or floor mount
position.
A
K
G
F
I
B
JL
H
D
CE

7
OPERATION
!
!
CHARGING THE BATTERY
WARNING: Always ensure the battery is disconnected from the drill before making
any adjustments.
WARNING: Some dust created by power sanding, sawing, grinding, drilling and other
construction activities contains chemicals known to cause cancer, birth
defects and other reproductive harm. Some examples of these chemicals
are: a) Lead from lead based paints.
b) Cement and other masonry products.
c) Chemically treated timbers.
Batteries must be fully charged before the first use. It is recommended that you
NOTE: This Lithium-Ion battery pack is shipped partially charged. Fully charge the
battery pack before using it for the first time.
A fully discharged battery pack will charge in about 3-5 hours at a temperature
between 32 °F (0° C) and 104°F (40°C).
• Put the battery pack in the charger stand. Make sure it is placed correctly (+ and -)
• The battery charger consists of two parts.
1. A AC/DC adaptor. (part# 7 of the picture on page 4)
2. A charging stand. (part# 8 of the picture on page 4)
• Insert the AC/DC adaptor into household current receptacle. The green light is on.
The green light is the power indicator.
• Properly insert the battery pack into the charge stand. Make sure it is placed
correctly(+ and -). The red light is on. The red light is the charge indicator.
• Normal charging time is 3-5 hours. When the battery is fully charge, the red light
will turn off.
• When charging more than one battery pack in succession, allow 15 minutes
between charges.
STARTING/STOPPING THE SAW
To start the saw:
• Depress the lock-off button.
• Depress the switch trigger.
Always let the blade reach full speed, then guide the saw into the workpiece.
WARNING:
The blade coming in contact with the workpiece before it reaches full speed could cause the
saw to kick back towards you resulting in serious injury.
charge the battery for 1 hour for the initial charge. To obtain maximum energy,
ensure the batteries are fully discharged of all power before re-charging for the
first 5 or 6 charges. The batteries must also be charged for a full hour during this
time. Ensure the saw being used is appropriate for the intended function and that
it is installed correctly.
!
!
NOTE: The operation time of a new battery will ramp up as it is properly used and
recharged.
IMPORTANT:
•The battery should be recharged when the saw does not operate up to it’s normal
performance level. Do not continue to use the drill when this occurs. Recharge the
battery at least every 6 months.
•Overcharging may reduce the life of the battery. Do not leave the battery charging
for more than 1 hour.
•Never charge a battery pack again immediately it has been charged.
•If the saw is not used, the battery will lose it’s power capacity. To ensure maximum
performance, recharge the battery after prolonged storage or non-use periods. If
charging more than one battery, wait at least fifteen minutes between each charge.
!

8
OPERATION
!
To stop the saw: release the switch trigger.
After you release the switch trigger, allow the blade to come to a complete stop. Do
not remove the saw from the workpiece while the blade is moving.
LOCK-OFF BUTTON
The lock-off button reduces the possibility of accidental starting. The lock-off button
is located on the handle above the switch trigger. The lock-off button must be
depressed before you pull the switch trigger. The lock resets each time the trigger
is released.
NOTE: You can depress the lock-off button from either the left or right side.
KICKBACK
Kickback occurs when the blade stalls rapidly and the saw is driven back towards you.
Blade stalling is caused by any action which pinches the blade in the wood.
DANGER:
Release switch immediately if blade binds or saw stalls. Kickback could cause you to
lose control of the saw. Loss of control can lead to serious injury.
To guard against kickback, avoid dangerous practices such as the following:
• Setting blade depth incorrectly.
• Sawing into knots or nails in workpiece.
• Twisting the blade while making a cut.
• Making a cut with a dull, gummed up, or improperly set blade.
• Supporting the workpiece incorrectly.
• Forcing a cut.
• Cutting warped or wet lumber.
• Operating the tool incorrectly or misusing the tool.
To lessen the chance of kickback, follow these safety practices:
• Keep the blade at the correct depth setting. The depth setting should not exceed 1/4
in. below the material being cut.
• Inspect the workpiece for knots or nails before cutting. Never saw into a knot or nail.
• Make straight cuts. Always use a straight edge guide when rip cutting. This helps
prevent twisting the blade.
• Use clean, sharp, and properly set blades. Never make cuts with dull blades.
• Support the workpiece properly before beginning a cut.
• Use steady, even pressure when making a cut. Never force a cut.
• Do not cut warped or wet lumber.
• Hold the saw firmly with both hands and keep your body in a balanced position so as
to resist the forces if kickback should occur.
WARNING:
When using the saw, always stay alert and exercise control. Do not remove the saw
from the workpiece while the blade is moving.
Blade Installation
• REMOVE THE BATTERY FROM THE CIRCULAR SAW.
• Use Supplied Wrench.
• Depress the spindle lock.
• Using the wrench, remove the blade bolt by turning it counterclockwise.
• Remove the outer flange washer.
• Slide the blade inside the lower blade guard and onto the spindle. The saw
teeth point upward at the front of the saw.• Replace the outer flange washer.
• Depress the spindle lock and replace the blade bolt.• Tighten the blade bolt
securely by turning it clockwise with the wrench.
• Place the wrench in the storage area.
9
OPERATION
WARNING: If, while operating the saw, the cord hangs up on the work piece or
other object during a cut, release the switch trigger immediately.
Unplug the saw and reposition the cord to prevent it from hanging up
again.
!
WARNING: Always be sure that the battery is removed from the tool before making any
adjustments. !
!
Adjusting the Depth of Cut
• REMOVE ATTERY FROM THE CIRCULAR SAW.
• Loosen the lever on the depth guide at the back of saw.
• Move the base up or down to the desired depth as indicated on the Depth of Cut Scale.
• Raise the lower blade guard and place the saw base on the work piece to be cut with
the saw blade positioned against the edge. Hold the saw base
surface, then raise or lower the m
down on the work piece
otor housing to
the work piece edge
obtain the desired depth of cut using
as a reference.
• Secure the base by tightening the lever.
ADJUSTING THE BEVEL SETTING
• Loosen the Bevel bevel adjusting konb.
• Raise the motor housing end of the saw until you reach the desired angle setting on the bevel scale.
•Tighten the bevel adjusting konb securely.
Removing the Blade
• REMOVE ATTERY FROM THE CIRCULAR SAW.
• Use Supplied Wrench.
• Depress the spindle lock.
• Remove the blade bolt by turning it counterclockwise with the wrench.
• Remove the outer flange washer.
• Lift the lower blade guard.
• Remove the blade from the spindle and o
BLADE GUARD SYSTEM
The lower blade guard attached to the circular saw is there for your protection and safety.
Do not alter it for any reason. If it becomes damaged, do not operate the saw until you
have the guard repaired or replaced. Always leave guard in operating position when using
the saw.
DANGER:
When sawing through work, lower blade guard does not cover blade on the underside of
work. Since blade is exposed on underside of work, keep hands and fingers away from
cutting area. Any part of your body coming in contact with moving blade will result in
serious injury.
CAUTION:
Never use saw when guard is not operating correctly. Check the guard for correct operation
before each use. The guard is operating correctly when it moves freely and readily returns
to the closed position. If you drop the saw, check the lower blade guard and bumper for
damage at all depth settings before reuse.
ff the saw.
CATUION: DO NOT OVER TIGHTEN. !
10
OPERATION
Cross-Cutting and Rip Cutting
Cutting directly across the grain of a piece of wood is called crosscutting
and is likely the most common type of cut done with a circular saw.
Cutting wood lengthwise, or “with” the grain, is called rip cutting. However,
it’s most often referred to simply as ripping.
Both types of cuts are performed in the same manner with the exception of
the methods used to support and secure the work piece for cutting. After you
have secured the work piece in position with clamps or similar devices,
prepared the work area, positioned the cord so it won’t be cut or become
hung up, performed the saw set up adjustments, made the necessary
measurements, drawn a straight guideline, and put on your eye protection,
you can begin the cutting operation.
• Hold the tool firmly using both the front grip and rear handle. Use both
gripping areas to best hold and control the saw. If both hands are holding
the saw, they cannot be cut by the blade.
• Set the front portion of the saw’s base on the work piece to be cut without
the blade making any contact. Align the line-of-cut indicator notch on the right
side of the base with your guideline.
POCKET CUTTING
WARNING:
Always adjust bevel setting to zero before making a pocket cut. Attempting a
pocket cut at any other setting can result in loss of control of the saw possibly
causing serious injury.
• Adjust the bevel setting to zero.
• Set the blade to the correct blade depth setting.
• Swing the lower blade guard up using the lower blade guard handle.10 English
NOTE: Always raise the lower blade guard with the handle to avoid serious injury.
• Hold the lower blade guard by the handle.
WARNING:
Never extend your fingers while holding the lower blade guard handle. Extending
your fingers could result in contact with the blade, causing serious injury.
• Rest the front of the base flat against the workpiece with the rear of the handle
raised so the blade does not touch the workpiece.
• Start the saw and let the blade reach full speed.
• Guide the saw into the workpiece and make the cut.
WARNING:
Always cut in a forward direction when pocket cutting. Cutting in the reverse
direction could cause the saw to climb up on the workpiece and back toward you.
• Release the trigger and allow the blade to come to a complete stop.
• Lift the saw from the workpiece.
• Clear corners out with a hand saw or sabre saw.
WARNING:
Never tie the lower blade guard in a raised position. Leaving the blade exposed
could lead to serious injury.
!
!
!

1. Keep
11
the vents clear
WARNING: To prevent accidental starting that could cause serious personal injury, always
remove the battery pack from the product when making adjustments.
0° BEVEL STOP
The saw has a 0° bevel stop that has been factory adjusted to assure 0° angle of the saw
blade plate when making 90° cuts.
CHECKING 0° BEVEL STOP
• Remove battery pack.
• Place the saw in an upside down position on a workbench.
• Check the squareness of the saw blade plate to the base of the saw using a carpenter’s
square.
ADJUSTING 0° BEVEL STOP
• Remove battery pack.
• Loosen bevel lock knob.
• Loosen hex nut securing adjusting screw.
• Turn adjusting screw and adjust base until square with saw blade.
• Tighten hex nut and bevel lock knob securely.
WARNING:
Attempting a bevel cut without having the bevel adjustment knob securely tightened can
result in serious injury.
of dust and debris. This will help prevent possible
electrical shorts and ensure proper cooling.
2. Keep the tool housing clean, free of oil and grease by using mild soap and
a damp (not wet) cloth.
3. Inspect the cord regularly and have it replaced by an authorized repair
facility if it is damaged.
4. Lubrication for this tool is done at the factory and should not be necessary
again under normal use.
5. An authorized repair center should do any repairs, modification, or
maintenance that involve disassembling the tool.
6. Any damage to the tool should be corrected at an authorized repair center.
MAINTENANCE
OPERATION
!
!

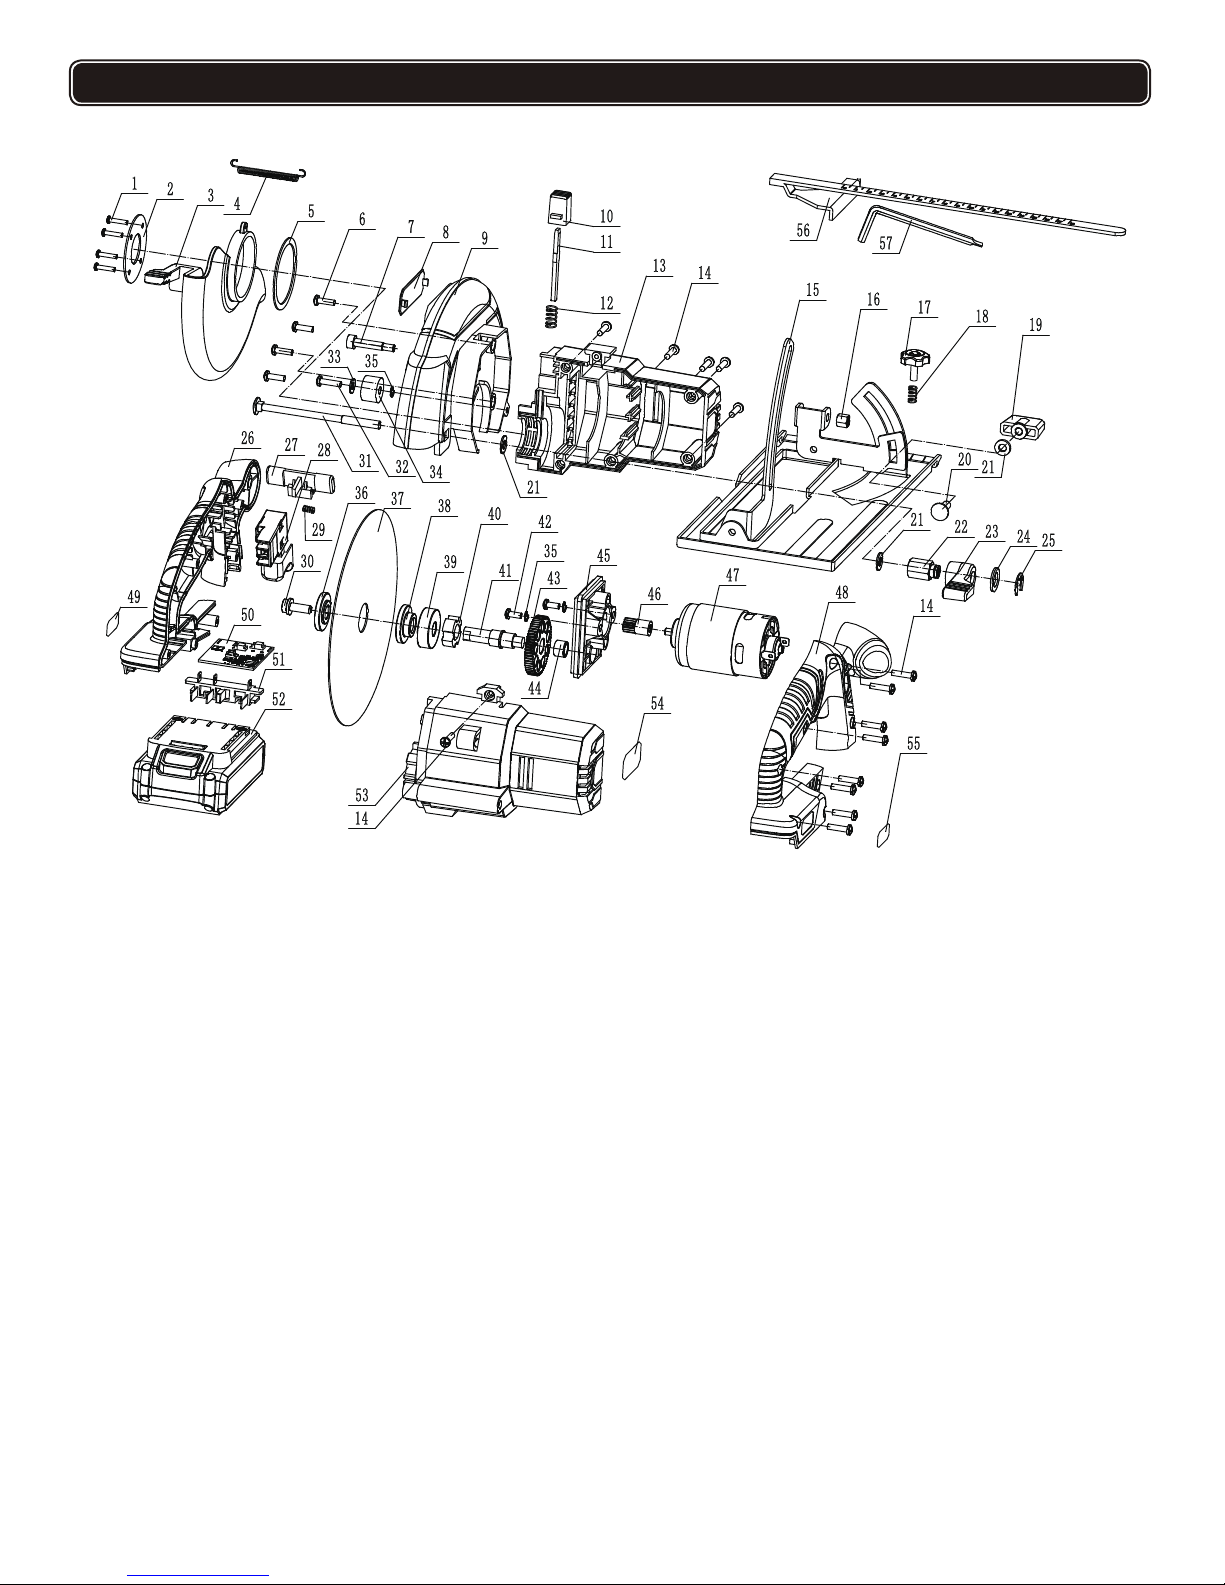
PARTS LIST AND SCHEMATIC DRAWING
NO DESCRIPTION
1 Screw
2 Plate
3 Lower Guard
4 Spring
5 Retainer Ring
6 Screw
7 Sawing Cover Screw
8 Label
9 Upper Saw Guard
10 Spindle Lock Button
11 Spindle Lock Rod
12
12
Spindle Lock Spring
13 Housing(Right)
14 Screw
15 Base Plate
16 Nut
17 Locking Knob
18 Compression Spring
19 Angle Locking Knob
20 Bolt
21 Flat Gasket
22 Nut
23 Flat Gasket
24 Cutting Depth Adjusting Knob
25 Circlip
26 Left handle
27 Switch Lock Button
28 Switch
29 Switch Lock Spring
30 Bolt
31 Cutting Depth Adjusting Rob
32 Screw
33 Flat Gasket
34 Limit Column
35 Spring Gasket
36 outer flange washer
37 Saw Blade
38 washer
39 Bearing
40 Locking Block
41 Output Shaft
42 Screw
43 Gear
44 Bearing
45 Motor Support
46 Gear Wheel
47 Motor
48 Right Handle
49 Label
50 PCB
51 Battery pack pins
52 Battery pack Components
53 Left Housing
54 Label
55 Label
56 Guide Ruler
57 Hex key
PARTS LIST AND SCHEMATIC DRAWING
13

Veuillez lire attentivement les instructions avant d'utiliser la
scie circulaire sans fil et conservez ces instructions.
SCIE CIRCULAIRE SANS FIL AU LITHIUM 20V
ARTICLE: Cab-CCS326
T O O L S

CATALOGUE
ONNÉES TECHNIQUES
DONNÉES TECHNIQUES ............................................................................................ P.15
RÈGLES GÉNÉRALES DE SÉCURITÉ ....................................................................... P.16
RÈGLES DE SÉCURITÉ PARTICULIÈRES
................................................................. P.18
PRÉCAUTIONS DE SÉCURITÉ POUR LE CHARGEUR
............................................
P.18
PRÉCAUTIONS DE SÉCURITÉ POUR LE BLOC-BATTERIE .................................... P.19
DESCRIPTION FONCTIONNELLE
............................................................................... P.19
OPÉRATION
.................................................................................................................. P.20
MAINTENANCE ............................................................................................................ P.24
LISTE DES PIÈCES ET DESSINS SCHEMATIQUES
................................................. P.25
Ension: 20Volts Courant Continu
Vitesse à vide: 4000 / min
Lame: 6-1 / 2 "
Profondeur de coupe max: 2-1 / 8
Batterie: Batterie Li-ion 1x20V 1.5Ah
Chargeur: Charge de 3-5 heures
Inclut :
1 Pièce Scie Circulaire 1 Pièce Règle 1 Pièce Clef
1 Pièce Batterie Li-ion 20V 1 Pièce Chargeur de Batterie
15

1. ZONE DE TRAVAIL
a. Gardez la zone de travail propre et bien éclairée. Les endroits encombrés ou sombres sont
propices aux accidents.
b. Ne mettez pas en marche votre outil dans un environnement explosif, ou en présence de
liquide inflammable, de gaz, ou de poussière. b.Les outils électriques crée des étincelles qui
peuvent faire exploser la poussière ou les vapeurs.
c. Tenez les enfants et les spectateurs à l'écart lorsque vous utilisez un outil électrique. Les
distractions peuvent vous faire perdre le contrôle.
2. SÉCURITÉ ÉLECTRIQUE
a. Les fiches de l'outil électrique doivent correspondre à la prise. Ne modifiez jamais la fiche
de toute façon. N'utilisez pas de fiches d'adaptateur avec des outils électriques mis à la terre.
Les fiches non modifiés et les prises correspondantes réduisent le risque de choc.
b. Évitez tout contact du corps avec des surfaces mises à la terre, telles que des tuyaux, des
radiateurs, des cuisinières et des réfrigérateurs. Il existe un risque accru de choc électrique
lorsque votre corps est mis à la terre.
c. N'exposez pas les outils électriques à la pluie ou à l'humidité. L'eau pénétrant dans l'outil
électrique augmentera le risque de choc électrique.
d. N'abusez pas le cordon. N'utilisez jamais le cordon pour transporter, tirer ou débrancher
l'outil électrique. Tenez le cordon éloigné de la chaleur, de l'huile, de bordures coupantes ou de
pièces d'appareil mobiles. Les cordons endommagés ou emmêlés augmentent le risque de choc
électrique.
e. Lorsque vous utilisez un outil électrique à l'extérieur, utilisez une rallonge extérieure
marquée W-A ou W. Ces cordons sont conçus pour une utilisation en extérieur et réduisent le
risque de choc électrique.
3. SÉCURITÉ PERSONNELLE
a. Restez vigilant, surveillez ce que vous faites et utilisez les sens commun lorsque vous
opérez un outil électrique. N'utilisez pas d'outils lorsque vous êtes fatigué ou sous l'influence de
drogues, d'alcool ou de médicaments. Un moment d'inattention lors de l'utilisation d'outils
électriques peut entraîner des blessures graves.
b. Utilisez l’équipement de sécurité. Portez toujoursdes lunettes de protection. Les
équipements de sécurité tels que les masques antipoussières, les chaussures de sécurité
antidérapantes, les casques ou les protections auditives utilisés dans des conditions appropriées
réduisent les risques de blessures corporelles.
c. Évitez les démarrages accidentels. Assurez-vous que l'interrupteur est en position d'arrêt
avant de brancher. Porter un outil électrique avec un doigt sur l'interrupteur ou insérer un outil
électrique avec un interrupteur de marche peuvent provoquer des accidents.
d. Retirez les clés de réglage ou les interrupteurs avant de mettre l'outil en marche. Une clef ou
une clé laissée attachée à une partie rotative de l'outil peut entraîner des blessures.
e. Ne pas dépasser. Gardez toujours une position assurant un équilibre parfait. Cela permet un
meilleur contrôle de l'outil électrique dans des situations inattendues.
f. Habillez-vous proprement. Ne portez pas de vêtements amples ou de bijoux. Gardez vos
cheveux, vos vêtements et vos gants éloignés des pièces mobiles. Les vêtements amples, les
bijoux ou les cheveux longs peuvent être pris dans les pièces mobiles.
4. UTILISATION ET SOIN DE L'OUTIL ÉLECTRIQUE
a. Utilisez des pinces ou d'autres moyens pratiques pour fixer et soutenir la pièce à usiner sur
une plate-forme stable. Tenir le travail à la main ou contre votre corps est instable qui peut
entraîner une perte de contrôle.
RÈGLES GÉNÉRALES DE SÉCURITÉ
16
!AVERTISSEMENT : Lisez et comprenez toutes les instructions. Le non-respect de toutes les
instructions listées ci-dessous peut entraîner un choc électrique, un incendie
et/ou des blessures.

b. Ne forcez pas l'outil électrique. Utilisez l'outil électrique approprié pour votre application.
L'outil électrique correct fera le travail mieux et plus sûr au rythme conçu.
c. Ne pas utiliser l'outil si l'interrupteur ne le met pas en marche et à l'arrêt. Tout outil
électrique qui ne peut pas être contrôlé par l'interrupteur est dangereux et doit être réparé.
d. Débranchez la fiche de la source d'alimentation et / ou le bloc-batterie de l'outil
électrique avant d'effectuer des réglages, de changer d'accessoire ou de ranger des
outils électriques. De telles mesures de sécurité préventives réduisent le risque de démarrage
accidentel des outils électriques.
e. Stockez les outils électriques inutilisés hors de la portée des enfants et ne permettez pas
à des personnes non familières avec l'outil électrique ou avec les instructions d'utiliser
l'outil électrique. Les outils électriques sont dangereux entre les mains d'utilisateurs non formés.
f. Maintenezles outils électriques. Vérifiez le désalignement ou le grippage des pièces
mobiles, la cassure des pièces et de toute autre condition pouvant affecter le
fonctionnement des outils électriques. Si endommagé, faites réparer l'outil électrique avant de
l'utiliser. De nombreux accidents sont causés par des outils électriques mal entretenus.
g. Gardez les outils de coupe tranchants et propres. Des outils de coupe entretenus
correctement avec des bords tranchants ont moins de chance de se lier et sont plus faciles à
contrôler.
h. Vérifiez le désalignement ou le grippage des pièces mobiles, la cassure des pièces et de
toute autre condition pouvant affecter le fonctionnement des outils électriques. Si
endommagé, faites réparer l'outil avant de l'utiliser. De nombreux accidents sont causés par des
outils électriques mal entretenus.
5. UTILISATION ET SOIN DE L'OUTIL DE BATTERIE
a. Assurez-vous que l'interrupteur est en position d'arrêt avant d'insérer la batterie. L’insertion
de la batterie dans les outils électriques avec l'interrupteur sur la position « ON » provoque des
problèmes.
b. Rechargez uniquement avec le chargeur spécifié par le fabricant. Un chargeur adapté à un
type de batterie peut créer un risque d'incendie lorsqu'il est utilisé avec une autre batterie.
c. Utilisez des outils électriques uniquement avec des batteries spécialement conçues. L'utilisation
de toute autre batterie peut créer un risque de blessure ou d'incendie.
d. Lorsque la batterie nest pas utilisée, éloignez-la des autres objets métalliques tels que des
trombones, des pièces de monnaie, des clés, des clous, des vis ou dautres petits objets
métalliques pouvant établir une connexion entre deux bornes. Le court-circuit des bornes peut
provoquer des brûlures ou un incendie.
e. Dans des conditions abusives, le liquide peut être éjecté de la batterie; évitez le contact. En cas
de contact accidentel, rincez-vous à l'eau. Si le liquide contacte les yeux, consultez un médecin. Le
liquide éjecté de la batterie peut provoquer une irritation ou des brûlures.
6. LE SERVICE
a. Faites réparer votre outil électrique par un réparateur qualifié en utilisant seulement des pièces
de rechange indentiques. Cela garantira que la sécurité de l'outil électrique .
RÈGLES GÉNÉRALES DE SÉCURITÉ
17

1. Ne démarrez pas la scie avec la lame en contact avec une surface quelconque. La scie peut
rebondir soudainement et causer des blessures.
2. Laissez la lame de scie s'arrêter avant de poser l'outil.
3. Si un bruit ou une vibration anormale se produit, éteignez immédiatement la scie et corrigez le
problème avant de re-démarrer l'outil.
Gardez les mains à l'écart de la zone de coupe et des lames. Ne placez JAMAIS votre
main derrière la lame de la scie, car un rebond pourrait faire reculer la scie par-dessus
votre main. Gardez votre corps positionné d'un.
Si la batterie est endommagée de toute manière, ne l'insérez pas dans le chargeur. Il
existe un risque de choc électrique ou d’électrocution.
Ne laissez aucun liquide contacte le chargeur. Il existe un risque d'électrocution.
3. Le chargeur et les blocs-batteries fournis sont spécifiquement conçus pour fonctionner ensemble.
N'essayez pas de charger la batterie avec un autre chargeur que celui fourni.
RÈGLES DE SÉCURITÉ PARTICULIÈRES
PRÉCAUTIONS DE SÉCURITÉ POUR LE CHARGEUR
4. Vérifiez que la protection inférieure est correctement fermé avant chaque utilisation.
5. Gardez votre main libre sur le carter du moteur ou sur la poignée auxiliaire avant, pas près de la
lame.
6. Soutenez la pièce à usiner correctement avant de commencer, et maintenez la scie fermement
pendant la coupe pour éviter la perte de contrôle, ce qui pourrait causer des blessures.
7. Faire des "coupures de poche" aveugles dans les murs existants ou dans d'autres zones cachées
est dangereux.
8. Lorsque la coupe est interrompue ou que la lame est coincée, relâchez immédiatement la gâchette
et maintenez fermement la scie dans le matériau jusqu'à ce que la lame s'arrête complètement.
9. En utilisant un guide de refente ou de bord droit lors de la scie.
10. Évitez de couper les ongles. Inspectez et enlevez tous les clous du bois avant de couper.
11. Ne faites pas fonctionner la scie en la portant à vos côtés.
12. Assurez-vous que les réglages de profondeur et de biseau sont serrés et sécurisés avant
d'effectuer la coupe.
13. N'utilisez pas de lames endommagées ou émoussées. Les lames non affûtées ou mal réglées
produisent un trait de scie trop étroit, provoquant un frottement excessif, un grippage de la lame et
un rebond.
14. Utilisez toujours des lames avec un alésage de taille correcte. N'utilisez jamais de rondelles ou de
boulons de lame défectueux ou incorrects.
15. Lorsque la lame est pincée ou attachée fermement par la saignée qui se ferme, la lame et le
moteur entraîne rapidement l'unité vers l'opérateur.
16. Si la lame est tordue ou mal alignée dans la coupe, les dents du bord arrière de la lame peuvent
s'enfoncer dans la surface supérieure de bois, faisant sortir la lame de saignée et rebondir vers
l'opérateur.
L'utilisation de lames émoussées ou de la pièce à usiner mal supporté augmentera la tendance
au rebond.
1. Avant d'utiliser le chargeur, lisez toutes les instructions et les étiquettes d'avertissement sur le
chargeur et la batterie, ainsi que les instructions d'utilisation de la batterie.
2. Assurez-vous que la source d'alimentation est conforme aux exigences indiquées sur la plaque
signalétique de chargeur. Ne rechargez vos batteries qu'à l'intérieur, car le chargeur est conçu
pour une utilisation en intérieur uniquement.
18
!DANGER:
!DANGER:
!AVERTISSEMENT:

4. Tirez sur la fiche pour la déconnecter de la source d'alimentation. Ne te tire pas la tête.
5. N'utilisez pas le chargeur s'il a été soumis à un fort coup, s'il est tombé ou s'il a été endommagé
de toute façon. Apportez le chargeur à un centre de service autorisé pour un contrôle ou une
réparation.
6. Ne pas démonter le chargeur. Apportez-le à un centre de service autorisé lorsque vous avez
besoin d'un service ou d'une réparation. Un remontage incorrect peut entraîner un risque
d'incendie, d'électrocution ou d'électrocution.
7. Pour réduire le risque d'électrocution, débranchez le chargeur de l'alimentation électrique avant
de tenter de le nettoyer. Retirez la batterie seule ne réduit pas le risque.
8. L'unité d'alimentation est destinée à d’être orientée correctement dans une position de montage
verticale ou au sol.
1. Le bloc- batterie de cet outil a été expédiée dans un état de charge faible. Vous devez charger
la batterie complètement avant utilisation.
2. Ne pas incinérer la batterie si elle est sérieusement endommagée ou ne peut plus supporter
une charge. La batterie pouvait exploser dans un incendie. Contactez votre conseil local pour
obtenir des conseils d'élimination.
3. Une petite fuite de liquide de la batterie peut se produire sous l'extrême
conditions d'utilisation ou de température. Cela n'indique pas nécessairement la défaillance de la
batterie. Cependant, si le joint extérieur est cassé et que cette fuite entre en contact avec votre
peau, lavez rapidement la zone affectée avec de l'eau et de savon. Si la fuite s'introduit dans les
yeux, rincez à l'eau claire pendant au moins 10 minutes, consultez immédiatement un médecin et
informez le personnel médical que le liquide est une solution à 25-35% d'hydroxyde de potassium.
4. N'essayez jamais d'ouvrir le bloc- batterie pour toute raison. Si le boîtier en plastique de la
batterie s'ouvre ou se fissure, cessez immédiatement son utilisation et ne la rechargez pas.
5. Ne stockez pas ni transportez pas le bloc-batterie de rechange dans une poche ou une boîte à
outils ou dans tout autre endroit où il pourrait contacter avec des objets métalliques. La batterie
pouvait se court-circuiter, entraînant des dommages à la batterie, des brûlures ou un incendie.
PRÉCAUTIONS DE SÉCURITÉ POUR LE CHARGEUR
DESCRIPTION FONCTIONNELLE
PRÉCAUTIONS DE SÉCURITÉ POUR LE
BLOC-BATTERIE
19
A. Carter de Moteur
B. Bouton de Verrouillage de Broche
C. Protection Inférieure
D. Boulon de l'Arbre
E. Plaque de Base
F. Poignée Souple
G. Interrupteur de Gâchette
H. Levier de Protection Inférieur
I. Protection Supérieure de Scie
J. Levier de Réglage de La Profondeur de Coupe
K. Bouton de Verrouillage
L. Bouton de Réglage de l'Angle de Coupe
A
K
G
F
I
B
JL
H
D
CE
Les batteries doivent être complètement chargées avant la première utilisation. Il est recommandé de
charger la batterie pendant 1 heure pour la charge initiale. Pour une énergie maximale, assurez-vous
de charger la batterie après qu'elle ait été complètement déchargée dans les 5 ou 6 premières fois.
La batterie doit également être complètement chargée pendant ce temps. Assurez-vous que la scie
utilisée convient à la fonction prévue et qu'elle est installée correctement.
CHARGER LA BATTERIE
REMARQUE: Cet bloc-batterie Lithium-Ion est livrée partiellement chargée. Chargez complètement
le bloc- batterie avant la première utilisation. Le bloc- batterie complètement déchargée se charge en
environ 3 à 5 heures à une température entre 32 ° F (0 ° C) et 104 ° F (40 ° C).
• Placez le bloc- batterie dans le support de chargeur. Assurez-vous qu'il est placé correctement (+ et -)
• Le chargeur de batterie se compose de deux parties.
1. Un adaptateur du Courant Alternatif / Continu (partie # 7 de l'image à la page 4)
2. Un support de charge. (partie # 8 de l'image à la page 4)
• Insérez l'adaptateur du Courant Alternatif / Continu dans la prise de courant domestique. Le voyant
vert est allumé. Le voyant vert est l'indicateur d'alimentation.
• Insérez correctement le bloc- batterie dans le support de charge. Assurez-vous qu'il est placé
correctement (+ et -). Le voyant rouge est allumée. Le voyant rouge est l'indicateur de charge.
• Le temps de charge normal est de 3-5 heures. Lorsque la batterie est complètement chargée, le
voyant rouge s'éteint.
• Lorsque vous chargez plus d'une batterie successivement, faites l’intervalle de 15 minutes entre
chaque charge.
DÉMARRAGE / ARRÊT DE LA SCIE
Pour démarrer la scie:
• Appuyez sur le bouton de verrouillage.
• Appuyez sur l'interrupteur de gâchette.
Laissez toujours la lame atteindre sa pleine vitesse, puis guidez la scie dans la pièce à usiner.
AVERTISSEMENT : Assurez-vous toujours que la batterie est déconnectée de la perceuse avant de
la faire.
AVERTISSEMENT : Certaines poussières produites par le ponçage, le sciage, le meulage, le forage
et d'autres activités de construction contiennent des produits chimiques connus
pour causer le cancer, des anomalies congénitales et d'autres problèmes de
reproduction. Quelques exemples de ces produits chimiques sont: a) La peinture
à base de plomb.
OPÉRATION
20
!
REMARQUE: Le temps de fonctionnement d'une nouvelle batterie va augmenter avec l'utilisation et
la recharge.
IMPORTANT:
• La batterie doit être rechargée lorsque la scie ne fonctionne pas à son niveau de performance
normal. Ne continuez pas à utiliser la perceuse lorsque les situations suivantes se produisent.
Chargez la batterie au moins tous les 6 mois.
• La surcharge peut réduire la durée de vie de la batterie. Ne laissez pas la batterie se charger
pendant plus d'une heure.
• Ne rechargez jamais une batterie immédiatement après qu'elle a été chargée. Si la scie n'est pas
utilisée, la batterie perdra sa capacité d'alimentation. Pour assurer une performance maximale,
rechargez la batterie après un stockage.
!
!
!
Table of contents
Languages:
Popular Saw manuals by other brands


Norton
Norton CGW 1.30.1 230V operating instructions

DeWalt
DeWalt DW937 instruction manual

SOCO
SOCO MC-315CE instruction manual

MK Diamond Products
MK Diamond Products MK-212 Series Owner's manual & operating instructions

Makita
Makita LS1040N instruction manual

King Canada
King Canada KC-10MB instruction manual

Sima
Sima TRENCHER 60/70 FE G13H Original user guide

Craftsman
Craftsman 126.32561 Operator's manual

Cutters Edge
Cutters Edge MULTI-CUT CE2165RS operation & maintenance

Porter-Cable
Porter-Cable PC15TCS instruction manual

PEUGEOT
PEUGEOT EnergyCut 180 MC USING MANUAL (Original manual translation

PELA
PELA JF72557 manual