Primo Water PRI-450G User manual

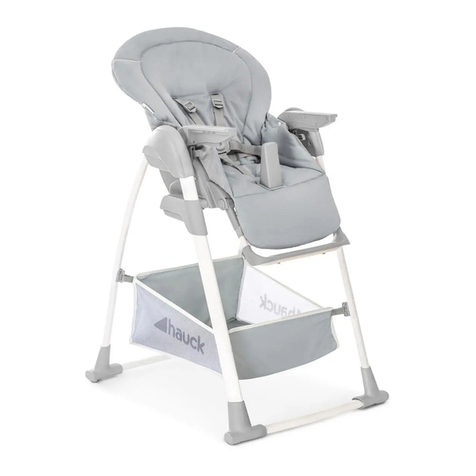
2-in-1 Smart Voyager
Swing and High Chair
PRIMO
149 Shaw Avenue, Irvington, NJ 07111
Tel: (973) 926-5900 Fax: (973) 926-1745
e-mail: [email protected]
www.primobaby.com
Model No.:PRI-450G
Standard:ASTM F404-17/ASTM F0288-15

1
Contents
I. Part List..................................................
II. Assembly................................................
III. Use Instructions.....................................
IV. Cleaning and Maintenance....................
V. Warnings................................................
VI. Warranty................................................
I.Part List
Part
Name
Quantity
Part
Name
Quantity
Main
Control Arm
1
Swing Release
Bar
1
Assist Arm
1
Feeding Tray
& Cover
1
Front Foot
Tube
1
Toy Bar
1
Rear Foot
Tube
1
Footrest Base
1
Left Swing
Arm Tube
1
Electrical
Adapter
1
Right Swing
Arm Tube
1
Instruction Manual
1
Seat &
Cushion
1
Page 1
Pages 2-10
Pages 11-13
Page 14
Pages 14-15
Page 15

2
II. Assembly Instructions
1. Combine the front base tube (A) with the main frame (A). A "click" will indicate that the pieces
have locked together properly.
“C lic k ”
A
A
A
A
2. Combine the rear base tube (B) with the main frame (B). A "click" will indicate that the pieces have
locked together properly.
“Click”
B
B
B
B

3
4. Insert the swing release bar (D) into the bottom of the seat (D).
D
D
3. Slide the left and right swing arms (C) into the seat (C). The arms should not be able to be pulled out
of the frame without pressing in the button to remove them.

4
Main Arm
Assist Arm
to
to
6. To disconnect the seat from the frame follow the instructions in the image below.
1
Use a rod or paper clip that is
about 4mm wide to push the
button located on each arm
7. To install the feeding tray, slide the tray rails into the seat until they lock into place.
NOTICE: Only use feeding tray in the locked high chair configuration.
5. Connect the Left and Right Swing Arms as shown in the image below to complete the main
assembly of the 2-2-in-1 Smart Voyager Swing & High Chair.

5
9. Adjust the height of the footrest by sliding the plate into the desired height level as shown in the image
below.
8. To install the toy bar, slide the rails into the seat until they lock into place.
NOTICE: Only use toy bar in the swing configuration. Remove Toy Bar when baby can
reach or grab toys.

6
3.DC plug
2.Power connector
11.This product requires 4 AA batteries to run without being plugged in to an electrical outlet.
10. To power the Voyager, insert DC plug of adapter to receiver on the main frame. Insert the AC plug
into a wall socket to power on the Voyager.
1. AC adapter plug
4.Screw battery enclosure
inlay securely back on.
3.Ensure batteries
are fully inserted
2.Line up positive
polarity with + sign
1.Line up negative
polarity with - sign.

7
WARNING!
Different types of batteries or old and new batteries cannot be mixed.
The batteries should be placed in the correct polarity.
Exhausted batteries need to be removed from the infant swing.
The Infant Swing shall only be used with the included adapter or 4 AA bateries.
Keep adapter out of reach of children.
Adapter used with the infant swing must be regularly examined for damage to the cord, plug,
enclosure, and other parts - discontinue use of adapter if such damage occurs.
Unplug the power adapter and remove the batteries before storing the Voyager for long periods.
12.When Voyager is in Swing mode, the seat backrest can only recline to two possible positions. When
Voyager is in High Chair mode, the seat backrest can recline two positions in the two lowest height levels.
Backrest can fully recline when chair is in the three highest height positions.
WARNING!Do not adjust the recline or height of the Voyager while baby is in seat!
22
22

8
13.As shown in the figure, press the adjustment button on both sides and select one of the five
height adjustment levels. Once you hear a "click" the seat height has locked into place.
6 Height Levels
14. Feeding tray has 3 adjustable positions that can be changed by pressing adjustment button located
under tray.
2
1
15. Remove the top layer of the feeding tray to clean it with soap and water or in the "top
rack only" of your dishwasher.
1
2
16.Press both sides of the footrest button at the same time to adjust the level of incline

9
17. Only when the seat is in the lowest height position can you switch between High Chair and Swing
mode. Notice: While in Swing Mode the seat height can not be adjusted.
WARNING! Do not use the Voyager's swing function while in High Chair mode or it will
wear out the motor and impact the function of the chair.
18. While in the swing position, the backrest has a maximum of two possible recline positions.
22

10
19.Baby should be safely secured by safety harness at all times while using the Voyager. Ensure that
safety harness is fitted properly and that baby is held securely in place.
1.Slide
2.Press
1.Slide
2.Press Slide
20.To fold the chair, press the buttons on the left and right side, and step on the back foot tube. Then
fold the front tube towards the back tube.
1
Button to fold up
2
3
Step on the
back foot tube
Fold the
front tube
inward
21.To unfold the chair, press the left and right side button, and step on the back foot tube.
Then pull the back foot tube out until fully extended.
1
2
3
pull back
foot tube
Button to fold up
step on the
back foot tube

11
3. Mobile App Download
1) Download the "Swing Control" app by "xiaomei su" (our production partner) on the Apple or
Android Store. You can also find the correct app by following instructions on the Voyager's
product page at https://www.primobaby.com/products/2-in-1-smart-voyager-swing-and-high-
chair
11. Speed indicator
2. Slow Down
6. Water Sounds
5. Next Song / Volum e Adjustment
3.Timer Setting
III. Using your Voyager 2-in-1
1. Control Panel Diagram
8. Sound Activation
14.Sound Activation Indicator
12. Power Indicator
13.Tim e Indicator
1. Speed Up
10. Mode Change
7. Bird Sounds
4. Pause/Play
9. Power
2. Control Panel Functions
•Speed Settings: The Voyager has 8 swing speeds. Press "+" (1) to speed up and "-" (2) to slow down.
•Timer Settings: Press Timer Setting (3) once for 8 minutes of use, a second time for 15 minutes of
use, and a third time for 30 minutes of use. If the timer function is not used, the swing will function
until powered off.
•Play/Pause Button: Press the Play/Pause Button (4) once to start playing music. Press it second
time to stop playing music.
•Volume/Next Song Button: After pressing the play button (4), press the Volume/Next Song Button
(5) to move to the next song. Hold the Volume/Next Song Button (5) to adjust the volume. After
reaching desired volume release the button.
•Music & Sound Options: The Voyager comes installed with Piano Music (5), Soothing Water Sounds
(6) , and Ambient Bird Sounds (7). Pressing these buttons will play the corresponding sounds. Pressing
these buttons again will stop sounds or music from playing.
•Sound Activation Mode: Press the Sound Activation Mode Button (8) to turn on responsive
activation. When the Voyager detects sound (like baby crying) the swing will engage on the lowest
setting and low volume. Pressing any button after enabling this mode will cancel it.
•Power Button: Turn the Voyager On/Off (9)
•Mode Button: Press the Mode Button (10) to switch between app and default music.

12
Timer
8 15 30
SwingUSB
Mobile
Timer Setting
Music
Bird Sounds
Water Sounds
Swing Speed Up
Mode Switch
Sound Activation Mode
Swing Speed Down
Previous Song Next Song
Volume control
Pause/Play
Menu
Volume Down Volume Up
1) Previous Song/Next Song: Go back to prior song or move to the next song.
2) Play/Pause: Start or stop playing music.
3) Sound Activation Mode: Enable or disable the Voyager's Sound Activation function.
4) Speed Adjustment: "+" will increase and "-" will decrease swing speed.
5) Mode Switch: Press Mode to switch between using the manual and mobile controls.
6) Timer Adjustment: Sets the Voyager to swing for 8, 15, or 30 minutes - after the timer runs out the Voyager
will stop swinging.
7) Water/Bird Sounds: Chair will play relaxing aquatic sounds or chirping birds.
8) Music: Plays pre-recorded music options.
9) Menu: Displays connected phone.
Toy/Light Activation (Unavailable on
Voyager 2-in-1)
4. "Swing Control" app layout

13
Settings Bluetooth
Bluetooth
Now discoverable as“iphone”
OTHE R DEVICES
Swing -018A
To pair an Apple Watch w ith your iphone,go to the
Watch app.
ooooo
Swing -018B
Swing -018A
ooooo
Swing -018B
Connected i
定时
8 15 3 0
Swing USB Mobile
Connecting
2. Ensure that Swing-018A is
marked as Connected
3. Load the Swing Control
App
ooooo
Settings Bluetooth
Bluetooth
Now discoverable as“iphone”
MY D EV IC ES
To pair an Apple Watch w ith your iphone,go to the
Watch app.
DEVICES
6. Connecting to the Voyager
(Note: Pair with Swing-018A)
1. Go to Settings -> Bluetooth
-> Connect to Swing-018A
(Note: Make sure the Voyager
is on)
4. If you were successful the
top right corner will show
"Connected" (Note: If not
connected repeat Steps 1-3)
5. App Download Instructions (iOS 8.3.0 and up or Android 4.3.0 and up)
Go to the App Store and search for "SwingControl" by "xiaomei su" (our production partner) or go to www.primobaby.com/
products/2-in-1-smart-voyager-swing-and-high-chair
7. Playing Personal Music via Voyager Speakers
The 2-in-1 Smart Voyager is able help introduce your child to your favorite music at an early age. To do this,
connect your Smart Voyager to your phone via Bluetooth. Then, in your favorite music app, direct the “Speaker”
to the connected Swing. Once the music app and Swing are connected, the music should begin playing through
the chair once you press the "Mode"button. Control the music in app, or through the control panel on the Smart
Voyager itself.
8.Playing music via Bluetooth with your Voyager
Settings Biuetooth
Biuetooth
Now discoverable as“iphone”
DEVICES
SWING-018
To pair an Apple Watch with your iphone,go
to the Apple Watch app.
SWING-018 Connected i
OTHER DEVICE S
To pair an Apple Watch with your iphone,go
to the Apple Watch app.
Music
10:44
Settings Biuetooth
Biuetooth
Now discoverable as“iphone”
MY DEVICES
10:44
10:44
1. Enable Bluetooth 3. Press "Mode" on the Voyager or the app.
Open your music app of choice and ensure
that the Swing is listed as the speaker
2. Connect to SWING-018

14
WARNING!
1. Always use this product with the safety harness.
2. Discontinue use of Toy Bar once child can reach or grab the toys to prevent choking or injury.
3. Do not use the Smart Voyager unless all parts are properly installed and assembled or if any parts
are loose.
4. Make sure that all locking mechanisms are in use before using the Smart Voyager.
5. Do not leave children unattended in the Smart Voyager.
6. The 2-in-1 Smart Voyager's Infant Swing function is intended for 0-6 months or under 20lbs.
7. The 2-in-1 Smart Voyager's High Chair function is intended for 6-36 months or up to 40lbs.
8. Do not lift the Smart Voyager by the toy bar or feeding tray.
9. Do not lift, move, or carry the Smart Voyager while a child is in the chair.
10.Do not use the Smart Voyager on any surface but a level floor.
11.Do not use the Smart Voyager on counters, tables, uneven surfaces, etc.
12.Do not let a child stand in the Smart Voyager's seat while in use.
13.Do not attempt to fold or store the Smart Voyager while a child in the chair.
14.Do not use the Smart Voyager if any parts are damaged, missing, or malfunctioning.
15.Do not use substitute parts from third parties to replace parts that may become damaged by use.
16.Keep away from extreme heat and cold (fire, space heaters, gas heaters, baseboards, windows,
outdoors, etc.).
17.Do not hang anything from Smart Voyager while in use.
18.Allow up to 3-5 seconds after powering on to use electronic functions of the Smart Voyager.
19.Keep swing seat fully reclined until child is at least 4 months old AND can hold up head without
help. Young infants have limited head and neck control. If seat is too upright, infant’s head can
drop forward, compress the airway, and result in DEATH.
20.The child should be secured in the high chair at all times by the restraining system. The tray is not
designed to hold the child in the chair. It is recommended that the high chair be used only by
children capable of sitting upright unassisted.
21.The child should be secured in the high chair at all times by the restraining system, either in the
reclining or upright position. The tray is not designed to hold the child in the chair. It is
recommended that the high chair be used in the upright position only by children capable of
sitting upright unassisted.
1. Voyager Seat Cushion
a. Wash in cold water.
b. Use mild soap or upholstery shampoo.
c. Wash separately.
d. Do not bleach, soak, tumble dry, or dry clean.
e. Dry flat in the shade thoroughly before reuse and avoid direct heat.
2. Voyager Plastic/Metal Components
a. Wipe down with damp cloth and soap.
b. Dry thoroughly.
c. Do not use water on or near electric components.
IV. Care & Maintenance Instructions

15
LIMITED WARRANTY POLICY
PRIMO® warrants that the PRIMO® 2-in-1 Smart Voyager Swing and High Chair is accompanied with a limited warranty and is free
from defects resulting from material, missing parts or workmanship for a period of 6 months from the date of original purchase. This
warranty only applies to the original purchaser of the product. This LIMITED WARRANTY does not apply to defects from normal wear
and tear, product misuse, product abuse, after market alterations or failure to follow instructions supplied for assembly, use, maintenance
and care of the product.
If any defect is discovered during the 6 month warranty period, please call (973) 926-5900 or e-mail [email protected] with a
description of the problem and a request for return authorization of parts or replacement. If PRIMO® determines that a defect is covered
by this limited warranty, PRIMO® will, at its option, either repair, send new parts or replace product. The Limited Warranty extends to
repaired and replacement products and components only through the end of the original 6 month limited warranty period from the original
date of purchase. When authorization is issued for replacement or parts, send (postage prepaid and insured) to:
PRIMO
149 Shaw Avenue
Irvington, NJ 07111 USA
The warranty details above shall be in lieu of any and all other warranties.
ALL OTHER WARRANTIES, INCLUDING IMPLIED WARRANTIES OF MERCHANTABILITY AND FITNESS FOR A
PARTICULAR PURPOSE ARE HEREBY EXPRESSLY DISCLAIMED.
This warranty is valid only with an original dated receipt.
Your remedies under this warranty are limited to repair or replacement of the product or components of the product as determined by
PRIMO®. In no event will PRIMO® or any of its retailers, dealers, distributors or resellers be liable for incidental, indirect or
consequential damages relating to the product (including any repaired or replacement products or replacement components) or its use.
To activate this limited warranty, the purchaser must complete the enclosed product registration card and have returned it to the PRIMO®
address on the enclosed warranty registration card within thirty (30) days of the original purchase date.
(PRIMO® 2-in-1 Smart Voyager Swing and High Chair PRI-450G)
Cushion Care Instructions
