Prince Castle 110 VOLT SERIES User manual

TABLE OF CONTENTS
WARRANTY . . . . . . . . . . . . . . . . . . . . . . . . . . . . . . . . . . . . . . . . . . . . . . . . . . . . . . . . . . . . . . . . . . . . . . . . . . Page 1
INTRODUCTION . . . . . . . . . . . . . . . . . . . . . . . . . . . . . . . . . . . . . . . . . . . . . . . . . . . . . . . . . . . . . . . . . . . . . . Page 2
PARTS IDENTIFICATION/FUNCTION . . . . . . . . . . . . . . . . . . . . . . . . . . . . . . . . . . . . . . . . . . . . . . . . . . . . Page 2
EXPLODED VIEW . . . . . . . . . . . . . . . . . . . . . . . . . . . . . . . . . . . . . . . . . . . . . . . . . . . . . . . . . . . . . . . . . . . . . Page 6
EQUIPMENT SET-UP AND CLOSE PROCEDURES . . . . . . . . . . . . . . . . . . . . . . . . . . . . . . . . . . . . . . . . . Page 7
TROUBLESHOOTING GUIDE . . . . . . . . . . . . . . . . . . . . . . . . . . . . . . . . . . . . . . . . . . . . . . . . . . . . . . . . . . . Page 9
ORDERING/SERVICE INFORMATION . . . . . . . . . . . . . . . . . . . . . . . . . . . . . . . . . . . . . . . . . . . . . . . . . . . . Page 10
NON-SCHEDULED MAINTENANCE . . . . . . . . . . . . . . . . . . . . . . . . . . . . . . . . . . . . . . . . . . . . . . . . . . . . . . Page 10
Place this chapter in the Small Equipment/
Miscellaneous Section of your Equipment
Manual.
MANUFACTURED
EXCLUSIVELY FOR
McDONALD’S
BY
PRINCE CASTLE INC.
CAROL STREAM, IL 60188 USA
PHONE 1-800-323-2930
TOLL FREE NUMBER
1-800-323-2930
FAX: 1-630-462-1460
WARRANTY
This product is warranted to be free from defects in material and/or workmanship for a period of one year
from the date of original installation. Any component which proves to be faulty during the warranty period
will be replaced without cost to the customer.
This warranty is subject to the following exceptions/conditions:
(1) This equipment is portable; charges for on-location service (e. g., trip charges, mileage) are only
included in the provisions of this warranty for a failure which occurs within the first 30 days of installa-
tion.
(2) Damage caused by carelessness, neglect, and/or abuse (e.g., using wrong current, dropping, tamper-
ing with or altering electrical components) voids this warranty.
(3) Running water through pump rusts internal parts and will void the warranty.
This manual is for the exclusive use of licensees and employees of McDonald’s Systems, Inc.
2001 McDonald’s Corporation
All Rights Reserved Printed in
The United States of America
Part No. 107-515
Printed in September
EM MISC 5
SHORTENING FILTER
PRINCE CASTLE NO. 107-AMC
110 VOLT SERIES
HAZARD COMMUNICATION STANDARD (HCS) – THE PROCEDURES IN THIS CHAPTER INCLUDE THE
USE OF CHEMICAL PRODUCTS. THESE CHEMICAL PRODUCTS WILL BE HIGHLIGHTED WITH BOLD
FACE LETTERS FOLLOWED BY THE ABBREVIATION (HCS). SEE THE HAZARD COMMUNICATION
STANDARD (HCS) MANUAL FOR THE APPROPRIATE MATERIAL SAFETY DATA SHEET(S) (MSDS).

INTRODUCTION
This filter is used for cleaning the shortening used in
frying. The Filter Aid (HCS) is sprinkled evenly onto the
filter paper (refer to your Operations and Training Manual).
2
The shortening is drained from the fry vats to the filter.
The shortening is recirculated thru the filter paper and
Filter Aid (HCS) to remove impurities.
PARTS IDENTIFICATION/FUNCTION
* Not Shown
1102-32 Union Nut, Knurled 2 Used to attach hose assembly and standpipe to
pump.
2102-33 Female Union 2 When used with male union, forms a seal.
3100-59 3/8” NPT x 1” (10 X 25 2 Used to attach female union to the standpipe
mm) coupling.
102-110 3/8” NPT x 11/4” (10 X 32 1
mm) Long Close Nipple
(For 102-117)
4100-57 c” (10 mm)– 18 NPT 1 Used to attach female union to the hose coupling.
Street Elbow
5102-171 Three way Valve 1 Directs the flow of the shortening to the ose or the
& Bushing recirculating nipple.
6 93-027 Nipple 1/2” NPT X 11/2” 1 Parts used for recirculating the hot shortening into
Long the filter bowl.
7 93-026 Elbow (1/2” NPT 90°) 1
8 93-023 Nipple (1/2” NPT) 1
9107-087 Motor Base Assembly 1 Attaches to the motor and holds up the motor and
pump when it is placed on top of the filter bowl. Also
holds the hose nozzle when not in use.
10 93-003 Close Nipple 1/2” NPT 1 Attaches 3-way valve to the pump.
11 105-152 Handle 1 Used for carrying the motor and pump assembly.
12 100-58 Reducing Bushing 1/2” to 1 Used to attach the motor and pump to the standpipe
3/8 NPT assembly.
X 3/4” Long
13 102-117 Standpipe Coupling 1 Used to attach the motor and pump to the standpipe
assembly.
14 72-296S Power Cord 1 Transfers electrical power from the wall outlet to the
motor.
15 100-22 Rubber Strip 2 Absorbs vibrations from the motor when it is running.
16 105-77 Pump Assembly (Blue) 1 Creates a vacuum and pulls the hot shortening thru
the paper and filter powder up the standpipe, thru the
pump and out the filter hose.
*16A 102-219 Set Screws (Pkg. of 3) 1 Mounts blue pump to blue motor.
PART
NO.
ITEM DESCRIPTION QTY. FUNCTION

3
* Not Shown
17 108-385S Motor Assembly (Blue) 1 Turns the gears in the blue pump (or turns the
impeller in the gray pump) creating a vacuum, which
then moves the shortening from the filter bowl the
through standpipe, and pump assembly to the hose
and into the fry vat.
* 88-409 Strain Relief (Not shown) 1 Securely holds power cord to motor.
* 100-19 Strain Relief (Wire Mesh) 1
(not shown)
A 76-061 1/4” #20 X 3/4” Hardware used to attach motor and pump
Hex Head Screw assembly to base.
79-028 1/4” I.D. Split Lockwasher
79-030 1/4” I.D. Flatwasher
73-022 1/4” – #20 Hex Nut
B 76-049 5/16” – 18 X 5/8”
Hex Head Screw
79-046 5/16” I.D. Split
Lockwasher
C 76-061 1/4” – 20 X 3/4”
Hex Head Screw
79-028 1/4” Split
Lockwasher
79-030 1/4” I.D. Flatwasher
73-022 1/4” –20 Hex Nut
D 100-5 Hose Coupling Assembly 1 Used to attach hose assembly to pump.
18 102-286 Hose Assembly 1 Transfers the hot shortening from the pump to
the fry vats.
19 110 Anti-Splash Tube 1 Prevents the hot shortening from splashing onto
the floor when draining the shortening from the fry
vat into the filter bowl.
20 102-125 Safety Screen 1 Prevents hands and feet from accidentally going
into the bowl.
21 105-22 Ring Weight 1 Seals the filter paper to the filter bowl.
22 102-10 Standpipe 1 Connects the filter pump with the screen assembly
and transfers the shortening from the bowl to the
pump.
23 – Filter Paper (available 1 Removes unwanted solids. When used with filter-aid
from your purveyor) also removes moisture and frees fatty acids,
extending the life of the shortening.
24 100-13 Screen 1 Support for the filter paper and powder. Provides
attachment for standpipe.
25 105-21 Bowl with Casters 1 Holds the filter paper, screen, ring weight and
shortening for filtering.
PART
NO.
ITEM DESCRIPTION QTY. FUNCTION

4
* Not Shown
26 89-112 Caster 2 Used to easily move the shortening filter from one
89-410 Caster (Locking) 2 one fry vat to another.
27 126 Maple Wood Paddle 1 Used to stir the shortening after the filter powder has
been added.
*28 Transfers the shortening through the filter paper
into the fry vat.
107-088 Complete Motor and Pump 1
Assembly 110V
PART
NO.
ITEM DESCRIPTION QTY. FUNCTION

*37 578-61 Switch Guard 1 Provides protection for switch against accidental
activation or breakage.
38 78-120 Overload Protector Switch 1 Protects motor from overheating. Must be reset
manually.
39 63-077 Starting Capacitor 1 Provides extra power to start motor.
40 78-129 ON/OFF Toggle Switch 1 Turns unit ON when switch is up and OFF when
switch is down.
41 102-202 Starting Switch 1 When ON/OFF Switch is activated, turns ON
capacitor.
42 102-211 Insulator 1 Protects switches from shorting.
43 102-210 Spring Wave Washer 1 Keeps bearing and shaft from binding on end
cap.
44 102-209 Bearing 1 Allows armature and shaft to rotate freely.
45 102-93 Rotor Switch (115V) 1 Provides power to field when first starting, at
higher R.P.M. moves out of circuit.
46 88-409 Strain Relief 1 Protects power cord from misuse.
*47 578-61 Switch Guard 1 Provides protection for switch against accidental
activation or breakage.
48 100-62 Male Union Fitting 1 Provides connection for hose assembly to pump
union nut.
49 102-240S Handle w/Hardware 1 Allows a safe method to hold the nozzle
when returning the shortening to the fry vat.
FUNCTION
PART
NO.
ITEM DESCRIPTION QTY.
5
* Not Shown

6
11
12
13
14
15
16
11 105-140 Casting 1 Holds the gears.
12 105-144 Cover 1 Holds the gears in the casting.
13 105-145S Screw (Pkg. of 4) 1 Hold the cover in place.
14 102-128S Drive Gear 1 Provides movement to idler gear
which moves shortening.
15 105-73S Idler Gear 1 When turning creates a vacuum which moves the
shortening
16 93-021S Package of one Oil Seal 1 Seals the pump to the motor.
and 2 O-Rings
FUNCTION
PART
NO.
ITEM DESCRIPTION QTY.

EQUIPMENT SET-UP, CALIBRATION,
CLEANING AND CLOSE PROCEDURES
Set-up
IMPORTANT: Clean out any remaining water from filter
machine bowl.
1. Place the screen, with its thread facing up, inside the
filtering bowl. See figure 1.
2. Place filter paper (manufactured to McDonalds
specifications) over the threads and on top of the
screen. Be sure the hole in the paper is centered to
fit over the shoulder so the paper will lay flat. See
figure 2.
3. Screw on the standpipe. Tighten by hand. See figure
3.
4. Place the ring weight on the filter paper. Make sure
paper is not folded or creased under the ring. See
figure 4.
5. Center safety grid over standpipe. This will allow the
grid to suspend over the rim of the filtering bowl. See
figure 5.
6. Set the motor on the edge of bowl and screw the union
to the standpipe by hand. Make sure the connection
is hand tight. See figure 6.
7
figure 1
figure 2
figure 3
figure 4
figure 5
figure 6

8
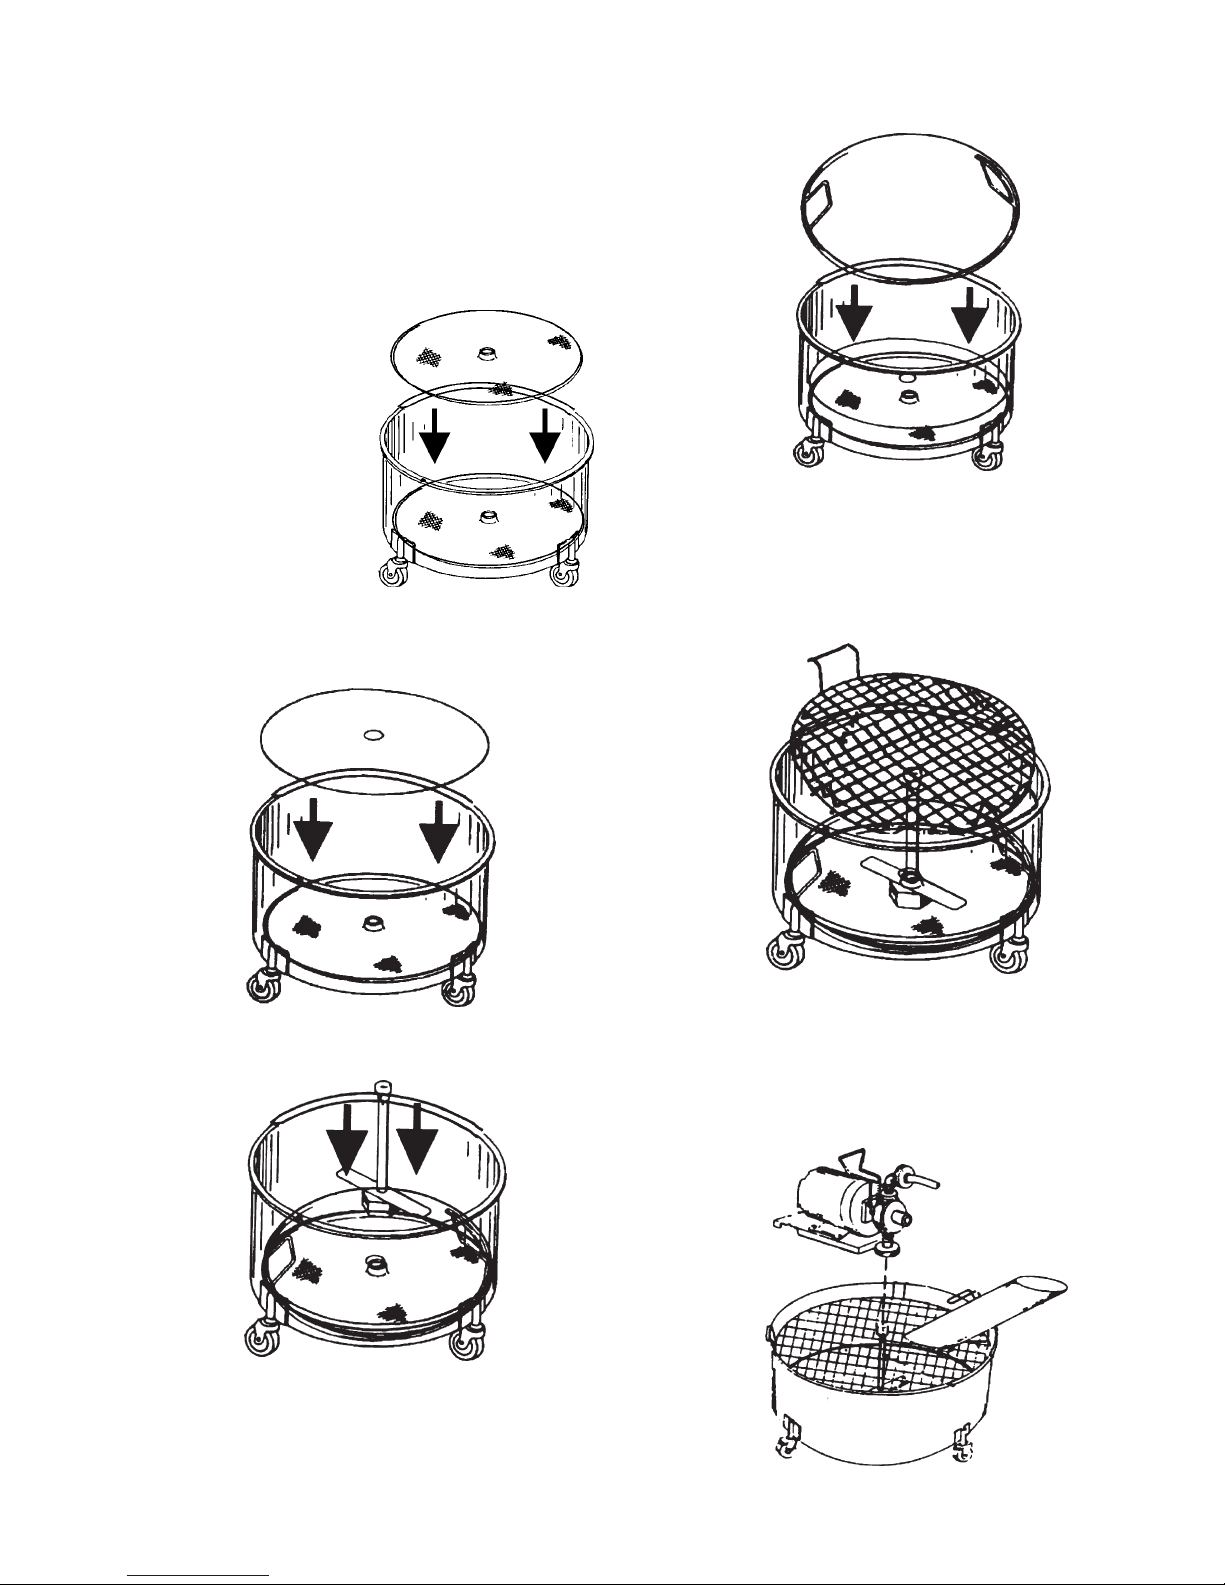
7. Place the anti-splash tube on filter bowl by doing the
following:
A. Grasp tube by handle.
B. Hook prongs under lip of bowl.
C. Rotate downward until tube rest is against the
shortening filter bowl.
The anti-splash tube has 2 ends. One end has a
diffuser plate attached inside the tube, and the
opposite end is open. Hook the tube over the filtering
bowl rim so that the end with the diffuser is closest to
the safety grid.
8. Attach hose to pump. Make sure the connection is
hand tight. Put the nozzle in its holder.
CAUTION: This hose is made to bend up to a
radius of six inches (15.2 cm). If the hose is
bent under six inches (15.2 cm) or if the hose
is crimped, it could crack, causing it to leak
hot oil which may cause burns. If the hose is
cracked and/or leaking, do not use until it
has been replaced or repaired.
When finished filtering each vat, roll the unit to the next
vat by using the handle attached to the motor and pump
assembly.
CAUTION: Do not pull the unit by the power
cord or the hose.
OPERATING INSTRUCTIONS
Refer to your McDonald’s Operations and
Training Manual for the proper procedures to
filter your Fry Vats. If your manual does not
contain this procedure, contact your Regional
Training Department.
Close
After the filtering, the filter must be cleaned and stored
so that it will be ready for next use. Follow these
cleaning procedures:
CAUTION: Parts are hot. Handle with care,
and use filter shortening gloves.
1. Unplug the power cord. Return the filtering machine
to the back sink to disassemble.
2. IMMEDIATELY disconnect the hose from the pump
and drain the shortening from the hose into the bowl.
3. Unscrew the pump from the standpipe and lift the
motor assembly from the bowl.
4. Remove the safety grid, ring weight, anti-splash tube,
and place them in the back sink. Unscrew the
standpipe assembly from the screen assembly and
place in the back sink.
5. Remove and discard filter paper.
7. Discard any shortening left in the bowl into the
shortening disposal cart/shortening drum.
8. Wash the ring weight, standpipe, screen and bowl
with the hottest water possible and fryer cleanser to
prevent carbon buildup. (Do not use APC.)
9. Wipe dry with a clean towel.
10. Wipe the motor assembly and filter hose using a
clean towel.
11. Reassemble bowl, filter screen and ring weight.
Place the standpipe assembly, and filter hose inside
the bowl.
12. Roll filtering equipment into storage location.
CAUTION: Do not store motor and pump
assembly on the screen assembly. This
could cause the screen to warp, tear away
from the welds or cause grease to damage
the power cord and motor.
CAUTION: Do not pump water through the
motor and pump assembly. This will cause
the pump gears to rust and void the war-
ranty.

9
TROUBLESHOOTING CHART
Filter will not pump Filter paper too thick. Use new sheet of paper.
shortening. Dirt or nick on standpipe pump Clean off dirt.
fittings which results in leaking Replace standpipe assembly.
air into the pump intake. Replace standpipe coupling.
Leaking gaskets. Return for service.
Oil seal leaking. Return for service.
Motor not running. Check power supply.
Return for service.
Cold shortening. Ensure vat is at operating temperature.
Hose clogged. Hose not drained at Soak in hot water until loose.
finish of previous operation. CAUTION: Make sure there is not water
CAUTION: HOSE MAY BURST IF in hose before reconnecting to pump.
USED IN THIS CONDITION
Pump not operating. Consult operating procedures.
Return for service.
Filter paper clogged. 2” (5 cm) of Spread filter powder around ring weight.
shortening in bowl. See sealing procedure on page 11.
Examine ring weight and bowl for defects
(ie, warps, dents). If defective, replace.
Lost seal. See sealing procedure on page 11.
Using too much Gycor (HCS) or Use recommended amount 1 McD portion
filter aid. pak (HCS) 10.5 oz. (300 grams).
Machine pumping Shortening too cool (will cause Keep vat at cooking temperature until
shortening slowly. paper to clog and machine to pump emptied into filter machine.
slowly). CAUTION: Vat must be turned OFF just
before vat is drained.
Using too much Gycor (HCS) or Use recommended amount of McD portion
filter aid. pak (HCS) 10.5 oz. (300 grams).
Power cord attached improperly or Return for service.
not in good repair (Motor will not
run at full power).
Motor not operating correctly. Return for service.
Shortening cannot be Filter paper not centered or creased See sealing procedure on page 11.
completely pumped under ring. Ensure paper is centered and placed flat.
out (Shortening Ring weight is bent or warped See sealing procedure on page 11.
covering surface (should be flat). Badly warped or bent rings should be
of filter paper.) replaced.
Bowl rim is bent or not clean (buildup See sealing procedure on page 11.
of hardened shortening). Clean bowl thoroughly.
Remove dents or replace bowl.
PROBABLE CAUSEPROBLEM CORRECTIVE ACTION

SEALING PROCEDURE:
Sprinkle 5 oz. (142 g) of Gycor (HCS) around the edge of
the ring weight. Drain the vat and re-circulate the short-
ening. This process should “seal” air leaks around the
ring.
CAUTION: Use this procedure only when a leak
occurs and all shortening cannot be drained. Using
excess Gycor (HCS) can cause the machine to clog
during filtering of last vats. THIS SHOULD ONLY BE
AN INTERIM PROCEDURE UNTIL EQUIPMENT CAN
BE REPAIRED OR REPLACED.
ORDERING/SERVICE INFORMATION
1. WHERE AND HOW TO ORDER
REPLACEMENT PARTS
To order replacement parts, look on the back of your
Prince Castle Price List for the name and phone
number of your local Prince Castle Service Center.
You may also call Prince Castle at 1-800-323-2930
(or fax us at 630-462-1460) for the name of your local
Service Center.
2. PARTS RETURNS
To return parts to your Service Center for credit, you
must obtain authorization from your Service Center.
iMPORTANT: All warranty situations should be handled
by your center.
3. PRICES:
A. All prices are F.O.B. Prince Castle Service
Center or F.O.B. factory, Carol Stream, Illinois.
B. All prices are subject to change without notice.
These prices are exclusive of all sales taxes or any
special taxes which may be levied by federal, state,
or city governments.
OUTSIDE THE U.S.
Contact your kitchen equipment supplier or designated
repair facility for parts and service.
NON-SCHEDULED MAINTENANCE
IMPORTANT: No user-serviceable parts are inside this
motor and pump assembly. This motor and pump
assembly must be serviced by a Prince Castle Autho-
rized Service Center. Failure to do so can void the
warranty.
10
TROUBLESHOOTING CHART
Shortening cannot be Bowl not level (Can cause See sealing procedures on page 11.
completely pumped out “seal” to break). Repair or replace wheels on filter machine.
(shortening covering Filter paper clogged. Machine must be broken down, cleaned,
surface of filter paper). and set up again.
(cont.) Too much Gycor or Filter Aid Must use recommended amounts to prevent
(HCS). clogging.
Excessive food particles. Skim vats more often and before filtering.
Shortening too cool. Shortening must be at cooking temperature
prior to filtering.
Filter powder Ring weight bent. Replace ring weight.
pumped back into fryer. Nick or debris on seal surface Replace bowl.
on bowl.
Screen assembly bent. Replace screen assembly.
Filter paper torn. Replace filter paper.
PROBABLE CAUSE
PROBLEM CORRECTIVE ACTION

PRINTED ON RECYCLED PAPER
10%Post-Consumer Content
40% Pre-Consumer Content
12
This manual suits for next models
1
Table of contents
Other Prince Castle Water Filtration System manuals
Popular Water Filtration System manuals by other brands

Bestway
Bestway Flowclear 58397 owner's manual

BWT
BWT Bewades LC Installation and operating manual

EcoWater
EcoWater ERO-375 user manual

Manitowoc
Manitowoc ArcticPure Plus Installation, operation and maintenance manual

National Flooring Equipment
National Flooring Equipment DLS3000 instruction manual

Life
Life 7700C user manual

GF
GF JRG 1830 Operating and maintenance instructions

Watts
Watts OF1465 Installation, operation and maintenance manual

Sumake
Sumake SA-2354-1A manual

flamco
flamco Clean Installation and operating instructions

Chungho
Chungho Water Purifier 450 user manual

Klimawent
Klimawent STRONG-2000-N Use and maintenance manual