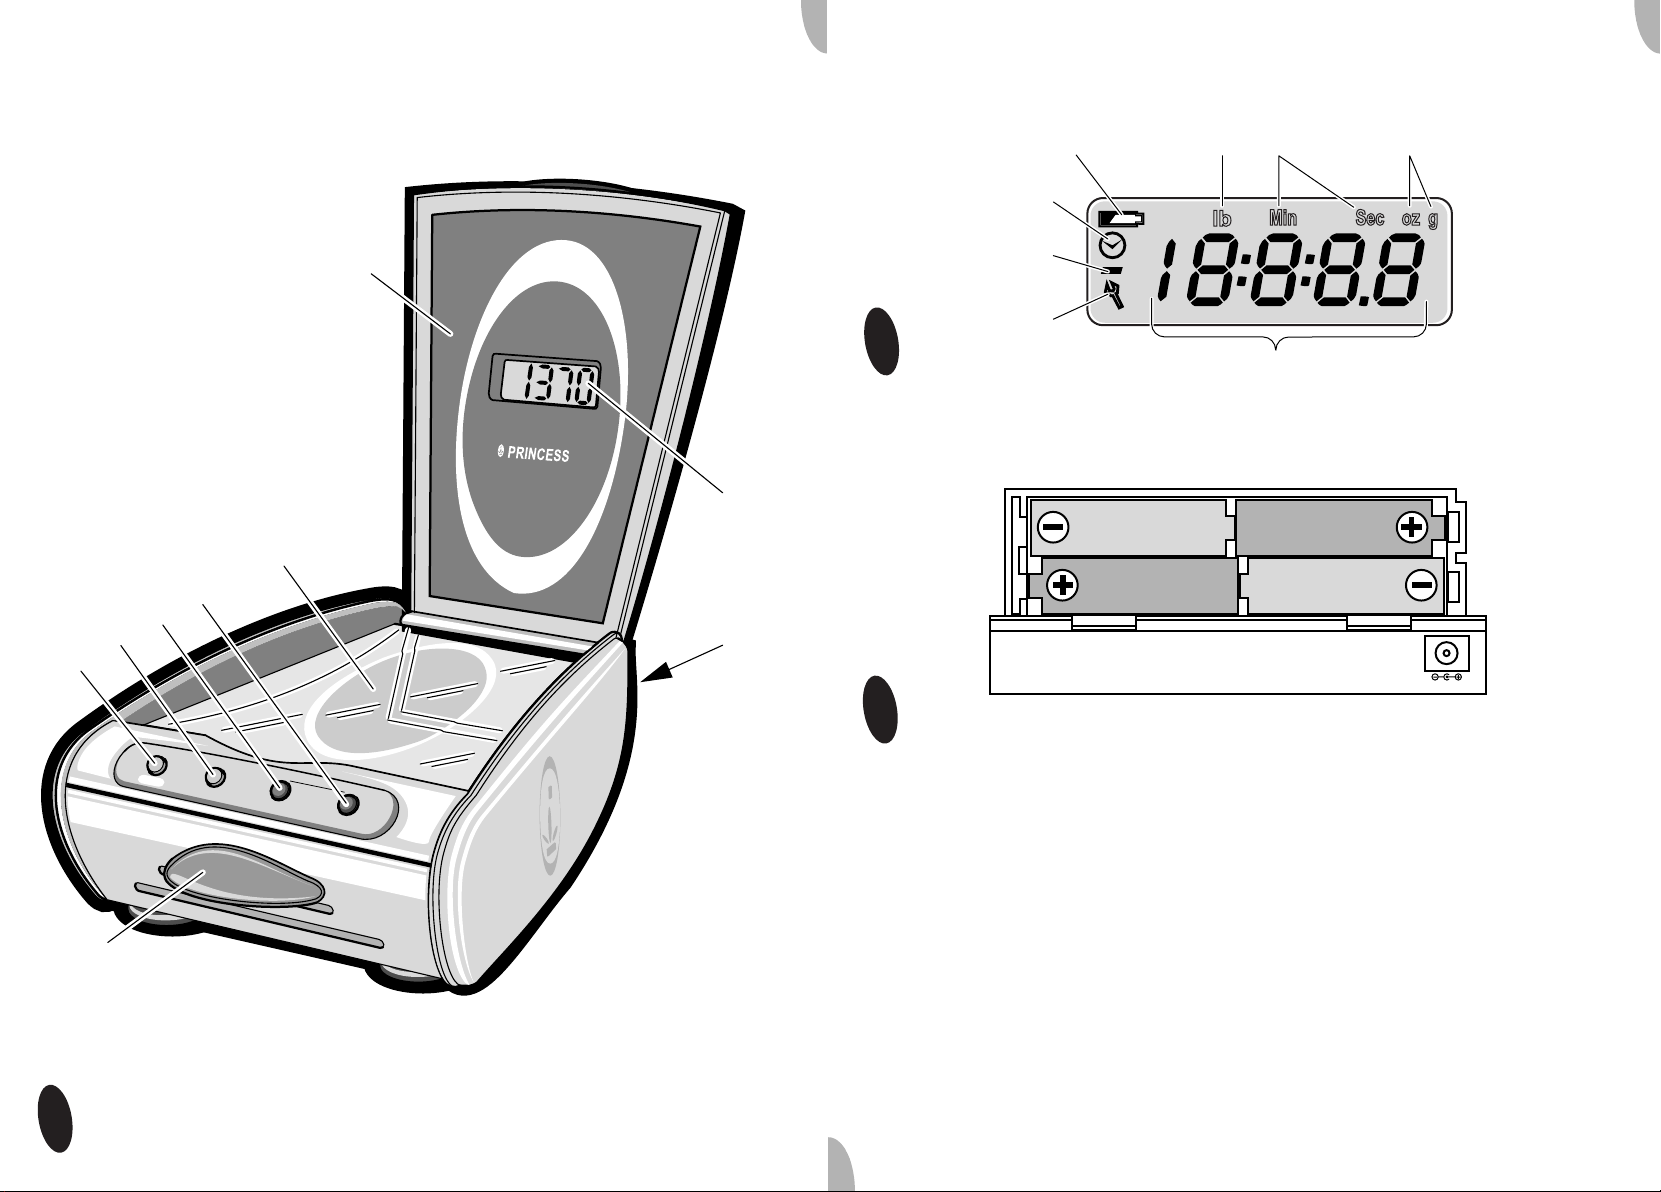
Princess 2954 User manual

START/STOP TIMER
RESET
New Classics Kitchen Scale
Article 2954
• Gebruiksaanwijzing • User's instructions • Mode d'emploi
• Bedienungsanleitung • Instrucciones de uso • Istruzioni per l'uso
• Bruksanvisning • Brugsanvisning • Bruksanvisning
• Käyttöohje • Instruções de uso •
ϡΪΨΘδϤϟ ϞϴϟΩ
START/STOP TIMER
RESET
START/STOP
TIMER
RESET
Garantiekaart / Guarantee card /
Certificat de garantie / Garantiekarte /
Certificado de garantía / Certificato di
garanzia / Garantikort / Garantibevis/
Takuutodistus / Garantibevis / Postal de
garantia /
Δ
ϗΎτΑϥΎϤπϟ
Datum van aankoop / Date of purchase / Date d'achat / Kaufdatum / Fecha de compra/Data di acquisto /
Inköpsdatum / Købsdato / Ostopäivämäärä / Kjøpsdato / Data de compra / :
˯ήθϟ ΦϳέΎΗ
Dealer / Dealer / Concessionnaire / Händler / Distribuidor / Rivenditore / Återförsäljare / Forhandler / Myyjä
/ Forhandler/Revendedor / :
ήΟΎΘϟ
Type / Model / Type / Typ / Tipo / Modello / Modell / Type / Tyyppi / Type / Tipo / :
ϞϳΩϮϤϟ
Koper / Purchaser / Acheteur / Käufer / Comprador / Dati relativi all'acquirente / Köpare / Køber /
Ostaja / Kjøper / Cliente / :
ϱήΘθϤ
ϟ
Nederlands 1
English 4
Français 7
Deutsch 10
Español 13
Italiano 17
Svenska 21
Dansk 24
Norsk 27
Suomi 30
Português 33
36
ΓΪΤΘϤϟ ΔϜϠϤϤϟ
princess_New_Classics_Kitchen_Scale_2954_omslag.fm Page 1 Friday, April 22, 2005 11:46 AM

START/STOP TIMER
RESET
START/STOP
TIMER
RESET
1
START/STOP TIMER
RESET
12345
6
7
8
9
12
7
6
5
4
23
2
DC6V
3
Nederlands: Garantievoorwaarden
1 jaar op fabrikage- en materiaalfouten. De
garantie geldt alleen met volledig ingevuld garan-
tiebewijs. Geen garantie op defekten t.g.v.
verkeerd gebruik, onbevoegde demontage en
vallen. De garantie is niet geldig voor gevolg-
schade.
English: Terms and conditions of
guarantee
1 year on manufacturing and material faults.
The guarantee is valid solely when the guarantee
card has been completed in full. The guarantee
does not cover defects caused by incorrect use,
unauthorized disassembly, or damage caused
by a fall. The guarantee does not cover
consequential damage.
Français : Conditions de garantie
1 année sur les défauts de pièce et main
d'œuvre. La garantie est valable uniquement si le
certificat de garantie est entièrement rempli. La
garantie n'est pas valable si l'appareil a été incor-
rectement utilisé, démonté par une personne non
qualifiée, ou est tombé. La garantie n'est pas
valable pour les dommages consécutifs.
Deutsch: Garantiebedingungen
1 Jahr auf Herstellungs- und Materialfehler.
Die Garantie gilt nur mit komplett ausgefülltem
Garantienachweis. Die Garantie gilt nicht für
Schäden, die aufgrund falschen Gebrauchs,
unbefugter Demontage und weil das Gerät
heruntergefallen ist, entstanden sind. Die Garan-
tie gilt nicht für Folgeschäden.
Español: Condiciones de garantía
1 año por defectos de fabricación o de los
materiales. La garantía es válida únicamente con
la presentación del certificado de garantía debi-
damente gestionado. No se otorga garantía por
fallos ocasionados por el uso inadecuado,
desmontaje de las partes por personas no
autorizadas o caída del aparato. La garantía no
aplica para daños consecuenciales.
Italiano: Condizioni di garanzia
L'apparecchio è garantito per un periodo di 12
mesi dalla data di acquisto a copertura di difetti di
materiale e/o di fabbricazione. La garanzia è
valida unicamente se accompagnata da un
certificato di garanzia debitamente compilato in
ogni sua parte. La garanzia non si applica ai
danni derivanti da utilizzo errato o non conforme
del prodotto, da riparazioni eseguite da
personale non autorizzato e da eventuali cadute
dell'apparecchio. La garanzia non copre gli
eventuali danni indiretti a persone e/o cose
causati dal malfunzionamento del prodotto.
Svenska: Garantivillkor
1 år på tillverknings- och materialfel. Garantin
gäller endast tillsammans med ett fullständigt
ifyllt garantibevis. Ingen garanti för fel på grund
av felaktig användning, obehörig demontering
och fall. Garantin täcker inte följdskador.
Dansk: Garantibetingelser
1 år på fabrikations- og materialefejl. Garantien
gælder kun med et fuldstændigt udfyldt garan-
tibevis. Ingen garanti på defekter opstået som
følge af forkert brug, uautoriseret afmontering og
fald. Garantien dækker ikke følgeskade.
Norsk: Garantibetingelser
Ett år på fabrikasjons- og materialfeil. Garantien
gjelder bare når garantibeviset er fullstendig
utfylt. Det gis ingen garanti for defekter på grunn
av feil bruk, uautorisert demontering og fall.
Garantien gjelder ikke følgeskader.
Suomi: Takuuehdot
Yhden vuoden takuu valmistus- ja materiaalivir-
heiden osalta. Takuu on voimassa vain, jos
takuutodistus on täytetty täydellisesti. Takuu ei
kata vikoja, jotka johtuvat virheellisestä käytöstä,
valtuuttomattomasta purkamisesta tai
putoamisesta. Takuu ei kata seurannaisva-
hinkoja.
Português: Condições de garantia
1 ano para defeitos de fabrico e de material A
garantia apenas é válida com a prova de
garantia completamente preenchida. Não se
garantem defeitos devido a utilização errada,
desmontagem não autorizada e queda.
A garantia não abrange danos resultantes.
ΓΪΤΘϤϟ ΔϜϠϤϤϟ:ϥΎϤπϟ ρϭήη
ΔϣΪΨΘδϤϟ ΩϮϤϟϭ ϊϴϨμΘϟ ϲϓ ΐϴϋ ϱϷ ΓΪΣϭ ΔϨγ.
˱ΔϠϣΎϛ ϥΎϤπϟ ΔϗΎτΑ ˯Ϟϣ ϝΎΣ ϲϓ ϻ· ˱ΎΤϟΎλ ϥΎϤπϟ ϥϮϜϳ ϻϭ.
ˬίΎϬΠϟ ϡΪΨΘγ ˯Ϯγ Ϧϋ ΔΠΗΎϨϟ ΏϮϴόϟ ϥΎϤπϟ ϲτϐϳ ϻϭϞϜθΑ ϪϜϓ ϭ
ίΎϬΠϟ ρϮϘγ Ϧϋ ΞΗΎϨϟ Ϟτόϟ ϭ ˬϪΑ κΧήϤϟ ήϴϏ.
ΔϴϋΎΒΘΘγϻ έήοϷ ϥΎϤπϟ ϲτϐϳ ϻϭ.
princess_New_Classics_Kitchen_Scale_2954_omslag.fm Page 2 Friday, April 22, 2005 11:46 AM

1
New Classics Kitchen Scale Article 2954
Algemeen
Deze fraaie Princess New Classics Kitchen
Scale is onderdeel van onze New Classics-
productlijn, die is uitgevoerd in robuust
verchroomd staal. Met de Kitchen Scale
kunt u producten wegen tot 5000 g/176 oz.
Ook is een handige timer ingebouwd, die u
als kookwekker kunt gebruiken.
Werking en bediening
Zie figuur 1.
Het apparaat bevat de volgende
onderdelen:
1 Aan/uit- en reset-knop
2 g/oz- en start/stop-knop
3Timer-
4Timer+
5 Weegplateau
6 Deksel
7 LCD-display
8 Afdekkap voor vier 1,5 V-batterijen
9 Opzetbak voor losse producten.
Zie figuur 2.
Het LCD-display bevat de volgende
functionaliteiten:
1 Batterij-indicator
2 Eenheid voor gewicht (g of oz)
3 Eenheid voor tijd (min en sec)
4 Gewicht- of tijdaanduiding
5 Tang (bij storingen)
6 Minteken (bij negatief gewicht)
7 Aanduiding voor timermodus.
Voor het eerste gebruik
Zie figuur 3.
1 Verwijder de verpakking.
2 Verwijder de afdekkap voor de
batterijen aan de achterkant van het
apparaat.
3 Plaats vier 1,5 V-batterijen, zoals op het
apparaat is aangegeven.
4 Plaats de afdekkap weer op het batterij-
vak.
Gebruik
• Plaats het apparaat op een harde en
vlakke ondergrond, waar zo min
mogelijk trillingen voorkomen.
• Plaats het apparaat zodanig dat het
niet kan vallen.
Producten wegen
1 Open het deksel.
2 Druk op de aan/uit- en reset-knop om
het apparaat aan te zetten. Op het
display verschijnt eerst ‘888’ en na
1 seconde ‘0g’ (default-scherm).
3 Druk op de g/oz- en start/stop-knop om
te schakelen tussen g en oz. Welke
eenheid u gebruikt, ziet u bovenin het
display. U kunt altijd van eenheid
wisselen.
4 Als u losse producten zoals rijst wilt
wegen, trekt u eerst de opzetbak uit de
voorkant van het apparaat en plaatst
hem op het weegplateau.
5 Druk kort op de aan/uit- en reset-knop
om te resetten. Hierdoor zet u het
gewicht op ‘0’. Deze knop kunt u altijd
gebruiken.
6 Plaats het product op het plateau of in
de opzetbak (als u deze gebruikt). Als u
hiermee de maximale capaciteit
overschrijdt (5000 g/176 oz) dan
verschijnt ‘EEEE’ in het display. Druk op
de aan/uit- en reset-knop om te
resetten. Het default-scherm verschijnt.
U kunt nu een nieuw product volgens
de aanwijzingen hierboven plaatsen.
7 Lees het gewicht af.

2New Classics Kitchen Scale Article 2954
8 Pak het product (eventueel met de
opzetbak) van het apparaat af. Het
apparaat kan een negatief gewicht aan-
geven. Er verschijnt dan een ‘-’-teken
links in het display.
9 Druk gedurende 1 seconde de aan/uit-
en reset-knop in om het apparaat uit te
schakelen. Het apparaat schakelt ook
vanzelf uit als u het gedurende 1 minuut
niet gebruikt.
Timer instellen
U kunt altijd de timer inschakelen.
1 Open het deksel.
2 Druk op de aan/uit- en reset-knop om
het apparaat aan te zetten. Op het
display verschijnt eerst ‘888’ en na
1 seconde ‘0g’ (default-scherm).
3 Druk op ‘timer -’ of ‘timer +’ om de timer
in te schakelen. Er verschijnt een klokje
(
) links in het display. Bovenin het
display verschijnt ‘min’ en ‘sec’. Midden
in het display staat ‘00:00’.
4 Druk op ‘timer +’ om de tijd met stappen
van 30 seconden te verhogen. De
maximale tijd is 90 minuten.
5 Druk op ‘timer -’ om de ingestelde tijd
met stappen van 30 seconden te
verlagen (u kunt geen negatieve tijd
instellen). Houd u ‘timer +’ of ‘timer -’
ingedrukt dan wordt de tijd sneller
verhoogd of verlaagd.
6 Druk op de g/oz- en start/stop-knop om
de timer te starten. U kunt de timer
onderbreken door op de g/oz- en start/
stop-knop te drukken. Drukt u nog-
maals op deze knop dan loopt de timer
weer verder.
7 De timer telt af naar ‘0’. Als er nog
5 seconden op de timer staan, geeft de
timer elke 0,5 seconde een korte piep-
toon. Als de timer op 0 springt, zal
‘00:00’ gedurende 10 seconden gaan
knipperen. Druk op een willekeurige
knop om de pieptoon te stoppen.
8 Druk op de aan/uit- en reset-knop om
terug te gaan naar het defaultscherm
van de weegmodus. Dit kunt u ook
doen als de timer loopt, maar dan stopt
u de timer. U moet deze dan opnieuw
instellen.
9 Druk op de aan/uit- en reset-knop om
het apparaat uit te schakelen. Het
apparaat schakelt vanzelf uit als u het
gedurende 1 minuut niet gebruikt.
Onderhoud
en reinigen
Batterijen vervangen
Vervang de batterijen onmiddellijk als de
batterij-indicator links bovenin het display
knippert.
1 Schakel het apparaat uit.
2 Verwijder de afdekkap.
3 Vervang de batterijen.
4 Plaats de afdekkap weer op het batterij-
vak.
Kitchen Scale reinigen
• Dompel het apparaat nooit onder in
water of een andere vloeistof. Mocht
dit wel gebeuren, gebruik het apparaat
dan niet meer en gooi het weg.
• Gebruik geen schurende of
agressieve middelen.
1 Reinig het apparaat alleen met het spe-
ciaal daarvoor bijgeleverde microvezel-
doekje. Gebruik dit doekje alleen droog.
Storingen oplossen
Er verschijnt een tangetje linksonder in het
display (fig. 2; 5), als er in het apparaat een
bepaalde storing optreedt. Los de storing
als volgt op:
1 Zet het apparaat uit door 1 s op de aan/
uit- en reset-knop te drukken.
2 Plaats de batterijen opnieuw goed in het
batterijvak (zie ‘Batterijen vervangen’).
3 Zet het apparaat weer aan.

3
New Classics Kitchen Scale Article 2954
Veiligheid
Algemeen
• Lees de gebruiksaanwijzing goed
door en bewaar deze zorgvuldig.
• Gebruik dit apparaat alleen zoals
beschreven in deze gebruiks-
aanwijzing.
• Gebruik dit apparaat alleen voor
huishoudelijke doeleinden.
• Houd het apparaat buiten het bereik
van kinderen of personen die er niet
goed mee om kunnen gaan.
• Laat reparaties uitvoeren door een
gekwalificeerde monteur. Probeer
nooit zelf het apparaat te repareren.
Warmte en elektriciteit
• Zorg ervoor dat het apparaat niet in
aanraking komt met hittebronnen,
zoals een hete kookplaat of open vuur.
• Zorg ervoor dat het apparaat niet in
aanraking komt met water.
Tijdens gebruik
• Gebruik het apparaat nooit buiten.
• Plaats het apparaat op een harde en
vlakke ondergrond, waar zo min
mogelijk trillingen voorkomen.
• Plaats het apparaat zodanig dat het
niet kan vallen.
• Zorg ervoor dat uw handen droog zijn
als u het apparaat aanraakt.
• Gebruik het apparaat nooit in vochtige
ruimten.
• Schakel het apparaat uit als u tijdens
het gebruik storingen ondervindt, het
apparaat gaat reinigen of klaar bent
met het gebruik.
• Verplaats het apparaat nooit als het is
ingeschakeld. Schakel het apparaat
eerst uit.
Milieu
Werp verpakkingsmateriaal zoals plastic
en dozen in de daarvoor bestemde
containers.
Aan het eind van de levensduur dient het
apparaat op een verantwoorde wijze
afgevoerd te worden. Neem hiervoor
contact op met uw gemeente of
afvalverwerkingsinstantie. U kunt het
apparaat ook inleveren bij de winkelier.

4New Classics Kitchen Scale Article 2954
General
This attractive Princess New Classics
Kitchen Scale is one of the products in our
New Classics range, all of which are
finished in sturdy chrome-plated steel. You
can use your Kitchen Scale to weigh
products to 5000 g/176 oz. It also includes
a handy kitchen timer.
Operation and
controls
See Figure 1.
The appliance is equipped with the
following features:
1 On/off and reset button
2 g/oz and start/stop button
3Timer-
4Timer+
5 Weighing platform
6 Cover
7 LCD display
8 Cover for four 1.5 V batteries
9 Container for loose products.
See Figure 2.
The LCD display has the following
functionalities:
1 Battery indicator
2 Units of weight (g or oz)
3 Units of time (min and sec)
4 Display of weight or time
5 Spanner (in the event of malfunction)
6 Minus sign (for negative weight)
7 Indicator for timer mode.
Before use for the first time
See Figure 3.
1 Remove the packaging.
2 Remove the battery cover at the rear of
the appliance.
3 Fit four 1.5 V batteries as indicated on
the appliance.
4 Fit the cover to the battery
compartment.
Use
• Place the appliance on a hard and
level surface, as free from vibration as
possible.
• Put the appliance in a place where it
cannot fall off the worktop.
Weighing products
1 Open the cover.
2 Press the on/off and reset button to
switch on the appliance. ‘888’ will be
shown on the display, and ‘0g’ will then
be shown after 1 second (default
display).
3 Press the g/oz and start/stop button to
switch between g and oz. The selected
unti is shown at the top of the display.
You can change units at any time you
wish.
4 To weigh loose products such as rice,
slide the container out of the front of the
appliance and put it on the weighing
platform.
5 Reset the appliance by briefly pressing
the on/off and reset button. This sets
the weight to ‘0’. You can use this
button at any time you wish.
6 Put the product on the weighing
platform or in the container (where
relevant). On weighing product with a
weight of more than (5000 g/176 oz)
‘EEEE’ will be shown in the display.
Reset the appliance by pressing the on/
off and reset button. The default display
will be shown. You can now weigh a
new product using the above
procedure.

5
New Classics Kitchen Scale Article 2954
7 Read the weight.
8 Remove the product (where relevant,
with the container) from the appliance.
The appliance may display a negative
weight. A ‘-’ sign will then be shown at
the left of the display.
9 Press the on/off and reset button for
1 second to switch off the appliance.
The appliance will also switch off
automatically when it is not used for
1 minute.
Setting the timer
You can set the timer whenever you wish.
1 Open the cover.
2 Press the on/off and reset button to
switch on the appliance. ‘888’ will be
shown on the display, and ‘0g’ will ten
be shown after 1 second (default
display).
3 Press either ‘timer -’ or ‘timer +’ to
switch on the timer. A clock (
) will be
shown at the left of the display. ‘min’
and ‘sec’ are shown at the top of the
display. ‘00:00’ is shown in the middle of
the display.
4 Press ‘timer +’ to increase the time in
intervals of 30 seconds. The maximum
time is 90 minutes.
5 Press ‘timer -’ to decrease the set time
in intervals of 30 seconds (you cannot
set a negative time). Keeping ‘timer +’
or ‘timer -’ pressed in will increase the
speed at which the time is increased or
decreased.
6 Press the g/oz and start/stop button to
switch on the timer. You can interrupt
the timer by pressing the g/oz and start/
stop button. Press the button again to
restart the timer.
7 The timer counts back to ‘0’. When
there are 5 seconds left the timer emits
a brief beep every 0.5 second. When
the timer reaches 0, then ‘00:00’ will
flash on the display for 10 seconds.
Press any button to stop the beep.
8 Press the on/off and reset button to
return to the default display of the
weighing mode. You can also do this
while the timer is running; however, this
will stop the timer. You will then need to
set the timer again.
9 Press the on/off and reset button to
switch off the appliance. The appliance
will also switch off automatically when it
is not used for 1 minute.
Maintenance
and cleaning
Replacing the batteries
Replace the batteries immediately if the
battery indicator at the top left of the
display begins to flash.
1 Switch off the appliance.
2 Remove the battery cover.
3 Replace the batteries.
4 Fit the cover to the battery
compartment.
Cleaning the Kitchen Scale
• Do not immerse the appliance in
water, or in other liquids. If this
happens do not use the appliance any
more; dispose of the appliance.
• Never use corrosive or scouring
cleaning agents.
1 Clean the control panel solely with the
special microfibre cloth supplied with
the appliance. Do not moisten the cloth.
Troubleshooting
A spanner is shown at the bottom left of
the display (Fig. 2; 5) in the event of a
specific malfunction. Rectify this
malfunction using the following procedure:
1 Switch off the appliance by pressing the
on/off and reset button for 1 s.
2 Remove the batteries, and then fit them
correctly in the battery compartment
(see ‘Replacing batteries’).

6New Classics Kitchen Scale Article 2954
3 Switch the appliance on again.
Safety
General
• Please read these instructions
carefully and retain them for
reference.
• Use this appliance only in accordance
with the instructions.
• This appliance is intended solely for
domestic use.
• Keep the appliance out of the reach of
children, and of persons who may not
be able to operate it safely.
• Have the appliance repaired only by a
qualified electrician. Never try to
repair the appliance yourself.
Electricity and heat
• Make sure that the appliance does not
come in contact with sources of heat,
such as a hot hob or naked flame.
• Make sure that the appliance does not
come in contact with water.
During use
• Never use the appliance outdoors.
• Place the appliance on a hard and
level surface, as free from vibration as
possible.
• Put the appliance in a place where it
cannot fall off the worktop.
• Make sure that your hands are dry
before touching the appliance.
• Never use the appliance in a humid
room.
• Switch off the appliance in the event
of a malfunction during use, and
before cleaning the appliance or
storing it after use.
• Never move the appliance whilst it is
switched on. Always switch off the
appliance first.
The Environment
Dispose of packaging material, such as
plastic and boxes, in the appropriate waste
containers.
When it reaches the end of its useful life
the appliance must be disposed of in a
responsible manner. Contact your
municipal council or refuse-disposal
agency for disposal instructions. You can
also hand in the appliance to the retailer.

7
New Classics Kitchen Scale Article 2954
Généralités
Cette magnifique balance de cuisine
Princess New Classics Kitchen Scale fait
partie de notre ligne de produits New
Classics en robuste acier chromé. La
balance Kitchen Scale vous permet des
pesées allant jusqu'à 5000 g/176 oz. Elle
comporte également une minuterie
incorporée qui peut vous servir de
minuterie de cuisine.
Fonctionnement et
utilisation
Voir la figure 1.
Les composants de l'appareil sont :
1 Interrupteur principal 'reset' (mise sous
tension - réinitialisation)
2 'Start/stop' (g/oz et marche/arrêt)
3 Timer - (minuterie -)
4 Timer + (minuterie +)
5 Plateau de pesage
6 Couvercle
7 Écran LCD
8 Couvercle du compartiment des 4 piles
1,5 V
9 Récipient de pesage pour produits en
vrac.
Voir la figure 2.
Les fonctions de l'écran LCD sont :
1 Indication de charge de la pile
2 Unité de poids (g ou oz)
3 Unité de temps (min et sec)
4 Affichage du poids ou de l'heure
5 Pince (indicateur de problème)
6 Signe moins (pour un poids négatif)
7 Indication du mode de la minuterie.
Avant la première utilisation
Voir la figure 3.
1 Enlevez l'emballage.
2 Retirez le couvercle du compartiment
des piles, à l'arrière de l'appareil.
3 Placez quatre piles 1,5 V dans le
compartiment, comme indiqué sur
l'appareil.
4 Refermez le couvercle du
compartiment des piles.
Utilisation
• Installez l'appareil sur une surface
plane et stable, peu sensible aux
vibrations.
• Placez l'appareil de telle façon qu'il ne
risque pas de tomber.
Pesées
1 Ouvrez le couvercle.
2 Appuyez sur l'interrupteur principal
'reset' pour mettre l'appareil sous
tension. L'écran affiche d'abord '888',
puis, après 1 seconde, '0g' (écran par
défaut).
3 Appuyez sur le commutateur 'start/stop'
pour sélectionner g ou oz. L'unité en
usage est affichée en haut de l'écran.
Vous pouvez en changer à tout
moment.
4 Pour peser des produits en vrac,
comme par exemple du riz, vous sortez
d'abord le récipient de pesage de
l'avant de l'appareil, et vous le placez
sur le plateau.
5 Appuyez brièvement sur l'interrupteur
principal 'reset' pour initialiser l'appareil.
Vous mettez ainsi le poids à '0'. Vous
pouvez actionner cet interrupteur à tout
moment.
6 Mettez le produit à peser sur le plateau
ou, le cas échéant, dans le récipient. Si
le poids du produit dépasse le
maximum supporté (5000 g/176 oz),
l'écran affiche 'EEEE'. Appuyez sur
l'interrupteur principal 'reset' pour
réinitialiser l'appareil. L'écran par défaut

8New Classics Kitchen Scale Article 2954
s'affiche. Vous pouvez maintenant
mettre en place un autre produit, selon
les indications ci-dessus.
7 Lisez le poids sur l'écran.
8 Retirez le produit de la balance (y
compris le récipient, si vous utilisez
celui-ci). Il est possible que la balance
affiche maintenant un poids négatif.
L'écran affiche alors un signe '-', à
gauche.
9 Appuyez sur l'interrupteur principal
'reset' pendant 1 seconde pour couper
l'alimentation de l'appareil. L'appareil se
met hors tension automatiquement s'il
reste inutilisé pendant 1 minute.
Réglage de la minuterie
Vous pouvez régler la minuterie à
n'importe quel moment.
1 Ouvrez le couvercle.
2 Appuyez sur l'interrupteur principal
'reset' pour mettre l'appareil sous
tension. L'écran affiche d'abord '888',
puis, après 1 seconde, '0g' (écran par
défaut).
3 Appuyez sur 'timer -' ou sur 'timer +'
pour enclencher la minuterie. Une
petite face d'horloge (
) s'affiche à
gauche de l'écran. En haut de l'écran
s'affichent 'min' et 'sec'. Au milieu de
l'écran s'affiche la durée '00:00'.
4 Appuyez sur 'timer +' pour augmenter la
durée affichée par incréments de
30 secondes. La durée maximale
possible est de 90 minutes.
5 Appuyez sur 'timer +' pour diminuer la
durée affichée par incréments de
30 secondes. Si vous enfoncez le
bouton 'timer +' ou 'timer -', et le
maintenez, la durée augmente ou
diminue plus rapidement.
6 Appuyez sur le commutateur 'start/stop'
pour que la minuterie commence à
compter. Appuyez de nouveau sur le
commutateur 'start/stop' pour
interrompre la minuterie. Appuyez
encore une fois sur le même
commutateur, et la minuterie se remet
en marche.
7 La minuterie compte à rebours jusqu'à
'0'. Quand il lui reste 5 secondes, la
minuterie donne un bref bip toutes les
0,5 secondes. Lorsque la minuterie
atteint 0, l'écran affiche '00:00' en
clignotant pendant 10 secondes.
Appuyez sur n'importe lequel des
boutons pour arrêter le signal sonore.
8 Appuyez sur l'interrupteur principal
'reset' pour revenir à l'écran par défaut
du mode de pesée. Ceci est également
possible pendant que la minuterie est
en train de compter, mais alors, la
minuterie s'arrête. Vous devez alors la
régler à nouveau.
9 Appuyez sur l'interrupteur principal
'reset' pour couper l'alimentation de
l'appareil. L'appareil se met hors
tension automatiquement s'il reste
inutilisé pendant 1 minute.
Entretien
et nettoyage
Remplacement des piles
Remplacez immédiatement les piles
lorsque l'indication de charge de la pile
clignote (en haut à gauche de l'écran).
1 Coupez l'alimentation de l'appareil.
2 Enlevez le couvercle.
3 Remplacez les piles.
4 Refermez le couvercle du
compartiment des piles.
Nettoyage de la balance Kitchen
Scale
• N'immergez jamais l'appareil dans
l'eau ou dans un autre liquide. Le cas
échéant, cessez d'utiliser l'appareil et
mettez-le au rebut.
• N'utilisez pas de détergents agressifs
ou décapants.

9
New Classics Kitchen Scale Article 2954
1 Nettoyez l'appareil uniquement avec le
chiffon microfibres spécial livré avec
l'appareil. Utilisez ce chiffon
uniquement à sec.
Problèmes et solutions
Une petite pince s'affiche en bas à gauche
de l'écran (fig. 2; 5) lorsque l'appareil a un
problème. Vous remédiez au problème
comme suit :
1 Coupez l'alimentation de l'appareil ;
pour cela, vous appuyez pendant 1 s
sur l'interrupteur principal 'reset'.
2 Sortez les piles de leur compartiment et
remettez-les en place comme il faut
(voir 'Remplacement des piles').
3 Remettez l'appareil sous tension.
Sécurité
Généralités
• Lisez soigneusement le mode
d'emploi et conservez-le
précieusement.
• Utilisez cet appareil uniquement
suivant les instructions décrites dans
le mode d'emploi.
• L'appareil est destiné uniquement à
l'utilisation domestique.
• Tenez l'appareil hors de la portée des
enfants ou des personnes incapables
de l'utiliser correctement.
• Faites effectuer les réparations par un
technicien qualifié. Ne tentez jamais
de réparer vous-même l'appareil.
Électricité et chaleur
• Assurez-vous que l'appareil n'entre
pas en contact avec une source de
chaleur telle qu'une plaque électrique
chaude ou une flamme.
• Assurez-vous que l'appareil n'entre
pas en contact avec de l'eau.
Pendant l'utilisation
• N´utilisez jamais l'appareil à
l'extérieur.
• Installez l'appareil sur une surface
plane et stable, peu sensible aux
vibrations.
• Placez l'appareil de telle façon qu'il ne
risque pas de tomber.
• Assurez-vous que vos mains sont
sèches avant de toucher l'appareil.
• N'utilisez jamais l'appareil dans une
pièce humide.
• Éteignez l'appareil en cas de problème
durant l'utilisation, pour le nettoyage,
et dès que vous avez fini de l'utiliser.
• Ne déplacez jamais l'appareil pendant
qu'il est en marche. Coupez au
préalable l'alimentation de l'appareil.
Environnement
Jetez le matériel d'emballage, tel que le
plastique et les boîtes, dans les
conteneurs prévus à cet effet.
Lorsque l'appareil est usé, il doit être mis
au rebut selon les règlements en vigueur.
Pour plus d'informations, contactez les
autorités communales ou l'autorité
responsable du retraitement des déchets.
Vous pouvez également rapporter
l'appareil au point de vente.

10 New Classics Kitchen Scale Article 2954
Allgemein
Diese geschmackvolle Princess New
Classics Küchenwaage ist Teil unserer
New Classics-Produktlinie, die aus
stabilem, verchromtem Stahl hergestellt
wird. Mit der Küchenwaage können Sie
Produkte bis 5000 g/175 oz wiegen. In der
Waage ist auch ein praktischer Timer
eingebaut, den Sie als Küchenwecker
verwenden können.
Arbeitsweise und
Bedienung
Siehe Abbildung 1.
Das Gerät besteht aus den folgenden
Teilen:
1 Ein/Aus- und Reset-Taste
2 g/oz- und Start/Stopp-Taste
3Timer-
4Timer+
5 Wiegeplattform
6 Deckel
7 LCD-Display
8 Schutzhaube für vier 1,5 V-Batterien
9 Aufsatzbehälter für lose Produkte.
Siehe Abbildung 2.
Das LCD-Display verfügt über die
folgenden Funktionen:
1 Batterieanzeige
2 Einheit für Gewicht (g oder oz)
3 Einheit für Zeit (Min und Sek)
4 Gewichts- oder Zeitanzeige
5 Zange (bei Störungen)
6 Minuszeichen (bei negativem Gewicht)
7 Anzeige für Timermodus.
Vor der ersten Verwendung
Siehe Abbildung 3.
1 Entfernen Sie die Verpackung.
2 Nehmen Sie die an der Geräterückseite
befindliche Schutzhaube für die
Batterien ab.
3 Legen Sie wie auf dem Gerät
angegeben vier 1,5 V-Batterien ein.
4 Bringen Sie die Schutzhaube wieder
auf dem Batteriefach an.
Verwendung
• Stellen Sie das Gerät auf eine feste
und flache Oberfläche, die möglichst
keinen Erschütterungen ausgesetzt
ist.
• Stellen Sie das Gerät so auf, dass es
nicht herunterfallen kann.
Produkte wiegen
1 Öffnen Sie den Deckel.
2 Drücken Sie zum Einschalten des
Geräts auf die Ein/Aus- und Reset-
Taste. Auf dem Display erscheint zuerst
„888“ und nach 1 Sekunde "0g"
(Standardanzeige).
3 Drücken Sie auf die g/oz- und Start/
Stopp-Taste, um zwischen g und oz zu
wechseln. Welche Einheit Sie
verwenden, wird oben im Display
angezeigt. Sie können die Einheit
jederzeit wechseln.
4 Wenn Sie lose Produkte wie Reis
wiegen möchten, dann ziehen Sie
zuerst den Aufsatzbehälter aus der
Gerätevorderseite heraus und stellen
ihn auf die Wiegeplattform.
5 Drücken Sie kurz auf die Ein/Aus- und
Reset-Taste, um die Einstellung
zurückzusetzen. Hierdurch stellen Sie
das Gewicht auf „0“. Diese Taste
können Sie jederzeit verwenden.
6 Legen Sie das Produkt auf die Plattform
oder in den Aufsatzbehälter (wenn Sie
diesen verwenden). Wenn Sie damit die
Höchstmenge überschreiten (5000 g/
176 oz), erscheint im Display "EEEE".

11
New Classics Kitchen Scale Article 2954
Drücken Sie auf die Ein/Aus- und
Reset-Taste, um die Einstellung
zurückzusetzen. Es erscheint die
Standardanzeige. Jetzt können Sie ein
neues Produkt entsprechend den
Anweisungen dazugeben.
7 Lesen Sie das Gewicht ab.
8 Nehmen Sie das Produkt (eventuell mit
dem Aufsatzbehälter) vom Gerät
herunter. Die Waage kann ein
negatives Gewicht anzeigen. Im Display
erscheint dann links ein „-"-Zeichen.
9 Drücken Sie zum Ausschalten des
Geräts 1 Sekunde lang die Ein/Aus-
und Reset-Taste. Die Waage schaltet
sich auch von selbst aus, wenn sie
1 Minute lang nicht benutzt wurde.
Timer einstellen
Sie können den Timer jederzeit
einschalten.
1 Öffnen Sie den Deckel.
2 Drücken Sie zum Einschalten des
Geräts auf die Ein/Aus- und Reset-
Taste. Auf dem Display erscheint zuerst
„888“ und nach 1 Sekunde "0g"
(Standardanzeige).
3 Drücken Sie zum Einschalten des
Timers auf „Timer -„ oder „Timer +“. Im
Display erscheint links eine Uhr (
) .
Oben im Display erscheint „min" und
"sec". In der Mitte des Displays steht
„00:00“.
4 Drücken Sie auf ‘Timer +’, um die Zeit
in Schritten von 30 Sekunden zu
erhöhen. Die einstellbare Höchstzeit
beträgt 90 Minuten.
5 Drücken Sie auf „Timer -, um die
eingestellte Zeit in Schritten von
30 Sekunden zurückzustellen (Sie
können keine negative Zeit einstellen).
Halten Sie die Taste „Timer +“ oder
„Timer “ gedrückt, wird die Zeit
schneller erhöht oder zurückgestellt.
6 Drücken Sie auf die g/oz- und Start/
Stopp-Taste, um den Timer zu starten.
Durch Drücken der g/oz- und Start/
Stopp-Taste können Sie den Timer
unterbrechen. Wenn Sie die Taste
erneut drücken, läuft der Timer wieder
weiter.
7 Der Timer zählt auf „0“ zurück. Wenn
noch 5 Sekunden auf dem Timer
stehen, ertönt alle 0,5 Sekunden ein
kurzer Piepton. Wenn der Timer auf 0
springt, blinkt für 10 Sekunden die
Anzeige „00:00“. Drücken Sie auf eine
beliebige Taste, um den Piepton
auszustellen.
8 Drücken Sie auf die Ein/Aus- und
Reset-Taste, um zur Standardanzeige
des Wiegemodus zurückzukehren. Sie
können dies auch tun, wenn der Timer
läuft, allerdings stoppen Sie dann den
Timer. Diesen müssen Sie dann erneut
einstellen.
9 Drücken Sie zum Ausschalten des
Geräts auf die Ein/Aus- und Reset-
Taste. Die Waage schaltet sich auch
von selbst aus, wenn sie 1 Minute lang
nicht benutzt wurde.
Wartung
und Reinigung
Batterien ersetzen
Ersetzen Sie die Batterien sofort, wenn die
Batterieanzeige oben links im Display
blinkt.
1 Schalten Sie das Gerät aus.
2 Entfernen Sie die Schutzhaube.
3 Ersetzen Sie die Batterien.
4 Bringen Sie die Schutzhaube wieder
auf dem Batteriefach an.
Reinigung der Küchenwaage
• Tauchen Sie das Gerät nie ins Wasser
oder in eine andere Flüssigkeit. Sollte
dies trotzdem passieren, dann
benutzen Sie das Gerät nicht mehr
und entsorgen Sie es.

12 New Classics Kitchen Scale Article 2954
• Verwenden Sie keine Scheuermittel
oder aggressiven Reinigungsmittel.
1 Reinigen Sie das Gerät nur mit dem
speziell dafür mitgelieferten
Mikrofasertuch. Verwenden Sie dieses
Tuch nur trocken.
Störungen beheben
Wenn im Gerät eine Störung auftritt,
erscheint links unten im Display eine
Zange (Abb. 2; 5). Beheben Sie die
Störung wie folgt:
1 Drücken Sie zum Ausschalten des
Geräts 1 Sekunde lang auf die Ein/Aus-
und Reset-Taste.
2 Legen Sie die Batterien erneut richtig in
das Batteriefach ein (siehe „Batterien
ersetzen“).
3 Schalten Sie das Gerät wieder ein.
Sicherheit
Allgemein
• Lesen Sie die Gebrauchsanweisung
gut durch und bewahren Sie diese
sorgfältig auf.
• Verwenden Sie das Gerät nur so wie in
dieser Anleitung beschrieben.
• Verwenden Sie dieses Gerät nur für
Haushaltszwecke.
• Halten Sie das Gerät außerhalb der
Reichweite von Kindern oder von
Personen, die es nicht richtig
bedienen können.
• Lassen Sie Reparaturen von einem
qualifizierten Mechaniker ausführen.
Versuchen Sie keinesfalls, das Gerät
selbst zu reparieren.
Wärme und Elektrzität
• Sorgen Sie dafür, dass das Gerät nicht
mit Hitzequellen wie heißen
Kochplatten oder offenem Feuer in
Berührung kommt.
• Sorgen Sie dafür, dass das Gerät nicht
mit Wasser in Berührung kommt.
Während der Verwendung
• Verwenden Sie das Gerät nie im
Freien.
• Stellen Sie das Gerät auf einen
stabilen und flachen Untergrund, der
möglichst keinen Erschütterungen
ausgesetzt ist.
• Stellen Sie das Gerät so auf, dass es
nicht herunterfallen kann.
• Sorgen Sie dafür, dass Ihre Hände
trocken sind, wenn Sie das Gerät
berühren.
• Verwenden Sie das Gerät nie in
feuchten Räumen.
• Schalten Sie das Gerät aus, wenn bei
der Benutzung Störungen auftreten,
Sie das Gerät reinigen oder Sie das
Gerät nicht mehr benutzen.
• Stellen Sie das Gerät nicht um, wenn
es eingeschaltet ist. Schalten Sie das
Gerät zuerst aus.
Umwelt
Werfen Sie Verpackungsmaterial wie
Kunststoff und Kartons in die dafür
vorgesehenen Container.
Am Ende der Lebensdauer muss das
Gerät auf verantwortungsvolle Weise
entsorgt werden. Nehmen Sie hierfür
Kontakt mit Ihrer Stadt oder der für die
Müllverarbeitung verantwortlichen Behörde
auf. Sie können das Gerät auch im
Geschäft abgeben.

13
New Classics Kitchen Scale Article 2954
Generalidades
Esta fabulosa balanza de cocina Princess
New Classics Kitchen Scale hace parte de
nuestra nueva línea de productos clásicos,
fabricada en acero cromado de alta
calidad. Con esta balanza de cocina puede
usted pesar productos hasta
5.000 gramos/176 onzas. La balanza
también está provista de un temporizador
incorporado que puede usar como reloj de
cocina.
Funcionamiento y
manejo
Véase la figura 1.
El aparato está compuesto por las
siguientes partes:
1 Botón de encendido/apagado y puesta
a cero
2 botón de selección gramos/onzas e
inicio/parada
3 Temporizador -
4 Temporizador +
5 Bandeja de pesado
6 Tapa
7 Pantalla LCD
8 Tapa del compartimiento para 4 pilas
de 1,5 V
9 Recipiente para pesar productos
sueltos.
Véase la figura 2.
La pantalla LCD dispone de las siguientes
funciones:
1 Indicador de carga de la pila
2 Unidad de medida para el peso (gramo
u onza)
3 Unidad de medida para el tiempo
(minutos y segundos)
4 Indicador de peso o tiempo
5 Símbolo de un alicate (en caso de
avería)
6 Signo menos (para medidas de peso
negativas)
7 Indicador de modo temporizador.
Antes del primer uso
Véase la figura 3.
1 Quite el embalaje.
2 Retire la tapa del compartimiento de las
pilas, ubicado en la parte posterior del
aparato.
3 Inserte cuatro pilas de 1,5 V tal como
se indica en el interior del aparato.
4 Vuelva a colocar la tapa del
compartimiento para cerrarlo.
Uso
• Coloque el aparato sobre una
superficie sólida y plana, en un lugar
donde se exponga a la menor
cantidad de vibraciones posible.
• Coloque el aparato en forma tal que
no pueda caerse.
Pesar un producto
1 Levante la tapa.
2 Pulse el botón de encendido/apagado y
puesta a cero para encender el
aparato. En la pantalla aparece primero
el texto ‘888’. Transcurrido 1 segundo
aparece el texto ‘0g’ (pantalla
estándar).
3 Pulse el botón gramo/onza y el botón
de encendido/apagado para conmutar
entre g (gramos) y oz (onzas). En la
pantalla aparecerá la unidad de peso
que está usando para pesar el
producto. Siempre puede cambiar la
unidad en que desea medir.
4 Si quiere pesar productos sueltos,
como arroz por ejemplo, retire primero

14 New Classics Kitchen Scale Article 2954
el recipiente de la parte frontal del
aparato y colóquelo sobre la bandeja
de pesado.
5 Pulse brevemente el botón de
encendido/apagado y puesta a cero
para poner a cero la balanza. Con ello
se fija el peso en '0'. Este botón se
puede usar en cualquier momento.
6 Coloque el producto sobre la bandeja
de pesado o en el recipiente (si lo está
utilizando). Si el peso del producto
sobrepasa la capacidad máxima del
aparato (5.000 gramos/176 onzas), el
texto ‘EEEE’ aparecerá en la pantalla.
Pulse el botón de encendido/apagado y
puesta a cero para poner a cero la
balanza. Aparece la pantalla estándar.
Puede proceder a pesar un nuevo
producto siguiendo las instrucciones
anteriores.
7 Lea el peso.
8 Retire el producto del aparato
(eventualmente con el recipiente). El
aparato puede indicar una medida de
peso negativa. En tal caso aparece el
signo ‘-’al lado izquierdo de la pantalla.
9 Pulse, durante 1 segundo, el botón de
encendido/apagado y puesta a cero
para apagar el aparato. El aparato se
apaga también, por sí solo, si no se ha
usado durante el lapso de 1 minuto.
Ajuste del temporizador
El temporizador se puede activar en
cualquier momento.
1 Levante la tapa.
2 Pulse el botón de encendido/apagado y
puesta a cero para encender el
aparato. En la pantalla aparece primero
el texto ‘888’. Transcurrido 1 segundo
aparece el texto ‘0g’ (pantalla
estándar).
3 Pulse el botón ‘temporizador -’ o
‘temporizador +’ para activar la función.
Aparecerá el símbolo de un reloj (
) en
el costado izquierdo de la pantalla. En
la parte superior de la pantalla aparece
el texto 'min' y 'sec'. En todo el centro
de la pantalla aparece '00:00'.
4 Pulse ‘temporizador +’ para aumentar
el tiempo en segmentos de
30 segundos. El tiempo máximo es
90 minutos.
5 Pulse ‘temporizador -’ para reducir el
tiempo fijado en segmentos de
30 segundos (no es posible fijar un
tiempo negativo). Si mantiene pulsado
‘temporizador +’ o ‘temporizador -’, se
aumenta o disminuye el tiempo a mayor
velocidad.
6 Pulse el botón gramo/onza e inicio/
parada para activar el temporizador.
Puede interrumpir el temporizador
pulsando el botón gramo/onza e inicio/
parada. Para desbloquear el
temporizador, pulse nuevamente el
mismo botón.
7 El temporizador cuenta en marcha
regresiva hasta '0'. Cuando aún quedan
5 segundos, el temporizador emite una
señal acústica cada 0,5 segundos.
Cuando el temporizador llega a 0, el
texto ‘00:00’ se enciende en la pantalla
durante 10 segundos en forma
intermitente. Pulse cualquier botón
para suspender la señal acústica.
8 Pulse el botón de encendido/apagado y
puesta a cero para volver a la pantalla
estándar del modo de pesado. Esto
también se puede hacer mientras está
activado el temporizador, solo que
entonces se suspenderá su
funcionamiento. En tal caso deberá
volver a ajustarlo.
9 Pulse el botón de encendido/apagado y
puesta a cero para apagar el aparato.
El aparato se apaga también, por sí
solo, si no se ha usado durante el lapso
de 1 minuto.

15
New Classics Kitchen Scale Article 2954
Mantenimiento
y limpieza
Sustitución de las pilas
Sustituya las pilas inmediatamente el
indicador que se encuentra en la parte
superior izquierda de la pantalla empiece a
parpadear.
1 Apague el aparato.
2 Retire la tapa.
3 Sustituye las pilas.
4 Vuelva a colocar la tapa del
compartimiento para cerrarlo.
Limpieza de la balanza de
cocina
• No sumerja el aparato nunca en agua
ni en ningún otro líquido. Si esto
ocurre, no vuelva a usarlo más y
deshágase de él.
• No use productos abrasivos o
agresivos.
1 Limpie el aparato con el paño especial
de microfibra adjunto. Use este paño
únicamente seco.
Solución de fallos
El símbolo de un alicate aparecerá en la
esquina inferior izquierda de la pantalla
(fig. 2; 5) cuando se produzca un fallo en el
aparato. Solucione los fallos de la
siguiente forma:
1 Apague el aparato pulsando durante
1 segundo el botón de encendido/
apagado y puesta a cero.
2 Vuelva a colocar bien las pilas en el
compartimiento (véase el apartado
'sustitución de las pilas').
3 Vuelva a encender el aparato.
Seguridad
Generalidades
• Lea las instrucciones de uso con
detenimiento y guárdelas
cuidadosamente.
• Utilice este aparato únicamente en la
forma que se describe en las
instrucciones.
• Use este aparato únicamente para
fines domésticos.
• Manténgalo fuera del alcance de los
niños o de personas que no sepan
utilizarlo en la forma correcta.
• Haga reparar el aparato únicamente
por personal cualificado. No intente
nunca repararlo usted mismo.
Electricidad y fuentes de calor
• Asegúrese de que el aparato no está
en contacto con fuentes de calor, por
ejemplo, con una placa caliente de la
estufa o con fuego abierto.
• Asegúrese de que el aparato no está
en contacto con el agua.
Durante el uso
• No use nunca este aparato fuera del
hogar.
• Coloque el aparato sobre una
superficie sólida y plana, en un lugar
donde se exponga a la menor
cantidad de vibraciones posible.
• Coloque el aparato en forma tal que
no pueda caerse.
• Asegúrese de tener las manos secas
cuando manipule el aparato.
• No use el aparato en lugares
húmedos.

16 New Classics Kitchen Scale Article 2954
• Apague el aparato si se presentan
fallos durante el uso, cuando quiera
limpiarlo, o después de usarlo.
• No mueva nunca el aparato mientras
que esté encendido. Apague primero
el aparato.
Medio ambiente
Tire el material de embalaje, como plástico
y cajas, en los contenedores destinados
para ello.
Al concluir la vida útil del aparato,
deséchelo en forma responsable
llevándolo a un lugar autorizado. Para ello,
póngase en contacto con las autoridades
municipales o con el servicio de
procesamiento de basuras. También
puede llevar el aparato a la tienda donde lo
adquirió.

17
New Classics Kitchen Scale Article 2954
Avvertenze generali
Il prodotto New Classics Kitchen Scale di
Princess, dal design moderno ed elegante,
fa parte della gamma New Classics,
realizzata in robusto acciaio cromato. La
bilancia da cucina permette di pesare
prodotti e alimenti fino a 5.000 g / 176 oz.
Inoltre, il prodotto è dotato di un pratico
timer integrato utilizzabile come
contaminuti da cucina.
Funzionamento e
utilizzo del prodotto
Vedere la fig. 1.
L’apparecchio è composto dai seguenti
elementi:
1 Pulsante di acceso/spento e di ripristino
(reset)
2 Pulsante di conversione grammi/once e
di avvio/arresto (g/oz e start/stop)
3 Pulsante Timer -
4 Pulsante Timer +
5 Piatto di carico
6 Coperchio
7 Display LCD
8 Coperchio di chiusura del vano
portabatterie (capacità: 4 batterie da
1,5 V)
9 Contenitore per la pesatura di prodotti
sfusi.
Vedere la fig. 2.
Il display LCD dispone delle seguenti
funzioni di visualizzazione:
1 Indicazione del livello della batteria
2 Unità di peso (grammi od once)
3 Contaminuti (minuti e secondi)
4 Visualizzazione del peso o del tempo
impostato
5 Simbolo chiave inglese (in caso di
guasto o malfunzionamento)
6 Segno meno (in caso di peso negativo)
7 Simbolo di funzionamento in modalità
timer.
Operazioni preliminari al primo
utilizzo
Vedere la fig. 3.
1 Rimuovere l’imballaggio.
2 Rimuovere il coperchio di chiusura del
vano portabatterie presente sulla parte
posteriore dell'apparecchio.
3 Inserire nel vano 4 batterie da 1,5 V
attenendosi alle polarità indicate
sull'apparecchio.
4 Riposizionare il coperchio di chiusura
sul vano portabatterie.
Uso
• Posizionare l’apparecchio su di una
superficie piana e stabile, in un luogo
in cui non sia possibile risentire di
eventuali oscillazioni o vibrazioni.
• Assicurarsi di collocare l’apparecchio
in un punto da cui non possa cadere.
Come procedere alla pesatura
1 Aprire il coperchio.
2 Premere il pulsante di acceso/spento e
di ripristino (reset) per accendere
l’apparecchio. Il display visualizzerà
prima la cifra "888" e dopo ca.
1 secondo la dicitura "0g"
(visualizzazione iniziale).
3 Premere il pulsante di conversione
grammi/once e di avvio/arresto (g/oz e
start/stop) per passare alla
visualizzazione del peso in grammi o in
once. L'unità di peso attuale viene
indicata nella parte superiore del
display. L'unità di peso può essere
modificata in qualsiasi momento.

18 New Classics Kitchen Scale Article 2954
4 Qualora si desideri pesare prodotti sfusi
(quali per es. il riso), estrarre l'apposito
contenitore dalla parte anteriore
dell'apparecchio e collocarlo sul piatto
di carico.
5 Premere brevemente il pulsante di
acceso/spento e di ripristino (reset) per
reimpostare l’apparecchio. In tal modo
sarà possibile riportare l'indicazione del
peso al valore di "0". Questo pulsante
può essere utilizzato in qualsiasi
momento.
6 Collocare il prodotto da pesare sul
piatto di carico o all'interno dell'apposito
contenitore (se necessario). Qualora il
peso del prodotto superi la portata
massima (5.000 g / 176 oz), il display
visualizzerà la dicitura "EEEE".
Premere il pulsante di acceso/spento e
di ripristino (reset) per reimpostare
l’apparecchio. Il display passerà
nuovamente alla visualizzazione
iniziale. Sarà quindi possibile procedere
alla pesatura di un altro prodotto
attenendosi alle istruzioni indicate qui
sopra.
7 Leggere il peso indicato sul display.
8 Togliere il prodotto pesato
(eventualmente con il contenitore) dal
piatto di carico. L'apparecchio potrebbe
adesso indicare un peso negativo. In tal
caso sulla parte sinistra del display
apparirà il segno meno ("-").
9 Per spegnere l'apparecchio, tenere
premuto per almeno 1 secondo il
pulsante di acceso/spento e di ripristino
(reset). L'apparecchio si spegne
automaticamente quando non viene
utilizzato per oltre 1 minuto.
Impostazione del timer
Il timer può essere attivato in qualsiasi
momento.
1 Aprire il coperchio.
2 Premere il pulsante di acceso/spento e
di ripristino (reset) per accendere
l’apparecchio. Il display visualizzerà
prima la cifra "888" e dopo ca.
1 secondo la dicitura "0g"
(visualizzazione iniziale).
3 Premere i pulsanti "Timer -" o "Timer +"
per attivare il contaminuti. Sulla parte
sinistra del display apparirà il simbolo
dell'orologio (
). Nella parte superiore
del display appariranno le diciture "min"
e "sec". Al centro del display verranno
visualizzate le cifre "00:00".
4 Premere il pulsante "Timer +" per
incrementare il periodo di tempo
desiderato con intervalli di 30 secondi.
Il periodo massimo impostabile con il
timer è di 90 minuti.
5 Premere il pulsante "Timer -" per
diminuire il tempo impostato con
intervalli di 30 secondi (è impossibile
impostare un periodo inferiore a 0). Per
incrementare o diminuire in modo più
rapido il periodo di tempo da impostare,
mantenere premuti i pulsanti "Timer +"
o "Timer -".
6 Premere il pulsante di conversione
grammi/once e di avvio/arresto (g/oz e
start/stop) per avviare il contaminuti.
Per interrompere il conteggio del timer,
premere il pulsante di conversione
grammi/once e di avvio/arresto (g/oz e
start/stop). Premendo nuovamente
questo pulsante, il timer riprenderà i
conteggio.
7 Il timer esegue un conto alla rovescia
verso lo "0". Quando mancheranno gli
ultimi 5 secondi allo scadere del tempo
impostato, il timer emetterà un breve
segnale acustico ogni 0,5 secondi. Una
volta raggiunto lo "0", la cifra "00:00"
lampeggerà sul display per ca.
10 secondi. Premere un tasto qualsiasi
per disattivare il segnale acustico.
8 Premere il pulsante di acceso/spento e
di ripristino (reset) per tornare
nuovamente alla visualizzazione iniziale
della modalità di pesatura. Questa
operazione può essere eseguita anche
quando il timer è in funzione: in tal
modo verrà arrestato il funzionamento
del contaminuti. Sarà quindi necessario
reimpostare il timer.
Table of contents
Languages:
Other Princess Scale manuals