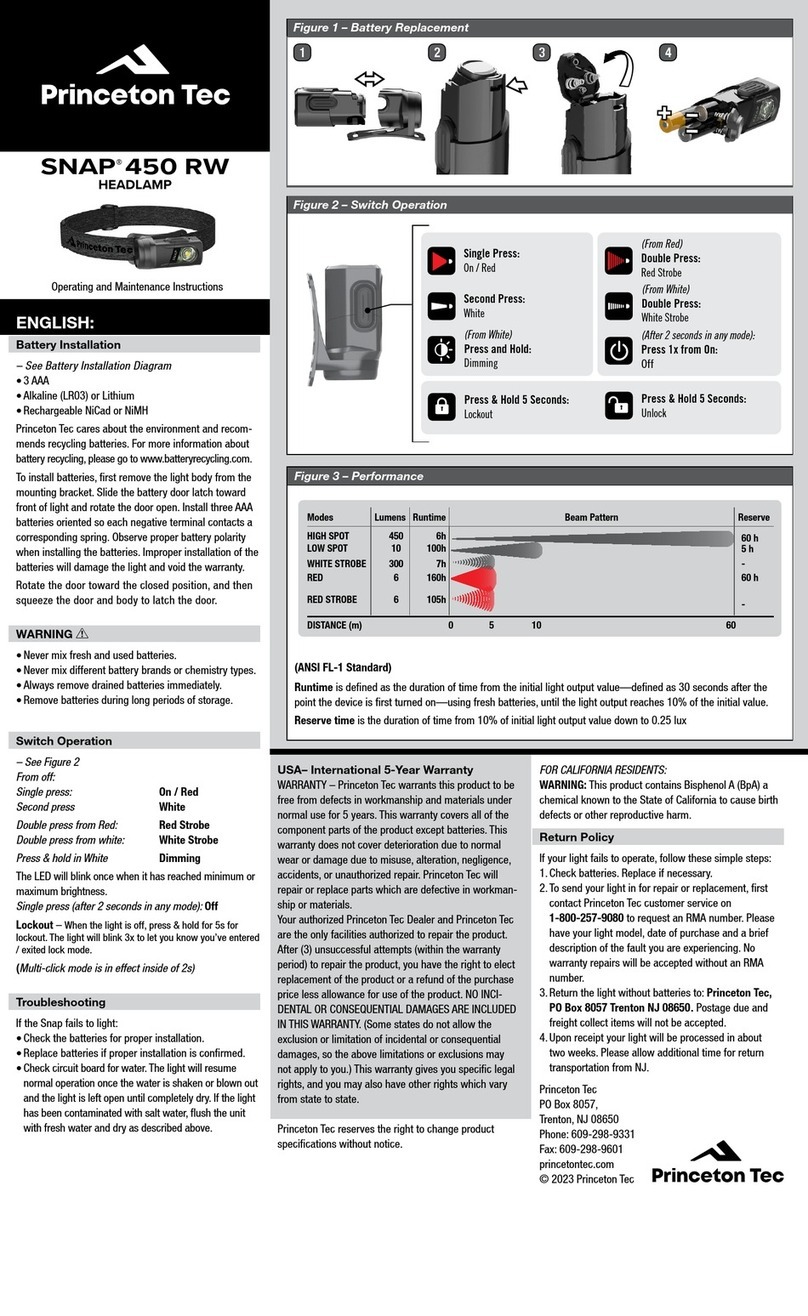
Princeton Tec se soucie de l'environnement et
recommande le recyclage des piles. Pour plus
d'informations sur le recyclage des piles, rendez-vous
sur: www.batteryrecycling.com
de bouton précédente. Pour tourner l'EOS deux de,
appuyer et tenir le bouton en bas jusqu' aux virages
légers de.
Les modes hauts et bas sont choisis en appuyant et
relâcher le bouton dans de 1,5 seconde de la presse
de bouton précédente. Pour tourner l'EOS deux de,
• Ne combinez jamais des piles neuves et des piles
déjà utilisées.
• Ne combinez jamais des piles de marques ou de
types différents.
• Ne laissez jamais de piles déchargées dans la
lampe; retirez-les immédiatement.
• Retirez les piles avant une longue période
d'inutilisation.
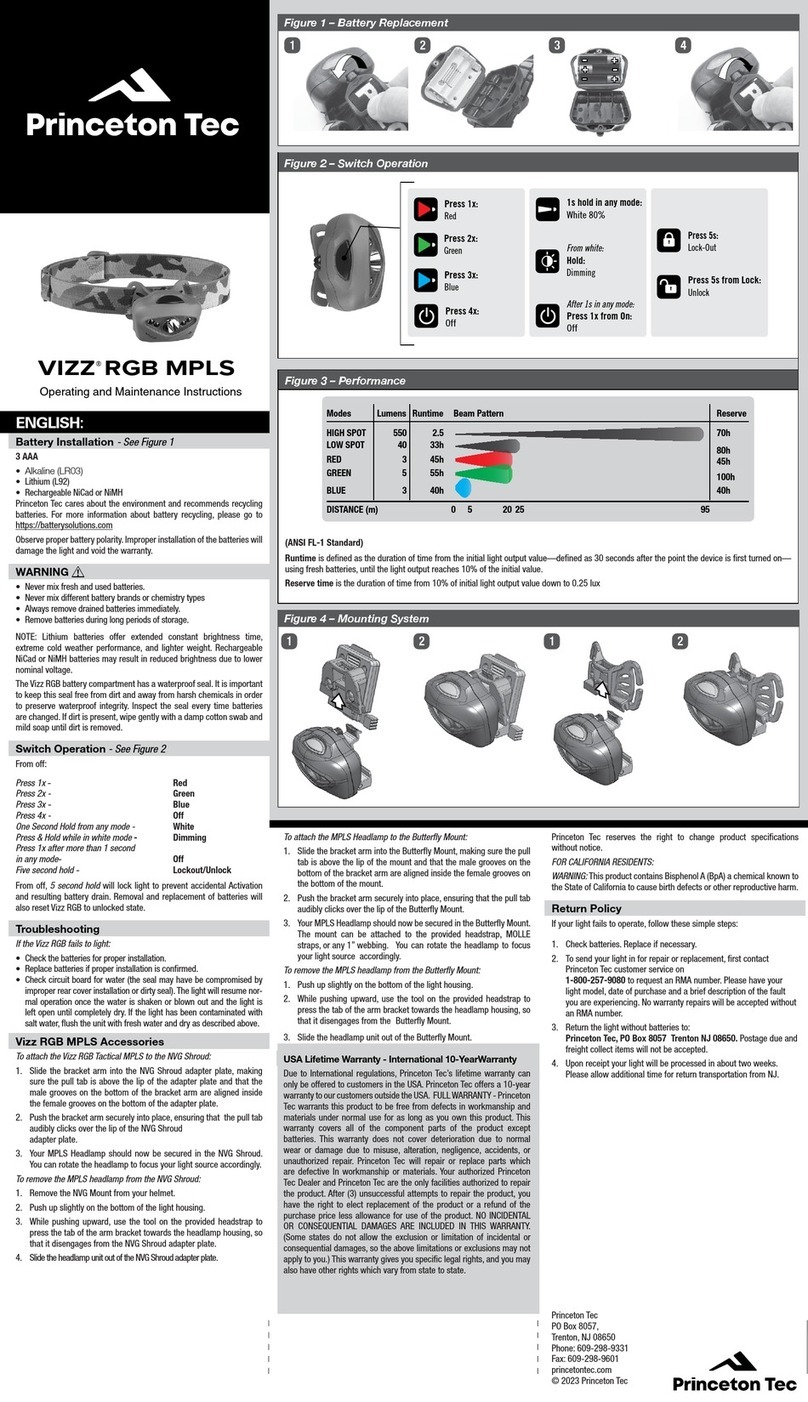
Opération de commutation
Circuits et consommation d'énergie/LED régulées
REMARQUE: les piles au lithium accroissent la durée
de luminosité constante, sont performantes dans des
conditions de froid extrême et sont plus légères. Il se
peut que les piles NiCad ou NiMH rechargeables
produisent une luminosité moindre du fait de leur
tension nominale plus faible.
Le compartiment à piles Eos est doté d'un joint
d'étanchéité. Il est important de ne pas salir ce joint
et d'éviter tout contact avec un produit chimique
agressif afin de ne pas compromettre l'étanchéité.
Examinez le joint chaque fois que vous changez les
piles. S'il est sale, essuyez-le délicatement à l'aide
d'un coton-tige humide et de savon doux jusqu'à ce
qu'il soit net.
REMARQUE: certains types de pile peuvent dégager
de l'hydrogène, ce qui expose les appareils étanches
à un risque d'explosion en l'absence de dispositif de
ventilation ou d'élimination du gaz. Le Eos est équipé
d'un catalyseur au platine qui élimine le gaz. Le
catalyseur peut se fêler en cas de choc important. Si
vous entendez un bruit de ballottement dans la lampe
ou constatez la présence de particules grises dans le
compartiment à piles, n'utilisez pas la lampe. Pour
plus d'informations, reportez-vous à la garantie et à la
procédure de retour.
Voir le schéma LED régulée
Le Eos est doté d'un circuit sophistiqué de
régulation du courant qui assure la constance de la
luminosité initiale tant que les piles fournissent une
tension suffisante.
LED régulées - Fournissent un flux lumineux
constant sur une période de temps donnée.
LED non régulées - Fournissent une lumière en
diminution constante sur la même période de temps.
La durée d'éclairage régulé dépend du type de pile
et du mode d'éclairage utilisés. A mesure que
l'énergie des piles diminue, les différents modes
semblent avoir le même niveau de luminosité. Il
s'agit d'une fonction normale de la LED régulée ou
du circuit de commande du courant.
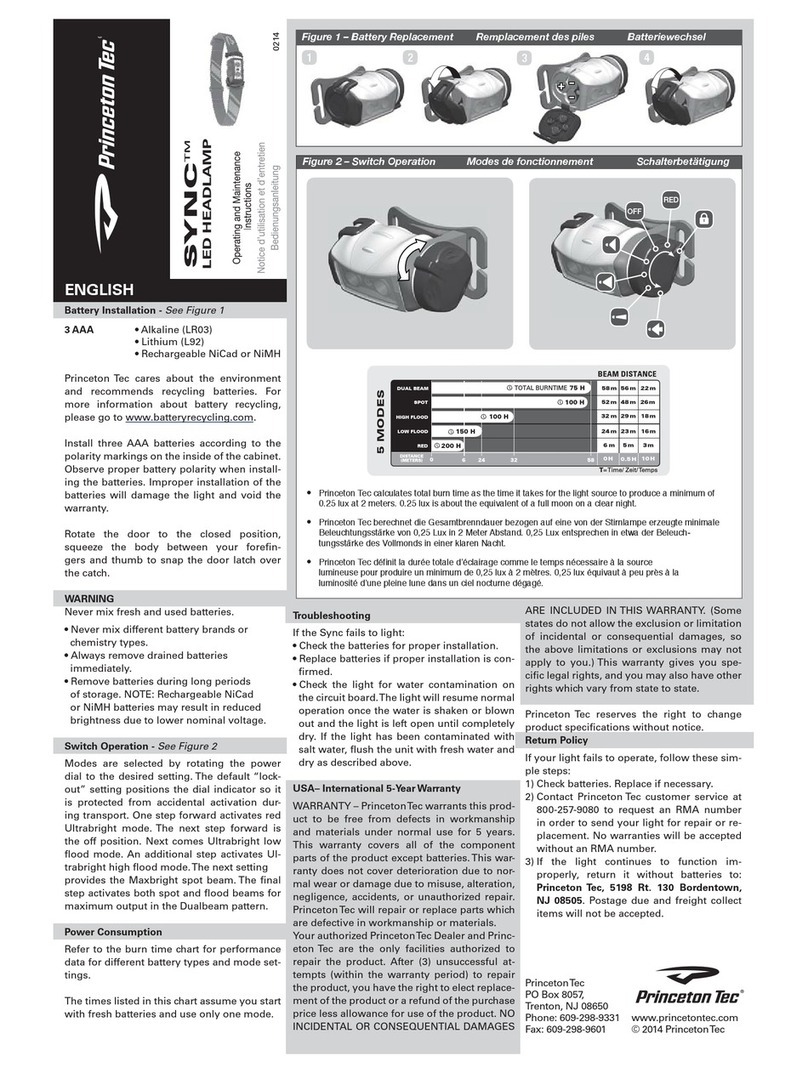
Reportez-vous au tableau des durées d'éclairage
pour accéder à des données sur les performances
des différents types de pile et au paramétrage des modes.
Si le Eos ne s'allume pas:
Si le Eos ne semble pas changer de mode d'éclairage:
• ll se peut que la tension des piles soit trop faible
pour passer à un mode d'éclairage plus puissant.
C'est normal lorsque l'on utilise une LED régulée/un
circuit de commande du courant. Insérez de nouvelles
piles et testez à nouveau les modes.
• Contrôlez la bonne insertion des piles.
• Remplacez les piles s'il s'avère que l'installatiest correcte.
• Vérifiez la présence éventuelle d'eau sur la carte
de circuit imprimé (l'étanchéité peut avoir été
compromise par une mauvaise installation du cache
arrière). Le fonctionnement normal de la lampe
reprend une fois que l'eau a été égouttée
ou évacuée et que la lampe est restée ouverte jusqu'à
ce qu'elle soit totalement sèche. Si la lampe a été
touchée par de l'eau salée, rincez
l'unité à l'eau douce et séchez-la comme précédem-
ment indiqué.
Du fait des réglementations internationales, Princeton Tec ne
peut offrir sa garantie à vie qu'aux résidents des Etats-Unis.
Pour les clients hors des États-Unis, la garantie Princeton Tec
s'étend sur 10 ans.
GARANTIE COMPLÈTE - Princeton Tec garantit ce produit
contre tout vice de fabrication ou de matière pourvu qu'il soit
utilisé dans des conditions normales, et ce, tant et aussi
longtemps que l'appareil vous appartient. La présente
garantie couvre tous les composants du produit à l'exception
des piles. La présente garantie ne couvre pas l'usure normale
ou les dommages résultant d'une mauvaise utilisation, d'une
altération, d'une négligence, d'accidents ou d'une réparation
non autorisée. Princeton Tec s'engage à réparer ou remplacer
les pièces qui présentent un vice de fabrication ou de matière.
Seuls Princeton Tec et votre revendeur agréé Princeton Tec
sont autorisés à réparer le produit. Au bout de trois tentatives
de réparation non concluantes, vous êtes en droit de
demander le remplacement du produit ou son remboursement
au prix d'achat diminué des frais d'utilisation. LA PRÉSENTE
GARANTIE NE COUVRE PAS LES DOMMAGES
ACCESSOIRES OU IMMATÉRIELS QUELS QU'ILS SOIENT.
(La législation en vigueur dans certains pays n'autorise pas
l'exclusion ou la limitation des dommages accessoires ou
immatériels, aussi se peut-il que les limitations ou exclusions
mentionnées ne vous concernent pas.) La présente garantie
vous confère des droits spécifiques reconnus par la loi. Il se
peut que vous ayez d'autres droits qui varient d'un pays à l'autre.
Princeton Tec se réserve le droit de modifier les
spécifications du produit sans préavis.
Si votre lampe ne fonctionne pas, procédez comme
suit:
1) Vérifiez l'état des piles. Remplacez-les au besoin.
2) Contactez le service d'assistance à la clientèle de
Princeton Tec au 800-257-9080 (en Amérique du nord)
pour demander un numéro d'autorisation de retour d'a
rticle afin d'envoyer la torche pour réparation ou
remplacement. Aucun retour ne sera accepté si le
produit n'est pas accompagné d'un numéro
d'autorisation de retour d'article.
3) Si votre lampe n'a pas retrouvé un fonctionnement
correct, renvoyez-la sans les piles à l'adresse
suivante: Princeton Tec, 5198 Rt. 130, Bordentown,
NJ 08505. Aucun envoi en contre remboursement ou
en port dû ne sera accepté.
Dépannage
Procédure de retour
Garantie à vie aux États-Unis - Garantie de dix ans
au niveau international
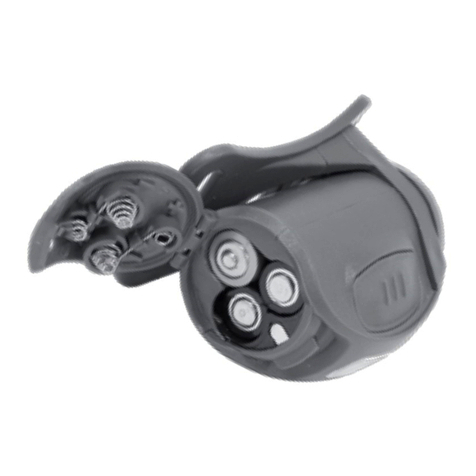
Insérez les piles en respectant la polarité. Une
mauvaise insertion des piles aura pour effet
d'endommager la lampe et d'annuler la garantie.
Princeton Tec
PO Box 8057,
Trenton, NJ 08650
Tél. : 609-298-9331
Fax: 609-298-9601
www.princetontec.com
© 2013 Princeton Tec
Princeton Tec empfiehlt die umweltgerechte
Entsorgung von Batterien und Akkus. Weitere
Informationen zum Recycling von Batterien in Ihrem
Gebiet finden Sie unter: www.batteryrecycling.com
II auszuschalten, drücken Sie und wehren Sie den
Knopf bis die leichten Drehungen hinunter ab.
Modi hoh und niedrig werden von Drücken und
Freigeben dem Knopf innerhalb 1,5 Sekunden des
vorherigen Knopfs Presse ausgewählt. Um den EOS
• Mischen Sie nie neue und teilweise entladene
Batterien.
• Mischen Sie nie unterschiedliche Batteriemarken
oder -typen.
• Entnehmen Sie verbrauchte Batterien umgehend.
• Entnehmen Sie die Batterien, wenn das Produkt
längere Zeit nicht verwendet wird.
BetriebsartenschaUer
Schaltung und Energieverbrauch / Regulierte LED
HINWEIS: Lithium-Batterien bieten längere Zeit
konstante Helligkeit, arbeiten besser bei kaltem
Wetter und wiegen weniger. Aufladbare NiCd- oder
NiMH-Akkus können aufgrund einer niedrigeren
Nennspannung zu einem Helligkeitsverlust führen.
Das Eos Batteriegehäuse ist wasserdicht versiegelt.
Um die Wasserdichtheit der Lampe intakt zu halten,
ist es wichtig, den Kontakt.mit Schmutz und scharfen
Chemikalien zu vermeiden. Uberprüfen Sie die
Dichtung bei jedem Batteriewechsel. Falls sie
schmutzig ist, reinigen Sie sie vorsichtig mit einem
Wattebausch und milder Seife.
HINWEIS: Einige Batterietypen können Wasserstoff-
gase freisetzen, die in abgedichteten Geräten
explodieren können, wenn sie nicht regelmäßig
entlüftet oder entfernt werden. Die Eos Stirnlampe ist
zur Beseitigung dieser Gase mit einem Platinkatalysa-
tor ausgestattet. Bei schweren Stößen könnte der
Katalysator beschädigt werden. Falls Sie ein
Rasselgeräusch in der Stirnlampe oder graue Teilchen
im Batteriegehäuse feststellen, verwenden Sie die
Stirnlampe nicht. Weitere Einzelheiten entnehmen Sie
den Informationen zu Garantie und Rücknahmeverfahren.
siehe Abb. "Regulierte LED"
Die Eos Stirnlampe verwendet eine stromgesteuerte
Schaltung, die für eine konstante Lichtabgabe sorgt,
solange die Batterien ausreichend Spannung aufweisen.
Regulierte LED - bieten eine konstante Lichtabgabe
über einen bestimmten Zeitraum.
Nicht regulierte LED - bieten eine konstant
abnehmende Lichtabgabe im selben Zeitraum.
Die regulierte Brenndauer ist abhängig vom
Batterietyp und der gewählten Beleuchtungsstärke.
Bei abnehmender Batteriespannung kann sich die
Helligkeit von regulierten und nicht regulierten LED
einander angleichen. Dies ist eine normale Funktion
der regulierten LED bzw. stromgesteuerten Schaltung.
Die Brenndauertabelle enthält Angaben für
verschiedene Batterietypen und Betriebsarten.
Falls die Eos Stirnlampe nicht leuchtet:
Falls die Eos Stirnlampe keine Helligkeitsstufen zu
wechseln scheint:
• Möglicherweise ist die Batteriespannung zu gering,
um zu einer helleren Einstellung zu wechseln.
Dieser Umstand ist für eine regulierte
LED/stromgesteuerte Schaltung normal. Legen
Sie neue Batterien ein und überprüfen Sie die
verschiedenen Betriebsarten.
• Prüfen Sie, ob die Batterien ordnungsgemäß
eingelegt sind.
• Ersetzen Sie die Batterien, falls sie ordnungsgemäß
eingelegt waren.
• Prüfen Sie, on Wasser in die Lampe eingedrungen
ist (durch eine falsche Montage des hinteren Deckels
kann die Dichtung beschädigt werden). Die Lampe
wird wieder normal arbeiten, sobald das Wasser
herausgeschüttelt oder -geblasen und die Lampe
offen liegen gelassen wurde, um trocknen zu können.
Falls die Lampe mit Salzwasser verunreinigt wurde,
spülen Sie sie mit Frischwasser und trocknen Sie sie
wie oben beschrieben.
Aufgrund internationaler Vorschriften kann Princeton Tec die
lebenslange Garantie nur seinen Kunden in den USA anbieten.
Princeton Tec bietet seinen Kunden weltweit eine 1O-jährige
Garantie an.
VOLLE GARANTIE - Princeton Tec gewährleistet, dass dieses
Produkt während der gesamten Nutzungsdauer bei normaler
Verwendung keine Material- und Verarbeitungsfehler aufweist.
Diese Garantie deckt alle Komponententeile des Produkts mit
Ausnahme der Batterien ab. Diese Garantie erstreckt sich
nicht auf normale Abnutzung oder auf Schäden, die durch
unsachgemäße Verwendung, Änderung, Nachlässigkeit,
Unfälle oder nicht autorisierte Reparaturen entstanden sind.
Princeton Tec repariert oder ersetzt Teile, die Material- oder
Verarbeitungsfehler aufweisen.
Ihr zugelassener Princeton Tec-Händler und Princeton Tec sind
die einzigen Ansprechpartner, die für die Reparatur des
Produkts autorisiert sind. Nach (3) erfolglosen Reparaturver-
suchen am Produkt haben Sie das Recht, einen Umtausch des
Produkts oder eine Erstattung des Kaufpreises abzüglich einer
Pauschale für die Verwendung des Produkts zu wählen.
ZUFALLIG ENTSTANDENE ODER FOLGESCHÄDEN SIND
VON DIESER GARANTIE AUSGESCHLOSSEN. (Da in einigen
Staaten/Rechtsordnungen der Ausschluss oder die
Beschränkung einer Haftung für zufällig entstandene und
Folgeschäden nicht gestattet ist, gilt die obige Einschränkung
eventuell nicht für Sie.) Diese Garantie verleiht Ihnen bestimmte
Rechte, und Sie haben möglicherweise zusätzlich andere
Rechte, die sich von Staat zu Staat unterscheiden.
Princeton Tec behält sich das Recht vor, Produktspezi-
fikationen ohne Vorankündigung zu ändern.
Wenn Ihre Lampe nicht funktioniert, gehen Sie
folgendermaBen vor:
1) Überprüfen Sie die Batterien. Siehe Schemazum
Einsetzen der Batterien.
2) Um Ihre Lampe für Reparaturen oder Ersatzt einzu
schicken kontaktieren Sie Princeton Tec's
Kundendienst unter +1 800-257-9080 und fordern Sie
eine RMA # an. Garantieforderungen werden nur mit
RMA# akzeptiert.
3)Wenn aufgrund eines zuvor nicht beschriebenen
Problems eine Reparatur erforderlich ist, senden Sie
die Lampe ohne Batterien zurück an: Princeton Tec
5198 Rt. 130, Bordentown, NJ 08505. Unterfrankierte
und unfreie Sendungen werden nicht angenommen.
Störungsbehebung
Lebenslange Garantie in den USA - 10 Jahre
Garantie weltweit
Rücknahmeverfahren
Achten Sie beim Einlegen der Batterien auf die
richtige Polarität. Fehlerhaft eingelegte Batterien
können die Lampe beschädigen und führen zum
Erlöschen der Garantie.
Princeton Tec
PO Box 8057,
Trenton, NJ 08650
Telefon: 609-298-9331
Fax: 609-298-9601
www.princetontec.com
© 2013 Princeton Tec
Einlegen der Batterien
WARNUNG:
