Prinetti IA4547 User manual

INSTRUCTION MANUAL
1800W
Infrared Outdoor
Radiant Heater
IA4547
Please read and save all instructions to ensure safe and effective use of this Appliance

02
Table of Contents
Important Safety and General Instructions 03
Parts List Diagram 06
Before First Use 08
Assembly 11
Location of Electrical Connection 14
Operating Instructions 15
Frequently Asked Questions 19
Cleaning, Care and Maintenance 20
Storage 21
Warranty Information 22

03
Read this manual thoroughly before first use, even if you are familiar with this
type of appliance.The safety precautions enclosed herein reduce the risk of
fire, electric shock and injury when correctly adhered to. Please keep this user
manual in a safe place along with your purchase receipt and carton for future
reference. If applicable, pass these instructions and packaging on to the next
owner of the appliance.Always follow basic safety precautions and accident
prevention measures when using an electrical appliance.
1. Read all instructions before using the Prinetti® Outdoor Heater.
2. DO NOT touch hot surfaces.The temperature of the outer surface can get very
hot while the Outdoor Heater is in operation. Allow the unit to cool thoroughly
before moving or cleaning.
3. This appliance is not a toy. Close supervision is necessary when any appliance
is used by or near children.
4. DO NOT use the Outdoor Heater for other than its intended use.
5. DO NOT use the unit in an unventilated area.
6. Before turning on, ensure the electrical voltage and frequency of the circuit
corresponds to those indicated on the rating label of the appliance.
7. To protect against the risk of electric shock, do not immerse this Outdoor Heater,
cord set or plug in water or any other liquid.
8. The Outdoor Heater is not intended to be operated by means of an external
timer or any type of separate remote control system.
9. The use of attachments not recommended or sold by the manufacturer may
cause fire, electric shock or injury.
10. This appliance is intended to be used for household use only.
11. DO NOT use an extension cord unless completely necessary with this
appliance. If an extension cord is used please ensure that it has a rating equal
or exceeding the rating of this appliance.
12. DO NOT pull or carry the Outdoor Heater by the cord, bend the cord, use the
cord as a handle, close a door on the cord, or pull the cord around sharp
edges or corners. Keep the cord away from heated surfaces including the front
of the Outdoor Heater.
13. DO NOT bend or damage the power cord.
14. Unless your home is already fitted with a residual current device (safety switch),
we recommend installing a RCD with a rated residual operating current not
exceeding 30mA to provide additional safety protection when using electrical
appliances. See your electrician for professional advice.
Important Safety and General Instructions

04
Important Safety and General Instructions (cont)
15. DO NOT put the cord on top of or wrap it around the Outdoor Heater.
16. DO NOT leave the Outdoor Heater unattended when plugged in.Always switch
off and unplug the Outdoor Heater when not in use.To disconnect from the
power supply, grip the plug and pull from the power socket. Never pull by the
cord.The power plug must be removed from the power socket before cleaning,
servicing, maintenance or moving the Outdoor Heater.
17. DO NOT move or lift the Outdoor Heater while the power cord is still connected
to the wall outlet or still on.Always ensure it is switched off and has cooled
down before moving the appliance.
18. Never force the plug into an outlet.
19. To reduce the risk of electrocution, never operate this appliance with wet hands,
submerge under water or spill liquids into the Outdoor Heater.
20. Allow adequate space above and around the Outdoor Heater for air
circulation. Do not allow the Outdoor Heater to touch curtains, wall coverings,
clothing, or other flammable materials during use.
21. DO NOT use in areas where gasoline, paint or other flammable liquids are used
or stored.
22. DO NOT operate or place any part of the Outdoor Heater on or near any hot
surfaces (such as a gas or electric burner, or a heated oven).
23. DO NOT cover the appliance whilst in use. If it is covered there is a risk of fire.
24. DO NOT use the Outdoor Heater in the immediate surroundings of a bath,
shower or swimming pool.
25. Improper installation may result in the risk of fire, electric shock and/or injury to
persons.C
26. DO NOT use the Outdoor Heater if the plug, cord or Outdoor Heater itself is
damaged. Please return to your place of purchase along with your receipt for a
refund or exchange.
27. The manufacturer is not responsible for any eventual damages caused by
improper or faulty use.
28. The unit has no user-serviceable parts contained within. DO NOT attempt to
repair, disassemble or modify the appliance.
29. This appliance is not intended for use by persons (including children) with
reduced physical, sensory or mental capabilities or lack of experience and
knowledge, unless they have been given supervision or instruction concerning
use of the appliance by a person responsible for their safety. Children should be
supervised to ensure they do not play with the appliance.

05
Important Safety and General Instructions (cont)
30. To prevent damage to the appliance do not use alkaline cleaning agents or
metal scouring pads.When cleaning the exterior, use a soft, damp cloth and a
small amount of mild detergent.
CAUTION: Never leave this Outdoor Heater unattended while it is switched on.
This is very dangerous.
CAUTION: Never hang clothing or manchester over the Outdoor Heater as it
may cause a fire.
WARNING: Do not use this Outdoor Heater in small areas when they are
occupied by persons not capable of leaving the area on their own, unless
constant supervision is provided.
WARNING: To reduce the risk of fire, keep textiles, curtains, or any other
flammable material a minimum distance of 1m from the air outlet.
CAUTION: Do not use the Outdoor Heater if it has been dropped.
CAUTION: Do not use the Outdoor Heater inside. It is for outside use only.
06
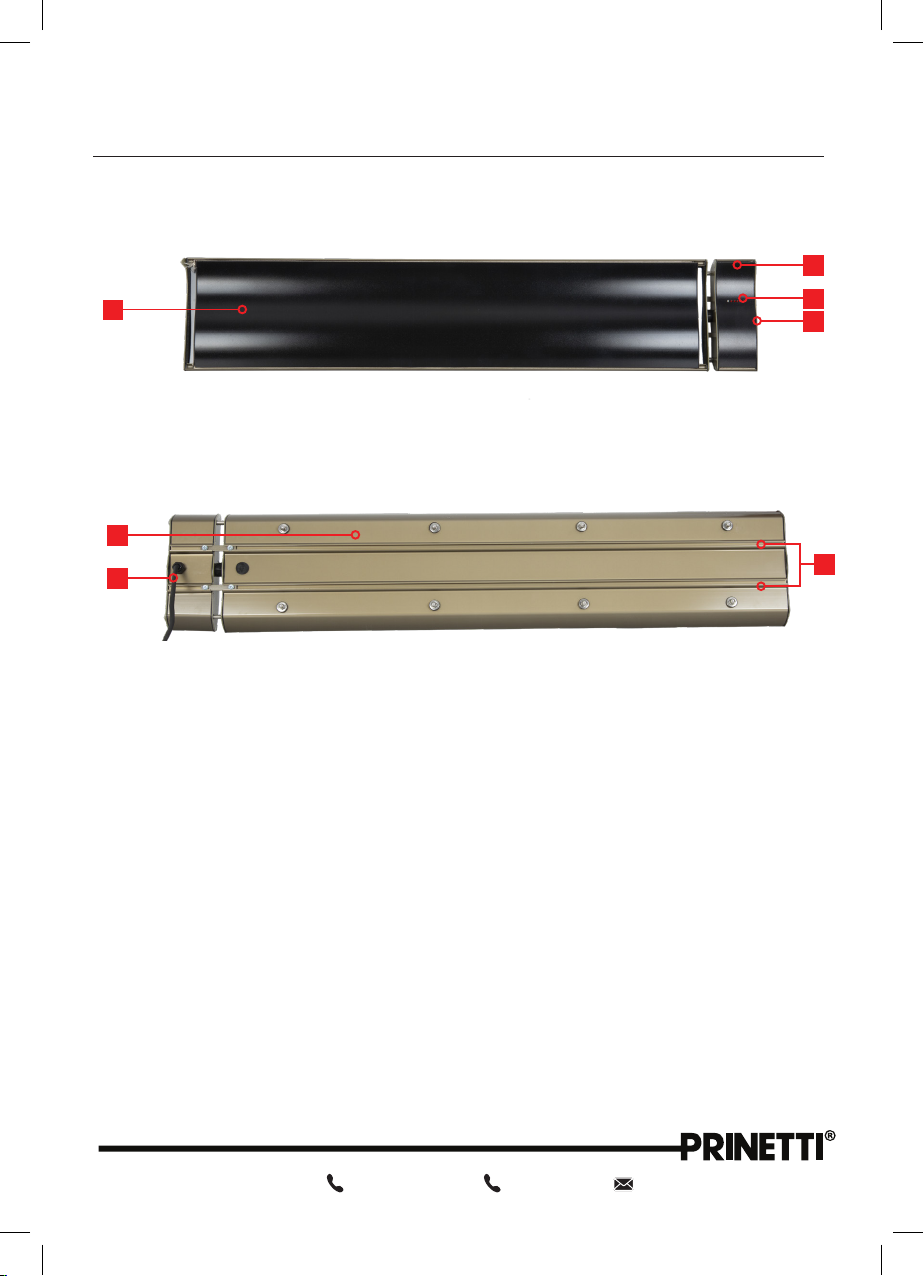
Parts List Diagram
Front of Unit
1. Front Radiating Surface
2. Infrared Receiver Module
3. LED Indicator Lights
4. Manual Control Button
Back of Unit
5. Heater Body
6. Power Cord and Plug
7. Sliding Rails for Mounting Bracket
1
2
3
4
6
5
7

07
Parts List Diagram (cont)
1
2
3
Mounting Kit
1. Sliding Brackets x 2pcs
2. Fixed Mounting Brackets x 2pcs
3. Adjustable Angle Mounting Brackets x 2pcs
Included (Not Pictured)
• M8*60mm Expansion Screws x 4pcs
• M5*12mm Butterfly Screw Bolts x 4pcs
• M5 Butterfly Screw Nuts x 4pcs
• M6*30mm Butterfly Screw Bolts x 2pcs
• M6*20mm Outer Hexagon Bolts x 4pcs
• M6 Nuts x 4pcs
• M5 Spring Washers x 4pcs
• M6 Spring Washers x 4pcs
• M6*12mm (Outer Diameter) Flat Washers x
4pcs
Remote Control
1. Display
2. Power Button
3. Timer On Button
4. Down Button
5. Up Button
6. Timer Off Button
7. Fast Hot Button
8. Clock Button
2
1
3
7
45
6
8
08
Remove all the parts from the packaging materials and thoroughly read the user
manual before using this appliance for the first time. Ensure all parts indicated on
the parts diagram listed have been included in the gift box. Plastic wrapping can
be a suffocation hazard for babies and young children so ensure all packaging
materials are kept out of reach of children.
• We recommend you keep the original packaging for storing the Outdoor
Heater when not in use.
• Unwind the cord to its full length and inspect the cord and plug for damage.
• Do not use the Outdoor Heater if any parts are damaged. In case of damage,
phone the after sales support line on 1300 777 137.
• Proper mounting technique and clearances must be followed while installing
the Outdoor Heater.
• The Outdoor Heater is protected from low pressure water/rain from any
direction therefore should be located under a covered area to be protected
from high pressure water/heavy rains. If the Outdoor Heater has been
exposed to high water pressure or extreme wetness be sure to dry the
Outdoor Heater before using it again.The power outlet and plug need to
always be undercover and fully protected from all elements as the power
outlet and plug cannot get wet.
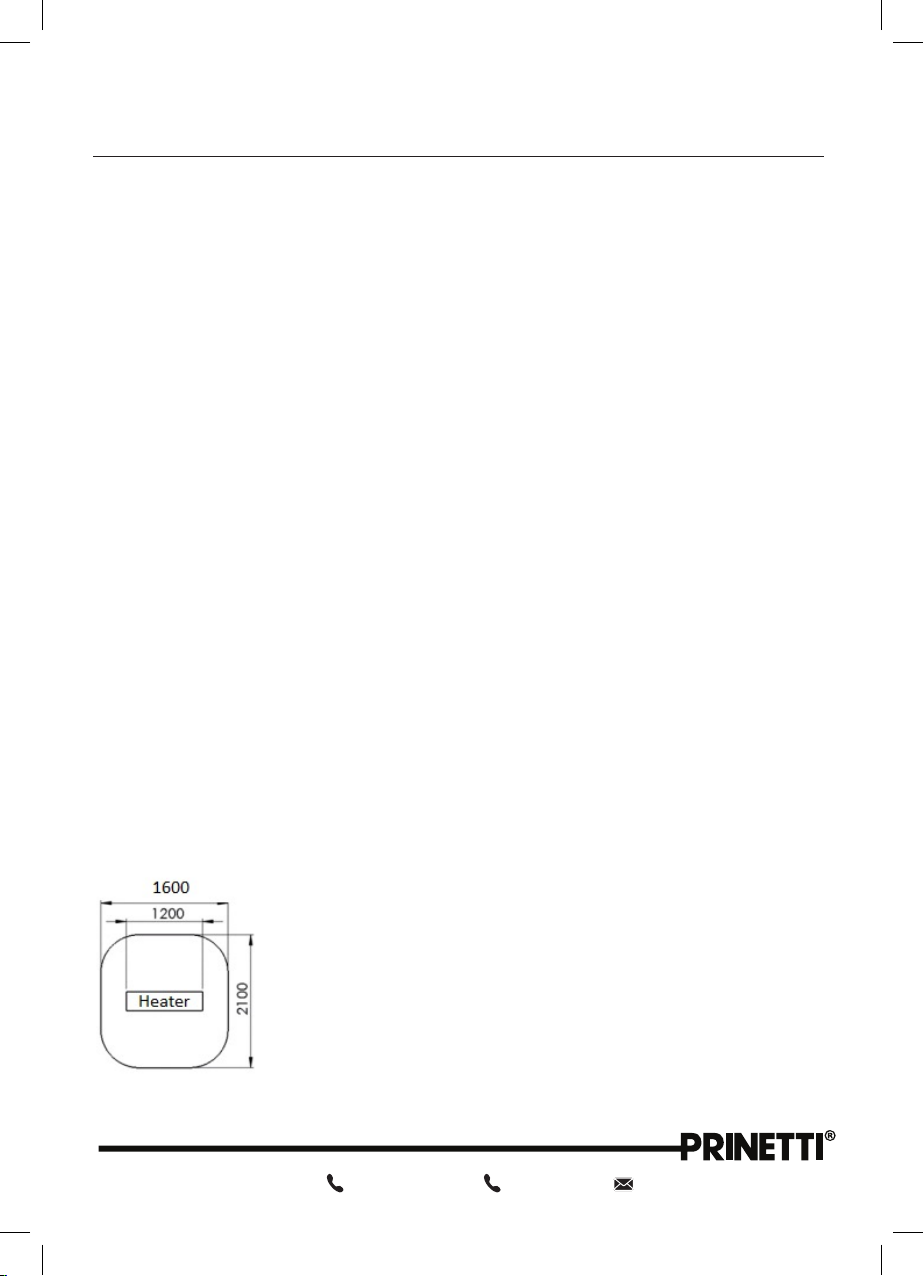
Approximate Heating Area
Infrared Radiant Heaters produce radiant heat which heats objects rather than
air.Therefore, it is imperative that objects to be heated (i.e., people), are within the
direct radiant footprint of the heater.
The below diagram shows the approximate heating area, based on an outdoor
enclosed environment, with direct overhead mounting.The radiant footprint is
reduced in angled and wall mounted installations.
Outdoor spot heating
Before First Use

09
Mounting Guide
This Outdoor Heater comes with a pair of metal adjustable angle mounting
brackets.The adjustable angle enables the heater to be installed on vertical,
horizontal, and inclined surfaces.
The ideal mounting position is directly above the area to be heated with a
longitudinal orientation and facing vertically downwards. If this is not possible, the
Outdoor Heater can be mounted on a wall and angled downwards. Please ensure
the mounting height is within 2.1m to 3m.
NOTE: The Outdoor Heater must never be installed in the upwards or inwards
facing position, the heating surface must always be positioned to direct the heat
in a downwards or outwards direction.
Before First Use (cont)

10
Clearance Guide
Minimum clearances when mounting the Outdoor Heater on a vertical wall.
Minimum clearances when mounting the Outdoor Heater parallel with a ceiling.
Minimum clearances when mounting the Outdoor Heater at an angle to a ceiling.
Before First Use (cont)
11
Unpack the Outdoor Heater making sure that all the parts are present and that the
heater is free from any packing material.
Do not connect the heater to the power supply until all the assembly is complete.
However, the Outdoor Heater needs to be installed within reach of a power supply.
Be sure the cord length is within reach of the power supply before installing. Please
read all instructions before installing the Outdoor Heater.
Do not connect the Outdoor Heater to the power supply if any of the components
or the power cable is damaged in any way.
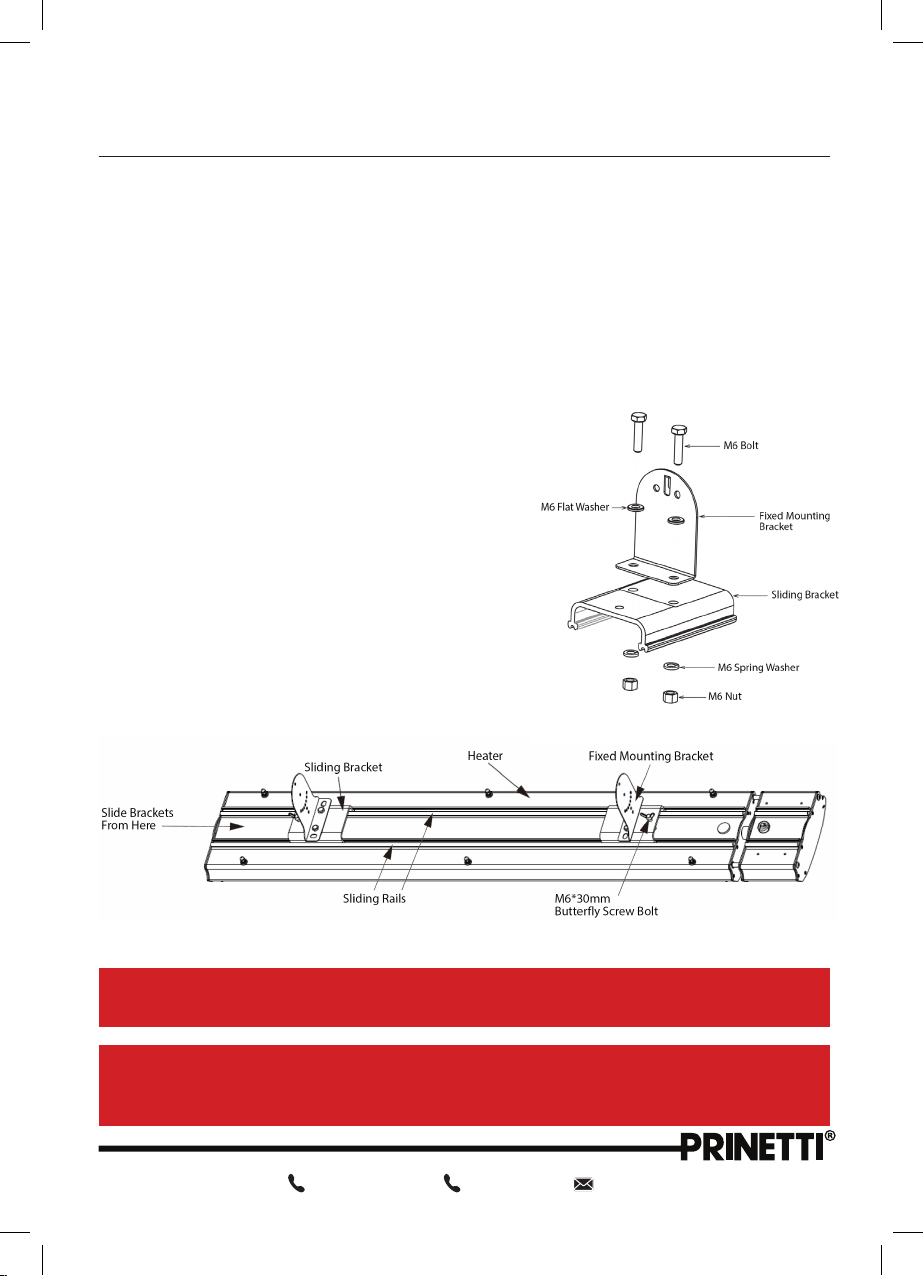
To assemble the Outdoor Heater, please
follow the following steps:
1. Connect the fixed mounting bracket to the
sliding bracket (see Fig. 1). Repeat for other
fixed mounting bracket and sliding bracket
provided.
2. Lay the Outdoor Heater on a flat surface
with back of the Outdoor Heater facing
up, corded plug entry on the right and
adequate cushion provided in between
the surface and Outdoor Heater so no
damage is caused to front radiating
surface. Install sliding bracket with fixed
mounting bracket as below (see Fig. 2).
Fig. 2
NOTE: Mark the position of the two sliding brackets, using the minimum
recommended bracket spacing of 710mm to determine the correct location.
NOTE: The Outdoor Heater comes bubble wrapped.To avoid any damage to the
Outdoor Heater while laying it down on a flat surface,the bubble wrap with the bubble
side up can be placed in between the flat surface and front radiating surface.
Assembly
Fig. 1
12
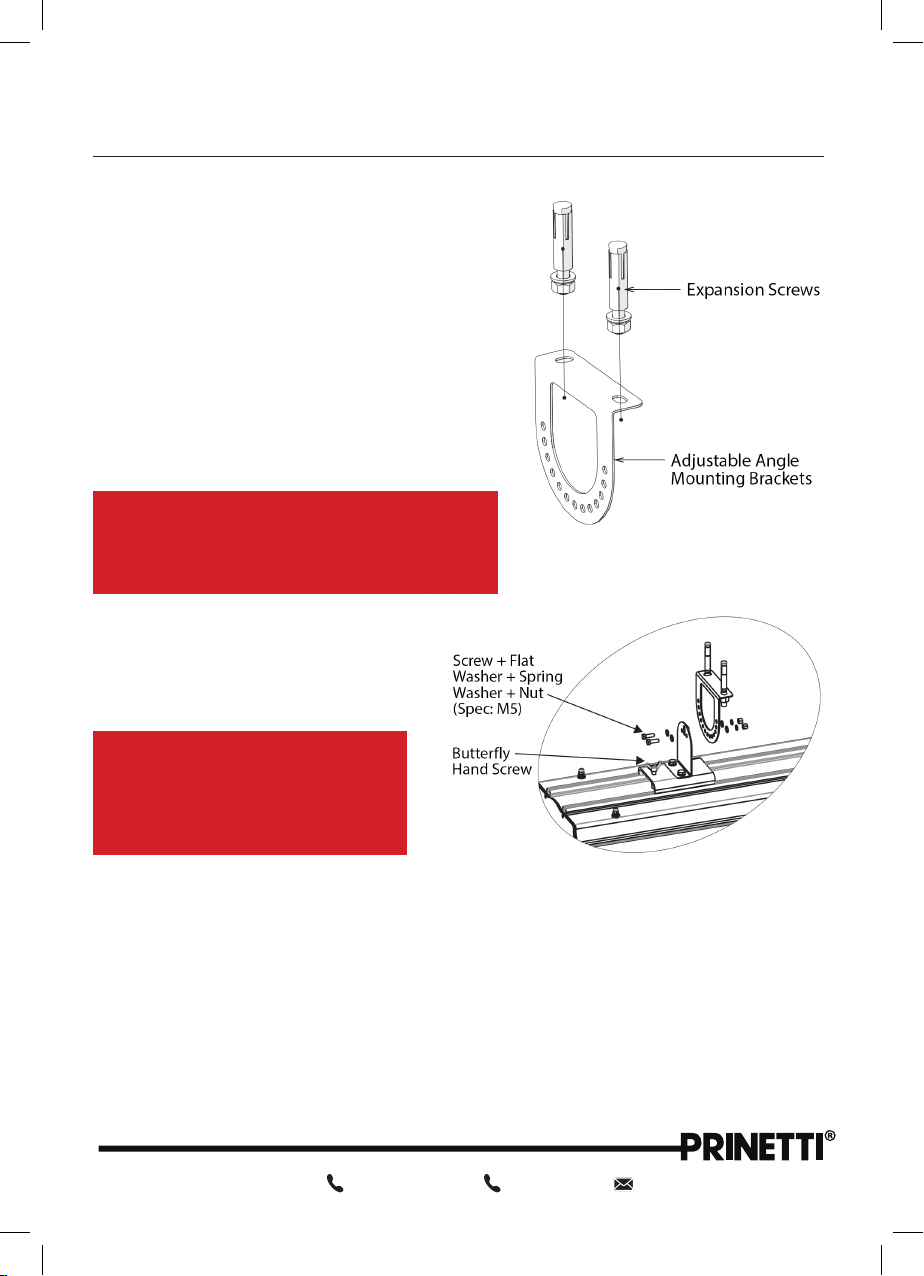
3. Install the adjustable angle mounting
brackets onto the nominated surface
(wall or ceiling) using appropriate fixing
screws suitable for the mounted surface
material and able to support more than
double the weight of the heater being
installed (weight of heater = 6.8kg). For
your convenience, expansion screws
have been provided (see fig. 3). Distance
between the two adjustable angle
mounting brackets should be same as
distance between the fixed mounting
brackets installed on the Outdoor Heater
in step 2.
NOTE: To determine the mounting position
of the heater, refer to ‘Approximate Heating
Area’ on page 8,‘Mounting Guide’ on page
9, and ‘Clearance Guide’ on page 10.
4. Mount the Outdoor Heater by
bolting the adjustable angle
mounting brackets (installed in
step 3) with the fixed mounting
brackets on heater (see Fig. 4).
NOTE: To determine the correct
mounting orientation and angle
of the Outdoor Heater, refer to
‘Mounting Guide’ on page 9 and
mounting angles below.
Assembly (cont)
Fig. 3
Fig. 4
13
Assembly (cont)
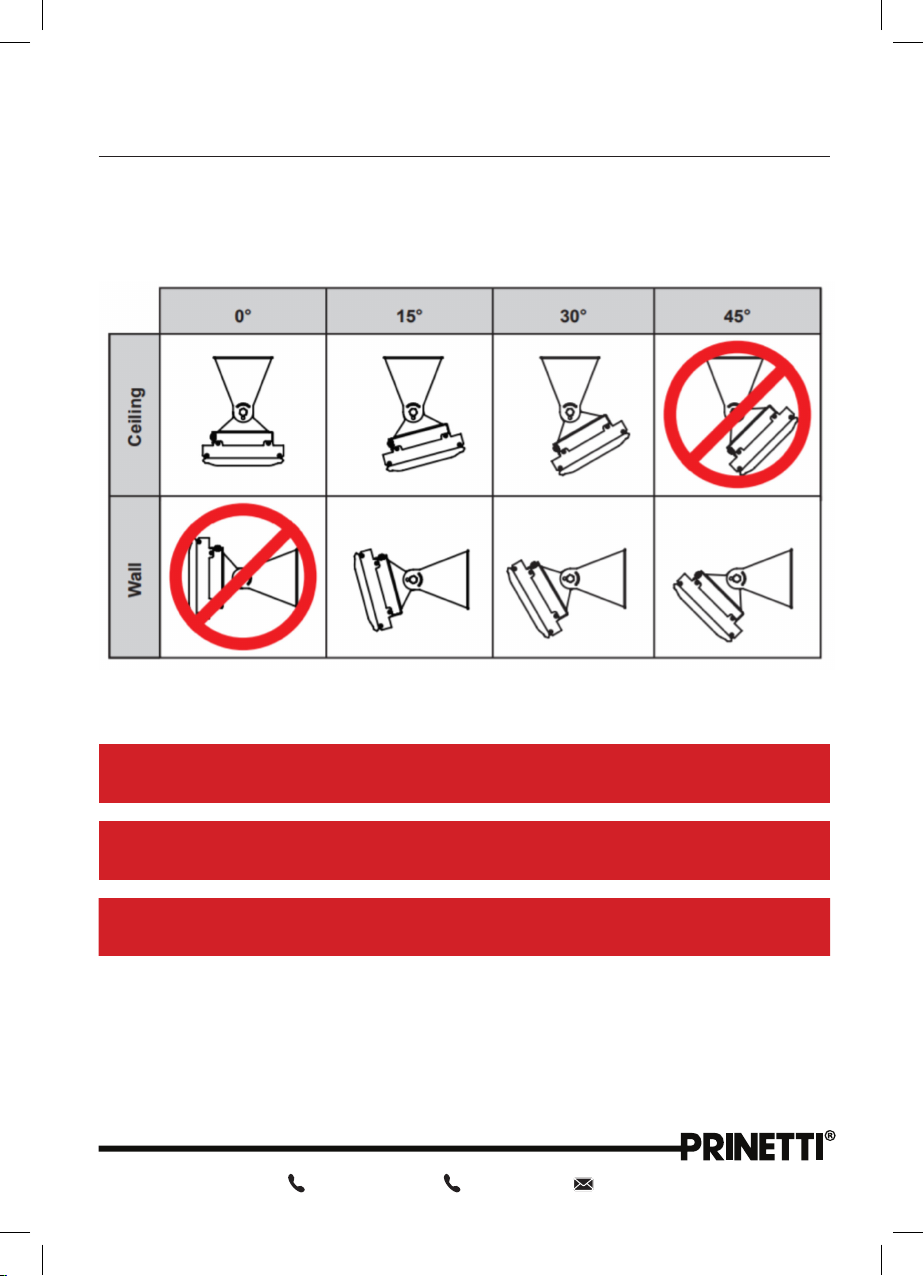
For ceiling mounted installations, the mount angles should be restricted to
anywhere in between 0° and 30° only.
For wall mounted installations, the mount angles should be restricted to anywhere
in between 15° and 45° only.
5. The Outdoor Heater is provided with a power cord fitted with 3 pin plug. Insert
the corded plug into a power outlet and turn the power outlet On.
NOTE: Before connection, make sure that specifications of the power outlet meet
the requirements of those indicated on the heater rating label.
NOTE: The power outlet MUST be equipped with an automatic circuit breaker
with rated current not less than 16A.
CAUTION: DO NOT use an extension cord with this product. Plug the Outdoor
Heater directly into power supply.
14
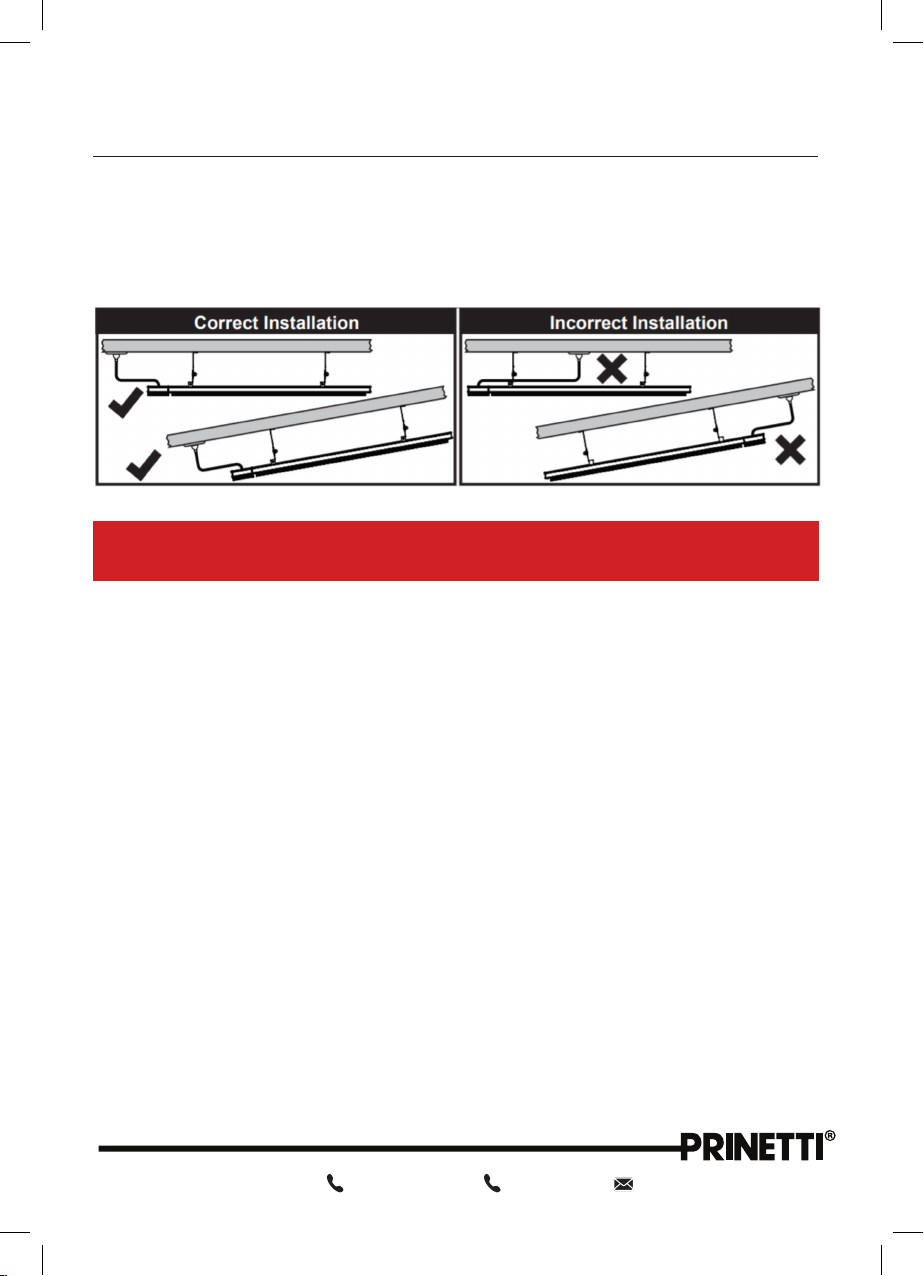
Electrical connections or GPOs MUST NOT be located at the back of the Outdoor
Heater.They MUST be located outside the installation footprint of the units to
reduce the effect of damage caused by heat build-up behind the Outdoor Heater.
When mounted on an incline ensure the electrical connection is located at the
lowest point of the Outdoor Heater.
NOTE: For connection of more than one Outdoor Heater to a common "ON/
OFF" isolation switch, consult your authorised electrical installer.
Location of Electrical Connection

15
The Outdoor Heater can be operated manually or using a remote control
(included).
Manual Mode
The Outdoor Heater has a Manual Control Button on the side of the Infrared
Receiver Module (See Parts List Diagram on page 6 and Fig. 5 below).
Fig. 5
When you press the Manual Control Button for the first time, the Outdoor Heater will
switch ON. The Outdoor Heater will switch ON at the power (Heating) level at which
it was last switched OFF. The number of illuminated LED Indicator Lights will indicate
the power (Heating) level at which the Outdoor Heater is operating.
If you want to change the power level or switch the Outdoor Heater OFF, keep
pressing the Manual Control Button to toggle through the different power levels till
all LEDs are off, at which stage the Outdoor Heater has switched OFF.
Operating Instructions

16
Remote Control
Open the battery cover located on the back of the remote control. Check the
inside of the remote control battery chamber for the polarity symbols, then insert
2 x AAA batteries (not included). Replace the battery cover.
Fig. 6 Fig.7
Power ON/OFF
Press ‘ON/OFF’ button to switch the heater ON. Press again to switch the Outdoor
Heater OFF.
The symbol indicates the signal strength between the remote control and the
Outdoor Heater. The more bars showing, the stronger the signal.
Clock Button
Use this button to set the time. Once remote is powered on, the time defaults to
00:00 (i.e. 12 AM, See Fig. 8.1).
Press the ‘Clock’ button and the hour digits will flash. Press or arrow button to
reach desired hour (See Fig. 8.2).
Press the ‘Clock’ button again and the hour is set causing the minute digits to flash.
Press or arrow button to reach desired minutes (See Fig. 8.3).
Press the ‘Clock’ button again and the minutes are set causing the second digits to
flash. Press or arrow button to reach desired seconds (See Fig. 8.4).
Operating Instructions (cont)
17
Operating Instructions (cont)
Press the ‘Clock’ button again and the second digits will stop flashing and the time
is now set.
Fig. 8.1 Fig. 8.2 Fig. 8.3 Fig. 8.4
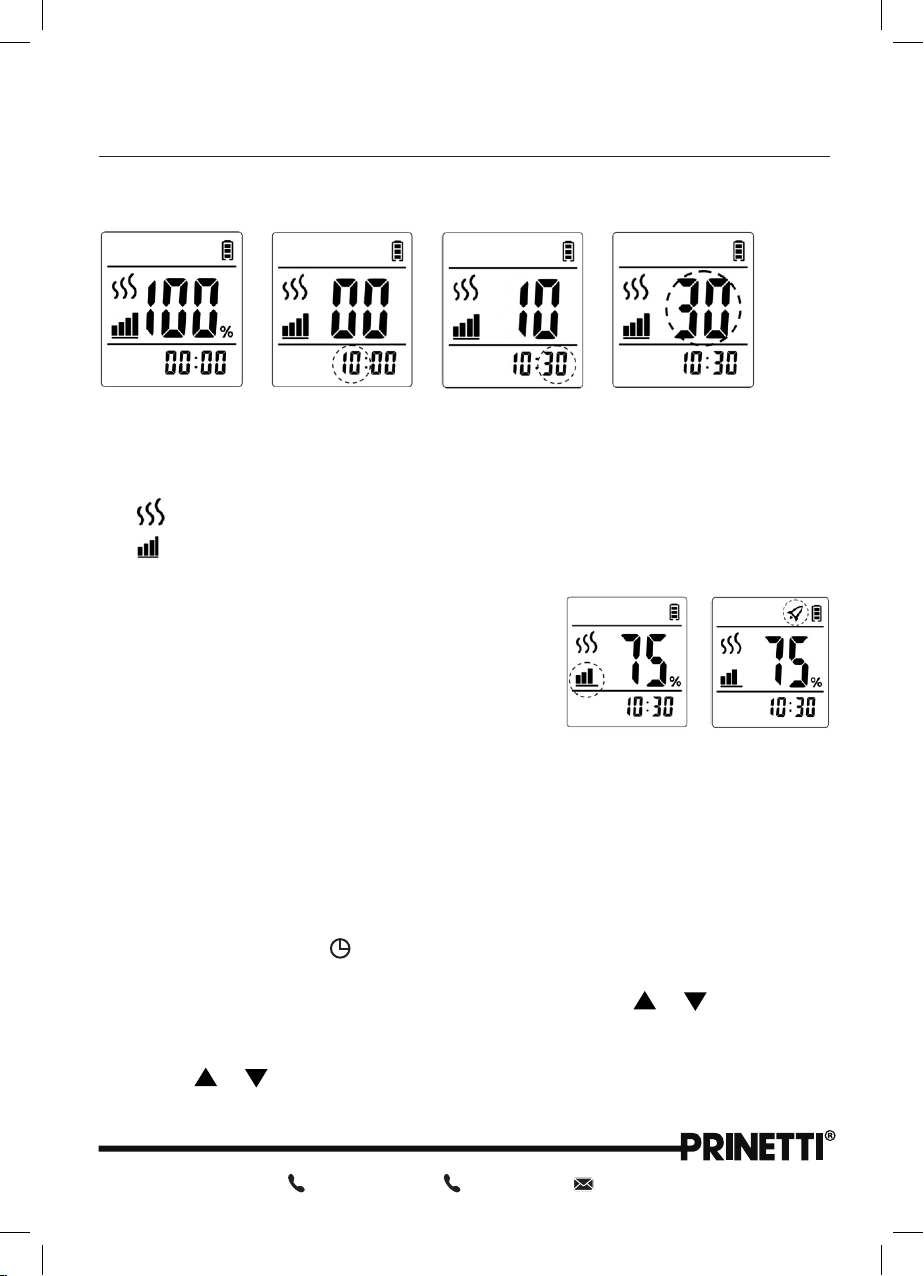
Heat Button
Press the Heat Button to adjust the heat level when the Outdoor Heater is ON.
The symbol indicates that the Outdoor Heater is ON.
The symbol indicates the heating level the Outdoor Heater is operating at. Each
bar indicates a different heating level. Refer to Fig. 9.
1 bar: 25%
2 bars: 50%
3 bars: 75%
4 bars: 100%
Fast Hot Button
Press the Fast Hot Button to turn ON/OFF Fast Hot Function. Fast Hot function
bypasses the current heat setting level and lets the heater run at FULL POWER for
few minutes to achieve rapid heating, after which it reverts to original heat setting
level. Refer to Fig. 10.
Timer ON Button
Use this feature to switch the Outdoor Heater ON at a set time during the day.
Press the Timer ON button, symbol with ‘ON’ will show up (see Fig. 11.1). The timer
can now be set.
Press the ‘Timer ON’ button and the hour digits will flash. Press or arrow button
to reach desired hour (See Fig. 11.2).
Press the ‘Timer ON’ button again and the hour is set causing the minute digits to
flash. Press or arrow button to reach desired minutes (See Fig. 11.3).
Fig. 9 Fig. 10
18
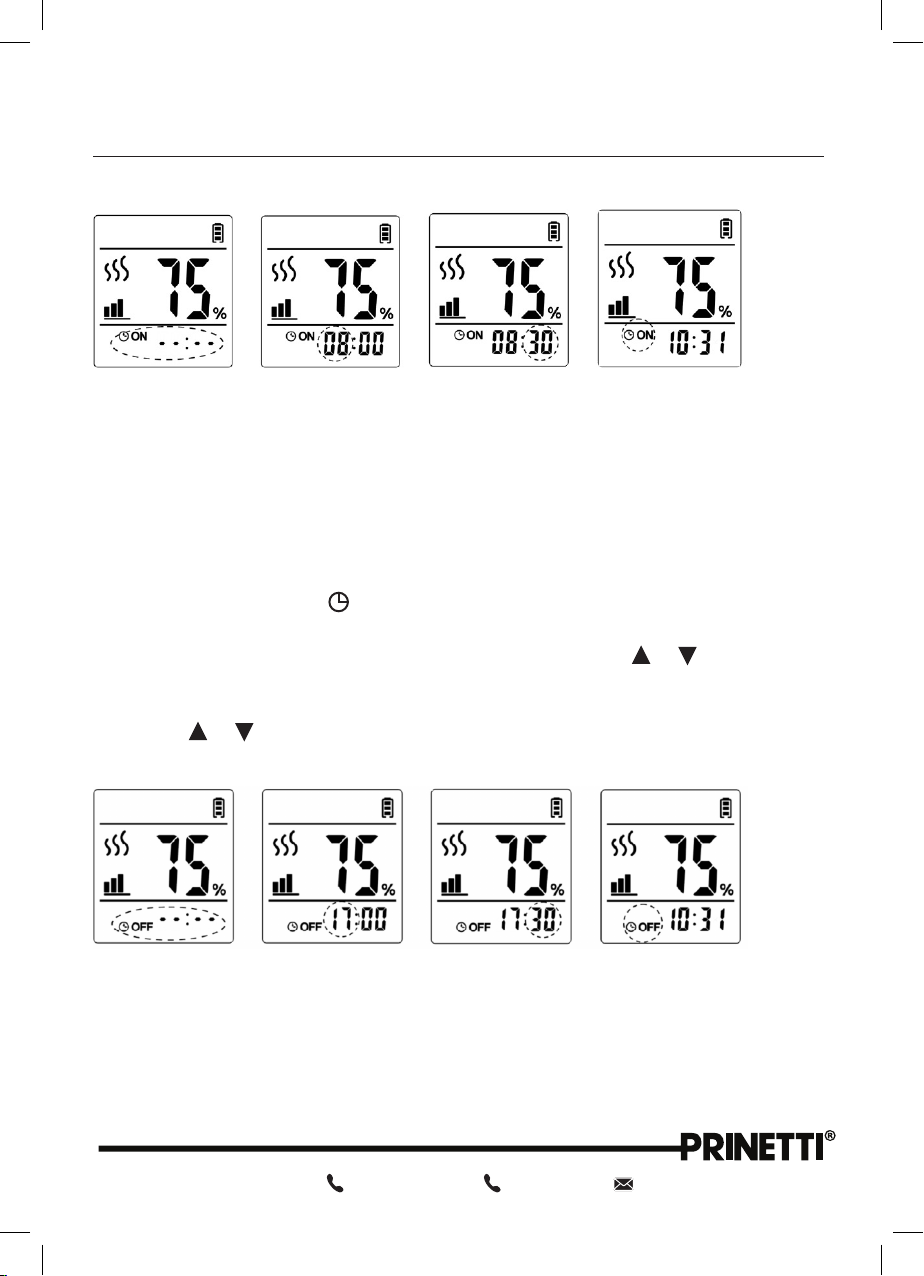
Press the ‘Timer ON’ button again and the minutes are now set (See Fig. 11.4).
Fig. 11.1 Fig. 11.2 Fig. 11.3 Fig. 11.4
The ON timer is now set and when the time reaches the time that has been set on
the timer, the heater will then switch on.
When the ON timer is set, the first LED light in the infrared receiver module will start
flashing green. Once the timer is triggered the LED light will illuminate to solid red.
Timer OFF Button
Use this feature to switch the heater OFF at a set time during the day.
Press the Timer OFF button, symbol with ‘OFF’ will show up (see Fig 12.1).The timer
can now be set.
Press the ‘Timer OFF’ button and the hour digits will flash. Press or arrow button
to reach desired hour (See Fig 12.2).
Press the ‘Timer OFF’ button again and the hour is set causing the minute digits to
flash. Press or arrow button to reach desired minutes (See Fig 12.3).
Press the ‘Timer OFF’ button again and the minutes are now set (See Fig 12.4).
Fig. 12.1 Fig. 12.2 Fig. 12.3 Fig. 12.4
The OFF timer is now set and when the time reaches the time that has been set on
the timer, the heater will then switch OFF.
When the OFF timer is set, the first LED light in the infrared receiver module will start
flashing green. Once the timer is triggered the LED light will switch off.
Operating Instructions (cont)

19
Problem Solution
The Outdoor Heater does not
switch on?
Check main switch for the power outlet is turned
ON. Check if remote control has batteries or if
the batteries are still working. Check if you can
switch ON the Outdoor Heater using the Manual
Control Button. If the Outdoor Heater still will not
switch ON, contact the After Sales Support on
1300 777 137 for advice.
Outdoor Heater smells when
first used?
This is caused by oil or dust left over from the
manufacturing process and will stop after a short
time.
Faint smell for short periods
after turning on the Outdoor
Heater?
This is normal and should stop after a short time.
The Outdoor Heater smells
when turned on after periods
of non-use?
Build-up of debris and dust on the Outdoor
Heater. Switch the Outdoor Heater off and allow
it to cool down and then clean with a soft damp
cloth.
Clinking noises when Outdoor
Heater is turned on and after
being turned off?
This is expansion and contraction noises of the
heaters metal components and is normal.
Poor heating performance? Exposure to extreme ambient conditions such as
high winds and excessively cold temperatures
can lower the heating performance of an
outdoor installation. If ambient conditions are
normal, check if Outdoor Heater has been
installed as per recommended mounting and
clearance guide. Contact authorised electric
installer for further guidance. If poor heating
persists, contact the After Sales Support on 1300
777 137 for advice.
When associated circuit
breaker (safety, ground) is
thrown or a fuse is blown?
Turn off the Outdoor Heater and contact your
authorised electrical installer.
Frequently Asked Questions
20
Cleaning, Care and Maintenance
CAUTION: Always switch off and disconnect the appliance from the power supply
before attempting any maintenance or cleaning of the Outdoor Heater. Ensure
the Outdoor Heater has cooled down completely.
CAUTION: Never immerse the Outdoor Heater in water.
1. To clean the Outdoor Heater, use a soft, damp cloth. Never clean the unit with
powerful or alkaline solutions such as benzene, thinner or polishing powder etc.
2. Always ensure that the Outdoor Heater is switched off and has cooled down
completely before cleaning.
3. After cleaning, ensure the Outdoor Heater is completely dry before turning on.
Table of contents
Other Prinetti Heater manuals


Popular Heater manuals by other brands

Radialight
Radialight OASI Installation and operating manual

ARDES
ARDES AR4F03 Instructions for use

Tayosan
Tayosan SRE 3001 instruction manual

Butts of Bawtry
Butts of Bawtry DHI-15 Instructions for use and maintenance

Dimplex
Dimplex FW 550 F Installation and operating instructions

Herschel
Herschel Inspire HB-750 Installation & operating instructions


Rinnai
Rinnai Energysaver RHFE-1004FTR How to use

Heatscope
Heatscope Spot Original installation and instruction manual

United States Stove
United States Stove US2000E-P Owner’s Instruction and Operation Manual

L.B. White
L.B. White Tradesman K70 owner's manual

EOS
EOS IRS 35 Assembly and operating instruction

NuTone
NuTone 161 Specification sheet