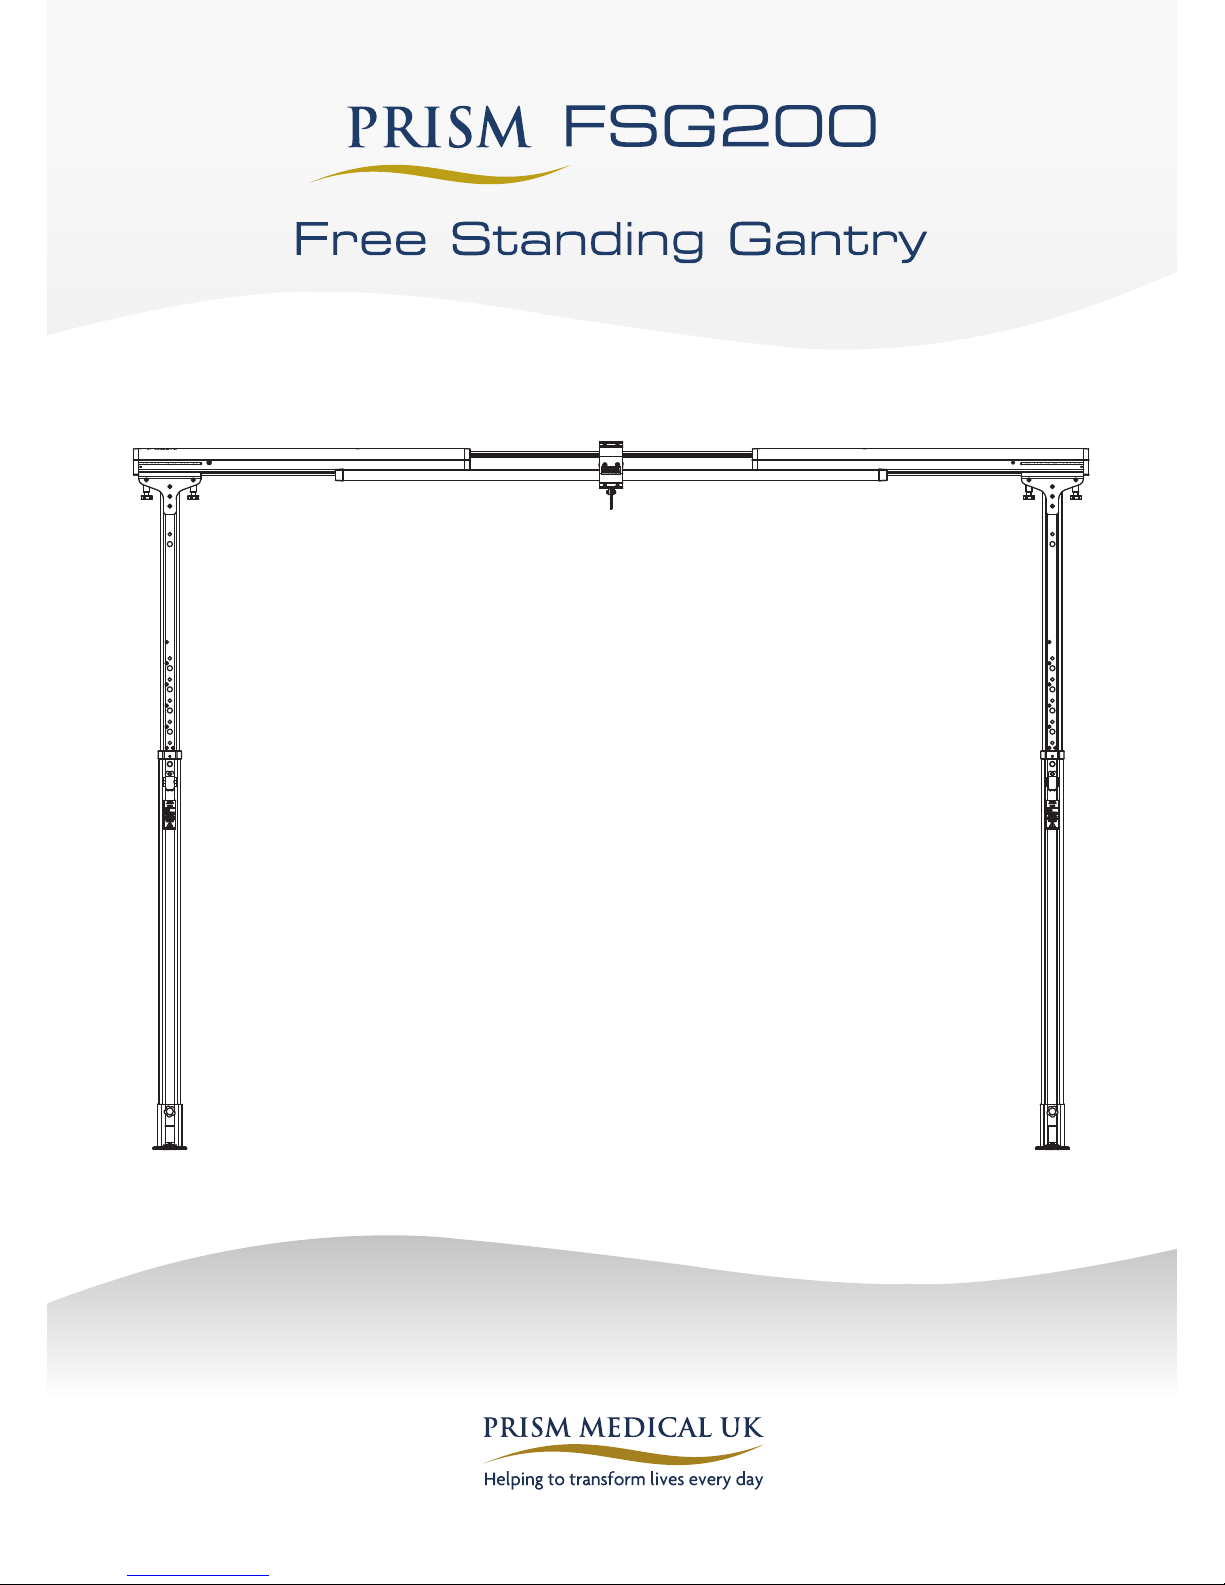
PRISM+ FSG200 User manual
User Manual

Contents
1. Safety Instructions ............................................................Page 3
• Contraindications............................................................Page 4
• Intended Use ................................................................Page 4
• Caution ....................................................................Page 5
2. Components .................................................................Page 6
3. Specications ................................................................Page 7
4. Assembly ....................................................................Page 8-9
5. Placement of the FSG200 .......................................................Page 10
6. Troubleshooting ..............................................................Page 11-12
7. Pre-use Inspection and Maintenance .............................................Page 13
8. Cleaning .....................................................................Page 14
• Dilution Chart...............................................................Page 15
• Safety Precautions ...........................................................Page 16
9. Standards Applied.............................................................Page 16
10. Service Record History ........................................................Page 17-18
11. Warranty ...................................................................Page 19
1. Safety Instructions and Warnings
Symbols used
Caution – Consult instructions for use
Manufacturer
Please observe local laws on recycling
CAUTION: DO NOT ATTEMPT TO USE THIS EQUIPMENT
WITHOUT FIRST UNDERSTANDING THE CONTENTS OF THIS
MANUAL
Before using this equipment, and to ensure the safe operation of your FSG200, carefully read this entire
manual, especially the section on “Cautions”.
Failure to comply with warnings in this manual may result in injury to the operator, or the individual being
lied/transferred. Damage to the li and/or related components may occur. Be sure that the contents of this
manual are completely understood prior to using this piece of equipment.
Store this manual with the documents included with the li system and sling(s). Contents of this manual are
subject to change without prior written notice.
3

Contraindications
ere are no known “contraindications” associated with the use of the FSG200 and its accessories, provided
they are used a per manufacturer’s recommendations and guidelines. However, it is recommended that a client
specic assessment is completed by a trained and knowledgeable health care professional to determine the
method of transfer.
Prism Medical UK does not recommend a required number of caregivers for the use of our products. is
information and recommendation can only be provided aer a thorough personalised, case specic assessment,
as there are many factors that can inuence these decisions.
It is however, “obligatory” that a client that is assessed as being an independent user of our ceiling hoist
technology have the ability to receive assistance, during the transfer, in the event of a hoist malfunction or
personal concern. is assistance can be provided in the form of; a nearby qualied caregiver, a phone, a
communication device etc.
Intended use/ Overview of the FSG200
e FSG200 is a liing aid to help li, position and transfer clients or a disabled family member. e FSG200 is part of
what is termed overhead hoist technology which takes advantage of liing from above and not from below or the side.
e FSG200 makes it possible to move mobility impaired individuals with minimal strain or risk to the caregiver, while
providing complete safety, dignity and comfort for the client or family member.
e FSG200 is designed to work with a Prism Medical UK portable hoist systems such as the P200 and CP200. Use of
other portable hoist units with this system may be possible, however, a risk assessment needs to be carried out.
e FSG200 is a oor based free standing system that can be used to li and transfer individuals from a bed, chair or
similar xture. It needs basic level of expertise to assemble or setup. It is easy to assemble and can be completed by just
one person in a short period of time (but we recommend two people). Additionally, no tools are required and once
dismantled can be moved to another location.
Should you have any questions about this product or its use contact your local authorised dealer.
4

Caution
Should you have any questions during assembly contact your local authorised dealer.
• Under no circumstance should the track, li and sling(s) or entire system be put in control of a
person who has not been properly trained in the use and care of this equipment. Failure to adhere to this
warning may result in serious injury to the operator, and/or the individual being lied/transferred.
• e FSG200 and associated li and sling(s) are not toys. Do not use them for unsafe practices. Do not allow
children to play with this equipment or any of its components.
• e manufacturer’s warranty is void if persons unauthorised to perform work undertake this on the FSG200.
• Check the feet are level aer installation.
• In places where more than one operator will be responsible for using the FSG200, associated li and sling(s),
it is imperative that all operators be trained in its proper use.
• Never expose the FSG200 directly to water. Warranty does not cover any misuse or abuse of the FSG200
• To maintain optimum function, the FSG200 should be inspected and maintained on a regular basis.
• Any accessories used with the FSG200 including li and sling(s), should be checked to ensure that they are
in good working order. Check for signs of wear or fraying prior to use. Report any unusual wear or damage
immediately to your local authorised dealer.
• e FSG200 and associated li, and sling(s) are intended only for liing and transferring of a person. e
manufacturer will not be responsible for any damage caused by the misuse, neglect or purposeful destruction
of the li and/or its associated components.
• Do not in any circumstance exceed the maximum load for this piece of equipment. Refer to the “Specications
of the FSG200”section of this manual.
• e installation of the FSG200, li, accessories, and sling are certied to a maximum load. Do not exceed the
maximum rated load of any of the components.
• Ensure that a clear space is maintained around the FSG200. Remove all furniture and other obstacles out of
the way before performing a transfer.
• e FSG200 has been designed to li vertically at its maximum load and at maximum height. Do not attempt
to li an individual at an angle to the track.
5
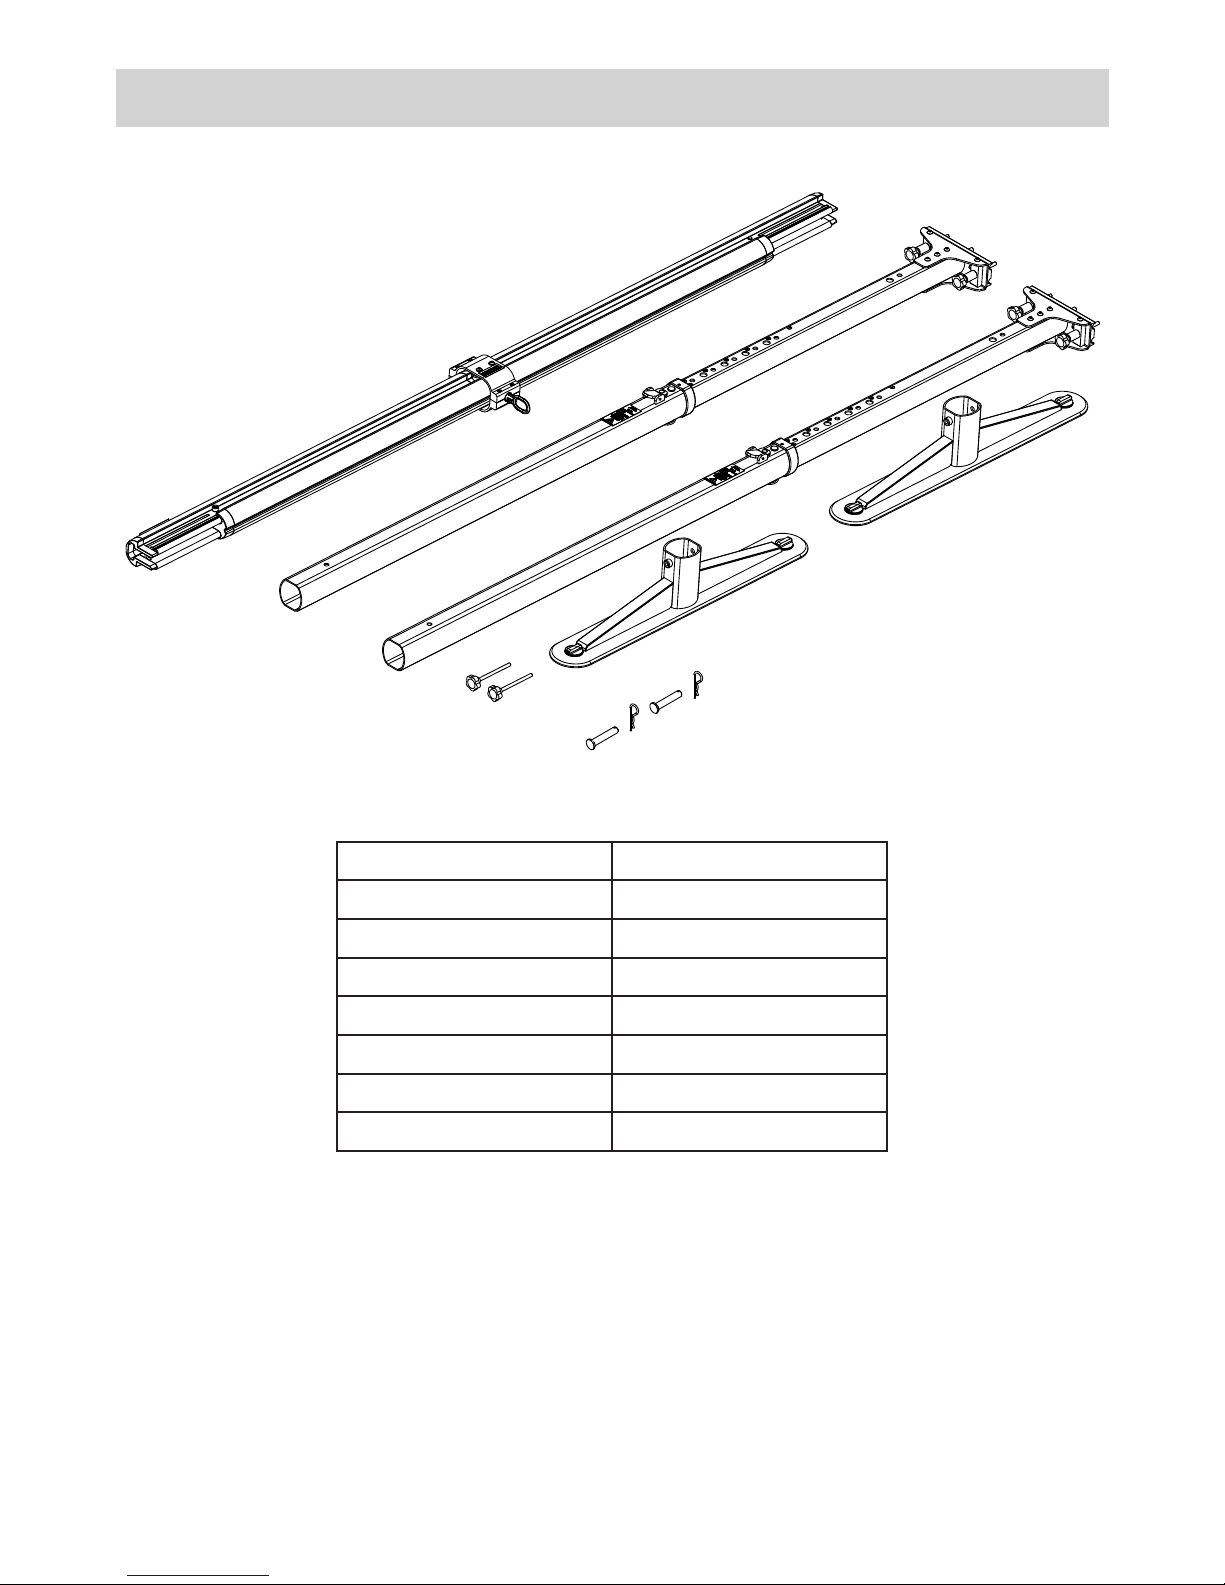
2. Components
FSG200
Components
Description Quantity
Foot 2
Support Post 2
Safety Pins 2
Star handle 2
Adjustable track 1
Split pins 2
Owner’s manual 1
Component List
6
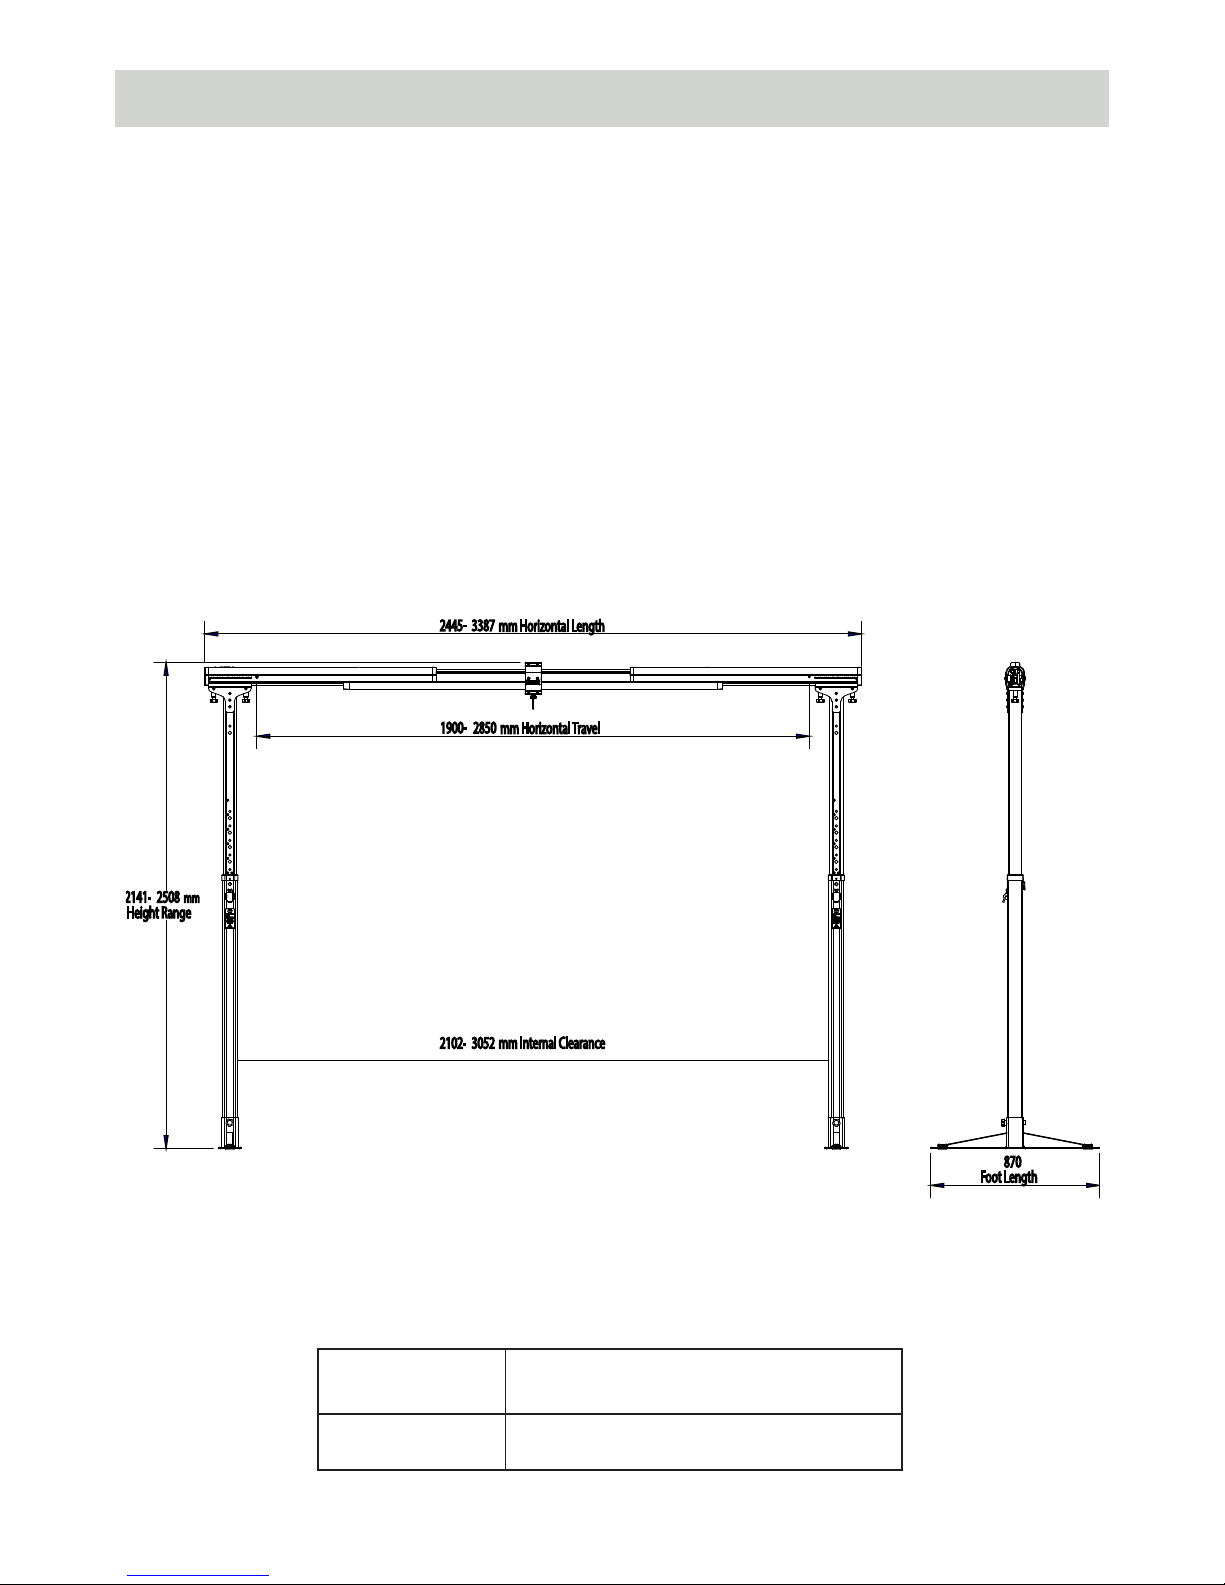
3. Features & Specifications
Weights and Dimensions
• High-strength lightweight Aluminium
• Track weight is 6.8 Kgs
• Post and leg assembly weight 5.9 Kgs
• Unit weight is 19.5 Kgs including trolley
• Portable installation
• Eliminates the mounting of a connection system in the ceiling
• One person set up (less than 5 minutes)
• Addresses a number of dierent set ups
• Weight capacity Maximum Safe Working Load of 200 Kgs
• Adjustable in height
• Minimum ceiling height 2141mm Maximum ceiling height 2508mm
• Height adjustable in 50mm increments
• Expected life time of product is 5 years but could potentially last longer if maintained properly.
2102
-
3052 mm Internal Clearance
2141
-
2508
mm
Height Range
1900- 2850 mm Horizontal Travel
2445- 3387 mm Horizontal Length
870
Foot Length
7
Code Description
114000 FSG200 – 2 post version
Model table for FSG200

4. Assembly
Prior to the Installation
Caution: Read the section ‘Safety Instructions and Warnings’ before attempting to assemble the
FSG200
Before using the
FSG200
, the components must be visually checked to ensure that they are not damaged.
Should anything look unusual contact your local dealer prior to use.
Failure to comply with this caution could result in serious injury to the operator, the individual being lied
and/or damage to the
FSG200
and/or portable hoist unit.
1. Place the Foot Plate on the oor in the
required position for use
2. Insert the bottom of the Support Post
onto the Bottom Foot Plate
3. Insert the Star Knob into the Foot Plate
and Support Post and tighten it
4. Place the Track onto the Support Posts
using the Locating Pins
8

Assembly continued...
5. Secure the Track to the Support Post using the
Star Handle
6. Extend the height by pushing the Track
upwards to extend the Support Posts
8. Insert the Safety Pins
9. Secure the Safety Pins with the Split Pins 10. Turn the level adjuster to prevent rocking
and make a level paltform level the feet
7. Press the Safety Latch when you reached
the desired height
9
General Placement Requirements
1. e feet of the
FSG200
must always be placed on a hard level surface.
2. Do not place the feet on surfaces that will cause them to wobble or be unstable. Make sure the surfaces are
free of any obstacles that may cause the feet to be unstable.
3. Never place the feet on wet surfaces.
4. Assemble the
FSG200
so that the Track is directly over the location where the transfer will occur. For beds
this is generally between 900mm - 1100mm from the head of the bed. For wheelchairs, living room chairs,
recliner chairs and similar furniture this is directly above the middle (centre) of the seat.
5. Placement of the FSG200 in a room
Aer Installation
• Make sure all four foot feet are sitting at on the oor. ere should be no gap between the feet and oor.
• During the use of
FSG200
do not bump or lean against the posts. is might cause the system to become
unstable.
• In places where more than one operator will be responsible for using the
FSG200
, associated hoist and
slings, it is imperative that all operators be trained in its’ proper use.
• To maintain optimum function, the
FSG200
should be inspected and maintained on a regular basis. e
manufacturer ’s warranty is void if persons unauthorised by Prism Medical perform work on the
FSG200
.
• Please ensure adequate clearance aer installation to ensure the power supply for the hoist can be accessed.
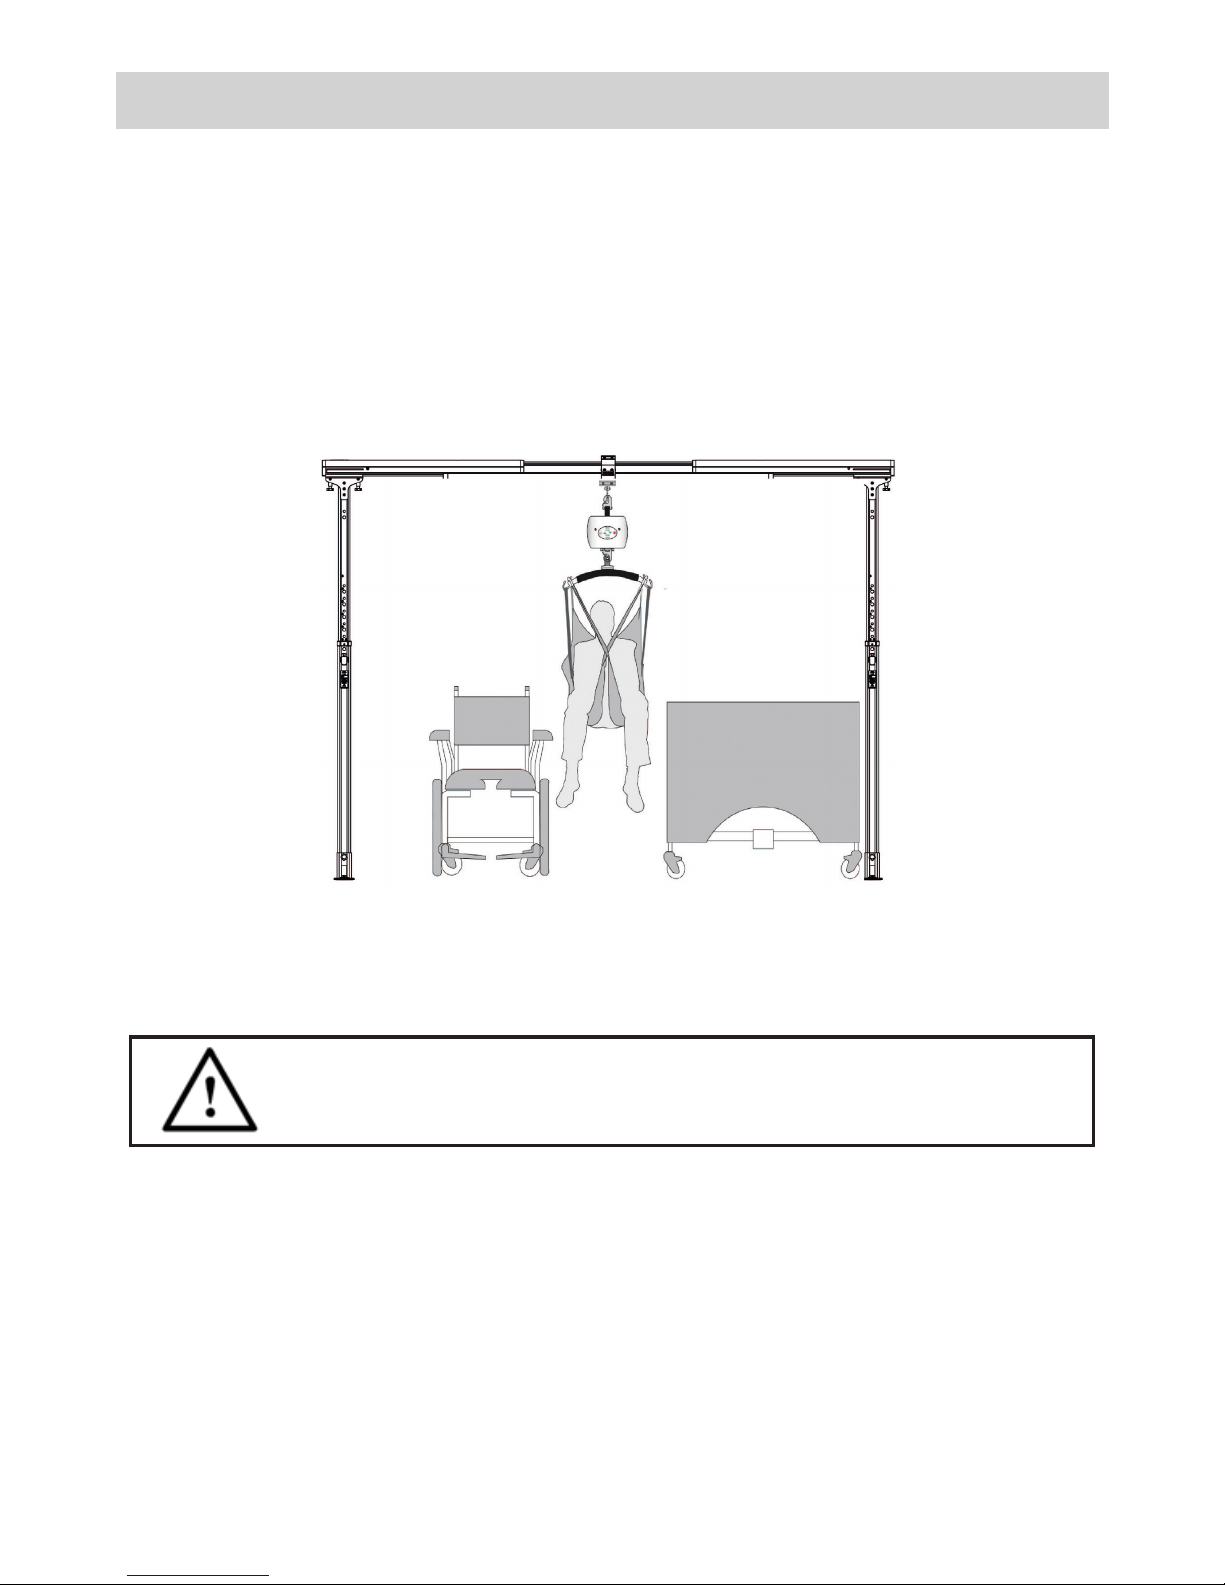
Drawing showing front view of a common FSG200 System set up in a room. In this drawing arrangement,
a general placement of a bed is shown in relationship to the system. Notice that there is still room for a
wheelchair to be placed beside the bed.
DO NOT GO OUTSIDE OF THIS RANGE OF PLACEMENT OTHERWISE INJURY
MAY OCCUR TO THE OPERATOR OF THE LIFT AND/OR THE INDIVIDUAL
BEING TRANSFERRED, AND/OR THE EASY FIT SYSTEM
10

6. Troubleshooting
Should problems arise with the use of the FSG200 review the following chart. Find the fault and complete the
recommended solution. If the fault is not found and/or the solution does not correct the problem, contact
your local authorised dealer for service immediately.
Fault Reason Recommended Solution
Visually the system is not aligned
straight
1. Floor is not level.
2. Post is not straight
1.The Feet must be sitting completely at on the
oor.
2. Dismantle the post and set up again
following “Assembly Instructions”. If problem
persists, contact your local Authorised dealer
immediately.
Note: Make sure the Adjustable Track is
seating completely at on the track holder.
Feet are slipping after installation 1. Feet are not cleaned.
2. Floor is not cleaned.
1. Clean the feet.
2. Ensure oor area is dry and free of obstacles.
If problem persists, contact your local authorised
dealer immediately .
The AdjustableTrack does not sit
properly on the Support Posts.
1. Support Post instructions not
followed.
1. Set up the post following the Support Post
instructions.
2. Check for physical damage to track
If problem persists, contact your local authorised
dealer immediately
The Adjustable Track doesn’t
extend smoothly or doesn’t
extend up to required limit.
1. Physical damage to track.
2. Foreign object stopping lock from
retracting
1. Check for physical damage to track. If so,
contact local authorized dealer immediately
2. Clean the track slots with cloth and wipe out
the dirt. Again try extending the tracks.
If problem persists, contact your local authorised
dealer immediately .
Trolley does not move smoothly
along the adjustable track.
1. Physical damage to track or trolley
wheels.
2. Track slots or trolley wheels are not
cleaned.
1. Visually make sure tracks and wheels are ne
and are free of obstacles.
2. Ensure that tracks are cleaned with cloth and
free of dirt
If problem persists, contact local authorised
dealer immediately
The Adjustable Track is not
locking on the Support Post
1. Track hook damaged or broken
Difcult to insert foot into Support
Post
1. Support Post damaged or bend.
2. Foot damaged or bend.
Do not use the system.
Contact your local authorised
dealer immediately.
11
Do not use the system.
Contact your local authorised
dealer immediately.

Fault Reason Recommended Solution
Latch not working
1. Latch Spring broken
Parts missing
1. Locking pin missing.
2. Locking clip missing
Please ensure any accessory used with this system is stored safely when not in use to prevent
any damage or any unintended use which would introduce an inadvertent risk to minors who
may be present around the system
Do not use the system.
Contact your local authorised
dealer immediately.
Do not use the system.
Contact your local authorised
dealer immediately.
12
Disposal
Please respect the current laws for disposal within the community the device is being used within.
e relevant components utilised in the manufacture of the device that can be recycled at the end of
the device life are:
• Fully recyclables:
1. Metal framework
2. Plastic and rubber components
3. Initial packaging of the device (Cardboard)
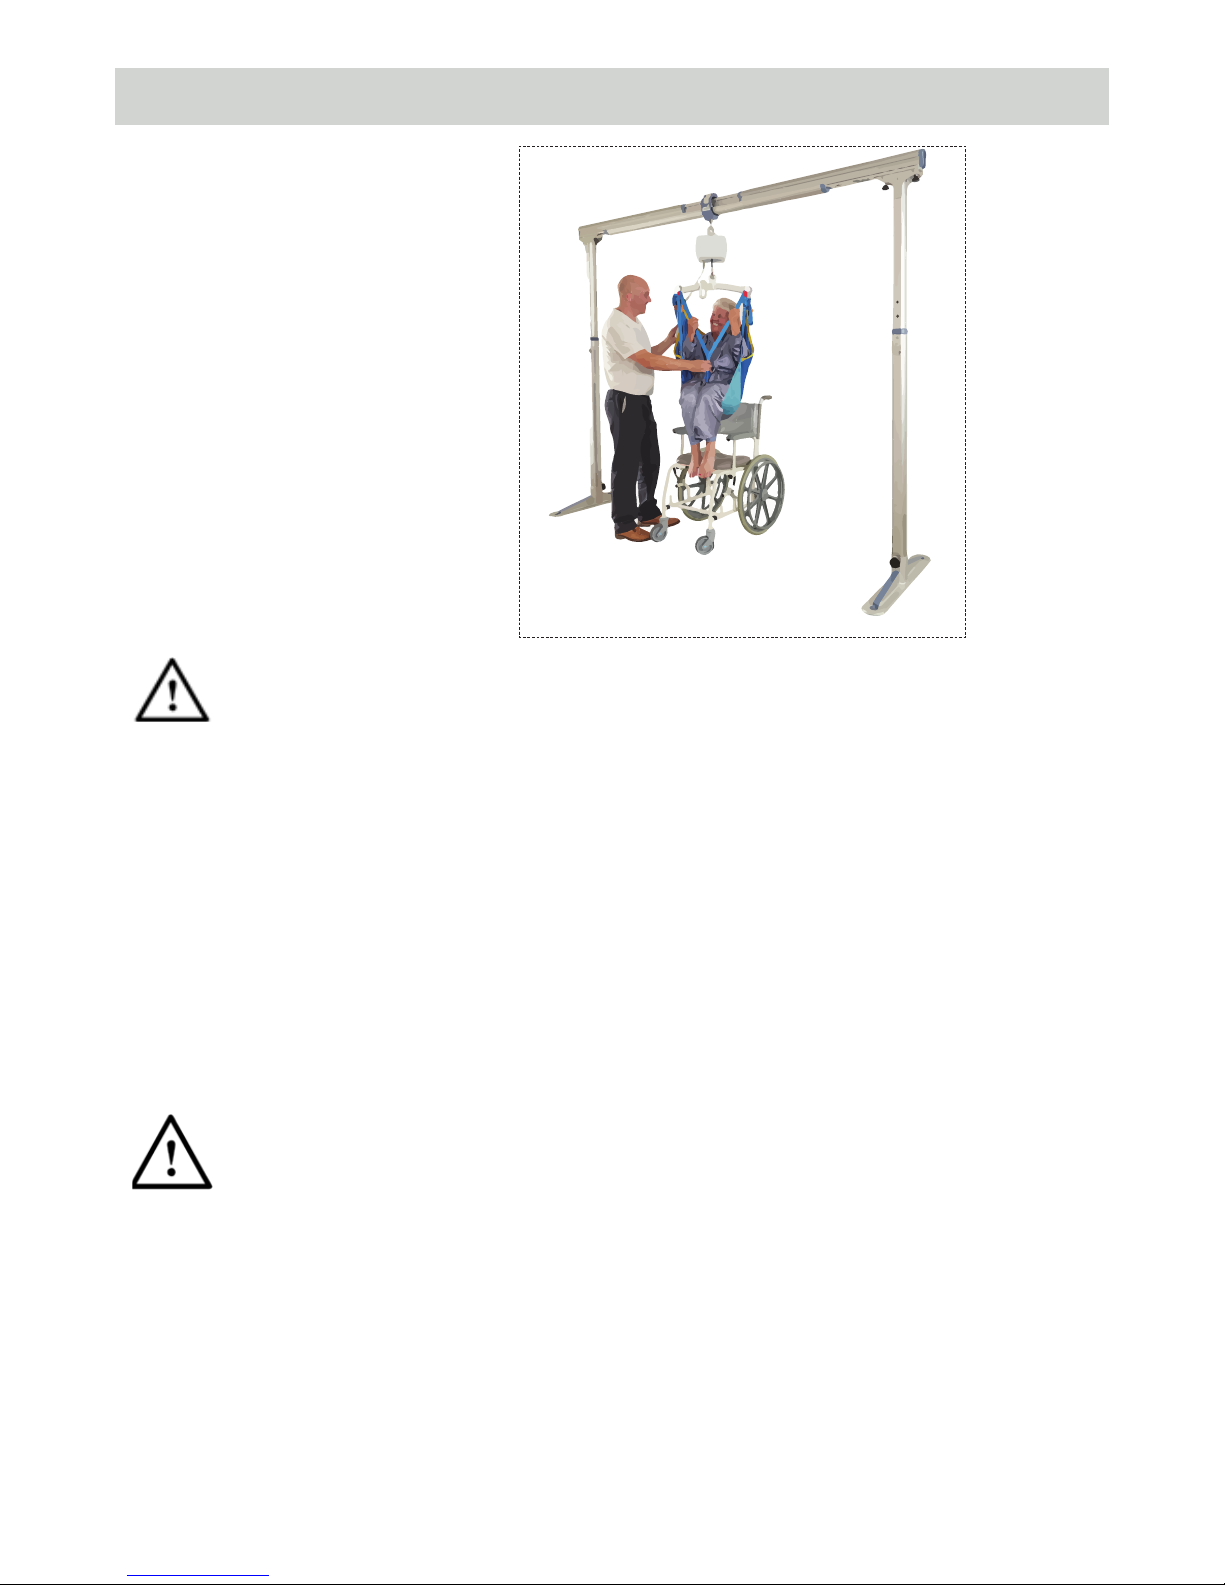
7. Pre-Use Inspection and Maintenance
e illustrations opposite are of the
system with an installed hoist with a user
installed in the hoist sling
Prior to each li, this will be completed by the user, the FSG200 and associated hoist, accessories and
sling(s), must be visually inspected. Refer to the hoist, accessory and sling user guides for specic
details regarding their inspection.
Should any of these items below fail the inspection do not use the
FSG200
. Contact your local authorised
dealer for service or Prism Medical UK.
Visually check for the following:
• e
FSG200
parts should not be loose, broken or bent
• e feet are on a stable, level surface and the Support Posts are secure.
• e trolley moves easily along the track
• e Adjustable Track is placed in the correct location for transferring
• e portable hoist has been inspected as outlined in its owner’s manual
• e sling (s) has been inspected as outlined in its owner’s manual.
Prior to mounting the portable li onto the trolley of the FSG200, please read the owner’s manual
of the portable li. Be sure that the instructions on the use of the li and any accessories, such as
slings are thoroughly understood before attempting to use them with the FSG200.
Failure to comply with this may result in injury to the individual being lied and/or the caregiver or damage
to the li and/or the FSG200.
Following the instructions for the portable li, attach the carabiner, (or other similar attaching device) located
at the end of the li strap. Be sure that the carabiner is securely attached to the trolley prior to proceeding with
the transfer.
Proceed to transfer the individual in the manner described in the owner’s manual for the portable li and
sling. When the transfer is completed the li may be removed from the trolley.
13

8. Cleaning
Recommended Cleaning Instructions
e exterior of the
FSG200
can be cleaned using a damp soapy cloth for general cleaning duties. Please
ensure the cloth is damp and not wet. Ensure the exterior of the device is dry aer cleaning, dry using a
clean dry cloth.
Care should always be taken when cleaning around electrical components where these are
installed.
Disinfecting (if necessary)
Should the
FSG200
require a more thorough clean, the use of the Actichlor disinfectant product, which is
widely available in tablet form and used throughout the healthcare industry, is recommended for use to
ensure a thorough clean.
• Please follow the manufacturers safety instruction for the use of the cleaning product before use to
ensure safe use for the operator and the patient.
• Ensure the cloth is damp before the cleaning process. DO NOT use a wet cloth over electrical
systems.
• Be careful not to let water ingress into the device as although the device is IP rated, it is not
water tight.
Application is through a clean soaked (but damp) cloth applied to wipe the device down
Used in the following dilutions to ensure an eective clean:
• Actichlor dissolvable chlorine tablets provide a concentration of 1000 ppm of available chlorine (0.1%)
per 1 tablet
• 1 tablet (1.7g formed tablet (x1)) will create a virucidal solution, diluted in 1 litre of water to provide
eective means to clean a “Dirty” device. is is also ideal for use aer an outbreak of the Norovirus /
winter vomiting and can be used as a precaution against C.Di. It is eective against viruses, bacteria,
spores, yeasts and moulds.
• e contact time against the outer components of the device should be for 5 minutes to prevent
any virucidal infections without a degradation to the functionality of the device. 5 minutes is a
recommended contact time. e device can withstand a longer contact period but the 5 minute
recommendation as a minimum must be followed to provide an eective cleaning regime.
• Blood spills should be dealt with by an increased concentration of the solution – please refer to the
instructions on the manufacturers product labelling.
Concentration limits for diering cleans will be shown on the manufacturers Achtochlor tablet container,
however, this is reected in the table below:
14

Dilution chart
Product used
as:
Device
Condition
Concentration
(ppm)
Dilution
qty *
Tablets
per litre
Contact
time
Bactericidal Clean 200 5 litre 1 1 minute
Dirty 1000 1 litre 1 5 minutes
Yeasticidal Clean 200 5 litre 1 1 minute
Dirty 1000 1 litre 1 5 minutes
Fungicidal Clean 2000 1 litre 2 15 minutes
Dirty 5000 1 litre 5 15 minutes
Mycrobactericidal Clean 1000 1 litre 1 15 minutes
Dirty 5000 1 litre 5 15 minutes
Virucidal Clean 500 2 litre 1 5 minutes
Dirty 1000 1 litre 1 5 minutes
Sporcidal (C.Di) Clean 1000 1 litre 1 10 minutes
- - -
Sporcidal Clean 5000 1 litre 5 10 minutes
- - -
* Dilution is made within water
• When diluted in water, one tablet gives 1000 ppm of available chlorine DO NOT dilute within any other
medium
• e concentration of the solution depends upon whether the device being cleaned is noticeably dirty or
note (indicated in the table by “Device Condition”
15

9. Standards Applied
e standards that have been applied to the device are as follows:
• BS EN ISO 10535
Hoists for the transfer of disabled persons. Requirements and test methods
Safety precautions when using this cleaning agent
Handling and Storage:
Advice on Safe Handling
Avoid contact with skin and eyes. Do not breathe dust / fumes / gas / mist / vapours / spray. Use
only with adequate ventilation. Wash hands thoroughly aer handling. Mixing this product with
acid or ammonia releases chlorine gas
Hygiene Measures
Handle in accordance with good industrial hygiene and safety practice. Remove and wash contaminated
clothing before re-use. Wash face, hands and any exposed skin thoroughly aer handling.
Conditions for safe storage, including and incompatibilities
• Keep out of reach of children
• Keep container tightly closed
• Store in suitable labelled containers
• Storage temperature: 0°C to 25°C
Individual protective measures:
• Hand protection: Gloves
Dissolve
Dissolve in cold water – With no agitation, 1 tablet will take approx. 10 minutes to fully dissolve in the water
used.
e information above has been extracted from the Actichlor MSDS (Manufacturers Safety Data Sheet). For
a full review of the data please follow the link below:
http://www.nhsggc.org.uk/media/236215/msds-actichlor-plus.pdf
16

10. Service Record History
Initial Information
• Complete the following section on Purchase and Service Information as soon as this equipment is
supplied.
• Use the service record history to record to any completed service and repairs.
• Ensure that the service record is signed and dated each time it is used.
• Be sure to have this piece of equipment serviced on a regular basis (6 monthly where LOLER applies)
Purchase Information
Product name: Pressure Fit System
Date of purchase: ……………………………………….. Serial No.: ………………………....
Purchased from: ……………………………………………………………………………………...
Address: ……………………………………………………………………………………………..…
City: …………………………………..……… Postal code: …………………….………………..
Telephone number: ………………………..
Comments:
Contact the following company for service
Company: ……………………………………………………………………………………...
Address: ……………………………………………………..…………………………………
City: …………………………………… Postal code: ……………………………………...
Telephone number: ……………………………………………….
Comments:
17

Service Record History
Complete this section aer each service, repair inspection and/or maintenance.
* Photocopy additional pages as required*
Date:
……………………………………………… Time: ……………………………………...
Service Type: Periodic inspection Monthly inspection 6 inspection Repair Yearly inspection Other
Completed by:
………………………........................... (printed name)....................................................... (signature)
Company:.......................................................................................................................................................................................
Remarks & Action Taken:
Device left in a safe usable condition: YES NO if ‘NO’ explain in remarks the action) taken
18

WARRANTY
is Warranty does not aect or in any way limit your Statutory Rights
1. All equipment supplied as new against failure within the period of 1 year from date of purchase by virtue
of defects in material or workmanship.
2. is guarantee does not apply to failure attributable to normal wear and tear, damage by natural forces,
user neglect or misuse or to deliberate destruction, or to batteries more than 90 days aer original purchase.
3. is guarantee shall be void if the equipment is not serviced by PRISM or its authorised service agents
in accordance with the manufacturers recommendations or if any unauthorised person carries out works on the
equipment.
4. e liability of PRISM under the terms of this guarantee shall be limited to the replacement of defective
parts and in no event shall PRISM incur liability for any consequential or unforeseeable losses.
19
Date:
……………………………………………… Time: ……………………………………...
Service Type: Periodic inspection Monthly inspection 6 inspection Repair Yearly inspection Other
Completed by:
………………………........................... (printed name)....................................................... (signature)
Company:.......................................................................................................................................................................................
Remarks & Action Taken:
Device left in a safe usable condition: YES NO if ‘NO’ explain in remarks the action) taken

PRISM MEDICAL UK
Unit 1
Tir Llwyd Industrial Estate
Saint Asaph Avenue
Kinmel Bay
Rhyl
LL18 5JZ
Email: [email protected].uk
Tel: +44 (0)0844 980 2296
Website: www.prismmedical.co.uk
For service please contact:
+44 (0) 844 980 2296
PRISM MEDICAL HEAD OFFICE
Unit 4
Jubilee Business Park
Jubilee Way
Grange Moor
Wakeeld
West Yorkshire
WF4 4TD
Email: [email protected].uk
Tel: +44 (0) 1924 840 100
Fax: +44 (0) 844 980 2261
Part Number: 999001 / Rev: A / Date: Sept 2018
Disclaimer
While every eort has been made to ensure the accuracy of information
contained in this user manual, no liability can be accepted by Freeway for any
errors or omissions. Freeway operates a policy of continuous improvement.
Specications and other data are subject to change without notice.
Other manuals for FSG200
2
Table of contents
Popular Lifting System manuals by other brands


Terex
Terex SX18014-101 Operator's manual

Schmalz
Schmalz JumboFlex Safety+ operating instructions

Pro-Lift
Pro-Lift T2151 owner's manual

probst
probst STONEMAGNET SM-600 operating instructions

Clas Ohlson
Clas Ohlson JYQ2-9410 instruction manual

John Bean
John Bean ALIGNMENT 44218Q Installation and operation manual


