Proaster THCR-06 User manual

Coffee Roaster
THCR-06 (10KG)
Document number : THCR06-M04
Revised number : Rev. 04
Date : 2015. 07. 17
Manufactured by TaeHwan Automation Ind.
TEL: 82-32-624-3410~3 Fax: 82-32-624-3414
Operation Manual
Please carefully review the user before you use the machine.
You should fully understand the manual to use the machine property.

Ⅰ. General Information
1. Specifications
2. Purpose
3. Features
Ⅱ. Safety Regulations
1. General Safety Regulations
2-1. Safety Label
2-2. Safety Device
Ⅲ. Installation
1. Carriage
2. Preparation for installment
3. Installation
4. Disposal Instructions
Ⅳ. Operation
1. General Information
2. Components
3. Operation (How to Roast)
Ⅴ. Cleaning and Maintenance
1. How to Clean - Procedure
2. Maintenance - Disassembly
3. Post Cleaning
4. Trouble-Shooting
Ⅵ. Replacement Parts List
Ⅶ. Electrical diagram
Ⅷ. Warranty
Outline
P 4
P 4
P 5
P 5
P 6
P 6
P 7
P 8
P 9
P 14
P 23
P 23
P 31
P 37
P 41
P 45
P 4
P 48
P 8
P 3
2

Specification
HSK-NO MODEL Description Unit Q'ty
THCR-06 Coffee Roaster Set 1
Ⅰ. General Information
-Place this manual near the machine for easy access and read the manual completely
before operation.
-Please read and understand these instructions prior to operating this unit.
-Gloves are recommended to prevent injury.
-Start and stop the machine only after giving it enough time to heat and cool down.
3
Capacity 2~10kg/batch (MAX 10kg Green beans)
Operating time About 10~15min/Batch (depending on profiles)
Roaster Dimension 1,670(w)×700(L)×1,350(H)(mm) (Coffee Roaster)
Power 1Phase V220~240 (60Hz)
Power consumption: 2.0kw/hr, 9.1A
Heat Source GAS Pipe burner (18,000Kcal/hr Natural gas)
(1.5kg/hr LPG)
Gas Pressure Natural gas Above 2kpa / LPG: 2.8kpa Above
Parts Specification
Motor : AC / 220V / 1/2hp 1/30 / 60HZ
Blower : Cooling - AC 700w 60HZ
Exhaust – AC 340w 60HZ

1. Purpose
- This coffee roaster is manufactured as a commercial roaster for coffee beans
- Inappropriate use of the machine (grains, foods, etc.) is prohibited. Repair of the machine must be
done by a designated service center.
- Carefully review safety regulations before first use and please contact the designated service center
or store if you have any questions/problems.
2. Features
- The product uses two heating methods, radiation and hot-air convection, to bring out optimal roasting
control and uniformity of results.
- The design maximizes heat efficiency to extract the ideal aroma and taste of the beans.
- By adjusting the damper control, you can increase/decrease the volume of exhaust and hot air
flowing through the roaster to customize the roasting and flavor profile.
- The powerful blower cools the roasted beans in as little as 3~4 minutes.
- The safety system terminates the gas supply/shuts off the heater if the preset MAX
temperature is exceeded.
Ⅱ. Safety Regulations
1. General Safety Regulations
1) Injury Risk
You may risk injury if you touch the main surface, handle, or pipe while the machine is hot.
Be cautious of the rapid rotation of moving parts such as bearings, belts, and motors.
Stop the Cooling Motor prior to checking the bean temperature while cooling as the cooling tray stir arm
may cause injury.
2) Fire Risk
- Do not put in any foreign objects in the machine
- Do not place any flammable material, such as cloth or paper, in or near the machine
- Do not open or disassemble the machine while the machine is running
3) Electricity and Gas
- Avoid handling the machine with wet hands
- Keep power cables and gas hoses away from all heated parts and surfaces
- After use, close the gas valve, turn off the power (switch located on the back of machine), and unplug
the power cord.
- Inspect any gas leakage of connecting parts with soapy water before and after use
4) Cleaning and general care
1) Avoid exposing machine to moisture. Always follow the specified directions for cleaning and care,
paying attention to the order of the steps. Clean the machine regularly to ensure smooth functioning.
(See directions for cleaning and care)
4

5. Damages
Taehwan Automation is not responsible for any damage or injury caused by:
- Inappropriate use (different materials, incorrect operation)
- Damages caused by self disassembly / repair
- Use of the wrong voltage or gas pressure
- Breakdown from improper maintenance (cleaning and general care)
* We cannot guarantee coverage for damages caused by poor operation or unauthorized repair
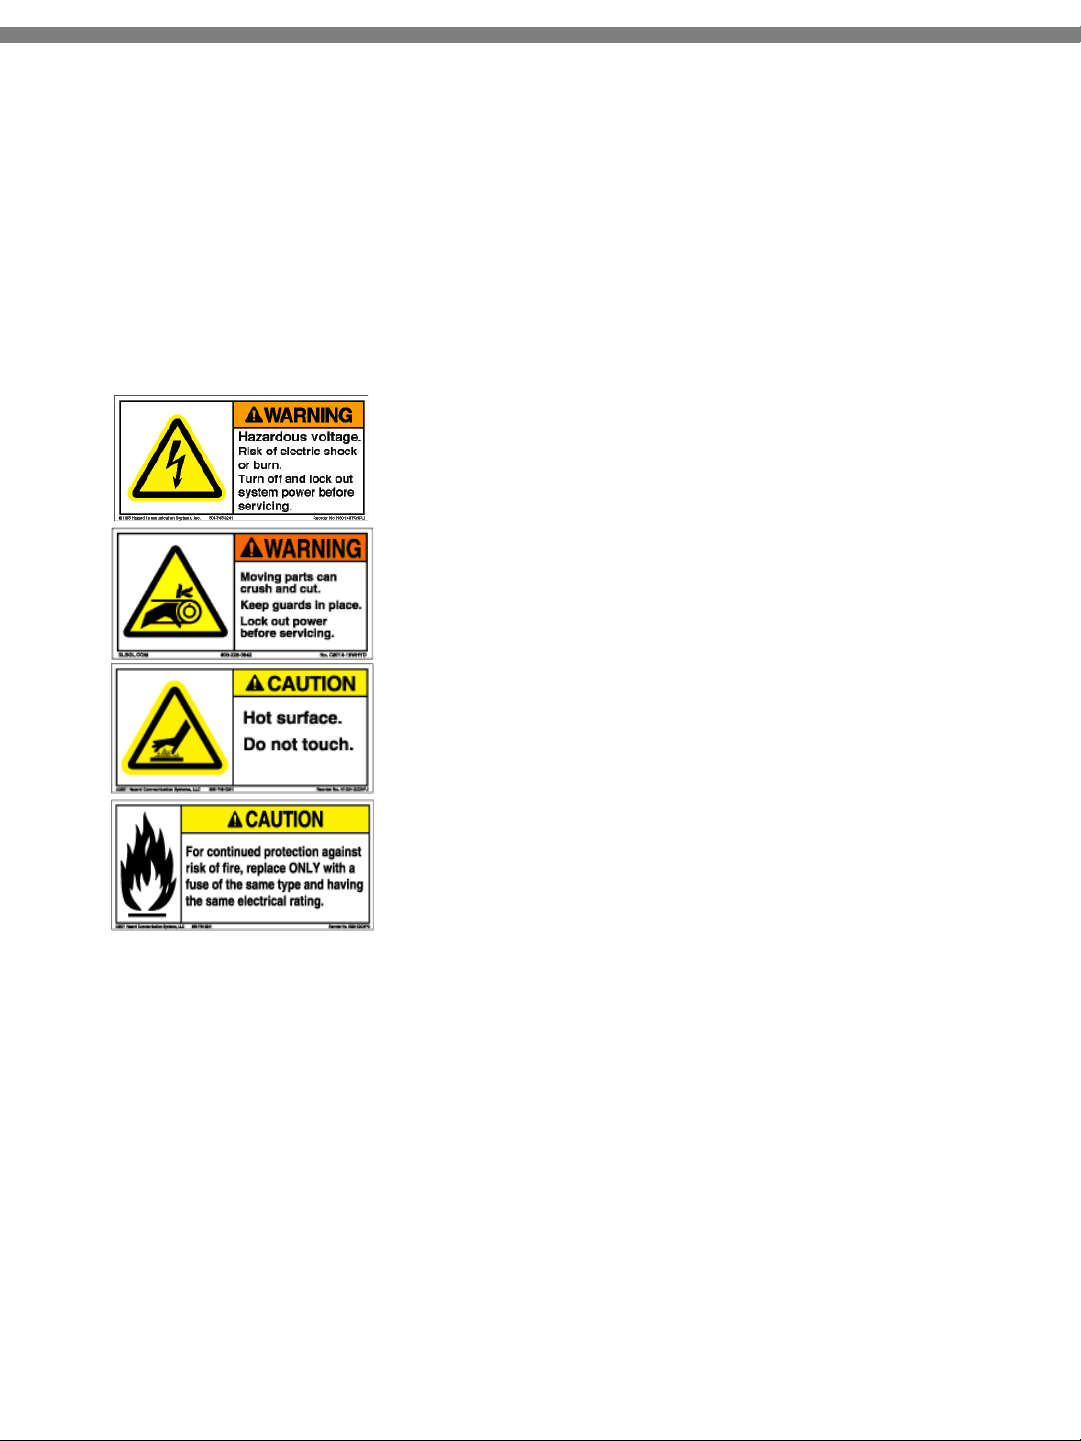
2. Safety Label
1) Electric Shock Hazard
Warning of electric shock. Always turn off the power before
doing any maintenance.
2) Moving parts Hazard
Warning of moving parts. Use the safety cover to avoid
injury. Always turn off the power before maintenance.
3) Burn Hazard
Warning of possible burns by touching hot surfaces.
4) Fire Hazard
Warning of fire hazard. Be cautious of short circuits, gas
leaks, and flammable objects.
3. Safety Device
1) Safety Gear Cover
The safety gear cover is to protect the operator from moving parts such as the pulley and
bearings between the drum and the control box.
- Check that the gear cover is closed before operation.
- Wait until the machine is completely cooled down before turning off to avoid damage to the machine
due to rapid temperature changes.
2) Emergency Switch
This button is to be used in the case of emergency from heat exposure, fire, and
other situations. By activating the emergency switch all parts of the machine, with the exception of the
digital display, are shut down.
- To activate the emergency switch, pull out the button turn right slightly.
- The drum rotation, power, and gas supply are immediately stopped if activated. 5

3) Overheating protection mechanism
- The machine automatically stops when the roasting temp reaches the MAX temp to prevent
overheating. The gas and power supply are stopped as well.
- Do not change the setting temperature due to danger of overheating.
4) Overflowing voltage protection system (Circuit Breaker)
- To prevent electrical accidents or injuries the machine is equipped with a circuit
breaker that shuts off the power if necessary.
5) Fire extinguishing safety device
- The machine stops the flow of gas when the circuit breaker is activated.
6) Gas leak alarm device
- Users must install a gas detector or gas leak alarm device, as recommended by your gas company,
for safety.
Ⅲ. Installation
1 Carriage
2 Before Installation
1) Packing
- For exported machines, first remove nails from the
wooden container and take out slats and boards. Please
recycle packaging materials in accordance with your
country’s regulations.
- Please confirm that the roaster, cyclone, manual, and
toolkit have been included.
2) How to carry
- Weight: approximately 430kg ( 950 lbs)
- Use a forklift to transport over level ground
1) Check point
1)-1 Electricity
This machine is manufactured to utilize a standard Korean wall socket.
Please install regarding your country’s voltage requirements.
1)-2 Gas Pressure
Install according to the requirements of your gas system. It is necessary to install a separate safety
device for preventing gas leaks in addition to the built-in safety device. Please see specifications for
gas pressure requirements.
1)-3 Exhaust Condition
Place your coffee roaster in a place where you can install the exhaust pipe. Please note that shorter
exhaust distances make for ideal air-flow conditions. 6

3. Installation
7
* When installing an afterburner: Do not install it near a fire source! Duct made of heat-
resistant material is required.
1) Duct Work (Exhaust facility)
Combustion occurs in this equipment and it should be installed in a dry place with good ventilation as
close as possible to a wall so that a shorter exhaust pipe can be used. And it is also recommended that
the exhaust pipe used is exclusively for roasters to consistently maintain quality. Caution should be
used in the case where the duct is connected to the central exhaust system as it may negatively affect
the exhaust flow and inlet temperature during roasting due to the change in the exhaust impedance.
1)-1 Drilling holes in the wall
Exhaust pipe is Ø150mm ( Ø200mm in case afterburner is installed)
Cooling pipe is Ø100mm
(Location of the center of the holes: 2000mm above the floor, and 2300mm in case afterburner is
installed)
In case they are required to drill in the wall or glass, contact a specialist after checking the material.
1)-2 The construction cost of external exhaust pipe work is not included in the equipment price and it is
required to install it separately at your own expense.
In this equipment, the exhaust pipe is made of stainless steel. Heat-resistant and corrosion-resistant
material should be used for safely.
It is recommended to install the equipment using an exhaust pipe with a length shorter than 4m, if
possible, and when an exhaust pipe is longer than 10m an additional blower needs to be used.
Otherwise, there may be an exhaust problem during roasting due to improper airflow. Please contact a
specialist for the duct construction.
2) Gas supply
This information is for your gas facilities companies.
2)-1 In case of Natural gas, it is recommended to secure a shared gas pressure of equipment of more
than the minimum 2kpa /0.290psi considering gas consumption.
2)-2 Things to be prepared before the equipment is delivered: please have the gas line(s) set up near
where you would like to install the roaster.
2)-3 Gas consumption by equipment
Coffee Roaster: Natural gas: Max. 21,000kcal / LPG: Max. 1.8kg
Afterburner: Natural gas: Max. 30,000kcal / LPG: Max. 2.8kg
2)-4 Securing sharing gas pressure of equipment
It negatively affects the quality of the roasting due to low heat when gas pressure is not sufficiently
provided.
a. Natural gas: Gas pressure should be more than 2kpa /0.290psi
b. LPG : Gas pressure more than 2.8kpa / 0.406psi

2)-5 Gas pipe specification: 15A or higher
2)-6 Caution when installing a fuse cock: Be sure to check gas consumption beforehand
2)-7 Be sure to install a gas leak alarm system.
2)-8 Install a pressure gauge in the front end of the equipment to check if normal pressurized-gas is
supplied.
2)-9 Check the standard specification of gas pipe as pressure may vary depending on the size and
length of a gas pipe. The shorter the gas pipe, the better.
2)-10 How to build a gas pipe when installing the afterburner together with the roaster:
Build separate pipelines at the main pipe to supply gas constantly during roasting without affecting
firepower.
In case of the simultaneous connection at one pipeline, the amount of gas supplied to the roaster will
be rapidly reduced when operating the afterburner, which results in lack of firepower causing which
affects the roast. It is recommended to use separate pipelines if possible.
3) Power supply
Be sure that the total power consumption of all peripheral devices does not exceed 80% of the amount
of power to be supplied.
We recommend that you raise voltage in the event there that this condition is not met.
4. Disposal Instruction
1). Cartons and package materials should be recycled or disposed in accordance with the disposal
regulations of your country
2). For the disposal of metal parts and electrical parts, please contact your local recycling center.
3). Machine must not be disposed with regular garbage. Dispose the product in accordance to the
regulations for electrical products.
4). Disposing of wastes from coffee beans must be done in accordance to the regulations of your
country.
8
Ⅳ. Operation
1. General Information
1) User
This machine must be operated by users who have experience with roasting coffee. Please contact
your distributor or a representative of PROASTER for more information regarding training.
2) Before Operation (Precautions)
Check if the outlet is connected and that the power switch at the back of the machine is switched
down.
- Do not touch the power cord or hot surfaces.
- Check the temperature, exhaust, internal / external moisture of the machine before operating
- Do not manipulate the control box without clear instruction, check the ventilation condition.
- Check that the following are clean and clear: chaff drawer, cooler, inside cooler, cyclone for seamless
exhaust and roasting conditions.

2. Structure and operations - Operation parts
A mechanism that controls the rate and amount of hot air that is
guided into the drum.
Control flow of air from 0(close) to 5 (wide open)
1) Used to control the amount of heat inside the drum
2) Used to emit chaff & fumes from roasting
3) Used to eliminate or emit the flavor generated during roasting
The top display is for measuring warm-up time and roasting time of
the current batch.
The lower display is for the timer feature.
How to set timer: Move to a number to set using ◀ button and move up
or down with ▲ ▼ buttons
Press the MD button to complete setting.
Blower
Speed
Timer
Knob
ENT is for adjusting the exhaust blower motor speed, the
remaining digits are blurred except the part you want to change
Move to the number to set with ◀ button and move up or down with ▲
▼ buttons
Press the ENT button to complete setting of time
Note: recommended setting is between 40-60
Device for controlling flame during roasting process. It should be
adjusted based on the gas gauge. Please move delicately.
(However, it is recommended to match the thermal power with gas
gauge because the gas pressure is different depending on the region
and environmental conditions.)
Inverter
MD202
Ignition reset
button
This functions to reset the auto ignition device
If there is air inside the gas pipe it will not ignite and the red light comes
on. At this time, press the reset button.
※ If it still fails to ignite, press the ignition button repeatedly to ignite
until the air inside is drained out.
9

⑴⑵⑶⑷
⑸
⑹
⑺
⑼
⑽
⑾
⑿
⒀
⒁
⒂
(16)
(9) Discharge handle
(10) Chaff drawers
(11) Roasting Check Window
(12) Cooling Tray
(13) Cooling Tray Discharge handle
(14) Cooling Stir-arm
(15) Front Bearing
(16) Sampler
⑻
(1) Input hopper
(2) Inlet Handle
(3) Damper
(4) Drum
(5) Pulley Cover
(6) Control Box
(7) Gas Knob
(8) Inspection Window (front)
2. Structure and operations
1) Frontside product structure and nomenclature
10

⑴ ⑵ ⑶ ⑷ ⑸
⑹
⑺
⑻
(1) Cyclone body
(2) Cyclone connecting piping
(3) USB Port
(4) Control Box Fan
(5) Exhausting Blower
(6) Inspection Window
(Back)
(7) Cooling Blower Pipe
(8) Gas connection piping
(9) Weighing lever
(9)
2) Backside product structure and nomenclature
11

⑴
⑵ ⑶
⑷ ⑸ ⑹
⑺ ⑻ ⑼
(5) Burner switch
(6) Timer switch
(7) Cooling Stir arm Switch
(8) Cooling Motor Switch
(9) Emergency stop button
(1) Roasting timer
(2) Air temperature Controllers
(3) Roasting temperature
Controllers
(4) Operation switch
3) Control Box Product Name
12

⑴ ⑵ ⑶
⑷
⑸
⑹
⑺
⑻
⑼
⑽
⑴ Circuit breaker
⑵ Relay
⑶ Inverter
⑷ Power
⑸ Drum
⑹ Blower
⑺ Cooling Blower
⑻ Cooling
⑼ Burner
⑽ FAN
⑾ Control box FAN
⑾
4) Structure and name inside control box
13

Step1.
After plugging in the power cord of the
Roaster open the access door to the
circuit breaker and flip the breaker to
the ON position. (Once you turn on the
circuit breaker the displays for the the
temperature and timer on the control
box will turn on. The roaster drum will
not turn on.)
3. How to Operate
* Raise the breaker to the ON position and
ensure that the timer and thermostat light
up.
* Emergency stop buttons should always
maintain a protruding state except for
during an emergency. When the
emergency stop button is pressed in all
power is shut off to the machine.
14

* OPERATION Switch
Step2.
Turn the OPERATION switch to the ON
position after checking that the control box
lights up. (Note: you should be able to
observe a whirring sound after turning on
the operation switch.) Make sure that the
drum is moving and the exhaust fan is
working.
* Please ensure that the drum is rotating
prior to applying heat to prevent damage to
the machine.
Step3.
Open the valve of the first gas pipe.
* Roaster Gas pipe
15

Step4
Open the access door to the roaster body
and open the gas valve inside.
*Roaster internal gas valve
Step5
Turn the BURNER switch to the ON
position after opening all of the gas valves
of the roaster (previous steps).
(Turning on the burner switch causes
ignition that will spark after 15 seconds
and the pilot burner will be ignited)
* BURNER Switch
16

Step6
Start the warm-up process by adjusting
the flame. It is recommended that you
preheat the drum sufficiently with low
heat evenly as preheating with a strong
flame may damage the drum. Please
ensure that the drum is rotating before
applying heat.
Turn the TIME switch to the ON position
to monitor the the time during preheating
and also for roasting.
* Roasting Timer
17

Step8.
Now that the hopper contains the green
beans you wish to roast pull the hopper gate
to the open position once you have reached
your ideal beginning roasting temperature.
Close the hopper gate once all of the green
beans have entered the drum.
Step7.
Once the machine is sufficiently warmed up
and you’ve reached your optimal beginning
roasting temperature you will be ready to
roast. At this time place the green beans in
the Hopper.
Please note that some heat transfers from the
roaster into the hopper and therefore you
should not put the green beans into the
hopper until you are ready to begin your roast.
18

Step9.
Start roasting after feeding the green
coffee into the drum.
Note: please turn on the timer and
ensure that the temperature displays are
functioning.
•The roast can be adjusted by the Damper
which controls volume of the the
exhaust air flow during roasting. By
adjusting this Damper you can achieve
your ideal roast flavor and aroma and
have a way to control the convection
heat of the air flowing through the drum
and beans.
• If you close the Damper too low then it may
not have proper exhaust during the roast.
Moreover, insufficient airflow can cause
chaff to accumulate in the roaster and not
reach the cyclone.
19

Step11.
Ensure that the cooler and cooling motor are
on and then discharge the roasted beans by
open the discharging handle.
If you plan on continuing to roast while
cooling then do not turn off the burner to
bring the drum back to your starting
roasting temperature and feed fresh beans
into the hopper and into the drum.
Step10.
Once the roast is complete, turn on the
cooling motor and the cooling fan before
discharging roasted beans.
- Cooling motor should be operating in
advance to minimize the smoke generated
during discharge.
20
Table of contents
Other Proaster Kitchen Appliance manuals
Popular Kitchen Appliance manuals by other brands

SEVERIN
SEVERIN CP 3542 - PRESSE-AGRUMES Dimensions

Westinghouse
Westinghouse QK042 owner's manual

Espressions
Espressions EP5800 Instruction Manual and Recipes

Hanseatic
Hanseatic HWC171GCIA user manual

ZANOLLI
ZANOLLI Citizen 6/MC Instructions for installation, use and maintenance manual

Tylo
Tylo STEAM HOME manual