Procomcure Phoenix-Pure32 User manual

Phoenix-Pure32
Nucleic Acid Purification System
Operation Manual
v 1.0

2
Foreword
Thank you for purchasing the Phoenix-Pure32 Nucleic Acid Purification System. This
manual describes the function and operation of then instrument. In order to use the
instrument properly, please read this manual carefully before operating the device.
Keep it with your device in case you encounter handling issues while operating.
Opening Check
Please check the instrument and accessories according to the packing list when you
first open the packing case. If anything is wrong or missing, please contact
Procomcure Biotech GmbH
Breitwies 1
A-5303 Thalgau
+43 6229 39608
support@procomcure.com
www.procomcure.com
Safety Warnings and Guidelines
1. Important information for safe use
Users should have a clear understanding of how to use this instrument before
operation, please read this manual carefully prior to operation. Any improper
operation may cause injury or electric shock.
Please read the manual carefully and operate safely according to the guidelines.
2. Security
The operation and maintenance of the instrument should comply with the basic
guidelines and warnings below. Incorrect operation or maintenance will have effect
on using life, performance, and safety features of the instrument.
•The instrument is a normal indoor instrument which conforms to class I of GB
4793.1 standard. Please read this manual carefully before operation.
•The device must be used by experienced personnel with appropriate training.
•The operator should not repair the instrument to avoid injury or out of warranty
reasons. If service is required, please contact Procomcure Biotech for repair.
•Before powering on, please make sure the voltage of the power supply is
consistent with the required voltage. Make sure the rated load of the power
outlet is not less than required by the instrument.
•If the power cord is damaged, replace it with the same type and specification
power cord.
•Do not cover anything on the instrument when using.
•Do not touch the heating bock during operation to avoid injury.

3
•The instrument should be kept in an area with minimal dust, away from wet
areas and direct sunlight. Additionally, the installation location should have
sufficient ventilation and be protected from electromagnetic interference and
heat sources.
•The instrument must be placed on a level, vibration-free surface for proper
operation.
•Do not cover the vent of the instrument as this can cause overheating.
•When several instruments are used at the same time, the distance between
each instrument should be more than 100 cm.
•Power off when not in use. If the instrument will not be used for a long period of
time, cover it with a cloth or plastic to protect it from dust.
•Disconnect the power cord from the jack at once in the following cases, and
contact Procomcure Biotech:
oLiquid enters the instrument.
oInstrument became wet.
oAbnormal operation, such as abnormal sound or smell.
oInstrument was dropped or outer shell damaged.
oThe function has obviously changed.
3. Maintenance
The instrument should be cleaned regularly using a soft cloth damp with a small
amount of alcohol. Stains on the surface of the instrument can be wiped with soft cloth
damp with cleansing cream.
4. Transportation and Storage Requirements
Ambient temperature: 10°C ~ 35°C
Relative humidity: ≤ 70%
Atmosphere pressure range: 500 ~ 1060 hpa
Locate it in a well-ventilated room, away from corrosive gas.

4
Contents
Chapter 1 Introduction........................................................................................... 5
1.1. Application...................................................................................................... 5
1.2. Contraindication............................................................................................. 5
1.3. Service Life....................................................................................................... 5
Chapter 2 Specifications ....................................................................................... 5
2.1. Working Conditions......................................................................................... 5
2.2. Basic Parameters ............................................................................................ 5
2.3. Overall Dimensions ......................................................................................... 6
Chapter 3 Basic Operating Instructions ............................................................... 7
3.1. Structures ......................................................................................................... 7
Chapter 4 Operations ............................................................................................ 9
4.1. Power Connection.......................................................................................... 9
4.2. Installation of Phoenix-Pure32 ........................................................................ 9
4.3 Kits Installation .................................................................................................. 9
4.4. Install the Magnetic Rod Cover................................................................... 10
4.5. Detailed Operations ..................................................................................... 10
4.5.1. Start-up Interface ........................................................................... 10
4.5.2. Shortcut Mode ................................................................................ 11
4.5.3. List Mode ......................................................................................... 12
4.5.4. Lamp................................................................................................ 12
4.5.5. Program Management .................................................................. 13
4.5.6. System Settings................................................................................ 15
4.5.7 UV Sterilization.................................................................................. 17
4.5.8 Help................................................................................................... 17
Chapter 5 Trouble Shooting................................................................................. 18
5.1. Troubleshooting............................................................................................. 18
5.2. Software Error Alarm List ............................................................................... 19
Chapter 6 Accessory ........................................................................................... 19
Chapter 7 Abbreviations and Tags..................................................................... 20
7.1. Abbreviations ................................................................................................ 20
7.2. Tags ................................................................................................................ 20

5
Chapter 1 Introduction
Phoenix-Pure32 Nucleic Acid Purification System is a newly launched automatic
extraction and purification system for DNA/RNA, proteins and cells. It can absorb,
transfer and release magnetic beads by a magnetic rod and magnetic rod sleeve to
separate magnetic beads and samples. The operation is automatic, fast, and simple.
Users can extract 1 to 32 samples simultaneously in 15-40 minutes with special kits.
Phoenix-Pure32 can extract samples of animal/plant tissue, blood and body fluids etc.
with different kinds of magnetic bead nucleic acid extraction reagents. It is mainly
used for the extraction and purification of nucleic acid from human body samples.
1.1. Application
This instrument is suitable for the extraction and purification of nucleic acids in animal
and plant tissues, blood and body fluids and other samples (mainly used in human
body samples).
1.2. Contraindication
No contraindication.
1.3. Service Life
Service life of the instrument is five years.
For production date, please see the label on back of the instrument.
Chapter 2 Specifications
2.1. Working Conditions
Environmental Temperature: 10°C -35°C
Relative Humidity: ≤ 70%
Input Voltage: AC 100-240V, 50Hz/60Hz
2.2. Basic Parameters
Instrument
Phoenix-Pure32
Principle
Magnetic Particle Method
Sample Volume
20 μL—1000 μL
Throughput
32
Stability
CV ≤5%
Extraction time
15 ~ 40 min/time
Temperature control module
Room temperature to 120°C for lysis and elution
Temp. Accuracy
±1°C

6
Vibrate and mix
10 different speeds
Operation
7-inch color touch screen, mouse can be connected
Programs
8 groups of programs are pre-installed, can store 100
custom programs
Program management
Create, edit, save as, delete, model program
Extension interface
With USB port and Ethernet port
Network
Extendable Ethernet remote control, WiFi function.
Data Storage
Store with SD card
Sterilization
UV-Sterilization
Venting
Fan
Power Supply
AC100-240V, 50Hz/60Hz, 250VA
Weight
28 kg
Dimensions
400mm×470mm×450mm
2.3. Overall Dimensions
7
Chapter 3 Basic Operating Instructions
This chapter mainly introduces structures, basic operation keys, displays as well as
preparations before starting up. Please read this chapter carefully before using this
instrument.
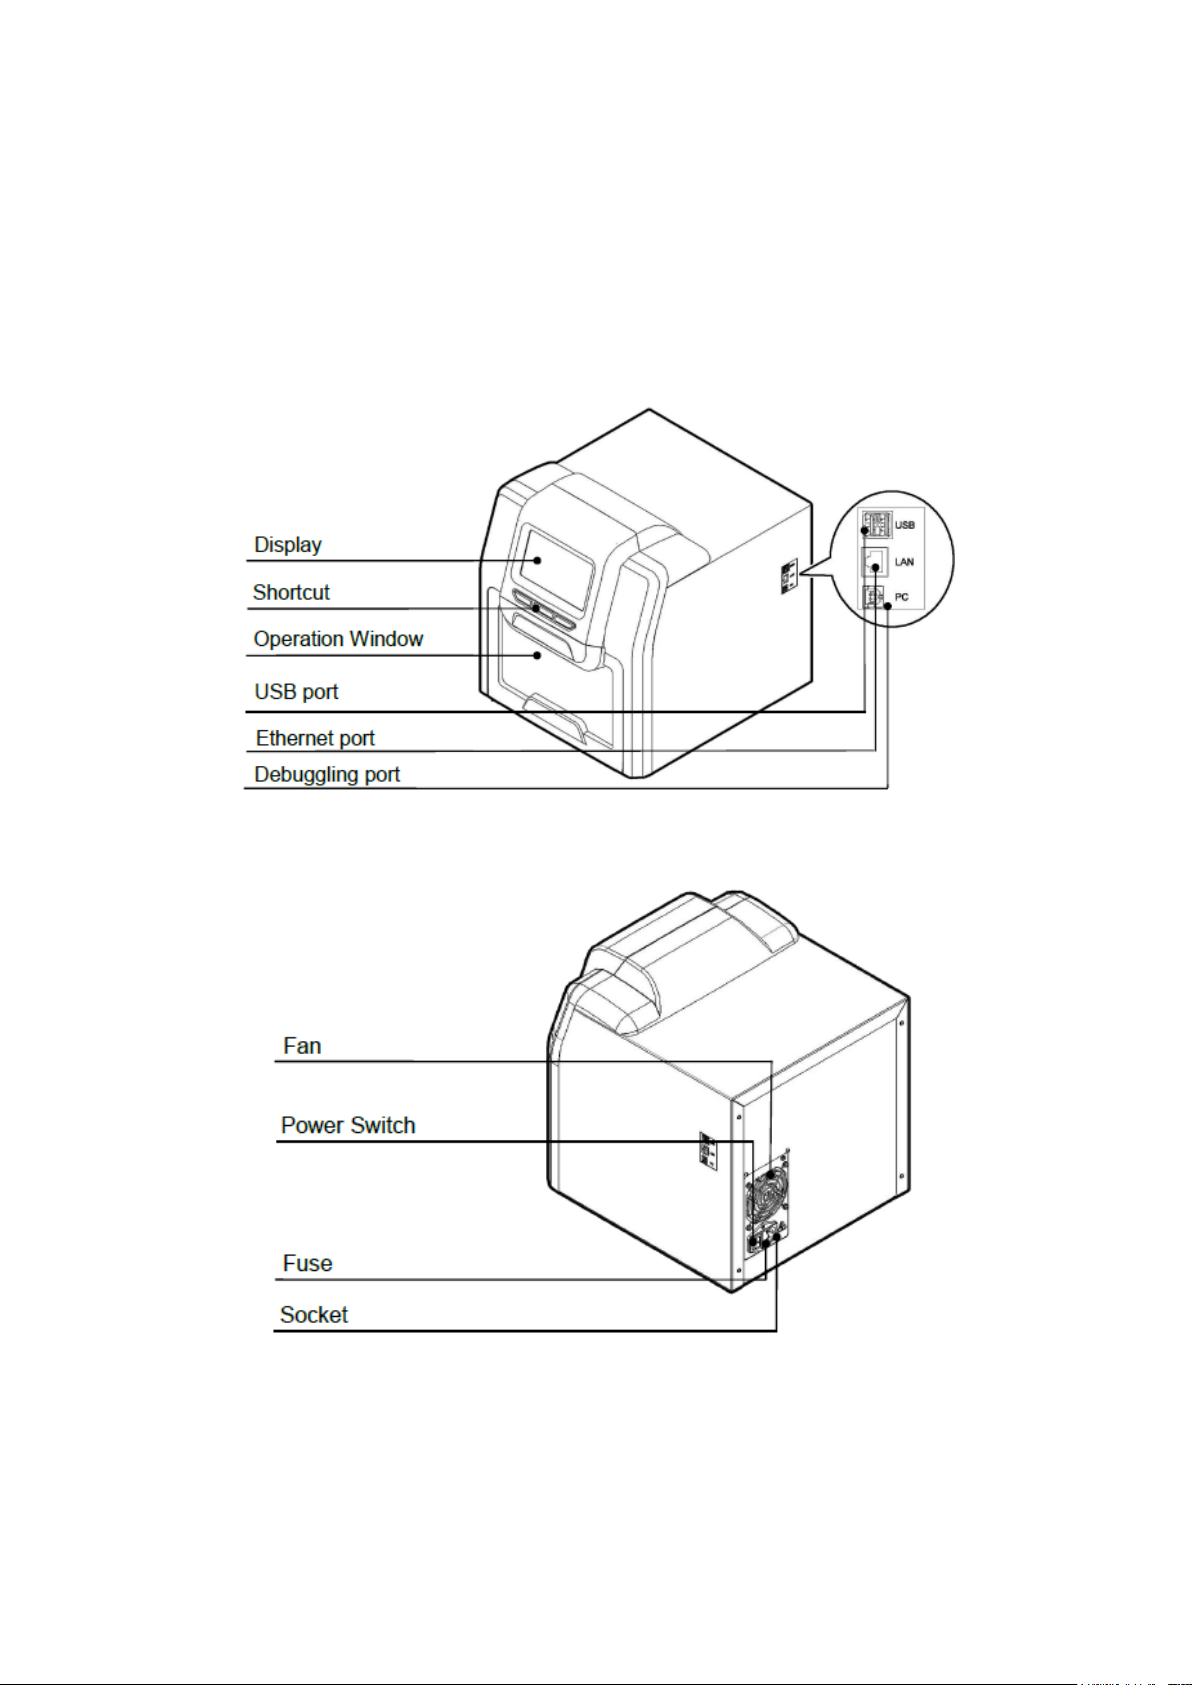
3.1. Structures
3.1.1. Front
3.1.2 Back
8
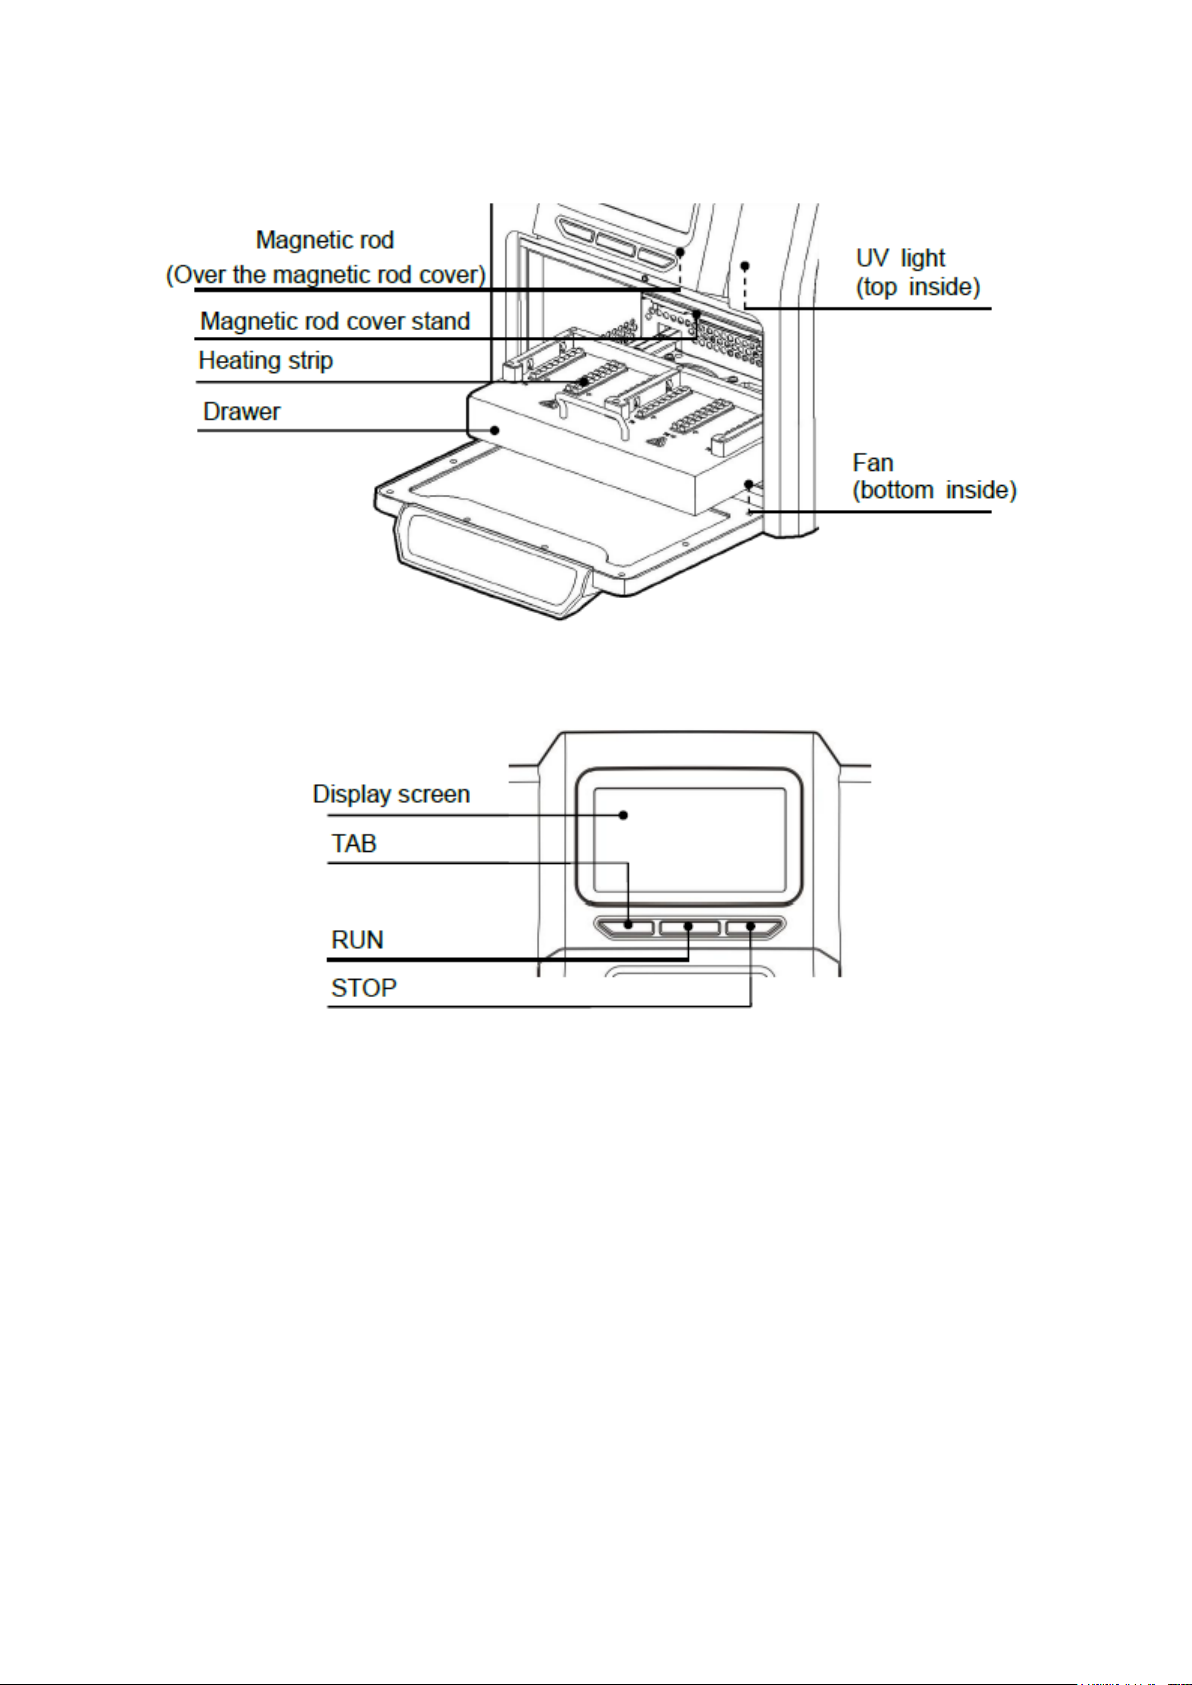
3.1.3. Inside View
3.1.4. Operation Panel
Display screen: Touch screen, mouse also can be connected for operation.
TAB: Select shortcut program.
RUN: Start the shortcut program and run the instrument.
STOP: Stop the operation.

9
Chapter 4 Operations
4.1. Power Connection
AC 100 - 240V
4.2. Installation of Phoenix-Pure32
Take out the instrument from the packaging carton and tear off the tape on the edge
of the operation window, then open it and take out the foam. Screw out the screw of
position ①as below, take out the baffle and release the drawer.
Note: Be careful while un-packing or the magnetic rod can be damaged.
4.3. Kits Installation
Take out the drawer and put in the 96 well reaction plate (already filled with your
samples) mounted on the locating slot, make sure the plate with notch is on the left
side, then push back the drawer slowly.

10
4.4. Install the Magnetic Rod Cover
Insert the magnetic rod cover completely on the mounting groove. The installation
quantity depends on the reagent kit number. Up to 4 pieces can be installed.
4.5. Detailed Operations
4.5.1. Start-up Interface
Turn on the instrument and make sure the drawer is closed before start. The start-up
interface will come up.
After start, it will enter the shortcut mode as below:

11
4.5.2. Short Cut Mode
Under the shortcut mode, select the program needed and click “Run”, it will enter into
the program run interface.
The program can also be selected by press “Tab” button on the panel and then press
“Run”for start or “Stop” for terminate.
On the left side, the current step info is shown. When this reagent position starts to run,
the position will be highlighted and there will be a temperature displayed on the
position of heating function. The progress bar will display the progress, the remaining
time is displayed in the top right corner.
•Click “Pause” to pause or continue the program.
•Click “Stop”, the program will stop and there will be a check box. Click
“Cancel”, the program will be continued, then click “OK” and the program run
will be back to original place and the “Stop” button will change to “Run Again”.
Click “Run Again” to continue the program.
•Click “Back” to return the previous menu.
Remark: If the drawer is open during operation, there will be a message box and the
device will stop to run. The instrument will continue to run only after the drawer is
closed.

12
4.5.3. List Mode
Select the program and click "Run" to enter the run interface. Click “View” to enter the
check interface.
Click “Run” to enter the running interface.
Click “Option” to view the parameter setting of the program.
Click “Back” to previous interface.
4.5.4 Lamp
At the bottom of interface, the icon “ ” shows that the lamp is on.
The icon “ ” shows that the lamp is off. Click this icon to change the state of
the lamp.

13
4.5.5 Program Management
Click “Manage prog” to open program management.
4.5.5.1 Shortcut Operation
Check the Shortcut Box of the program in the “Manage Prog.” interface and the
program will be displayed in the “Shortcut” list interface. If the lock icon is “ ”, the
program cannot be edited, deleted and saved as. If the icon is “ ”, the program
can be edited, deleted and saved as.
4.5.5.2 Insert
Click “Insert” under the “Manage prog.” to enter the “Insert” surface.
When creating a new program, you should name the program first.

14
Click “Insert” to add a new step.
Click “Well” to fix the well number, then input the program name, waiting time,
mixing time, magnetic time and sample volume. At the end, please click the
mixing speed to select the speed.
Only well location 1,6, 7 & 12 have a heating function. When selecting other well
locations, “temperature”will not be displayed.
On suitable well locations, “temperature” is displayed and can be set within device
parameters. “Zero” means no heating is required.
Click “ ” to enter the extended parameter setting interface. For all regular
applications, it is not necessary to change these settings. Click “ ”to get back
to the parameter setting interface.
Click “Delete” and then click “OK” to delete the last step; or click “Cancel” to
not delete the last step.
Click “Save” and then click “OK” to save the editing program; or click “Cancel”
to not save the edited program.
Click “Back”, once the new program has been saved, to get back to the
“Management prog.” interface.
Click “Cancel”, to get back to “Management prog” interface without saving.
Click “Cancel”, to stay in the “Insert” interface.
4.5.5.3 Edit
Choose the program in the “Manage prog.” interface, then click “Edit”to enter the
program editing.
The following steps are identical to “Insert” (Chapter 3.5.2).
4.5.5.4 Save
In the “Manage prog.” interface to make a selection, click “Save as” and then choose
a new program name, click “Enter” to save the current program, or “ESC” to not save.
4.5.5.5 Delete
In the “Manage prog.” interface to make a selection, click “Delete” and then click
“Ok” to confirm or “Cancel” to not delete.

15
4.5.6 System Settings
Click “Settings” and enter the System Setting surface.
4.5.6.1 Instrument
Click “Instrument” to enter the right password and then enter the setting interface to
set the parameters of instrument.
Remark: Usually, there is no need to change instrument parameters as instrument has
already been set correctly before factory dispatch. If instrument parameters need to
be set, contact your distributor.
4.5.6.2 Date & Time
Click “Date & Time” to set system time by directly entering numbers or clicking “+” “-”.
4.5.6.3 Language
Click “Language Setting” to choose the language that you need.

16
4.5.6.4 Air ejector fan
Click “Air Ejector Fan” to enter the fan setting.
4.5.6.5 Im.&export
Click “Import/Export” and insert USB drive to finish the step.
4.5.6.6 Upgrade
Click “Upgrade” to enter the right password and enter the interface. Insert a USB drive
to operate.

17
4.5.7 UV Sterilization
Click “UV sterilization” and enter numbers or click “+” “-”to set the time.
Click “Start” start the sterilization process.
Click “Stop” to stop the UV sterilization.
During sterilization, the UV light will automatically stop when the drawer is opened. It
will continue after the drawer is closed.
4.5.8 Help
Click “Help” to check the help info. The help interface displays the relevant features
and version information.

18
Chapter 5 Trouble Shooting
5.1. Troubleshooting
No.
Error
Causes
Solution
1
No display after switching on
Power not
connected
Check power
Switch failure
Replace Switch
Fuse failure
Replace Fuse (5X20
250V 8A)
Others
Contact PCC
2
No UV light
UV light failure
Replace light tube
Contact PCC
3
No Light
Light failure
Replace light tube
Contact PCC
4
Cannot stop automatically after
opening the drawer.
Sensor failure
Contact PCC
5
Big variance between actual and
display temperature
Sensor failure
Contact PCC
6
No heating for heating strip
Sensor failure
Contact PCC
Heater failure
7
Instrument cannot run
Controller failure
Contact PCC
Motor failure
8
Abnormal sound during working
Guide rail installed
incorrectly
Contact PCC
Motor failure
Synchronous belt
abrasion
9
Press button not working
Press button failure
Contact PCC

19
5.2. Software Error Alarm List
Error Type
Error Name
Error Code
Temperature
(Code: 0)
T1,T2,T3,T4,T5,T6,
T7,T8Overheat
E011,E021,E031,E041,
E051,E061,E071,E081
T1,T2,T3,T4,T5,T6,
T7,T8Drive circuit fault
E018,E028,E038,E048,
E058,E068,E078,E088
T1,T2,T3,T4,T5,T6,
T7,T8Open circuit
E015,E025,E035,E045,
E055,E065,E075,E085
T1,T2,T3,T4,T5,T6,
T7,T8Short circuit
E016,E026,E036,E046,
E056,E066,E076,E086
The drive circuit of
exhaust fan fault
E019
The drive circuit of
cooling fan fault
E009
Electric Machinery
(Code: 1)
Electric machinery
brake lock fault
E108
Electric machinery stroke position
(Code: 4)
The left sensor
E403
The sensor of magnetic
bar cover on electric
machinery position fault
E425
The sensor of magnetic
bar on electric
machinery position fault
E415
LCD, Crystal oscillator, Storage
(Code: 7)
The clock crystal fault
E702
The storage chip fault,
setting parameter lost
E703
Communication
(Code: 8)
Online failure
E801
Chapter 6 Accessory
No.
Name
Specs.
Unit
Qty.
1
Power Cord
Pc
1
1
Mouse
Logitech
Pc
1

20
Chapter 7 Abbreviations and Tags
7.1. Abbreviations
The following abbreviations are for reference and will appear in this operation manual.
Abbreviation
Meaning
A
ampere
AC
alternating current
V
volt
Hz
hertz
W
watt
USB
universal serial bus
SD
secure digital card
WiFi
wireless fidelity
kg
kilogram
mm
millimeter
µl
microliter
hpa
hectopascal
°C
degree centrigrade
cv
stability
TAB
tab
RUN
run
STOP
stop
7.2. Tags
Following marks appear on the instrument
Table of contents
Popular Medical Equipment manuals by other brands


Getinge
Getinge Arjohuntleigh Nimbus 3 Professional Instructions for use

Mettler Electronics
Mettler Electronics Sonicator 730 Maintenance manual

Pressalit Care
Pressalit Care R1100 Mounting instruction

Denas MS
Denas MS DENAS-T operating manual

bort medical
bort medical ActiveColor quick guide

AccuVein
AccuVein AV400 user manual


