Procopi BEL 180 Series User manual
BEL 180
PLONGEOIR POUR PISCINE RÉSIDENTIELLE
DIVING BOARD FOR PRIVATE SWIMMING POOLS
SPRUNGBRETT FÜR PRIVATE SCHWIMMBECKEN
TRAMPOLÍN PARA PISCINA PRIVADA
4
2
1
5
6
3
7
8
14
10 11
11
12
9
13
15
16
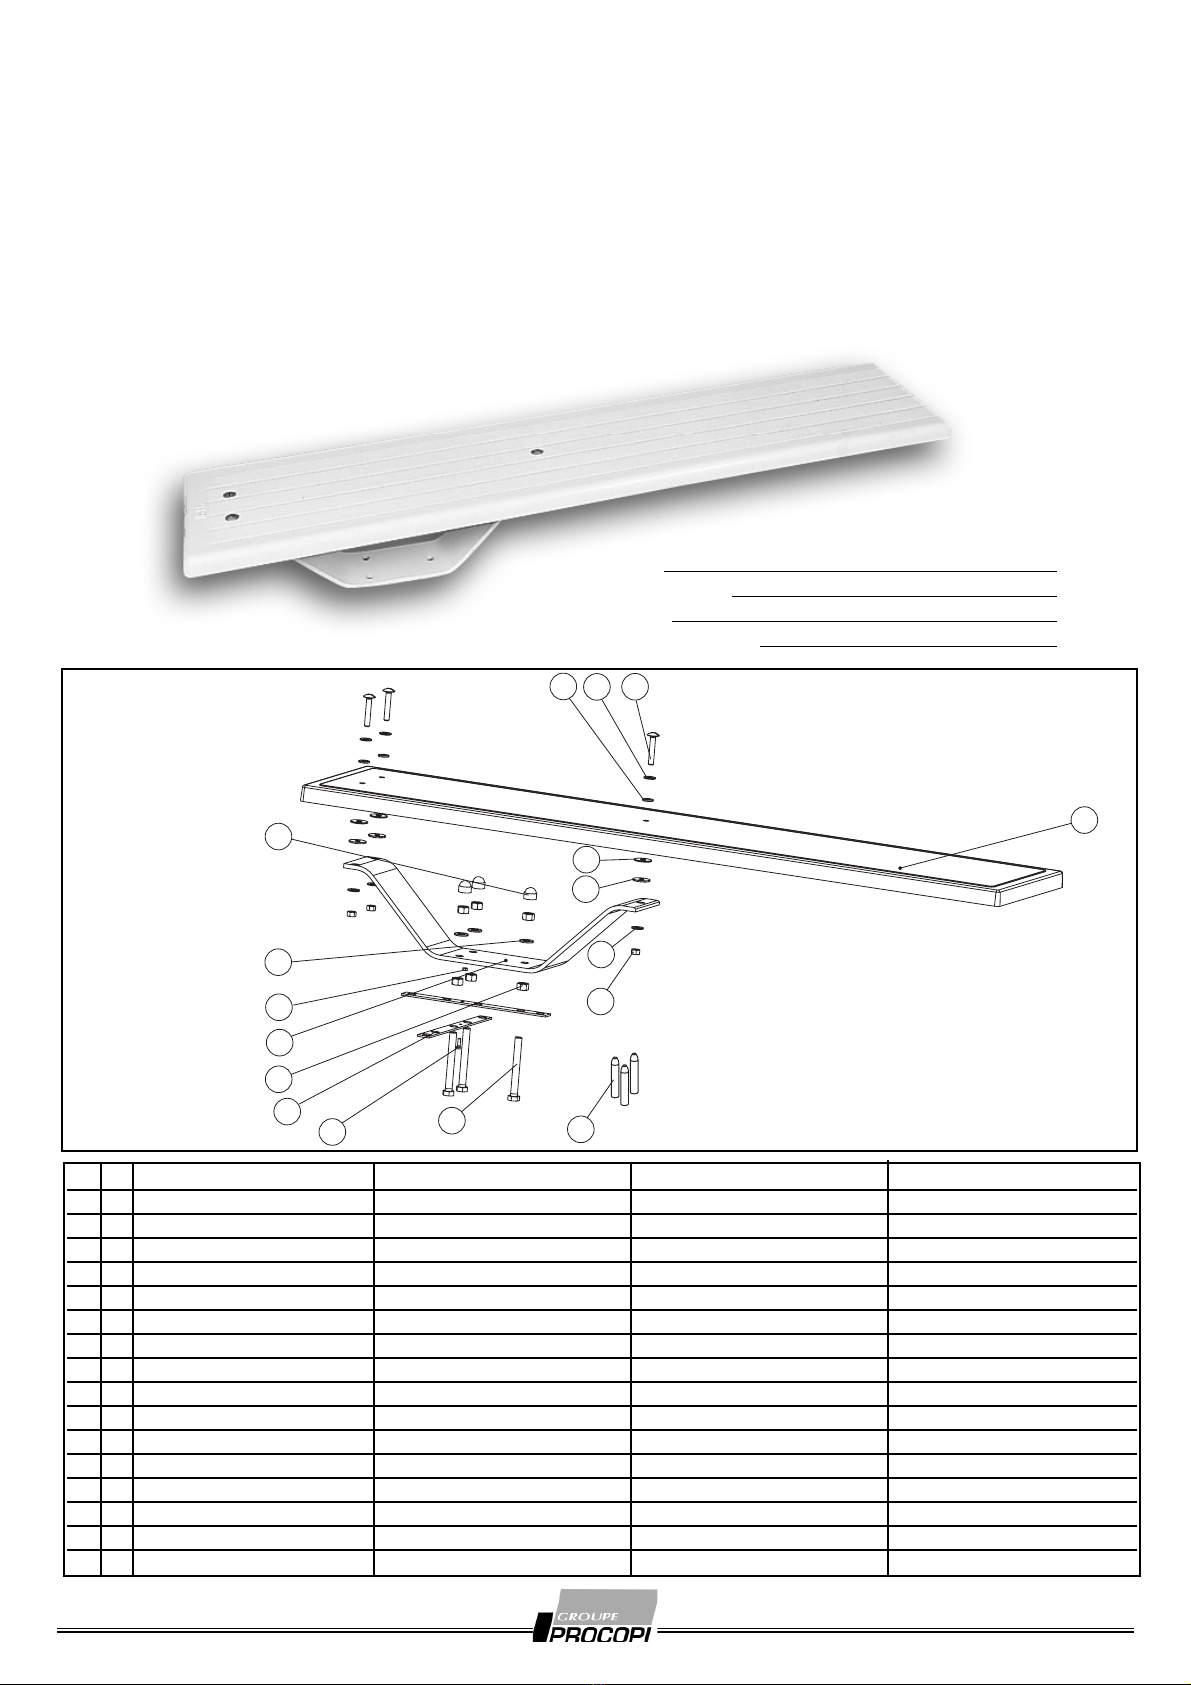
Rep. Nb. Désignation des composants
1 2 Fer plat scellement plongeoir
21
Vis H Gr A entièrement filetée M6-20
3 1 Ecrou H style 1 M6
43
Vis H Gr A entièrement filetée M16-140
5 6 Ecrou H style 1 M16
6 1 Socle BEL-180 nu
7 3 Rondelle M 16
8 3 Cache vis pour TH m16 blanc
9 1 Planche BEL
10 3 Joint 25x12x3 nitrile blanc
11 6 Rondelle M 12
12 3 Vis TP M12x70x70 inox A2
13 3 Joint 40x12x3 nitrile noir
14 3 Rondelle LL 12
15 3 Ecrou H style 1 M12
16 3
Fourreau de protection pour vis M16
Components description
Iron seal plate to fit the diving board
H Gr A compl. threaded screw M6-20
H nut style 1 M 6
H Gr A compl. threaded screw M16-140
H nut style 1 M 16
BEL-180 base plate w/o fittings
M 16 Washer
Screw cover for TH M16, white
BEL board
25x12x3 seal, white nitrile
Washer M 12
TP M12x70x70 A2 stainless steel screw
Seal 40x12x3, black nitrile
LL 12 washer
H nut style 1 M 12
M 16 screw protection sheath
Bezeichnung der Bestandteile
Eiseneinbauplatte für Sprungbrett
Schraube H Gr A, kompl. Gewinde,M6-20
H Mutter Stil 1 M6
Schraube H Gr A, kompl. Gewinde,M16-140
H Mutter Stil 1 M 16
Sockel BEL-180 ohne Zubehör
Unterlegscheibe M 16
Abdeckung Schraube TH M16, weiß
Brett BEL
Dichtung 25x12x3, Nitrile weiß
Unterlegscheibe M12
Schraube, Edelstahl, TP M12x70x70 A2
Dichtung 40x12x3 Nitrile schwarz
Unterlegscheibe LL 12
H Mutter Stil 1 M12
Schutzhülle für Schrauben M16
Descripción de los componentes
Placa de hierro para empotrar el trampolín
Tornillo H Gr A roscado completo, M6-20
Tuerca H, estilo 1 M6
Tornillo H Gr A roscado compl. M16-140
Tuerca H, estilo 1 M 16
Zóccalo BEL-180 sólo
Arandela M 16
Tapa para tornillo TH M16, blanca
Plancha BEL
Junta 25x12x3 nitrilo blanco
Arandela M12
Tornillo, acero inox, TP M12x70x70 A2
Junta 40x12x3 nitrilo negro
Arandela LL 12
Tuerca H estilo 1 M12
Funda de protección para tornillos M16
NOTICE D’INSTALLATION ET CONSEILS D’UTILISATION
INSTRUCTIONS FOR INSTALLATION AND USE
MONTAGEANLEITUNG UND ANWENDUNGSHINWEISE
INSTRUCCIONES DE MONTAJE Y EMPLEO

COTES D’IMPLANTATION INSTALLATION MEASUREMENTS
EINBAUMAßE MEDICIONES DE EMPOTRAMIENTO
700
525
100
40
30
700
PRÉCAUTIONS
Ne pas installer un plongeoir à un endroit où la profondeur de
l’eau est inférieure à 2,30 m.
Le socle en béton armé devra être d’une épaisseur minimale de
25 cm (BEL 180A et BEL 180B).
WARNING
Do not install the diving board in a place where the water level is
less than 2.30 m.
The reinforced concrete base must have a minimum thickness of
25 cm (BEL 180A and BEL 180B).
WICHTIG
Das Sprungbrett nie an einer Stelle mit einer Wassertiefe von
weniger als 2,30 m installieren.
Der Stahlbetonsockel muss mindestens 25 cm dick sein (BEL
180A und BEL 180B).
CUIDADO
No instalar el trampolín en un lugar con una profundidad del
agua inferior a 2,30 m
El zócalo de hormigón armado debe ser de 25 cm de espesor
(BEL 180A y BEL 180B).
PRÉPARATION DE LA PIÈCE À SCELLER PREPARE THE SEAL PLATE
VORBEREITEN DES EINBAUTEILS PREPARAR LA PIEZA DE EMPOTRAMIENTO
Disposer les deux fers plats suivant le schéma ci-dessus. Les assembler à l’aide de la vis et écrou Ø 6 sans les serrer.
Place the two iron plates as shown above, Use the Ø 6 screw and nut to assemble the plates. Make sure not to tighten the screw and nut.
Legen Sie die beiden Eisenplatten, wie in der Skizze angegeben. Mit der Schraube und Mutter Ø 6 zusammen montieren. Nicht fest ziehen.
Poner las dos placas de hierro según el dibujo de arriba. Montarlas con el tornillo y la tuerca Ø 6. No apretar.
75
150
90°
=
=

FIXATION PAR PIÈCE À SCELLER FASTEN WITH SEAL PLATE
MIT EINBAUTEIL BEFESTIGEN FIJAR CON PIEZA DE EMPOTRAMIENTO
BEL 180 A
AVANT LE SCELLEMENT PRIOR TO SEAL PLATE INSTALLATION
VOR BEFESTIGUNG MIT EINBAUTEIL ANTES DE LA FIJACIÓN CON PIEZA DE EMPOTRAMIENTO
APRÈS LE SCELLEMENT AFTER SEAL PLATE INSTALLATION
NACH BEFESTIGUNG DES EINBAUTEILS DESPUÉS DEL EMPOTRAMIENTO
LAISSER SÉCHER LE SCELLEMENT AU MINIMUM 48 HEURES
THE SEALING MUST BE LEFT TO DRY FOR FOR A PERIOD OF 48 HOURS
48 STUNDEN TROCKENEN LASSEN DEJE SECAR EL EMPOTRAMIENTO POR 48 HORAS
Placer les trois vis Ø 16 et leurs écrous
sans les bloquer.
Place the three Ø 16 screws and nuts. Do
not tighten them.
Die 3 Schrauben und Muttern Ø 16
plazieren. Nicht fest ziehen.
Meter los tres tornillos y tuercas Ø 16 sin
apretarlos.
Coiffer les vis à l’aide des capuchons de
protection.
Provide the screws with covers.
Schrauben mit Abdeckungen versehen.
Tapar los tornillos.
Présenter le socle sur la pièce à sceller et
bloquer les écrous.
Put the base plate on the seal plate and
tighten the screws
Den Sockel auf das Einbauteil setzen.
Muttern festziehen.
Poner el zócalo en la pieza de
empotramiento. Apretar las tuercas.
8
5
7
Fixer le socle au sol à l’aide des rondelles et écrous M
16. Poser les capuchons sur les écrous
Use the M16 washers and nuts to fasten the base
plate to the ground. Put covers on the nuts.
Mit den Unterlegscheiben und Muttern M16 den
Sockel am Boden befestigen. Muttern mit
Abdeckungen versehen.
Fijar el zócalo en el suelo utilizando las arandelas y
tuercas M16. Poner embellecedores.
Fixer la planche sur le socle à l’aide des vis à tête plate. Pour le bon
fonctionnement, il est impératif de respecter l’ordre des pièces ci-dessus
Use the flathead screws to attach the board to the base plate.The pieces must be
installed in correct order, to ensure perfect operation.
Das Brett mit den Flachkopfschrauben am Sockel befestigen. Die Teile müssen in
der richtigen Reihenfolge montiert werden, um die Funktionsfähigkeit zu garantieren.
Fijar la plancha en el zócalo utilizando las tornillos de cabeza plana. Montar las
piezas en el órden correcto, para garantizar un funcionamiento perfecto.
15
14
13
10 11 12
Vérifier le serrage des boulons tous les mois.
Check once a month, if the bolts are still properly tightened.
Überprüfen Sie einmal im Monat, ob die Bolzen noch fest sitzen.
Verficar cada mes que los pernos estén firmemente apretados.

FIXATION PAR CHEVILLES MOUNT THE PLUGS
EINSETZEN DER DÜBEL MONTAR LOS TACOS
Utiliser le socle comme gabarit de perçage (le coté comportant un
seul trou dirigé vers la piscine)
Use the base plate as a drilling template (The side with the single
hole must point to the pool)
Sockel als Bohrschablone verwenden (Seite mit dem 1 Loch zum
Becken)
Utilizar el zócalo como plantilla de taladro (lado con el agujero solo
hacia la piscina).
Percer 3 trous Ø 25 mm de 120 mm de profondeur, et y enfoncer les
chevilles.
Drill 3 Ø25 mm holes of 120 mm of depth. Insert the plugs.
3 Löcher Ø 25 mm von 120 mm Tiefe bohren. Dübel einsetzen.
Realizar 3 agujeros Ø 25 mm de 120 mm de profundidad. Insertar
los tacos.
15
14
13
10 11 12
Fixer la planche sur le socle à l’aide des vis à tête plate. Pour le bon
fonctionnement, il est impératif de respecter l’ordre des pièces ci-dessus
Use the flathead screws to attach the board to the base plate. The pieces must be
mounted in correct order, to ensure perfect operation.
Das Brett mit den Flachkopfschrauben am Sockel befestigen. Die Teile müssen in
der richtigen Reihenfolge montiert werden, um die Funktionsfähigkeit zu garantieren.
Fijar la plancha en el zócalo con los tornillos de cabeza plana. Montar las piezas
en el órden correcto, para garantizar un funcionamiento perfecto.
4
8
7
Fixer le socle au sol à l’aide des rondelles et vis M 16.
Poser les capuchons sur les vis.
Use the M16 washers and screws to fasten the base
plate to the ground. Put covers on the screws.
Sockel mit den Unterlegscheiben und Schrauben M 16 am
Boden befestigen. Schrauben mit Abdeckungen versehen.
Fijar el zócalo en el suelo con las arandelas y los
tornillos M 16. Poner embellecedores.
BEL 180 B
Vérifier le serrage des boulons tous les mois.
Check once a month, if the bolts are still properly tightened.
Überprüfen Sie einmal im Monat, ob die Bolzen noch fest sitzen.
Verficar cada mes que los pernos estén firmemente apretados.

CONSEILS DE SÉCURITÉ POUR L’UTILISATEUR
- Familiarisez-vous avec la profondeur de l’eau avant de plonger.
- Evaluez l’effet de ressort du plongeoir avant de l’utiliser.
- Durant le plongeon, n’oubliez pas d’allonger les bras, et de relever la tête et les mains.
- Rappelez-vous de cambrer le dos avoir pénétré dans l’eau pour remonter à la surface.
- Ne plongez jamais dans la partie peu profonde de la piscine. C’est là que se produisent la plupart des
accidents.
- Ne plongez jamais sur le côté d’un plongeoir. Plongez toujours droit devant.
- Ne plongez jamais dans le sens de la portion étroite d’une piscine. Il se pourrait que vous n’ayez pas
suffisamment d’espace pour remonter.
- Ne tentez jamais des plongeons fantaisistes ou à reculons.
- Ne plongez jamais vers ou à travers des objets tels que des chambres à air.
SECURITY ADVICE FOR THE USER
- Make sure that the water is deep enough before you dive.
- Make sure that the spring is in correct working order before you use it.
- Do not forget to extend your arms and then lift your head and hands, while you are diving.
- Do not forget to make a hollow back in the water to rise to the surface.
- Never jump into the pool where the water is not deep enough. Risk of accident.
- Never jump into the water from the side of the diving board. Only jump directly from the tip of the board.
- Never jump in the narrow end of the pool. You may not have enough space to rise.
- Never make fancy jumps. Never perform a backward dive.
- Never jump towards or over objects like air chambers.
CONSEJOS DE SEGURIDAD
- Asegúrese si hay profundidad suficiente antes de hacer un salto.
- Asegúrese del buen funcionamiento del resorte.
- Bucear con sus brazos delante y después orientar los brazos y la cabeza hacia arriba.
- Haga una lordosis bajo el agua para salir a la superficie del agua.
- No salte nunca dónde no hay una profundidad suficiente. Riesgo de hundirse.
- Salte únicamente desde la punta del trampolín y no desde los lados.
- No salte nunca dónde no hay anchura suficiente. Puede ser que no hay espacio suficiente para salir a
la superficie del agua.
- Técnicas inapropriadas de salto y saltos hacia atrás están prohibidos.
- No salte nunca hacia o a través de objetos como cámaras de aire.
S.A. au capital de 35 000 000 F - R.C.S/Rennes B 333263846000 37 2002/04 - Indice de révision : A - code : 0031010
SICHERHEITSANWEISUNGEN
- Vergewissern Sie sich, dass das Wasser für eine Sprung tief genug ist.
- Vorher sollten Sie die Funktionstüchtigkeit der Feder überprüfen.
- Strecken Sie beim Eintauchen die Arme aus und heben Sie dann Kopf und Arme.
- Machen Sie im Wasser ein Hohlkreuz, um wieder an die Wasseroberfläche zu gelangen.
- Springen Sie nie im Beckenteil mit der geringsten Wassertiefe. Höchste Unfallgefahr.
- Springen Sie nie seitlich vom Sprungbrett, sondern immer direkt vorne vom Brett ins Wasser.
- Springen Sie nie dort, wo das Becken die geringste Breite hat. Der Platz zum wieder Auftauchen könnte
nicht ausreichen.
- Springen Sie nie übermütig oder rückwärts ins Wasser.
- Springen Sie nie in die Richtung von Gegenständen wie Luftkammern oder darüber.
This manual suits for next models
2
Table of contents
Other Procopi Lighting Equipment manuals

Procopi
Procopi CALYPSO User manual

Procopi
Procopi Aquareva SL-101 Guide

Procopi
Procopi PYTHON Top Series User manual

Procopi
Procopi CALYPSO User manual

Procopi
Procopi AQUADECK EB User manual

Procopi
Procopi Aquareva NAJA NS-50 User manual

Procopi
Procopi Delta AQUADECK Operating instructions

Procopi
Procopi Trianon User manual


