I NL
Technische data.___________________________________________________________________________________
Batterijtype Lithium
Batterij Capaciteit 6V /12.000mAh
Levensduur 500 - 700 oplaadcycli
Oplaadtijd 8 - 10 uur
Piekvermogen 600A @ 10ms
Nominaal vermogen 300A
Bedrijfstemperatuur -20°C~ 50°C
Opslag Koel en droog.Vermijd grote temperatuurschommelingen
Productgewicht ca. 0,72 kg
Lengte 12 V laadkabel ca. 1,50 Meter
Funzionalità:______________________________________________________________________________________
Questo booster funziona dopo aver premuto l‘interruttore ON / OFF. Solo allora la potenza di avviamento è disponibile per ON / OFF e quindi l‘interruttore di avvia-
mento di emergenza rosso è stato attivato contemporaneamente contemporaneamente. Quindi l‘unità rileva un resistore corrispondente (batteria dell‘auto). I cavi
jumper rimangono senza alimentazione nché il dispositivo non è collegato alla batteria del veicolo e l‘interruttore di avviamento di emergenza non è azionato.
Collegare l‘unità di aumento pressione solo ai terminali della batteria. Collegare con la polarità corretta! Nero su meno (-). Rosso su più (+). In caso di collegamento
errato e inverso, l‘interruttore rosso di avviamento assistito lampeggia In questo caso collegamento corretto.
Functionaliteit:____________________________________________________________________________________
Deze booster werkt na het indrukken van de AAN / UIT-schakelaar. Alleen dan is er een startvermogen beschikbaar voor de AAN / UIT en daarna werd de rode
starthulpschakelaar beide tegelijk geactiveerd. En dan detecteert het apparaat een overeenkomstige weerstand (auto-accu). De startkabels blijven zonder stroom-
voorziening, zolang het apparaat niet op een voertuigaccu is aangesloten en de starthulpschakelaar niet wordt bediend. Verbind de boostereenheid alleen met de
accuklemmen. Sluit aan met de juiste polariteit! Zwart op min (-). Rood op plus (+). Bij verkeerde, omgekeerde aansluiting knippert de rode starthulpschakelaar. In
dit geval correcte aansluiting.
Connection / operation in single steps:________________________________________________________________
Passo 1 Collegare la spina dell‘unità di aumento pressione. La spina deve innestarsi. Potrebbe essere necessaria una certa forza. Premere l‘interruttore ON / OFF. La
tensione di carica del dispositivo di ausilio all‘avviamento deve essere almeno compresa tra l‘80% o più per ottenere i migliori risultati. Passo 2: Collegare alla batteria
del veicolo. Fissare il terminale del polo nero al polo negativo (-) (B) della batteria. Quindi ssare il terminale del polo rosso (A) al polo positivo (+) della batteria. In caso
di collegamento errato. il pulsante di avvio con salto (rosso) lampeggia. Passaggio 3A: Jump-start • Pulsante Jump-start per attivare l‘uscita. Display: il simbolo è illu-
minato. Continua con il passaggio 4A. Passaggio 4A: Avviamento del veicolo • Assicurarsi che il simbolo nella nestra Info LCD si illumini e che la carica della batteria
del booster sia almeno dell‘80% (7,8 V o superiore). Avvia il veicolo. Se l‘avvio di emergenza non riesce, ripetere il passaggio 3A. Se più di 5 tentativi di Jump Start sono
vani, è necessario il supporto di altri. Passaggio 5: Quando il veicolo è stato avviato con successo. L‘unità disattiva la funzione di avvio di emergenza dopo 3 secondi
automatici. Spegnere il dispositivo, necessario. Passaggio 6: Rimuovere i morsetti del palo. Vericare che il dispositivo sia spento. 1. Sbloccare il terminale del polo nero
(B) dal polo negativo (-) della batteria. 2 Sbloccare il terminale del polo rosso (A) dal polo positivo (+) della batteria.
Aansluiting / bediening in enkele stappen:____________________________________________________________
Stap 1: Sluit de stekker van de boostereenheid aan. De stekker moet vastklikken. Het kan een bepaalde vereiste kracht vereisen. Druk op de AAN / UIT-schakelaar.
De laadspanning van de starthulp moet minimaal 80% of hoger zijn voor het beste resultaat. Stap 2: Maak verbinding met de voertuigaccu. Klem de zwarte poolklem
enorme aan de negatieve (-) pool (B) van de accu. Klem vervolgens de rode poolklem (A) vast aan de pluspool (+) van de accu. In geval van verkeerde aansluiting. de
startknop (rood) verschijnen. Stap 3A: Jump-start • Jump-start-knop om de uitgang te activeren. Display: Het symbool is verlicht. Ga verder met stap 4A. Stap 4A: Het
voertuig starten • Zorg ervoor dat het symbool in het LCD-informatievenster oplicht en dat de acculading van de booster minimaal 80% (7,8 V of hoger) is. Start het
voertuig. Herhaal stap 3A als de starthulp misukt. Als meer dan 5 Jump Start-pogingen tevergeefs zijn, heb je steun van anderen nodig. Stap 5: Toen het voertuig met
succes werd gestart. Het apparaat de starthulp na 3 seconden automatisch uit. Schakel het apparaat uit, indien nodig Stap 6: Verwijder de paalklemmen. Zorg ervoor
dat het apparaat is uitgeschakeld 1. Maak de zwarte poolklem (B) los van de negatieve (-) accupool. 2 Maak de rode poolklem (A) los van de pluspool (+) van de accu.
Caricamento del dispositivo Jump Start_______________________________________________________________
Caricare il dispositivo di avviamento dopo ogni avvio di emergenza. Quando non in uso, caricare al massimo ogni 6 mesi. Nota: nota nel calendario.
Alla consegna, l‘ausilio alla partenza è parzialmente addebitato. Caricare 24 ore prima del primo utilizzo esclusivamente con il caricatore di rete CA / CC. Inserire la
piccola spina tonda all‘estremità del cavo nella presa di ricarica„Input 12V 1A“ sul ponticello. L‘unità booster può essere utilizzata esclusivamente con il caricabatterie
incluso o il cavo di ricarica per veicoli da 12V. A temperature ambiente inferiori a - 5 ° C e superiori a 50 ° C non è possibile caricare l‘unità booster per proteggere la
batteria al litio.
Het Jump Start-apparaat opladen____________________________________________________________________
Laad de starthulp na elke starthulp op. Indien niet in gebruik, uiterlijk om de 6 maanden opladen. Opmerking: opmerking in de kalender.
Bij levering is de starthulp gedeeltelijk in rekening gebracht. Laad het apparaat 24 uur vóór het eerste gebruik uitsluitend op met de AC / DC-lader. Steek de kleine
ronde stekker aan het uiteinde van de kabel in de laadaansluiting„Input 12V 1A“ op de jumper. De boostereenheid mag uitsluitend worden gebruikt met de mee-
geleverde oplader of de 12V-voertuiglaadkabel. Bij omgevingstemperaturen onder - 5 ° C en boven 50 ° C is opladen van de boostereenheid niet mogelijk om de
lithiumbatterij te beschermen.
Il caricabatterie AC / DC:____________________________________________________________________________
Collegare il caricabatterie a una presa con messa a terra da 230 V. Collegare la spina di ricarica al lato della presa di ricarica montata sul dispositivo con la scritta Input. Il proces-
so di ricarica inizia automaticamente. Lo stato di carica viene visualizzato nella visualizzazione dello stato di carica. L‘indicatore del livello di carica segnala il rispettivo livello di
carica dell‘assistente all‘avviamento. Quando viene visualizzato 100 %, il ponticello è completamente carico e pronto per il jumpstart. Il booster aiuta dopo ogni operazione di
avvio di emergenza almeno no a raggiungere il livello dell‘ 80 % per mantenerlo sempre pronto per l‘uso. Il caricabatterie si riscalda durante la ricarica, questo è normale.
De AC / DC-oplader:________________________________________________________________________________
Sluit de oplader aan op een 230V geaard stopcontact. Steek de laadstekker in de aan de zijkant van het op het apparaat gemonteerde laadcontactdoos met de opschriftin-
gang. Het laadproces start automatisch. De laadstatus wordt weergegeven in de laadstatusweergave. De laadniveau-indicator geeft het respectieve laadniveau van de start-
hulp aan. Als 100% wordt weergegeven, is de jumper volledig opgeladen en klaar voor jumpstart. De booster helpt na elke starthulp minimaal tot het 80% -niveau is bereikt
om het altijd klaar voor gebruik te houden. De oplader wordt warm tijdens het opladen, dit is normaal.
RicaricatramiteveicoloCavodiricarica:________________________________________________________________
Collegare la spina rotonda di ricarica del cavo di ricarica alla presa di ricarica dell‘unità booster (Input 12V 1A). Collegare la spina lunga e angolata del cavo di ricarica a una
presa di corrente sul veicolo. Assicurarsi che la presa del veicolo sia alimentata. È possibile che l‘accensione debba essere inserita. L‘alimentazione è fornita. Se la presa è
attivata, il LED rosso sulla spina del cavo di ricarica si accende. Il processo di ricarica inizia automaticamente. L‘indicatore del livello di carica del booster indica lo stato di
avanzamento del caricamento.
Opladen via voertuig Oplaadkabel:__________________________________________________________________
Sluit de ronde laadstekker van de laadkabel aan op de laadbus van de boostereenheid (ingang 12V 1A). Steek de lange, haakse stekker van de laadkabel in een stopcon-
tact op het voertuig. Zorg ervoor dat het stopcontact in het voertuig van stroom wordt voorzien. Het is mogelijk dat het contact ingeschakeld moet zijn. Er wordt stroom
geleverd. Als het stopcontact is geactiveerd, gaat de rode LED op de stekker van de laadkabel branden. Het opladen begint automatisch. De laadniveau-indicator van de
booster geeft de voortgang van het laden aan.
Archiviazione del dispositivo Jump Start______________________________________________________________
Notare che le batterie al litio sono sensibili alle alte temperature.Tenere lontano da qualsiasi altra fonte di calore o luce solare. La batteria invecchia più velocemente, sempre
La sua tensione delle celle è alta, quindi è per evitare che una batteria al litio venga costantemente caricata al 100% per mantenerla. La conservazione al fresco è vantaggiosa.
Opslag van het Jump Start-apparaat_________________________________________________________________
Houd er rekening mee dat lithiumbatterijen gevoelig zijn voor hoge temperaturen. Blijf uit de buurt van extra warmtebronnen of zonlicht. De batterij veroudert sneller,
ooit. De celspanning is hoog, daarom is het te voorkomen dat een lithiumbatterij constant voor 100 procent wordt opgeladen. Koel bewaren is voordelig.
„Power Punch“
„Power Punch“
6V
DC Jump Start 6V
DC Jump Start
1212
11
12 3
4
5
6
11
12 3
4
5
6
CHARGING
9
10
7
8
CHARGING
9
10
7
8
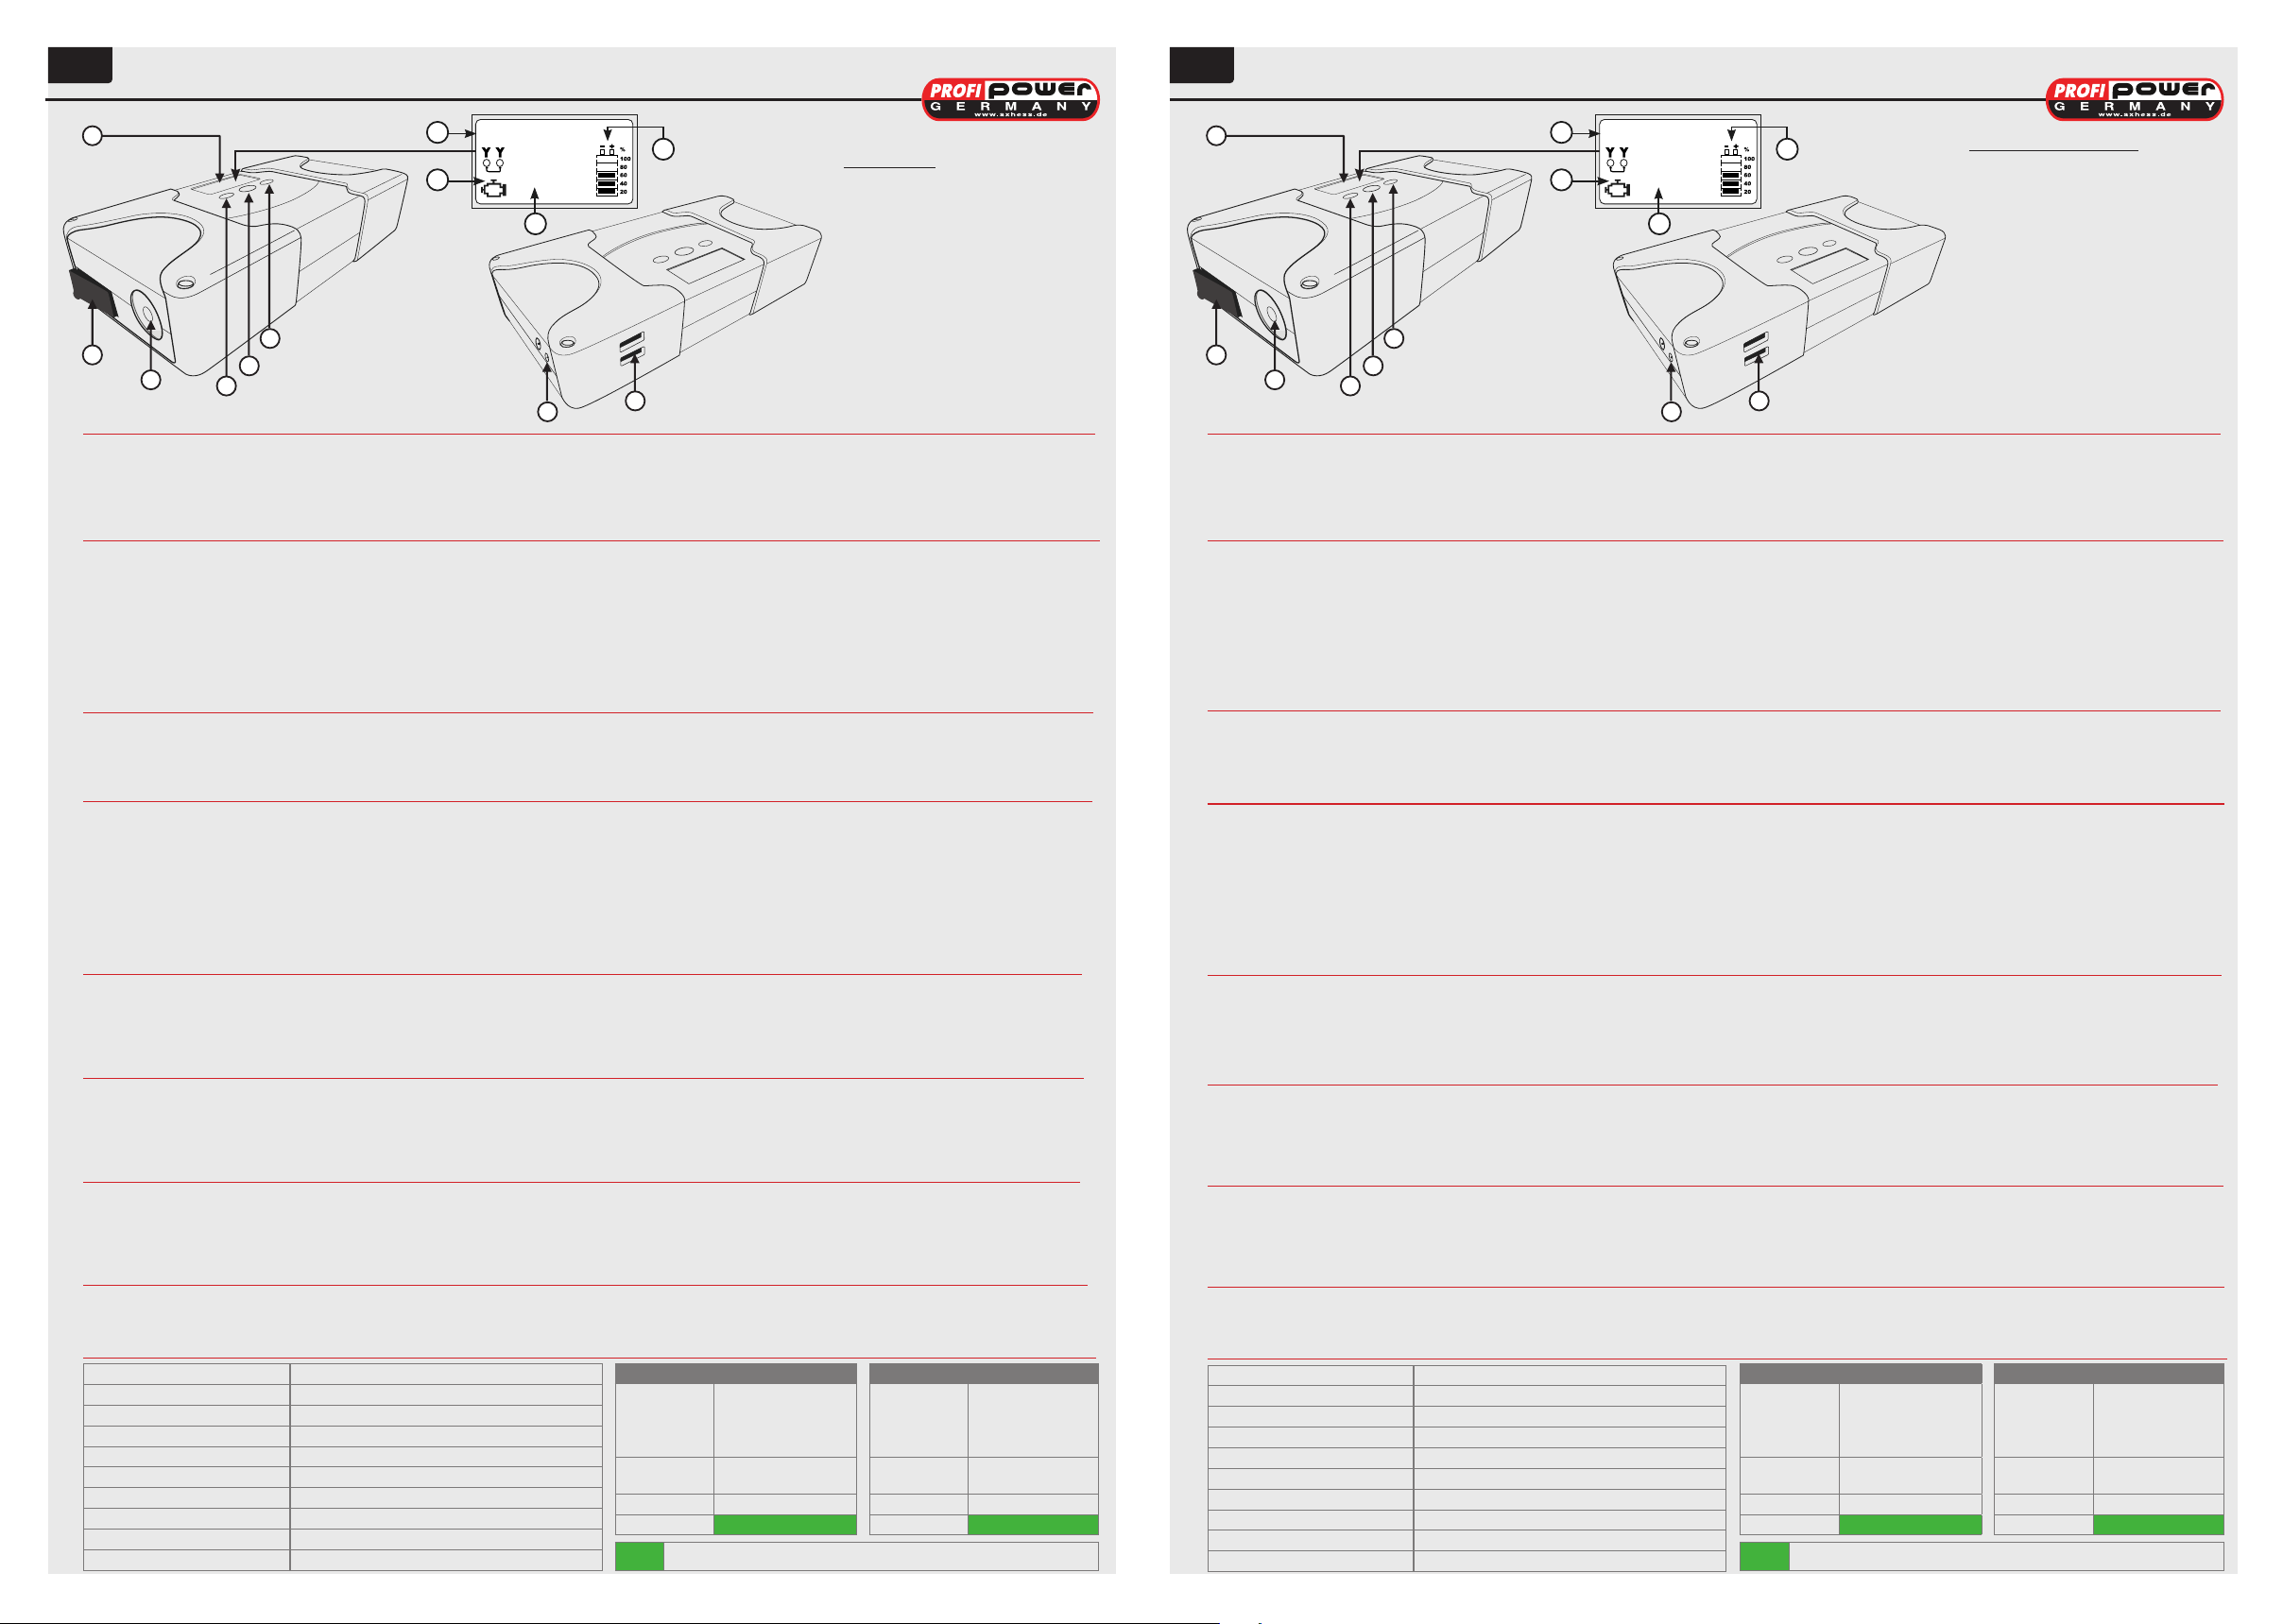
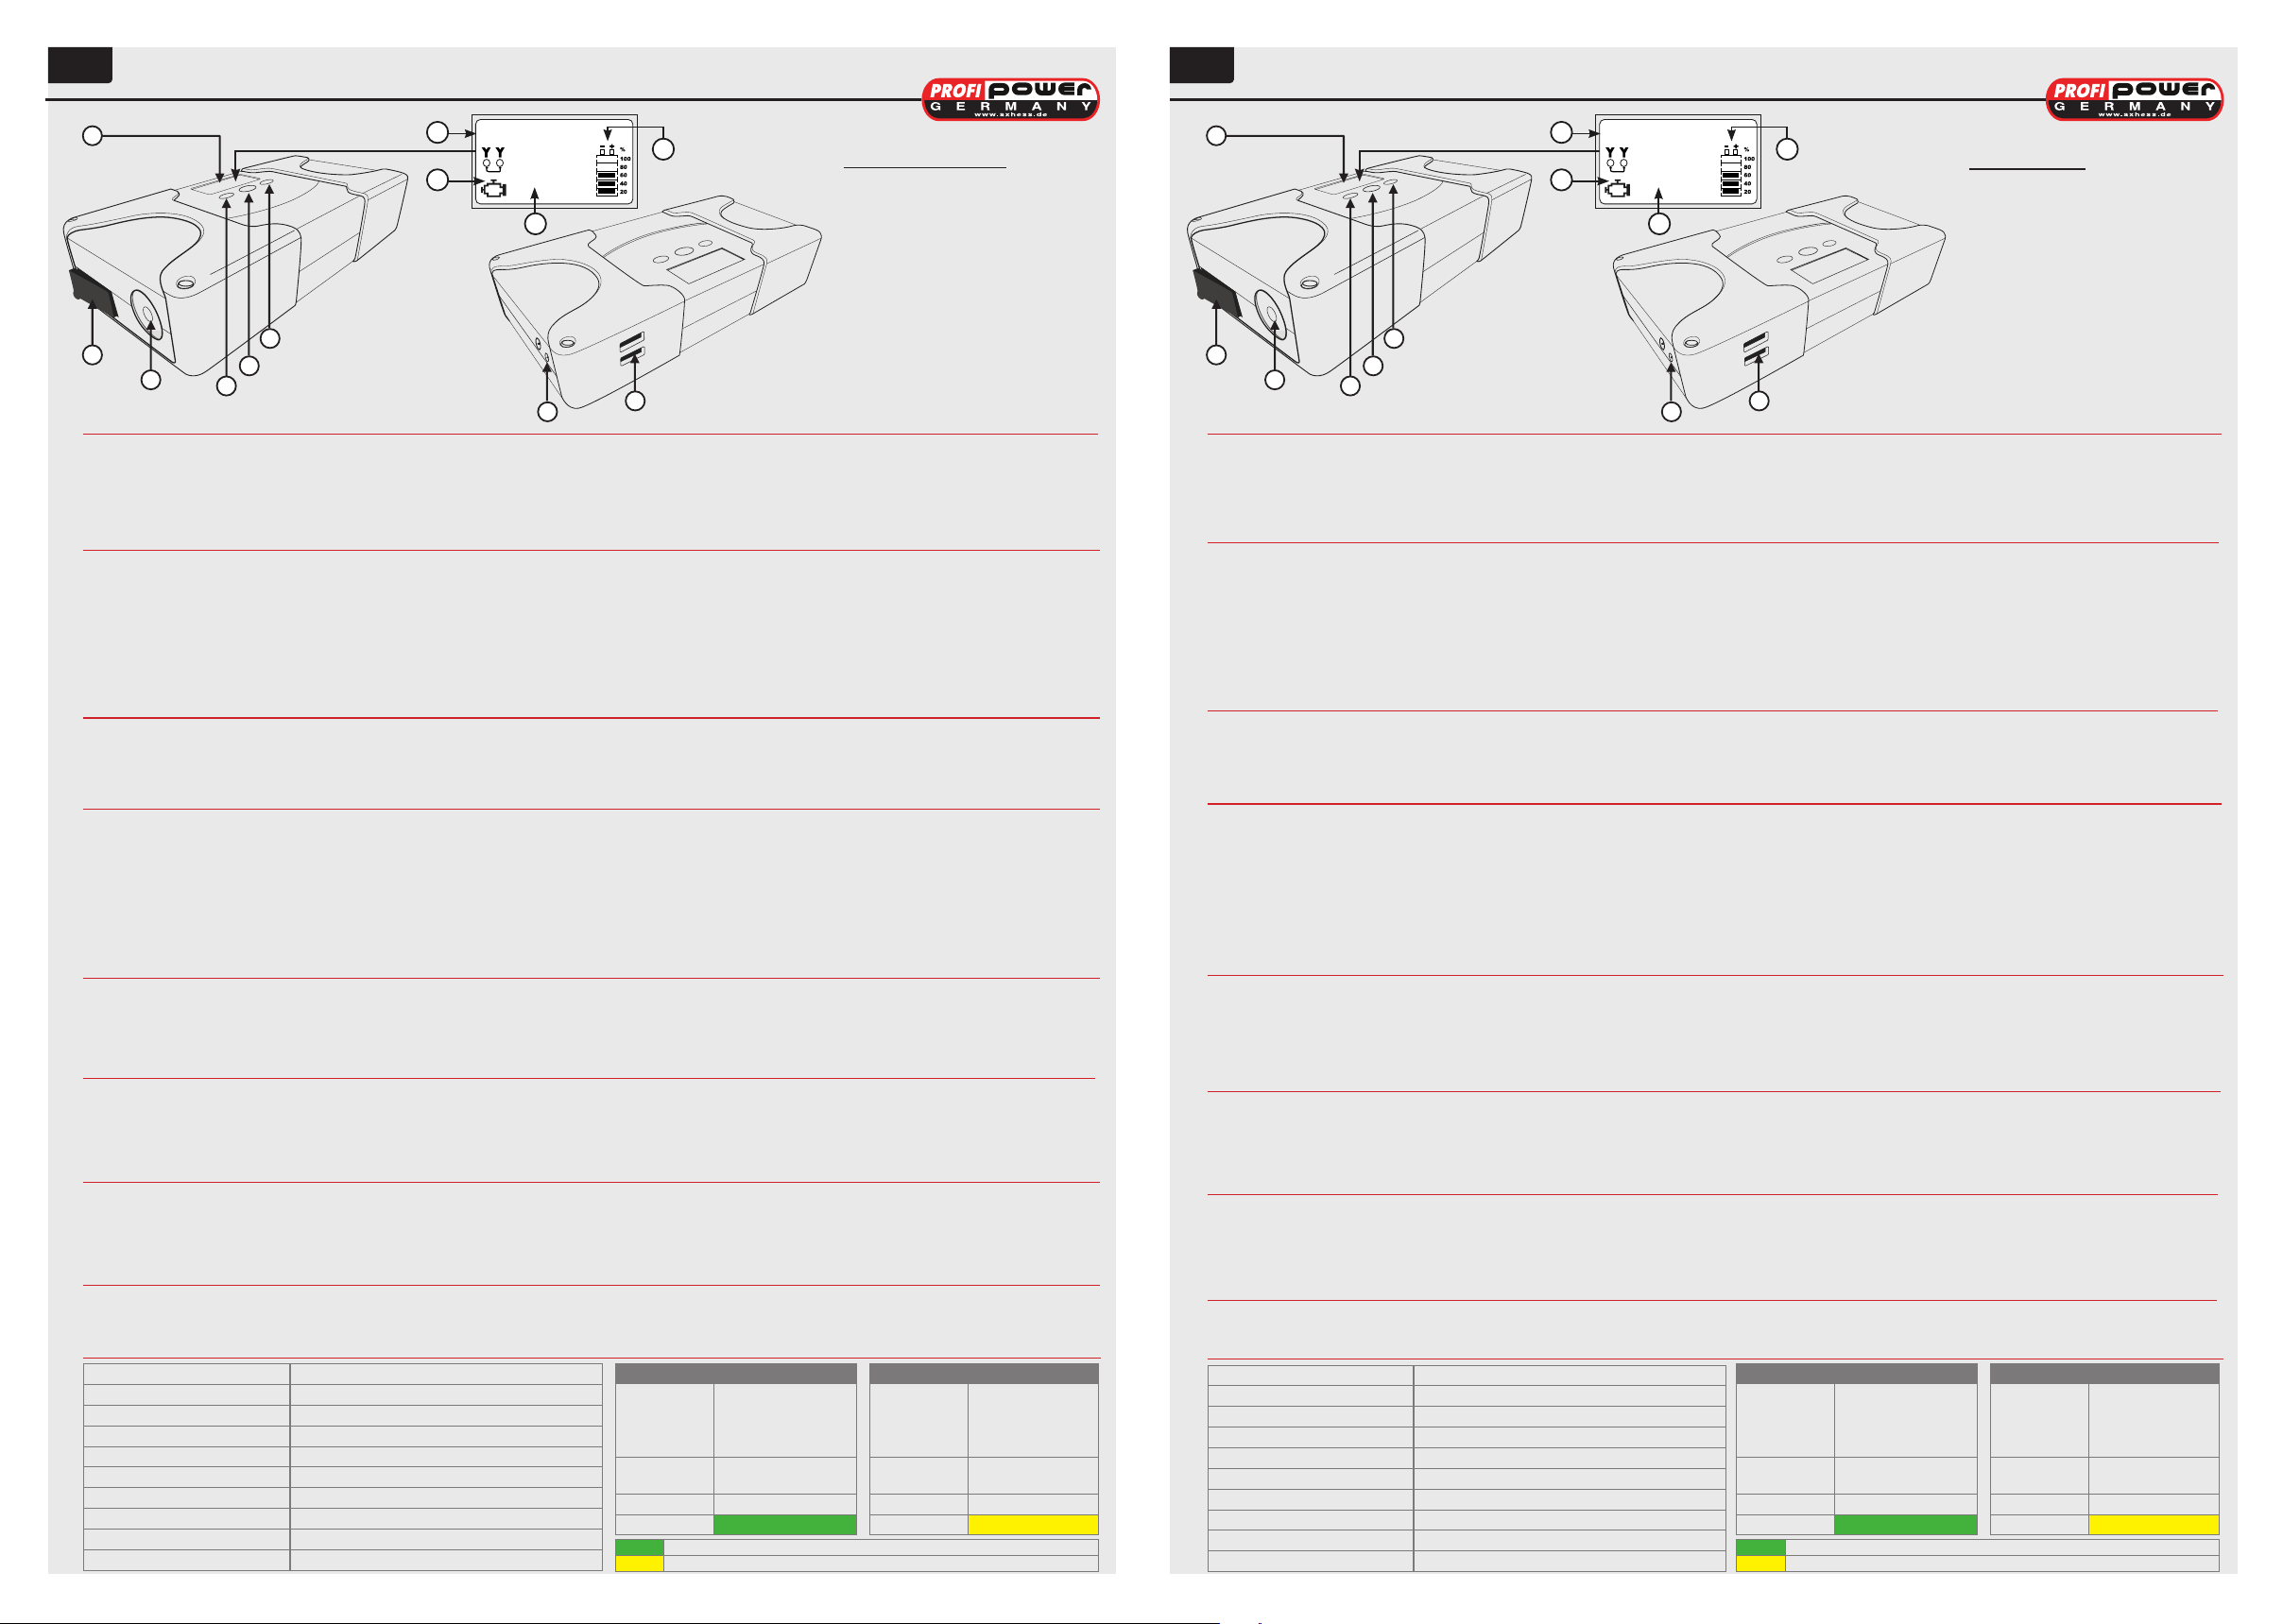
Caratteristiche
1 Ingresso caricabatteria (12V/1A)
2 Uscite USB 2,1A max. 5V
3 Interruttore ON / OFF
4 Interruttore di avviamento di
emergenza
5 Selettore funzionante e spia luminosa
6 Display LCD
7 Stato di carica V
8 Stato di carica %
9 Faro da lavoro a LED
10 Visualizzazione di jump start ready
11 Slot per cavo booster
12 Fari da lavoro a 12 LED
Kenmerken
1lader (12 V / 1A) ingang
2USB-uitgang 2,1A max. 5V
3AAN / UIT-schakelaar
4Jump-start-schakelaar
5werkschakelaar keuzeschakelaar
en waarschuwingslampje
6LC-display
7Laadstatus V
8Oplaadstatus%
9LED-werklamp
10 Jump start klaar display
11 Sleuf voor boosterkabel
12 LED-werklamp
L‘unità booster ha diversi meccanismi di protezione:____________________________________________________
-Protezione da sovraccarico / Protezione da bassa tensione
-Il sovraccarico della batteria al litio è impedito dal caricatore CA / CC.
-Non si desidera mantenere il caricabatterie CA / CC permanentemente collegato all‘unità di aumento pressione. In una carica troppo bassa della batteria del
dispositivo integrato, dal display inferiore a 5 V, il booster si ferma per fornire un‘adeguata potenza di avviamento.
-Protezione da scintille Quando le pinze per palo si toccano, non si generano scintille durante il normale funzionamento. ATTENTO! Rischio di esplosione! Il corto
circuito dei terminali dei poli porta a gravi danni al dispositivo, può provocare l‘esplosione del dispositivo Assicurarsi sempre che le pinze per palo non si tocchino.
-Protezione contro il surriscaldamento. L‘unità si spegne automaticamente al superamento della temperatura massima di esercizio nell‘alloggiamento del
dispositivo (+ 45 ° C). Si riaccenderà automaticamente quando si sarà rareddato di conseguenza. (<40 ° C)
De boostereenheid heeft verschillende beschermingsmechanismen:_____________________________________
- Overbelastingsbeveiliging / Laagspanningsbeveiliging
- Overladen van de lithiumbatterij wordt voorkomen door de AC / DC-oplader.
- Het is niet gewenst om de AC / DC-lader permanent op de boostereenheid aangesloten te houden. Bij een te lage lading van de ingebouwde batterij van het
apparaat, van een display van minder dan 5V, stopt de booster om voldoende startvermogen te leveren.
- Vonkbescherming Wanneer de stoktangen elkaar raken, worden er in de normale functie geen vonken gegenereerd. KIJK UIT! Explosiegevaar! Het kortsluiten
van de poolklemmen leidt tot ernstige schade aan het apparaat, kan de explosie van het apparaat veroorzaken. Zorg er altijd voor dat de pooltangen elkaar niet raken.
- Oververhittingsbeveiliging. Het apparaat schakelt automatisch uit als de max. Bedrijfstemperatuur in de apparaatbehuizing (+ 45 ° C) wordt overschreden.
Het wordt automatisch weer ingeschakeld wanneer het dienovereenkomstig is afgekoeld. (<40 ° C)
Dati tecnici.________________________________________________________________________________________
Tipo di batteria al Lithium
Capacità della batteria 6V /12.000mAh
Durata 500-700 cicli di ricarica
Tempo di ricarica 8-10 ore
Potenza di picco 600A a 10ms
Potenza nominale 300A
Temperatura di esercizio -20°C~ 50°C
Conservazione Al fresco e all‘asciutto. Evitare grandi sbalzi di temperatura
Peso prodotto ca. 0,72 kg
Lunghezza del cavo di ricarica 12V ca. 1,50 Meter
G A S O L I N E E N G I N E
Performance
Motore
Benzina
Cilindrata
Engine Size 4 CYL + 6 CYL
≤ 3400 ccm
Batt 0 %
JSF 6000
G A S O L I N E E N G I N E
Startvermogen
Benzinemotor
Cilinderinhoud
Engine Size 6 CYL + 8 CYL
≤ 5000 ccm
Batt 50 %
JSF 6000
D I E S E L E N G I N E
Performance
Motore
Benzina
Cilindrata
Engine Size 4 CYL + 6 CYL
≤ 3000 ccm
Batt 0 %
JSF 6000
D I E S E L E N G I N E
Startvermogen
Dieselmotor
Cilinderinhoud
Engine Size 8 CYL
≤ 5000 ccm
Batt 50 %
JSF 6000
Il dispositivo ha una potenza suciente per avviare il veicolo
JSG può fornire supporto dell‘avvio , a seconda dello stato della batteria ricevente
Apparaat heeft genoeg kracht om het voertuig te starten
Starten mogelijk afhankelijk van de conditie van de startaccu
Kenmerken_______________________________________________________________________________________
1. Robuuste kunststof behuizing 2. Hoge prestaties bij het starten 3. Geïntegreerde LED-noodwerklamp aan de zijkant van de behuizing 4. Vonkbescherming
5. Oververhittingsbeveiliging, automatische uitschakeling bij oververhitting van het apparaat 6. Handige connectoren voor de jumperkabelset 7. Maximaal 10
jumpers achter elkaar met één acculading mogelijk. 8. Lithiumbatterij met een hoge levensverwachting volgens de instructies. 9. LED-waarschuwingslampje
10. LC-display (informatievenster) 11. LCD-spanningsindicatie
axhess GmbH & Co. KG, Industriestrasse 11, 56598 Rheinbrohl, www.axhess.de axhess GmbH & Co. KG, Industriestrasse 11, 56598 Rheinbrohl, www.axhess.de
Caratteristiche_________________________________________________________________________________________
1. Robusto alloggiamento in plastica 2. Elevate prestazioni di aiuto all‘avviamento 3. Luce di lavoro di emergenza a LED integrata sul lato dell‘alloggiamento
4. Protezione da scintille 5. Protezione da surriscaldamento, spegnimento automatico in caso di surriscaldamento del dispositivo 6. Pratici connettori per il set di
cavi jumper 7. Fino a 10 jumper in successione con una carica della batteria possibile. 8. Batteria al litio con un‘aspettativa di vita elevata seguendo le istruzioni.
9. Spia LED 10. Display LC (nestra informativa) 11. Indicazione di tensione LCD