manuals.online logo
Brands
  1. Home
  2. •
  3. Brands
  4. •
  5. ProFlo
  6. •
  7. Plumbing Product
  8. •
  9. ProFlo KALADA PFXCM2M313 User manual

ProFlo KALADA PFXCM2M313 User manual

1
FERGUSON.COM/PROFLO
Goggles
Lunettes de sécurité
Anteojos Protectores
Wrench
Clé ajustable
Llave
(2) Supply Lines
(2) Tuyaux d'al imentation
2 Líneas de Suministro
Silicone
Silicone
Silicón
SILICONE
KALADA TWO-HANDLE KITCHEN FAUCET
Installation Instructions
KALADA ROBINET DE CUISINE À DEUX MANETTES
Instructions pour l’installation
KALADA GRIFO PARA COCINA, DE DOS LLAVES
Instrucciones de instalación
ENGLISH
Care Instructions:
Your new faucet is designed for years of trouble-free
performance. Keep it looking new by cleaning it
periodically with a soft cloth. Avoid abrasive cleaners,
steel wool and harsh chemicals as these will dull the
nish and void your warranty.
FRANÇAIS
Directives d’Entretien:
Votre nouveau robinet est conçu pour fonctionner
sans problème, des années durant. Le nettoyer
périodiquement avec un chiffon doux pour qu’il
conserve la même apparence qu’à l’état neuf. Éviter
les nettoyants abrasifs, la laine d’acier et les produits
chimiques forts puisqu’ils endommageront le ni et
rendront votre garantie nulle.
ESPAÑOL
Instrucciones de Cuidado:
Su grifo nuevo está diseñado para brindar años de
servicio sin problemas. Mantenga su apariencia
nueva limpiándolo periódicamente con un paño
suave. Evite limpiadores abrasivos, estropajo de
acero y químicos cáusticos porque deslustrarán el
acabado y anularán la garantía.
WARNING
Caution-Tips:
Cover your drain to avoid losing parts.
The fittings should be installed by a licensed
plumber.
When installing flexible hose, there should be
no torsion or deformation; do not fold into
Shape V or L; do not use if there is any crack or
deformation.
Remove old faucet. Clean sink surface in
preparation for new faucet.
AVERTISSEMENT
Attention-suggestions:
Couvrez le drain à fin de ne pas perdre de
pièces.
Les raccords doivent être installés par un
plombier qualifié pour exercer.
Mise en garde pour l’installation d’un tuyau
flexible: le tuyau ne doit pas être tordu ou
déformé; ne pas plier le tuyau en V ou en L; ne
pas utiliser si le tuyau est fendu ou déformé.
Enlever le vieux robinet. Nettoyer la surface du
lavabo en prévision de l'installation du robinet
neuf.
ADVERTENCIA
Precaución-consejos:
Tape la boca del desagüe para prevenir la
pérdida de piezas pequeñas.
Los componentes deben ser instalados por un
plomero.
Al instalar la manguera flexible, tenga en
cuento lo siguiente:procure no torcerla ni
deformarla; no la doble en forma de V o de L;
no la utilice si está agrietada o deformada.
Retire el grifo antiguo y limpie la superficie
del lavatorio como preparación para el nuevo
grifo.
You May Need/Usted Puede Necesitar / Aticles Dont Vous Pouvez Avoir Besion
PFXCM2M313/PFXCM2M313ZBN
2
FERGUSON.COM/PROFLO
1. Fermez l'alimentation en eau. Enlevez l’ancien
robinet. Nettoyez la surface de montage. Assurez
-vous que le joint d'étanchéité(1) se trouve en bas
du nouveau robinet(2).
1. Shut off the water supply. Remove the old faucet.
Clean the mounting surface. Ensure the gasket (1)
is on the bottom of the new faucet (2).
1. Cierra el suministro de agua. Retira el grifo anterior.
Limpia la supercie de montaje. Asegúrate de que
la junta (1) esté en la parte inferior de la mezcladora
nueva (2).
3. Insert the side sprayer (1) hose down through
the sprayer ange (2) and sink. Align the
tabs (3 & 4) on the quick connects (5). Push the
quick connector housing rmly upward and
snap it onto the receiving tube tab. Pull down
the hose moderately to ensure the connection
has been made.
3. Insérez le tuyau de la douchette latérale(1)
vers le bas, dans la bride de douchette(2)
et l’évier. Alignez les languettes (3 et 4) sur les
raccords à branchement rapide (5). Poussez
le boîtier du raccord à branchement rapide
fermement vers le haut et enclenchez-le sur
la languette du tuyau récepteur. Tirez le
tuyau modérément vers le bas pour vous
assurer que le raccord est bon.
3. Inserta la manguera del rociador lateral (1)
hacia abajo a través de la brida del rociador (2)
y el lavabo. Alinea las pestañas (3 y 4) con los
conectores rápidos (5). Presiona rmemente el
ensamblaje del conector rápido hacia arriba
hasta que encaje en la pestaña del tubo receptor.
Hala cuidadosamente la manguera para
asegurarte de que la conexión se ha realizado.
2. Insert the sprayer ange (1) through the far right
hole on the sink. Screw the sprayer mounting nut
(2) onto the sprayer ange (1) shank from underneath
the sink, and hand tighten. Do not overtighten.
2. Insérez la bride de la douchette(1) dans le trou
à l’extrême droite de l’évier. Vissez l’écrou de
montage de la douchette(2) sur la tige de bride
de la douchette(1) à partir du dessous de l'évier
et serrez à la main. Ne serrez pas trop.
2. Inserta la brida del rociador (1) a través del oricio
derecho extremo del lavabo. Enrosca la tuerca de
montaje del rociador (2) en el vástago de la brida
del rociador (1) desde abajo del lavabo y aprieta
con la mano. No aprietes demasiado.
2
1
2
1
2
1
2
1
2
1
2
1
3
1
2
4
5
3
1
2
4
5
3
1
2
4
5
3
FERGUSON.COM/PROFLO
4. Place the faucet (1) through the mounting holes
in the sink. Secure the faucet (1) to the sink using
the mounting nuts (2) provided. Hand tighten only.
4. Placez le robinet(1) dans les trous de montage
de l’évier. Fixez solidement le robinet(1) sur
l'évier à l'aide des écrous de montage(2) fournis.
Serrez à la main uniquement.
4. Coloca la mezcladora (1) en los oricios de
montaje del lavabo. Asegura la mezcladora (1) al
lavabo con las tuercas de montaje (2) suministradas.
Aprieta con la mano solamente.
5.
Make connections to water lines. Use 1/2 in. I.P.S.
faucet connections (2), or use supply line coupling
nuts (3) (not included) with a 3/8 in. O.D. ball-nose
riser (1). Use wrenches to tighten the connections.
Do not overtighten.
5.
Conecta a las líneas de suministro. Usa conexiones
de grifos de 1/2" IPS (2) o tuercas de acoplamiento
de líneas de suministro (3) (no incluidas) con un tubo
montante de bola de diámetro exterior de 3/8" (1).
Usa llaves para apretar las conexiones. No aprietes
demasiado.
5. Branchez I'alimentation en eau. Utilisez des raccords
de robinet IPS de 1,27cm (½po) (2), ou utilisez des
écrous d'accouplement pour conduite d'alimentation
(3) (non compris) avec une colonne montante à bout
sphérique de D.E. 9,53mm (3/8po) (1). Utilisez la
clé pour serrer les raccords. Ne serrez pas trop.
2
1
3
2
1
3
2
1
3
1
2
1
2
1
2
111
If the sink surface is uneven or irregular,
plumber’s putty or a silicone sealant may be
used to create a watertight seal. Plumber’s putty
may have an adverse reaction with plastic
gaskets under the spout base so if your faucet
has a plastic gasket, use a high quality silicone
sealant. Plumber’s putty also may have an
adverse reaction with some cultured marble or
natural stone. In these cases a high quality
silicone sealant is recommended.
·Note:
Si la surface du lavabo n'est pas
uniforme ou est irrégulière, vous pouvez utiliser
du mastic de plomberie ou un scellant à la
silicone pour créer un joint étanche. Le mastic
de plomberie peut réagir de manière indésirable
avec les joints en plastique sous la base du bec.
Par conséquent, si le robinet présente un joint
en plastique, veuillez utiliser un scellant à la
silicone de haute qualité. Le mastic de plomberie
peut également présenter une réaction
indésirable avec certains similimarbres ou
certaines pierres naturelles. Dans de tels cas,
il est recommandé d'utiliser un scellant à la
silicone de haut qualité.
·Remarque: ·Nota:
Si la supercie del lavamanos es irregular o
está desnivelada, puede usarse masilla de
plomero o un sellador de silicona para dar
hermeticidad. La masilla de plomero puede
tener reacción adversa con juntas plásticas
debajo de la base del caño. Si tu grifo tiene
junta plástica, usa un sellador de silicona de
alta calidad. La masilla de plomero puede tener
también un reacción adversa con algún mármol
cultivado o piedra natural. En estos casos se
recomienda un sellador de silicona de alta
calidad.
Une fois l’installation terminée, enlevez l’aérateur.
Ouvrez l’alimentation d’eau et laissez couler l’eau
chaude et l’eau froide au moins une minute
chacune. Pendant que l’eau coule, vériez s’il y a
des fuites. Reposez l’aérateur. Cette opération
sert à évacuer les débris qui pourraient
endommager les éléments internes. Ne perdez
pas le joint d’étanchéité (1) dans l’aérateur.
6. Una vez que termine la instalación, quite el aireador.
Abra el suministro de agua y deje correr agua fría
y caliente durante al menos un minuto cada una.
Mientras el agua corre, controle que no haya
pérdidas. Reemplace el aireador. Esto limpia
cualquier residuo que pueda causar daño a las
partes internas. No a ojes la junta (1) en el aireador.
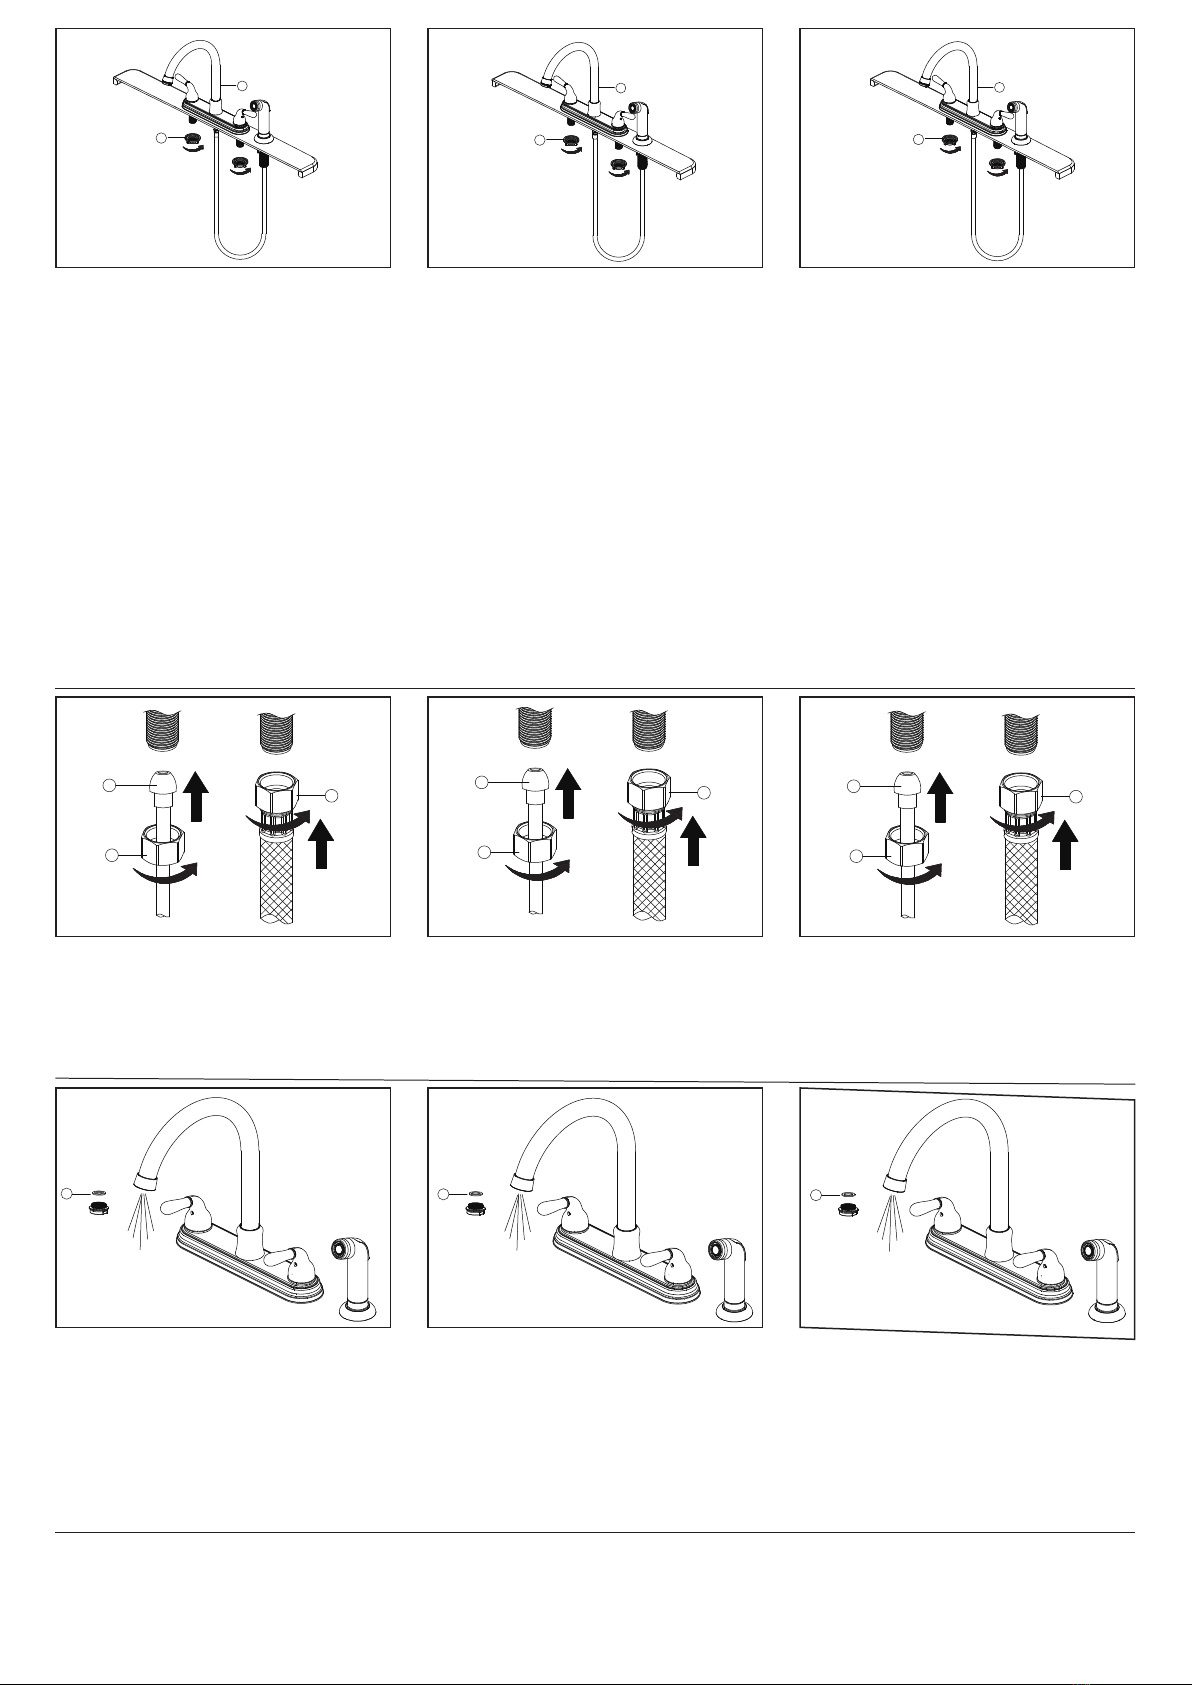
6.6. After installation is completed, remove aerator.
Turn on water supply and allow both hot and cold
water to run for at least one minute each. While
water is running, check for leaks. Replace aerator.
This ushes away any debris that could cause
damage to internal parts. Do not lose the gasket (1)
in the aerator.
Important: Important: Importante:
4
FERGUSON.COM/PROFLO
Maintenance: If faucet leaks from spout outlet -Shut off water supplies-replace cartridge (1).
Note: Install cartridge (1) correctly for proper handle rotation.
Entretien: Si le robinet fuit par la sortie du bec-coupez l'eau puis remplacez l'obturateur (1).
Nota: Installer correctement les obturateurs (1) pour que les manettes tournent
dans le bon sens.
Mantenimiento: Si la llave tiene ltraciones del pico del tubo de salida-Cierre los suministros de
agua-Reemplace el ensamble de la Unidad de la Espiga (1).
Note: Instale las espigas (1) correctamente para obtener una rotación debida.
No. Item Description Part Number Material Type
1 Handle H OBPF7F13108* Zinc Alloy
2 Handle C OBPF7F13109* Zinc Alloy
3 Aerator OBPF5F30014* Brass
4 Cartridge H OBPF220067 Ceramic
5 Cartridge C OBPF220068 Ceramic
6 Mounting Nut OBPF156001 Plastic
7 Coupling Nut OBPF156002 Brass
8 Side Spray OBPF6F36001* Plastic
8
1
1
2
4
5
6
79
9 2.5mm Hex Allen Wrench OBPF1RP70221 Steel
3
Distributed Exclusively by Ferguson and Wolseley Canada
©2023 Ferguson Enterprises, LLC. All Rights Reserved.

This manual suits for next models

1

Other ProFlo Plumbing Product manuals

ProFlo PFWSC1247ACP/ZBN User manual

ProFlo

ProFlo PFWSC1247ACP/ZBN User manual

ProFlo PF4820GCP User manual

ProFlo

ProFlo PF4820GCP User manual

ProFlo PFSH309GCP User manual

ProFlo

ProFlo PFSH309GCP User manual

ProFlo POGO Series User manual

ProFlo

ProFlo POGO Series User manual

ProFlo PFBKIT03 User manual

ProFlo

ProFlo PFBKIT03 User manual

ProFlo PFWSC1040ACP User manual

ProFlo

ProFlo PFWSC1040ACP User manual

ProFlo PFWSC4850CP User manual

ProFlo

ProFlo PFWSC4850CP User manual

ProFlo PFXC5012CP User manual

ProFlo

ProFlo PFXC5012CP User manual

ProFlo PFX3045 User manual

ProFlo

ProFlo PFX3045 User manual

ProFlo PFXC4121CP User manual

ProFlo

ProFlo PFXC4121CP User manual

ProFlo PF1033G2CP User manual

ProFlo

ProFlo PF1033G2CP User manual

ProFlo PFWSC2840CP User manual

ProFlo

ProFlo PFWSC2840CP User manual

ProFlo PF1830GCP User manual

ProFlo

ProFlo PF1830GCP User manual

ProFlo PFWSC6850ZBN User manual

ProFlo

ProFlo PFWSC6850ZBN User manual

ProFlo PFXC4117CP User manual

ProFlo

ProFlo PFXC4117CP User manual

ProFlo PFXC1711CP User manual

ProFlo

ProFlo PFXC1711CP User manual

ProFlo PF9870CP User manual

ProFlo

ProFlo PF9870CP User manual

ProFlo PFTS38CP User manual

ProFlo

ProFlo PFTS38CP User manual

ProFlo PFWSC4867CP User manual

ProFlo

ProFlo PFWSC4867CP User manual

ProFlo PFXC4111CP User manual

ProFlo

ProFlo PFXC4111CP User manual

ProFlo PFSAH02CP User manual

ProFlo

ProFlo PFSAH02CP User manual

ProFlo PFXC1717CP User manual

ProFlo

ProFlo PFXC1717CP User manual

ProFlo PFWSC1850CP User manual

ProFlo

ProFlo PFWSC1850CP User manual

ProFlo PFWSCM1M108 User manual

ProFlo

ProFlo PFWSCM1M108 User manual

Popular Plumbing Product manuals by other brands

Hans Grohe Status 04281 0 Series Installation/User Instructions/Warranty

Hans Grohe

Hans Grohe Status 04281 0 Series Installation/User Instructions/Warranty

American Standard Amarilis Jasmine In-Wall Diverter Valves... Specification sheet

American Standard

American Standard Amarilis Jasmine In-Wall Diverter Valves... Specification sheet

Sanela SLSN 02E Instructions for use

Sanela

Sanela SLSN 02E Instructions for use

Helvex EP-3007-EB installation guide

Helvex

Helvex EP-3007-EB installation guide

Toto TLP02309 installation manual

Toto

Toto TLP02309 installation manual

Fir Italia FIRUnico MELROSE 20 2080178 manual

Fir Italia

Fir Italia FIRUnico MELROSE 20 2080178 manual

Blu SA0504 installation guide

Blu

Blu SA0504 installation guide

JADO Oriental 893 installation instructions

JADO

JADO Oriental 893 installation instructions

Sanela 03210 Mounting instructions

Sanela

Sanela 03210 Mounting instructions

Hansa DESIGNO STYLE 5101 2283 Installation and maintenance guide

Hansa

Hansa DESIGNO STYLE 5101 2283 Installation and maintenance guide

PEERLESS P299623LF W Series manual

PEERLESS

PEERLESS P299623LF W Series manual

Kohler K-5415 installation guide

Kohler

Kohler K-5415 installation guide

Grohe Allure 32 755 manual

Grohe

Grohe Allure 32 755 manual

resideo Braukmann D06F3 installation instructions

resideo

resideo Braukmann D06F3 installation instructions

newform NIO 68930E instructions

newform

newform NIO 68930E instructions

Sanela SLP 03N Instructions for use

Sanela

Sanela SLP 03N Instructions for use

Harvia sentiotec WELLFUN LARGE Instructions for installation

Harvia

Harvia sentiotec WELLFUN LARGE Instructions for installation

Jacuzzi Shower Base Bonaire 4848 Specifications

Jacuzzi

Jacuzzi Shower Base Bonaire 4848 Specifications

manuals.online logo
manuals.online logoBrands
  • About & Mission
  • Contact us
  • Privacy Policy
  • Terms and Conditions

Copyright 2025 Manuals.Online. All Rights Reserved.