manuals.online logo
Brands
  1. Home
  2. •
  3. Brands
  4. •
  5. ProFlo
  6. •
  7. Plumbing Product
  8. •
  9. ProFlo PFWSC4857CP User manual

ProFlo PFWSC4857CP User manual

This manual suits for next models

1

Other ProFlo Plumbing Product manuals

ProFlo PF2870CP User manual

ProFlo

ProFlo PF2870CP User manual

ProFlo PFWSCM1M1087 User manual

ProFlo

ProFlo PFWSCM1M1087 User manual

ProFlo PFLT2522D User manual

ProFlo

ProFlo PFLT2522D User manual

ProFlo PFXC3127CP User manual

ProFlo

ProFlo PFXC3127CP User manual

ProFlo PFWSCM1M108 User manual

ProFlo

ProFlo PFWSCM1M108 User manual

ProFlo PFWSC1247CP/ZBN User manual

ProFlo

ProFlo PFWSC1247CP/ZBN User manual

ProFlo PFXC5012CP User manual

ProFlo

ProFlo PFXC5012CP User manual

ProFlo PFTS38CP User manual

ProFlo

ProFlo PFTS38CP User manual

ProFlo IPFX3085 Assembly instructions

ProFlo

ProFlo IPFX3085 Assembly instructions

ProFlo PFXC5017CP User manual

ProFlo

ProFlo PFXC5017CP User manual

ProFlo PF244A User manual

ProFlo

ProFlo PF244A User manual

ProFlo PFXC1187CP User manual

ProFlo

ProFlo PFXC1187CP User manual

ProFlo PFWSC1840CP User manual

ProFlo

ProFlo PFWSC1840CP User manual

ProFlo PFXC1080LSCP User manual

ProFlo

ProFlo PFXC1080LSCP User manual

ProFlo PFWSC4850CP User manual

ProFlo

ProFlo PFWSC4850CP User manual

ProFlo PFSH309GCP User manual

ProFlo

ProFlo PFSH309GCP User manual

ProFlo PFWSC1850CP User manual

ProFlo

ProFlo PFWSC1850CP User manual

ProFlo PF2830GCP User manual

ProFlo

ProFlo PF2830GCP User manual

ProFlo KALADA PFXCM2M313 User manual

ProFlo

ProFlo KALADA PFXCM2M313 User manual

ProFlo PFWSC6850ZBN User manual

ProFlo

ProFlo PFWSC6850ZBN User manual

ProFlo PFWSCM1M103 User manual

ProFlo

ProFlo PFWSCM1M103 User manual

ProFlo PFWSCM2M101 User manual

ProFlo

ProFlo PFWSCM2M101 User manual

ProFlo PFSH308GCP User manual

ProFlo

ProFlo PFSH308GCP User manual

ProFlo PFX3045 User manual

ProFlo

ProFlo PFX3045 User manual

Popular Plumbing Product manuals by other brands

Weka 506.2020.00E ASSEMBLY, USER AND MAINTENANCE INSTRUCTIONS

Weka

Weka 506.2020.00E ASSEMBLY, USER AND MAINTENANCE INSTRUCTIONS

American Standard DetectLink 6072121 manual

American Standard

American Standard DetectLink 6072121 manual

Kohler K-6228 Installation and care guide

Kohler

Kohler K-6228 Installation and care guide

Uponor Contec TS Mounting instructions

Uponor

Uponor Contec TS Mounting instructions

Pfister Selia 49-SL Quick installation guide

Pfister

Pfister Selia 49-SL Quick installation guide

Fortis VITRINA 6068700 quick start guide

Fortis

Fortis VITRINA 6068700 quick start guide

Kohler K-12183 Homeowner's guide

Kohler

Kohler K-12183 Homeowner's guide

Maxxus MX-M206-01 instruction manual

Maxxus

Maxxus MX-M206-01 instruction manual

Viega Prevista Pure 8512 Instructions for use

Viega

Viega Prevista Pure 8512 Instructions for use

Kohler Centerset K-15240 Homeowner's guide

Kohler

Kohler Centerset K-15240 Homeowner's guide

Viega Prevista Dry 8522.33 Instructions for use

Viega

Viega Prevista Dry 8522.33 Instructions for use

Sanela Lema SLP 59RB Instructions for use

Sanela

Sanela Lema SLP 59RB Instructions for use

Elkay EDF15AC Installation, care & use manual

Elkay

Elkay EDF15AC Installation, care & use manual

Hans Grohe AXOR Citterio E 36702000 Instructions for use/assembly instructions

Hans Grohe

Hans Grohe AXOR Citterio E 36702000 Instructions for use/assembly instructions

baliv WT-140 manual

baliv

baliv WT-140 manual

Kohler Mira Eco Installation & user guide

Kohler

Kohler Mira Eco Installation & user guide

BELLOSTA romina 0308/CC Installation instruction

BELLOSTA

BELLOSTA romina 0308/CC Installation instruction

Bristan PS2 BAS C D2 Installation instructions & user guide

Bristan

Bristan PS2 BAS C D2 Installation instructions & user guide

manuals.online logo
manuals.online logoBrands
  • About & Mission
  • Contact us
  • Privacy Policy
  • Terms and Conditions

Copyright 2025 Manuals.Online. All Rights Reserved.

SINGLE HANDLE LAVATORY FAUCET
GRIFO PARA LAVABO DE UNA LLAVE / ROBINET DE SALLE DE BAINS À UNE POIGNÉE
PFWSC4857CP PFWSC4857ZBN
Installation Instructions
Instrucciones de instalación / Instructions d'installation
ENGLISH
CAUTION-TIPS FOR REMOVAL OF
OLD FAUCET:
Always turn off water supply before
removing existing faucet or replacing
any part of the faucet. Open the
faucet handle to relieve water
pressure and ensure that water is
completely shut off.
CARE INSTRUCTIONS:
apply non-abrasive wax. Any
cleaners should be rinsed off
immediately. Do not use abrasive
cleaners on the faucet.
ESPAÑOL
PRECAUCIÓN-CONSEJOS PARA
CAMBIAR LA LLAVE MEZCLADORA:
Siempre corte el suministro de agua
antes de retirar el grifo actual o
remplazar cualquier pieza del mismo.
Abra la llave del grifo para liberar la
presión de agua y asegurar que ya no
corre agua.
INSTRUCCIONES DE CUIDADO:
Para conservar el acabado que cubre
las partes metálicas de su llave
mezcladora, aplique cera que no sea
abrasive, como una cera para autos. Si
usa algún tipo de limpiador, deberá
enjuagarlo inmediatamente. Los
abrasivos suaves son aceptables en
acabados platinum y LifeShine.
FRANÇAIS
ATTENTION-SUGGESTIONS POUR
ENLEVER L'ANCIEN ROBIENT:
Toujours couper l'alimentation en eau
avant d'enlever ou de démonter le
robinet. Ouvrir le robinet pour libérer la
pression d'eau et pour s'assurer que
l'alimentation en eau a bien été coupée.
DIRECTIVES D’ENTRETINE:
métalliques du robinet, appliquer une
cire non abrasive comme une cire à
votiure. Rincer immédiatement le
robinet aprés l'avoir nettoyé avec un
LifeShine peuvent être nettoyés à l'aide
de produits abrasifs doux.
1
You may need/Usted puede necesitar/
Aticles dont vous pouvez avoir besion
Goggles
Anteojos Protectores
Lunettes de sécurité
Wrench
Llave
Clé ajustable
Sealant Tape
Cinta Selladora
Ruban d'étanchéité
Silicone
Silicón
Silicone
SILICONE
04/19/22 REV.A FERGUSON.COM/PROFLO
Distributed Exclusively by Ferguson and Wolseley Canada
© 2022 Ferguson Enterprises, Inc. 0423 252402
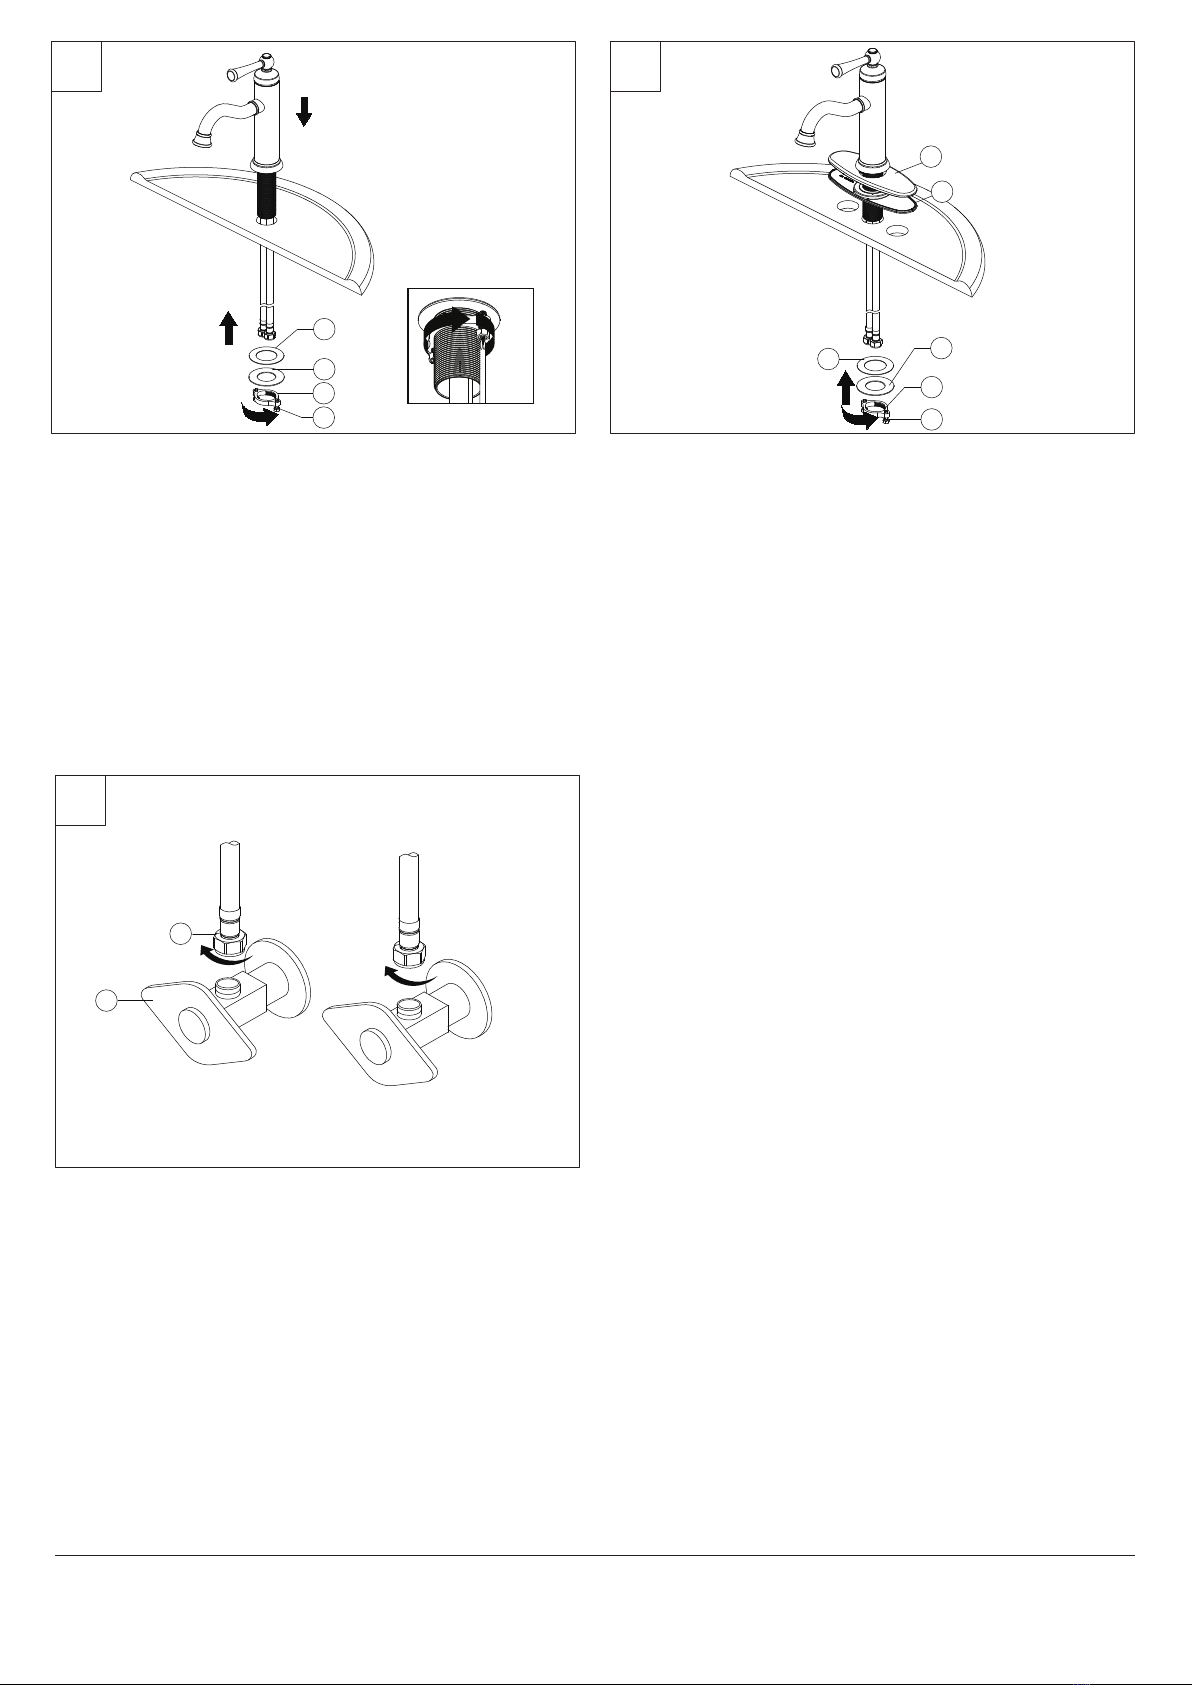
Shut off water supplies. Place new faucet through holes in top of sink. Install plastic
washer (1) and metal washer (2) onto the threaded mounting shank. Thread nut (3)
onto mounting shank. Lock nut into position by tightening screws (4). Do not over
tighten. If installing the faucet with the escutcheon, begin with step 2.
Cerrar los suministros de agua. Coloque el grifo nuevo a través de los orificios en la
parte superior del lavabo. Instala la arandela de plástico (1) y la arandela de metal
(2) en el vástago de montaje roscado. Enrosca la tuerca (3) en el vástago de montaje.
Fija la tuerca (3) en posición, apretando los tornillos (4). No aprietes demasiado. Si
es con la placa protectora, comienza con el 2.
Fermez les conduites d’alimentation en eau. Insérez le nouveau robinet dans les
trous prévus à cet effet sur le dessus du lavabo. Installez la rondelle en plastique (1)
et la rondelle en métal (2) sur sur la tige de montage filetée. Vissez l’écrou (3) sur la
tige de montage. Verrouillez l’écrou (3) en position en serrant les vis (4). Ne serrez
pas trop. Si vous installez le robinet avec l’entraxe, commencez à l’étape 2.
1 2
3
2
1
2
5
Shut off water supplies. Place the escutcheon (5) and the gasket (6) on the bottom of
the new faucet assembly. Place new faucet through holes in top of sink. Install
plastic washer (1) and metal washer (2) onto the threaded mounting shank. Thread
nut (3) onto mounting shank. Lock nut into position by tightening screws (4). Do not
over tighten.
Note: If the sink surface is uneven or irregular, plumber’s putty or a silicone sealant
may be used to create a watertight seal. Plumber’s putty may have an adverse
reaction with plastic gaskets under the spout base so if your faucet has a plastic
gasket, use a high quality silicone sealant. Plumber’s putty also may have an adverse
reaction with some cultured marble or natural stone. In these cases a high quality
silicone sealant is recommended.
Corte el suministro de agua. Coloca la placa protectora (5) y la junta (6) en la parte
inferior del ensamblaje del grifo nuevo. Coloque el grifo nuevo a través de los
orificios en la parte superior del lavabo. Instala la arandela de plástico (1) y la
arandela de metal (2) en el vástago de montaje roscado. Enrosca la tuerca (3) en el
vástago de montaje. Fija la tuerca (3) en posición, apretando los tornillos (4). No
aprietes demasiado.
Nota: Si la superficie del lavamanos es irregular o está desnivelada, puede usarse
masilla de plomero o un sellador de silicona para dar hermeticidad. La masilla de
plomero puede tener reacción adversa con juntas plásticas debajo de la base del
caño. Si tu grifo tiene junta plástica, usa un sellador de silicona de alta calidad. La
masilla de plomero puede tener también un reacción adversa con algún mármol
cultivado o piedra natural. En estos casos se recomienda un sellador de silicona de
alta calidad.
Coupez l'alimentation en eau. Placez la rosace (5) et le joint d'étanchéité (6) sur le
bas du nouvel ensemble de robinetterie. Insérez le nouveau robinet dans les trous
prévus à cet effet sur le dessus du lavabo. Installez la rondelle en plastique (1) et la
rondelle en métal (2) sur sur la tige de montage filetée. Vissez l’écrou (3) sur la tige
de montage. Verrouillez l’écrou (3) en position en serrant les vis (4). Ne serrez pas
trop.
Remarque : Si la surface du lavabo n'est pas uniforme ou est irrégulière, vous
pouvez utiliser du mastic de plomberie ou un scellant à la silicone pour créer un joint
étanche. Le mastic de plomberie peut réagir de manière indésirable avec les joints
en plastique sous la base du bec. Par conséquent, si le robinet présente un joint en
plastique, veuillez utiliser un scellant à la silicone de haute qualité. Le mastic de
plomberie peut également présenter une réaction indésirable avec certains
similimarbres ou certaines pierres naturelles. Dans de tels cas, il est recommandé
d'utiliser un scellant à la silicone de haut qualité.
3
4
12
3
4
6
1
2
Making the waterline connections
Thread the nut (1) on supply line onto outlet of water supply valve (2) and tighten
with wrench. Do not over tighten.
Cómo hacer las conexiones de las tuberías de agua
Enrosca la tuerca (1) de la línea de suministro en la salida de la válvula de
suministro de agua (2) y aprieta con una llave. No aprietes demasiado.
Branchement des conduites d'alimentation en eau
Vissez l’écrou (1) de la conduite d’alimentation sur la sortie du robinet d’alimentation
en eau (2) et serrez à l’aide d’une clé. Ne serrez pas trop.
(2 N.m
Max)
04/19/22 REV.A FERGUSON.COM/PROFLO
Distributed Exclusively by Ferguson and Wolseley Canada
© 2022 Ferguson Enterprises, Inc. 0423 252402
3
5
4
1
2
3
Important: After installation is complete, remove aerator. Turn on water supply and
allow both hot and cold water to run for at least one minute each. While water is
running, check for leaks. Replace aerator. This flushes away any debris that could
cause damage to internal parts.
Importante: Después de terminar la instalación, retira el aireador. Abre el suministro
de agua y deja que corran el agua fría y caliente, al menos un minuto cada uno. Con
el chorro abierto, verifica que no haya filtraciones. Coloca el aireador de nuevo. Esto
enjuaga cualquier suciedad que podría dañar las piezas internas.
Important : Une fois l’installation terminée, retirez l’aérateur. Ouvrez l’alimentation en
eau, et laissez couler l’eau chaude et l’eau froide pendant au moins une minute
chacune. Pendant que l’eau coule, recherchez les fuites. Remettez l’aérateur en place.
Ce rinçage chasse les débris éventuels qui pourraient endommager les pièces internes.
67
Remove the bottom gasket (2),washer (3) and nut (4) from the pop-up body (1).
Retira la junta inferior (2), la arandela (3) y la tuerca (4) del cuerpo emergente (1).
Retirez le joint d’étanchéité inférieur (2), la rondelle (3) et l’écrou (4) du corps
d’évacuation mécanique (1).
Insert the pop-up body (2) into the sink. Ensure that the top gasket (1) rests securely
between the top of the sink and the top of the pop-up body (2).
Inserta el cuerpo emergente (2) en el lavamanos. Garantiza que la junta superior (1)
descanse de manera segura entre la parte superior del lavamanos y la parte
superior del cuerpo emergente (2).
Insérez le corps d’évacuation mécanique (2) dans le lavabo. Assurez-vous que le
joint supérieur (1) repose de manière solide et sûre entre le haut du lavabo et le haut
du corps d’évacuation mécanique (2).
From underneath the sink, screw the bottom gasket (2), washer (3) and nut (4)
assembly onto the pop-up body (1) by twisting clockwise until secure.
Desde la parte inferior del lavamanos, enrosca la junta inferior (2), la arandela (3) y
el conjunto de la tuerca (4) en el cuerpo emergente (1), girando hacia la derecha
hasta asegurar.
Depuis le dessous du lavabo, vissez le joint d’étanchéité inférieur (2), la rondelle (3)
et l’écrou (4) sur le corps d’évacuation mécanique (1) en tournant dans le sens
horaire jusqu’à ce que l’ensemble soit solidement fixé.
2
1
2
3
4
1
4
04/19/22 REV.A FERGUSON.COM/PROFLO
Distributed Exclusively by Ferguson and Wolseley Canada
© 2022 Ferguson Enterprises, Inc. 0423 252402
* Specify Finish
Especifíque el Acabado
Précisez le Fini
4
Maintenance:
If faucet leaks underneath handle or water does not completely shut off: replace cartridge.
Mantenimiento:
Si hay una filtración debajo de la llave o el Agua no se corta por completo: reemplace el cartucho.
Entretien:
S'il y a une fuite sous la poignée ou si le robinet ne se ferme pas complètement: remplacez la cartouche.
OBPFK7F13039*
Handle
Llave
Poignée
OBPF5F30005*
Aerator
Aireado
Aérateur
OBPF220090
Cartridge
Cartucho
Cartouche
OBPF1F80032*
Deck plate
Placa de cubierta
Plaque décorative
OBPF9F40005*
Press pop-up assembly
Presiona el ensamblaje emergente
Appuyez sur l’évacuation
mécanique
04/19/22 REV.A FERGUSON.COM/PROFLO
Distributed Exclusively by Ferguson and Wolseley Canada
© 2022 Ferguson Enterprises, Inc. 0423 252402