manuals.online logo
Brands
  1. Home
  2. •
  3. Brands
  4. •
  5. ProFlo
  6. •
  7. Plumbing Product
  8. •
  9. ProFlo PFWSCM1M103 User manual

ProFlo PFWSCM1M103 User manual

SINGLE HANDLE LAVATORY FAUCET
Model PFWSCM1M103
GRIFO PARA LAVABO DE UNA LLAVE
Modelos PFWSCM1M103
ROBINET DE SALLE DE BAINS À UNE POIGNÉE
Modèles PFWSCM1M103
1 www.PROFLO.com
English Español Français
CAUTION-TIPS FOR REMOVAL OF
OLD FAUCET:
PRECAUCIÓN-CONSEJOS PARA CAMBIAR
LA LLAVE MEZCLADORA:
ATTENTION-SUGGESTIONS POUR
ENLEVER L'ANCIEN ROBIENT:
Always turn off water supply before
removing existing faucet or replacing
any part of the faucet. Open the
faucet handle to relieve water
pressure and ensure that water is
completely shut off.
Siempre corte el suministro de agua
antes de retirar el grifo actual o
remplazar cualquier pieza del mismo.
Abra la llave del grifo para liberar la
presión de agua y asegurar que ya no
corre agua.
Toujours couper l'alimentation en eau
avant d'enlever ou de démonter le
robinet. Ouvrir le robinet pour libérer la
pression d'eau et pour s'assurer que
l'alimentation en eau a bien été coupée.
CARE INSTRUCTIONS: INSTRUCCIONES DE CUIDADO: DIRECTIVES D'ENTRETINE:
To preserve the finish of your faucet,
apply non-abrasive wax. Any
cleaners should be rinsed off
immediately. Do not use abrasive
cleaners on the faucet.
Para conservar el acabado que cubre
las partes metálicas de su llave
mezcladora, aplique cera que no sea
abrasive, como una cera para autos. Si
usa algún tipo de limpiador, deberá
enjuagarlo inmediatamente. Los
abrasivos suaves son aceptables en
acabados platinum y LifeShine.
Pour préserver le fini des pièces
métalliques du robinet, appliquer une
cire non abrasive comme une cire à
votiure. Rincer immédiatement le
robinet aprés l'avoir nettoyé avec un
agent nettoyant. Les finis platinum et
LifeShine peuvent être nettoyés à l'aide
de produits abrasifs doux.
You may need/Usted puede necesitar/
Aticles dont vous pouvez avoir besion
Goggles
Anteojos Protectores
Lunettes de sécurité
Wrench
Llave
Clé ajustable
Basin Wrench
Llave para Instalar Grifos
Clé pour lavabo
(2) Supply Lines
2 Líneas de Suministro
(2) Tuyaux d'alimentation
Sealant Tape
Cinta Selladora
Ruban d'étanchéité
Silicone
Silicón
Silicone
2.5mm Hex Allen Wrench
2.5mm Hex Llave Allen
2.5mm Cié hexagonale
SILICONE
®
11/17/16 REV.A
2 www.PROFLO.com
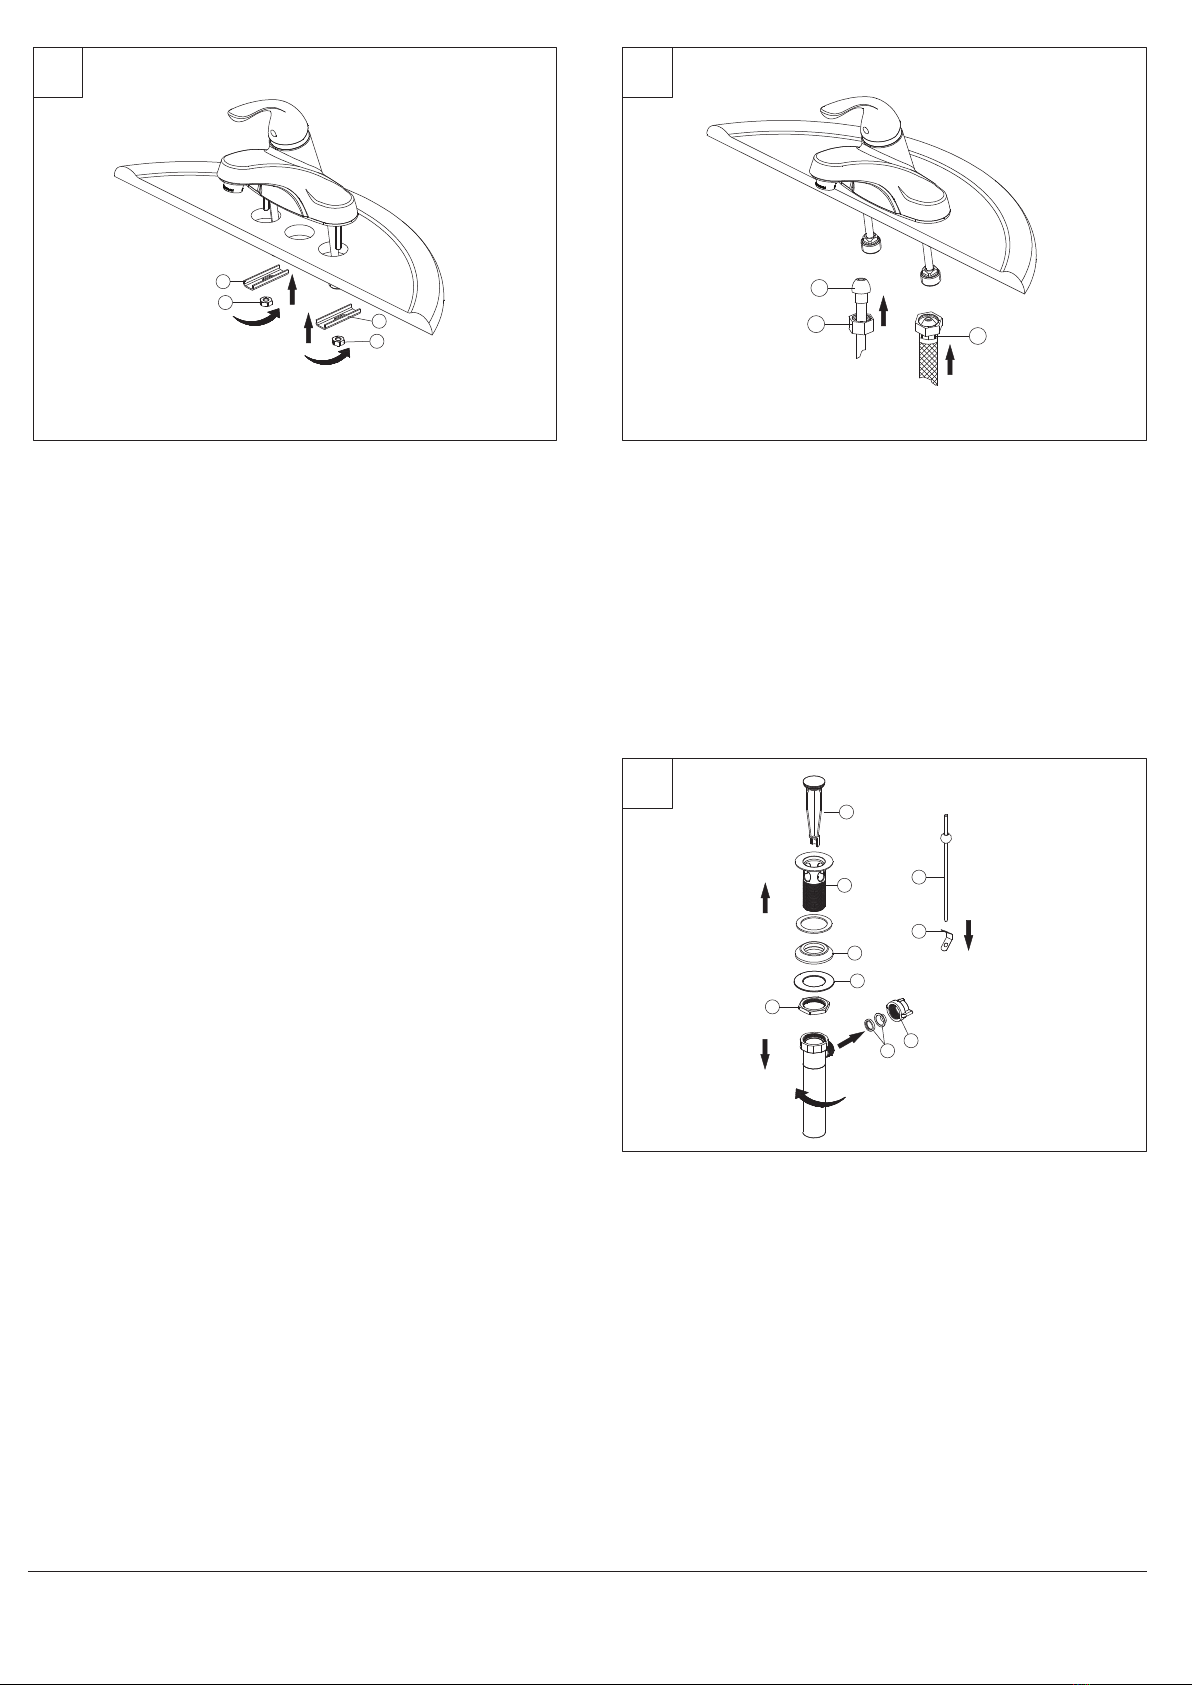
Shut off water supplies. Place new faucet through holes in top of sink. From under
sink slide washers (1) onto threaded. Secure with washers and nuts (2).
Note: If the sink surface is uneven or irregular, plumber’s putty or a silicone
sealant may be used to create a watertight seal. Plumber’s putty may have
an adverse reaction with plastic gaskets under the spout base so if your
faucet has a plastic gasket, use a high quality silicone sealant. Plumber’s
putty also may have an adverse reaction with some cultured marble or
natural stone. In these cases a high quality silicone sealant is
recommended.
Corte el suministro de agua. Coloque el grifo nuevo a través de los orificios en la
parte superior del lavabo. Desde la parte inferior, deslice las arandelas (1) hacia las
barras roscadas. Asegure con arandelas y tuercas (2).
Nota: Si la superficie del lavamanos es irregular o está desnivelada, puede
usarse masilla de plomero o un sellador de silicona para dar hermeticidad.
La masilla de plomero puede tener reacción adversa con juntas plásticas
debajo de la base del caño. Si tu grifo tiene junta plástica, usa un sellador
de silicona de alta calidad. La masilla de plomero puede tener también un
reacción adversa con algún mármol cultivado o piedra natural. En estos
casos se recomienda un sellador de silicona de alta calidad.
Coupez l'alimentation en eau. Insérez le nouveau robinet dans les trous prévus à cet
effet sur le dessus du lavabo. Sous le lavabo, glissez les rondelles (1) sur les tiges
filetées et fixez-les à l'aide de rondelles et d'écrous (2).
Remarque : Si la surface du lavabo n'est pas uniforme ou est irrégulière,
vous pouvez utiliser du mastic de plomberie ou un scellant à la silicone
pour créer un joint étanche. Le mastic de plomberie peut réagir de manière
indésirable avec les joints en plastique sous la base du bec. Par
conséquent, si le robinet présente un joint en plastique, veuillez utiliser un
scellant à la silicone de haute qualité. Le mastic de plomberie peut
également présenter une réaction indésirable avec certains similimarbres
ou certaines pierres naturelles. Dans de tels cas, il est recommandé
d'utiliser un scellant à la silicone de haut qualité.
Make connections to water lines. Use 1/2" I.P.S. faucet connections (2) or use supply
line coupling nuts (3) with 3/8" O.D.ball-nose riser (1). Use wrenches to tighten
connections. Do not overtighten.
Conecta a las líneas de suministro. Usa conexiones de grifos de 1/2" I.P.S (2) o las
tuercas de acoplamiento de líneas de suministro incluidas (3) con un tubos
montantes de bola de diámetro exterior de 3/8" (1). Usa llaves para apretar las
conexiones. No aprietes demasiado.
Branchez l'alimentation en eau. Utilisez un raccord de robinet I.P.S (2) de 1,27 cm
(1/2 po) ou utilisez des écrous d'accouplement (3) pour conduite d'alimentation avec
colonne montante à embout arrondi au diamètre extérieur de 0,95 cm (3/8 po) (1).
Utilisez la clé pour serrer les raccords. Ne serrez pas trop.
Remove stopper (1) and flange (2). Screw brass nut (3) all the way down. Push metal
washer (4) and gasket (5) down. Unscrew pivot nut (6) from the pop-up body and
remove the seal washers (7). Take off the spring clip (9) from horizontal rod (8).
Retira el tope (1) y la brida (2). Enrosca la tuerca de latón (3) hasta el límite. Empuja
la arandela de metal (4) y la junta (5) hacia abajo. Desenrosca la tuerca pivotante (6)
del cuerpo del desagüe emergente y retira las arandelas de sellado (7). Saca el
sujetador de resorte (9) de la varilla horizontal (8).
Retirez le bouchon (1) et la bride (2). Vissez l'écrou en laiton (3) complètement
jusqu'en bas. Poussez la rondelle en métal (4) et le joint (5) jusqu'en bas. Dévissez
l’écrou de pivot (6) du corps d'évacuation et retirez les rondelles d'étanchéité (7).
Retirez la pince à ressort (9) de la tige horizontale (8).
1 2
3
2
1
3
1
2
2
1
3
2
7
6
4
9
5
8
1
11/17/16 REV.A
3 www.PROFLO.com
Apply silicone to underside of flange (1). Insert flange into sink. Install gasket (2),
metal washer (3) and brass nut (4) onto flange (1) from below sink, but do not tighten
brass nut. Screw on tail piece (5) and hand tighten.
Note: Don’t drop silicone onto gasket (2).
Aplica silicona en el lado inferior de la brida (1). Coloca la brida en el fregadero.
Instala la junta (2), la arandela de metal (3) y la tuerca de latón (4) en la brida (1)
desde abajo del fregadero, pero no aprietes la tuerca de latón. Atornilla en el tubo
extensor (5) y aprieta con la mano.
Nota: No eches silicona en la junta (2).
Appliquez de la silicone sur le dessous de la bride (1). Insérez la bride dans le lavabo.
Installez le joint (2), la rondelle en métal (3) et l'écrou en laiton (4) sur la bride (1) à
partir du dessous du lavabo, mais ne serrez pas l'écrou en laiton. Vissez l'embout (5)
et serrez à la main.
Remarque: Ne faites pas tomber de scellant à la silicone sur le joint (2).
Place one end of spring clip (1) onto the end of horizontal rod (2). Insert horizontal
rod (2) through a hole on strap (3). Connect the other end of spring clip (1) to
horizontal rod (2). Insert lift rod (4) into strap and tighten screw (5).
Coloque un extremo del sujetador de resorte (1) en el extremo de la varilla horizontal
(2). Coloca la varilla horizontal (2) a través de un orificio en la correa (3). Conecta el
otro extremo del sujetador de resorte (1) en la varilla horizontal (2). Inserta la vara
del aireador (4) en la correa y aprieta el tornillo (5).
Placez une extrémité de la pince à ressort (1) au bout de la tige horizontale (2).
Insérez la tige horizontale (2) à travers un trou sur la courroie (3). Raccordez l'autre
extrémité de la pince à ressort (1) à la tige horizontale (2). Insérez la tige de levage
(4) dans la courroie et serrez la vis (5).
4
With pivot (1) facing toward faucet, pull pop-up straight down into drain hole and
secure gasket (2), metal washer (3) and brass nut. Remove excess sealant.
Con el pivote (1) de frente al grifo, hala el cuerpo del desagüe emergente de forma
recta hacia abajo y hacia el interior del orificio de drenaje y asegura la junta (2), la
arandela de metal (3) y la tuerca de latón. Limpia el exceso de sellador.
Avec le pivot (1) orienté vers le robinet, enfoncez tout droit le corps d'évacuation
dans le trou d'évacuation et fixez le joint (2), la rondelle en métal (3) et l'écrou en
laiton. Retirez l'excès de produit d'étanchéité.
Install horizontal rod (2) and stopper (3) as non-removable (4). Hand tighten pivot nut
(1).
Instala la varilla horizontal (2) y el tapón (3) en la posición fija (4). Aprieta la tuerca
del orificio del pivote con la mano (1).
Installez la tige horizontale (2) et le bouchon (3) en position non amovible (4). Serrez
l'écrou de pivot à la main (1).
5
67
5
4
3
2
1
2
3
1
4
2
3
1
3
1
2
5
4
11/17/16 REV.A
4 www.PROFLO.com
Maintenance:
If faucet leaks underneath handle or Water does not completely
shut off: Replace cartridge.
Mantenimiento:
Si hay una filtración debajo de la llave o el Agua no se corta por
completo: Reemplace el cartucho.
Entretien:
S'il y a une fuite sous la poignée ou si le robinet ne se ferme pas
complètement: Remplacez la cartouche.
8
11/17/16 REV.A
1
Important: After installation is completed, remove aerator. Turn on water supply and
allow both hot and cold water to run for at least one minute each. While water is
running, check for leaks. Replace aerator. This flushes away any debris that could
cause damage to internal parts. Do not lose the gasket (1) in the aerator.
Importante: Una vez que termine la instalación,quite el aireador. Abra el suministro
de agua y deje correr agua fría y caliente durante al menos un minuto cada una.
Mientras el agua corre, controle que no haya pérdidas. Reemplace el aireador. Esto
limpia cualquier residuo que pueda causar daño a las partes internas. No aojes la
junta (1) en el aireador.
Important: Une fois l’installation terminée, enlevez l’aérateur. Ouvrez l’alimentation
d’eau et laissez couler l’eau chaude et l’eau froide au moins une minute chacune.
Pendant que l’eau coule, vérifiez s’il y a des fuites. Reposez l’aérateur. Cette
opération sert à évacuer les débris qui pourraient endommager les éléments
internes. Ne perdez pas le joint d’étanchéité (1) dans l’aérateur.
5 www.PROFLO.com
* Specify Finish
Especifíque el Acabado
Précisez le Fini
RP50002
Set Screw
Tornillo de Fijación
Vis de calage
RP10006
Index
Índice
Repère
RP13060*
Handle
Llave
Poignée
RP50015
Screw
Tornillo
Vis
RP80109*
Cap
Tapa
Capuchon
RP70336
Bonnet
Capuchón
Chapeau
PF3357061
Cartridge
Cartucho
Cartouche
RP50071
Bolt
Perno
Boulon
RP70221
2.5mm Hex Allen Wrench
2.5mm Hex Llave Allen
2.5mm Hex Cié hexagonale
RP64083
Washer
Arandela
Rondelle
RP56033
Nut
Tuerca
Écrou
RP56002
Coupling Nut
Tuerca de acoplamiento
Écrou de raccordement
RP40006*
Lift rod & Lift rod knob
Perilla de la varilla de extensión & Varilla de
elevación
Bouton & Tuge de Tige de levage
RP40145*
Pop-up Assembly Less Lift Rod
Ensamble del Desagüe AutomáticoMenos la
Barra de Alzar
Renvoi Mécanique en Plastique Sans la Tige de
Manoeuvre
11/17/16 REV.A
RP30190*
Aerator
Aireado
Aérateur

Other ProFlo Plumbing Product manuals

ProFlo PFWSC9860CP User manual

ProFlo

ProFlo PFWSC9860CP User manual

ProFlo PFWSC4850CP User manual

ProFlo

ProFlo PFWSC4850CP User manual

ProFlo PFSAH02CP User manual

ProFlo

ProFlo PFSAH02CP User manual

ProFlo PF244A User manual

ProFlo

ProFlo PF244A User manual

ProFlo PFXC4111CP User manual

ProFlo

ProFlo PFXC4111CP User manual

ProFlo PFXC4111CP User manual

ProFlo

ProFlo PFXC4111CP User manual

ProFlo PF418A User manual

ProFlo

ProFlo PF418A User manual

ProFlo PFWSC1850CP User manual

ProFlo

ProFlo PFWSC1850CP User manual

ProFlo PF9870BN User manual

ProFlo

ProFlo PF9870BN User manual

ProFlo PFXC4027CP User manual

ProFlo

ProFlo PFXC4027CP User manual

ProFlo PFXCM1M7202 User manual

ProFlo

ProFlo PFXCM1M7202 User manual

ProFlo POGO Series User manual

ProFlo

ProFlo POGO Series User manual

ProFlo PFWSC4840CP User manual

ProFlo

ProFlo PFWSC4840CP User manual

ProFlo PFWSC1040ACP User manual

ProFlo

ProFlo PFWSC1040ACP User manual

ProFlo PFXU3085 User manual

ProFlo

ProFlo PFXU3085 User manual

ProFlo PFXC5017CP User manual

ProFlo

ProFlo PFXC5017CP User manual

ProFlo PF1612PA User manual

ProFlo

ProFlo PF1612PA User manual

ProFlo PIXLEY PFWSC1850CP User manual

ProFlo

ProFlo PIXLEY PFWSC1850CP User manual

ProFlo PFLT2522D User manual

ProFlo

ProFlo PFLT2522D User manual

ProFlo PFXC5157CP User manual

ProFlo

ProFlo PFXC5157CP User manual

ProFlo PF1830GCP User manual

ProFlo

ProFlo PF1830GCP User manual

ProFlo PFWSCM2M101 User manual

ProFlo

ProFlo PFWSCM2M101 User manual

ProFlo PF601BN User manual

ProFlo

ProFlo PF601BN User manual

ProFlo PFX122CP User manual

ProFlo

ProFlo PFX122CP User manual

Popular Plumbing Product manuals by other brands

Symmons SCOT SLS-7000 Series Operation & maintenance manual

Symmons

Symmons SCOT SLS-7000 Series Operation & maintenance manual

Flomasta 5059340065038 manual

Flomasta

Flomasta 5059340065038 manual

Omnires Y1237-1BSB Installation and Maintenance

Omnires

Omnires Y1237-1BSB Installation and Maintenance

Raritan TPWK12 Maintenance and installation instructions

Raritan

Raritan TPWK12 Maintenance and installation instructions

Karibu 75260 Building instructions

Karibu

Karibu 75260 Building instructions

Peerless Faucet P88121LF-SD-W Series quick start guide

Peerless Faucet

Peerless Faucet P88121LF-SD-W Series quick start guide

Akuaplus ELITE 2 User manua

Akuaplus

Akuaplus ELITE 2 User manua

IB RUBINETTI Wave 299 Fitting instructions

IB RUBINETTI

IB RUBINETTI Wave 299 Fitting instructions

saunalife G11 installation manual

saunalife

saunalife G11 installation manual

Kohler K-10088 Installation and care guide

Kohler

Kohler K-10088 Installation and care guide

Grohe DEFINED 29302000 owner's manual

Grohe

Grohe DEFINED 29302000 owner's manual

BERMAD C50 Installation, operation and maintenance manual

BERMAD

BERMAD C50 Installation, operation and maintenance manual

KWC S.10.D5.02 Features

KWC

KWC S.10.D5.02 Features

American Standard Princeton T508.990 installation instructions

American Standard

American Standard Princeton T508.990 installation instructions

Graff 2196300 Instructions for assembly and use

Graff

Graff 2196300 Instructions for assembly and use

IKEA ODENSVIK Assembly instructions

IKEA

IKEA ODENSVIK Assembly instructions

Watts N45BDU-EZ Series installation instructions

Watts

Watts N45BDU-EZ Series installation instructions

Graff 7030 installation instructions

Graff

Graff 7030 installation instructions

manuals.online logo
manuals.online logoBrands
  • About & Mission
  • Contact us
  • Privacy Policy
  • Terms and Conditions

Copyright 2025 Manuals.Online. All Rights Reserved.