manuals.online logo
Brands
  1. Home
  2. •
  3. Brands
  4. •
  5. ProFlo
  6. •
  7. Plumbing Product
  8. •
  9. ProFlo Kiger PFXC1711CP User manual

ProFlo Kiger PFXC1711CP User manual

SINGLE HANDLE KITCHEN FAUCET
LLAVES DE FREGADERO UNA MANIJA / ROBINET DE CUISINE À UNE MANETTE
PFXC1711CP PFXC1711ZBN PFXC1711MB
Installation Instructions
Instrucciones de instalación / Instructions d'installation
ENGLISH
CAUTION-TIPS FOR REMOVAL OF
OLD FAUCET:
Always turn off water supply before
removing existing faucet or replacing
any part of the faucet. Open the
faucet handle to relieve water
pressure and ensure that water is
completely shut off.
CARE INSTRUCTIONS:
apply non-abrasive wax. Any
cleaners should be rinsed off
immediately. Do not use abrasive
cleaners on the faucet.
ESPAÑOL
PRECAUCIÓN-CONSEJOS PARA
CAMBIAR LA LLAVE MEZCLADORA:
Siempre corte el suministro de agua
antes de retirar el grifo actual o
remplazar cualquier pieza del mismo.
Abra la llave del grifo para liberar la
presión de agua y asegurar que ya no
corre agua.
INSTRUCCIONES DE CUIDADO:
Para conservar el acabado que cubre
las partes metálicas de su llave
mezcladora, aplique cera que no sea
abrasive, como una cera para autos. Si
usa algún tipo de limpiador, deberá
enjuagarlo inmediatamente. Los
abrasivos suaves son aceptables en
acabados platinum y LifeShine.
FRANÇAIS
ATTENTION-SUGGESTIONS POUR
ENLEVER L'ANCIEN ROBIENT:
Toujours couper l'alimentation en eau
avant d'enlever ou de démonter le
robinet. Ouvrir le robinet pour libérer la
pression d'eau et pour s'assurer que
l'alimentation en eau a bien été coupée.
DIRECTIVES D’ENTRETINE:
métalliques du robinet, appliquer une
cire non abrasive comme une cire à
votiure. Rincer immédiatement le
robinet aprés l'avoir nettoyé avec un
LifeShine peuvent être nettoyés à l'aide
de produits abrasifs doux.
www.PROFLO.com
Distributed Exclusively by Ferguson and Wolseley Canada
© 2018 Ferguson Enterprises, Inc. 1010 252402
1
You may need/Usted puede necesitar/
Aticles dont vous pouvez avoir besion
Goggles
Anteojos Protectores
Lunettes de sécurité
Wrench
Llave
Clé ajustable
Basin Wrench
Llave para Instalar Grifos
Clé pour lavabo
(2) Supply Lines
2 Líneas de Suministro
(2) Tuyaux d'alimentation
Sealant Tape
Cinta Selladora
Ruban d'étanchéité
Silicone
Silicón
Silicone
SILICONE
06/11/21 REV.B
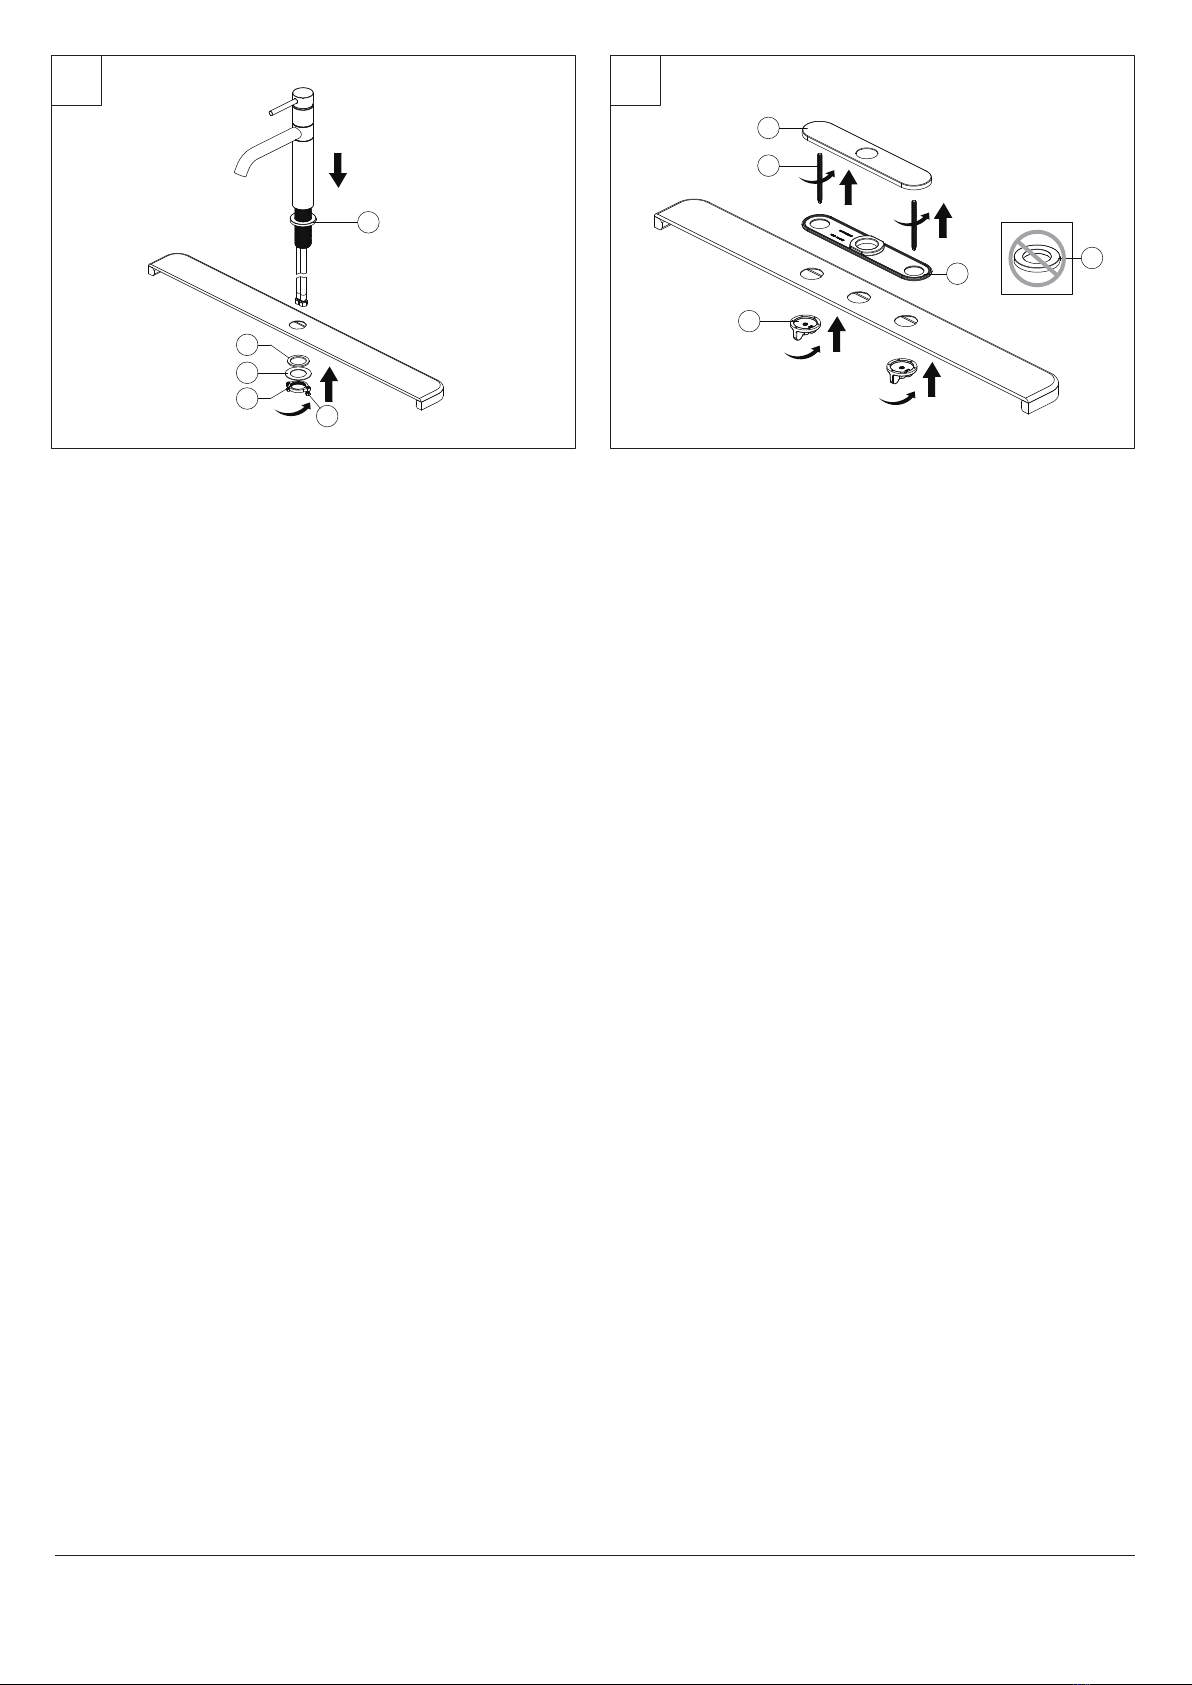
Optional Flange Installation
Shut off water supplies. Before installation, ensure that the flange (1) is placed on
the bottom of the new faucet assembly. Insert faucet body through the hole in sink.
Install plastic washer (2) and metal washer (3) onto the threaded mounting shank.
Thread nut (4) onto mounting shank. Lock nut into position by tightening screws (5).
Do not overtighten. Please continue to Step 3.
If installing the faucet with the escutcheon, begin with step 2a.
Optional Escutcheon Installation
Shut off water supplies.
Before installation, remove the flange (1). Screw the bolts (2) into the escutcheon (3)
and ensure that the base plate (4) is pressed onto the escutcheon (3) before the
escutcheon (3) is installed over the three holes in the sink. From underneath sink,
hand tighten the mounting nuts (5). Do not overtighten. If installing the faucet
without the escutcheon, begin with step 1.
Note: If the sink surface is uneven or irregular, plumber’s putty or a silicone sealant
may be used to create a watertight seal. Plumber’s putty may have an adverse
reaction with plastic gaskets under the spout base so if your faucet has a plastic
gasket, use a high quality silicone sealant. Plumber’s putty also may have an
adverse reaction with some cultured marble or natural stone. In these cases a high
quality silicone sealant is recommended.
Instalación de la Placa Protectora (opcional)
Cierra el suministro de agua.
Antes de la instalación, quite la brida (1). Atornilla los pernos (2) en la placa
protectora (3) y asegúrate de que la placa base (4) esté presionada sobre la placa
protectora (3) antes de instalar esta última en los tres ori cios del freqadero. Desde
abajo del fregadero, ajusta manualmente la tuerca de montaje (5). No aprietes
demasiado. Si instalas el grifo sin la placa protectora, empieza por el paso 1.
Nota: Si la superficie del lavamanos es irregular o está desnivelada, puede usarse
masilla de plomero o un sellador de silicona para dar hermeticidad. La masilla de
plomero puede tener reacción adversa con juntas plásticas debajo de la base del
caño. Si tu grifo tiene junta plástica, usa un sellador de silicona de alta calidad. La
masilla de plomero puede tener también un reacción adversa con algún mármol
cultivado o piedra natural. En estos casos se recomienda un sellador de silicona de
alta calidad.
Installation de la rosace (facultatif)
Coupez l'alimentation en eau.
Avant l'installation, retirez la bride (1). Vissez les boulons (2) dans la rosace (3) et
assurez-vous que la plaque de base (4) est appuyée sur la rosace (3) avant que la
rosace (3) ne soit installée par-dessus les trois trous de l'évier. Serrez manuellement
l'écrou de montage à partir du dessous de l'évier (5). Ne serrez pas trop. Si vous
installez le robinet sans l’entraxe, commencez avec l’étape 1.
Remarque: Si la surface du lavabo n'est pas uniforme ou est irrégulière, vous
pouvez utiliser du mastic de plomberie ou un scellant à la silicone pour créer un
joint étanche. Le mastic de plomberie peut réagir de manière indésirable avec les
joints en plastique sous la base du bec. Par conséquent, si le robinet présente un
joint en plastique, veuillez utiliser un scellant à la silicone de haute qualité. Le
mastic de plomberie peut également présenter une réaction indésirable avec
certains similimarbres ou certaines pierres naturelles. Dans de tels cas, il est
recommandé d'utiliser un scellant à la silicone de haut qualité.
Instalación del Reborde Opcional
Cierra el suministro de agua. Antes de la instalación, veri que que la brida (1) esté
colocada sobre el fondo del montaje de la nueva llave. Inserta el grifo a través del
orificio en el fregadero. Monta la arandela plástica (2) y la de metal (3) en el vástago
de montaje roscado. Enrosca la tuerca (4) en el vástago de montaje. Fija la tuerca en
posición, apretando los tornillos (5). No aprietes demasiado.
Por favor procede con el Paso 3.
Si es con la placa protectora, comienza con el 2a.
Installation de la bride (facultative)
Coupez l'alimentation en eau. Avant l'installation, véri ez que la bride (1) est placée
au fond du nouveau robinet. Insérez le corps du robinet dans le trou du lavabo.
Installez une rondelle en plastique (2) et une en métal (3) sur la tige de montage
filetée. Vissez l'écrou (4) sur la tige de montage. Verrouillez l'écrou en place en
serrant les vis (5). Ne serrez pas trop.
Veuillez continuer en passant à l’étape 3.
Si vous installez le robinet avec l’entraxe, commencez à l’étape 2a.
12a
www.PROFLO.com
Distributed Exclusively by Ferguson and Wolseley Canada
© 2018 Ferguson Enterprises, Inc. 1010 252402
2
1
2
4
3
4
5
2
3
5
1
06/11/21 REV.B
www.PROFLO.com
Distributed Exclusively by Ferguson and Wolseley Canada
© 2018 Ferguson Enterprises, Inc. 1010 252402
3
Important: After installation is complete, remove aerator with plastic wrench. Turn
on water supply and allow both hot and cold water to run for at least one minute
each. While water is running, check for leaks. Replace aerator. This flushes away
any debris that could cause damage to internal parts.
Importante: Luego de haber terminado la instalación, quite el aireador con una llave
plástica. Abra el suministro de agua y deje correr agua fría y caliente durante al
menos un minuto cada una. Mientras el agua corre, controle que no haya pérdidas.
Reemplace el aireador. Esto limpia cualquier residuo que pueda causar daño a las
partes internas.
Important: Une fois l'installation terminée, retirez l'aérateur à l'aide de la clé en
plastique. Ouvrez l'alimentation d'eau et laissez couler l'eau chaude et l'eau froide
au moins une minute chacune. Pendant que l'eau coule, vérifiez s'il y a des fuites.
Reposez l'aérateur. Cette opération sert à évacuer les débris qui pourraient
endommager les éléments internes.
Optional Escutcheon Installation
Insert faucet body through the hole in escutcheon. Install plastic washer (1) and
metal washer (2) onto the threaded mounting shank. Thread nut (3) onto mounting
shank. Lock nut into position by tightening screws (4). Do not overtighten.
Instalación de la Placa Protectora (opcional).
Inserta el grifo a través del orificio en la placa protectora. Monta la arandela plástica
(1) y la de metal (2) en el vástago de montaje roscado. Enrosca la tuerca (3) en el
vástago de montaje. Fija la tuerca en posición, apretando los tornillos (4). No
aprietes demasiado.
Installation de la rosace (facultatif)
Insérez le corps du robinet à travers le trou de la rosace. Installez une rondelle en
plastique (1) et une en métal (2) sur la tige de montage filetée. Vissez l'écrou (3) sur
la tige de montage. Verrouillez l'écrou en place en serrant les vis (4). Ne serrez pas
trop.
2b 3
4
1
2
3
4
Making the waterline connections
Thread the nut (1) on supply line onto outlet of water supply valve (2) and tighten
with wrench. Do not overtighten.
Cómo hacer las conexiones de las tuberías de agua
Enrosca la tuerca (1) de la línea de suministro en la salida de la válvula de
suministro de agua (2) y aprieta con una llave. No aprietes demasiado.
Branchement des conduites d'alimentation en eau
Vissez l’écrou (1) de la conduite d’alimentation sur la sortie du robinet d’alimentation
en eau (2) et serrez à l’aide d’une clé. Ne serrez pas trop.
1
2
06/11/21 REV.B
* Specify Finish
Especifíque el Acabado
Précisez le Fini
www.PROFLO.com
Distributed Exclusively by Ferguson and Wolseley Canada
© 2018 Ferguson Enterprises, Inc. 1010 252402
4
Maintenance:
If faucet leaks underneath handle or water does not completely shut off: replace cartridge.
Mantenimiento:
Si hay una filtración debajo de la llave o el Agua no se corta por completo: reemplace el cartucho.
Entretien:
S'il y a une fuite sous la poignée ou si le robinet ne se ferme pas complètement: remplacez la cartouche.
OBPF2RP20094
Cartridge & Screw
Cartucho & Tornillo
Cartouche & Vis
OBPF5F30001
Aerator
Aireado
Aérateur
OBPF5F30002
Plastic Wrench
Llave plástica
Clé en plastique
OBPF1F80015*
Flange
Brida
Bride
PF1711DP*
Optional Deckplate Assembly
Ensamblaje opcional de la placa del grifo
Assemblage de plaque décorative en option
OBPF1RP70221
2.5mm Hex Allen Wrench
2.5mm Hex Llave Allen
2.5mm Cié hexagonale
06/11/21 REV.B
OBPF7RP13334*
Handle
Llave
Poignée

This manual suits for next models

2

Other ProFlo Plumbing Product manuals

ProFlo PFWSC6840CP User manual

ProFlo

ProFlo PFWSC6840CP User manual

ProFlo PFWSC5260CP User manual

ProFlo

ProFlo PFWSC5260CP User manual

ProFlo PF2870CP User manual

ProFlo

ProFlo PF2870CP User manual

ProFlo PFXC1717CP User manual

ProFlo

ProFlo PFXC1717CP User manual

ProFlo PFWSCM1M1097 User manual

ProFlo

ProFlo PFWSCM1M1097 User manual

ProFlo PFX3085 User manual

ProFlo

ProFlo PFX3085 User manual

ProFlo PFWSCM1M108 User manual

ProFlo

ProFlo PFWSCM1M108 User manual

ProFlo PFWSCM1M104 User manual

ProFlo

ProFlo PFWSCM1M104 User manual

ProFlo PFWSCM1M1157 User manual

ProFlo

ProFlo PFWSCM1M1157 User manual

ProFlo PFWSCM2M316 User manual

ProFlo

ProFlo PFWSCM2M316 User manual

ProFlo PFXCM6847CP User manual

ProFlo

ProFlo PFXCM6847CP User manual

ProFlo PFXC1711CP User manual

ProFlo

ProFlo PFXC1711CP User manual

ProFlo PFWSC2860CP User manual

ProFlo

ProFlo PFWSC2860CP User manual

ProFlo KALADA PFXCM2M313 User manual

ProFlo

ProFlo KALADA PFXCM2M313 User manual

ProFlo PFXC1080LSCP User manual

ProFlo

ProFlo PFXC1080LSCP User manual

ProFlo PFTS38CP User manual

ProFlo

ProFlo PFTS38CP User manual

ProFlo PIXLEY PFWSC1850CP User manual

ProFlo

ProFlo PIXLEY PFWSC1850CP User manual

ProFlo PFWSCM1M313 User manual

ProFlo

ProFlo PFWSCM1M313 User manual

ProFlo PFWSC9860CP User manual

ProFlo

ProFlo PFWSC9860CP User manual

ProFlo PF1713UWH User manual

ProFlo

ProFlo PF1713UWH User manual

ProFlo PFWS5260CP User manual

ProFlo

ProFlo PFWS5260CP User manual

ProFlo PFWSC4757CP User manual

ProFlo

ProFlo PFWSC4757CP User manual

ProFlo PFXC5150CP User manual

ProFlo

ProFlo PFXC5150CP User manual

ProFlo PFWSC1040CP User manual

ProFlo

ProFlo PFWSC1040CP User manual

Popular Plumbing Product manuals by other brands

baliv KBS-24.60 manual

baliv

baliv KBS-24.60 manual

Elkay ILGR6022 Series Specifications

Elkay

Elkay ILGR6022 Series Specifications

Franke MATRIX Using instructions and guarantee

Franke

Franke MATRIX Using instructions and guarantee

Glacier bay 67392W-6101 Installation and care guide

Glacier bay

Glacier bay 67392W-6101 Installation and care guide

Halsey Taylor SCWT8A-CB-Q owner's manual

Halsey Taylor

Halsey Taylor SCWT8A-CB-Q owner's manual

Gessi EQUILIBRIO 52002 manual

Gessi

Gessi EQUILIBRIO 52002 manual

Moen Show House TS883 Series owner's manual

Moen

Moen Show House TS883 Series owner's manual

Kohler Rada 215 Series product manual

Kohler

Kohler Rada 215 Series product manual

La Buvette LAKCHO 2 manual

La Buvette

La Buvette LAKCHO 2 manual

Kohler 84625 Service Kit Instructions

Kohler

Kohler 84625 Service Kit Instructions

Hans Grohe Status M Instructions for use/assembly instructions

Hans Grohe

Hans Grohe Status M Instructions for use/assembly instructions

Axor Starck 10030XX1 Installation instructions / warranty

Axor

Axor Starck 10030XX1 Installation instructions / warranty

Pressalit R9113 Mounting instruction

Pressalit

Pressalit R9113 Mounting instruction

Moen INS191 installation instructions

Moen

Moen INS191 installation instructions

Kebo SH-PN-60211 quick start guide

Kebo

Kebo SH-PN-60211 quick start guide

Grohe BAULOOP 20 225 manual

Grohe

Grohe BAULOOP 20 225 manual

Belanger essential DEL43CCP quick start guide

Belanger

Belanger essential DEL43CCP quick start guide

Hans Grohe Focus 240 31815000 Instructions for use/assembly instructions

Hans Grohe

Hans Grohe Focus 240 31815000 Instructions for use/assembly instructions

manuals.online logo
manuals.online logoBrands
  • About & Mission
  • Contact us
  • Privacy Policy
  • Terms and Conditions

Copyright 2025 Manuals.Online. All Rights Reserved.