Proline CNE8X User manual

BUILTͲINOVEN
FOUR ENCASTRABLE
INBOUWOVEN
CNE8X

INDEX
FR
MISES EN GARDE IMPORTANTES MERCI DE BIEN
VOULOIR LIRE LES CONSIGNES
LES INSTRUCTIONS
D’UTILISER L'APPAREIL
RÉFÉRENCE ULTÉRIEURE.
DE SÉCURITÉ ET
ATTENTIVEMENT AVANT
ET CONSERVER POUR
FR-1
...............
ATTENTION .............................................................................................................................................. 2
MISES EN GARDE IMPORTANTES ....................................................................................................
DESCRIPTION DU FOUR...........................................................................................................
Panneau de commande...................................................................................................................
.....
Accessoires du four. ..........................................................................................................
INSTALLATION............................................................................................................................................
..................................................................................................................................
NETTOYAGE ET ENTRETIEN ......................................................................................................................
...............................................................................................................
.................................................................................................................. 6
BRANCHEMENT ÉLECTRIQUE
Fonctions.....................................................................................................................................
8
8
9
SPÉCIFICATIONS TECHNIQUES
........ .5
.
........ .5
........
5
5
7
6
UTILISATION ........
...

ATTENTION
Cet appareil est destiné à être utiliz dans des
applications domestiques et
analogues telles que :
-les coins cuisines réservés au personnel des
magasins, bureaux et autres environnements
professionnels ;
-les fermes ;
-l’utilisation par les clients des hôtels,motels et
autres environnements à
caractère résidentiel ;
-les environnements de type chambres d’hôtes.
é
FR-2

Nepasutiliserd’appareildenettoyageàlavapeur.
afind'éviterundanger.
Silecâbled'alimentationestendommagé,ildoit
êtreremplacéparlefabricant,sonserviceaprès
venteoudespersonnesdequalificationsimilaire
Il convient de maintenir à distance les enfants de
moins de 8 ans, à moins qu’ils ne soient sous une
surveillance con�nue.
L'appareildoitêtreinstalléd'unemanière
conformeàlaréglementationnationaleen
matièredecâblageNFC15Ͳ100.
Ledispositifdedéconnexiondoitêtreincorporéau
câblagefixe,conformémentàlaréglementation
en matière de câblage.
Lessurfacesaccessiblespeuventêtreportéesà
FR-3

MISEENGARDE:S'assurerquel'appareilest
déconnectédel'alimentationavantderemplacer
lalampepourévitertoutrisquedechocélectrique.
Touteslescuissonssefontporteferméede
préférence.
Nepasaccrocherdelingeoudetorchonàla
poignéedufour.
Nerecouvrerpasl’intérieurdufourdepapier
aluminiumpouréconomiserunnettoyage:en
provoquantunesurchauffe,vousendommageriez
l’émailquirecouvrelacavité.
hautetempératurelorsquel’appareilfonctionne.
En ce qui concerne les informa�ons détaillées sur la
façon d’installer correctement les étagères,
référez-vous à la sec�on “Accessoires du four”.
En ce qui concerne les informa�ons détaillées sur le
raccordement du câble électrique, référez-vous à la
sec�on “BRANCHEMENT ELECTRIQUES”.
Concernant les instruc�ons sur comment fixer
l’appareil sur son support et sur les dimensions des
espaces nécessaires, référez-vous la sec�on «
INSTALLATION ».
FR-4

DESCRIPTIONDUFOUR
Panneaudecommande
Bouton
de
commande
de
fonction
Bouton
du
thermostat
:Letémoins'allumelorsquelefourestallumé.
Fonctions
SymboleDescription
Lampedufour
Cettefonctionpermetdefaireensortequelalamperesteallumée
mêmelorsquelefournefonctionnepas.
Résistanceduhaut
Larésistanceduhautfonctionnelorsqueceboutonestappuyé.
N'essayezpasdesouleveroudedéplacerl'appareilentirantsurlapoignéedela
porte.
Lorsquelaportedufourestouverte,nelaissezpaslesenfantsgrimperou
s'asseoirdessus.
Débranchezl'appareilsivouscomptezlelaisserinutilisépendantlongtemps.
MISESENGARDEIMPORTANTES
Lefourdoitêtrecorrectementinstalléetmisàlaterreparuntechnicienqualifié.
Évitezdeporterdesvêtementsamplesoutombantssivousdevezutiliserlefour:
Ilsrisqueraientdeprendrefeuaucontactdesrésistances,etvousrisqueriezde
vousbrûler.
Aucunmatériauinflammablenedoitêtrerangésurouàproximitédufour.Risque
d'incendie!
Lesmanipulationsd'entretienetderéparationnepeuventêtreeffectuéesque
paruntechnicienagréé.Toutemanipulationd'installationetderéparation
effectuéeparunepersonnenonhabilitéepeutvousmettreendanger.Ilest
dangereuxd'essayerdechangeroumodifierlesspécificationsdel'appareilde
quelquemanièrequecesoit.
()
sauf
la
fontion
ECO
FR-5

Chaleurparlebas
Idéalpourlesdaubes,lecurryettouslesplatsàcuissonlente.
Traditionnel
Idéalpourlacuissonàunseulétage,commeparexemplepourles
tartesauxfruitsetlespâtésdeviande.Nécessiteunpréchauffage.
Accessoiresdufour
GrilledecuissonPlatàrôtir
Pourlesplats,lesmoulesàgâteaux,les
grilladesetrôtisseries
Pourcuireourôtiroupourrécupérerlesgraisses.
Engagezlagrilleouleplatdanslesrailsde
guidagedufour.
Sivousdevezutiliserenmêmetempslagrilleet
leplat,mettezleplatsouslagrille.
Les branchements électriques ne doivent être effectués que par un
électricien qualifié et agréé.
Le fil marron doit être branché
à la borne
portant la lettre L.
Le fil bleu doit être
branché à la borne
portant la lettre N.
Le fil vert et jaune doit être branché à la borne portant la lettre E ou le
symbole de terre .
BRANCHEMENT ÉLECTRIQUE
Cette fonction garantit des économies d'énergie pendant la cuisson.
FR-6

INSTALLATION
Les chiffres ci-dessous correspondent aux dimensions requises pour une installation dans un
meuble, sous plan ou en colonne.
575
595
595
560
600
850
50
80
250
100
570
600
560
FR-7
Les dimensions ci-jointes sont en mm.
Étapes d’installation
1. Veuillez monter les armoires en vous basant sur les données du
« Schéma de montage d’armoire ».
2. Avant l'installation, veuillez vérifier si la prise de courant est
reliée à la terre et si la taille de l’armoire répond aux exigences
d'installation.
3. Installez la machine à l'endroit prévu dans la cuisine et placez-la
dans une armoire verticale.
4. Ouvrez la porte du four, repérez les deux trous d'installation sur le
cadre, et fixez la machine à la position de montage à l’aide des vis
accompagnant le produit.
Schéma de fixation de l'armoire

1. Branchezlefour.
2. Choisissezlafonctionsouhaitéeentournantleboutondecommandedefonction.
3. Mettezleboutonduthermostatsurlatempératuresouhaitée.
4. Pouréteindrelefour,mettezlethermostatsur"0".
REMARQUE
:
Selonladuréedefonctionnementdufouretla
températureambiante,desgouttesd'eaupeuventtomber
delaportedufaitdelacondensation;aucuntapis(ouobjetsimilaire)nedoitdonc
êtreplacésouslaporte.
NETTOYAGEETENTRETIEN
1. Éteignezl'appareiletattendezqu’ilaitcomplètementrefroidiavantdelenettoyer.
2. Essuyezlessurfacesexternesavecunchiffonhumide.N'utilisezenaucuncasdu
poliàmétal.
3. Touteslespartiesamoviblespeuventselaverdansl'eauchaudesavonneuse.
RincezͲlesetséchezͲlesbienavantdelesréutiliser.
Changement de la lampe du four
La vapeur sort par cet
orifice dans la poignée
Aprèschaqueutilisation,remetteztoujourslesboutonsdecommandedel'appareil
sur"0".
Lorsque le four est en marche, de la vapeur s'échappe par la
sortie d'air située sous la poignée, à l'avant du four; faites
attention lorsque vous devez toucher cette partie de la
poignée.
La condensation est plus importante lorsque la température
ambiante est plus basse; ainsi, il y a par exemple davantage
de condensation en hiver qu'en été.
Lacondensationestunphénomènenormalpourcetype
defouretnedoitpasêtreconsidéréecommeundéfaut
ouundysfonctionnement.
Ilestrecommandédeconfiercettemanipulationàun
électricienqualifié.
1. DébranchezlefouretlaissezͲlerefroidir
complètement.
2. Mettezuneampouleneuveàlaplacedel'ancienne.
3. Mettezuneampouleneuve.
4. RemettezlecapotenplaceetvissezͲle.
UTILISATION
FR-8
Source lumineuse remplaçable
par un professionnel.
Ce produit contient une source
lumineuse de classe d’efficacité
énergétique G.

DÉPANNAGE
En cas de problème avec l'appareil, veuillez vérifier les points suivants avant de
contacter un réparateur agréé.
Si le four ne marche pas:
Le four est peut-être éteint, ou il y a peut-être eu une coupure de courant.
Si le four ne chauffe pas:
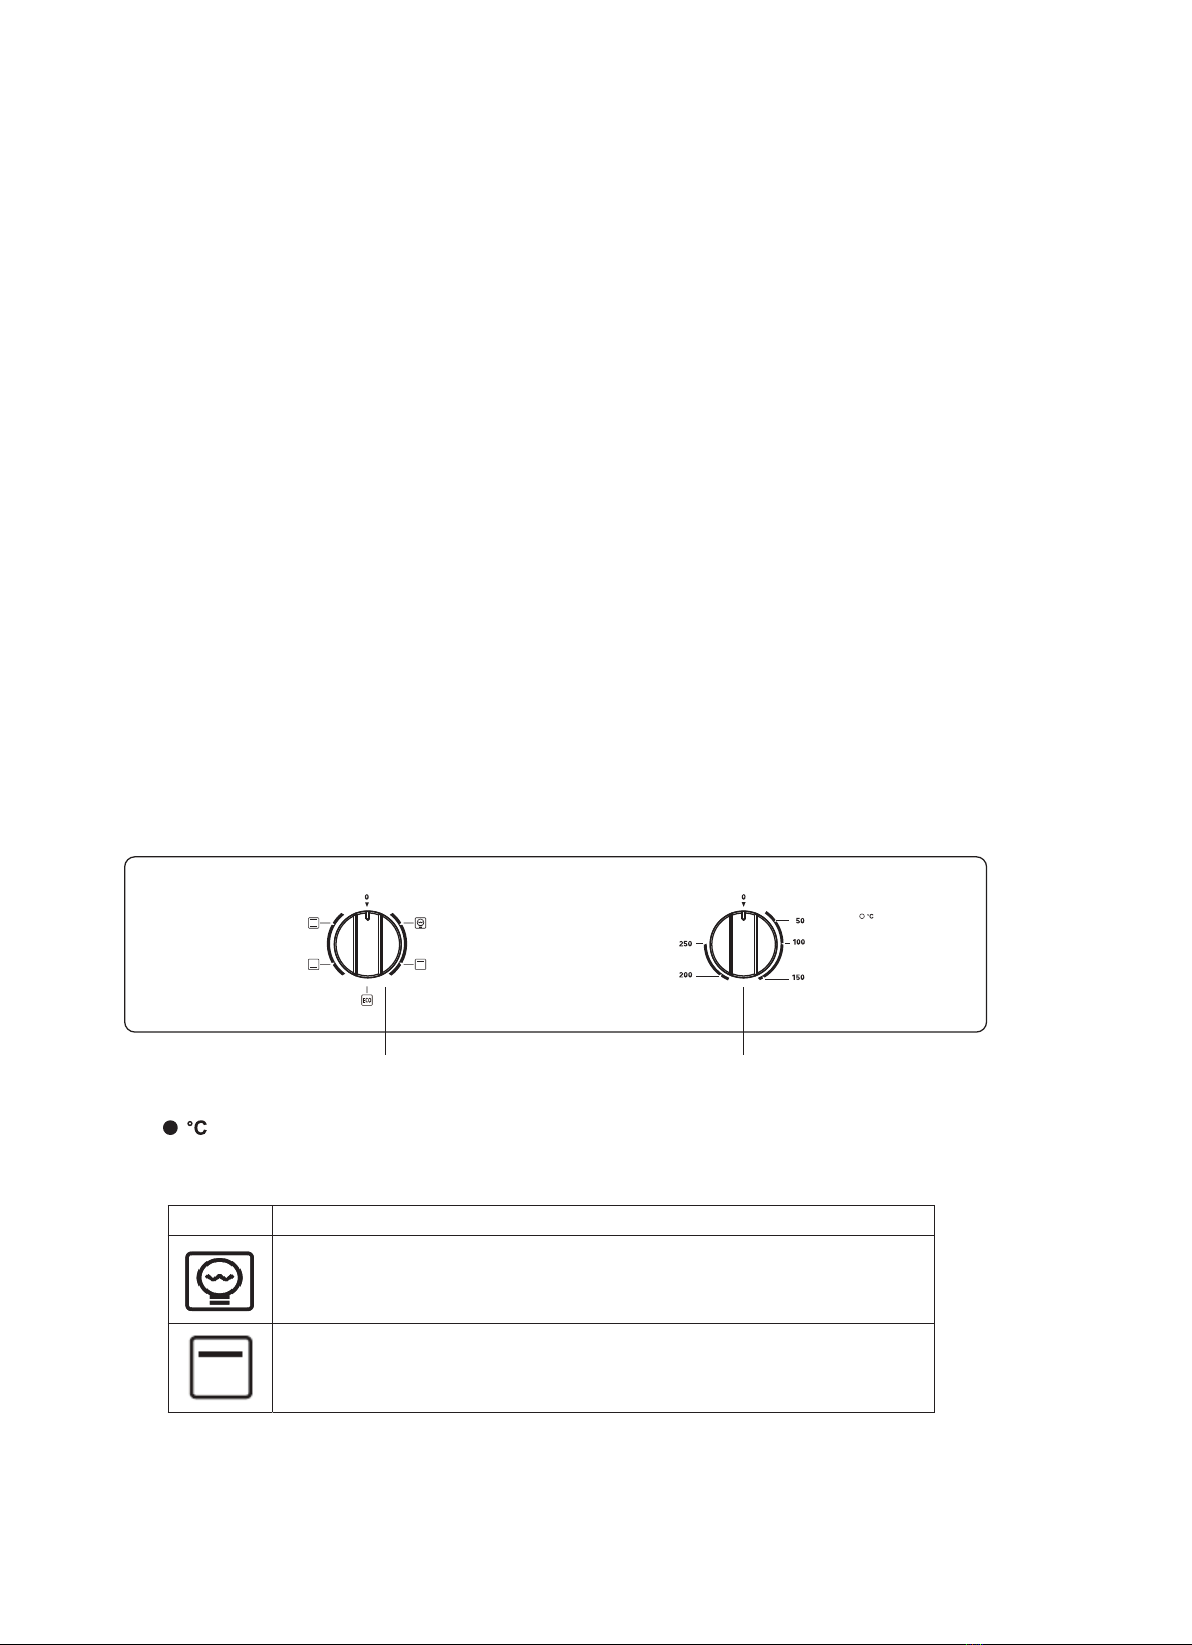
Le bouton de fonction du four n'est peut-être pas sur la bonne température.
Si la lampe intérieure ne s'allume pas:
L'appareil est peut-être débranché.
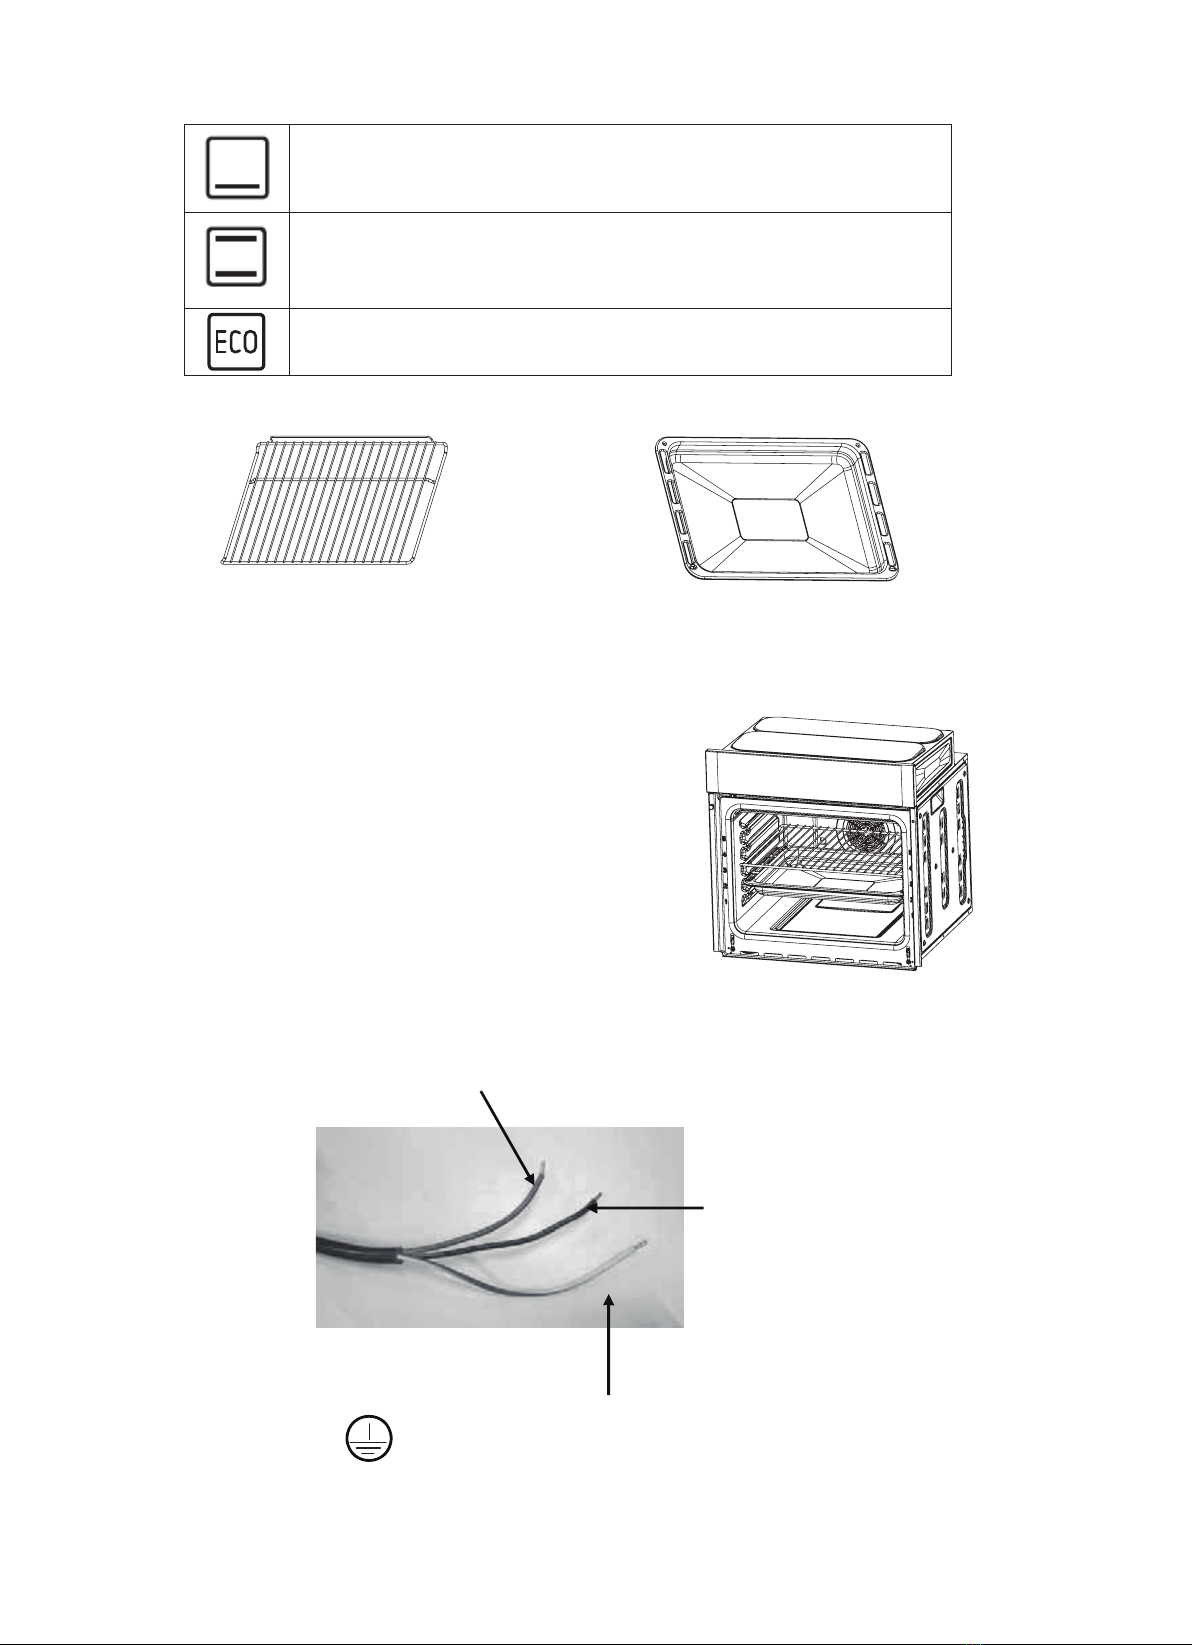
L'ampoule est peut-être défectueuse. Si c'est le cas, changez-la de la
manière décrite dans la section "Changer l'ampoule du four".
Si la résistance du haut et celle du bas ne chauffent pas de manière uniforme:
Vérifiez l'emplacement des grilles, les temps de cuisson et les
températures.
VeuilleztrouverciͲdessouslafichetechniquedufourdomestiqueconformémentàla
réglementationdel'Unioneuropéennen°66/2014.
Numérodemodèle
TypedefourFourélectrique
Massedel'appareil(M)kg
Nombredecavités 1
Sourcedechaleurparcavité(électricitéougaz)Electricité
Volumeparcavité(V)70L
Consommationd'énergie(électricité)nécessairepour
chaufferunechargestandardiséedansunecavitéd'un
fouràchauffageélectriquependantuncycleenmode
conventionnelparcavité(énergiefinaleélectrique)
(ECcavitéélectrique)
0,79kWh/cycle
Consommationd'énergienécessairepourchaufferune
chargestandardiséedansunecavitéd'unfourà
chauffageélectriquependantuncycleenmodeenmode
deventilationforcéeparcavité(énergiefinale
électrique)(ECcavitéélectrique)
NA
Indiced'efficacitéénergétiqueparcavité(EEIcavité)
SPÉCIFICATIONS TECHNIQUES
24.9
CNE8X
94
MarqueProline
Typed’appareil FOUR ENCASTRABLE
Tensionetfréquence
d’alimentation/nominales 220Ͳ240V
Puissancemaximale2.1
Puissancemaximaledel’ampouledufour25W
Élémentchauffantsupérieur(W) 950
Élémentchauffantinférieur(W)1100
Nettoyage(émail/catalyse/pyrolyse) Enamel
Poidsnetkg24.9
()
50 Hz - 60 Hz
~
kW
FR-9

Dimensionsducompartimentdumeuble
(LxPxH) 560*570*600
Classeénergétique(lettresurl’étiquette)*A
Consommationélectrique(kWh)
Fonction chauffage
Traditionnel
Volume utile (litres)70
Taille:(Petit/Moyen/Grand) Grande
FabriquéenR.P.deChine
Dimensions du produit (LxPxH) 595*575*595mm
0,79kWh/cycle
*Classeénergétique:A+++……D(A+++=économiqueD=moinséconomique)
Laméthoded'essaiestenconformitéaveclesexigencesdelanorme
EN60350Ͳ1:2013.
MISE AU REBUT
grande importance à la protection de l’environnement.
Nous vous encourageons à respecter les procédures correctes de mise au
rebut de votre appareil, des piles et des éléments d’emballage. Cela aidera
à préserver les ressources naturelles et à garantir qu’il soit recyclé d’une
manière respectueuse de la santé et de l’environnement.
Vous devez jeter ce produit et son emballage selon les lois et les règles locales.
Puisque ce produit contient des composants électroniques et parfois des piles,
le produit et ses accessoires doivent être jetés séparément des déchets
domestiques lorsque le produit est en fin de vie.
Pour plus de renseignements sur les procédures de mise au rebut et de recyclage,
contactez les autorités de votre commune.
Apportez l’appareil à un point de collecte local pour qu’il soit recyclé.
Certains centres acceptent les produits gratuitement.
En tant que distributeur responsable, nous accordons une
Hotline Darty France
Quels que soient votre panne et le lieu d'achat de votre produit en France, avant
de vous déplacer en magasin Darty, appelez le 0 978 970 970 (prix d'un appel local)
7j/7 et 24h/24.
Hotline Vanden Borre
Le service après-vente est joignable au +32 2 334 00 00, du lundi au samedi de 8h à 18h.
En raison des mises au point et améliora�ons constamment apportées à nos
produits, de pe�tes incohérences peuvent apparaître dans ces instruc�ons.
Veuillez nous excuser pour la gêne occasionnée.
Hotline Fnac France
Quels que soient votre panne et le lieu d'achat de votre produit en France, avant de vous
déplacer en magasin Fnac, appelez le 0 969 324 334 du lundi au samedi (8h30-21h00) et le
dimanche et jours fériés (10h00-18h00).(prix d’un appel local)
FR
FR-10
Etablissements Darty & fils ©,
9 Rue des Bateaux-Lavoirs, 94200 Ivry-sur-Seine, France 11/03/2022

CONTENTS
WARNINGS............................................................................................................................... 2
IMPORTANT SAFETY INSTRUCTIONS..................................................................................
DESCRIPTION OF THE OVEN.................................................................................................
Control panel ....................................................................................................................
Functions ..........................................................................................................................
Oven accessories.............................................................................................................
INSTALLATION ........................................................................................................................
OPERATION .............................................................................................................................
CLEANING AND MAINTENANCE ...........................................................................................
......................................................................................................
EN
ELECTRICAL CONNECTION .................................................................................................
6
7
8
5
5
5
5
6
8
9
.
TECHNICAL DATA SHEET
THE FOLLOWING SAFETY
INSTRUCTIONS CAREFULLY
APPLIANCE AND KEEP FOR FUTURE REFERENCE.
WARNINGS AND THE
BEFORE USING THE
EN-1
IMPORTANT SAFETY INSTRUCTIONS PLEASE READ

WARNINGS
Thisappliancecanbeusedbychildrenagedfrom
8yearsandaboveandpersonswithreduced
physical,sensoryormentalcapabilitiesorlackof
experienceandknowledgeiftheyhavebeengiven
supervisionorinstructionconcerninguseofthe
applianceinasafewayandunderstandthehazards
involved.Childrenshallnotplaywiththeappliance.
Cleaningandusermaintenanceshallnotbemade
bychildrenwithoutsupervision.
WARNING:Theapplianceanditsaccessibleparts
becomehotduringuse.Careshouldbetakento
avoidtouchingheatingelements.Childrenlessthan
8yearsofageshallbekeptawayunless
continuouslysupervised.
This appliance is intended to be used in
household and similar
applications such as:
- staff kitchen areas in shops, offices and other
working environments;
- farm houses;
- by clients in hotels, motels and other residential
type environments;
- bed and breakfast type environments.
Ifthesupplycordisdamaged,itmustbereplaced
bythemanufacturer,itsserviceagentorsimilarly
qualifiedpersonsinordertoavoidahazard.
EN-2

Duringusetheappliancebecomeshot.Care
shouldbetakentoavoidtouchingheatingelements
insidetheoven.
Donotuseharshabrasivecleanersorsharpmetal
scraperstocleantheovendoorglasssincetheycan
scratchthesurfacewhichmayresultinshattering
of
the
glass.
Thedoorshouldpreferablybeclosedinallcooking
modes.
Donothanganyclothorgarmenttothehandleof
the oven.
Themeansfordisconnectionmustbe
incorporatedinthefixedwiringinaccordancewith
thewiringrules.
Donotlinetheoven’scavitywithaluminumfoil
foreasiercleaning:Theovenmayoverheatandthe
enamelcoatingofthecavitymaybedamaged.
Theapplianceshallbeinstalledinaccordancewith
nationalwiringregulationsNFC15Ͳ100.
EN-3

WARNING:Ensurethattheapplianceisswitched
offbeforereplacingthelamptoavoidthe
possibility
ofelectricshock.
Thedoorshouldpreferablybeclosedinallcooking
modes.
Donothanganyclothorgarmenttothehandleof
theoven.
Donotlinetheoven’scavitywithaluminumfoil
foreasiercleaning:Theovenmayoverheatandthe
enamel
coating
of
the
cavity
may
be
damaged.
Thetemperatureofaccessiblesurfacesmaybe
highwhentheapplianceisoperating.
Regarding the instruc�ons for the all necessary
spaces with dimensions, the method of fixing and
how the appliance is to be fixed to its support, refer
to the sec�on “INSTALLATION”.
Regarding the instruc�ons for the connec�on of the
appliance to the supply mains refer to the sec�on
“ELECTRICAL CONNECTION”.
EN-4
Regarding the instrucons for the details indicang the
correct installaon of the shelves, refer to the secon
“Oven accessories”.

IMPORTANTSAFETYINSTRUCTIONS
ovenmustbeproperlyinstalledandgroundedbyaqualifiedtechnician.
notwearlooseorhanginggarmentswhenusingtheoven.couldigniteif
theytouchahotheatingelementandthismayleadtotheriskofburning
yourself.
notstoreflammablematerialsonorneartheoven.maycauseafire
hazard.
DESCRIPTIONOFTHEOVEN
Controlpanel
:Theindicatorlightwillbeturnedonwhentheovenisoperational.
Functions
SymbolDescription
Ovenlamp
Thefunctionallowstheovenlamptobeonwithoutanycooking
function.
Topheat
Thetopheatingelementisworkingwhenthefunctionisselected.
Bottomheat
Idealforcasseroles,curriesandanyslowcooking.
Conventional
Idealforsingleshelfcooking.Goodformeatandfruitpies.Theoven
needstobepreheated.
Maintenanceandrepairworkmustbemadeonlybyauthorisedservice
technicians.Installationandrepairworkthatiscarriedoutbyunauthorised
peoplemayendangeryou.Itisdangeroustoalterormodifythespecificationsof
theapplianceinanyway.
Donottrytoliftormovetheappliancebypullingthedoorhandle.
Whiletheovendoorisopen,donotletchildrenclimborsitonit.
Ifyouwillnotusetheapplianceforalongtime,plugitoff.
The
DoThey
DoThis
This function ensures energy savings during cooking.
(except ECO function.)
EN-5
Function Control Knob Temperature Control Knob

Ovenaccessories
WireshelfRoastingpan
Fordishes,caketinsanditemsfor
roastingandgrilling
Forbakingandroastingorfor
collectingfat
Pushthewireshelf/roastingpanbetweenthe
guidebarsintheoven.
Incasethattheovenshelfandtheroastingpan
areinsertedtogether,laythewireshelfonthe
roastingpan.
ELECTRICAL CONNECTION
Electrical connections must only be performed by a qualified and authorised
electrician.
The brown wire must be connected to the terminal marked L.
The blue wire must be
connected to the
terminal marked N.
The green and yellow wire must be connected to the letter E or the earth
symbol .
EN-6

INSTALLATION
The figures below give the dimensions for installation to the furniture.
575
595
595
560
600
850
50
80
250
100
570
600
560
EN-7
The attached dimensions are in mm.
Installation Steps
Please make cabinets based on the data of "Cabinet diagram".
Before installation, please check whether the power socket is
grounded and the cabinet size meets the installation require-ments.
Install the machine at the designated location in the kitchen and
install it in an upright cabinet.
Open the furnace door, determine the two installation holes on
the frame, and fix the machine at the installation position with
the screws provided with the product.
1.
2.
3.
4.
Schematic diagram of cabinet fixing

OPERATION
1. Plugtheovenin.
2. Turnthefunctioncontrolknobtoselectthedesiredfunction.
3. Turnthethermostatcontrolknobtoselectthedesiredtemperature.
4. Toswitchofftheoven,turnthethermostatcontrolknobto“0”.
NOTE:
CLEANINGANDMAINTENANCE
1. Switchofftheapplianceandallowittocoolcompletelybeforecleaning.
2. Cleantheoutsideoftheappliancewithadampcloth.Neverusemetalpolish.
3. Washalltheremovablepartsinmildsoapedwater.Rinseanddrythoroughly
beforeuse.
Makesuretheappliancecontrolknobsarealwaysinthe"0"positionwhenitisnot
used.
Therewillbesteamcomingoutfromthefrontexhaust
ventunderthehandlewhentheovenisinoperation;care
shallbetakenwhenthisareaofthehandleistouched.
Therewillbemorecondensationwhentheenvironmental
temperatureiscolder,forexampletherewillbemore
condensationinthewintermonthscomparedtothe
summermonths.
Condensationisnormalforthistypeofovenandisnot
consideredtobeafaultormalfunction.
Pleasemakesurethattherearenocarpetsorthelike
placedundertheovendoorastheremightbe
condensationwaterdroppingdownonthefloordependingontheovenoperation
timeandtheenvironmentaltemperature.
Replacingtheovenlamp
Itisrecommendedthatyouleavethisoperationtoa
qualifiedelectrician.
1. Unplugtheovenandmakesureithasbeenallowed
tocool.
2. Removetheglasslampcoverbyunscrewingit.
3. Replacethelightbulbwithanewone.
4. Screwtheglasslampcoverbackinplace.
WARNING:
EN-8
Replaceable light source
by a professional.
This product contains a
light source of energy
efficiency class G.

TROUBLESHOOTING
Before contacting your authorised service if you have a problem with your
appliance, please check the following.
If the oven does not operate:
Check that the oven is not switched off; there may have been a power outage.
If the oven does not heat:
Check that the heat is adjusted with the oven’s function control knob.
If the interior lighting lamp does not light:
Check that the appliance is plugged.
Check whether the lamp is defective. If it is, you can change it as described in
section “Replacing the oven lamp”.
If lower and upper heating elements do not cook equally:
Control the shelf locations, cooking period and heat values.
TECHNICAL DATA SHEET
EN-9
BelowisthesheetofdomesticovenaccordingtoEUregulationNo.66/2014.
Modelidentification
TypeofovenElectricoven
Massoftheappliance(M)kg
Numberofcavities 1
Heatsourcepercavity(electricityorgas)Electricity
Volumepercavity(V)70L
Energyconsumption(electricity)requiredtoheata
standardizedloadinacavityofanelectricheatedoven
duringacycleinconventionalmodepercavity(electric
finalenergy)(ECelectriccavity)
0.79kWh/cycle
Energyconsumptionrequiredtoheatastandardized
loadinacacityofanelectricheatedovenduringacycle
infan‐forcedmodepercacity(electricfinalenergy)
(ECelectriccavity)
NA
EnergyEfficiencyIndexpercavity(EEIcavity)
ThetestisperformedincompliancewiththerequirementsofEN60350‐1:2013.
24.9
CNE8X
94
Table of contents
Languages:
Other Proline Oven manuals

Proline
Proline SM202 User manual

Proline
Proline OV23 User manual

Proline
Proline GM202W User manual

Proline
Proline PSO 60W-SS-E User manual

Proline
Proline CNC65WH2 User manual

Proline
Proline PCC56SL-F User manual

Proline
Proline POM 651 SS User manual

Proline
Proline MFP6500SSB2 User manual

Proline
Proline PMC57W-F Manual

Proline
Proline OCP38 User manual

Proline
Proline PMF60A User manual

Proline
Proline CN 34 User manual

Proline
Proline MFP6500SSB User manual

Proline
Proline PM019 User manual

Proline
Proline COOKY User manual

Proline
Proline PSO60FW User manual

Proline
Proline CN19 User manual

Proline
Proline PSO58F User manual

Proline
Proline POM567SS User manual

Proline
Proline OV28 User manual