PROLiNK PEN1201 User manual

USER MANUAL
PROLiNK® Wireless-N 300Mbps Range Extender
PEN1201

i
Copyright
The contents of this publication may not be reproduced in any part or as a whole, stored,
transcribed in an information retrieval system, translated into any language, or transmitted in
any form or by any means, mechanical, magnetic, electronic, optical, photocopying, manual, or
otherwise, without the prior written permission.
Trademark
All products, company, brand names are trademarks or registered trademarks of their
respective companies. They use for identification purpose only. Specifications are subject to be
changed without prior notice.
FCC Interface
This equipment has been tested and found to comply with the limits for a Class B digital device
under Part 15 of the FCC Rules. These limits are designed to provide reasonable protection
against radio interference in a commercial environment. This equipment can generate, use and
radiate radio frequency energy and, if not installed and used following the instructions in this
manual, may cause harmful interference to radio communications. Operation of this equipment
in a residential area is likely to cause interference, in which case the user, at his own expense,
requires to take whatever measures are necessary to correct the interference.
CE Declaration of Conformity
This equipment complies with the requirements relating to electromagnetic compatibility, EN
55022/A1 Class B.

ii
PREFACE
Revision
Date
Descriptions
1.0
26 June 2019
Initial release
1.1
5 June 2020
Updated content and Formatting

iii
Table of Contents
1Introduction .....................................................................................................................................1
1.1 Package Contents...................................................................................................................1
1.2 Product Overview ....................................................................................................................2
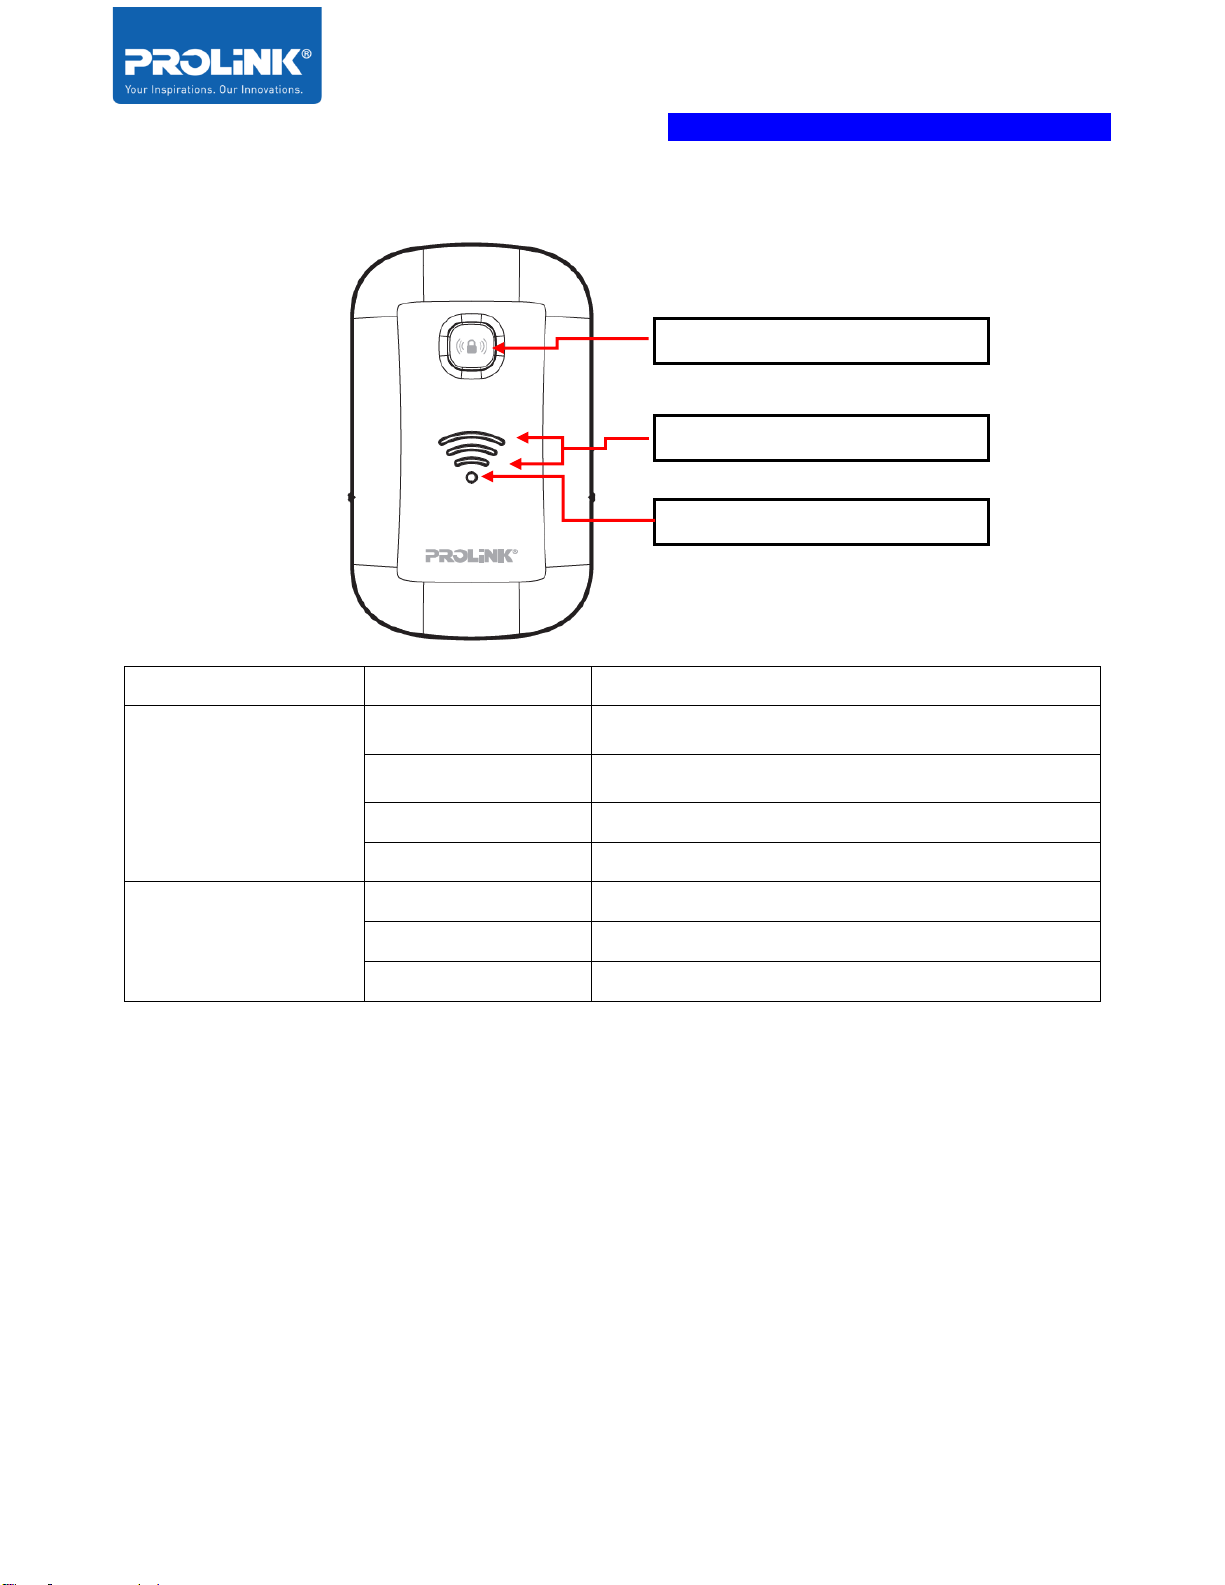
1.3 Hardware Overview.................................................................................................................3
1.4 LED Indicator ...........................................................................................................................5
2Extender PEN1201 Installation....................................................................................................6
2.1 Setup Requirement .................................................................................................................6
2.2 Placement Guide.....................................................................................................................6
2.3 Hardware Setup.......................................................................................................................8
Repeater Mode Setup (Default)...................................................................................................8
Router Mode Setup......................................................................................................................10
Access Point (AP) Mode Setup .................................................................................................12
3Getting Started .............................................................................................................................14
3.1 TCP/IP Setup .........................................................................................................................14
3.2 Log-in into the Web User Interface Configuration............................................................16
Log-in to PEN1201 Web Interface through PC / Laptop ...............................................................16
Log-in to PEN1201 Web Interface through Mobile Phone ............................................................17
3.3 Setup Wizard............................................................................................................................20
Repeater Wizard ..........................................................................................................................20
Router Wizard...............................................................................................................................22
Access Point (AP) Wizard ..........................................................................................................27
4Web User Interface (UI) Configuration .....................................................................................29
4.1 Home Page.............................................................................................................................30
Home Page – Repeater ..............................................................................................................31
Repeater Wizard....................................................................................................................... 31
Internet Status and LAN Setting ............................................................................................ 32
Extender PEN1201 ICON Status........................................................................................... 32
Home Page – Router...................................................................................................................33
Router Wizard ........................................................................................................................... 33
WAN Setting and LAN Setting................................................................................................ 34
PEN1201 ICON Status............................................................................................................ 34
Home Page – Access Point........................................................................................................35
AP Wizard.................................................................................................................................. 35
Internet and LAN Setting......................................................................................................... 36
Extender PEN1201 Status...................................................................................................... 36
4.2 2.4G Wi-Fi Clients .................................................................................................................37
4.3 Wi-Fi Setting...........................................................................................................................37
4.4 Setting Management.............................................................................................................38
Password Setting.................................................................................................................. 38
Save/Import Settings............................................................................................................ 38
Upgrade Firmware................................................................................................................ 39
Restart Device ...................................................................................................................... 39
Logout .................................................................................................................................... 39
5Technical Specification................................................................................................................40

PROLiNK® PEN1201 Wireless-N 300Mbps Range Extender II
Page 1
1 Introduction
This chapter introduces the packaging contents of Extender PEN1201, the product overview
regarding all the main features available and the appearance of the product included the LED
indicator.
1.1 Package Contents
Quantity (unit)
Item Description
1
1
PEN1201 Range Extender
2
1
Quick Installation Guide
3
1
RJ45 Ethernet Cable

PROLiNK® PEN1201 Wireless-N 300Mbps Range Extender II
Page 2
1.2 Product Overview
The PROLiNK Wireless-N 300Mbps Range Extender II PEN1201 is a 3-in-1 device which by
default functions as a Repeater and can easily be switched to be an Access Point or Router
depending on the user's needs. Besides reaching out to Wi-Fi dead zones with its improved
connectivity and speed, it also introduces new user-friendly and features to fully tap the
Extender's overall performance.
Designed to fit seamlessly into any corner of the household, the space-saving wall-mounted
Extender enables full flexibility to shift the positioning of the device with minimal hassle. The
newly modernized outlook also features a Smart LED Indicator which helps detect the signal
strength from the primary router and guide users to find and locate the positioning for optimal
Wi-Fi coverage. Other upgraded features include straightforward and easily accessible On/off
Switch and Easy Mode Selection buttons, which can be found and easily adjusted from the
sides of the device.
Together with its easy and secure one-step setup system, the PROLiNK Wireless-N 300Mbps
Range Extender II is the perfect add-on device and inexpensive solution to effortless home and
office network expansion.

PROLiNK® PEN1201 Wireless-N 300Mbps Range Extender II
Page 3
1.3 Hardware Overview

PROLiNK® PEN1201 Wireless-N 300Mbps Range Extender II
Page 4
1
WPS
To connect with Wi-Fi Client (e.g. mobile phone): Press and release
To connect with an existing Router’s Wi-Fi: Press and hold for 6
seconds
2
Wi-Fi Signal
To show the Wi-Fi Signal Strength Indicator
3
Status Indicator
To show the device status
4
Reset Button
Hold for 10 seconds and release to reset to factory setting
5
Power Switch
Top position: Turn OFF Extender/Bottom position: Turn ON Extender
6
Operation Mode
switch
Top position : Access Point (AP) Mode
Middle position : Repeater Mode
Bottom position : Router Mode
7
AC Power Input
To plug into switch socket outlet
8
WAN/LAN Port
For Router and AP Mode: this port is to be connected with Internet
source/Modem
For Repeater Mode: this port functions as a LAN port
9
LAN Port
Port to connect with a client’s (PC / Laptop) Ethernet port

PROLiNK® PEN1201 Wireless-N 300Mbps Range Extender II
Page 5
1.4 LED Indicator
Indicator
Behaviour
Description
Status
OFF
Extender is turned Off / No Power
ON
Extender is turned On
Fast Blinking
Extender is having data transmission
Slow Blinking
Triggering WPS
Wi-Fi Signal Strength
One LED Bar
Low Wi-Fi signal strength
Two LED Bar
Good Wi-Fi signal strength
Three LED Bar
Excellent Wi-Fi signal strength
Status Indicator
Wi-Fi Signal Strength Indicator
WPS Button

PROLiNK® PEN1201 Wireless-N 300Mbps Range Extender II
6
2 Extender PEN1201 Installation
This chapter guides you on how to set up the PEN1201 as an Extender / Repeater. Please
ensure not to place the PEN1201 in an enclosed area such as closet and cabinet.
2.1 Setup Requirement
To setup Extender PEN1201 you need to ensure the following item in the list is available.
•Internet Access (DSL, Modem or existing Wireless Router).
•Ethernet Cable with RJ45 connector at both ends.
•Laptop / PC equipped with Ethernet Network adapter (10Base-T or 100Base-TX or
1000Base-TX) and Wi-Fi card / adapter.
•Web Browser (Microsoft Edge, Chrome, Firefox, or Safari).
2.2 Placement Guide
For the best Wi-Fi signal transmission between PEN1201 and network devices that connect to
it:
•Place the Extender PEN1201 in a well-ventilated place and avoid exposure to moisture
or excessive heat.
•Keep away or avoid placing Extender PEN1201 from electrical devices or appliance that
generate the electromagnetic wave to prevent Wi-Fi signal interference and signal loss
•Place the Extender PEN1201 in between your router and your Wi-Fi dead zone

PROLiNK® PEN1201 Wireless-N 300Mbps Range Extender II
7
•Plug in Extender PEN1201 into an electrical outlet and switch “ON”. The Wi-Fi Signal
Strength indicators indicate the link quality once PEN1201 is connected to the existing
router or access point. It is recommended to achieve Two or Three LED bars which
illustrate reliable connectivity between the Extender PEN1201 and existing router or
access point.

PROLiNK® PEN1201 Wireless-N 300Mbps Range Extender II
8
2.3 Hardware Setup
There are several different ways you can configure your PEN1201 to connect to the Internet
and connect to your clients. Guides below shows how the hardware connection setup for each
mode available for PEN1201. Please first make sure that Wi-Fi client can successfully access
the Internet via the main router.
Repeater Mode Setup (Default)
The following is a step to setup PEN1210 as a Wi-Fi range extender or Repeater. Make sure
your internet connection source from the main router is valid. Follow the step below to complete
the hardware connection.
1. Turn OFF Main/Existing Router.
2. Connect Ethernet cable between Computer LAN port to PEN1210 LAN port.
3. Ensure the PEN1201 Operation Mode Switch is set to “Repeater” and Turn ON power
of Main/Existing Router and PEN1210.

PROLiNK® PEN1201 Wireless-N 300Mbps Range Extender II
9
The booting up process takes approximately 60 seconds. When PEN1210 is ready to
setup, the Status indicator will lit up solid green.
Note that at this point, the Repeater Mode is not yet fully set and Wi-Fi Signal
Strength indicator will not lit up. Please follow until Section 3.4 Setup Wizard.

PROLiNK® PEN1201 Wireless-N 300Mbps Range Extender II
10
Router Mode Setup
The following is a step to setup Extender PEN1201 as Router Mode. If your internet connection
source is coming from ADSL/Modem, follow the following step below to complete the hardware
connection.
1. Turn OFF modem.
2. Connect Ethernet cable between modem Internet (LAN) port to PEN1201 WAN Port.
3. Connect Ethernet cable between Computer LAN port to PEN1201 LAN port.
4. Ensure the PEN1201 Operation Mode Switch is set to “Router” Turn ON power for
modem and PEN1201.

PROLiNK® PRC2401U Wireless AC2600 MU-MIMO Dual-Band Gigabit Router
12
Access Point (AP) Mode Setup
The following is a step to setup PEN1201 as AP Mode. Follow steps below to complete the
hardware connection.
1. Turn OFF Main Router/Existing Router
2. Connect Ethernet cable between Main/Existing Router LAN port to PEN1201 WAN
Port.
3. Connect Ethernet cable between Computer LAN port to PEN1201 LAN port.
5. Ensure the PEN1201 Operation Mode Switch is set to “AP” and Turn ON power
Main/Existing Router and PEN1201.

PROLiNK® PRC2401U Wireless AC2600 MU-MIMO Dual-Band Gigabit Router
13
The booting up process takes approximately 60 seconds. When PEN1210 is ready to
setup, the Status indicator will lit up solid green.
Note that at this point, the AP Mode is not yet fully set. Please follow until Section
3.4 Setup Wizard.

PROLiNK® PEN1201 Wireless-N 300Mbps Range Extender II
Page 14
3 Getting Started
In the previous chapter, we have made a network hardware connection setup in various different
operating modes. In this chapter, it guides user on how to check TCP/IP setup before getting
started, how to log into the PEN1201 Web User Interface configuration and guide on using
Setup Wizard.
3.1 TCP/IP Setup
By default, PEN1201 IP address is 192.168.123.253 and Subnet Mask is 255.255.255.0.
Please ensure that your TCP/IP Protocol is set to “Obtain an IP address automatically” for
Windows OS or “Using DHCP” for MAC OS.
To verify the connection between Computer and PEN1201, run command prompt and execute
ping to PEN1201 IP address. To complete Ping command, you need to type ping
192.168.123.253 and press Enter to start ping. The ping test result, should show as per the
following figure.

PROLiNK® PEN1201 Wireless-N 300Mbps Range Extender II
Page 15
If you encounter different result from the above, it indicates your connection between Computer
and PEN1201 probably failed. You may follow below steps in order to try rectifying the issue:
1. Please recheck and ensure the Hardware Setup is correct
2. Try to follow the Hardware Setup, but with another Client (PC / Laptop / mobile phone)
3. Ensure that the client devices are not using Fixed IP Address
Other manuals for PEN1201
1
Table of contents
Other PROLiNK Extender manuals