ProLinx Maidesite User manual
ԟࠅ؍પޢа
Standing Desk Frame with Dual Motors
Standing Desk Assembly Instructions
Email(EU):[email protected]
Website:www.maidesite.de
YouTube:Maidesite Office
Facebook:Maidesite Desk
Instagram:Maidesite Standing Desk
English

1SPEVDUNBOVBM
$0/5&/54
1.Safety & Warnings
2.Parts List
3.Standing Desk Assembly
4.Handset
5.Q&A
P1
P2-P3
P4-P10
P11-P14
P15
1SPEVDUNBOVBM
Email(EU):[email protected]

Make sure no obstacles are in the desk's path.
Make sure the desktop is not touching any walls.
Make sure all cords are appropriate length to
accommodate the change in height.
8"3/*/(
1JODI1PJOU
,FFQIBOET
BOEOHFST
DMFBS
Keep children away from electric height-adjustable desks,
control units and handsets. There is a risk of injury and electric shock.
Keep all electrical components away from liquids.
Do not sit or stand on the desk frame. Do not crawl or lie under the desk frame.
Do not place any objects taller than 20" underneath the desk.
Do not open any of the components - the Legs, Control Box, or Switch.
There is a danger of electric shock.
This product is designed with a duty cycle of 10% (2 min. on, 18 min. off).
In the event of a power outage or if the power cord is unplugged,
a manual reset may be necessary - see USE section.
ӢThis height adjustable desk has electric motors and is designed for use in dry work areas only.
ӢThe desk height is adjustable so that it can be positioned at the most ergonomically suitable height.
ӢAny other use is at user's risk.
ӢUnder no circumstances does the manufacturer accept warranty claims or liability claims for damages
caused from improper use or handling of the desk frame.
USE/ LIABILITY
Warm prompt
Safety & Warnings
1

Parts List
1
Assembly Time Persons Needed
30
min
Self-provided Tools
A.
K.
C.
D2.
B.
F. H.G.
E.
D1.

P3
Hardware List
Parts List
Lifting Column ×2
H2H1 H3
M6*1*10
Machine Screw × 16
ST5*0.8*20
Tapping Screw × 7
H4 H5
M4 Allen Wrench ST5*0.8*16
Tapping Screw × 2
M6*1*14
Machine Screw × 19
Central Rail ×2
Left Crossbar End
Right Crossbar End
(with installation position)
Power Cable Adapter Cable Caster(Giveaway)×4
Handset
Foot ×2
Cable Management Cover
Side Bracket×2
A. B. C.
D1.D2.
F.
Control Box
G.
E.
H.
K.
I. J.
H7
Cable Clip × 10 M14 Open End Wrench
H6

Tighten the 4 screws.
Tighten the 4 screws.
Please put the frame on
soft stuff like a carpet
Hardware List
H4
M6*1*10
Machine Screw
×8
H1
M4 Allen Wrench
×1
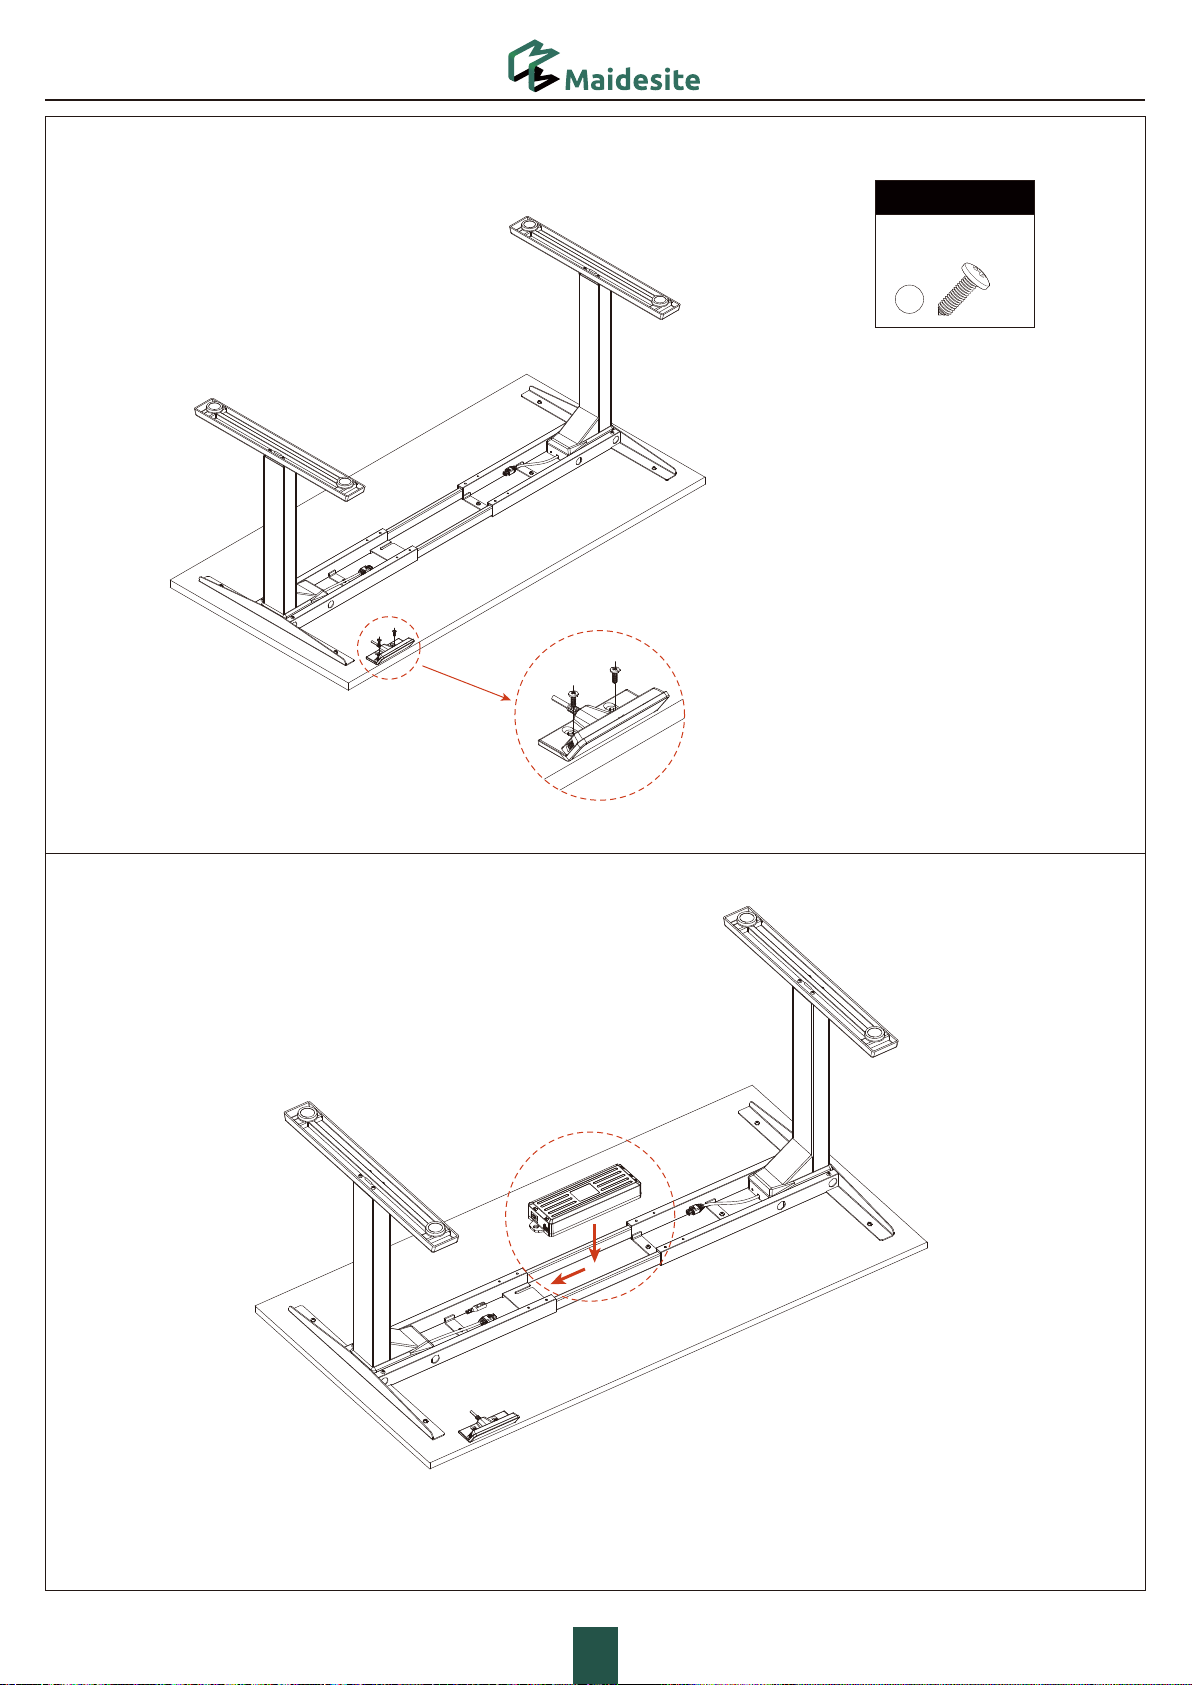
STEP 1: Assemble the lifting Columns
P4
A.
A.
D1.
D1.
C.
G.
D2.
D2.
Disassemble the crossbar to C, D1, D2, G.
Standing Desk Assembly

STEP 2: Install the Side Bracket
P5
Hardware List
H5
M6*1*14
Machine Screw
×4
H1
M4 Allen Wrench
×1
E. E.

The notch facing inward
and the narrow edge
facing up.
STEP 4: Assemble the Feet
STEP 3: Assemble the Frame and Center Rails
P6
H1 ×1
H5 ×8
Hardware List
M6*1*14
Machine Screw
M4 Allen Wrench
C.
B.
B.

·If the desktop is from our brand, please
put the frame on the desktop, adjust the
distance between crossbar ends and align
them with the holes.
·If the desktop is from other brand, put the
frame on the axis on the desktop and
adjust both lifting columns to proper
positions.(It’s recommended that the
distance between the side bracket and the
edge of the desk be 5cm.)
·For the desktop from our brand, please
secure the frame and desktop with 7
M6*1*14 Machine Screw socket head cap screws.
·For the desktop from other brand, please
secure the frame and desktop with 7
ST5*0.8*20 tapping screws.
STEP 5: Assemble the Frame and the Desktop
P7
H5 ×7H3
ST5*0.8*20
Tapping Screw
×7
H1 ×1
OR
M6*1*14
Machine Screw
M4 Allen Wrench
Hardware List Hardware List
For the desktop from our brand, please
secure the handset to the pilot holes with 2
ST5*0.8*16 self-tapping screws.
·For the desktop from other brand, please
secure the handset to a proper position
with 2 ST5*0.8*16 self-tapping screws.
Tighten the 2 screws
Insert the clip on the bottom of the control box into the installation
position of the right crossbar end (with the installation position), as
shown in the picture.
STEP 7: Install the Control Box
STEP 6: Install the Handset
P8
Hardware List
H2
ST5*0.8*16
Tapping Screw
×2
H.
G.
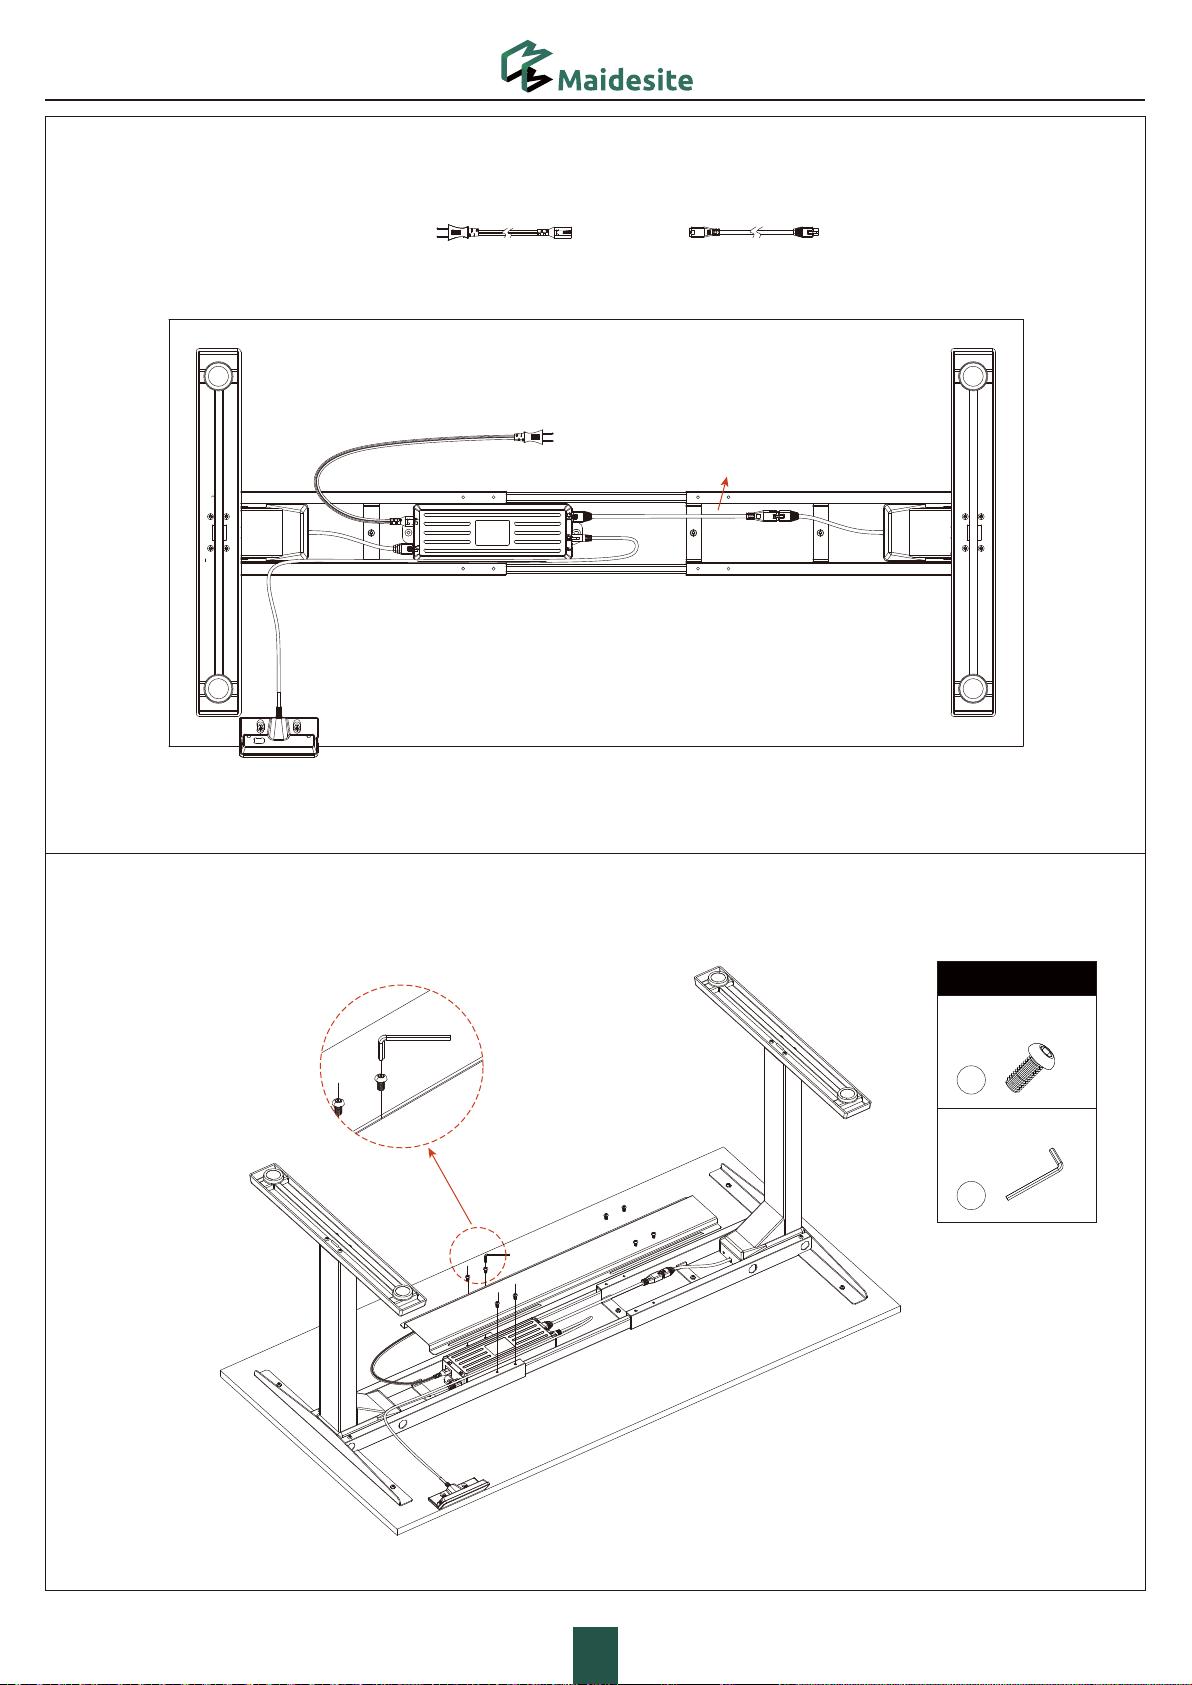
STEP 9: Install the Cable Management Cover
STEP 8: Connect Wires
Connect the power cable, wires on the handset,extension cable and the cable on lifting column to corresponding ports.
P9
Hardware List
H4
M6*1*10
Machine Screw
×8
H1
M4 Allen Wrench
×1
Power Cable Adapter Cable
I.
I.
H.
J.
J.
F.

P10
P10
Proceed the running check according to the instruction of the handset according to PAGE 11.
STEP 10: Upright the desk and plug it in to proceed the running check.
K.
Screw on the caster and finally
lock it with a wrench.
Pull the button up to unlock the casters.
Pull the button down to lock the casters.
Hardware List
H7
×1
M14 Open End Wrench
Install the Casters(Giveaway)
----It’s up to you to install the casters or not

1
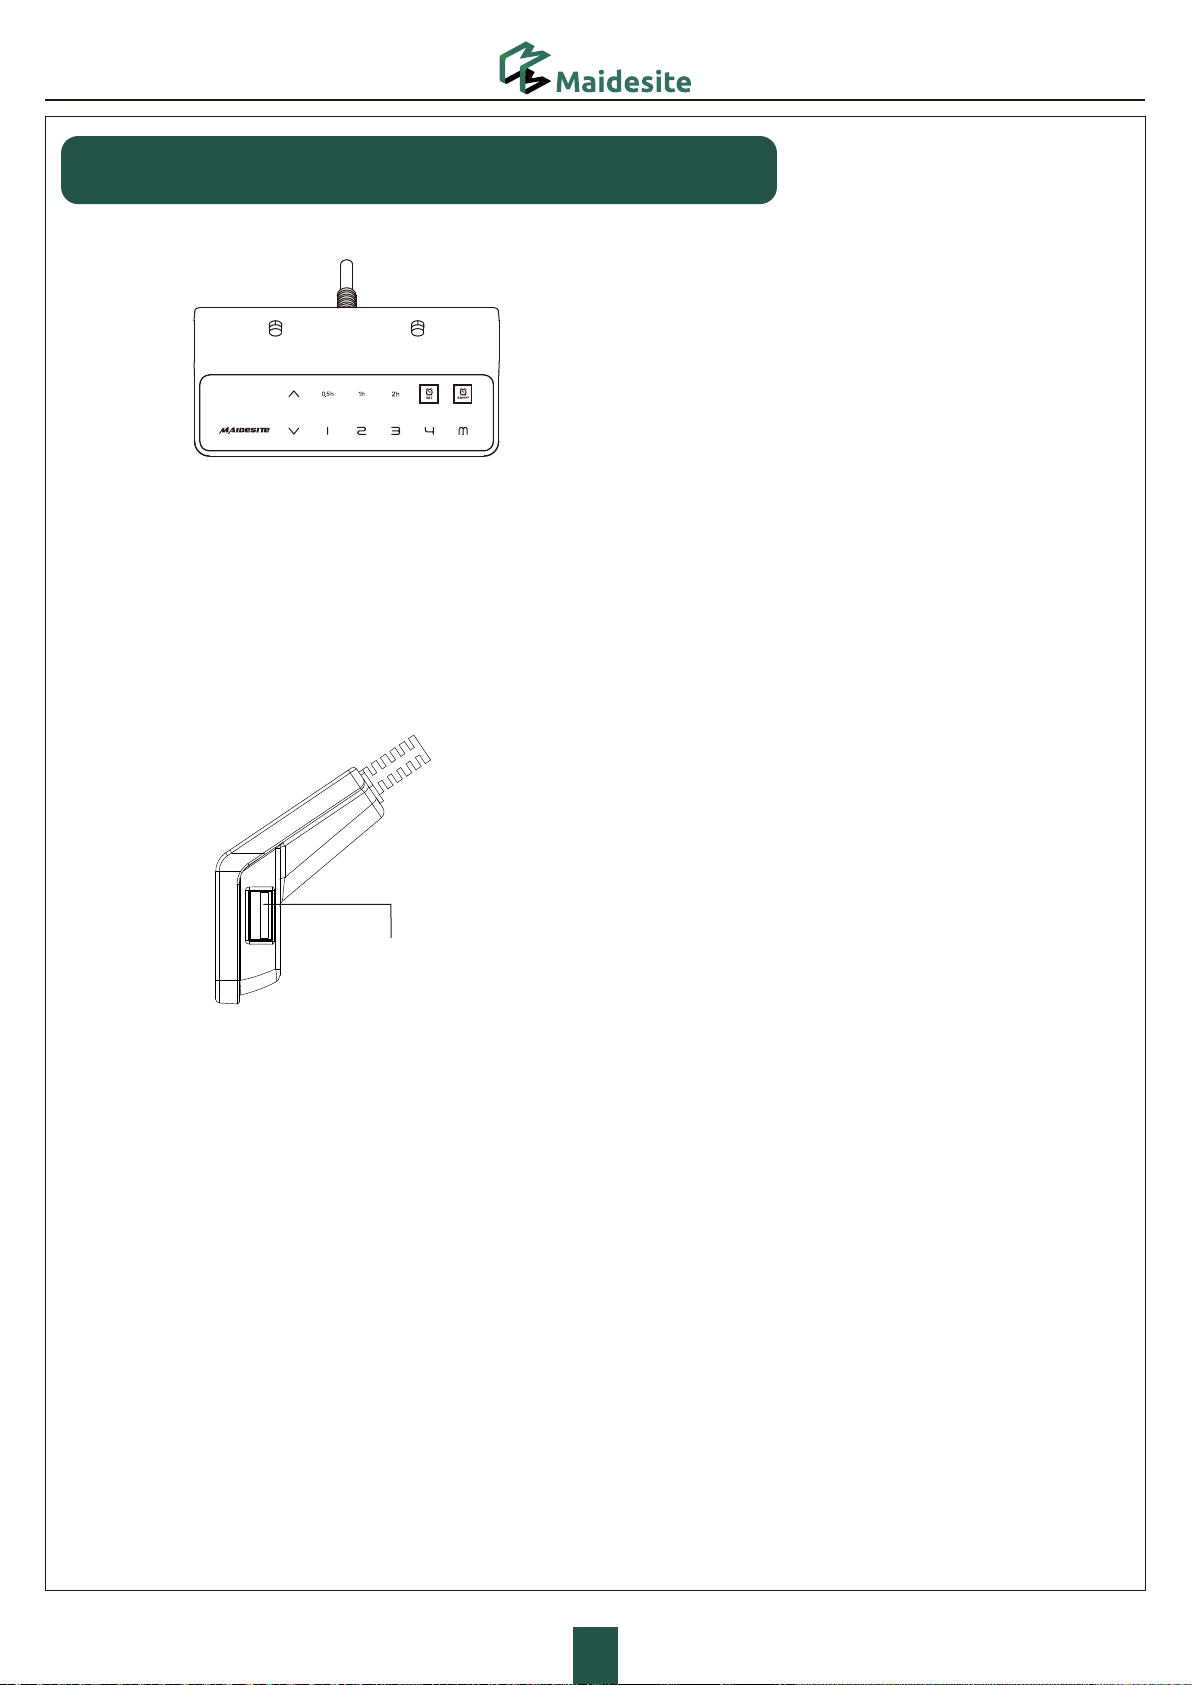
*OTUSVDUJPOTPG)BOETFU
CAUTION Please ensure that no objects (walls) will interrupt the movement of the desk,
and all cables of relevant devices are sufficiently long.
1.Enter the RST mode:
Hold the 'DOWN' key for 5s while the desktop is at the lowest
position (otherwise lower the desktop first).
The digital display shows RST. Now the system enters RST mode.
2.Quit the RST mode:
Hold the 'DOWN' key again until the desktop moves down slightly
and then moves up slightly. The display shows the current height.
The system quits RST mode.
Reset Exception Protection:
Condition
The digital display shows error E07/E08/E09
Disconnecting/Reconnect power, the error still remains.
Pressing any key has no effect.
Operation
Hold the 'DOWN' key for 5s, the digital display shows RST.
Release and hold the 'Down' key again to reset the desk.
(Note: This operation is also applicable to forced reset.
Please lower the desk to the lowest point first when forced reset.)
3&4&5
Set the upper limitn:
Touch the 'M' key: the display shows 'S-'.Touch the 'UP' key: the display
flashes. Touch and hold the 'M' key for 2s until the display shows '999'.
The upper limit is now stored.
“E07”
“E08”
“E09”
“S-”
“RST”
UP
DOWN
)PMEGPST
5PVDI
Height Setting
Memory Heights
Digital Display
Sit-stand Reminder
Time Display Sit-stand
Reminder Setting
Sit-stand
Reminder Switch
Memory/Setting

1
The next parts can be set according to your preference.
Set the upper limit:
5PVDIUIF.LFZUIFEJTQMBZTIPXT4�
5PVDIUIF61LFZUIFEJTQMBZBTIFT
5PVDIBOEIPMEUIF.LFZGPSTVOUJMUIFEJTQMBZ
TIPXT5IFVQQFSMJNJUJTOPXTUPSFE
Set the lower limit:
5PVDIUIF.LFZUIFEJTQMBZTIPXT4
5PVDIUIF%08/LFZUIFEJTQMBZBTIFT
5PVDIBOEIPMEUIF.LFZGPSTVOUJMUIFEJTQMBZTIPXT
5IFMPXFSMJNJUJTOPXTUPSFE
Delete height limits:
Touch the 'M' key: the display shows 'S-'.
Touch and hold the 'M' key for 2s until the display shows '555'.
Both upper and lower limits are deleted.
Change the RESET height:
Enter the RST mode (see instructions above).
Touch and hold the 'M' key for 5s: the display shows the reset height,
and the screen flashes.
Touch and hold the 'UP' key or 'DOWN' key to change the value.
The display switches back to 'RST' if no operation is detected for 5s,
indicating the change is successful.
Quit the RST mode (see instructions above).
“S-” “999”
“S-” “000”
“S-” “555”
“RST” “RST”
Height setting
Hold for 2s
Hold for 2s
Hold for 2s
Hold for 5s
Touch the 'M' key: the display shows'S-' .
Touch the 'UP' key: the display flashes.
Touch and hold the 'M' key for 2s until the display
shows '999'. The upper limit is now stored.
Touch the 'M' key: the display shows 'S-'.
Touch the 'DOWN' key: the display flashes.
Touch and hold the 'M' key for 2s until the display shows '000'.
The lower limit is now stored.
Change the RESET height:
Delete height limits:
Touch the 'M' key: the display shows 'S-'.
Touch and hold the 'M' key for 2s until the display shows '555'.
Both upper and lower limits are deleted.

P13
The next parts can be set according to your preference.
Switch the movement mode of the memory height:
Enter the RST mode (see instruction above).
Touch and hold the '1' key for 5s, the display shows one of the following:
'10.1': One-touch movement (Default)
'10.2': Constant-touch movement.
Change height unit(cm/inch):
Enter the RST mode (see instruction above).
Touch and hold the '2' key for 5s, the display shows one of
the following:
'10.3': height display in cm (Default),
'10.4': height display in inch.
Change the anti-collision sensitivity:
Enter the RST mode (see instruction above).
Touch and hold the 'UP' key for 5s, the display shows one of
the following:
'10.5' : Detect 10kg force (Default, most sensitive)
'10.6' : Detect 15kg force
'10.7' : Detect 20kg force.
Child Lock
“RST” “10.1/10.2”
“RST” “10.3/10.4”
“RST” “10.5/10.6/10.7”
Hold for 5s
Hold for 5s
Hold for 4s
Hold for 5s
T
Height setting
Child Lock
LOC
Touch and hold the Child Lock key for 4s: the displays shows 'LOC',
and all keys at front are locked.
Touch and hold the Child Lock key again for 4s to unlock.
1
The next parts can be set according to your preference.
USB Charging port:
Output: DC 5V/0.8A
64#
Sit-stand Reminder:
First time use: The sit-stand reminder is active by default and the default
time is 30 minutes. Touch the 'ON/OFF' key to turn on or off the sit-stand
reminder.
Touch the 'SET' key and then choose one of the reminder time.
Please make sure that the sit-stand reminder is ON before setting t
he time.
When the reminder time runs out, the hand control vibrates.
Touch any key to stop the vibration and turn off the reminder.
When the height of the desk is greater than 100 cm, the reminder will stop
the timing and reset. When the height of the desk is less than 100 cm,
the timing will restart.
Note: When there is no action, the reminder will be turned off after
about 30 seconds of vibration

P15
Q & A
Q&A
1.If you encountered the following problem, problem, please try RESET:
EC REP
Prolinx GmbH
Brehmstr.56,40239 Duesseldorf
Germany
MADE IN CHINA
FR
EPE
1.If you encountered the following problem, problem, please try RESET:
· Abnormal Operation
· The display shows RST.
· The display shows an error message(E07, E08), but all cable connections are normal.
2.The display shows H01(HOT): unplug the power, and let the system cool down
for 20 minutes.
3.When the desk raises or lowers only for a short time, please make sure that the desk
is stable and does not wobble. If that does not work, please refer to "Anti-collision Sensitivity
Setting" on PAGE 13 and adjust the sensitivity to "10.7".
Table of contents
Popular Indoor Furnishing manuals by other brands


easyfurn
easyfurn FRANCA Z7.T19 Series installation instructions

American Standard
American Standard 1340 installation instructions

Baumax
Baumax HVNK341 Assembling Instruction

Furniture of America
Furniture of America CM-BK450TF Assembly instructions

Schäfer
Schäfer ergoSTYLE STEELFORCE SLS 050 SF Assembly manual

Cooper Lighting
Cooper Lighting Portfolio 883 Specification sheet

Cooper Lighting
Cooper Lighting MCGRAW-EDISON 70 - 200W Specification sheet

Harvil
Harvil NGD2350 Assembly instructions

Homelegance
Homelegance B2013TTTDC-1 Assembly instruction

Bob's Discount Furniture
Bob's Discount Furniture Portsmouth 20062007001 Assembly instructions

SAUTHON easy
SAUTHON easy SERENA UT165A Technical manual

HOMCOM
HOMCOM 801-211V80 manual