ProLinx METRICY OxyPlus User manual
16° klm. Thessaloniki - Moudania, 570 01,
Ν. Rysio (Farmakeika Area), Thessaloniki.
T: +30 2316 002 740 | F: +30 2316 008 051
E: [email protected] | www.biopharm.gr
0123
FINGER PULSE OXIMETER
This oximeter is an innovative non-invasive medical device for continuous monitoring of arterial hemoglobin (SpO2) oxygen saturation
and pulse rate detection.
GENERAL DESCRIPTION
Oxygen saturation indicates the percentage of hemoglobin in arterial blood that is oxygen-rich. This is a very important parameter for the
respiratory and circulatory system. Many respiratory diseases can lead to reduced oxygen saturation in human blood. The following
factors may reduce oxygen saturation: Automatic regulation of organic dysfunction caused by anesthesia, intensive postoperative
trauma, injuries caused by certain medical examinations. These conditions can lead to dizziness, weakness and vomiting. Therefore, it
is very important to know the patient's oxygen saturation so that doctors can detect any problems in a timely manner.
The finger pulse oximeter is small, low in energy consumption, portable and easy to use. All the patient has to do is place one of his
fingers inside the fingertip photoelectric sensor and the screen will immediately display the measured hemoglobin saturation value.
Clinical experiments have shown that the device is accurate and its measurements have repeatability.
BASIC PRINCIPLE OF MEASUREMENT
The basic principle of operation of this oximeter is the following: A mathematical equation is installed which uses Lambert-Beer law
according to the absorption characteristics spectrum of deoxygenated hemoglobin (Hb) and oxyhemoglobin (HbO2) in radiation bands
and near-infrared bands.
The principle of operation of this device is the combination of photoelectric technology of monitoring oxyhemoglobin with the technology of
scanning and recording the pulse so that the two beams of light of different wavelengths (660nm radiation and 940nm near infrared light)
can focus on the human finger type sensor clamp. The measured signal received from a photosensitive element will be displayed on the
screen by a process in electronic circuits and a microprocessor.
Dear customer,
Thank you for purchasing the Metricy OxyPlus pulse oximeter.
Please read the manual carefully before using the device.
Failure to follow these instructions may result in an abnormal
measurement or damage to the oximeter.
ON / OFF button
Oxygen Saturation & Waveform (price as a percentage)
Pulse rate (value in pulses per minute)
Pulse rod
Perfusion index
Battery discharge indicator
INTENDED USE
The finger pulse oximeter is used to measure hemoglobin oxygen saturation and heart rate through the finger and can be used in hospitals,
at home, at school and in medical centers. The Metricy OxyPlus oximeter also has a Blood Pressure Index (PI) indicator defined as the
relative assessment of pulse quality in the measuring sensor. The stronger the pulse, the safer the measurement of saturation.
Contraindications: not found.
The picture in the instructions may differ slightly from the actual picture of the device.
CHARACTERISTICS
• Rotating double color OLED display with 4 directions and 6 different projection functions.
• Low power consumption, continuous operation for more than 6 hours with 2 AAA batteries.
• Low battery indicator.
• The device will automatically switch off approximately 8 seconds after the finger is removed from the socket.
• Small, light and comfortable to carry.
INSTRUCTIONS FOR USE
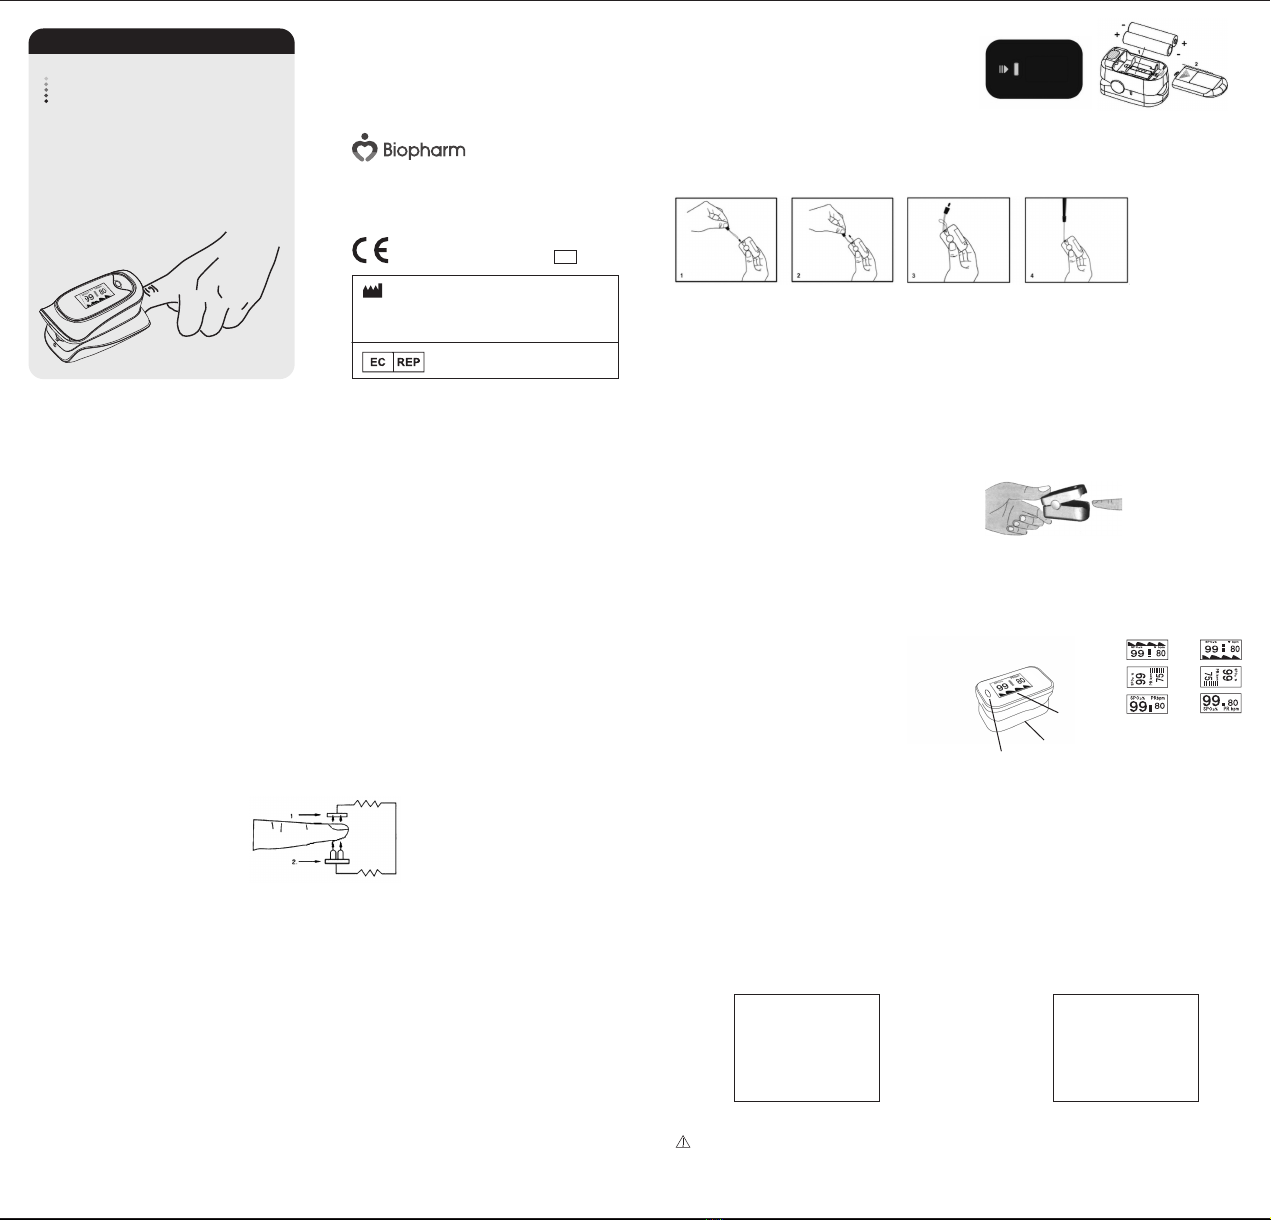
1. Insert the 2 AAA batteries in the battery compartment and close the cover.
2. Insert a finger into the Oximeter finger socket with the nail side up (it is best to insert the finger completely in) before releasing
the clamp.
3. Press the button on the front panel.
4. Do not move your finger during the measurement. Do not move your body during the measurement.
5. Press the button on the front panel if you want to change the display direction of the indicators on the screen.
6. Read the indications on the screen.
7. The device has a stand by function during which no signal is displayed.
8. Replace the batteries when the display shows low power.
When placing your finger inside the Oximeter
the surface of the nail should be facing up.
IMPORTANT: Use medical alcohol to clean the silicone in the socket before each measurement. Clean the finger to be used before
and after the measurement. (The oximeter socket is made of silicone for medical use that does not contain toxic substances and does
not cause side effects when used, such as skin allergies).
INSERTING BATTERIES
Insert the batteries paying attention to the indicated polarity.
Improper insertion of the batteries may damage the device.
Remove the battery cover by sliding it in the direction
indicated by the arrow.
DIAGRAM OF OPERATION PRINCIPLE
1. Infrared-ray receiving tube
2. Infrared-ray transmitting tube
Xuzhou Yongkang Electronic Science Technology Co., Ltd
4F Building C8, 40 Jingshan Road, Economic and Technological
Development Zone, 221000 Xuzhou,
PEOPLE’S REPUBLIC OF CHINA
Prolinx GmbH
Brehmstr.56, 40239, Duesseldorf, Germany
OxyPlus
FINGERTIP PULSE OXIMETER
METRICY
USER MANUAL
OLED screen
Battery Case Cover
ON-OFF button / Power switch
SHORT DESCRIPTION OF THE FRONT SCREEN
Button operation description: when the device is in standby
mode, press the power button, by pressing it again you can
change the appearance of the screen.
The device has a barometer and the display is as in pictures
1, 2, 3, 4, 5, 6.
YK-80B
REF
THE PACKAGING CONTAINS:
Oximeter Hang lace User Manual Batteries
HANG ROPE INSTALLATION
Pass the narrowest end of the strap through the socket on the back of the device.
Pass the widest end of the strap through the spiral end before pulling it tight.
Menu 1
Settings
Alm Setup
Alm off
off
off
OK
3
Beep
Demo
Restore
Brightness
Exit
*
Menu 2
Settings
Spo2 Alm Hi
Sounds Setup
Spo2 Alm Lo
PR Alm Hi
PR Alm Lo
+/- Exit
100
85
130
50
+
*
CONFIGURATION
Press and hold the power button in set up mode to configure. Menu 1 will appear.
Menu 1: When " * " appears in "Alm Setup" mode, briefly press the button to select a mode. Then press and hold the button to
turn on / off the following: the alarm sound, the beep, the screen preview and the screen brightness adjustment (scale 1-4). If you
want to return to the factory settings, in the "Restore" mode, press and hold the button.
Menu 2: In Menu 1, when " * " appears in "Alm Setup" mode, press and hold the button to go to the "Sounds Setup" mode.
Press the button briefly to select a function, and then press and hold the button to set the values at which you want the alarm sound
to sound. Select "+" or "-" to increase or decrease the values.
CAUTION
● When using the device outdoors or in bright light, adjust the screen brightness for better visibility.
● Select a lower brightness to save battery power.
1. 2.
3. 4.
5. 6.

WARNINGS FOR USE
1. Do not use the finger pulse oximeter together with Magnetic (MRI) or Axial (CT) CT equipment.
2. Risk of explosion: do not use the pulse oximeter in an environment where there is a risk of explosion.
3. The finger pulse oximeter is intended for the ancillary assessment of the patient's condition. Physicians should make a diagnosis
in conjunction with other methods of evaluating clinical signs and symptoms.
4. Regularly check the application position of the Finger Pulse Oximeter to make sure that the patient's circuit and skin condition
remain in good condition.
5. Do not stretch the connecting strip when applying the finger pulse oximeter sensor. This action may cause inaccurate
measurements or skin irritation.
6. Read the manual carefully before use.
7. The finger pulse oximeter does not have an oxygen saturation alarm and is not intended for continuous monitoring.
8. Prolonged use or the patient's condition may require changing the sensor position periodically. Change the position of the sensor
and check the integrity of the skin, the condition of the circulatory system.
9. Inaccurate measurements may be caused by ethylene oxide disinfectants or by immersion of the sensor in a liquid.
10. Inaccurate measurement can be caused by significant levels of dysfunctional hemoglobin.
11. Intravascular dyes such as indocyanine green or methylene blue may cause inaccurate measurements.
12. Measurements of arterial hemoglobin oxygen saturation may be adversely affected by intense atmospheric light. Protect the
sensor area with a surgical towel from direct sunlight if necessary.
13. Excessive patient movement may cause inaccurate measurement.
14. High frequency signal or interference caused by defibrillators may cause inaccurate measurements.
15. Venous pulses can cause inaccurate measurements.
16. Hypotension, acute vasoconstriction, acute anemia or hypothermia may cause inaccurate measurements.
17. Inaccurate measurements may occur if the patient has suffered a heart attack or is in a state of shock.
18. Nail polish or fake nails can cause inaccurate measurements.
Follow local regulations and recycling instructions regarding the disposal or recycling of appliances and their components,
including batteries.
WavelengthLED Radiation power
660±2nm 1.8 mW
905±10nm 2.0 mW
RED
IR
TECHNICAL SPECIFICATIONS
1. Screen type: OLED screen
2. SpO2: measuring range: 70%-99%
Accuracy: 80%-99%: ±2% (including 80%)
70%-79%: ±3%
Resolution: 1%
3. Pulses: measuring range 30BPM-240 BPM
Accuracy: ±1BPM ή ±1% (the larger one)
4. LED sensor parameters
(These parameters are especially useful for doctors)
5. PI perspiration index: Measurement field: 0 ~ 20
6. Power: 2 x 1.5 V AAA alkaline batteries
7. Automatic shut-off: the product switches off automatically when the
socket is empty for 8 seconds
8. Dimensions: 58 mm x 36mm x 33mm
9. Operating ambient temperature: 5°C ~ 40°C
Relative Humidity: 15% ~ 80%
Atmospheric pressure: 86 kPa ~106 kPa
Transport, storage conditions:
Temperature: -10°C ~ 40°C
Relative Humidity: 10% ~ 80%
Atmospheric pressure: 50kPa~106kPa, non-corrosive gas,
well-ventilated environment
10.Compliance: The product complies with the IEC60601-1-2 standard
MAINTENANCE
1. Replace the batteries when the low power indicator appears on the display.
2. Clean the oximeter finger socket before using it.
3. Remove the batteries if you are not going to use the appliance for a long time.
4. Store the appliance at a temperature between -10°C ~ 40°C (14 ~ 104°F) and relative humidity between 10% ~ 80%.
5. Keep the device away from moisture. A humid environment can affect the life of the device and damage it.
6. Follow current legislation on used batteries.
1. Retry by plugging the finger.
2. Try more times. If you can make sure
there is no problem in the product, please
go to hospital timely for exact diagnosis.
1. Finger is not plugged correctly.
2. Patient’s SpO2 value is too low to be
measured.
SpO2 or PR can not be shown
normally.
SolutionsSymptoms / Possible reasonsDescription
1. Retry by plugging the finger.
2. Please remain at rest.
1. The finger might notbe plugged deep
enough.
2. Finger is trembling or the patient is
on movement status.
SpO2 or PR is shown unsteady.
1. Please replace the batteries.
2. Please reinstall the batteries.
3. Please contact with Biopharm Customer
Service.
1. Inadequate power or power off.
2. Batteries might be installed
incorrectly.
3. The Oximeter might be damaged.
The Oximeter can not be turned on.
1. Normal.
2. Replace the batteries.
1. The product automatically shuts
off when no signal is detected in 8
seconds.
2. Inadequate power.
Indication lamps are suddenly off.
MALFUNCTION AND RESOLUTIONS
QUALITY WARRANTY
The oximeter you just got is accompanied by a Two (2) year Warranty from Biopharm. Please read the warranty terms that come with
the product carefully. Biopharm guarantees that for the period of validity of the warranty, it will cover in the way and the means that it
has any damages that the product will present. A necessary condition for the warranty to be valid, is the use of the product based on
its destination, according to its specifications and characteristics, as well as under normal conditions.
Warranty Start:
The warranty starts from the date of purchase of the product, which is proved by the presentation of a legal receipt or invoice. Please
visit the website www.biopharm.gr and register your warranty by filling out a simple form.
The Warranty expires when:
1. The fault is the result of modifications, poor connection, poor installation or misuse.
2. The damage was caused by accident, liquid or fire, abuse or negligence.
3. Liquids have entered the product.
4. Defects or damage to the device or its components, caused by improper shipment or transport without proper packaging.
5. There are obvious signs of falling or violation of the device, such as scratches, crooked screws, cut cables, etc.
The Warranty does not cover:
1. Normal wear and tear due to use on the outside of the appliance or damage caused by accidents, water or fire.
2. Damage caused to the product by any adjustments or adjustments which do not correspond to its technical specifications.
3. Defects or damage from food or liquids, corrosion or oxidation.
4. Periodic maintenance and repair or change of components, as a result of physical wear.
5. Installations of materials or equipment made by third parties.
6. The oximeter battery.
CATEGORIZATION
1. Medical device: Class II
2. Operation without the use of cable
3. The device type is BF
MANUFACTURER'S INSTRUCTION AND STATEMENT - ELECTROMAGNETIC RADIATION
The finger pulse oximeter is designed to be used in a specific electromagnetic environment.
The device must be used as specified below
Radiation Test Compliance Electromagnetic environment-guidance
The finger pulse oximeter uses RF energy only for its internal
operation. Therefore RF emissions are low and unlikely to cause
interference to nearby electronic equipment.
The Fingertip Pulse Oximeter applies to all establishments, including
domestic establishments and those directly connected to the public
low-voltage power supply network that supplies buildings used for
domestic purposes.
RF interference
CISPR 11
Group 1
RF interference
CISPR 11
Class B
BF type
application part IP degree Serial number
Date of manufacture
Humidity range
Separate collection
Manufacturer
European Union
Representative
Keep dry
Product certification
Reference manual
Cautions
Standby Temperature range Avoid sunlight
IP22
%
Up toward
0123
+40°C
-10°C
80%
10%
SYMBOLS AND DEFINITIONS
Other ProLinx Medical Equipment manuals


Popular Medical Equipment manuals by other brands


Getinge
Getinge Arjohuntleigh Nimbus 3 Professional Instructions for use

Mettler Electronics
Mettler Electronics Sonicator 730 Maintenance manual

Pressalit Care
Pressalit Care R1100 Mounting instruction

Denas MS
Denas MS DENAS-T operating manual

bort medical
bort medical ActiveColor quick guide

AccuVein
AccuVein AV400 user manual


