PROLUMIA 4106090 Series User manual

www.prolumia.eu
4106090x Eco-Flood, 10W, 3.000K/4.200K/6.500K, 1.100Lm/1.200Lm/1.200Lm
4106092x Eco-Flood, 30W, 3.000K/4.200K/6.500K, 3.250Lm/3.600Lm/3.600Lm
4106093x Eco-Flood, 50W, 3.000K/4.200K/6.500K, 5.400Lm/6.000Lm/6.000Lm
4106095x Eco-Flood, 100W, 3.000K/4.200K/6.500K, 11.000Lm/12.000Lm/12.000Lm
4106097x Eco-Flood, 200W, 3.000K/4.200K/6.500K, 21.600Lm/24.000Lm/24.000Lm
OPERATING INSTRUCTION
GEBRUIKSAANWIJZING
MANUEL D’UTILISATION
INSTALAČNÍ NÁVOD
GEBRAUCHSANLEITUNG
LED ECO-FLOOD
2
www.prolumia.eu
OFF
OFF OFF
2 pcs
L1
Brown Y./G. Blue
L
L
N
N
!
2 pcs 2 pcs
ON
ON
90˚
90˚
1
3
5
2
4
6
MONTAGE - MOUNTING - INSTALLATION - MONTÁŽ - MONTAGE

3
www.prolumia.eu
ATTENTIE
OPGELET
TECHNISCHE DATA
TECHNISCHE INFORMATIE
Lees de volgende instructies zorgvuldig door om ervoor te zorgen dat de montagewerkzaamheden op de juiste manier
worden uitgevoerd. Bewaar deze instructies goed voor eventueel toekomstig gebruik.
1. ZORG ERVOOR DAT DE ELEKTRICITEIT IS UITGESCHAKELD VOOR AANVANG VAN DE INSTALLATIE.
2. De installateur dient de benodigde accessoires en reserveonderdelen voor te bereiden (niet meegeleverd).
3. Het LED Eco-Flood armatuur dient te worden geaard.
4. Beschadigd veiligheidsglas dient onmiddellijk te worden vervangen door gehard glas.
LED ECO-FLOOD
Artikelnr. Vermogen Kleurtemperatuur Lichtstroom
41060900 10W 3.000K 1.100Lm
41060901 10W 4.200K 1.200Lm
41060902 10W 6.500K 1.200Lm
41060920 30W 3.000K 3.250Lm
41060921 30W 4.200K 3.600Lm
41060922 30W 6.500K 3.600Lm
41060930 50W 3.000K 5.400Lm
41060931 50W 4.200K 6.000Lm
41060932 50W 6.500K 6.000Lm
LED ECO-FLOOD
Artikelnr. Vermogen Kleurtemperatuur Lichtstroom
41060950 100W 3.000K 11.000Lm
41060951 100W 4.200K 12.000Lm
41060952 100W 6.500K 12.000Lm
41060970 200W 3.000K 21.600Lm
41060971 200W 4.200K 24.000Lm
41060972 200W 6.500K 24.000Lm
Voedingsspanning: AC100-240V 50Hz/60Hz
Lichtbron: LED SMD
Levensduur: L70 >30.000 uur
Beschermingsgraad: IP65
Bedrijfstemperatuur: -25 °C ~ +50 °C
Cosinus Phi: >0.95
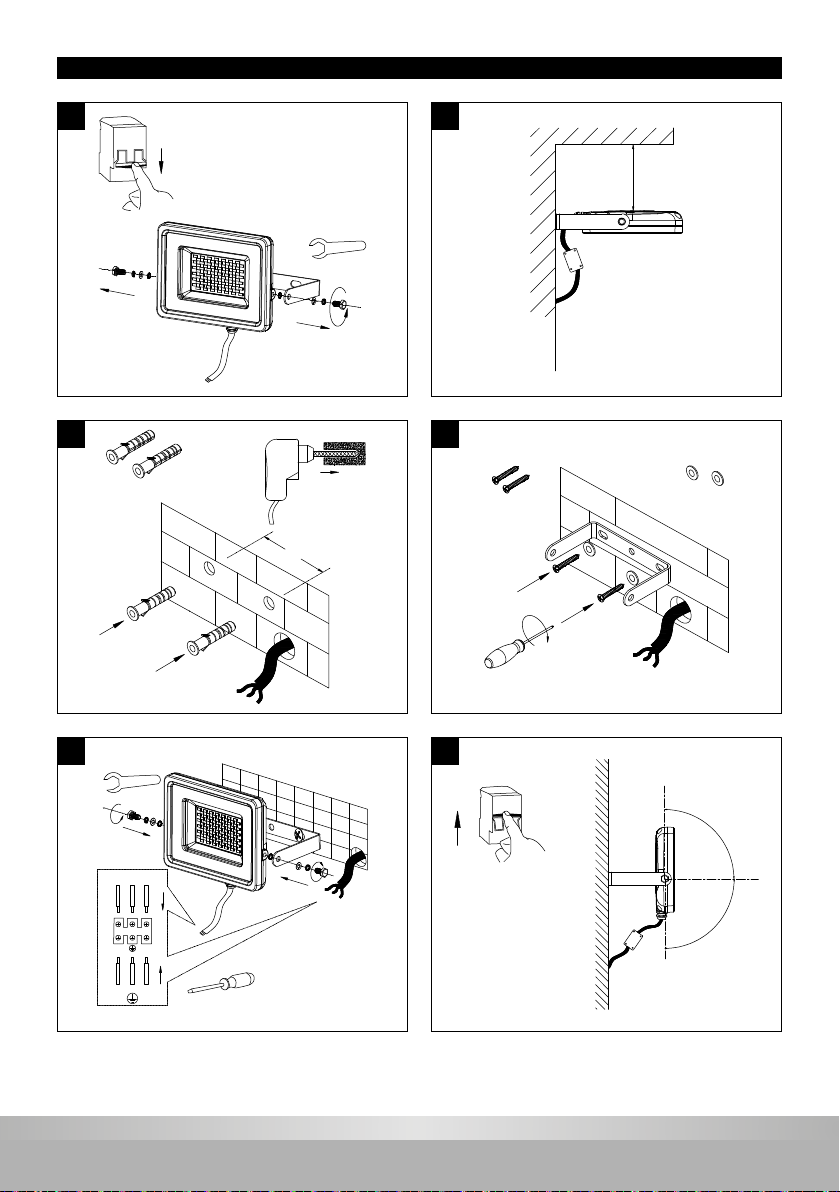
MONTAGE (ZIE PAGINA 2)
1. Monteer niet op een oppervlak dat vatbaar is voor trillingen.
2. Schakel de stroom uit. Verwijder de schroef die wordt gebruikt voor het monteren van de beugel op het armatuur.
Verwijder de beugel. (zie g. 1)
3. Zorg ervoor dat er voldoende ruimte rondom het armatuur aanwezig is. (zie g. 2)
4. Markeer de positie van de boorgaten voor het bevestigen van de beugel op de muur. Boor op de gemarkeerde posities. (zie g. 3)
5. Bevestig de beugel op de muur. (zie g. 4)
6. Monteer de beugel op het armatuur. Stel de LED Eco-Flood in op de gewenste positie en draai de schroef van de beugel vast.
Verbind het netsnoer met de kabel van de LED Eco-Flood via de waterdichte aansluitdoos (accessoire). (zie g. 5)
7. Schakel de stroom in en pas de hoek van het armatuur aan om aan de gewenste toepassing te voldoen. (zie g. 6)
BESCHERMING VAN HET MILIEU
Defecte elektrische apparaten behoren niet te worden weggegooid bij het huishoudelijk afval. Recycle waar mogelijk.
Neem contact op met uw gemeente of uw leverancier voor een deskundig recycling advies.
NL EN CZFR DE

4
www.prolumia.eu
ATTENTION
CAUTION
TECHNICAL DATA
TECHNICAL INFORMATION
ENVIRONMENTAL PROTECTION
1. PLEASE ENSURE THE ELECTRICITY IS SWITCHED OFF BEFORE INSTALLATION.
2. The installer should prepare necessary accessories and spare parts (not provided).
3. The LED Eco-Flood xture must be earthed.
4. Damaged safety glass must be replaced immediately with tempered glass.
Input Voltage: AC100-240V 50Hz/60Hz
Light source: LED SMD
Lifetime: L70 >30.000 hours
Protection rate: IP65
Working temperature: -25 °C ~ +50 °C
Power factor: >0.95
Please read the following instructions carefully to ensure that mounting operation will be carried out correctly. These instructions
should be properly preserved for future reference.
Waste electrical products should not be disposed of with household waste. Please recycle where facilities exist.
Check with your local authority or retailer for recycling advice.
MOUNTING (SEE PAGE 2)
1. Do not mount on a surface prone to vibrations.
2. Switch of the power. Remove the screw which is used for mounting the bracket to the xture. Remove the bracket. (see g. 1)
3. Please make sure there is enough space around the xture. (see g. 2)
4. Mark the hole position for xing the bracket onto the wall. Drill at the marked positions. (see g. 3)
5. Mount the bracket to the wall. (see g. 4)
6. Mount the bracket to the xture. Adjust the LED Eco-Flood to the desired position and tighten the screw of the bracket.
Connect the mains cable with the cable of the LED Eco-Flood through the waterproof junction box (accessory). (see g. 5)
7. Switch on the power and adjust the angle of the xture to meet the desired application. (see g. 6)
LED ECO-FLOOD
Art. no. Input power Color temperature Luminous ux
41060900 10W 3.000K 1.100Lm
41060901 10W 4.200K 1.200Lm
41060902 10W 6.500K 1.200Lm
41060920 30W 3.000K 3.250Lm
41060921 30W 4.200K 3.600Lm
41060922 30W 6.500K 3.600Lm
41060930 50W 3.000K 5.400Lm
41060931 50W 4.200K 6.000Lm
41060932 50W 6.500K 6.000Lm
LED ECO-FLOOD
Art. no. Input power Color temperature Luminous ux
41060950 100W 3.000K 11.000Lm
41060951 100W 4.200K 12.000Lm
41060952 100W 6.500K 12.000Lm
41060970 200W 3.000K 21.600Lm
41060971 200W 4.200K 24.000Lm
41060972 200W 6.500K 24.000Lm
NLENCZ FRDE
5
www.prolumia.eu
ATTENTION
ATTENTION
DONNÉES TECHNIQUES
INFORMATIONS TECHNIQUES
Lisez attentivement les instructions suivantes pour vous assurer que les travaux d’installation sont eectués correctement.
Conservez ces instructions en toute sécurité pour une utilisation future possible.
1. ASSUREZ VOUS QUE L’ALIMENTATION EST ÉTEINT AVANT DE COMMENCER L’INSTALLATION.
2. L’installateur doit préparer les accessoires et pièces de rechange nécessaires (non fournis).
3. Le luminaire LED Eco-Flood doit être mis à la terre.
4. Le verre de sécurité endommagé doit être remplacé immédiatement par du verre trempé.
INSTALLATION (VOIR PAGE 2)
1. Ne montez pas sur une surface sujette aux vibrations.
2. Éteignez le courant. Retirez la vis qui est utilisée pour monter le support sur l’appareil. Retirez le support. (voir gure 1)
3. Assurez-vous qu’il y a susamment d’espace autour du luminaire. (voir gure 2)
4. Marquer la position des trous de forage pour xer le support à la paroi. Percer aux positions marquées. (voir la gure 3)
5. Attachez le support au mur. (voir la gure 4)
6. Montez le support sur l’appareil. Réglez la LED Eco Flood à la position désirée et serrer la vis de serrage.
Branchez le cordon d’alimentation avec le câble du Flood LED Eco dans la boîte de jonction étanche (accessoire). (voir la gure 5)
7. Allumez l’appareil et adaptez le coin de l’appareil an de répondre à l’application souhaitée. (voir la gure 6)
PROTECTION DE L’ENVIRONNEMENT
Les appareils électriques défectueux ne doivent pas être jetés avec les ordures ménagères. Recycler si possible.
Contactez votre municipalité ou votre fournisseur pour obtenir des conseils spécialisés en matière de recyclage.
LED ECO-FLOOD
Numéro
article
Puissance
Température
de couleur Flux lumineux
41060900 10W 3.000K 1.100Lm
41060901 10W 4.200K 1.200Lm
41060902 10W 6.500K 1.200Lm
41060920 30W 3.000K 3.250Lm
41060921 30W 4.200K 3.600Lm
41060922 30W 6.500K 3.600Lm
41060930 50W 3.000K 5.400Lm
41060931 50W 4.200K 6.000Lm
41060932 50W 6.500K 6.000Lm
LED ECO-FLOOD
Numéro
article
Puissance
Température
de couleur Flux lumineux
41060950 100W 3.000K 11.000Lm
41060951 100W 4.200K 12.000Lm
41060952 100W 6.500K 12.000Lm
41060970 200W 3.000K 21.600Lm
41060971 200W 4.200K 24.000Lm
41060972 200W 6.500K 24.000Lm
Tension d’alimentation: AC100-240V 50Hz/60Hz
Source de lumière: LED SMD
Durée de vie: L70 >30.000 heures
Degré de protection: IP65
Température de fonctionnement: -25 °C ~ +50 °C
Cos phi: >0.95
NL EN CZFR DE
6
www.prolumia.eu
UPOZORNĚNÍ
UPOZORNĚNÍ
TECHNICKÁ DATA
TECHNICKÉ INFORMACE
OCHRANA ŽIVOTNÍHO PROSTŘEDÍ
Napájení: AC100-240V 50Hz/60Hz
Světelný zdroj: LED SMD
Životnost: L70 >30.000 hod
Stupeň krytí: IP65
Provozní teplota: -25 °C ~ +50 °C
Účiník: >0.95
Prosíme, přečtěte si pozorně návod k použití před začátkem instalace. Tento návod k použití si uchovejte
pro případnou budoucí potřebu.
Vyřazené elektronické přístroje nepatří do směsného odpadu. Prosíme recyklujte na místech tomu určených.
Případně se poraďte s místním úřadem nebo svým prodejcem.
MONTÁŽ (VIZ. STR. 2)
LED ECO-FLOOD
Obj.č. Příkon Teplota chromatičnosti Světelný tok
41060900 10W 3.000K 1.100Lm
41060901 10W 4.200K 1.200Lm
41060902 10W 6.500K 1.200Lm
41060920 30W 3.000K 3.250Lm
41060921 30W 4.200K 3.600Lm
41060922 30W 6.500K 3.600Lm
41060930 50W 3.000K 5.400Lm
41060931 50W 4.200K 6.000Lm
41060932 50W 6.500K 6.000Lm
LED ECO-FLOOD
Obj.č. Příkon Teplota chromatičnosti Světelný tok
41060950 100W 3.000K 11.000Lm
41060951 100W 4.200K 12.000Lm
41060952 100W 6.500K 12.000Lm
41060970 200W 3.000K 21.600Lm
41060971 200W 4.200K 24.000Lm
41060972 200W 6.500K 24.000Lm
1. Prosíme, ujistěte se, zda přívod proudu byl vypnut před začátkem instalace.
2. Montážní součásti a náhradní díly nejsou součástí dodávky. Musí být dodány montážním pracovníkem.
3. LED Eco-ood svítidla musí být uzěmněné.
4. Poškozené bezpečnostní sklo musí být okamžitě nahrazeno tvrzeným sklem.
1. Není určeno k instalaci na povrch pro zamezení vibrací.
2. Odpojte proud. Vyjměte šrouby , kterými je připevněn úchyt ke svítidlu. Odstraňte úchyt. (Viz. Obr. 1)
3. Prosíme, ujistěte se, zda je kolem svítidla ponechán dostatečný prostor. (Viz. Obr. 2)
4. Na stěně vyznačte umístění otvorů pro montáž úchytu. Vyvrtejte vyznačená místa. ( viz. obr. 3)
5. Připevněte úchyt na stěnu. (Viz. Obr. 4)
6. Připevněte úchyt ke svítidlu. Nastavte LED Eco-Flood do požadované pozice a doháhněte šrouby na úchytu.
Spojte hlavní přívodní kabel se svítidlem Eco-Flood pomocí vodotěsného spojení ( příslušenství). (Viz. Obr.5)
7. Zapněte přívod proudu a nastavte úhel svítidla pro požadované použití. ( Viz. Obr. 6)
NLENCZ FRDE

7
www.prolumia.eu
ACHTUNG
HINWEIS
TECHNISCHE DATEN
TECHNISCHE INFORMATIONEN
UMWELTSCHUTZ
Betriebsspannung: AC100-240V 50Hz/60Hz
Lichtquelle: LED SMD
Lebensdauer: L70 >30.000 Stunden
Schutzart: IP65
Betriebstemperatur: -25 °C ~ +50 °C
Leistungsfaktor: >0.95
Lesen Sie die folgende Anleitung bitte aufmerksam durch, um eine korrekte Ausführung der Montage zu gewährleisten. Bewahren Sie
diese Anleitung zum späteren Nachschlagen gut auf.
Defekte Elektrogeräte dürfen nicht über den Hausmüll entsorgt werden. Führen Sie sie, falls möglich, dem Recycling zu.
Für weitere Hinweise zum Recycling wenden Sie sich bitte an Ihre Gemeinde oder Ihren Lieferanten.
MONTAGE (SIEHE SEITE 2)
LED ECO-FLOOD
Artikelnr. Leistung Farbtemperatur Lichtstrom
41060900 10W 3.000K 1.100Lm
41060901 10W 4.200K 1.200Lm
41060902 10W 6.500K 1.200Lm
41060920 30W 3.000K 3.250Lm
41060921 30W 4.200K 3.600Lm
41060922 30W 6.500K 3.600Lm
41060930 50W 3.000K 5.400Lm
41060931 50W 4.200K 6.000Lm
41060932 50W 6.500K 6.000Lm
LED ECO-FLOOD
Artikelnr. Leistung Farbtemperatur Lichtstrom
41060950 100W 3.000K 11.000Lm
41060951 100W 4.200K 12.000Lm
41060952 100W 6.500K 12.000Lm
41060970 200W 3.000K 21.600Lm
41060971 200W 4.200K 24.000Lm
41060972 200W 6.500K 24.000Lm
1. BITTE SCHALTEN SIE DIE NETZSPANNUNG VOR DER INSTALLATION UND WARTUNG AUS.
2. Der Installateur hat notwendiges Zubehör und Ersatzteile (nicht mitgeliefert) vorzuhalten.
3. Die LED Eco-Flood Leuchte muss geerdet werden.
4. Beschädigtes Sicherheitsglas muss sofort durch ein originales Ersatzteil ersetzt werden.
1. Nicht auf schwingungsanfälligen Fläche montieren.
2. Schalten Sie die Netzspannung aus. Entfernen Sie die Schrauben mit der der Bügel an der Leuchte befestigt ist.
Entfernen Sie den Bügel. (siehe Abb. 1)
3. Bitte achten Sie darauf, dass um das Gerät ausreichend Platz vorhanden ist. (siehe Abb. 2)
4. Markieren Sie die Lochposition für die Befestigung des Bügels an der Wand. An den markierten Stellen bohren. (siehe Abb. 3)
5. Befestigen Sie den Bügel an der Wand. (siehe Abb. 4)
6. Befestigen Sie den Bügel, mit Schrauben an der Wand am Gerät. Befestigen Sie die Leuchte am Bügel (Schrauben noch nicht festziehen).
Verbinden Sie das Netzkabel mit dem Kabel der LED Eco-Flood durch die wasserdichte Anschlussdose (Zubehör). (siehe Abb. 5)
7. Schalten Sie die Netzspannung ein und stellen Sie die LED Eco-Flood auf die gewünschte Position ein und ziehen Sie die Schrauben
am Bügels fest. (siehe Abb. 6)
NL EN CZFR DE

www.prolumia.eu
NEDELKO BELGIUM NV
Prins Boudewijnlaan 49
2650 EDEGEM
T+32 (0)3 826 99 99
Einfo@nedelko.be
NEDELKO S.R.O.
Purkyňova 74/2
110 00 PRAHA 1 - NOVÉ MĚSTO
T+420 222 563 003
Einfo@nedelko.cz
NEDELKO GERMANY GMBH
Heinz-Bäcker-Str. 27
45356 ESSEN
T+49 (0)201 560503 50
Einfo@nedelko.de
IMPORTER
NEDELKO B.V.
Riga 10
2993 LW BARENDRECHT
T+31 (0)180 64 54 00
Einfo@nedelko.nl
This manual suits for next models
19
Table of contents
Languages:
Other PROLUMIA Floodlight manuals


