PRONIVO 205-PNXL User manual

Model
205-PNXL
XL
INSTRUCTION MANUAL
Instruction Manual
Bedienungsanleitung
Manuel d’Instructions
Manuale di Istruzioni
Manual de Instrucciones
Instruções de Utilização


2•PNXL
A
o
1 2 34 5
Fig. 2
Fig. 3
Fig. 1

Congratulations, you have purchased the most versatile multi-task laser tool
on the market.
Level and plumb from floor to ceiling with this self-leveling laser cross level. Project
bright, self-leveling level and plumb laser “ chalk lines “ for instant, accurate
reference marks.
The Mini Laser is a precise alignment tool which projects a vertical (plumb) line
and/or a horizontal (level) line at the press of a button. Or use it in manual mode (fig.2) to project
laser chalk lines in any orientation.
MODEL
205-PNXL PNXL Self-Leveling Mini-Laser Cross Level with extra bright laser lines,
includes mini laser tripod with magnetic mount, strap and soft bag.
Copyright © 2011 proNIVO, All rights reserved.
The information contained herein is proprietary information of proNIVO and is subject to
change without notice.
This document shall not be copied or otherwise reproduced without proNIVO's
written consent.
SAFE OPERATING PROCEDURES
WARNING: Be sure to read and understand all instructions in this manual before using this
product. Failure to follow all instructions may result in hazardous radiation exposure,
electric shock, fire, and/or bodily injury.
CAUTION: Use of controls or adjustments or performance of procedures other than those
specified in this manual, may result in hazardous radiation exposure.
CAUTION: The use of optical instruments with this product will increase eye hazard.
IMPORTANT: The following labels are on your laser tool for your convenience and safety. They
indicate where the laser light is emitted by the level. ALWAYS BE AWARE of their location when
using the level.
ALWAYS make sure that any bystanders in the vicinity of use are made aware of the dangers of
looking directly into the laser tool.
PNXL •3
EN
Complies with EN 60825-1

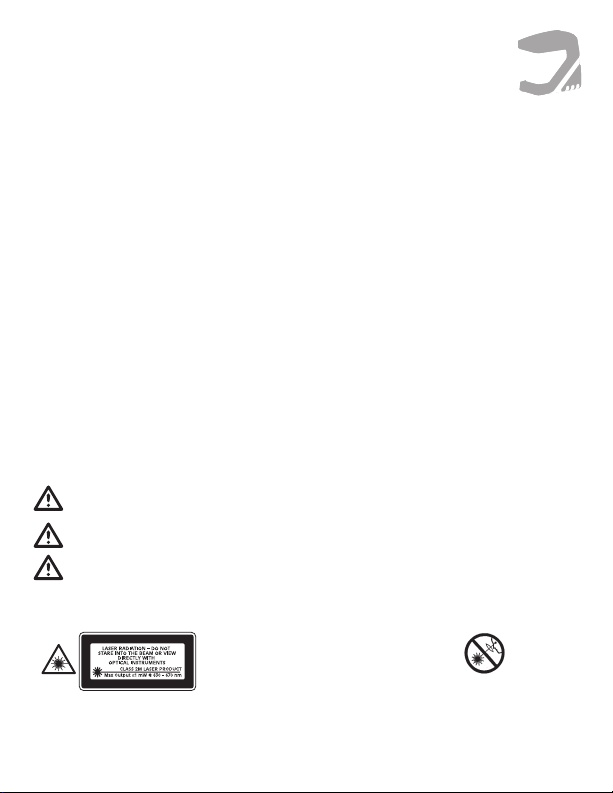
DO NOT remove or deface any warning or caution labels. Removing labels increases the risk of
exposure to laser radiation.
DO NOT stare directly at the laser beam or project the laser beam directly into the eyes of others.
Serious eye injury could result.
DO NOT place the laser tool in a position that may cause anyone to stare into the laser beam
intentionally or unintentionally. Serious eye injury could result.
DO NOT use any optical tools such as, but not limited to, telescopes or transits to view the laser
beam. Serious eye injury could result.
ALWAYS remove the batteries when cleaning the laser light aperture or laser lens.
DO NOT operate the laser tool around children or allow children to operate the laser tool. Serious
eye injury could result.
ALWAYS turn the laser tool "OFF" when not in use. Leaving the laser tool "ON" increases the risk of
someone inadvertently staring into the laser beam.
DO NOT operate the laser tool in combustible areas such as in the presence of flammable liquids,
gases or dust.
ALWAYS position the laser tool securely. Damage to the laser tool and/or serious injury to the user
could result if the laser tool falls.
ALWAYS use only the accessories that are recommended by the manufacturer of your laser tool.
Use of accessories that have been designed for use with other laser tools could result in
serious injury.
DO NOT use this laser tool for any purpose other than those outlined in this manual. This could
result in serious injury.
DO NOT leave laser tool "ON" unattended in any operating mode.
ALWAYS repair and servicing must be performed by a qualified repair facility. Repairs performed
by unqualified personnel could result in serious injury.
DO NOT disassemble the laser tool. There are no user serviceable parts inside. Disassembling the
laser will void all warranties on the product. Do not modify the product in any way. Modifying the
laser tool may result in hazardous laser radiation exposure.
ELECTRICAL SAFETY PROCEDURES
WARNING: Batteries can explode or leak, and can cause injury or fire. To reduce this risk:
ALWAYS follow all instructions and warnings on the battery label and package.
DO NOT short any battery terminals.
DO NOT charge alkaline batteries.
4 • PNXL

DO NOT mix old and new batteries. Replace all of them at the same time with new
batteries of the same brand and type.
DO NOT mix battery chemistries.
DISPOSE of batteries per local code.
DO NOT dispose of batteries in fire.
KEEP batteries out of reach of children.
REMOVE batteries if the device will not be used for several months.
CERTIFICATIONS
This Laser tool has also been tested and complies with the CE certification requirements set forth
in the EC regulations 89/336/EEC and EN 61000-6-1 (EN50082-1), EN 61000-6-3 (EN50081-1)
and EN 60825-1.
ENVIRONMENT PROTECTION
Recycle raw materials & batteries instead of disposing of waste. The unit, accessories, packaging
& used batteries should be sorted for environmentally friendly recycling in accordance with the
latest regulations.
FEATURES
Operating Controls: (Fig. 1)
1. POWER/MODE Button – Switches between mode functions
2. Laser Status Indicator (LED)
3. Laser output window
4. Battery compartment (under rubberized sleeve)
•Heavy Duty magnetically dampened compensator eliminates error by quickly self-leveling
the laser.
•Out-of-leveling range sensor triggers the beams to automatically blinks when the
unit is moved out of its ±4° self-leveling range.
PNXL •5

Power / Mode Button: (Fig. 2)
Press and release the POWER/MODE button to turn the laser tool on. Pressing and releasing the
POWER/MODE button will cycle through the different projection modes as listed below:
1.) Horizontal Laser Line
2.) Vertical Laser Line
3.) Laser Cross
4.) Tilt “Manual Mode”
5.) Off
Laser Status Indicator: (Fig. 2A)
The Laser Status Indicator LED indicates what state the laser tool is in. The Laser Status Indicator
light illuminates:
• “green” when the laser tool is on and level.
• “red” when the laser tool is in Manual Mode.
• “red and lasers will blink” when laser is out of self-leveling range.
OPERATION
1. To properly use the instrument, set the instrument on a flat, smooth surface. The self-leveling
range of the instrument is within approx. ±4° in any direction.
2. Turn the instrument on by pressing the POWER button. The indicator light should illuminate
“green” if the instrument is within its leveling range. If the indicator light illuminates “red”
and the laser line is flashing, the instrument is out of its self-leveling range. Position the
instrument to a more level surface.
3. Pressing the Power button will cycle the instrument through its modes of operation.
1. First Press – Self-leveling Horizontal Line Only
2. Second Press – Self-leveling Vertical Line Only
3. Third Press – Self-leveling Cross Line
4. Forth Press – Tilt "Manual" Cross Line
5. Fifth Press – off
6 • PNXL

4. Turn the instrument OFF by pressing the POWER button and cycle through the various
functions to come to the OFF position.
Note: If the instrument appears to be within its self-leveling range and the LED continues to blink,
be sure the instrument contains good batteries. If the instrument fails to operate after
completion of step 3 above, contact customer service.
POWER
Remove the battery cover by sliding it towards the bottom of the instrument. If replacing batteries,
remove the existing batteries. Insert three “AA” cell batteries into the instrument. Check for
correct polarity.
Alkaline batteries offer the longest battery life when used in this instrument.
Note: Extreme temperatures and the use of batteries with different levels of charge can reduce
the operating time of the instrument. Always use batteries with the same power rating and from
the same manufacturer. For the proper disposal of the used batteries, see the section
“Environmental Protection”.
MAINTENANCE AND CARE
DO NOT allow laser tool to get wet. The laser tool is not waterproof. Damage to internal circuits
will result
DO NOT leave the laser tool in direct sunlight or exposed to high temperatures. High temperature
may cause internal parts made of plastics to deform.
DO NOT store laser tool in cold environment. Moisture can form on interior parts when warming
up. This may cause laser windows to fog and corrosion to internal circuit boards.
DO NOT use aggressive cleaning agents or solvents to clean laser tool.
REMOVE moisture or dirt from laser windows with a soft, dry cloth.
ACCURACY CHECK
As with any level reference instrument, we strongly recommend checking the instrument’s
calibration before initial use; then periodically to ensure proper reference.
Check the laser Instrument following these steps:
Checking the horizontal line front to back (Fig. 4)
1. Choose two walls approximately 16-ft (5m) apart.
2. Set up the instrument 1-ft from wall (W1), project the laser cross onto wall. (W1) and mark
the point “A1” where the laser cross hits the wall.
3. Rotate the instrument 180° and project laser cross onto the opposite wall. (W2) and mark the
point where the laser cross hits the wall “B1”.
4. Reposition the instrument 1-ft from wall (W2), project the laser cross onto wall. (W2) and
mark the point “B2” where the laser cross hits the wall.
PNXL • 7

5. Rotate the instrument 180° and project laser cross onto the opposite wall. (W1) and mark the
point where the laser cross hits the wall “A2”.
6. Measure the distance between “A1” and “A2” and between “B1” and “B2” . If the distances
are the same, the Instrument is in calibration. If the difference between the two sets of
points is greater than 1/2 the specified accuracy the instrument is out of calibration.
Checking the horizontal line side to side (Fig. 5)
1. Set the instrument up approximately 8ft (2.5m) from a wall that is as least 16ft (5m) long.
2. Project the laser cross 1ft(0.3m) from one corner. Mark point (A) along the horizontal laser
line 8ft (2.5m) from the intersection of the laser cross.
3. Rotate the instrument so that the laser cross is projected at the wall 15ft (4.6m) away from
the first laser cross point.
4. The deviation of the horizontal laser line from the point (A) marked previously should not be
greater than 1/2 the specified accuracy.
CALIBRATION
This unit is factory calibrated and should never need calibration. But if it needs to be calibrated, it
must be done by a factory authorized service center. Contact customer service at +49 (0)8085 - 930530.
SPECIFICATIONS
LEVELING ACCURACY: - ±3/32-in at 30-ft feet (2.5mm at 9m)
LINE LENGTH: 60-ft @ 30 feet (18m at 9m)
WORKING RANGE: up to 100-ft (30 m), dependent on
illumination of area
FAN ANGLE: >120°
LASER DIODES: - 635nm
LASER CLASS: 2M
POWER: 3 “AA” batteries 1,5 V
ESTIMATED BATTERY LIFE: ±15 hrs
COMPENSATOR TYPE: Gimbel (Ball Bearing hung compensator
magnetically dampened)
SELF-LEVELING RANGE: ±4º
SELF-LEVELING SPEED: 3 seconds
OUT-OF-LEVEL SENSOR: Yes
FEATURE: “Manual Mode Feature” allows tilting for
extreme angles
OPERATING TEMPERATURE: 32°F to 104°F (0°C to 40°C)
WEIGHT (WITH MOUNT): 1.8 lbs. (0.9kg)
WALL/TRIPOD MOUNT: 1/4- 20 thread
WARRANTY: 1 year
8 • PNXL

APPLICATIONS (Fig. 6)
• Floor and wall tiles • Installing closets
• Wallpaper, stencil work • Interior decoration
• Finish carpentry • Masonry work
• Wall fixtures: outlets, switches, lighting • Wall studs, partitions
• Door and window frames • Cabinets and shelving
• Drop ceilings • Wainscoting and paneling
• Remodeling project • Wall hangings: artwork,
photos, collectibles
• Machinery • Pipe and conduit
ACCESSORIES
Mini Laser Tripod w/ Magnetic Mount (Fig. 7)
Tilts in two directions allowing the laser to set at any angle.
1. 1/4- 20 thread adapts to 5/8 x 11
2. Platform swivels in both directions to allow laser line positioning at any angle
3. Positioning Knobs
4. Folding tripod legs with non-skid rubber feet
5. 5/8- 11 thread mounts to surveying tripod
6. Industrial Strength Magnetic Mount
PNXL • 9

WARRANTY
One Year Warranty. proNIVO warrants the PNXL against defects in material and
workmanship for a period of one year from the date of purchase. Deficient products will be
repaired or replaced at proNIVO's discretion. For warranty and repair information, contact you
local distributor.
proNIVO Messgeräte Handels GmbH, Wasserburger Straße 9 84427 Sankt Wolfgang, Germany
proNIVO's liability under this warranty is limited to repair or replacement of the unit. Any
attempt to repair the product by other than factory authorized personnel will void this warranty.
Calibration, batteries and maintenance are the responsibility of the user. Where permitted by law,
proNIVO is not responsible for incidental or consequential damages.
Agents of proNIVO cannot change this warranty. proNIVO is not responsible for damage
resulting from wear, abuse, or alteration of this product. The user is expected to follow ALL
operating instructions.
This warranty may provide you with additional rights that vary by state, province or nation.
IMPORTANT NOTE: The customer is responsible for the correct use and care of the
instrument. Moreover he is completely responsible for checking the job along its prosecution, and
therefore for the calibration of the instrument. Calibration and care are not covered by warranty.
Subject to change without notice
PNXL •10
Tel: +49 (0) 8085 - 930 530 Fax: +49 (0) 8085 - 930 550

MINI LASER PNXL - AUTONIVELANTE
Gracias por haber escogido nuestro Mini Laser PNXL.
Se recomienda leer atentamente las instrucciones de uso, realizar periódicamente
mediciones de control, como se indica en el manual, y realizar un mantenimiento
periódico del equipo para garantizar el máximo rendimiento y asegurar que la pre`
cisión esté dentro de los margenes indicados por el fabricante.
MODELOS
205-PNXL Mini nivel láser cruzado autonivelante interior incluye mini trípode con
montante de imán, cinturón y bolsa.
Copyright© 2011 proNIVO Derechos reservados. Toda esta información es propiedad
de proNIVO.
Este documento no debe ser copiado o reproducido sin el consentimiento escrito de proNIVO.
PROCEDIMIENTOS DE OPERACIÓN SEGUROS
ADVERTENCIA: Asegúrese de leer y comprender todas la instrucciones en este manual
antes de usar este producto. El no seguir todas las instrucciones podrá resultar en
exposición de radiación peligrosa, electrocución, incendio y/o heridas corporales.
PRECAUCIÓN: El uso de controles, ajustes, o la ejecución de procedimientos diferentes a
aquellos especificados en este manual podrán resultar en la exposición a radiación
peligrosa.
PRECAUCIÓN: El uso de instrumentos ópticos con este producto le aumentará el peligro a
los ojos.
IMPORTANTE: Las siguientes etiquetas se encuentran en su herramienta láser para su
conveniencia y seguridad. Ellas indican por donde es emitido por el nivel el haz de láser.
SIEMPRE ESTÉ ALERTA: de su ubicación cuando use el nivel.
SIEMPRE: asegúrese de que cualquier espectador en la vecindad de uso sea alertado de los
peligros de mirar directamente dentro de la herramienta láser.
NO REMUEVA: o mutile ninguna etiqueta de advertencia o de precaución. El remover las etiquetas
aumenta el riesgo de exposición a la radiación del láser.
NO: se quede mirando ni proyecte el haz láser directamente a los ojos de los demás. Podrá dar
como resultado heridas serias en los ojos.
NO: coloque la herramienta láser en una posición que pueda causar que alguien mire el haz láser
intencionalmente o de manera no intencionada. Podrá dar como resultado heridas serias en los ojos.
NO: USE herramientas ópticas tales como, pero sin limitarse a, telescopios o teodolitos para ver el
haz de láser. Podrá dar como resultado heridas serias en los ojos.
11• PNXL
E

SIEMPRE: retire las baterías cuando limpie la abertura del haz láser o el lente láser.
NO OPERE: la herramienta láser alrededor de los niños ni permita que los niños la operen. Podrá
dar como resultado heridas serias en los ojos.
SIEMPRE: apague la herramienta láser cuando no esté siendo usada. El dejar la herramienta láser
prendida aumentará el riesgo de que alguien mire inadvertidamente el haz láser.
NO OPERE: la herramienta láser en ambientes explosivos, tales como en presencia de líquidos
inflamables, gases, o polvo.
SIEMPRE: coloque firmemente la herramienta láser. Si la herramienta láser se cae se podrá dañar
y/o resultar en heridas serias al usuario.
SIEMPRE: use únicamente los accesorios recomendados por el fabricante de su herramienta láser.
El uso de accesorios que fueron diseñados para uso con otras herramientas láser podrán causar
heridas serias.
NO USE :esta herramienta láser para ningún otro propósito que no haya sido descrito en este
manual. Esto podrá dar como resultado heridas serias.
NO DEJE: la herramienta prendida y desatendida en ninguna modalidad de operación.
La reparación y el servicio SIEMPRE deberán ser efectuados por un centro de reparación
calificado. Las reparaciones efectuadas por personal no calificado podrán dar como resultado
heridas serias.
NO: desarme la herramienta láser. No hay piezas dentro que sean reparables por el usuario. El
desarmar el láser anulará todas las garantías del producto. No modifique el producto de ninguna
manera. El modificar la herramienta láser podrá resultar en exposición peligrosa a la radiación.
PROCEDIMIENTOS DE SEGURIDAD ELÉCTRICOS
ADVERTENCIA: Las baterías pueden explotar o tener fugas y así causar heridas o un
incendio. Para reducir este riesgo:
SIEMPRE: siga todas las instrucciones y advertencias de la etiqueta y del empaque de la batería.
NO: ponga en corto los terminales de la batería.
NO: cargue las baterías alcalinas.
NO: mezcle las baterías viejas con las nuevas. Reemplácelas todas al mismo tiempo por baterías
nuevas de la misma marca y tipo.
NO: mezcle la química de las baterías.
DESHÁGASE: de las baterías de acuerdo con el código local.
NO: incinere las baterías.
MANTENGA: las baterías fuera del alcance de los niños.
REMUEVA: las baterías si el dispositivo no será usado durante varios meses.
CERTIFICACIONES
El PNXL ha pasado las pruebas y cumple con los requisitos para la obtención de la
certificación CE publicados en la Directiva 89/336/EEC y EN 61000-6-1 (EN50082-1), EN 61000-6-3
(EN50081-1) e IEC 60-825-1.
PNXL • 12

PROTECCIÓN AMBIENTAL
Recicle las materias primas y las pilas en lugar de tirarlas a la basura.
La unidad, así como los accesorios, el envase y las pilas gastadas deberán reciclarse de
acuerdo con la normativa vigente.
FUNCIONES
Controles de operación (Figura 1)
1. Interruptor ON(conexión)/OFF(desconexión) - 4 funciones
2. LED Indicador de la función seleccionada
3. Ventana de salida del rayo
4. Tapa de las pilas (bajo la protección de goma)
• El compensador magnético muy robusto elimina cualquier tipo de error de nivelación
al autonivelar rápidamente el nivel.
• Un sensor hace que los rayos laser parpadeen automáticamente cuando la unidad
está fuera de su campo de autonivelación de +/- 4º.
Interruptor multifuncional (Fig. 2)
Oprima y suelte el botón de ENERGÍA/MODALIDAD para encender la herramienta láser. Al oprimir
y soltar el botón de ENERGÍA/MODALIDAD la unidad hará un ciclo a través de las diferentes
modalidades de proyección listadas a continuación.
1 Horizontal 2 Vertical 3Cruz
4 Inclinación – “Modo Manual” (sólo línea horizontal) 5 Apagado
Indicador de estado del láser: (Fig. 2A)
El LED indicador de estado del láser indica en que estado se encuentra la herramienta. La luz
indicadora de estado del láser de prende en:
• “verde” cuando la herramienta láser está encendida y nivelada.
• “rojo” cuando la herramienta láser está en la modalidad manual.
• “rojo” y los láser parpadean cuando el láser está fuera de la amplitud de
auto nivelación.
PUESTA EN FUNCIONAMIENTO
1. Colocar el PNXL sobre una superficie lisa y a nivel. El campo de autonivelación es de
aproximadamente +/- 4º, en todas las direcciones.
2. Encender el láser pulsando el interruptor ON/OFF 1. El LED se enciende de color verde para
indicar que el instrumento está en su rango de autonivelación.
Si el LED se enciende rojo y el rayo láser parpadea, el láser está fuera de su rango de
autonivelación. Volver a posicionar el láser más a nivel y controlar.
13• PNXL

2a. Si el láser parece que esté nivelado, pero el rayo sigue parpadeando, comprobar que las
baterías estén cargadas.
3. Si el instrumento no funciona, contacte con su vendedor.
4. Para apagar el láser pulsar el botón de conexión/desconexión varias veces para pasar a
través de las diferentes funciones hasta OFF.
INSERCIÓN/ CAMBIO DE LAS PILAS
El PNXL funciona durante aproximadamente 25 horas con un diodo encendido, durante aprox. 20
horas con dos diodos encendidos, de uso intermitente con 3 baterías de 1,5 voltios. Si el
instrumento emite una luz débil, sustituir las baterías.
Retirar la protección de goma. Retirar la tapa del alojamiento de las pilas. Introducir las pilas o
bien sustituir las gastadas por pilas nuevas. Ponga atención al introducir las pilas según la
adecuada polarización.
Las baterías alcalinas ofrecen la máxima duración cuando son usadas en esta herramienta láser.
Nota: Temperaturas extremas y el uso de baterías con diferentes niveles de carga pueden reducir
el tiempo de operación de esta herramienta láser. Siempre use baterías con la misma capacidad
de energía y del mismo fabricante. Para deshacerse apropiadamente de las baterías usadas, vea
la sección
“Protección del Medio Ambiente”.
MANTENIMIENTO Y LIMPIEZA
NO PERMITA que la unidad se moje. La herramienta láser no es impermeable. Esto resultará en
daños en los circuitos internos.
NO DEJE la herramienta láser bajo la luz directa del sol o la exponga a altas temperaturas. Altas
temperaturas podrán causar que las piezas internas hechas de plástico se deformen.
NO ALMACENE la herramienta láser en un ambiente frío. Se podrá formar humedad en las piezas
internas cuando se caliente. Esto podrá causar que las ventanas láser se empañen y que los
tableros de circuitos internos se oxiden.
NO USE agentes limpiadores agresivos o disolventes para limpiar la herramienta láser.
REMUEVA cualquier humedad o mugre de la ventana láser con un trapo suave y seco.
CONTROL DE LA PRECISIÓN
Se recomienda comprobar la calibración antes de comenzar a utilizar el instrumento por primera
vez y hacerlo periódicamente a partir de este momento.
PNXL • 14

Revise la herramienta láser siguiendo estos pasos:
Revisión de la línea horizontal de adelante hacia atrás (Fig. 4)
1. Seleccione dos paredes a aproximadamente 16 pies (5 m) una de la otra.
2. Coloque la herramienta láser a 1 pie de la pared (W1), proyecte la cruz láser en la pared
(W1) y marque el punto “A1” donde la cruz le pegue a la pared.
3. Gire la herramienta láser 180° y proyecte la cruz en la pared opuesta (W2) y marque el punto
donde la cruz láser le pega a la pared “B1”.
4. Mueva la herramienta láser a 1 pie de la pared (W2), proyecte la cruz láser en la pared (W2)
y marque el punto “B1” donde la cruz le pegue a la pared.
5. Gire la herramienta láser 180° y proyecte la cruz en la pared opuesta (W1) y marque el punto
donde la cruz láser le pega a la pared “A1”.
6. Mida la distancia entre los puntos“A1” y “A2” y entre los puntos “B1” y “B2” Si las
distancias son iguales, la herramienta láser está calibrada. Si la diferencia entre los dos
juegos de puntos es mayor de la mitad de la precisión especificada, la herramienta láser
está fuera de calibración.
Revisión de la línea horizontal de lado a lado (Fig. 5)
1. Coloque la herramienta láser a aproximadamente 8 pies (2,5 m) de una pared que sea por lo
menos de 16 pies (5 m) de largo.
2. Proyecte la cruz láser a 1 pie (0,3 m) de una esquina. Marque el punto (A) por la línea láser
horizontal a 8 pies (2,5 m) de la intersección de la cruz láser.
3. Gire la herramienta láser de modo que la cruz láser sea proyectada en la pared a 15 pies
(4,6 m) lejos del primer punto de cruz láser.
4. La desviación de la línea horizontal desde el punto (A) marcado anteriormente no deberá ser
mayor de la mitad de la precisión especificada.
CALIBRACIÓN
El PNXL está calibrado en fábrica y no necesita otras calibraciones. Si fuera necesaria una
calibración, póngase en contacto con su proveedor o con un Centro de Servicio
Autorizado proNIVO.
DATOS TÉCNICOS
Precisión de Nivelado ± 2.5mm a 9 m (5/32 pul a 30 pies)
Longitud de las Líneas 18 m a 9 m de distancia
Distancia hasta 30 m dependiendo delas condiciones
de luminosidad ambiental
Angulo de Desviación >120°
Tipo Láser 635nm
Clase Láser 2M
Alimentación 3 baterías de 1,5 V LR6
Compensador coaxial (por gravedad con amortiguamiento magnético)
15 • PNXL

Rango de Autonivelación ± 4º
Velocidad de Autonivelación ≤3 segundos
Sensor de “fuera de nivel” si
Característica El « Modo Manual » permite de inclinar el
instrumento para hacer inclinaciones extremas
Peso 900 g incluido el soporte
Soporte Universal Rosca 1/4- 20
APLICACIONES (Fig. 6)
• Aplicación de azulejos • Montajes de mobiliario
• Estanterías • Suelos y azulejos
• Paredes divisorias • Montaje de falsos techos
• Instalación de maquinarias • Tabiquería seca
• Puertas y ventanas • Interiorismo
ACCESORIOS
Mini trípode para láser: (Fig. 7)
Se puede inclinar en dos direcciones, lo que posibilita que el láser se ajuste en cualquier ángulo.
1. Rosca adaptadora de 1/4-20 a 5/8-11
2. La plataforma gira en ambas direcciones para posibilitar el posicionamiento del láser en
cualquier ángulo
3. Mandos de posicionamiento
4. Patas plegables del trípode con pies de goma antideslizantes
5. La rosca de 5/8-11 se monta en el trípode de supervisión
PNXL • 16

GARANTÍA
proNIVO, garantiza sus instrumentos electrónicos de medición contra deficiencias en
materiales o mano de obra durante el año posterior a la fecha de compra.
Los productos defectuosos serán reparados o reemplazados, a elección de proNIVO, tras ser
recibidos junto con su prueba de compra.
Para información sobre garantía y reparación, contactar:
distribuidor local, o proNIVO.
Esta garantía no cubre deficiencias causadas por daños accidentales, desgaste por el uso o usos
diferentes de los indicados por el fabricante o reparaciones o alteraciones de estos productos no
autorizadas por proNIVO.
Cualquier reparación o reemplazo durante la vigencia de esta Garantía no afecta a su fecha de
vencimiento.
Dentro de lo autorizado por la legislación vigente, proNIVO no se obliga por esta Garantía a
compensar pérdidas como resultado de deficiencias en el producto.
Nada de lo establecido en esta Garantía limitará la responsabilidad de proNIVO para con los
compradores en caso de (1) muerte o daños personales causados por su negligencia o (2) mala
conducta intencionada o gran negligencia.
Esta Garantía no puede ser alterada sin la autorización de proNIVO.
Esta Garantía no afecta a los derechos implícitos de los compradores de estos productos.
NOTA IMPORTANTE:
El comprador es responsable del correcto uso y mantenimiento del instrumento. Y además es de
su responsabilidad controlar la buena ejecución del trabajo y por consiguiente la calibración del
instrumento. Mantenimiento, calibración y baterias no están en garantía.
proNIVO se reserva el derecho de aportar modificaciones técnicas sin previo aviso.
PNXL •17
proNIVO Messgeräte Handels GmbH, Wasserburger Straße 9, 84427 Sankt Wolfgang, Alemania
Tel: +49 (0) 8085 - 930 530 Fax: +49 (0) 8085 - 930 550
E-Mail: info@pronivo.de Web: www.pronivo.de

Mini Laser PNXL - Mise à niveau automatique
Nous vous remercions d’avoir choisi un Mini Laser PNXL.
Nous vous prions de lire attentivement le présent manuel d’instructions avant
d’utiliser le laser pour la première fois.
Modèles
205-PNXL Mini niveau laser pour intérieur avec autonivelage et multilignes en croix.
Comprend mini trépied avec montant magnétique, sangle, boîtier.
Copyright© 2011 proNIVO, Tous droits réservés.
Les informations contenues dans le présent manuel appartiennent à proNIVO qui se réserve le
droit d’apporter toute modification technique sans préavis.
Interdiction de copier ou de reproduire le présent manuel sans avoir obtenu auparavant
l’autorisation écrite de proNIVO.
PROCÉDURE DE FONCTIONNEMENT SÛR
AVERTISSEMENT:
Assurez-vous de lire et comprendre toutes les instructions dans ce manuel
avant d’utiliser ce produit. Ne pas suivre toutes les instructions peut entraîner l’exposition aux
radiations dangereuses, des électrochocs et/ou des blessures corporelles.
PRÉCAUTION:
L’emploi de commandes, réglages ou la réalisation de procédures autres que
ceux précisés dans ce manuel peut entraîner l’exposition aux radiations dangereuses.
PRÉCAUTION:
L’emploi d’instruments optiques avec ce produit accroîtra les risques de blessures
oculaires.
\
IMPORTANT:
Les étiquettes suivantes se trouvent sur votre outil laser pour votre sécurité et
convenance. Elles indiquent d’où la lumière laser est émise par le niveau. GARDEZ TOUJOURS EN TÊTE
leur emplacement quand vous utilisez le niveau.
Assurez
TOUJOURS
que les personnes dans le voisinage de son utilisation sont informées sur les
dangers encourus en regardant directement dans l’outil laser.
N’ENLEVEZ NI NE GRATTEZ PAS:
les étiquettes d’avertissement ou de précaution. Retirer les
étiquettes accroît les risques d’exposition aux radiations laser.
NE REGARDEZ PAS:
directement dans le faisceau laser ni NE LE PROJETEZ PAS directement dans les
yeux d’autrui. De graves blessures oculaires pourraient en résulter.
18 • PNXL
F

NE PLACEZ PAS:
l’outil laser dans une position permettant à une personne de regarder directement
dans le faisceau laser, volontairement ou non. De graves blessures oculaires pourraient en résulter.
N’UTILISEZ AUCUN:
outil optique tel que, mais pas limité à, un télescope ou théodolite pour voir le
faisceau laser. De graves blessures oculaires pourraient en résulter.
Enlevez TOUJOURS:
les piles quand vous nettoyez l’ouverture de lumière laser ou le verre du laser.
N’UTILISEZ PAS:
l’outil laser autour des enfants ni ne permettez pas aux enfants d’utiliser l’outil laser.
De graves blessures oculaires pourraient en résulter.
Éteignez
TOUJOURS
l’outil laser quand vous ne l’utilisez pas. Le laisser en marche accroît les risques
d’une personne regardant dans le faisceau laser par inadvertance.
N’UTILISEZ PAS:
l’outil laser autour de produits combustibles comme dans la présence de liquides, gaz
ou poussières inflammables.
Positionnez
TOUJOURS
l’outil laser d’une façon stable et sure. Si l’outil tombe, il peut être endommagé
ou l’utilisateur peut être blessé.
Utilisez
TOUJOURS
seul les accessoires recommandés par le fabricant de votre outil laser. L’emploi
d’accessoires conçus pour d’autres outils laser pourrait entraîner des blessures graves.
N’UTILISEZ PAS:
cet outil laser dans tout autre but que ceux décrits dans ce manuel. Autrement, de
graves blessures pourraient en résulter.
NE LAISSEZ PAS:
l’outil laser en marche sans surveillance dans un quelconque mode de
fonctionnement.
Les réparations et l’entretien doivent
TOUJOURS
être réalisés par un atelier de réparation qualifié. Les
réparations réalisées par du personnel non qualifié pourraient résulter en graves blessures.
NE DÉMONTEZ PAS:
l’outil laser. Il n’existe aucune pièce pouvant être réparée par l’utilisateur à
l’intérieur. Démonter le laser annulera toutes les garanties de ce produit. Ne modifiez pas le produit de
quelconque manière que ce soit. La modification de l’outil laser peut entraîner l’exposition dangereuse
aux radiations laser.
PROCÉDURES DE SÉCURITÉ ÉLECTRIQUE
AVERTISSEMENT:
Les piles peuvent exploser ou avoir des fuites, et causer des blessures ou
un incendie. Pour réduire ces risques :
Suivez
TOUJOURS
toutes les instructions et tous les avertissements sur l’étiquette de la pile et
l’emballage.
PNXL • 19
Table of contents
Languages:
Other PRONIVO Laser Level manuals