Propress PRO290 User manual

PRO290 STEAMER
USER MANUAL
Operating & Safety Instructions
Before using your Propress steamer, please read this manual
thoroughly and retain it for future reference.

1. Operating Safety 2
2. Unpacking Your Propress 4
3. Assembling Your Propress Steamer
and Preparing for Use 5
4. Operating Instructions 8
4.1 Filling Steamer with Water 8
4.2 Switching On 9
4.3 Using Your Steamer 10
4.4 Safety Filler Cap 10
5. Tips on Use 12
5.1 Steaming Clothing 12
5.2 Full Garment 13
5.3 Wedding Dresses 13
5.4 Curtains & Soft Furnishings 14
5.5 Fabric Limitations 14
6. Care and Maintenance 15
6.2 Cleaning Your Steamer 15
6.3 Descaling Your Steamer 16
7. Storing your Propress When Not In Use 17
8. Propress Troubleshooting Matrix 18
9. Guarantee 21
CONTENTS

1
Working safely with your Propress
steamer is only possible when these
operating and safety instructions are
read completely and the contents
herein are understood and followed.
PRO290 USER MANUAL
OPERATING & SAFETY INSTRUCTIONS

perating & Safety Instructions
disorder increases the risk of an accident.
The appliance is not to be used by
persons (including children) with reduced
physical, sensory or mental capabilities,
or lack of experience and knowledge
unless they have been given supervised
instruction.
Under no circumstances should the
steamer be left unattended when in
operation. When not in use disconnect
the power supply.
Keep children away from the steamer.
Children should be supervised to ensure
they do not play with the appliance.
Regularly check power cable and plug
when steamer is disconnected from the
power supply.
1. OPERATING SAFETY
Do not use the steamer if either power
cable or plug are damaged; contact an
approved service agent for repair.
rated extension cables can be dangerous
Regularly check hose for damage or
distortion.
when steamer contains hot water.
Do not unplug the steamer by pulling the
electric cord, always switch off at the
of socket.
and wait for steamer to cool down before
spillage before connecting steamer
steaming or heating up.
Once a week the steamer should
be cleaned. See section 6. Care and
Maintenance
clothing being worn.
Persons using the steamer must be
authorised to do so and trained in safe
working procedures. Where necessary,
protective clothing should be worn.
Propress steamers are
electrical steam generating
appliances, therefore
components may get very hot
and could cause burns.
Propress steamers are designed for
vertical pressing of fabric and removal
in any way to alter their operation.

3
To ensure appliance safety use only
spare parts and accessories approved
by the manufacturer. Service should only
be carried out by the manufacturer or an
approved service agent.
release valve ball is always replaced
moving before switching steamer on.
system or smoke detector as the steam
may trigger an alarm.
MAX
2L

perating & Safety Instructions
In the box you will nd the following:
• Propress PRO290 Steamer
• Telescopic pole set and top hook
• Steam hose with aluminium nozzle and
protective cotton cover/bag
• 3 Castors
• Funnel
• Safe Operating Poster
If any of these parts are missing
or damaged, notify your supplier
immediately.
2. UNPACKING YOUR PROPRESS
Poster

5
Before assembling, t
the 3 press-on castors to
locating holes in chassis
base of steamer.
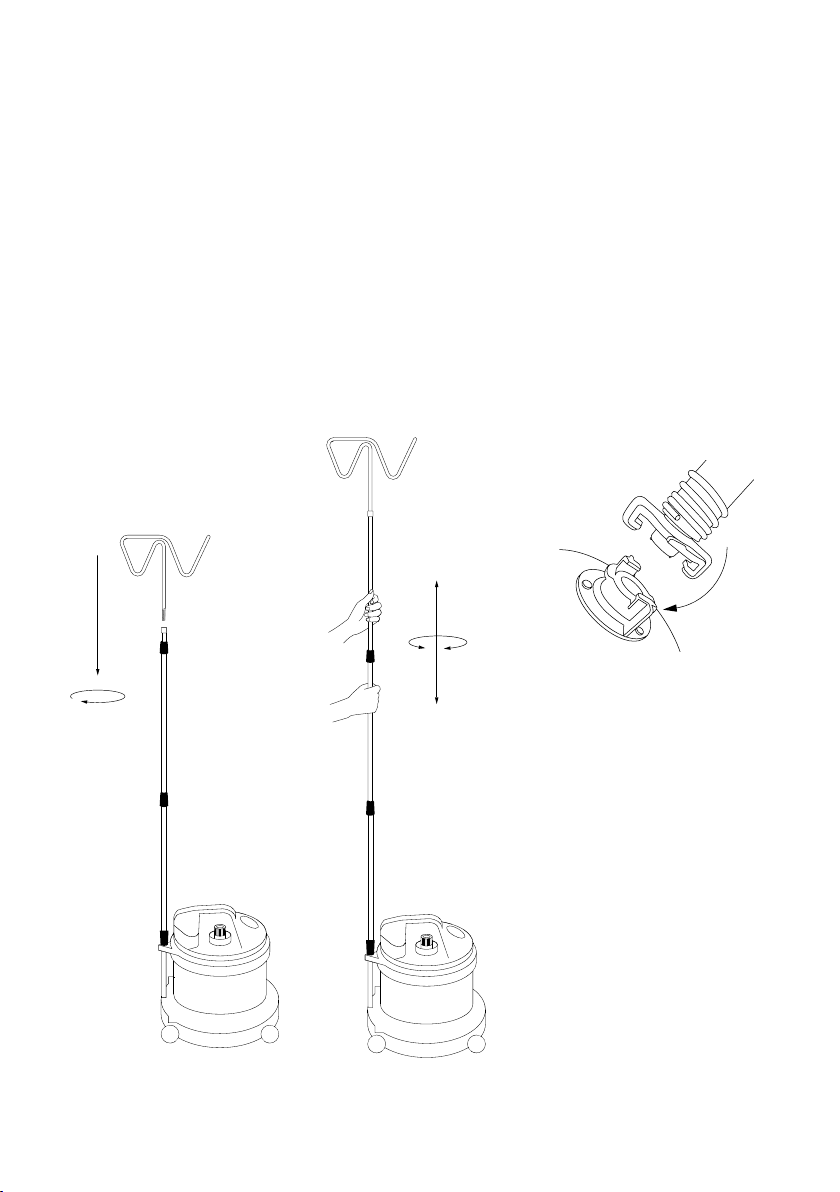
1. Gripping the telescopic
pole in both hands, twist
the internal/middle
pole section counter-
clockwise and extend
upwards by at least 10cm.
Twist clockwise to lock.
2. Gently lower telescopic
pole onto the base pole
which is attached to the
steamer.
3. Ensure telescopic pole
is pushed down over
the black plastic sleeve
and is resting on the top
bracket of the base pole.
3. ASSEMBLING YOUR PROPRESS
STEAMER AND PREPARING FOR USE

perating & Safety Instructions
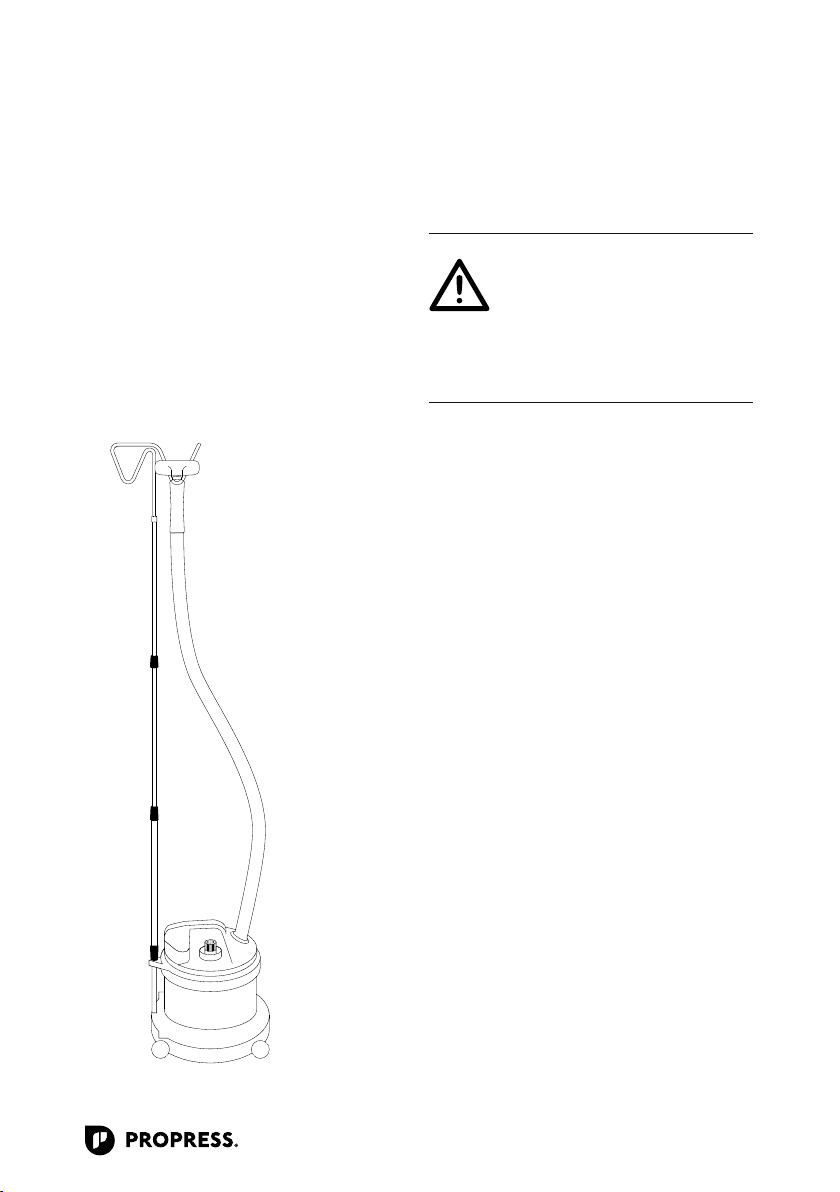
4. Screw hook into top of
telescopic poles – DO
poles to suitable height
(twisting clockwise
to lock and counter-
clockwise to unlock)
so the hose can easily
be rested in the hook.
hose outlet coupling by
aligning the ears then
pushing and twisting the
hose end clockwise on
the coupling until it locks
in to position.
3. ASSEMBLING YOUR PROPRESS STEAMER
AND PREPARING FOR USE (CONTINUED)

7
7. Place steam nozzle into
hook on top of pole set.
Remove protective cotton
cover/bag from nozzle.
position when not in use.
Your Propress steamer is designed to be
used with clean tap water, no additives
in any form should be used as the use
of additives (except Propress Descaler)
will damage your steamer and void the
warranty.
Your steamer is an electrical
appliance and is designed for
indoor use only. It must be
used on level ground, uneven
surfaces can cause damage to
the heating element.

perating & Safety Instructions
4. OPERATING INSTRUCTIONS
4.1 Filling Steamer with Water
1. Remove the Filler Cap from the
steamer.
and pour in using funnel supplied.
2L
MAX
2L
Never remove ller cap
when in operation.
Use only tap water. The addition
of perfume or other agents will
seriously damage your steamer
and void the warranty.
Ret ller cap. Ensure ball
bearing within ller cap is
always free moving before
switching steamer on.
Do not overll. When
the steamer is full the
indicator oat will appear
in the sight glass.
If condensation is restricting the view of
remove cap by twisting anti-clockwise,
top of the sight glass, the steamer has
removing the hose and pour out of steam
outlet mopping up any spillage.

9
4.2 Switching On
MAX
2L
If the amber “empty/rell” indicator
light illuminates and the buzzer
sounds when the steamer is switched on, your steamer is empty
of water. Turn off the power and rell according to instructions
Filling Steamer with Water.
1. Plug the steamer into a suitable power
outlet and push down the green on/off
switch that will illuminate to indicate
the steamer is “on” and heating up.
On/Off button
NOTE: The water in the steamer will
take 10 to 15 minutes to produce steam,
dependent upon the water temperature,
ambient temperature and also the
eciency of your electrical supply.

10 perating & Safety Instructions
4.3 Using Your Steamer
NOTE: Ensure the area you are steaming in is well ventilated.
Once steam is emitting from the nozzle, allow the hose and nozzle
to get hot for approximately 30 seconds before using the steamer.
This reduces any condensation build-up.
any excess condensation before use and repeat periodically when
steaming garments.
4.4 Safety Filler Cap
this occurs turn off immediately to ensure no damage is caused to
• The steamer needs rinsing out and descaling to remove build up of
sediment or limescale
• The steamer hose is blocked, kinked or restricted
4. OPERATING INSTRUCTIONS (CONTINUED)
steamer using the green on/off switch and disconnect
the power supply.
Never leave hose assembly on the oor as this
will cause a trip and burn hazard to the user
and others and could damage the hose.

11
assembly when not in use.
Do not kink or restrict the hose, as this may
cause an ejection of water and irreparable
damage to hose.
Use extreme caution when removing the ller cap.
Severe risk of burns from steam.
Never use fabric freshening sprays near your steamer.
If the body of your steamer comes into contact with this
type of spray it can cause severe damage to your steamer
and will void your warranty.
When steamer runs out of water an alarm buzzer will sound and the
from power supply. Wait for steamer to cool completely before removing
4.1 Filling Steamer with Water.
on for further steaming.

12 perating & Safety Instructions
5. TIPS ON USE
5.1 Steaming Clothing
Garments can either be steamed on a hanger, rail, mannequin
or hung from the hook on the pole assembly.
NOTE: Ensure that the pole hook is over the steamer when hanging
garments on it. This maintains the stability of the machine.
Run nozzle over the fabric while holding it taut with your free hand, taking
care not to steam near your hand in the process.
If steaming at a low level regularly lift hose up so condensation can be
allowed to run back into the steamer.
If steamer nozzle is used with holes
in vertical line, this can cause water
droplets to drip from the holes.

13
5.2 Full Garments
Full garments, such as dresses and skirts can be steamed from the
inside by touching the nozzle on to material and steaming outwards.
Caution is required as steam can build up inside the garment and get
extremely hot. Steaming from the inside reduces the possibility of
adding creases and opens up gathers; bringing dresses back to life.
5.3 Wedding Dresses
Wedding dresses should not be hung on the pole set as their weight
can make the steamer unstable and topple over. They are best steamed
hanging from a rail or, ideally, using a plastic chain attached to a hook in
the ceiling. This allows the dress to be hung at different heights on the
chain so the lower parts of the dress and the train can be steamed with
ease. Steam the dress in sections, starting with the underskirt.
creases and to shape collars.
If steaming at a low level, regularly lift hose up so condensation can be
allowed to run back into the steamer.
Never steam clothes whilst
they are being worn by a
person.
Use extreme caution when
operating the appliance.
Steam can burn.

14 perating & Safety Instructions
5.4 Curtains & Soft Furnishings
Steam curtains from the face side.
If curtains are interlined, it may be necessary to steam lining as well.
If using optional Drapery Kit, it will be necessary to change to standard
drapers hose when working at heights of less than 2m, otherwise
a large amount of condensation will build up in the hose and cause
reduced performance.
When steaming, periodically lift the hose so excess condensation can
run back into the boiler.
Ideal for use on bed valances, chair covers, banqueting table cloths
and removing pressure marks on carpets.
creases.
5.5 Fabric Limitations
• Seersucker
• Silk taffeta
If in doubt, test on a small inconspicuous area or steam from reverse
side of fabric.
Extreme caution should be used with man-made pile fabrics to
avoid shading – keep nozzle at least 10cm away from face or reverse,
allowing steam to penetrate and use Propress velvet brush to maintain
the pile.
Cotton and silk velvet can be steamed by lightly running the nozzle
over the pile. In the event of a condensation spot on fabric, gently rub
the back of the nozzle over the area. It should dry without leaving a
water mark.
5. TIPS ON USE (CONTINUED)

15
6. CARE AND MAINTENANCE
To ensure a long and trouble free life of your steamer it is essential that
of sediment and limescale. Descale regularly to ensure no unnecessary
on the heating element if not maintained properly; this will cause reduced
performance, irreparable damage to the element and void your warranty.
6.2 Cleaning your Steamer
Disconnect from the power supply.
Remove steam hose and telescopic pole assembly.
Steamer must be disconnected from the power supply.
The water in the steamer must be allowed to cool to a
temperature which will not cause injury before emptying.
NOTE: The steamer should be emptied through the steam outlet (not the
ller inlet) into a ground level drain where possible to avoid raising the
steamer up and emptying into a sink.
Start by emptying any residue water from the steamer.
fresh water and empty again, repeat procedure until the water runs clear.
Clean the outside of the steamer with a damp cloth. Do not use any
detergents or polish.
It is recommended the steamer be descaled using a non-aggressive descaler
at least every 2 months. Descaling frequency is dependent upon usage and
water hardness.
For details on suitable descalers, please contact Propress. We recommend
the use of Propress Descaler which can be purchased by calling Propress on
020 8417 0660 or visiting propress.co.uk.

16 perating & Safety Instructions
6.3 Descaling your Steamer
Before descaling, carry out 6.2 Cleaning your Steamer to remove as
much loose sediment as possible.
follow directions.
Dissolve/dilute descaler in warm water, or as directed by the
manufacturer, ensuring the correct water volume to descaler ratio is
followed. Pour the diluted descaler solution into the steamer.
for a minimum of 3 hours. For best results leave to descale overnight.
completely clear.
Failure to maintain your steamer will void its warranty.
NOTE: the water in the steam generator must be allowed to cool to a
temperature which will not cause injury before emptying.
In addition to mandatory electrical tests, regularly check the condition
of the steamer's plug, cable and cable restraint for damage. If any
approved service agent for repair. Ensure all warning labels are legible.
6. CARE AND MAINTENANCE (CONTINUED)
When descaler is left in the steamer, clearly label your
steamer so no one attempts to use it.

17
7. STORING YOUR PROPRESS WHEN
NOT IN USE
The steamer should be emptied of water and cleaned. The electrical
cable should be coiled and steamer stored in a dry location.
If the steamer is not to be used for an extended period of time it is
recommended that the steamer is descaled before storage.

18 perating & Safety Instructions
NO LIGHTS COME ON AND STEAMER DOES NOT HEAT UP
Probable Cause Solution
Steamer is not switched on, fuse
in plug has failed or power outlet
is not working/switched off.
Check steamer is switched on, plug into another
power outlet, if steamer still not working try changing
fuse in plug.
If steamer is still not working call your dealer to arrange service.
DIRTY WATER COMING OUT OF FILLER CAP
Probable Cause Solution
Steamer needs cleaning out
or descaling.
as directed in 6.2 Cleaning your Steamer. If steamer
has not been descaled recently, descale as directed
in 6.3 Descaling your Steamer.
Failure to regularly clean the boiler and descale regularly will result in damage to the element.
Your Propress steamer operates at high temperatures and produces steam
which can burn – use extreme caution. Troubleshooting should only be
carried out by a competent person. Always allow steamer to cool down
before commencing trouble shooting.
8. PROPRESS TROUBLESHOOTING
MATRIX
Other manuals for PRO290
1
Table of contents
Other Propress Kitchen Appliance manuals