Proslat HEAVY DUTY HOIST User manual

295D, boul. Industriel, Châteauguay (QC) J6J 4Z2
proslat.com 1-888-691-2944 // 450-691-2944 info@proslat.com
Installation guide
HEAVY DUTY HOIST
TOOLS REQUIRED
BOX CONTAINS
WARNING
1 x
2 x
1 x 1 x 1 x 2 x
2 x 4 x 4 x 4 x 4 x 1 x
Measure the distance between the handle
bars and seat of the bike. Most adult bikes
are between 32”and 36”, we suggest install-
ing your hoist a maximum of 48”apart.
For kayaks or similar items, we suggest 6’apart.
Drill 1/8’’Drill bit Star screwdriver Tape measure
Please read installation carefully prior to installing. Before using the product thoroughly
test the fully-weighted product (with equipment in place) to ensure the product has been
installed properly. Do not allow children to play on product. Proslat is not responsible for
any damage resulting from improper installation, overloading or product failure.
STEP 1
Adjustable wrench
01— 08-12-2014

295D, boul. Industriel, Châteauguay (QC) J6J 4Z2
proslat.com 1-888-691-2944 // 450-691-2944 info@proslat.com
Verify which way your ceiling joists are. Hoist brackets can be
mounted parallel or perpendicular. Use two wood screws each to
mount the back pulley and the front pulley to the ceiling, ensuring
the distance between the two matches the measurement made in
step 1. Pre-drilling 1/8”pilot holes in the ceiling will make mounting
the pulleys easier.
Attach pulley brackets to ceiling mounts.
Untangle your rope. Each end of the rope will be tied to a ceiling
bracket on the hoist. The left side will be used for one set of pulleys,
the right side for the other.
Start by threading the left side rope through the brake device as shown
in picture below. The left side rope will go through the rst pulley, then
to the second pulley, down around the second hook and up to the
ceiling bracket. Once through the hole in the ceiling mount, tie a gure
eight knot right after the hole and then a double knot around bolt.
Thread the other end of the rope through the right side, down around
the rst hook and up to the ceiling bracket. Once through the hole in
the ceiling mount, tie a gure eight knot right after the hole and then a
double knot around the bolt.
WARNING
It is important that your hoist is attached to a solid wood ceiling joist.
The joist must be 2”x 4” or larger.
PERPENDICULAR
PARALLEL
STEP 3
STEP 4
STEP 2
4 x
4 x
4 x
Le side rope
Le side rope
Right side rope
Right side rope
Le side rope
First pulley
Double knot around bolt
Figure eight knot
Second pulley
Proper rope
placement in brake
Tie double knot
around bolt
Tie double knot
around the bolt

295D, boul. Industriel, Châteauguay (QC) J6J 4Z2
proslat.com 1-888-691-2944 // 450-691-2944 info@proslat.com
OVERHEAD WARNING
Make sure that there are no obstructions to restrict operation of the bike lift.
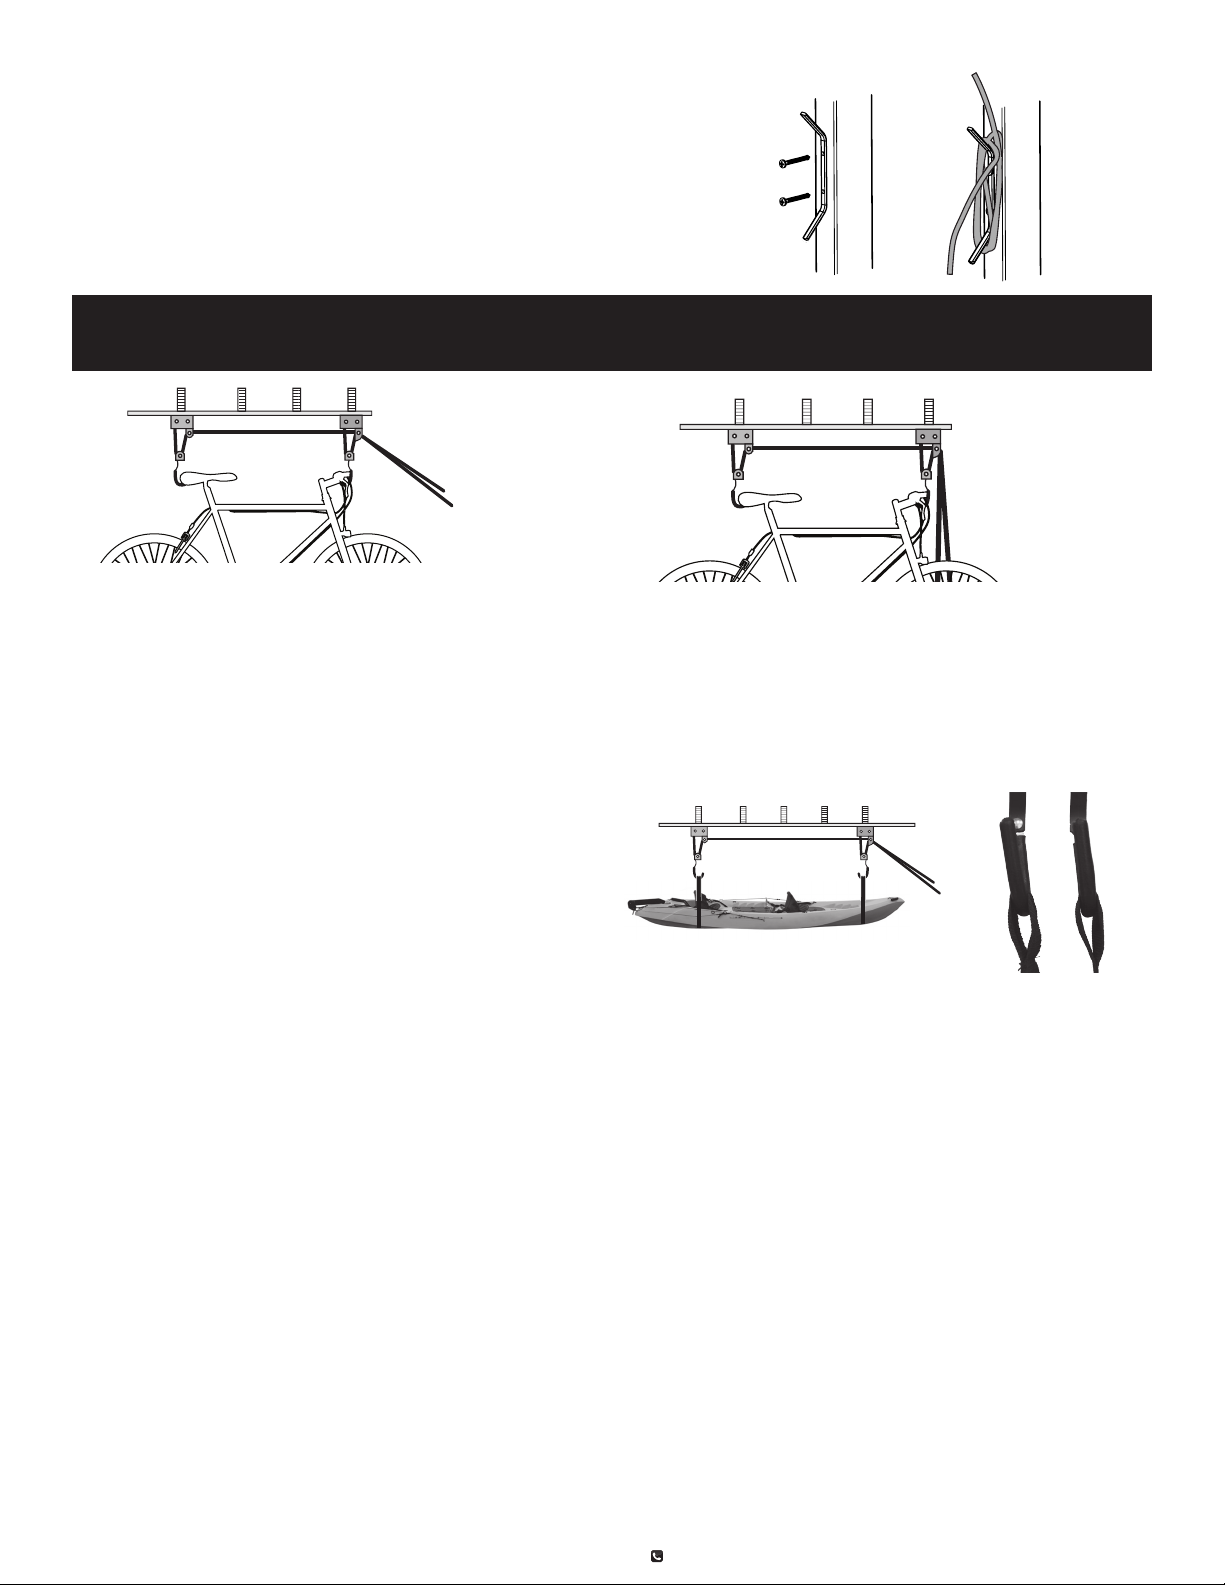
USING THE BIKE LIFT
Hook the bike handlebar and seat with the hooks and be sure
the ropes are not twisted (for bulky items, attach nylon straps to
hooks). The bike can now be raised to the ceiling by the pulling
rope. The rope will lock in place with each pull, preventing the
bike from falling. For safety, tie the rope on the cleat and wind
the excess rope around it. DO NOT CUT THE ROPE.
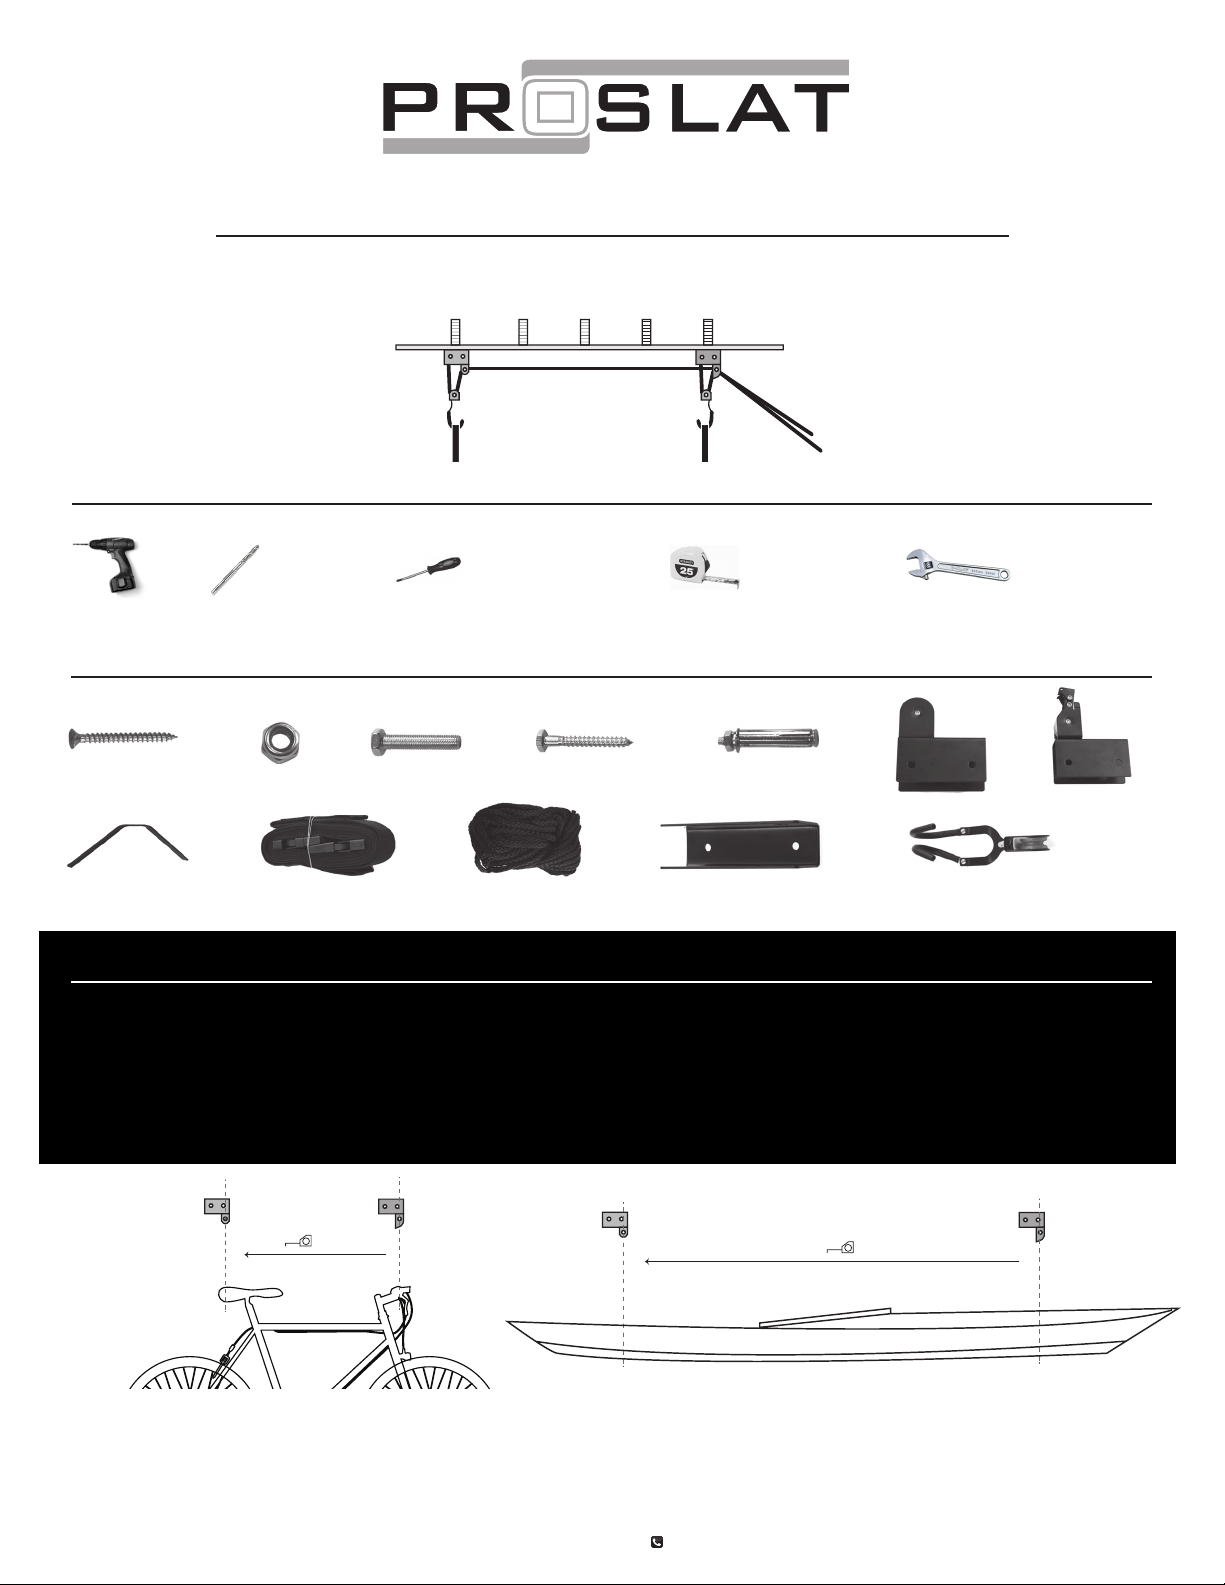
KAYAK OR SIMILAR APPLICATION
For use with nylon straps, hang each end of the strap on one of
the hooks. You can adjust the length of the strap at the buckle.
LOWERING THE BIKE
Pull the rope down at 90° from ceiling bracket maintaining tension
on rope. The tension will keep the locking mechanism open and
the bike will be able to lower. Slowly let one rope out at a time as
the bike lowers. Once the bike is low enough, remove it from the
hooks and tie the rope back to the cleat.
PROSLAT HOIST WARRANTY
We guarantee our hoist against material and workmanship defects for 5years. This warranty does not include any cost related to installation or return of the hoist.
This warranty is valid provided that the maximum weight supported by the hoist does not exceed 100 pounds.The customer, installer or the dealer, releases PROSLAT
of all claims if the hoist has been loaded with more than mentioned above. The hoist MUST BE installed as described in the INSTALLATION INSTRUCTIONS.
This warranty does not cover corrosion, rust or discoloration of paint, or product failure due to misuse, abuse, faulty installation, alteration or any other failure not
related to defects in materials or workmanship.
DISCLAIMER OF LIABILITY
Proslat Inc. and its successors, distributors and dealers (hereafter SELLER) shall in no way be responsible for the product’s proper use and service. THE BUYER HEREBY
WAIVES ALL LIABILITY CLAIMS. The BUYER acknowledges that he/she is not relying on the SELLER’s skill or judgment to select or furnish goods suitable for any
particular purpose and that there are no liabilities which extend beyond the description on the face hereof and the BUYER hereby waives all remedies or liabilities,
expressed or implied, arising by law or otherwise, (including without any obligations of the SELLER with respect to merchantability and consequential damages) or
whether or not occasioned by the SELLER’s negligence. The SELLER disclaims any warranty and expressly disclaims any liability for personal injury or damages. The
BUYER acknowledges and agrees that the disclaimer of any liability for personal injury is a material term for this agreement and the BUYER agrees to indemnify the
SELLER and to hold the SELLER harmless from any claim related to the item of the equipment purchased. Under no circumstances will the SELLER be liable for any
damages or expenses by reason of use or sale of any such equipment. The SELLER assumes no liability regarding the improper installation or misapplication of its
products. It is the installer’s responsibility to check for proper installation and if in doubt, contact the manufacturer. These assembly guidelines will direct you through
the process of assembling a section of Proslat Inc product. Please keep in mind that they may not cover every assembly or installation scenario you may encounter.
Since each installation is unique in its performance requirements, the ultimate installation method used is the sole responsibility of the installer. Proslat Inc. disclaims
any liability or responsibility for the improper installation of this product. The purchaser is solely responsible for compliance with applicable local codes. Proslat Inc.
recommends that all designs be reviewed by a licensed architect, engineer or local building ocial before installation.
Use two wood screws to mount the rope cleat to the wall. When the bike is up to
the ceiling, the excess rope should be stored in the cleat.
STEP 5

295D, boul. Industriel, Châteauguay (QC) J6J 4Z2
proslat.com 1-888-691-2944 // 450-691-2944 info@proslat.com
Guide d’installation
PALAN ULTRAROBUSTE
OUTILS REQUIS
LA BOÎTE CONTIENT:
AVERTISSEMENT
1 x
2 x
1 x 1 x 1 x 2 x
2 x 4 x 4 x 4 x 4 x 1 x
Veuillez lire attentivement les instructions avant l’installation. Avant
d’utiliser le produit, testez-le à sa charge maximale an de vous assurer
qu’il a été installé adéquatement. Ne pas permettre aux enfants
d’utiliser ou de jouer avec le produit. Proslat n’est pas responsable de
quelconque dommage causé par une mauvaise installation, une sur-
chage ou une défaillance du produit.
Pour les kayaks et articles similaires, nous suggérons
une distance de 6 pi (1.83 m).
Perceuse Mèche 1/8 po Tournevis étoile Gallon à mesurer
Veuillez lire attentivement les instructions avant l’installation. Avant d’utiliser le produit,
testez-le à sa charge maximale an de vous assurez qu’il a été installé adéquatement. Ne pas
permettre aux enfants d’utiliser ou de jouer avec le produit. Proslat n’est pas responsable de
quelconque dommage causé par une mauvaise installation, une surchage ou une défaillance
du produit.
ÉTAPE 1
Clé ajustable

295D, boul. Industriel, Châteauguay (QC) J6J 4Z2
proslat.com 1-888-691-2944 // 450-691-2944 info@proslat.com
Vériez de quelle direction sont vos poutres de plafond. Les supports pla-
fonniers du palan peuvent être installés perpendiculairement ou parallèle-
ment. Utilisez deux vis à bois pour installer chaque support au plafond en
vous assurant que la distance entre les deux correspond à la mesure prise
à l’étape 1. Percer des trous de guidage de 1/8 po dans le plafond facilitera
l’installation des poulies.
Connectez les supports de poulies aux supports plafonniers.
Démêlez votre corde. Chaque extrémité de la corde sera nouée à un support
plafonnier du palan. La corde de droite sera utilisée pour une poulie et celle de
gauche, pour l’autre poulie.
Commencez par enler la corde de gauche dans le dispositif de freinage tel
qu’illustré ci-dessous. La corde de gauche traversera la première poulie, puis la
deuxième poulie, descendra autour d’un crochet et s’insèrera dans le deuxième
support plafonnier. Une fois la corde insérée dans le trou du support plafon-
nier, faites un nœud en 8 et faites un double nœud autour du boulon. Enlez la
corde de droite dans le côté droit du dispositif de freinage, passez le l autour
du crochet restant et insérez la corde dans le premier support plafonnier. Une
fois la corde insérée dans le trou du support plafonnier, faites un nœud en 8 et
faites un double nœud autour du boulon.
AVERTISSEMENT
Il est important que votre palan soit attaché à une poutre du plafond. La poutre doit
être d’un minimum de 2 po x 4 po (5 cm x 10 cm).
PERPENDICULAIRE
PARALLÈLE
ÉTAPE 3
ÉTAPE 4
ÉTAPE 2
4 x
4 x
4 x
Côté droit
Corde de gauche
Corde de droite
Corde de droite
Corde de gauche
Première poulie Deuxième poulie
Mise en place de la
corde dans le frein
Faire un double
nœuds autour
duboulon
Faire un double nœuds
autour duboulon
Double knot around bolt
Figure eight knot

295D, boul. Industriel, Châteauguay (QC) J6J 4Z2
proslat.com 1-888-691-2944 // 450-691-2944 info@proslat.com
AVERTISSEMENT
Assurez-vous d’enlever tout obstacle qui pourrait nuire au fonctionnement du palan.
SOULEVEZ LE VÉLO
Accrochez le guidon et le banc aux crochets et assurez-vous que
les cordes ne sont pas mêlées (pour de plus gros articles, attachez
les sangles de nylon aux crochets). Le vélo peut maintenant être
soulevé au plafond en tirant les cordes. La corde se verrouillera
chaque fois qu’elle sera tirée an de prévenir que le vélo tombe.
Pour votre sécurité, nouez la corde au taquet et enroulez-y
l’excédent. NE COUPEZ PAS LA CORDE.
DESCENDRE LE VÉLO
Tirez la corde vers le bas à 90° du support plafonnier maintenant la tension
de la corde. La tension déverrouillera le mécanisme de freinage et le vélo
pourra descendre. Libérez doucement la tension d’une corde à la fois an
de faire descendre le vélo. Une fois le vélo à la hauteur désirée, retirez-le des
crochets et rattachez votre corde au taquet.
GARANTIE LIMITÉE DU PALAN
Nous garantissons notre palan contre tout défaut de matériau et de fabrication pour une période de cinq (5) ans. Cette garantie ne couvre pas les frais et les coûts
associés à l’installation, le démontage et/ou le transport relié au retour du palan pour n de garantie.
Cette garantie est valide seulement si la capacité maximale de 100 lb (45 kg) du palan a été respectée. (Le client, distributeur et/ou l’installateur s’engage à ne pas
tenir PROSLAT responsable en cas d’une réclamation concernant le spalan si le poids a dépassé la capacité maximale de celui-ci ou que l’installation n’a pas été eec-
tuée selon les instructions du fabricant. Le palan DOIT ÊTRE installé selon les présentes instructions.
Cette garantie ne couvre pas la corrosion, la décoloration de la peinture ou autres problèmes reliés à un mauvais usage, un mauvais traitement, une installation non-
conforme ou une modication du concept original.
LIMITATION DE RESPONSABILITÉ
Proslat Inc. et ses successeurs, distributeurs, et revendeurs (dans l’avenir VENDEUR) ne doivent en aucun cas être responsables pour l’utilisation et le service de ce
produit. L’ACHETEUR décline toute réclamations en responsabilité. L’ACHETEUR reconnaît qu’il/elle ne se fonde pas sur la compétence ou le jugement du vendeur
pour sélectionner ou fournir des biens appropriés à un usage particulier et qu’il n’y a pas de responsabilités qui s’étendent au-delà de la description gurant au recto
et l’acheteur renonce par la présente tous les recours ou responsabilités , explicite ou implicite, découlant de la loi ou autrement, (y compris, sans aucune obligation
du VENDEUR par rapport à la qualité marchande et les dommages indirects) ou si occasionné par la négligence du vendeur ou pas. Le vendeur décline de manière
explicite ou implicite toute garantie et responsabilité pour les dommages corporels. L’ACHETEUR reconnaît et accepte que l’exclusion de toute responsabilité pour les
dommages corporels est une condition importante de cet accord et il s’engage à indemniser et soustraire le vendeur de toute réclamation liée à l’élément de l’équi-
pement acheté. En aucun cas, le vendeur ne sera responsable d’aucun dommage ou frais en raison de l’utilisation ou de la vente d’un tel équipement. Le VENDEUR
n’assume aucune responsabilité quant à la mauvaise installation ou utilisation de ses produits. Il est de la responsabilité de l’installateur de vérier la bonne installa-
tion et en cas de doute, contacter le fabricant. Ces instructions d’assemblage vous dirigeront à travers du processus d’assemblage d’un produit Proslat Inc. S’il vous
plaît gardez à l’esprit qu’ils ne peuvent pas couvrir l’assemblage ou l’installation de tous les scénarios que vous pourriez rencontrer. Comme chaque installation est
unique dans ses exigences de performance, la méthode nale d’installation utilisée est de la seule responsabilité de l’installateur. Proslat Inc. décline toute respon-
sabilité pour la mauvaise installation de ce produit. L’acheteur est seul responsable du respect des réglementations locales en vigueur. Proslat Inc. recommande que
tous les modèles soient examinés par un architecte, un ingénieur ou responsable local avant l’installation.
Utilisez deux vis à bois pour installer le taquet au mur. Lorsque votre vélo
est au plafond, l’excédent de corde devrait être accroché au taquet.
ÉTAPE 5
POUR UN KAYAK OU UN OBJET SIMILAIRE
Pour une utilisation avec des sangles de nylon, accrochez chaque
extrémité de la sangle sur l’un des crochets.Vous pouvez ajuster
la longueur de la sangle à l’aide de la boucle.
Table of contents
Languages:
Other Proslat Lifting System manuals