manuals.online logo
Brands
  1. Home
  2. •
  3. Brands
  4. •
  5. Coleman
  6. •
  7. Tent
  8. •
  9. Coleman Pebble Creek 9272-210С User manual

Coleman Pebble Creek 9272-210С User manual

Fixez l’armature à la toile de la tente
– Introduisez une cheville dans le bout du mât
principal (noir) qui se trouve à côté de la porte
d’entrée (ill. 3 et 4).
– Allez à l’autre bout du mât et arquez le mât
progressivement jusqu’à ce que vous puissiez
rentrer la cheville dans son extrémité.
– Agissez de la même façon avec le deuxième
mât principal.
– Introduisez alors la cheville restante dans le
bout du mât latéral, allez à l’autre bout du mât
et arquez le mât progressivement jusqu’à ce
que vous puissiez rentrer la cheville dans son
extrémité (ill. 3 et 4).
– Agissez de la même façon avec le deuxième
mât latéral.
Pebble Creek™6,1 x 3,35 m
1Étalez et positionnez la tente et les mâts
– Étalez et positionnez la tente en orientant
les portes tel que désiré (ill. 1).
– Ouvrez la glissière des portes.
– Ancrez les coins de la tente avec les ganses
de piquet. Tendez bien le tapis de sol (ill. 2).
– Finissez d’ancrer la tente à l’aide des
ensembles cheville et bague.
– Emboîtez les mâts solidarisés de l’armature
(quatre mâts).
– Enfilez les mâts dans leur manchons
respectifs. Les mâts noirs – les plus longs –
se croisent et forment un X au milieu de la
tente. Les mâts gris – plus courts – s’insèrent
dans les passants d’avant en arrière des
côtés, alors que le mât central noir – le plus
court se place dans le passant du milieu de
la tente, d’avant en arrière (ill. 1).
2
Quand vous êtes prêt
à monter votre tente
– Choisissez un endroit propice:
de niveau et sans pierres,
branches ou matières dures
et pointues
– Ne placez pas la tente sous
les arbres
– Pour obtenir les meilleurs
résultats s’il y a du vent,
mettez l’arrière au vent
2 mâts de double toit
Mâts latéraux
(gris)
Mât central
court (noir)
Introduisez les mâts
emboîtés dans les passants
Instructions relatives au modèle 9272-210C
ill. 1
ill. 2
Piquet passé
dans la bague d’une
ganse de piquet
ill. 4
Armature de la
tente montée
Pièce no9272-321
Pièce no9272-323
Pièce no9272-325
Pièce no9272-315
ill. 3
Insérez la cheville
dans le bout du mât
Double toit
2 mâts principaux (noirs)
2 mâts latéraux (gris)
Pièce no9272-319
Pièce no9272-317
1 mât central (noir)
2 mâts droits (noir)
PIÈCES VARIÉES
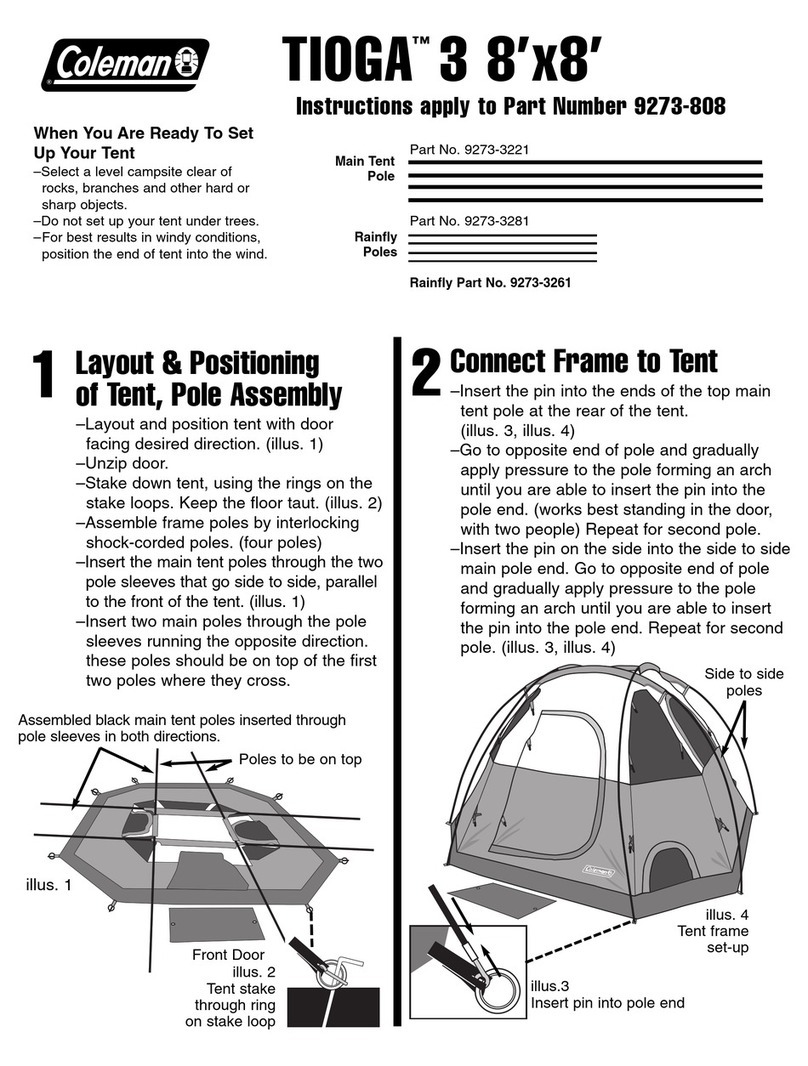
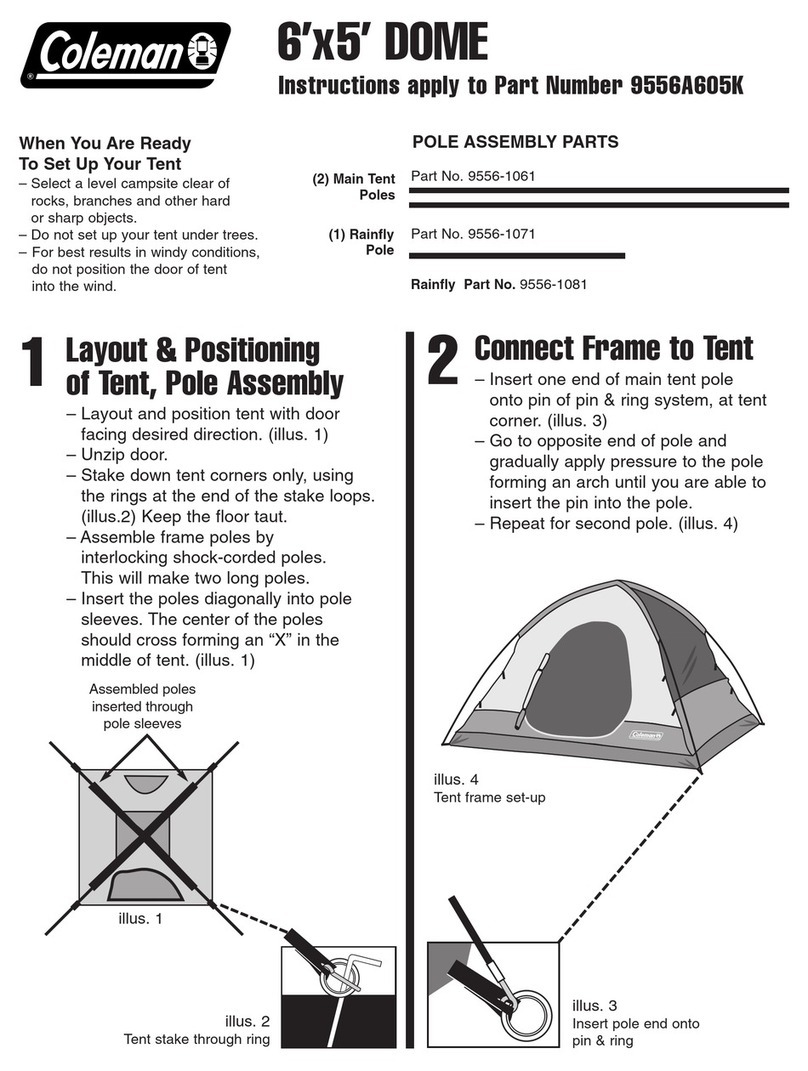
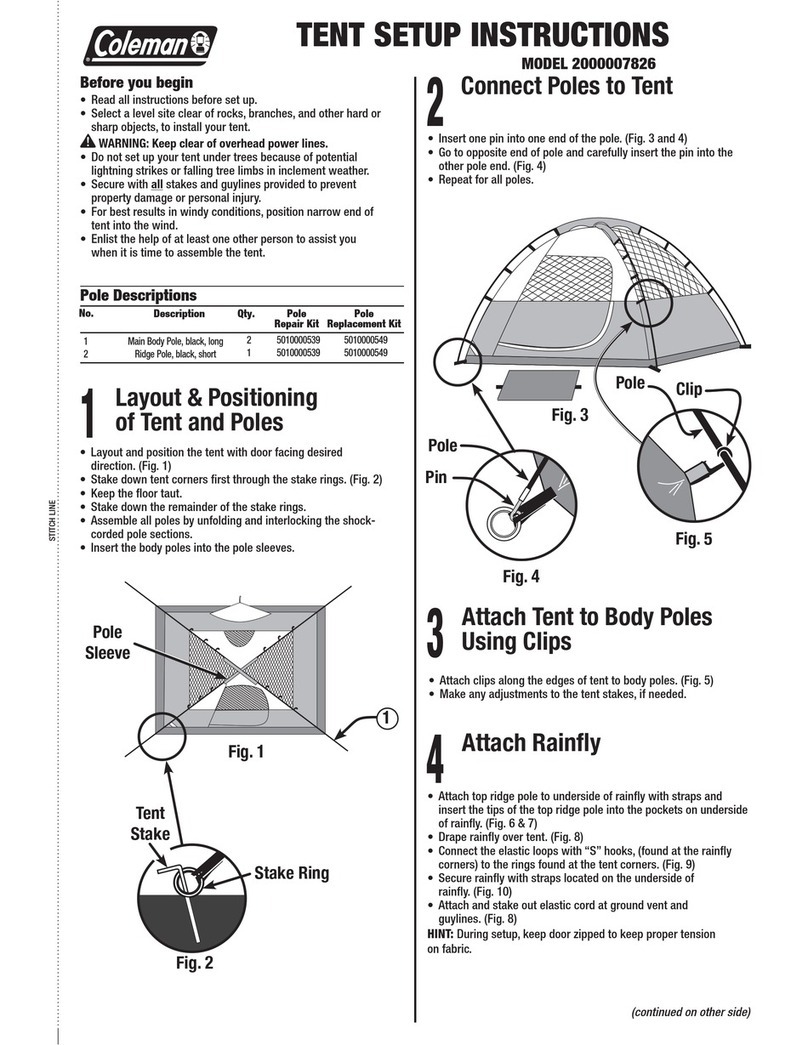
Connect Frame to Tent
– Insert one pin into the end of main black tent
pole to the side of the door. (illus. 3), (illus. 4)
– Go to opposite end of pole and gradually
apply pressure to the pole forming an arch
until you are able to insert the pin into the
pole end.
– Repeat for second pole.
– Insert remaining pin into the end of side pole,
go to opposite end of pole and apply
pressure until you arch the pole and can
insert the pin into the pole. (illus. 3), (illus. 4)
– Repeat for other side pole.
Pebble Creek™20’x11’
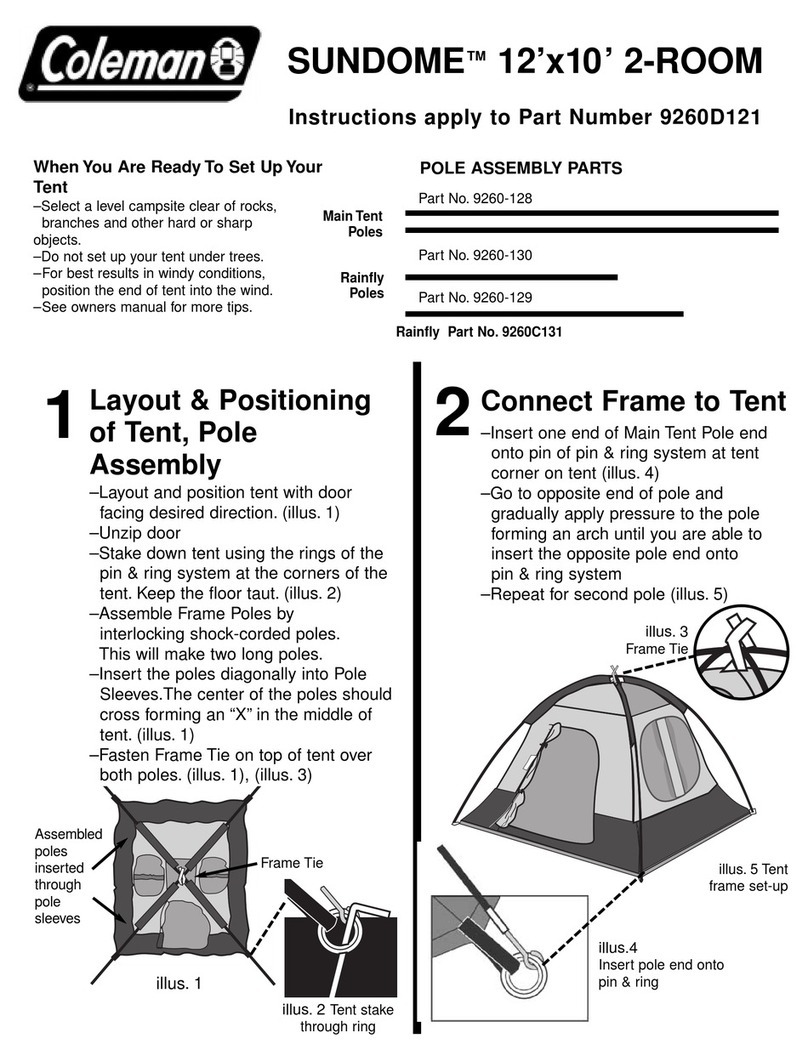
1Layout & Positioning
of Tent, Pole Assembly
– Layout and position tent with doors
facing desired direction. (illus. 1)
– Unzip doors.
– Stake down tent corners, using the stake
loops. Keep the floor taut. (illus. 2)
– Stake down tent through the rings on the pin
and ring system.
– Assemble frame poles by interlocking shock-
corded poles. (four poles)
– Insert the poles into pole sleeves. The longer
black poles should cross forming an “X” in
the middle of tent. The shorter side grey
poles insert into sleeves running front to
back. The shorter black center pole runs
straight front to back. (illus. 1)
2
When You Are Ready
To Set Up Your Tent
– Select a level campsite clear of
rocks, branches and other hard
or sharp objects.
– Do not set up your tent under trees.
– For best results in windy conditions,
position the end of tent into the wind.
(2) Rainfly Poles
Side poles
(Grey)
Short Center
Pole (Black)
Assembled poles inserted
through pole sleeves
Instructions apply to Part Number 9272-210C
illus. 1
illus. 2
Tent stake
through ring
on stake loop
illus. 4
Tent frame
set-up
Part No. 9272-321
Part No. 9272-323
Part No. 9272-325
Part No. 9272-315
illus. 3
Insert pin into pole end
Rainfly
(2) Main Tent Poles
(Black)
(2) Side Poles (Grey)
Part No. 9272-319
Part No. 9272-317
(1) Center Pole
(Black)
(2) Upright Poles
(Black)
POLE ASSEMBLY PARTS
All manuals and user guides at all-guides.com
all-guides.com
3Fixez le mât central ainsi que les mâts
droits au manchon
– Rentrez le bout du mât central dans le
haut du manchon. Agissez de la même
façon à l’autre bout (ill. 5 et 6).
– Insérez le bout d’un mât droit à crochet
dans le bas du manchon jusqu’à ce qu’il
s’adapte avec un déclic (ill. 5 et 6).
– Introduisez la pince en métal du milieu de
la tente dans le bout inférieur du mât (ill. 7).
– Agissez de la même façon avec l’autre
mât droit, de l’autre côté de la tente.
Attachez les crochets de l’armature
– Fixez les crochets des bords de la
toile à l’armature (ill. 6 et 8).
5
4ill. 6 Tente assemblée, sans son double toit
ill. 8
Crochets de
l’armature
ill. 10 Tente assemblée, avec son double toit
ill. 7
ill. 5
Mât central rentré dans le haut du manchon
et mât droit, dans le bas du manchon
ill. 9
Double toit
L’envers du double toit se fixe
aux mâts de l’armature
Œillets pour mâts
du double toit
Passants
des mâts
du double toit
Mâts du
double toit
Haubans
Attachez le double toit
– Enclenchez les sections des mâts
solidarisés du double toit.
– Enfilez ces mâts dans les passants
qui se trouvent du bord du double toit,
au milieu de la face envers (ill. 9 et 10).
– Étalez le double toit sur l’armature, les
mâts dessous. Les mâts du double toit
doivent être au-dessus des portes d’entrée
à l’avant et à l’arrière de la tente (ill. 10).
– Accrochez les 8 sangles élastiques (des
coins) aux ganses de tissu de la rangée
inférieure de crochets d’armature. (ill. 11)
– Introduisez les bouts des mâts du double
toit dans les œillets à cet effet, à
l’avant et à l’arrière de la tente (ill. 6).
– Fixez le double toit avec les attaches
se trouvant sur la face envers (ill. 9).
– Attachez et ancrez les haubans.
IMPRIMÉ AU SRI LANKA Rév. 11/04
Renseignements essentiels
• Sous certaines conditions (par temps froid ou humide, par exemple) de la
condensation se forme sur les surfaces intérieures de la tente. Cette
condensation est causée par la vapeur d’eau provenant de la respiration, de
la transpiration ou de vêtements mouillés, laissés dans la tente. Il ne s’agit
ABSOLUMENT PAS d’humidité ayant pénétré la toile. Vous pouvez la
minimiser en gardant les vêtements mouillés hors de la tente et en assurant
une bonne ventilation en tout temps.
• Ne rangez jamais la tente, même temporairement, sans la faire totalement
sécher et sans brosser la terre qui y adhère. Ne roulez jamais les piquets ou
les mâts à l’intérieur de la tente, utilisez des sacs de rangement distincts.
• POUR LES DÉTERRER, TIREZ SUR LES PIQUETS MÊMES –
NE TIREZ JAMAIS SUR LA TOILE OU SUR LES GANSES.
• NE RANGEZ JAMAIS LES MÂTS EMBOÎTÉS, DÉBOÎTEZ-LES.
• Aucun agent d’étanchéité n’est fourni avec la tente, bien qu’il soit essentiel
de traiter les coutures avant de camper. Vous trouverez l’agent d’étanchéité
requis chez votre marchand ou au magasin d’articles de sport du voisinage.
• Ne laissez pas la tente montée pendant des semaines et des semaines
car le rayonnement ultraviolet risquerait de sérieusement abîmer le tissu et
de le décolorer.
AVERTISSEMENT: ÉLOIGNEZ LE TISSU DE CETTE TENTE DES
FLAMMES ET DE TOUTE SOURCE DE CHALEUR. Cette tente est
conforme à la norme d’inflammabilité CPAI-84. Le tissu peut brûler
s’il est laissé en contact continu avec une source de flamme. Appliquer
toute substance étrangère sur le tissu peut neutraliser les propriétés
de résistance aux flammes.
ill. 11
Fixez les
crochets aux
ganses de tissu
IMPORTÉE PAR
SUNBEAM CORPORATION (CANADA) LIMITED
5975 Falbourne Street, Mississauga (Ontario) L5R 3V8
1 800 387-6161 • www.colemancanada.ca
FABRIQUÉE AU SRI LANKA
3Attach Center Pole and Upright Poles to
Hub.
– Insert center pole end into top of hub.
Repeat for other end. (illus. 5), (illus. 6)
– Insert the upright pole end with the clip
into the bottom of the hub until it clicks
into position. (illus. 5), (illus. 6)
– Insert the metal clip located at the
center of the tent, into the bottom
of the upright pole. (illus. 7)
– Repeat for second upright pole
on other side of tent.
Attach Frame Clips
– Attach frame clips along the edges of
tent to frame poles. (illus. 6), (illus. 8)
5
4illus. 6 Assembled tent without rainfly.
illus. 8
Frame clips
illus. 10 Completed tent with rainfly.
illus. 7
illus. 5
Center pole inserted into top of Hub
and Upright pole inserting into bottom
of hub.
illus. 9
Rainfly
Underside of rainfly
attaches to frame poles
Grommets for
rainfly poles
Rainfly pole
sleeves
Rainfly poles
Guylines
Attach Rainfly
– Assemble rainfly poles by interlocking
shock-corded poles.
– Insert rainfly poles into pole sleeves
located at the center edges of the
underside of rainfly. (illus. 9), (illus. 10)
– Drape rainfly over tent frame, pole side
down. Rainfly poles should be over front
and rear doors. (illus. 10)
– Hook the eight elastic loops (found at the
rainfly corners) to the fabric loops on the
bottom row of frame clips. (illus. 11)
– Insert the tips of the rainfly poles into the
grommets on the front and rear of tent.
(See above illus. 6)
– Secure rainfly with attachments located
on underside of fly. (illus. 9)
– Attach and stake out guylines.
PRINTED IN SRI LANKA Rev. 11/04
Things You Should Know
• Under certain conditions (cold weather, high humidity, etc.)
condensation will form on the inside surfaces of your tent. Condensation is
caused by water vapor from your breath, perspiration, or any wet clothing
inside your tent. It is NOT LEAKAGE through the tent fabric. It can be
minimized by removing wet clothing from your tent and by providing good
ventilation through the tent.
• Never store tent, even for a short period of time, without drying it
thoroughly and brushing off caked dirt. Do not pack stakes or poles inside
your tent. Use a separate storage bag.
• STAKES SHOULD BE REMOVED BY PULLING ON THE STAKE ITSELF.
NEVER PULL ON THE TENT FABRIC OR TENT STAKE LOOP TO
REMOVE STAKE.
• TENT POLES SHOULD NOT BE LEFT TELESCOPED
TOGETHER DURING STORAGE.
• Seam sealer has not been provided with your tent. For additional protection
we recommend seam sealing your tent prior to camping. Seam sealer may be
purchased through your local retailer or at your local sporting goods store.
• Do not leave your tent set-up for weeks at a time, be aware that
exposure to the ultraviolet rays of the sun can seriously damage material
and/or cause it to become discolored.
WARNING: KEEP ALL FLAME AND HEAT SOURCES
AWAY FROMTHIS TENT FABRIC. This tent meets the flammability
requirements of CPAI-84.The fabric will burn
if left in continuous contact with any flame source.The application of
any foreign substance to the tent fabric may render the flame-resistant
properties ineffective.
illus. 11
Hooks attach to
fabric loop
IMPORTED BY
SUNBEAM CORPORATION (CANADA) LIMITED
5975 Falbourne Street, Mississauga (Ontario) L5R 3V8
1 800 387-6161 • www.colemancanada.ca
MADE IN SRI LANKA
All manuals and user guides at all-guides.com

Other Coleman Tent manuals

Coleman 2000007825 Manual

Coleman

Coleman 2000007825 Manual

Coleman DURANGO FAMILY CABIN 9271-210 User manual

Coleman

Coleman DURANGO FAMILY CABIN 9271-210 User manual

Coleman CEDAR PASS 9160-908 User manual

Coleman

Coleman CEDAR PASS 9160-908 User manual

Coleman SUNDOME 9260F121 User manual

Coleman

Coleman SUNDOME 9260F121 User manual

Coleman Aquila 9145-171CD User manual

Coleman

Coleman Aquila 9145-171CD User manual

Coleman Monotana 9279B147 User manual

Coleman

Coleman Monotana 9279B147 User manual

Coleman SUNDOME 9180-309 User manual

Coleman

Coleman SUNDOME 9180-309 User manual

Coleman Fossil Creek 8'x7' User manual

Coleman

Coleman Fossil Creek 8'x7' User manual

Coleman SUNDOME 9260F907 User manual

Coleman

Coleman SUNDOME 9260F907 User manual

Coleman 2000001585 User manual

Coleman

Coleman 2000001585 User manual

Coleman American Heritage Weathermaster 9232B129 User manual

Coleman

Coleman American Heritage Weathermaster 9232B129 User manual

Coleman 9830-330 User manual

Coleman

Coleman 9830-330 User manual

Coleman Instant Shelter Manual

Coleman

Coleman Instant Shelter Manual

Coleman Sundome Manual

Coleman

Coleman Sundome Manual

Coleman EVANSTON 2000001589 User manual

Coleman

Coleman EVANSTON 2000001589 User manual

Coleman 2000001653 User manual

Coleman

Coleman 2000001653 User manual

Coleman 2000007832 Manual

Coleman

Coleman 2000007832 Manual

Coleman 2000010784 User manual

Coleman

Coleman 2000010784 User manual

Coleman AMERICAN HERITAGE WEATHERMASTER 2000000148 User manual

Coleman

Coleman AMERICAN HERITAGE WEATHERMASTER 2000000148 User manual

Coleman 2000007822 Manual

Coleman

Coleman 2000007822 Manual

Coleman BackHome Select 9392-136 User manual

Coleman

Coleman BackHome Select 9392-136 User manual

Coleman 2000014788 Manual

Coleman

Coleman 2000014788 Manual

Coleman Phad X3TM User manual

Coleman

Coleman Phad X3TM User manual

Coleman Octagon 98 Manual

Coleman

Coleman Octagon 98 Manual

Popular Tent manuals by other brands

Ventura Marlin Assembly instructions

Ventura

Ventura Marlin Assembly instructions

for Living L-GZ512PST-C Assembly instructions

for Living

for Living L-GZ512PST-C Assembly instructions

VEVOR HCP1220-S user manual

VEVOR

VEVOR HCP1220-S user manual

Outwell Regent YOSEMITE LAKE 5TC quick start guide

Outwell

Outwell Regent YOSEMITE LAKE 5TC quick start guide

Zempire PRONTO 10V2 instruction manual

Zempire

Zempire PRONTO 10V2 instruction manual

Gorilla 10x10 Grow Tent instructions

Gorilla

Gorilla 10x10 Grow Tent instructions

Kiwi Camping Kakapo 8 Pitching instructions

Kiwi Camping

Kiwi Camping Kakapo 8 Pitching instructions

SeaHawk 4693 instruction manual

SeaHawk

SeaHawk 4693 instruction manual

Palram Palma 5000 manual

Palram

Palram Palma 5000 manual

Vango Mokala 450 Pitching instructions

Vango

Vango Mokala 450 Pitching instructions

GYBE Event Assembly instructions

GYBE

GYBE Event Assembly instructions

GigaTent Prospect Rock FT049 owner's manual

GigaTent

GigaTent Prospect Rock FT049 owner's manual

A1 OTC 20X30 quick start guide

A1

A1 OTC 20X30 quick start guide

Jack Wolfskin grand illusion ii/ grand illusion iv manual 

Jack Wolfskin

Jack Wolfskin grand illusion ii/ grand illusion iv manual 

ClearSpan PB00826R3 instructions

ClearSpan

ClearSpan PB00826R3 instructions

Blumfeldt Partyzelt 10029437 quick start guide

Blumfeldt

Blumfeldt Partyzelt 10029437 quick start guide

Corradi PALLADIA flat 2 user manual

Corradi

Corradi PALLADIA flat 2 user manual

Outdoor Connection Easy Up 2 instructions

Outdoor Connection

Outdoor Connection Easy Up 2 instructions

manuals.online logo
manuals.online logoBrands
  • About & Mission
  • Contact us
  • Privacy Policy
  • Terms and Conditions

Copyright 2025 Manuals.Online. All Rights Reserved.