Proton XQ30 User manual

Proton XQ
Manual

Content
Description
Package Contents
Features
Components and Controls
Button Operation
Using the Battery Pack
Battery Charging
Battery Installation
Precautions
Recommendations for Use
External Power Supply
Operation
Installing Thermal Imaging Module on the Optical Device
Installing Pulsar 5x30 B Monocular on to the Proton XQ
Powering on and Image Setting
Microbolometer Calibration
Status Bar
Quick Menu Functions
Main Menu Functions
Enter the Main Menu
Mode
Image Detail Boost
Wi-Fi Settings
General Settings
Color Modes
Device Information
Defective Pixel Repair
Defective Pixel Repair
Restore Default Pixel Map
Microphone
Bluetooth
Calibration Mode
Video Recording and Photography
Wi-Fi Function
Display-Off Function
Wireless Remote Control
Descriptions of Controls
Remote Control Activation
Stream Vision
Firmware Update
USB Connection
Technical Inspection


Description
The Proton XQ30 thermal imager is designed for a variety of applications, including hunting
surveillance, security activities, day and night photo and video shooting.
The Proton XQ30 thermal imaging module can be mounted (using the correct PSP Ring
Adapter) on to the objective lens housing of various daylight optical devices, converting them
into a highly-sensitive thermal imaging device.

Package Contents
Proton XQ30 Thermal Imager
Pulsar 5x30 B Monocular
Carrying Case
Wireless Remote Control
APS 5 Rechargeable Battery
2x Lock-cover for APS 5 Battery
Power Adapter
USB Type-C Cable
Quick Start Guide
Lens-Cleaning Cloth
Warranty Card
Neck strap

Features
Microbolometer with a resolution of 384x288 pixels
Microbolometer pixel size of 17 microns
1024x768 AMOLED display resolution
Compact size
Easily converts daylight optical devices into thermal imaging devices
Preserves the benefits of daylight optics in night-time conditions
Three calibration modes (manual, semi-automatic and automatic)
Four observation modes: Forest, Rocks, Identification, User
Detection distance up to 900 m
Wireless remote control
Instant start
Display off function
Built-in video recording
Remote firmware update
Fully watertight (IPX7 protection class)
Wide operating temperature range (-25 °? – +50°?)
All-metal body made of light-alloy metal
Video/audio Recording
Built-in video recorder
Integration with iOS and Android devices
Wi-Fi Smartphone remote control and surveillance
YouTube Live broadcasting and direct recording on the Internet via a smartphone and the
Stream Vision app.
Battery Pack
Quick-change APS 5 Li-ion battery pack
USB Power Bank charging option

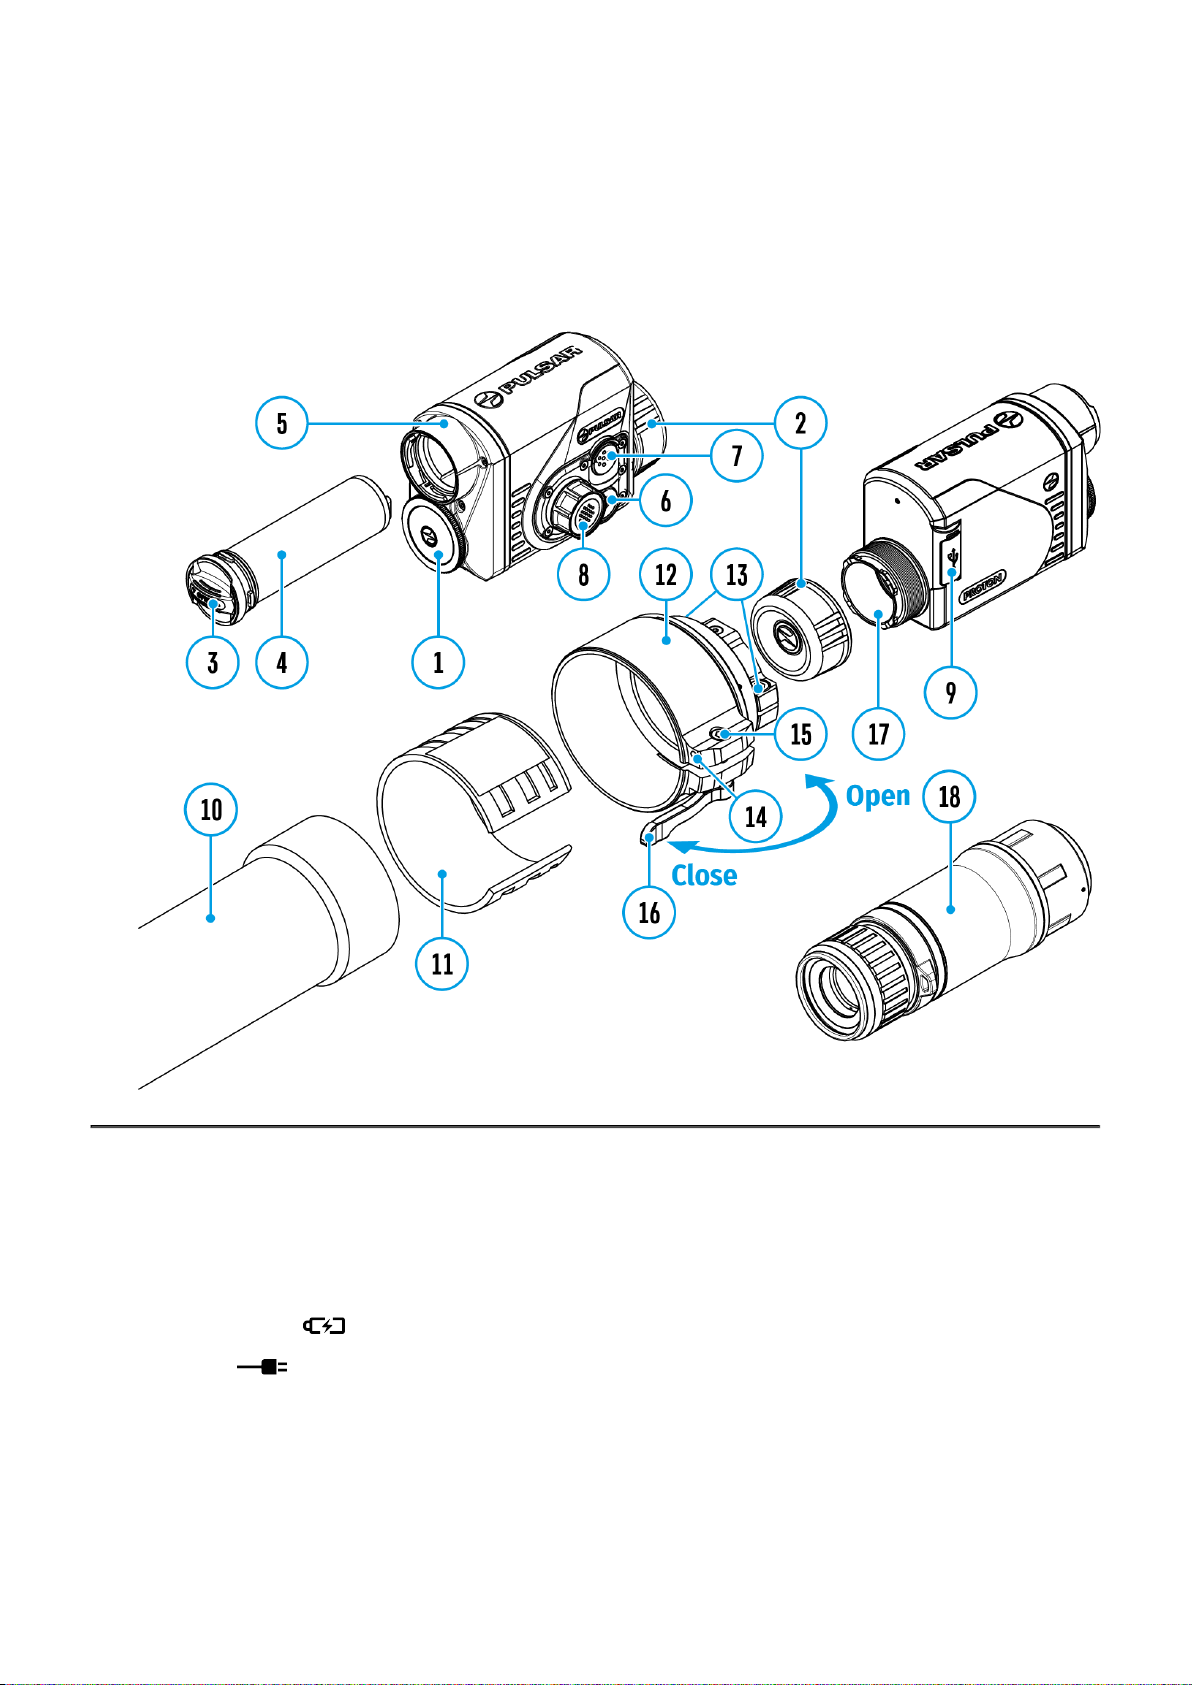
Components and Controls
1. Lens cover
2. Eyepiece cover
3. Battery compartment cover
4. Battery pack
5. Battery compartment
6. ON/OFF button
7. REC button
8. Controller
9. USB port
10. Objective lens end of daylight optical device
11. Insert
12. Adapter
13. Screws
14. Tightening screw
15. Screw

16. Adapter lever
17. Mounting area
18. Pulsar 5x30 B Monocular

Button Operation
Operation Button
Power device on short press
Power device o? long press for 3 secs
Turn display o? long press for less than 3 secs
Turn display on short press
Calibrate the microbolometer short press
VideoRecorder Button
Start/pause/resume video recording short press
Stop video recording long press
Switch to video / photo mode long press
Capture Photo short press
Main Menu Button
Enter main menu long press
Navigation through menu rotation
Enter menu items short press
Confirm value short press
Exit menu items long press

Exit main menu long press
Quick Menu Button
Enter quick menu short press
Switch between quick menu options short press
Parameter change rotation
Exit quick menu long press

Battery Charging
The Proton XQ30 thermal imager comes with an APS 5 rechargeable Lithium-ion battery.
APS 5 batteries support USB Power Delivery fast charging technology when using a standard
charging set (charger, USB Type-C cable, power adapter). Before first use, make sure the
battery is fully charged.
?

Option 1
1. Install the APS 5 battery (4) in the battery compartment (5) of the device.
2. Connect the USB cable (22) to the USB Type-C connector (9) of the device.
3. Connect the other end of the USB cable (22) to the Power Adapter (23).
4. Plug the Power Adapter (23) into a 100-240 V socket (24).
Option 2
1. Insert the APS 5 battery (4) along the guide into the APS 5 charger* (19) slot as far as it
will go.
2. Connect the plug of the USB Type-C cable(22) to the USB Type-C connector of the
Power Adapter(21).

3. Plug the Power Adapter (23) into a 100-240 V socket(24).
4. Connect the other end of the USB Type-C cable (22) to the USB Type-C connector(21)
of the charger.
5. LED indicators (20) will display the battery charge level (see Table).
Note:Two* batteries can be charged at the same time.
LED indication (20) in the battery
charging mode Battery Level
Battery charge level is from 0% to 25%
Battery charge level is from 26% to
50%
Battery charge level is from 51% to
80%
Battery charge level is from 81% to
99%
Battery is fully charged. It can be
disconnected from the charger.
Defective battery. Do not use the
battery!
LED indication (20) in the standby
mode** Battery Level
Battery charge level is from 0% to 25%
Battery charge level is from 26% to
50%
Battery charge level is from 51% to
80%
Battery charge level is from 81% to
99%
Battery is fully charged. It can be
disconnected from the charger.
Defective battery. Do not use the
battery!
* Sold separately.
** Standby mode is when the batteries are in the charger but the Power Adapter is not
connected. In this mode, the indicators are only on for 10 seconds.
Attention! When using a Power Adapter that does not support USB Power Delivery fast

charging technology, the flicker frequency of the LED indicators decreases by a factor of 3 and
the charge time increases.
Attention! The charger heats up during fast charging. Excess heat is removed through the
radiator and does not affect the device operation.
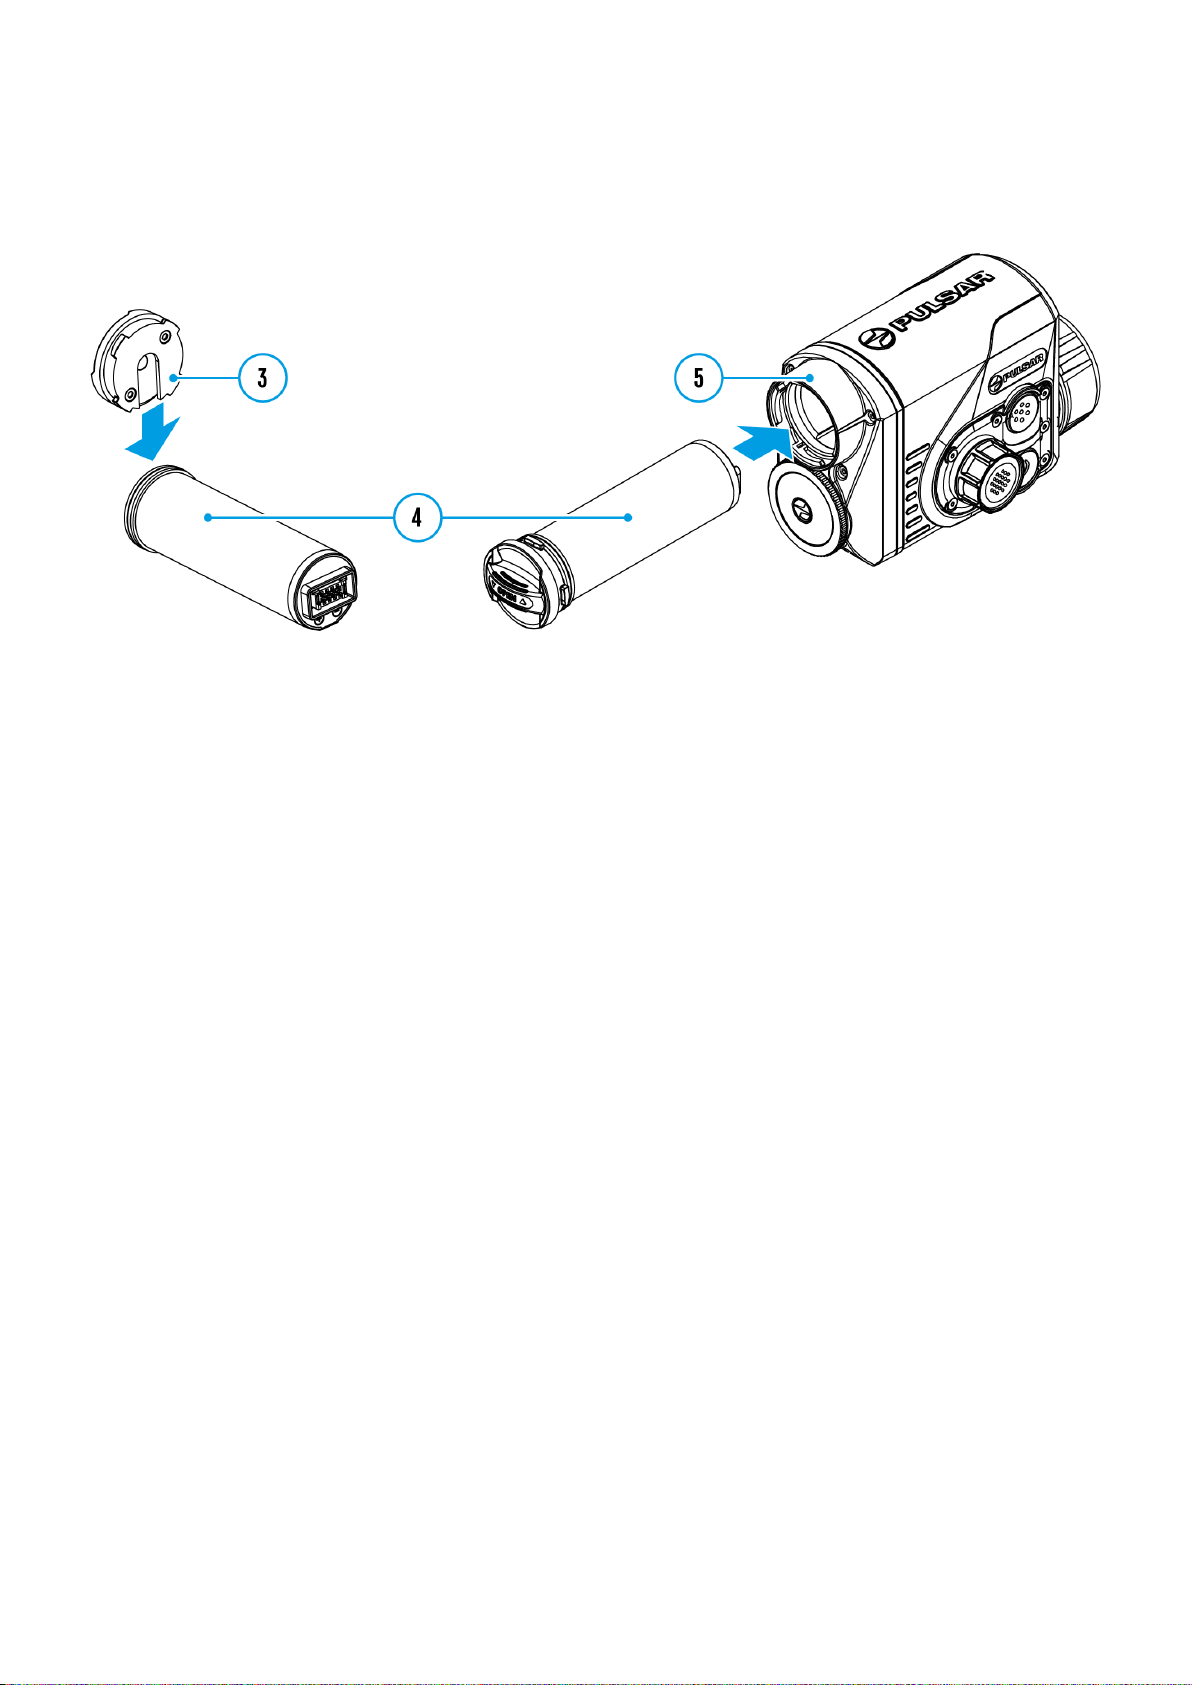
Battery Installation
1. Put the Lock-cover (3) on the rechargeable APS 5 battery (4).
2. Insert the APS 5 battery (4) along the guide into the battery compartment (5).
3. Lock the battery (4) by turning the Lock-cover (3) clockwise until it stops.
4. Turn the Lock-cover (3) counter-clockwise to remove the battery (4).

Precautions
Always use the APS 5 charger supplied with the device (or purchased separately) to
charge APS 5 batteries. Using an unsuitable charger can cause irreparable damage to
the battery and fire.
Do not charge the battery immediately after bringing it from cold to warm. Wait at least 30
minutes for the battery to warm up.
Do not leave the battery unattended while charging.
Do not use the charger if it has been modified or damaged.
Do not leave the battery in a charger connected to the mains after charging is complete.
Do not expose the battery to high temperatures or naked flames.
Do not use the battery as a power source for devices that do not support APS 5 batteries.
Do not disassemble or deform the battery or charger.
Do not drop or strike the battery or charger.
The battery and charger must not be immersed in water.
Keep the battery out of the reach of children.

Recommendations for Use
The batteries should be partially charged (50 to 80 %) for long-term storage.
The battery is to be charged at an ambient temperature of 0 °C to +35 °C or the lifespan
of the battery will decrease significantly.
When using the battery at sub-zero ambient temperatures, the battery capacity
decreases. This is normal and not a defect.
Do not use the battery at temperatures outside the range of -25°C to +50 °C or it may
reduce battery life.
The battery is short circuit protected. However, any situation that may cause short-
circuiting should be avoided.
External Power Supply
☐
Show device diagram
External power can be supplied from an external source, such as a Power Bank (5 V).
1. Connect the external power source to the USB Type-C connector(9) on the device.
2. The device will switch to draw power from the external source while the ?PS5 battery will
be gradually recharged.
3. A battery icon will appear on the display showing the percentage charge level.
4. An icon will be displayed when the device is powered by an external power source
and the ?PS5 battery is not connected.
5. The device automatically switches to the APS 5 battery when the external power supply
is disconnected.

Attention!Charging APS 5 batteries from an external source at temperatures below 0°C can
reduce battery life. When using external power, connect the Power Bank to the device only
after it has been turned on and working for at least several minutes.

Installing Thermal Imaging
Module on the Optical Device
☐
Show device diagram
This manual suits for next models
1
Table of contents
Popular Laboratory Equipment manuals by other brands

Microscan
Microscan MicroHAWK 98-9000077-01 Accessory guide

GW Instek
GW Instek Two Line V-Network GLN-5040A user manual

BIO RAD
BIO RAD 170-6555 instruction manual

Takara Bio
Takara Bio Thermal Cycler Dice Touch quick guide

Leica
Leica Aperio AT2 DX user guide

NEW BRUNSWICK SCIENTIFIC
NEW BRUNSWICK SCIENTIFIC C-24 Guide to operations


