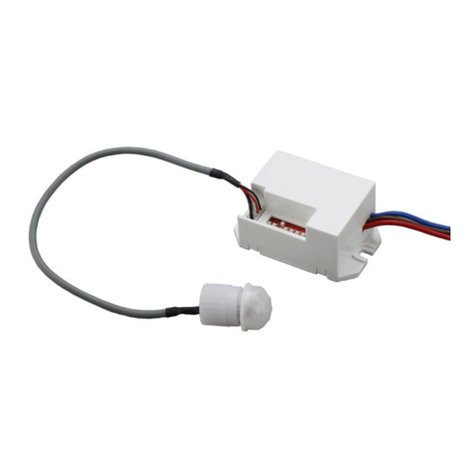
ProVero ID-0055 User manual

ID-0055
Instruction/Instrukcja
Welcome to use ID-0055 infrared motion sensor!
The product adopts good sensitivity detector and integrated circuit. It gathers automatism,
convenience, safety, saving-energy and practical functions. It utilizes the infrared energy from
human as control-signal source and it can start the load at once when one enters detection field.
It can identify day and night automatically. It is easy to install and used widely.
SPECIFICATION:
Power Source:12V Detection Range: 120°/360°
Detection Distance: 3m/6m (choice) (<24℃) Working Temperature: -20~+40℃
Ambient Light: 10LUX/2000LUX (choice) Working Humidity: <93%RH
Time Delay: 5s, 30s, 1min, 3min, Detection Moving Speed: 0.6-1.5m/s
5min, 8min (choice) Installation Height: 2.2-4m (ceiling mounting)
Rated Load: Max.60W-12V Installation Height: 1.8-2.5m (wall mounting)
120W-24V
FUNCTION:
➢Can identify day and night automatically: when turn to SUN ((below is SUN)), it will work day
and night, when turn it to MOON (above is moon), it will only work in the ambient light less
than 10LUX. As for adjustment, please refer to testing way.
➢SENS adjustable: It can be adjusted according to using location. The detection distance of
low sensitivity could be only 3m and high sensitivity could be 6m which fits for large room.
➢Time-Delay is added continually: When it receives the second induction signals within the
first induction, it will restart to time from the moment.
Good sensitivity Poor sensitivity
INSTALLATION ADVICE:
As the detector responds to changes in temperature, avoid the following situations:
➢Avoid pointing the detector towards objects with highly reflective surfaces, such as mirrors
etc.
➢Avoid mounting the detector near heat sources, such as heating vents, air conditioning
units, light etc.
➢Avoid pointing the detector towards objects that may move in the wind, such as curtains, tall
plants etc.

CONNECTION:
Warning. Danger of death through electric shock!
⚫Must be installed by professional electrician.
⚫Disconnect power source.
⚫Cover or shied any adjacent live components.
⚫Ensure device cannot be switched on.
⚫Check power supply is disconnected.
➢Connect the power and the load according to the
connection-wire diagram.
➢Fix the bottom on the selected position with the inflated
screw.
➢Switch on the power and test it.
CONNECTION-WIRE DIAGRAM:
(See the right figure)
TEST:
➢Slide the LUX switch to SUN
position (below is SUN). Slide the
SENS switch to maximum
(below is the maximum).
Adjust the TIME switch, slide 5”
switch to ON position. (slide
upwards)
➢Switch on the power; the sensor and its connected lamp will have no signal at the beginning.
After Warm-up 30sec, the sensor can start work .If the sensor receives the induction signal,
the lamp will turn on. While there is no another induction signal any more, the load should
stop working within 5sec and the lamp would turn off.
➢Slide the LUX knob above on the minimum (moon). If the ambient light is more than
10LUX, the sensor would not work and the lamp stop working too. If you cover the
detection window with the opaque objects (towel etc), the sensor would work .Under no
induction signal condition, the sensor should stop working within 5sec.
Note: when testing in daylight, please turn LUX knob to (SUN) position, otherwise
the sensor lamp could not work! If the lamp is more than 60W, the distance between lamp
and sensor should be 60cm at least.
SOME PROBLEM AND SOLVED WAY:
➢The load does not work:
a. Please check if the connection of power source and load is correct.
b. Please check if the load is good.
c. Please check if the settings of working light correspond to ambient light.
➢The sensitivity is poor:
a. Please check if there is any hindrance in front of the detector to affect it to receive
the signals.
b. Please check if the ambient temperature is too high.
c. Please check if the induction signal source is in the detection field.
d. Please check if the installation height corresponds to the height required in the
instruction.
e. Please check if the moving orientation is correct.
➢The sensor can not shut off the load automatically:
a. Please check if there is continual signal in the detection field.
b. Please check if the time delay is set to the maximum position
c. Please check if the power corresponds to the instruction.

Dziękujemy za zakup naszego czujnika na podczerwień model ID - 0055.
Czujnik ruchu z zewnętrznym sensorem służy do automatycznego sterowanie oświetleniem lub
innymi urządzeniami elektrycznymi. Zapewnia przy tym oszczędność energii elektrycznej.
Oświetlenie jest włączane za pomocą czujnika ruchu PIR, działającego na podczerwień.
Oświetlenie włącza się pod wpływem ruchu obiektu wydzielającego ciepło.
UWAGA!
Urządzenie współpracuje z diodami LED. Napięcie wejściowe 12V DC!
Przed przystąpieniem do montażu prosimy o dokładne zapoznanie się z instrukcją obsługi.
SPECYFIKACJA TECHNICZNA:
Napięcie zasilania:12V Kąt widzenia: 120°/360°
Zasięg: 3m/6m (do wyboru) (<24℃) Temperatura pracy: -20~+40℃
Natężenie światła: 10LUX/2000LUX (do wyboru) Wilgotność: <93%RH
Czas świecenia: 5s, 30s, 1min, 3min, Wykrywana prędkość ruchu: 0.6-1.5m/s
5min, 8min (do wyboru) Wysokość montażu: 2.2-4m (na suficie)
Maksymalne obciążenie: 60W-12V 1.8-2.5m (na ścianie)
120W-24V
FUNKCJE
➢Automatyczne wykrywanie dnia i nocy (LUX): włączenie opcji SŁOŃCE (przycisk DIP
SWITCH –na dole) powoduje, że urządzenie będzie pracować w dzień i w nocy. W
przypadku opcji KSIĘŻYC (przycisk DIP SWITCH - na górze) urządzenie pracować będzie
tylko, gdy natężenie światła będzie mniejsze niż 10 lx.
➢Regulacja czułości: możliwa regulacja, niska czułość w małych pomieszczeniach a wysoka
w dużych.
➢Włącznik czasowy (w trybie ciągłym): gdy czujnik wykryje kolejny sygnał indukcyjny,
następuje zrestartowanie czasu działania od nowa.
.
Good sensitivity Poor sensitivity
PORADY DOTYCZĄCE MONTAŻU
Jako, że czujnik reaguje na zmiany temperatury, należy unikać następujących sytuacji:
➢Unikaj kierowania czujnika w kierunku obiektów silnie odbijających (np. lustro
itp.);
➢Unikaj montażu czujnika blisko źródeł ciepła tj. grzejniki, klimatyzacja;
➢Unikaj montowania czujnika w pobliżu obiektów, które mogą poruszać się pod
wpływem wiatru (np. zasłony).
CONNECTION:
Uwaga.
-Montażu powinna dokonać osoba posiadająca
odpowiednie kwalifikacje
-Odłącz źródło zasilania
-Przewody elektryczne muszą być podłączone zgodnie
z instrukcją
➢Podłącz przewody zgodnie ze schematem połączeń.
➢Przymocuj czujnik za pomocą
wkrętów (brak w zestawie).
➢Podłącz zasilanie i przetestuj.
Schemat połączenia:
(Patrz rysunek)

TESTOWANIE
➢Ustaw przełącznik LUX - w pozycji dolnej.
➢Ustaw przełącznik SENS - w pozycji dolnej.
➢Ustaw przełącznik TIME przesuwając przycisk 5’’ w położenie ON (w górę).
➢Po włączeniu zasilania i nagrzaniu przez 30s czujnik może zacząć pracę. Jeśli
czujnik wykryje ruch to lampa włączy się. Jeśli nie będzie żadnego sygnału
indukcyjnego, urządzenie powinno wyłączyć się w przeciągu 10 3s.
➢Ustaw przełącznik LUX w położeniu KSIĘŻYC – urządzenie nie będzie włączać
się w dzień. Zakrycie czujnika nieprzezroczystym przedmiotem spowoduje zatrzymanie
pracy podłączonego odbiornika z powodu braku sygnału wzbudzającego w ciągu
10 3s.
➢UWAGA!
➢W przypadku testowania w świetle dziennym – przełącznik LUX powinien znajdować
się w położeniu SŁOŃCE (na dole) – w przeciwnym razie czujnik może pracować
nieprawidłowo.
ROZWIĄZYWANIE PROBLEMÓW
➢Obciążenie nie jest załączane:
- Sprawdź podłączenie przewodów zasilających czujnik;
- Sprawdź czy obciążenie (LOAD) jest dobrze dobrane;
- Sprawdź nastawienie przełącznika LUX.
➢Czułość jest słaba:
- Sprawdź czy w pobliżu czujnika nie ma obiektów zakłócających sygnał;
- Sprawdź czy temperatura nie jest za wysoka;
- Sprawdź czy obiekt wykrywany znajduje się w polu detekcji czujnika;
- Sprawdź zalecaną wysokość montażu.
➢Czujnik nie może automatycznie odłączyć obciążenia:
- Sprawdź czy w polu detekcji nie występują ruchome elementy;
- Sprawdź czy czas naprawy czujnika nie jest za długi;
- Sprawdź napięcie zasilania urządzenia;
- Sprawdź czy w pobliżu czujnika nie zamontowano urządzeń zakłócających pracę.
Table of contents
Languages:
Other ProVero Security Sensor manuals
Popular Security Sensor manuals by other brands
Latchways
Latchways R20 Usage Guide
Vega
Vega DSGH operating instructions
IFM Electronic
IFM Electronic OGE3 Series operating instructions
GE
GE DD205-AD Series installation instructions
Larson Electronics
Larson Electronics SLEDB-110V-30C-XMS quick start guide
Indexa
Indexa FD01 Operating and safety instructions
