provita 1 Series User manual
1 179249
Fürs Leben gern. For your life.
www.provita.de
01/15
Gebrauchsanleitung Operating instructions
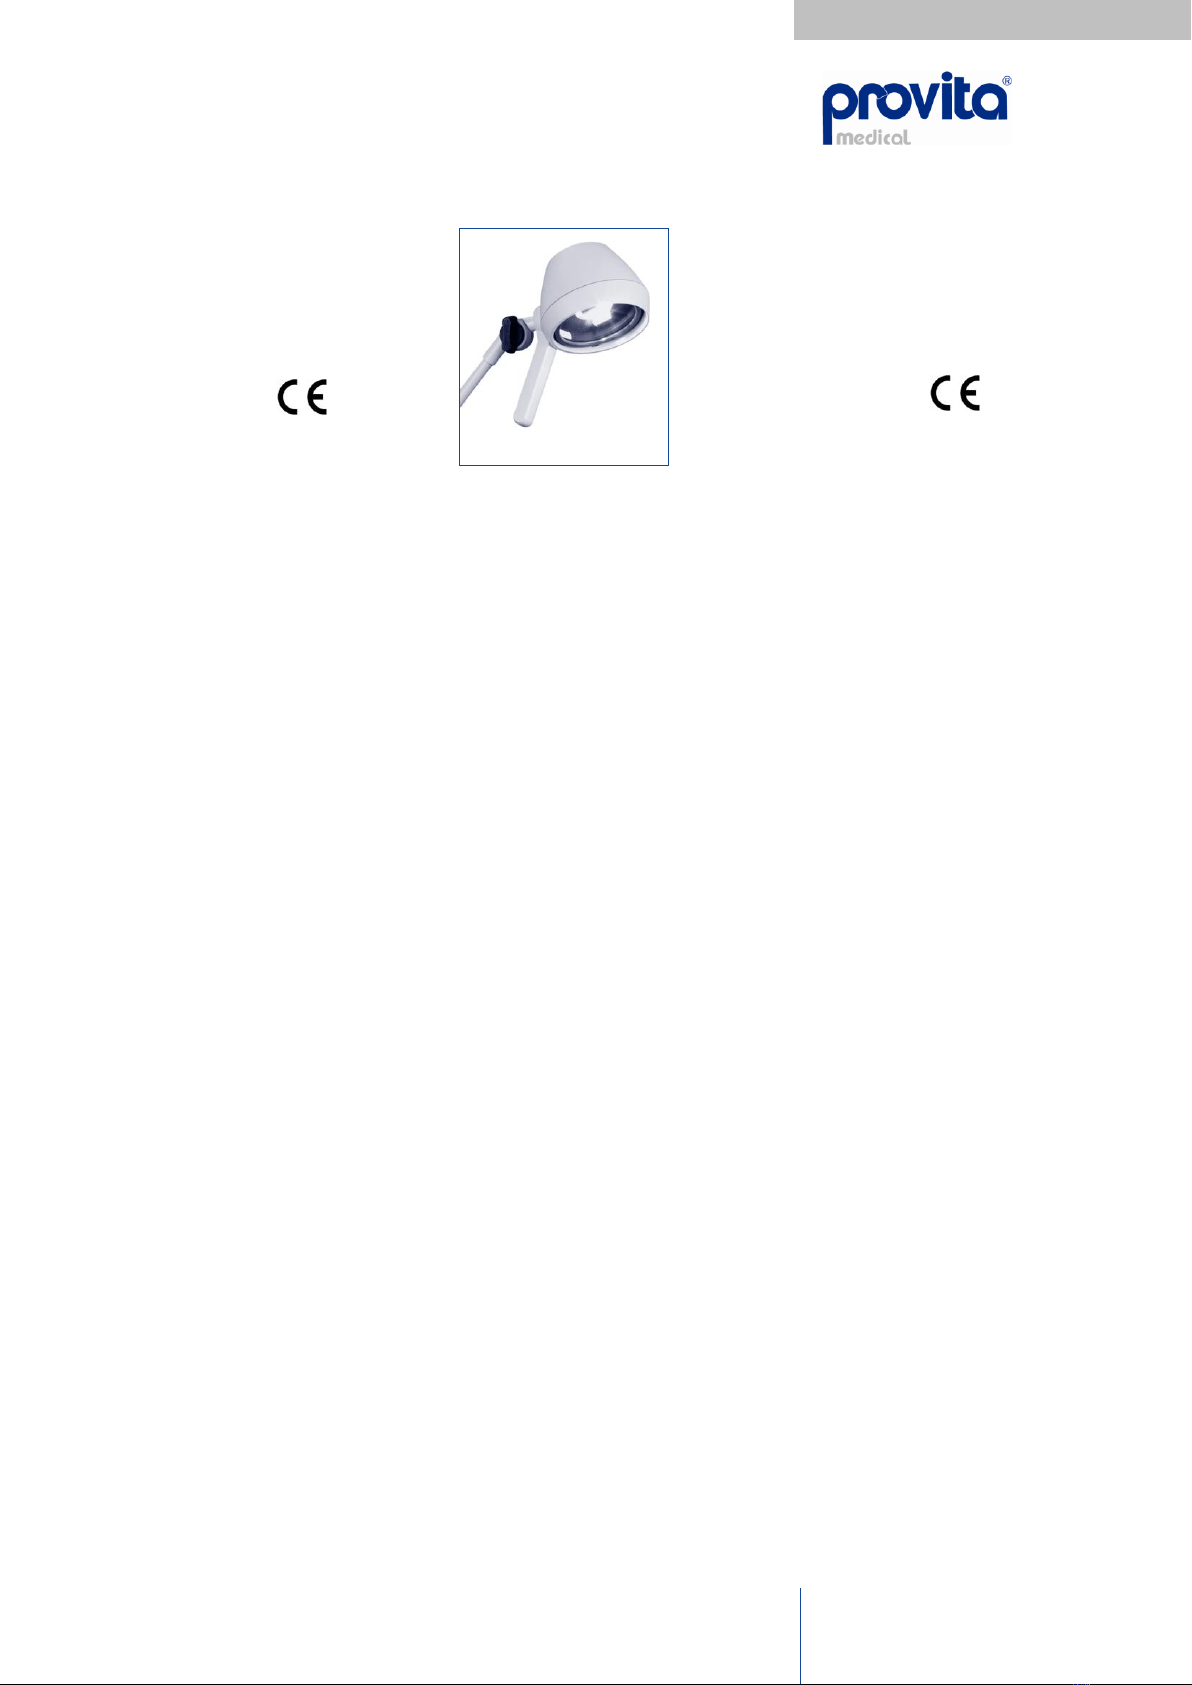
Deckenleuchte Serie 1 Ceiling mounted light Series 1
Wandleuchte Serie 1 Wall mounted light Series 1
Halogen Halogen
Nach EN 60601-1 according to EN 60601-1
1. Allgemeines
Informationen zur Gebrauchsanleitung
Diese Gebrauchsanleitung soll Ihnen den sicheren und
sachgerechten Umgang mit der Leuchte Serie 1 ermögli-
chen. Lesen Sie diese Gebrauchsanleitung vor der ersten
Benutzung des Gerätes sorgfältig durch.
Bewahren Sie die Anleitung gut auf. Falls Sie die Leuchte
an Dritte weitergeben, geben Sie auch die Gebrauchsanlei-
tung mit.
Die Nichtbeachtung dieser Anleitung kann zu schweren
Verletzungen oder Schäden an der Leuchte führen.
Bestimmungsgemäßer Gebrauch
Die Untersuchungsleuchte Serie 1 ist gemäß DIN EN
60601-1 ausgeführt und somit zur Verwendung in klini-
schen Bereichen von Krankenhäusern und Gebäuden zur
Gesundheitsfürsorge geeignet.
Haftung und Gewährleistung
Alle Angaben und Hinweise erfolgen unter Berücksichti-
gung unserer bisherigen Erfahrungen und Erkenntnisse
nach bestem Wissen. Technische Änderungen im Rahmen
der Weiterentwicklung behalten wir uns vor.
Für Schäden, die aufgrund der Nichtbeachtung dieser
Gebrauchsanleitung entstehen, übernehmen wir keine
Haftung.
1. General Information
Usage Instructions
These instructions for use should enable you to use the
lamp Series 1 safely and properly. Please read these in-
structions through carefully before using the lamp for the
first time.
Pay particular attention to the instructions. If you give the
lamp to a third party, please ensure that you also pass on
the instructions for use at the same time.
Non-compliance with these instructions can lead to serious
injury or may damage the lamp.
Correct use
The lamp Series 1 is designed according to DIN EN 60601-
1 and is thus suitable for use in clinical areas of hospitals
and health care premises.
Liability and warranty
All of the information and instructions provided are given to
the best of our knowledge and are based on our experi-
ence and knowledge to date. We reserve the right to make
technical changes essential for subsequent product devel-
opment.
We refuse to accept any liability for injuries sustained
as a result of non-compliance with these instructions.

2
Symbole in der Anleitung
Wichtige Hinweise in dieser Anleitung sind durch Symbole
wie folgt gekennzeichnet:
WARNUNG!
Kennzeichnet Sicherheitshinweise, bei deren Nichtbe-
achtung die Gefahr der Verletzung oder des Todes
besteht.
WARNUNG! Elektrischer Strom!
Macht auf gefährliche Situationen durch elektrischen
Strom aufmerksam. Bei Nichtbeachtung besteht die
Gefahr der Verletzung oder des Todes.
ACHTUNG!
Kennzeichnet Gefahren, die Beschädigungen des Gerä-
tes zur Folge haben können.
HINWEIS!
Hebt Tipps und andere nützliche Informationen dieser
Gebrauchsanleitung hervor.
Entsorgung
Wenn das Gebrauchsende erreicht ist, insbeson-
dere wenn Funktionsstörungen auftreten, machen
Sie die ausgediente Leuchte unbrauchbar, indem
Sie sie vom Strom trennen. Entsorgen Sie die Leuchte
entsprechend der in Ihrem Land geltenden Umweltvor-
schriften. Elektrische Abfälle dürfen nicht zusammen mit
Haushaltsabfällen entsorgt werden. Wenden Sie sich für
Ratschläge bezüglich des Recyclings an Ihre Kommunal-
behörde oder Ihren Händler.
2. Sicherheit
Besondere Gefahren für Kinder
Lassen Sie die Leuchte nicht unbeaufsichtigt einge-
schaltet und verwenden Sie sie mit größter Vorsicht,
wenn Kinder oder Personen, die die Gefahren nicht
einschätzen können, in der Nähe sind.
Kinder oder Personen, die die Gefahren nicht ein-
schätzen können, dürfen die Leuchte nicht benut-
zen. Bewahren Sie sie unzugänglich auf.
Verpackungsmaterialien dürfen nicht zum Spielen
verwendet werden. Es besteht Erstickungsgefahr.
Gefahren für Personen
Decken Sie die Leuchte niemals ab. Durch die so
entstehende Stauwärme besteht Brandgefahr.
Halten Sie während des Betriebs leicht entflammba-
re Mittel und Gegenstände, insbesondere Bettzeug
von der Leuchte und dam Lichtkegel entfernt.
Der Abstand zwischen Leuchtkopf und anderen Ge-
genständen muss mindestens 30 cm betragen.
Durch die Wärme der Lampe kann es bei zu gerin-
gem Abstand zum Brand kommen.
Sehen Sie niemals direkt in die Leuchte hinein. Hel-
les Licht kann zu Augenverletzungen führen.
Die Wand- und Deckenbefestigung muss statisch
sicher sein.
Symbols in the instructions for use
Important instructions in these instructions are highlighted
with symbols, as shown below:
WARNING!
This symbol refers to safety instructions. Failure to
comply with these could result in injury or even death.
WARNING! Electrical current!
Highlights hazardous situations caused by the
electrical current. Failure to comply with this could
result in injury or even death.
ATTENTION!
This refers to risks that may result in damage to the
lamp.
NOTE!
Contains tips and other useful information listed in these
instructions for use.
Disposal
When the life span of the lamp is over, especially
when functional problems occur, make the used
lamp unusable by removing the plug from the
socket and separating the cable. Dispose of the lamp in
accordance with environmental legislation applicable in
your country. Electrical waste must not be disposed of with
domestic waste. Contact your regional authorities or retailer
for advice on recycling.
2. Safety
Particular hazards for children
Do not leave the lamp in the „on” mode unsuper-
vised and take extreme caution when using in the
vicinity of children or people who are unaware of the
risks.
Children or people who are unaware of the risks
must not use the lamp. Make the lamp inaccessible.
Packaging materials must not be used as play-
things. These could present a choking hazard.
Human risks
Never cover the lamp up. There is a risk of fire as
the heat accumulates.
Do not use any explosive or readily flammable sub-
stances near the lamp due to the fire and explosion
hazard. Keep away your bed cover and cussion
from the lamp and from the light cone
Ensure that the top of the lamp is at least 30 cm
away from other objects. There is a fire hazard if
the lamp is placed too close to other objects.
Never look directly into the light. Bright light can
damage your eyes.
The wall and the ceiling mount/assembling has to be
made safe and secured in regards to static require-
ments.

3
Gefahren durch elektrischen Strom
Die Leuchte wird mit elektrischem Strom betrieben, dabei
besteht grundsätzlich die Gefahr eines elektrischen
Schlags. Achten Sie daher besonders auf Folgendes:
Fassen Sie den Stecker (je nach Ausführung vorhan-
den) niemals mit nassen Händen an.
Wenn Sie den Stecker aus der Steckdose heraus-
ziehen wollen, ziehen Sie immer direkt am Stecker.
Niemals am Kabel, es könnte beschädigt werden.
Achten Sie darauf, dass das Kabel nicht geknickt,
eingeklemmt oder mit Hitzequellen in Berührung
kommt.
Schützen Sie die Leuchte immer vor Nässe und
Feuchtigkeit.
Gefahren für das Gerät
Transportieren/versenden Sie die Leuchte grund-
sätzlich immer in der Originalverpackung, damit sie
keinen Schaden nimmt. Heben Sie dazu die Verpa-
ckung auf.
Verhalten im Gefahrenfall und bei Unfällen
Schalten Sie die Leuchte im Gefahrenfall und bei Unfällen
sofort ab und ziehen Sie den Stecker.
Falls die Leuchte defekt ist
Betreiben Sie niemals eine defekte Leuchte oder ei-
ne Leuchte mit einem defekten Kabel. Es besteht
erhebliches Verletzungsrisiko.
Geben Sie eine defekte Leuchte zur Reparatur an
einen Fachhändler.
Hazards caused by an electrical current
As the light operates on electricity, there is basically a risk
of electrical failure. Please note the following:
Never handle the plug with wet hands (plug not supplied
with all options).
When you want to pull the plug out of the socket,
always pull directly on the plug and never on the ca-
ble as it could be damaged.
Please note that the cable must not be twisted,
clamped or over-loaded. Do not allow it to come
into contact with heat sources.
Never immerse the lamp in water or other liquids
and protect from rain and moisture.
Risks for the device
always transport/dispatch the lamp in its original
packaging to protect it from damage. Keep the
packaging for this purpose.
Procedure to follow in the event of risks and accidents
Immediately switch off the lamp in risk and accident situa-
tions, and remove the plug.
If the lamp is defective
Never use a defective lamp or a lamp with a defec-
tive cable. There is a considerable risk of injury if
you do so.
Return a defective lamp to your retailer for repair.

4
3. Installation
Auspacken
Packen Sie die Leuchte und alle Zubehörteile aus und
überprüfen Sie den Inhalt auf Vollständigkeit.
Entsorgen Sie nicht mehr benötigtes Verpackungsmaterial
entsprechend den in Ihrem Land geltenden Vorschriften.
Sollten Sie einen Transportschaden bemerken, wenden Sie
sich umgehend an Ihren Händler.
Montieren
WARNUNG! Elektrischer Strom!
Schließen Sie den Strom erst an, wenn die Leuchte
vollständig montiert ist.
Die Montage ist Abhängig von der gewählten Ausführung:
3.1
Deckenleuchte
(Darstellung ohne Baldachin)
3.2
Wandleuchte
3. Installation
Unpacking
Unpack the lamp and all of the accessories and check that
the contents are intact.
Dispose of any packaging materials that are no longer
required in accordance with the current legislation in your
country. Please contact your retailer immediately if you
observe any damage caused during transport.
Assembly
WARNING! Electrical current!
Do not plug the lamp in until it has been completely
assembled.
Depending on the different lamp attachment, the mounting
has to be done differently:
3.1
Ceiling mounted light
(Covering not shown on picture)
3.2
Wall mounted light
5
3.1 Montage der Deckenleuchte
Lieferumfang:
1 Leuchte mit Gelenkarm
1 Deckenanbindung
1 Gebrauchsanleitung
11 K2S48096 Unterlegscheibe (3 zum Ausgleichen)
8 K2K7099- Kunststoffscheibe
4 K2K7109- Hülse
4 K2S48296 Federring
3 K2S47396 Unterlegscheibe (zum Ausgleichen)
3 K2S47596 Unterlegscheibe (zum Ausgleichen)
1 E2K2764A Abdeckkappe
1 Torx-Winkel-Schraubendreher
ACHTUNG!
Vergewissern Sie sich vor Anbringen der Leuchte darü-
ber ob die Decke über die nötige Tragkraft verfügt. Zie-
hen Sie im Zweifelsfalle einen Fachmann zu Rate.
WARNUNG! Elektrischer Strom!
Stellen Sie sicher dass die Stromzuführung unterbro-
chen wurde, bevor Sie die Leuchte montieren. So ver-
meiden Sie Unfälle!
Vorsicht!
Die Zuleitung muss geeignet abgesichert und dauerhaft
geerdet sein. Wir empfehlen die Absicherung über einen
FI Schalter.
Hinweis!
Das Anbringen der Deckenbefestigung und der elektrische
Anschluss des Trafos ist durch einen Elektrofachmann
vorzunehmen. Die Installation ist für Leitungsquerschnitte
bis 1,5 mm² geeignet.
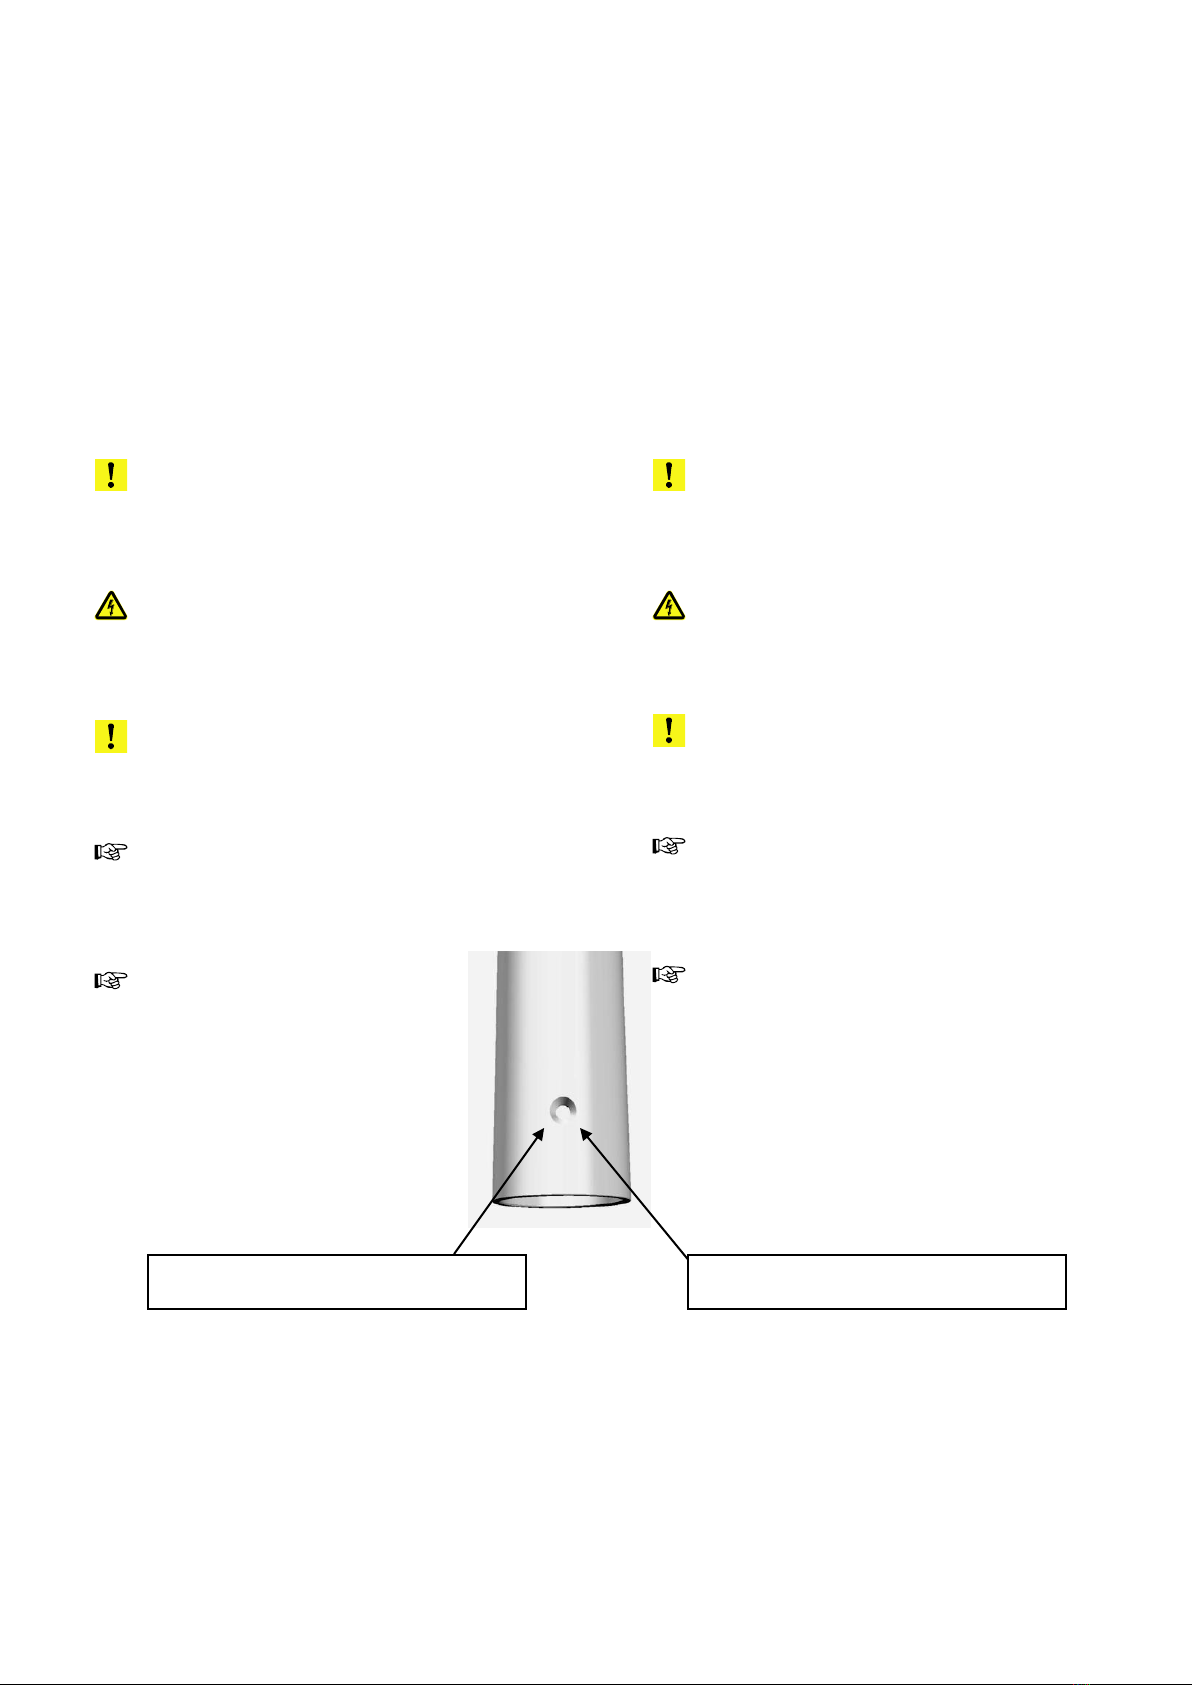
Hinweis!
Achten Sie beim Ausrichten der Deckenan-
bindung auf die Position der Senkbohrun-
gen für den Gelenkarm. Die Senkbohrun-
gen müssen in einer Linie mit der Mitte des
Schwenkbereiches liegen.
Die spätere Positionierbarkeit der Leuchte
ist von der Ausrichtung der Deckenanbin-
dung abhängig.
Bevor Sie den Gelenkarm an die Decken-
anbindung anschrauben sollten sie durch
drehen des Anschlussstückes prüfen wo der
Anschlag sitzt.
Netzversorgung abschalten und gegen wiedereinschal-
ten sichern.
Deckenanbindung anlegen und Bohrungen markieren.
Dabei darauf achten das die Stromzuführung noch zu-
gänglich ist.
Verdübelung vornehmen. Darauf achten, dass die
elektrischen Zuleitungen nicht angebohrt werden. Es
müssen Dübel und Schrauben verwendet werden die
für diese geeignet sind. (nicht im Lieferumfang enthal-
ten)
Die Deckenleuchte muss mindestens mit 3 gleich-
mäßig verteilten Schrauben sicher und tragfähig
befestigt werden!
Senkbohrung = Mitte Schwenkbereich
3.1 Mounting of the ceiling mounted light
Content of delivery:
1 Light with articulated arm
1 Ceiling unit
1 Operating instructions
11 K2S48096 Washer (3 for adjustment)
8 K2K7099- Plasticwasher
4 K2K7109- Bush
4 K2S48296 Lockwasher
3 K2S47396 Washer (for adjustment)
3 K2S47596 Washer (for adjustment)
1 E2K2764A Cover Cap
1 Torx-Angled-Allen key
WARNING!
Before mounting/assembling the light, please do ap-
prove that the ceiling load bearing capacity. In case of
doubt please ask an specialist.
WARNING! Electrical current!
Please make sure that the electrical supply is discon-
nected before you mount the lamp. So you avoid acci-
dents!
ATTENTION!
The power supply has to be fused and permanently
grounded. We do recommend the fusing by a FI fuse.
NOTE!
The assembling of the ceiling unit and the electrical con-
nection has to be made by a specialist only. The installation
was developed to be connected to electrical wiring with a
cross section of 1,5 mm².
NOTE!
Please make sure that the position of the
countersink for the articulated arm is cor-
rectly installed. THe countersinks have to
be in same line as the the center of the
rotating range.
The position and working range of the light
depends on the position of the ceiing unit.
Before assembling/mounting the articular-
arm arm to the ceiling unit, the position
„Stop“ should be checked by turning the
adapter fitting.
Shut-down the main supply and protect against switch-
ing on
Ceiling unit has to be docked and drilling holes have to
be marked. Please make sure that the power supply is
still accessible.
Set up the anchors. Please do take care, that the elec-
trical wires are not damaged by the drilling. Dedicated
anchors and screws have to be used (not included).
The ceiling lamp must be safely fixed and mounted
with at least 3 equally distributed screws!
Countersink = Center of rotating range
6
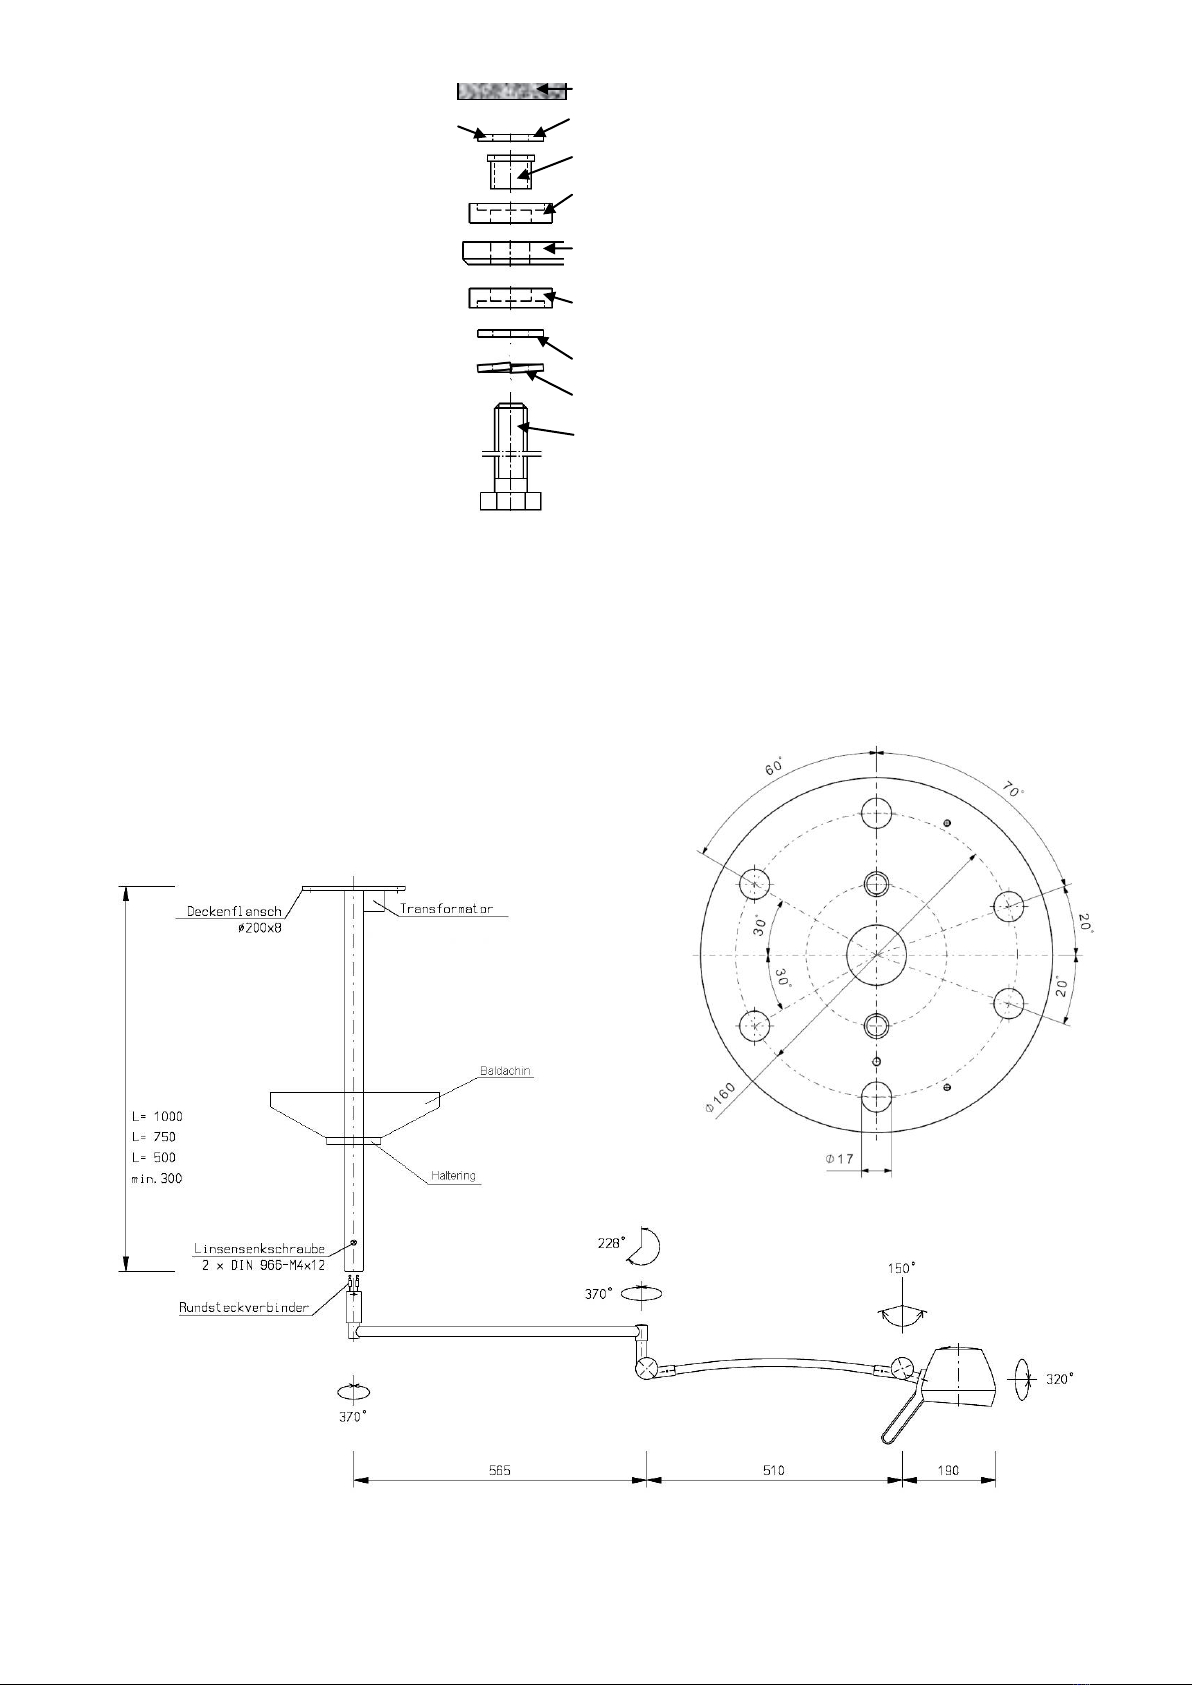
Deckenanbindung an der Decke mit
Unterlegscheiben und Abstandshal-
tern ausrichten und mit Schrauben
verschrauben wie im Bild dargestellt.
Sollte die Decke uneben sein und
das Deckenanbindungsrohr nicht
senkrecht nach unten ragen, gleichen
Sie Unebenheiten mit zusätzlichen
Unterlegscheiben an Pos 1 aus.
Schieben Sie den Baldachin (falls
mitbestellt) über das Deckenanbin-
dungsrohr und sichern Sie ihn im un-
teren Bereich mit dem Haltering ge-
gen abrutschen.
Die beiden Rundsteckverbinder des
Gelenkarms mit den Rundsteckver-
bindern der Deckenanbindung zu-
sammenstecken. Leuchte mit Ge-
lenkarm in die Deckenanbindung ein-
stecken. Um diesen Vorgang zu er-
leichtern, kann beim Einstecken am
oberen Ende der Deckenanbindung
das Stromkabel nachgezogen wer-
den.
Mit Linsensenkschrauben die Leuchte mit Ge-
lenkarm an die Deckenanbindung fest an-
schrauben. Auf die Ausrichtung achten!
Transformator elektrisch anschließen: P und
N entsprechend dem Aufdruck auf dem
Transformatorgehäuse an 230V und den
Schutzleiter (PE) an dem Deckenflansch.
Schieben Sie jetzt den Baldachin (wenn vor-
handen) ganz an die Decke und schrauben
Sie ihn mit dem Haltering fest.
1
Decke / Ceilling
Scheibe / Washer
Hülse / Bush
Kunststoffscheibe /
Plasticwasher
Deckenflansch /
Ceilingplate
Kunststoffscheibe /
Plasticwasher
Scheibe / Washer
Federring / Lockwasher
Schraube / Screw
Ceiling unit has to be levelled with wash-
ers and spacers, then screws can be as-
sembled (please see picture).
Should the ceiling be uneven and the
ceiling tube not be in a upright position,
please do even the difference by using
additional washers (at position 1).
Do put the cover (if ordered) over the
ceiling tube and do use the holding ring
for stopping the cover from down-sliding
Do plug on the connector of the articu-
lated arm to the connector of the ceiling
unit. Assemble articulated arm to the ceil-
ing unit. To ease the installation, the
power cable should be pulled while put-
ting the arm into the ceiling unit.
Attach the articulated arm securely to the
ceiling unit by using the lins head screw.
Please do pay attention to the right
position!
Hook up the transformer, by installing the
wires „P“ and „N“ to the 230V mains sup-
ply in accordance with the label on the
transformer housing. Connect the
grounding wire (PE) to the ceiling plate.
Now do lift the cover (if ordered) up to the
ceiling do adjust and mount the holding
ring.
7
3.2 Montage der Wandleuchte
Lieferumfang:
1 Leuchte mit Wandarm und Wandlager
1 Wandbefestigungsplatte mitmontiertem Transformator
4 Befestigungsschrauben mit Dübel
2 Senkschrauben
1 Gebrauchsanleitung
1 Torx-Schlüssel 53 x 20 mm
ACHTUNG!
Vergewissern Sie sich vor Anbringen der Leuchte darü-
ber ob die Wand über die nötige Tragkraft verfügt. Zie-
hen Sie im Zweifelsfalle einen Fachmann zu Rate.
WARNUNG! Elektrischer Strom!
Stellen Sie sicher dass die Stromzuführung unterbro-
chen wurde, bevor Sie die Leuchte montieren. So ver-
meiden Sie Unfälle!
Vorsicht!
Die Zuleitung muss geeignet abgesichert und dauerhaft
geerdet sein. Wir empfehlen die Absicherung über einen
FI Schalter.
Hinweis!
Das Anbringen der Wandbefestigungsplatte und der elekt-
rische Anschluss des Trafos ist durch einen Elektrofach-
mann vorzunehmen. Die Installation ist für Leitungsquer-
schnitte bis 1,5 mm² geeignet
Netzversorgung abschalten und gegen wiedereinschal-
ten sichern.
Wandhalterung über der Anschlussdose (2) mit Was-
serwaage senkrecht ausrichten.
Vier Wandbohrungen (3) markieren. Darauf achten,
dass die Aussparung der Wandbefestigung für die Ka-
beldurchführung über der Anschlussdose sitzt.
Hinweis!
Die spätere Positionierbarkeit der Leuchte ist von der senk-
rechten Ausrichtung der Wandbefestigungplatte (1) abhängig.
Wenn die Platte und die Leuchte nicht gerade ange-
schraubt werden, kann dies dazu führen dass sich die
Leuchte immer zu einer Seite wegbewegt.
Verdübelung vornehmen. Darauf achten, dass die
elektrischen Zuleitungen nicht angebohrt werden.
Wandbefestigungsplatte (1) an der Wand senkrecht
ausrichten und mit Schrauben (4) verschrauben.
Transformator (5) elektrisch anschließen, P und N an
230V und den Schutzleiter (PE) an der Wandbefesti-
gungsplatte, entsprechend dem Aufdruck auf dem
Transformatorgehäuse.
Leuchte von oben in die Wandbefestigungsplatte (1)
einhängen.
Mit Senkschrauben die Wandleuchte senkrecht aus-
richten und fest verschrauben.
Achtung!
Die Senkschraube, M6 x 12 DIN 966 ist eine Spezial-
schraube mit einer maximalen Länge von 12 mm
3.2 Assembling of the wall-mounted light
Content of delivery:
1 Light with wall-mounted arm and wall-housing
1 Assembling plate withpre-mounted transformer
4 Screws with anchors
2 Countersunk screws
1 Operating manuals
1 Torx-Key 53 x 20 mm
WARNING!
Before mounting/assembling the light, please do ap-
prove that the ceiling load bearing capacity. . In case of
doubt please ask an specialist..
WARNING! Electrical current!
Please make sure that the electrical supply is discon-
nected before you mount the lamp. So you avoid acci-
dents!
ATTENTION!
The power supply has to be fused and permanently
grounded. We do recommend the fusing by a FI fuse.
NOTE!
The assembling of the ceiling unit and the electrical con-
nection has to be made by a specialist only. THe installa-
tion was developed to be connected to electrial wiring with
a cross section of 1,5 mm².
Shut-down the mains supply and protect against switch
on
Do adjust the wall holder vertically over the electrical
outlet (2) by using the water-level.
Do mark the 4 drilling points (3). Please take note, that
the cut-out for the cable is positionend over the electri-
cal outlet.
NOTE!
The position of the lamp depends on the correct position of
the wall-mounting plate (1).
If the mounting plate and the lamp are not mounted lev-
elled, then a permanent sliding of the lamp to one side can
be the result.
Do drill and anchor. Please take note, that the electrial
power supply will not get damaged.
Do level the wall plate (1) vertically on the wall and do
screw on the screws (4).
Do hook up the transformer, by installing the wires „P“
and „N“ to the 230V mains supply and the grounding
(PE), in accordance with the label on the transformer
housing.
Do hang on securely the lamp into the mounting plate
(1)
Do level the lamp by srewing on securely the counter-
sunk screws.
ATTENTION!
The countersunk screw M6 x 12 DIN 966 is a special screw
with a maximum length of 12 mm

8

9
3.3 Elektrischer Anschluss der Leuchte
Die Leuchte ist für eine Betriebsspannung von 230 V ge-
eignet. Eine niedrigere oder höhere Spannung beeinflusst
die Beleuchtungsstärke und die Lebensdauer der Lampe.
Überprüfen, ob die Sicherung im Sicherungsträger
eingebaut ist.
Leuchte an Ein/Ausschalter einschalten
4. Bedienung
WARNUNG!
Lassen Sie die Leuchte niemals unbeaufsichtigt leuch-
ten. So vermeiden Sie Unfälle!
HINWEIS!
Vermeiden Sie Erschütterungen und Stöße um die Le-
bensdauer der Leuchtmittel zu erhöhen.
Schwenken Sie die Leuchte am Handgriff vorsichtig in
die gewünschte Position.
5. Reinigung und Pflege
WARNUNG! Elektrischer Strom!
Stellen Sie sicher dass die Stromzuführung unterbro-
chen wurde, bevor Sie die Leuchte reinigen. So ver-
meiden Sie Unfälle!
Verwenden Sie keine scharfen Reinigungsmittel.
Reinigen Sie die Leuchte ausschließlich mit leichten Reini-
gungs- oder Desinfektionsmitteln, wie z. B. Amocid,
Baktolan, Sagrotan.
Kontrollen
Kontrollieren Sie regelmäßig das Kunststoffgehäuse und
die äußeren Teile der Leuchte. Falls Sie eine Beschädi-
gung feststellen, geben Sie die Leuchte zur Reparatur an
Ihren Händler oder direkt an Provita.
Die Untersuchungsleuchte sollte min. einmal im Jahr auf
volle Funktion aller wichtigen Bauteile kontrolliert werden:
Schraubenverbindungen noch fest
Bremskrafteinstellung der Gelenke noch ausreichend
Alle beweglichen Verbindungen noch sicher
Sicherheitsglas noch vorhanden und unbeschädigt
Schalterund Sicherungohne Fehler
Wird ein Fehler festgestellt, muss die Leuchte umgehend
außer Betrieb genommen werden.
Es dürfen nur Originalersatzteile verwendet, und nur von ei-
nem Fachmann bzw. Kundendienst ausgetauscht werden.
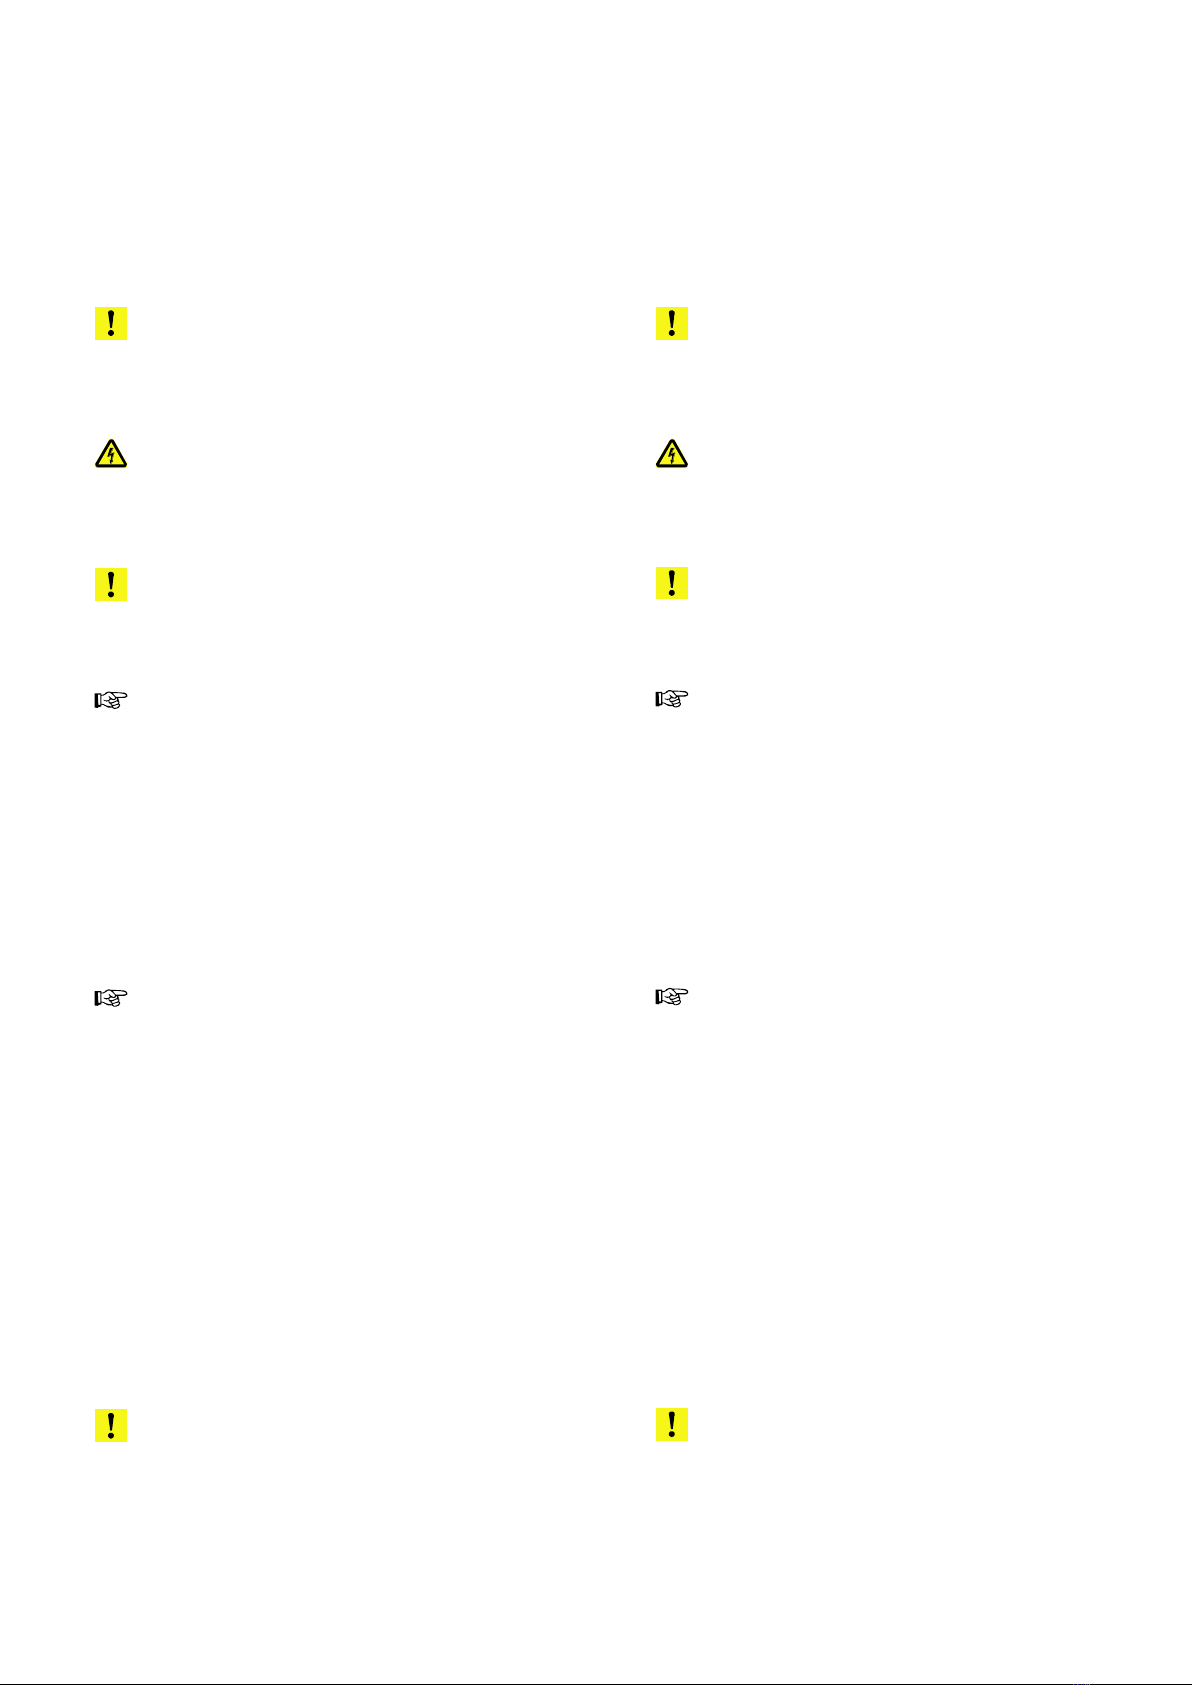
Richtige Anwendung
Right application
Falsche Anwendung
Wrong application
3.3 Electrical connection of the lamp
The lamp can be used with main power supply of 230 V
only. More or less voltage can affect the light intensity and
the life expectancy of the lamp.
Do check, that the fuse is integrated into the fuse
holder.
Do test the lamp by using the on/off switch
4. Operating Instructions
WARNING!
To avoid accidents, never leave the lamp on
unsupervised.
NOTE!
Avoid shaking and impact to prolong the life span of the
bulb.
Carefully swing the lamp into the desired position using
the handle.
5. Cleaning and maintenance
WARNING! Electrical current!
Please make sure that the electrical supply is discon-
nected before cleaning the lamp. So you avoid acci-
dents!
Do not use any sharp cleaning objects.
Use only mild cleaning agents or disinfectants such as
Amocide, Baktolan or Sagrotan to clean the lamp.
Inspection
Do inspect periodical the lamp housing and the outside
parts of the lamp. If there is any damage, the lamp should
be returned to your distributor or to Provita.
The lights should be inspected at least once a year in re-
gards to the following things:
Are the screws still securely assembled?
Is the brake force of the joints still sufficient?
Are all movable connections still working?
Is the safety glas still present and undamaged
Are the on/off switch and the fuse still working properly
Is there any defect inspected, the lamp has to be put out of
action immediately.
Only original spare parts should be used, and should only be
replaced by a specialist orservice engineer.

10
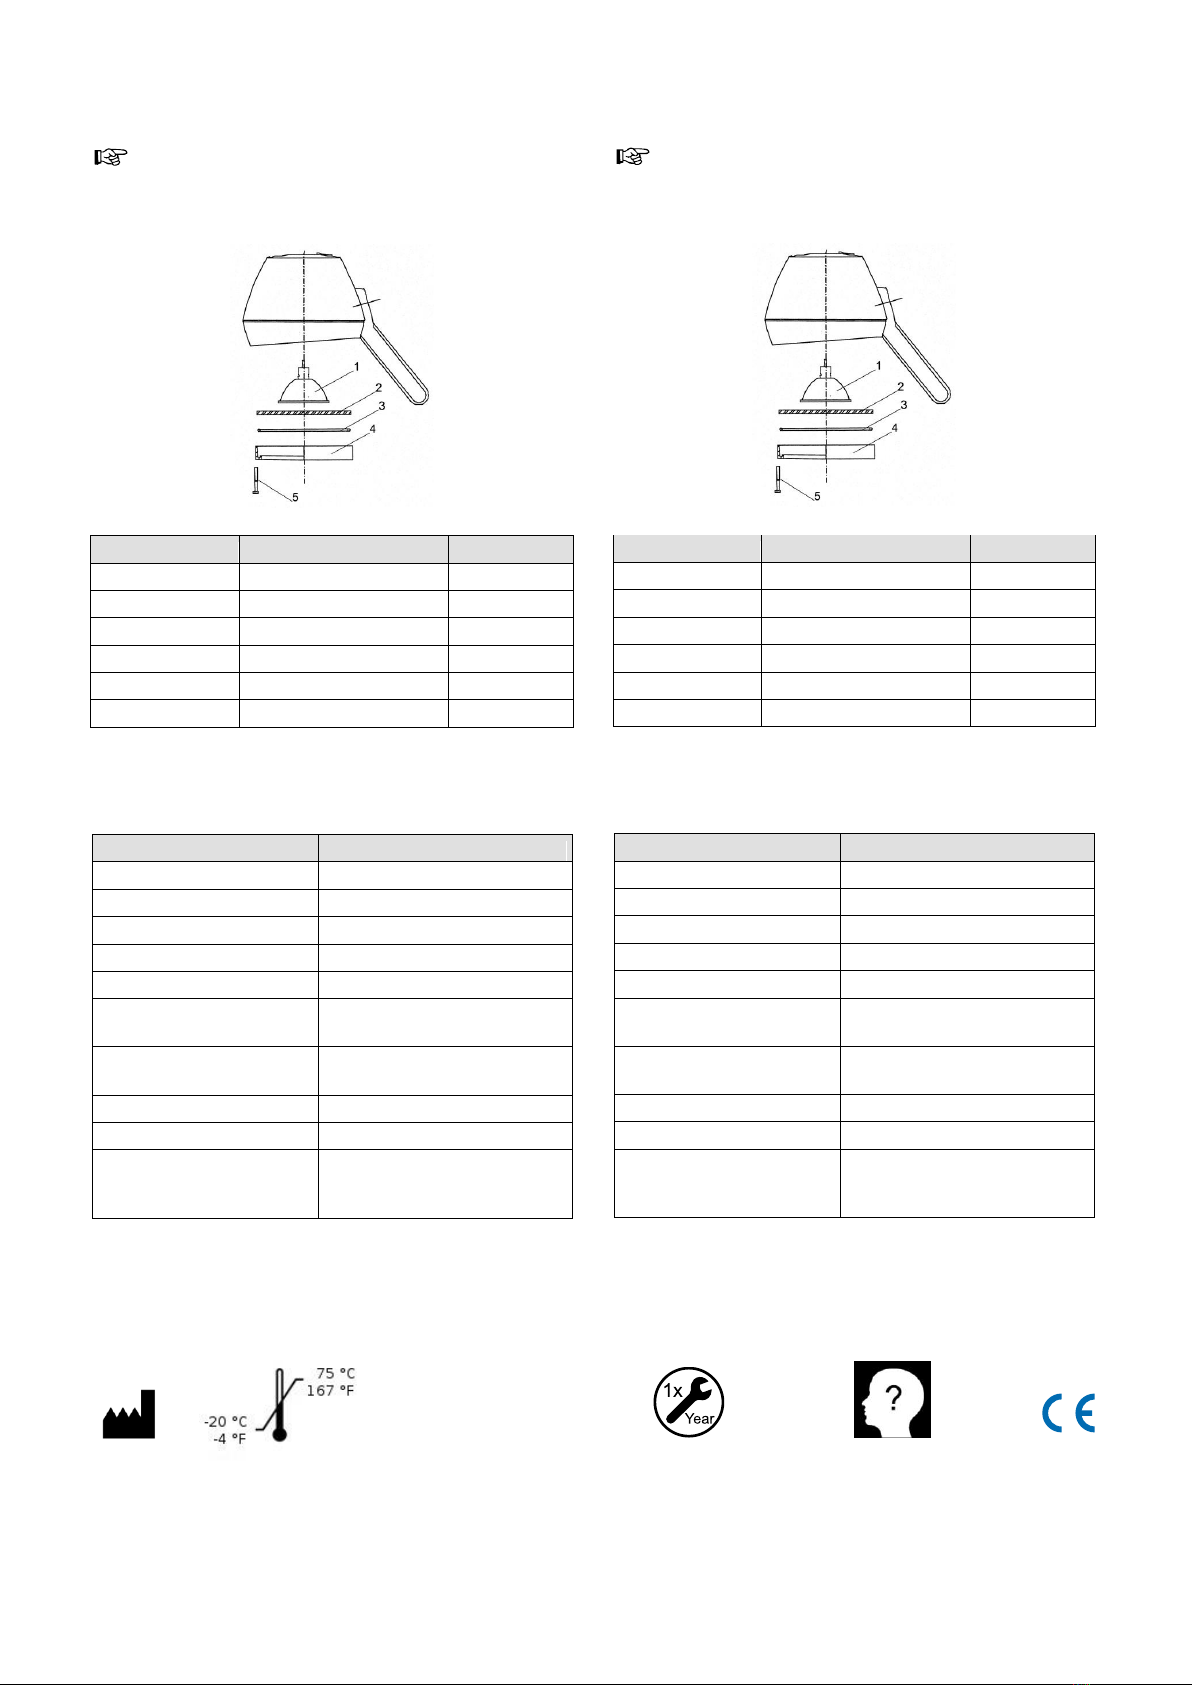
6. Leuchtmittel wechseln
WARNUNG! Elektrischer Strom!
Stellen Sie sicher, dass die Strom-
zuführung unterbrochen wurde,
bevor Sie das Leuchtmittel wech-
seln. So vermeiden Sie Unfälle!
ACHTUNG!
Verwenden Sie nur Original-
Leuchtmittel von Provita. Ungeeig-
nete Leuchtmittel können die
Leuchte zerstören.
HINWEIS!
Glaskörper der Lampe niemals mit
bloßen Fingern berühren. Entweder
die Originalverpackung oder ein sau-
beres Tuch bzw. einen Textilhand-
schuh benutzen! Andernfalls wird die
Lebensdauer der Lampe verringert.
Die drei Schrauben (5) mit dem
Sonderschlüssel lösen. (Sonder-
schlüssel liegt der Leuchte bei).
Glashaltering mit innen liegendem
Dichtring (4) Sicherheitsglasscheibe
(3) und optionalen Konversionsfilter
(2) herausziehen.
Lampe (1) auswechseln.
Optionalen Konversionsfilter (2),
Sicherheitsglasscheibe (3), Glashal-
tering mit innen liegendem Dichtring
(4) aufstecken.
Die drei Schrauben (5) mit Sonder-
schlüssel festziehen.
7. Störungen
Wenn die Leuchte nicht leuchtet:
prüfen Sie, ob die Zuleitung Strom führt.
prüfen Sie, ob der Netzschalter eingeschaltet ist.
wechseln Sie das Leuchtmittel.
Sollten Sie den Fehler nicht beheben können, geben Sie
die Leuchte zur Reparatur
6. Changing the bulb
WARNING! Electrical current!
Please make sure that the electrical supply
is disconnected before chaning the bulb.
So you avoid accidents!
ATTENTION!
Do use original bulbs only. Unsuitable
bulbs may damage the lamp beyond
repair.
NOTE!
Do never touch the lamps with your fingers.
Do either use the original packaging or a
clean cloth! If not used as described, the life
expectancy will be reduced.
Do unscrew the 3 screws (5) with the
spezial screw driver. (Special screw driver
is included in the box).
Do remove the glas holder with the seal-
ing ring (4). Do remove the safety glas (3)
and the optional filter (2).
Do replace the bulb (1).
Do assemble the optional filter (2), the
safety glas (3) and the glas holder with
the sealing ring (4).
Do screw on the 3 screws (5) by using the
spezial screw driver.
7. Defects
When the lamp fails to light:
Do check that the power supply is working
Check that the mains switch is switched ON.
Change the bulb.
If you cannot establish the fault, give the lamp to your re-
tailer for repair.
11
8. Ersatzteile
HINWEIS!
Verwenden Sie nur Original-Ersatzteile von Provita. Bei
Verwendung anderer Ersatzteile erlischt die Garantie.
Pos.
Bezeichnung
Artikelnr.
1
Halogenlampe
K2S8439
2
Filterscheibe (optional)
K2N5224-
3
Abdeckscheibe
K2N5204-
4
Glashaltering
E2K5223N
5
O-Ring
K2K0749R
6
Linsen-Schraube
K2S38596
Technische Daten
Beschreibung
Angabe
Spannung
AC 230 V, 50-60 Hz
Nennleistung
35 VA
Schutzmaßnahme
Schutzklasse I
Leuchtmittel
Halogen 35 W
Schutzart
IP20
Zentrale Beleuchtung
(Abstand 500mm)
~ 30000 Lux
Leuchtfelddurchmesser
D10 (Abstand 500mm)
Ø 100mm
Farbtemperatur
4300 Kelvin
Lebensdauer
> 3000 h
Betriebsbedingungen
10°C –30°C
rF 30-75%
700-1060 hPa
8. Spare parts
NOTE!
Use only original spare parts. The guarantee is rendered
invalid if other spare parts are used.
Pos.
Description
Item number
1
Bulb
K2S8439
2
Filter lense (optional)
K2N5224-
3
Safety glas
K2N5204-
4
Glas holder
E2K5223N
5
Sealing ring
K2K0749R
6
Countersunk screw
K2S38596
Technical data
Discription
Data
Voltage
AC 230 V, 50-60 Hz
Nominal Wattage
35 VA
Protective category
Protection class I
Bulb
Halogen 35 W
Protection
IP20
Central Illumination
(Distance 500mm)
~ 30000 Lux
Light field diameter
D10 (Distance 500mm)
Ø 100mm
Color temperature
4300 Kelvin
Lifetime
>3000 h
Conditions of use
10°C –30°C
rH 30-75%
700-1060 hPa
rF/rH 30-75%
700-1060 hPa
www.provita.de

12
Unversehrtheit
Netzleitung ohne Beschädigung
Leuchtenkopf ohne Beschädigung
Äußeren Zustand des Schutz-
schlauchs am Flexarm
auf Risse / Sprödigkeit und ande-
re Beschädigungen untersuchen
Gelenke öffnen und den Zustand
der Kabel überprüfen
Funktion
Leuchtmittel
Flexarm / Gelenkarm
Schalter und Sicherung ohne
Fehler
Vollständigkeit
Sicherheitsglas
Bedienungsanleitung griffbe-
reit
Datum
Unterschrift
Datum
Unterschrift
Datum
Unterschrift
Wartungsnachweis
Der Betreiber ist verpflichtet in regelmäßigen Abständen das System zu überprüfen.
Sollte einer der Punkte negativ bewertet werden, ist die betroffene Komponente umgehend stillzulegen.
Bitte bestätigen Sie mit Ihrer Unterschrift die, mit positivem Ergebnis, durchgeführte Überprüfung folgender Punkte:
Sollten ein oder gar mehrere Punkte nicht in Ordnung sein, ist ein sicherer Betrieb nicht mehr
gewährleistet und es sind geeignete Maßnahmen zu treffen um die Fehler zu beheben.
Das System darf NICHT benutzt werden, wenn die einwandfreie Funktion nicht gewährleistet ist.

13
Intactness
Power supply without damage
Lamp head without damage
Examine external condition of the pro-
tective tube on flexible arm for cracks
/ brittleness and other damage
Open joints and check the condition
of the cables
Functionality
Bulb
Flexible arm / joint arm
on/off switch and the fuse still
working properly
Completeness
Safety glas
Operating instructions readly
available
Date
Signature
Date
Signature
Date
Signature
Proof of maintenance-conformity
The user/operator is obliged to check/approve the system in regular times.
In case of non conformity to one of the below points the affected component has to be decommissioned immediately.
Please do confirm –by signing the below listed technical things- that the inspection was made and the result did not
show any negative condition of the system:
If the products do not fit/fulfil all above mentioned items of the list, the safe use of the system
cannot be guaranteed and suitable actions have to be taken –in order to solve the problems.
The system must NOT be used when proper operating is not guaranteed.

14
provita medical gmbh
Auf der Huhfuhr 8
42929 Wermelskirchen
Germany
Phone +49 (0) 21 93 / 51 05 - 0
Fax +49 (0) 21 93 / 51 05 - 269
www.provita.de
Other manuals for 1 Series
1
Table of contents


