Provo Craft Cricut User manual
© 2012 Provo Craft and Novelty, Inc.
All rights reserved/Tous droits réservés/
Todos los derechos reservados
South Jordan, UT 84095
Made in China/Fabriqué en Chine/
Fabricado en China
www.provocraft.com • 12137
User Manual
Manuel d’Utilisateur
Manual del Usuario
Benutzerhandbuch
Personal Electronic Cutter

WELCOME TO CRICUT®!
Cricut®is a revolutionary cutting system that does not require a computer. Its
cartridge-based system allows you to cut thousands of beautiful letters, shapes,
or phrases in a variety of sizes and styles with just the touch of a button.
Creative Features built into every Cricut®cartridge allow you to add special
effects to letters, shapes, and phrases. There are literally thousands of custom
combinations you can use to make each project uniquely your own.
With Cricut®, you cut what you want!
BIENVENU À CRICUT®!
Cricut®c’est un système révolutionnaire de découpage qui ne requiert pas l’utilisation d’un ordinateur. Son système sur
la base de cartouches vous permet de découper milles de lettres, formes et phrases merveilleux dans toutes les tailles et
tous les styles simplement en poussant un bouton. Les Fonctions Créatives intégrés dans chaque cartouche Cricut®vous
permettent d’ajouter des effets spéciaux à vos lettres, formes et phrases. Cricut®compte littéralement milliers de combi-
naisons dessinées à la mesure du client qui vous pouvez utiliser pour transformer chacun de vos projets dans une œuvre
exclusivement à vous. Avec Cricut®, vous coupez tout ce que vous voulez couper!
¡BIENVENIDO A CRICUT®!
Cricut®es un sistema revolucionario de recortar que no requiere del uso de un computador. Su sistema en base a car-
tuchos le permite recortar miles de letras, formas y frases maravillosas en una variedad de tamaños y estilos con sólo
apretar un botón. Las Funciones Creativas incorporadas en cada cartucho Cricut®le permiten agregar efectos especiales a
sus letras, formas y frases. Cricut®cuenta con literalmente miles de combinaciones a la medida del cliente que usted puede
utilizar para transformar cada uno de sus proyectos en una obra exclusivamente suya. ¡Con Cricut®, usted corta
todo lo que quiere cortar!
WILLKOMMEN BEI CRICUT®!
Cricut®ist ein revolutionäres Schneidesystem, das keinen Computer braucht. Sein auf Kassetten gebautes System ermögli-
cht es Ihnen, Tausende von schönen Buchstaben, Formen oder Phrasen in einer Vielfalt an Größen und Stilen zu schneiden,
indem Sie nur einen Knopf betätigen. Die in jede Cricut®-Kassette eingebauten Creative Features ermöglichen es Ihnen,
Buchstaben, Formen und Phrasen mit Sondereffekten zu verzieren. Es gibt buchstäblich Tausende von kundenspezifischen
Kombinationen, die Sie anwenden können, damit jedes Projekt einzigartig wird. Mit Cricut®können Sie schneiden,
was Sie wünschen!
Trademarks: Any trademarks, indicated or otherwise, are used only in an editorial fashion and to the benefit of the trademark owner, with no
intention of infringement of the trademark. Before activating your 30 days of free customer service, we recommend that you spend at least
an hour getting acquainted with your Cricut®Personal Electronic Cutter. The Cricut®User Manual has been prepared to help you become
familiar with the Cricut®machine and answer most questions you may have. For the most up-to-date information, FAQs, and tips, visit www.
cricut.com
Marques Commerciales: Les marques commerciales, qu’elles soient indiquées ou non, sont utilisées seulement pour des buts éditoriaux et au
bénéfice du propriétaire de la marque, sans aucune intention de nuire à cette marque. Avant d’activer vos 30 jours d’assistance au client gra-
tuite, nous vous recommandons de destiner au moins une heure à vous familiariser avec votre Cricut®Personal Electronic Cutter. Le Manuel
de l’Utilisateur Cricut®a été élaboré pour vous aider à vous familiariser avec la machine Cricut®et pour répondre à la plupart des doutes
que vous pourrait avoir. Pour obtenir l’information la plus récente, et pour accéder aux Questions les plus Fréquentes (FAQs) et aux Conseils
pratiques, nous vous invitons à visiter www.cricut.com
Marca Registrada: Cualquier marca registrada, ya sea que aparezca indicada o no, se usa sólo para propósitos editoriales y para beneficio
del titular de la marca, sin que exista intención alguna de contravenir las normas marcarias. Antes de activar sus 30 días de asistencia al cli-
ente gratuita, le recomendamos destinar al menos una hora a familiarizarse con su Cricut®Personal Electronic Cutter. El Manual del Usuario
de Cricut®ha sido elaborado para ayudarle a familiarizarse con la máquina Cricut®y responder la mayor parte de las dudas que pudieran
planteársele. Para una información más actualizada, y para acceder a Preguntas Frecuentes-FAQs y datos prácticos, le invitamos a visitar
www.cricut.com
Schutzmarken: Jegliche Schutzmarkennamen, ob mit oder ohne Anzeige, werden nur auf eine redaktionelle Weise und zugunsten von
Schutzmarkeneigentümern ohne jegliche Absicht der Schutzmarkenverletzung verwendet. Bevor Sie Ihre 30 gebührenfreien Tage des
Kundendiensts aktivieren, empfehlen wir Ihnen, dass Sie mindestens eine Stunde spenden, um Ihre Cricut®Personal Electronic Cutter ken-
nen zu lernen. Das Cricut®-Benutzerhandbuch wurde so verfasst, dass Sie sich mit Ihrer Cricut®-Maschine leichter vertraut machen und
Antworten auf die meisten Fragen finden, die bei Ihnen entstehen können. Die neuesten Informationen, häufig gestellten Fragen (FAQ) und
Tipps finden Sie auf www.cricut.com

ENGLISH
CONTENTS
License Agreement ....................................................................................................................................2
Unpack Your Box........................................................................................................................................4
The Cricut®Personal Electronic Cutter ................................................................................................ 5
Placing the Cutting Blade Assembly........................................................................................................ 6
Positioning your Cricut®Personal Electronic Cutter................................................................................. 7
What Your Cricut®Machine Can Cut ....................................................................................................... 7
Basic Operations
Set-Up .................................................................................................................................................. 7
Loading Paper........................................................................................................................................ 8
Place Paper on Cutting Mat......................................................................................................... 8
Load Cutting Mat into Machine.................................................................................................... 8
Choosing Your Letters, Shapes, and Phrases........................................................................................... 9
Basic Keys and Buttons You Should Know............................................................................................... 9
Stop.......................................................................................................................................... 9
Blade Navigation Buttons............................................................................................................ 9
Shift..........................................................................................................................................9
Shift Lock..................................................................................................................................9
Space........................................................................................................................................9
Back Space ............................................................................................................................... 9
Clear Display..............................................................................................................................10
Reset All ....................................................................................................................................10
Repeat Last ...............................................................................................................................10
Sound On/Off.............................................................................................................................10
Load Paper................................................................................................................................10
Unload Paper.............................................................................................................................10
Cutting Letters, Shapes, and Phrases...................................................................................................... 10
Size Dial....................................................................................................................................10
Cutting Your Selections.............................................................................................................. 11
Removing Your Cuts from the Cutting Mat................................................................................... 11
Advanced Operations
Creative Feature Keys ............................................................................................................................ 12
Shadow Feature........................................................................................................................ 12
Shadow Blackout Feature .......................................................................................................... 13
Blackout Feature .......................................................................................................................13
Advanced Keys and Buttons.................................................................................................................... 13
Blade Navigation Buttons............................................................................................................ 13
Set Paper Size...........................................................................................................................13
Load Last..................................................................................................................................14
Paper Saver .............................................................................................................................. 14
Sizing...................................................................................................................................................... 14
Real Dial Size............................................................................................................................. 14
Cutting on Lightweight or Heavyweight Materials..................................................................................... 15
Adjusting Blade Depth.................................................................................................................15
Speed Dial .................................................................................................................................15
Pressure Dial............................................................................................................................. 16
Basic Care
Blade Life................................................................................................................................................ 16
Replacing the Cutting Blade ..................................................................................................................... 17
Caring for the Cutting Mat ....................................................................................................................... 17
Cleaning Your Cricut®Machine................................................................................................................. 17
Frequently Asked Questions....................................................................................................................18
Troubleshooting..........................................................................................................................................19

CRICUT®PERSONAL ELECTRONIC CUTTER END USER LICENSE
AGREEMENT
PROVO CRAFT AND NOVELTY, INC. (“PROVO CRAFT”) IS WILLING TO LICENSE THE HARDWARE,
CARTRIDGES, FIRMWARE, AND SOFTWARE OF THE Cricut®PERSONAL ELECTRONIC Cutter (“CRICUT”)
TO YOU ONLY UPON THE CONDITION THAT YOU ACCEPT ALL OF THE TERMS CONTAINED IN THIS END
USER LICENSE AGREEMENT (“AGREEMENT”). PLEASE READ THE AGREEMENT CAREFULLY. BY USING
Cricut®OR ANY OF ITS ASSOCIATED COMPONENTS, YOU ACCEPT THE TERMS OF THE AGREEMENT. IF
YOU ARE NOT WILLING TO BE BOUND BY ALL THE TERMS OF THIS AGREEMENT, YOU MAY NOT USE
Cricut®AND YOU SHOULD PROMPTLY CONTACT PROVO CRAFT FOR INSTRUCTIONS ON RETURN OF
THE UNUSED PRODUCT(S).
1. DEFINITIONS. “Software” means any machine readable materials (including, but not limited to, source
code, compiled code, algorithms, libraries, source files, header files, and data files), any updates or
error corrections provided by PROVO CRAFT, and any user or owner manuals, programming guides,
and other documentation provided to you by PROVO CRAFT under this AGREEMENT. “Firmware”
means any encoded information provided on any chip or microprocessor of Cricut®including, but not
limited to, source code, compiled code, algorithms, libraries, source files, header files, and data files,
and any updates or error corrections provided by PROVO CRAFT. “Hardware” means any physical
component that is part of or sold with Cricut®, including but not limited to Cricut®cartridges used with
Cricut®that contain images or fonts. “Documentation” means any documents provided with Cricut®
when purchased, including but not limited to the User Manual.
2. LICENSE TO USE. Subject to the terms and conditions of this AGREEMENT, PROVO CRAFT grants
you a non-exclusive, non-transferable, limited license without license fees to use Cricut®and any asso-
ciated software, firmware, and hardware.
3. RESTRICTIONS. Software and firmware are confidential and copyrighted. Title to software, firm-
ware, and hardware and all associated intellectual property rights is retained by PROVO CRAFT. Unless
enforcement is prohibited by applicable law, you may not modify, decompile, disassemble, reverse
engineer, distribute, or copy software, firmware, or hardware. You may not, whether for your own use
or benefit or for the use or benefit of another, except as expressly provided herein, reproduce, copy,
or publish, or permit the reproduction, copying, or publication of, any physical, mechanical, electri-
cal, or electronic medium that is associated with the Cricut®, including any firmware, software, and
documentation, except as expressly provided herein. No right, title or interest in or to any trademark,
service mark, logo, or trade name of PROVO CRAFT or its licensors is granted under this AGREEMENT.
4. TRANSFER. You may permanently transfer all of your rights under this AGREEMENT only as part
of a sale or transfer of the Cricut®, provided you retain no copies of any part or component of the
Cricut®, you transfer all of the Cricut®(including all component parts, hardware, software and upgrades
thereof, and documentation), and the recipient agrees to the terms of this AGREEMENT.
5. LIMITED WARRANTIES. This AGREEMENT is subject to and hereby incorporates the Cricut®Personal
Electronic Cutter Statement of Limited Warranty and Cricut®Font and/or Shape Cartridge Statement of
Limited Warranty.
6. TERMINATION. This AGREEMENT is effective until terminated. This AGREEMENT will terminate imme-
diately without notice from PROVO CRAFT if you fail to comply with any provision of this AGREEMENT.
Either party may terminate this AGREEMENT immediately should any of the software, firmware or
hardware become, or in either party’s opinion be likely to become, the subject of a claim of infringe-
ment of any intellectual property right.
2

7. EXPORT REGULATIONS. All software, firmware, and technical data delivered
under this AGREEMENT are subject to U.S. export control laws and may be
subject to export or import regulations in other countries. You agree to comply
strictly with all such laws and regulations and acknowledge that you have the
responsibility to obtain such licenses to export, re-export, or import as may be
required after delivery to you.
8. TRADEMARKS AND LOGOS. You acknowledge and agree as between you and PROVO CRAFT that
PROVO CRAFT owns the Cricut®and PROVO CRAFT trademarks and all Cricut®and PROVO CRAFT-
related trademarks, service marks, logos, and other brand designations (“PROVO CRAFT Marks”). You
shall not use the PROVO CRAFT Marks for any purpose without the express written consent of PROVO
CRAFT. Any such authorized use of the PROVO CRAFT Marks inures to PROVO CRAFT’s benefit.
9. U.S. GOVERNMENT RESTRICTED RIGHTS. If software is being acquired by or on behalf of the
U.S. government or by a U.S. government prime contractor or subcontractor (at any tier), then the
government’s rights in software and accompanying documentation will be only as set forth in this
AGREEMENT; this is in accordance with 48 CFR 227.7201 through 227.7202-4 (for Department of
Defense [DOD] acquisitions) and with 48 CFR 2.101 and 12.212 (for non-DOD acquisitions).
10. GOVERNING LAW. Any action related to this AGREEMENT will be governed by Utah law and control-
ling U.S. federal law. No choice of law rules of any jurisdiction will apply.
11. SEVERABILITY. If any provision of this AGREEMENT is held to be unenforceable, this AGREEMENT
will remain in effect with the provision omitted, unless omission would frustrate the intent of the par-
ties, in which case this AGREEMENT will immediately terminate.
12. INTEGRATION. This AGREEMENT is the entire AGREEMENT between you and PROVO CRAFT relat-
ing to its subject matter. It supersedes all prior or contemporaneous oral or written communications,
proposals, representations, and warranties, and prevails over any conflicting or additional terms of
any quote, order, acknowledgment, or other communication between the parties relating to its subject
matter during the term of this AGREEMENT. No modification of this AGREEMENT will be binding, unless
in writing and signed by an authorized representative of each party.
Provo Craft Authorized Service Center
151 East 3450 North
Spanish Fork, Utah 84660 USA
USA: 1-877-7CRICUT (727-4288) (English Only)
www.cricut.com
International tech support: 08081017032 (English Only)
ENGLISH
3
4
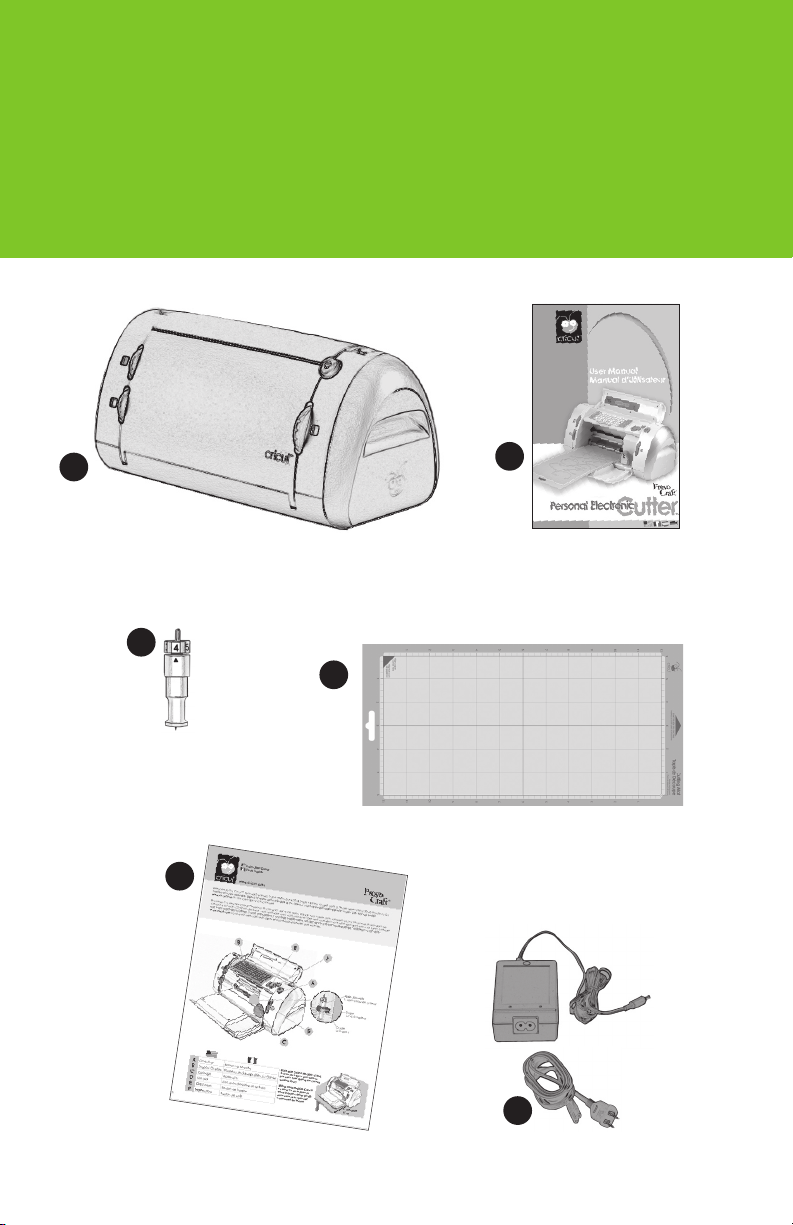
UNPACK YOUR BOX
Your box should contain the following:
1. Cricut®Personal Electronic Cutter
2. User Manual
3. Blade Assembly
4. Cutting Mat
5. Cricut®Quick Start Guide
6. Power Adapter
2
1
4
5
3
6

On Button
STOP Button
CUT Button
Blade Navigation Buttons
LCD Screen
Keypad
Speed Dial
Pressure Dial
Deck
Side Handles
Cartridge
Size Dial
5
ENGLISH
The illustration below will help you become familiar with your Cricut®machine.
All the buttons, keys, and components shown will be described in more detail later on.
THE CRICUT®PERSONAL ELECTRONIC CUTTER
WARNING: Disconnect electrical power before servicing or cleaning. DO NOT
place your fingers or other objects in the Cricut®machine while connected to
electrical power, powered on, or during cutting operations. Rapid movements of
the cutting carriage during operation may cause bodily injury and/or damage to the
Cricut®machine.
Door Roller Bar
6
Please note that the Cricut®machine’s cutting blade assembly is located in the bottom of
your box, separate from the machine. Before you turn the machine on, you will need to
insert the blade assembly. To do this, follow these simple instructions:
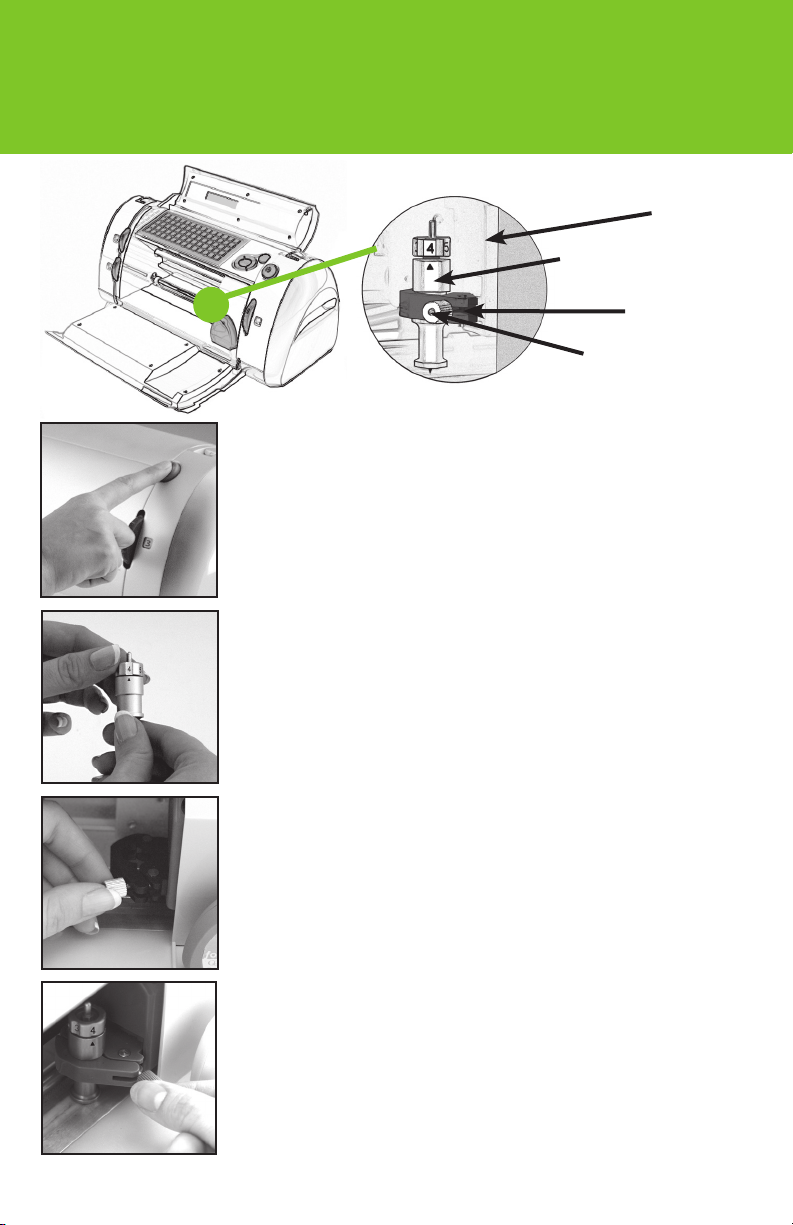
PLACING THE CUTTING BLADE ASSEMBLY
Car
Blade Assembly
Cradle
Thumbscrew
1. Press the On button on the Cricut®machine. This will open the doors but
will not turn the machine on because the cord is not plugged in.
2. Remove the cardboard inserts on either side of the car. Remove the
green cutting blade assembly from its bag. Make sure the black arrow on
the blade assembly points to the number 4 on the adjustment knob, and
ensure that the cutting blade has been inserted into the assembly with the
sharp end pointing down.
3. The blade assembly fits into the black cradle to the left of the car. Locate
the silver thumbscrew and turn it counter-clockwise until it loosens enough
that you can swing the thumbscrew to the right. Be careful not to loosen
the screw too much, or it will fall out.
4. Open the left arm of the black cradle and position the cutting blade
assembly inside, as shown. Close the cradle, swing the thumbscrew back
to the left, and tighten it by turning it clockwise. Plug the machine in and
press the On button to place the blade assembly in cutting position.
7
ENGLISH
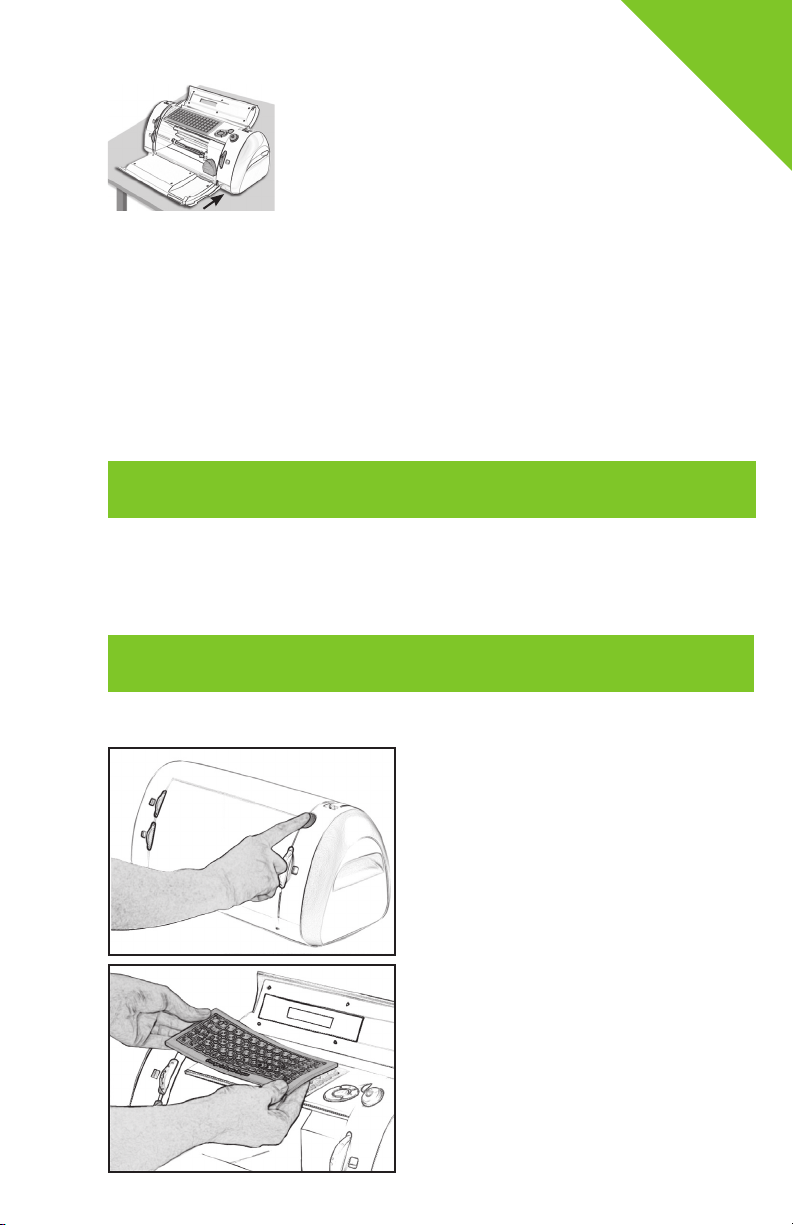
POSITIONING YOUR CRICUT®PERSONAL ELECTRONIC CUTTER
Place your Cricut®machine at least 6” from the edge
of your table to prevent it from tipping and causing
possible injury.
When positioning your Cricut®machine, choose a location that is:
•inaccessibletochildren.TheCricut®machine is not a toy and contains components, including a sharp
blade, that could be hazardous to children.
•stable,flat,andhard-surfaced,within6feet(1.8meters)ofagroundedelectricaloutlet,andthathasa
minimum clearance of 1 foot (30.5 cm) around the Cricut®machine for paper movement.
•indoorsorinadrylocationwheretheCricut®cartridges are not directly exposed to the effects of
the weather.
•awayfromdirectexposuretosunlightorextremetemperaturessuchasinparkedcars,storagesheds,
sunrooms, etc.
WHAT YOUR CRICUT®MACHINE CAN CUT
The Cricut®Personal Electronic Cutter can cut a wide range of paper from vellum to cardstock up to 0.5 mm thick. Provo
Craft has created cardstock pads and designer paper pads that coordinate with the Cricut®shape cartridges. These 6” x
12” papers fit perfectly in the Cricut®machine.
BASIC OPERATIONS
SET-UP
Plug your Cricut®machine into a grounded electrical outlet,
and turn it on by pressing the On button to the right of the
machine door.
The doors of the machine will open when the On button is
pressed. If the doors do not open, use gentle pressure to
open the Cricut®machine’s door completely.
Place the keypad overlay on top of the machine’s keypad.
TIP: The repeated cutting of heavy cardstock and similar weights of paper may reduce the life of your
Cricut®machine’s cutting blade and mat.
WARNING! Your Cricut®machine should never be left or stored outside, in un-heated or un-air conditioned
locations, or in environments where the machine or cartridges can come in contact with water.
6”

Insert a Cricut®cartridge into the cartridge slot located in
the front of your Cricut®machine.
LOADING PAPER
Place Paper on Cutting Mat
A 6” x 12” (15.2 cm x 30.5 cm) paper size is
recommended for the first try.
1. Remove protective film from Cutting Mat.
2. Align a corner of the paper with the “Align paper corner
here” icon in the lower left corner of the Cutting Mat (Figure 1).
3. Press the paper onto the Cutting Mat to adhere it well.
Your paper is ready to be cut. To use other paper sizes,
see “Advanced Operations.”
Load Cutting Mat into Machine
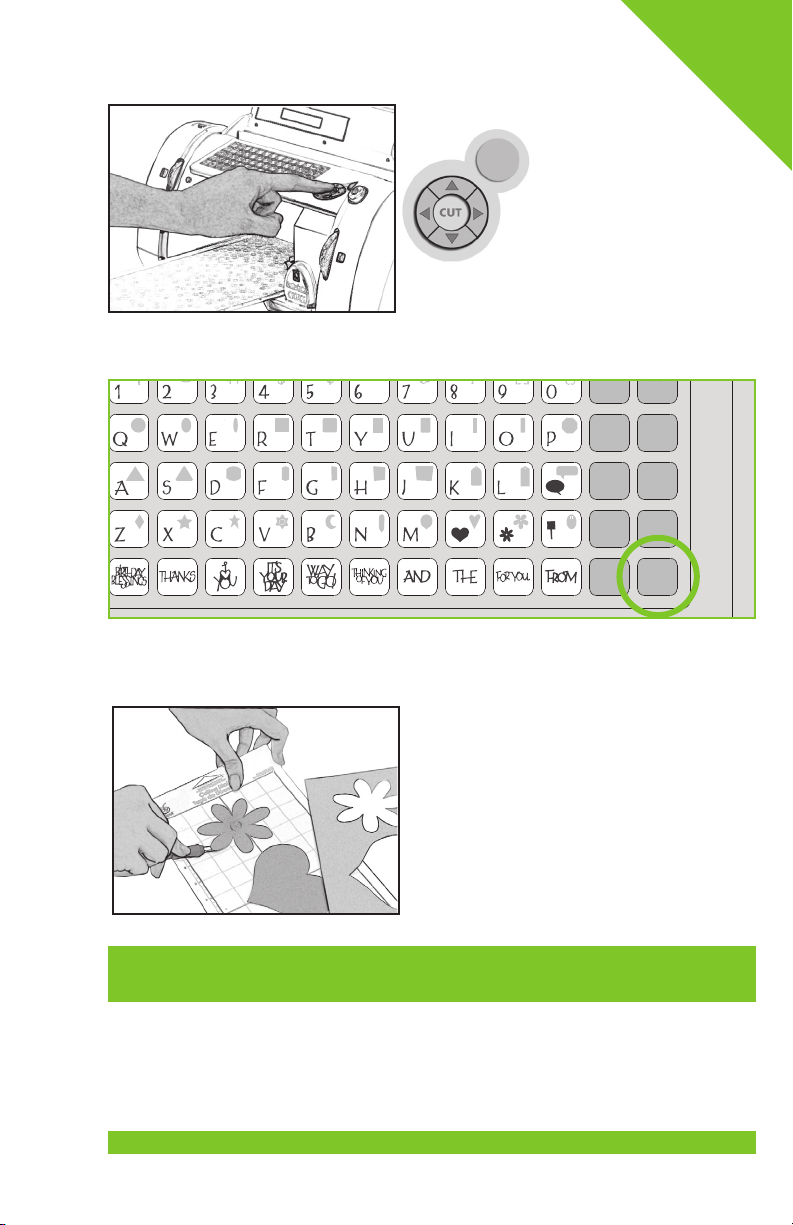
1. Once the paper has been placed on the mat, insert the
mat into the machine with the arrow pointing toward
the machine.
2. While holding the Cutting Mat firmly between the roller
bar and the deck, press the Load Paper key on the key-
pad overlay. The Cricut®machine will then load the mat and
paper. If the mat does not load, press the Unload Paper
key and try again.
8
TIP: Make sure the title on the cartridge is the same as the title on the keypad overlay.
TIP: The Cricut®machine can cut papers as large as 6” x 12”. It is recommended that papers be no smaller than
3” x 3”. Cardstock is recommended for the best results. We suggest that you practice on less expen-
sive materials while becoming familiar with the features described in this section and in the “Advanced
Operations” section.
TIP: The Cutting Mat surface is tacky to hold the paper in place during cutting. Remove paper slowly when
using lightweight materials such as vellum.
TIP: Your Cricut®machine needs 1 foot (30.5 cm) of clear space in the front and back for paper movement
in and out of the Cricut®machine.
Figure 1

CHOOSING YOUR LETTERS, SHAPES, AND PHRASES
Select the letter(s), shape(s) or phrase(s) you want to cut (up to 16). Your selection
will be displayed in the LCD screen above the keypad.
Foundation
SpaceBack
Space
Clear
Display
Reset
All
Repeat
Last
Load
Last
Load
Paper
Unload
Paper
Set
Paper
Size
Sound
On/Off
Sign
Charm
Shift Shift
Lock
Shadow
Paper
Saver
Real
Dial Size
Shadow
Blackout
Silhouette
Slotted
The Shift key allows you to select the letter, shape, or phrase in the upper right corner of a key.
The Shift Lock key allows repeated selections of letters, shapes, or phrases in the upper
right corners of keys. The Shift Lock key will be backlit in green when active.
The Space key functions just like the space bar on a computer or typewriter keyboard. It
inserts one space after the last letter, shape, or phrase entered, every time it is pressed.
The Back Space key functions just like the back space key on a computer or typewriter.
It deletes letter(s), shape(s), or phrase(s), starting from the last one entered, every time it
is pressed.
Foundation
SpaceBack
Space
Clear
Display
Reset
All
Repeat
Last
Load
Last
Load
Paper
Unload
Paper
Set
Paper
Size
Sound
On/Off
Sign
Charm
Shift
Shift
Lock
Shadow
Paper
Saver
Real
Dial Size
Shadow
Blackout
Silhouette
Slotted
Foundation
Space
Back
Space
Clear
Display
Reset
All
Repeat
Last
Load
Last
Load
Paper
Unload
Paper
Set
Paper
Size
Sound
On/Off
Sign
Charm
Shift Shift
Lock
Shadow
Paper
Saver
Real
Dial Size
Shadow
Blackout
Silhouette
Slotted
Foundation
Space
Back
Space
Clear
Display
Reset
All
Repeat
Last
Load
Last
Load
Paper
Unload
Paper
Set
Paper
Size
Sound
On/Off
Sign
Charm
Shift Shift
Lock
Shadow
Paper
Saver
Real
Dial Size
Shadow
Blackout
Silhouette
Slotted
Foundation
SpaceBack
Space
Clear
Display
Reset
All
Repeat
Last
Load
Last
Load
Paper
Unload
Paper
Set
Paper
Size
Sound
On/Off
Sign
Charm
Shift
Shift
Lock
Shadow
Paper
Saver
Real
Dial Size
Shadow
Blackout
Silhouette
Slotted
BASIC KEYS AND BUTTONS YOU SHOULD KNOW
If you want to stop the Cricut®machine from cutting before it is finished, simply press
the STOP button located adjacent to the CUT button. This will suspend any opera-
tion in progress.
The Blade Navigation Buttons (discussed in detail on page 13) move the cutting
blade to any location on the paper.
TIP: Letters will be cut as single characters.
TIP: To select a letter, shape, or phrase from the upper right corner of a key, press the
Shift key once (no need to hold it down) and make your selection. The Shift key will be
backlit in green when active.
TIP: If a letter, shape, or phrase takes up the entire key, that character will be displayed
whether Shift is selected or not.
STOP
TIP: You probably won’t need the Space key if you are cutting one word at a time. Use it
when you specifically want negative space in your cuts.
9
ENGLISH

CUTTING LETTERS, SHAPES, AND PHRASES
Size Dial
Using the Size Dial, choose one of eleven size settings ranging from 1” (2.5 cm) to 5.5” (14 cm) tall. This will
determine the height of your finished cuts.
The selected size will be displayed on the LCD screen above the keypad and in the window next to the Size Dial.
10
Foundation
SpaceBack
Space
Clear
Display
Reset
All
Repeat
Last
Load
Last
Load
Paper
Unload
Paper
Set
Paper
Size
Sound
On/Off
Sign
Charm
Shift Shift
Lock
Shadow
Paper
Saver
Real
Dial Size
Shadow
Blackout
Silhouette
Slotted
Foundation
SpaceBack
Space
Clear
Display
Reset
All
Repeat
Last
Load
Last
Load
Paper
Unload
Paper
Set
Paper
Size
Sound
On/Off
Sign
Charm
Shift Shift
Lock
Shadow
Paper
Saver
Real
Dial Size
Shadow
Blackout
Silhouette
Slotted
Foundation
SpaceBack
Space
Clear
Display
Reset
All
Repeat
Last
Load
Last
Load
Paper
Unload
Paper
Set
Paper
Size
Sound
On/Off
Sign
Charm
Shift Shift
Lock
Shadow
Paper
Saver
Real
Dial Size
Shadow
Blackout
Silhouette
Slotted
Foundation
SpaceBack
Space
Clear
Display
Reset
All
Repeat
Last
Load
Last
Load
Paper
Unload
Paper
Set
Paper
Size
Sound
On/Off
Sign
Charm
Shift Shift
Lock
Shadow
Paper
Saver
Real
Dial Size
Shadow
Blackout
Silhouette
Slotted
Foundation
SpaceBack
Space
Clear
Display
Reset
All
Repeat
Last
Load
Last
Load
Paper
Unload
Paper
Set
Paper
Size
Sound
On/Off
Sign
Charm
Shift Shift
Lock
Shadow
Paper
Saver
Real
Dial Size
Shadow
Blackout
Silhouette
Slotted
The Clear Display key clears the contents of the Cricut®machine’s LCD screen
when pressed.
The Reset All key clears the contents of the Cricut®machine’s LCD screen and returns all
settings to their factory defaults.
Press the Repeat Last key when you want to insert the last selections that were cut onto
the LCD screen. Once the letter(s), shape(s), or phrase(s) appears on the screen, you can
press CUT again, or you can change any settings (features, dial size, speed, pressure, etc.)
and then press CUT.
The Sound On/Off key turns the chirp on or off.
Press the Load Paper key when you want the paper to be pulled into the machine.
Press the Unload Paper key when the Cricut®machine is finished cutting. The Cutting Mat
and paper will be ejected from the machine.
Foundation
SpaceBack
Space
Clear
Display
Reset
All
Repeat
Last
Load
Last
Load
Paper
Unload
Paper
Set
Paper
Size
Sound
On/Off
Sign
Charm
Shift Shift
Lock
Shadow
Paper
Saver
Real
Dial Size
Shadow
Blackout
Silhouette
Slotted
TIP: All letters in an alphabet set are cut in proportion to the tallest letter, known as the Key Height Character.
(Refer to the handbook of each cartridge set to find out what the Key Height Character is.) For other
letter, shape, or phrase sizing options, see “Advanced Operations” on page 11.
•1"(2.5 cm)
•1-1/4"(3.2 cm)
•1-1/2"(3.8 cm)
•2"(5.1 cm)
•2-1/2"(6.4 cm)
•3"(7.6 cm)
•3-1/2"(8.9 cm)
•4"(10.2 cm)
•4-1/2"(11.4 cm)
•5"(12.7 cm)
•5-1/2"(14 cm)
TIP: If you turn the sound key off, that will become your default setting. The next time you
turn your Cricut®machine on, the sound will still be off. If you want to turn it on, you will
need to press Sound On/Off again.
Cutting Your Selections
Press the CUT button.
When the Cricut®machine is finished cutting, press the Unload Paper key on the keypad to eject the
Cutting Mat from the machine.
Removing Your Cuts from the Cutting Mat
Gently remove images from the Cutting Mat. If it is difficult to
remove the cuts, use a craft knife or the Cricut®Tools (sold
separately) to lift the images. Once all cuts are removed,
clean off any small scraps of paper remaining on the Cutting
Mat. This will help the Cutting Mat perform well in the future.
ADVANCED OPERATIONS
Your Cricut®machine has a variety of advanced operations designed to enhance your creativity. We recommend
you become familiar with basic operations before moving on to the advanced operations described in this section.
TIP: The Cricut®Scoop, Hook, Blade, and Scraping tools are specifically designed for lifting cuts and
cleaning scrap paper from the Cutting Mat. These are available for purchase.
TIP: For the latest information and updates, visit www.cricut.com
Foundation
SpaceBack
Space
Clear
Display
Reset
All
Repeat
Last
Load
Last
Load
Paper
Unload
Paper
Set
Paper
Size
Sound
On/Off
Sign
Charm
Shift Shift
Lock
Shadow
Paper
Saver
Real
Dial Size
Shadow
Blackout
Silhouette
Slotted
STOP
The STOP button, located adjacent to
the CUT button, will stop any operation
in progress.
11
ENGLISH
12
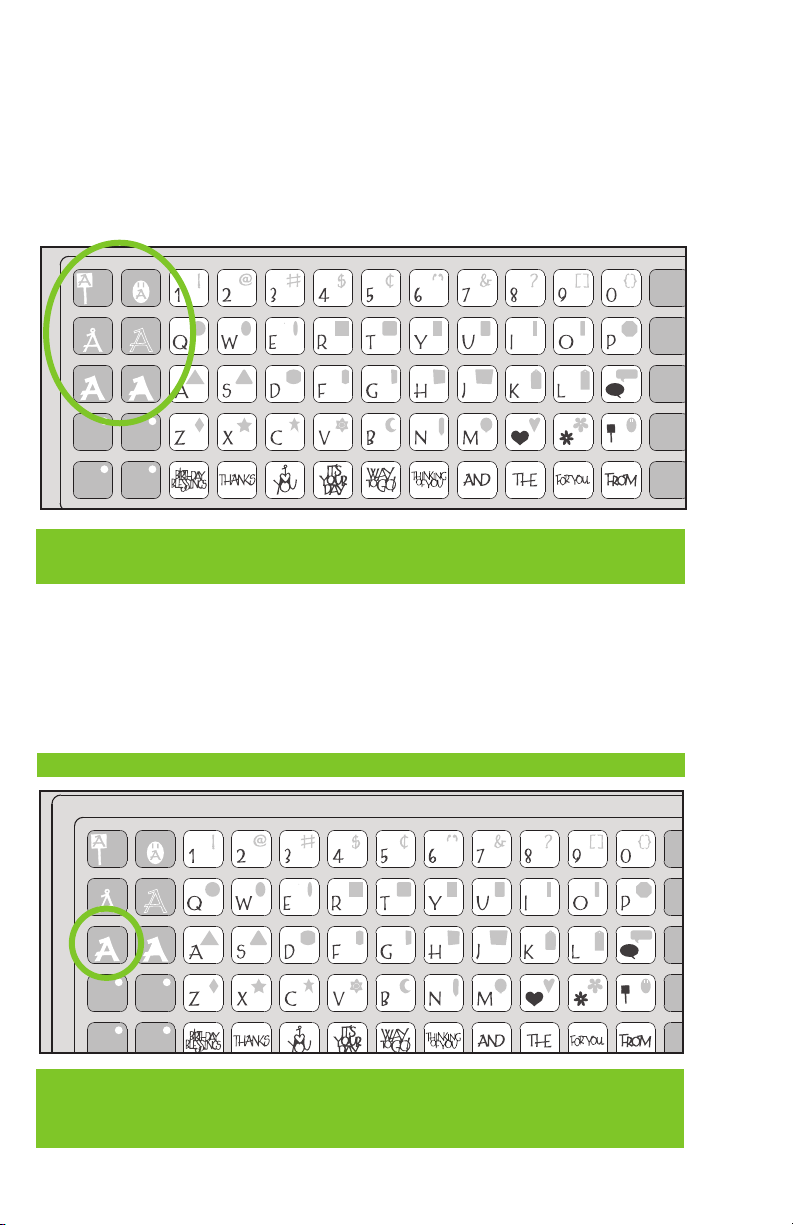
CREATIVE FEATURE KEYS
Creative Features are found in the top 3 rows of keys on the left side of the keypad overlay. Creative Features
vary from cartridge to cartridge and provide a multitude of creative options. Refer to a cartridge’s Cricut®
handbook for a full review of the Creative Features that are available on that particular cartridge. When
a Feature key is selected, it will be backlit in green. A Feature can be selected before or after a letter(s),
shape(s), or phrase(s) has been selected, but before the CUT button is pressed. Once pressed, a Feature key
will remain lit until it is turned off in one of the following ways: the Feature key is pressed a second time, the
Reset All key is pressed, or a different Feature is selected. Only one Creative Feature key can be selected
for each cut, and that Feature will be applied to all characters on the LCD screen.
Foundation
Space
Back
Space
Clear
Display
Reset
All
Repeat
Last
Load
Last
Load
Paper
Unload
Paper
Set
Paper
Size
Sound
On/Off
Sign
Charm
Shift Shift
Lock
Shadow
Paper
Saver
Real
Dial Size
Shadow
Blackout
Silhouette
Slotted
TIP: Due to their sizes and shapes, a Feature may not work with all letters, shapes, or phrases. Please
refer to the handbook included with each cartridge for Creative Feature details.
Two of the most common Creative Feature keys offered on Cricut®cartridges are the Shadow and the
Shadow Blackout/Blackout keys.
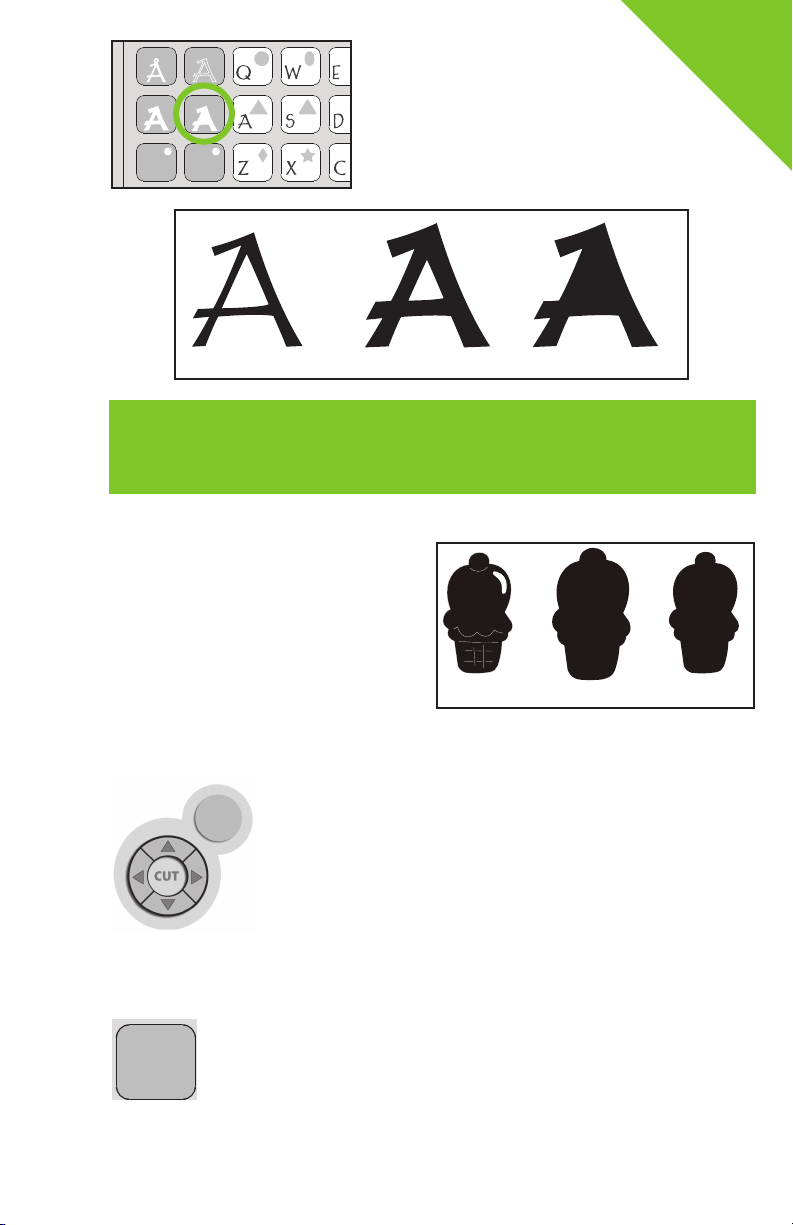
Shadow Feature
When selected, this Feature creates a proportionately larger shadow image of every letter, shape, or phrase
that is selected. When the Shadow Feature is active, the Shadow key will be backlit in green.
Foundation
SpaceBack
Space
Clear
Display
Reset
All
Repeat
Last
Load
Last
Load
Paper
Unload
Paper
Set
Paper
Size
Sound
On/Off
Sign
Charm
Shift Shift
Lock
Shadow
Paper
Saver
Real
Dial Size
Shadow
Blackout
Silhouette
Slotted
TIP: When sizing a Shadow to fit a letter, shape, or phrase, use the same dial size that was selected on
the base image or original letter. Example: If you’ve cut a 2-inch “A” and you now want a Shadow of it,
keep the Size Dial set at 2 inches.
TIP: Using just the Shadow by itself creates a chunky version of the original font.
ADVANCED KEYS AND BUTTONS
Blade Navigation Buttons are the four directional buttons marked with
arrows and arranged around the CUT button. They allow you to move the cutting
head up, down, left, or right so you can easily position the cutting head exactly
where you want to start a cut.
Use the Set Paper Size key when you are using a paper size smaller than 6” x 12” (15.2
cm x 30.5 cm). Place the paper on the Cutting Mat, aligning it in the lower LEFT corner of the
mat as indicated. Once the paper has been placed on the mat, insert the mat arrow first into
the machine, holding it firmly between the roller bar and the deck. Then press Load Paper.
Move the cutting blade to the upper RIGHT corner of the paper using the Blade Navigation
Buttons, and then push the Set Paper Size key. The size of your paper will appear on the
LCD screen. You can now begin entering your project information.
Foundation
SpaceBack
Space
Clear
Display
Reset
All
Repeat
Last
Load
Last
Load
Paper
Unload
Paper
Set
Paper
Size
Sound
On/Off
Sign
Charm
Shift Shift
Lock
Shadow
Paper
Saver
Real
Dial Size
Shadow
Blackout
Silhouette
Slotted
TIP: Because the maximum cut height is 5.5 inches, and because the Shadow and Shadow Blackout
Features are proportionately larger than the original character, these Features don’t always work when
the Size Dial is set at 5.5 inches. A warning on the LCD screen will appear if you try to cut a character
that will not fit on the paper.
Foundation
SpaceBack
Space
Clear
Display
Reset
All
Repeat
Last
Load
Last
Load
Paper
Unload
Paper
Set
Paper
Size
Sound
On/Off
Sign
Charm
Shift Shift
Lock
Shadow
Paper
Saver
Real
Dial Size
Shadow
Blackout
Silhouette
Slotted
Shadow Blackout Feature
This is the solid version of the Shadow Feature.
When sizing a Shadow Blackout to fit a letter, shape,
or phrase, use the same dial size that was selected on the
base image or original letter. Example: If you’ve cut a 2-inch “A”
and you now want a Shadow Blackout of it, keep the Size Dial set
at 2 inches.
Base Image Shadow Shadow Blackout
STOP
Blackout Feature
The Blackout Feature is the solid version of the
base shape. Images from the Doodlecharms®car-
tridge are shown here.
Base Shape Shadow Blackout
13
ENGLISH
14
Foundation
SpaceBack
Space
Clear
Display
Reset
All
Repeat
Last
Load
Last
Load
Paper
Unload
Paper
Set
Paper
Size
Sound
On/Off
Sign
Charm
Shift Shift
Lock
Shadow
Paper
Saver
Real
Dial Size
Shadow
Blackout
Silhouette
Slotted
Use the Load Last key instead of the Load Paper key when you want the blade to start
cutting at the point on the paper where the previous cut ended.
The Paper Saver key automatically rearranges your selections to take up the least amount
of space possible on your paper. If you turn the Paper Saver function on, that will become
your default setting. The next time you turn your Cricut®machine on, Paper Saver will still be
activated. If you want to deactivate it, you will need to press Paper Saver again.
Foundation
SpaceBack
Space
Clear
Display
Reset
All
Repeat
Last
Load
Last
Load
Paper
Unload
Paper
Set
Paper
Size
Sound
On/Off
Sign
Charm
Shift Shift
Lock
Shadow
Paper
Saver
Real
Dial Size
Shadow
Blackout
Silhouette
Slotted
Foundation
SpaceBack
Space
Clear
Display
Reset
All
Repeat
Last
Load
Last
Load
Paper
Unload
Paper
Set
Paper
Size
Sound
On/Off
Sign
Charm
Shift Shift
Lock
Shadow
Paper
Saver
Real
Dial Size
Shadow
Blackout
Silhouette
Slotted
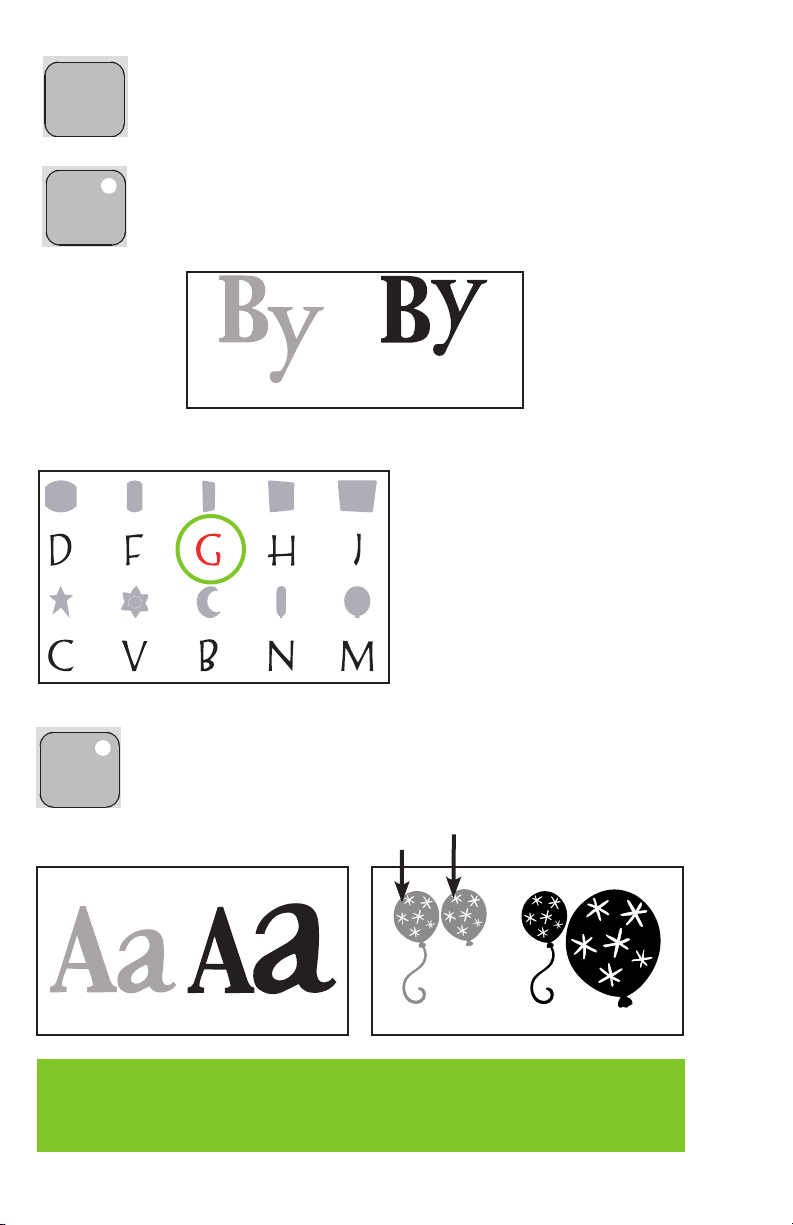
SIZING
Characters are measured from the lowest possible point to the highest possible point.
In font sets, the Key Height Character (shown here
in red) is the tallest character in any one font set.
All other characters will be sized in proportion
to the Key Height Character, unless Real Dial
Size is selected.
In shape sets, all images are created at the same
height unless an image is cut as a “layer,” in which
case it is proportionate to its base shape.
Real Dial Size
If Real Dial Size is selected, all letters or shapes will be sized according to the selected
dial size, rather than cutting proportionate to the Key Height Character or the base shape.
TIP: Only one dial size can be selected for each cut, and that dial size will be applied to all characters on
the LCD screen. For example, you cannot select an “A” at 1” (2.5 cm) and then immediately select a “B”
at 2” (5.2 cm) in the same cut. We recommend you check the size appearing in the LCD screen prior to
pressing the CUT button.
Paper Saver ON
Paper Saver OFF
Real Dial Size ON
Real Dial Size OFF
Font Set
Real Dial Size ON
Real Dial Size OFF
Shape Set
Base Shape Layer
15
ENGLISH
TIP: Cutting on cardstock and other heavy materials will reduce the life of your blade, but it will produce the
best cuts.
CUTTING ON LIGHTWEIGHT OR HEAVYWEIGHT MATERIALS
Your Cricut®machine can cut a variety of papers. For an optimal cut on lightweight papers
such as vellum or heavy papers such as thick cardstock, you may need to adjust the blade depth,
the speed of the cut, and/or the cut pressure (all discussed below).
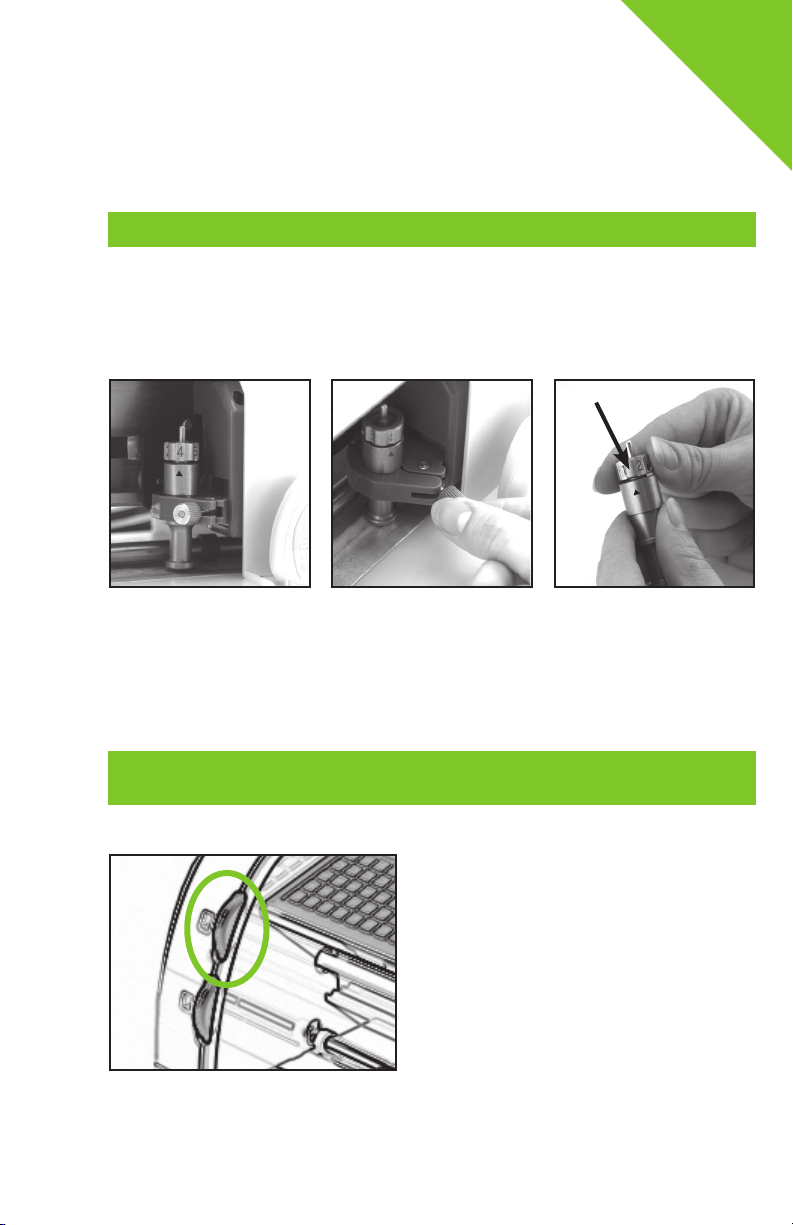
Adjusting Blade Depth
You will need to remove the cutting blade assembly from the Cricut®machine before you change the setting
on the Adjustment Knob.
To remove the cutting blade assembly (Figure 1), locate the thumbscrew and turn it counterclockwise until it
loosens enough that you can swing the thumbscrew to the right (Figure 2). Be careful not to loosen the screw too
much, or it will fall out. Remove the cutting blade assembly from the machine. Next, locate the Adjustment Knob
(Figure 3) on the top of the cutting blade assembly, and turn it to your desired setting (see the paragraph below).
The smaller the number, the shorter the blade depth. Shorter blade depths are recommended for lighter
weight materials such as vellum, longer blade lengths for heavier materials such as heavy cardstock. Reinstall
the cutting blade assembly into the Cricut®machine by reversing the procedure to remove the cutting blade
assembly. Test the setting on a scrap piece of paper and make adjustments as necessary.
Speed Dial
The Speed Dial allows you to control the cutting speed for
an optimal cut on a variety of papers. If you regularly cut
on thicker papers or cardstock, you may want to turn the
dial up to increase the cutting speed. For lighter papers
such as vellum, or for smaller, more detailed cuts, you may
want to turn the dial down to decrease the cutting speed.
After each adjustment, we recommend that you test the
setting with a scrap piece of paper, readjusting as necessary
until you achieve the desired results.
Figure 1 Figure 3
Figure 2
Adjustment Knob
WARNING! Always unplug your Cricut®machine before removing the cutting blade assembly!

16
The LCD screen and the window next to the Speed Dial will indicate the speed level, ranging from 1 (“Min”) to
5 (“Max”). As a general rule, decrease the cutting speed if your cuts are being torn. If this doesn’t work, the
blade depth may need to be adjusted (see page 15).
Pressure Dial
The Pressure Dial allows you to control how hard the
cutting mechanism presses against the paper. For thicker
papers, you may want to move the dial up to increase the
cut pressure. For lighter papers such as vellum, you may
want to turn the dial down to decrease the pressure. After
each adjustment, we recommend that you test the setting
with a scrap piece of paper, readjusting as necessary until
you achieve the desired results. The LCD screen and the
window next to the Pressure Dial will indicate the pressure
level, ranging from 1 (“Min”) to 5 (“Max”). As a general rule,
increase the pressure if your selections are not being cut completely through the paper. If this doesn’t work,
the blade depth may need to be adjusted (see page 15).
Pressure Adjustment Chart
LCD Screen Pressure/Material
Max Extra firm for heavy cardstock
High Firm for cardstock, textured, high fiber content papers
Med Factory default setting for printed papers
Low For lightweight papers
Min Light for vellum
Speed Adjustment Chart
LCD Screen Speed/Material
Max Extra fast for heavy cardstock or very simple cuts
High Fast for cardstock, textured papers or simple cuts
Med Factory default setting for printed papers or normal cuts
Low Slow for lightweight papers or detailed cuts
Min Extra slow for vellum or very detailed cuts
BASIC CARE
BLADE LIFE
You can expect anywhere from 500 to 1500 single cuts from your cutting blade before it requires replacement.
Your actual cutting blade life will vary, depending on the settings you use and the papers you cut. When the
quality of your cuts decreases, it is probably time to replace your cutting blade. For best results, use only
genuine Cricut®Replacement Cutting Blades, available at retailers everywhere (Part #290002).

REPLACING THE CUTTING BLADE
To change the cutting blade, you must first remove the cutting blade assembly. Refer to page 15 in
this manual for instructions.
After removing the cutting blade assembly, locate the blade release at the top of the cutting blade assembly
and push it in (Figure 1). The blade will emerge from the cutting blade assembly. You will need to gently pull
the blade away from the magnet holding it in place (Figure 2).
To install the new blade, let go of the blade release and carefully insert the shaft of the blade into the hole in
the bottom of the cutting blade assembly. The blade should be “sucked” up inside the shaft if properly installed
(Figure 3). The replacement cutting blade is now installed. Reinstall the cutting blade assembly into the Cricut®
machine by reversing the procedure to remove the cutting blade assembly.
CARING FOR THE CUTTING MAT
You can expect anywhere from 25-40 full mat cuts from your Cricut®Cutting Mat before it requires replace-
ment. Your actual Cutting Mat life will vary, depending on the settings you use and the papers you cut.
When your paper no longer sticks to the Cutting Mat, it’s time to replace the mat. Use only genuine Cricut®
Replacement Cutting Mats, available at retailers everywhere (Part #290003).
CLEANING YOUR CRICUT®MACHINE
To clean the Cricut®machine, gently wipe exterior panels with a damp cloth. Immediately dry any excess
moisture with a chamois or other soft cloth. Do not use chemicals or alcohol-based cleaners (including, but
not limited to, acetone, benzene, and carbon tetrachloride) on the machine. Abrasive cleansers and cleaning
tools should also be avoided. Do not immerse the machine or any component of it in water.
Additional Basic Care Tips:
•Keepawayfromfoodandliquids
•Keepindry,dust-freelocation
•Avoidexcessiveheatorcold
•Donotleaveincar,whereexcessiveheatmaymeltordamageplasticcomponents
•Donotexposetodirectsunlightforanyextendedperiodoftime
WARNING! Always unplug your Cricut®machine before cleaning!
WARNING! Cutting blades are extremely sharp and should be handled with the utmost care. They are also
potential choking hazards; they should be kept away from children.
TIP: We recommend that you use several mats, rotating them often. This will extend the overall life of each mat.
Figure 1 Figure 2 Figure 3
WARNING! Always unplug your Cricut®machine before replacing cutting blades!
Blade Release
17
ENGLISH

FREQUENTLY ASKED QUESTIONS
Q- Do I have to hold down the Shift key to use it?
A- No. Just press it once and it will be backlit in green, indicating it is in use.
Q- How long will the blade last?
A- Anywhere from 500 to 1500 single cuts, depending on what kind of paper/cardstock you use.
Replacement blades are inexpensive and easy to change. Refer to the “Replacing the Cutting Blade” section
on page 17 in this manual.
Q- How long will a Cutting Mat last?
A- Each mat will last anywhere from 25-40 full mat cuts, depending on the size of cuts and what kind of
paper/cardstock you use. We recommend that you use several mats, rotating them often. This will extend the
overall life of each mat.
Q- Can I use a smaller paper size than 6” x 12” (15.2 cm x 30.5 cm)?
A- Absolutely! Just align a corner of the smaller paper with the bottom left corner of the mat. Once the mat is
loaded, use the Blade Navigation Buttons to move the cutting blade down to the upper right corner of the new
paper. Then press the Set Paper Size key on the keypad overlay to let the machine know where to start
cutting on the new size of paper.
Q- Do I have to finish cutting a full page before unloading the Cutting Mat?
A- No. You can unload the paper and remove just the pieces you need. You can then reload the paper at a
later time and navigate the cutting blade to any open area to resume cutting. If you immediately use the same
paper for a new cut, press the Load Last key instead of the Load Paper key. The Load Last key will
automatically return the cutting head to the place where it stopped cutting.
Q- How does the Paper Saver mode work?
A- The Paper Saver mode will “pack in” any selected cuts to optimize the space needed. See the example on
page 14 of this manual.
Q- What does Real Dial Size do?
A- By default, your Cricut®machine will cut characters in proportion to each other. However, if you want to
“break” this proportion and get any character to cut at the literal dial size, press the Real Dial Size key. For
instance, with the Size Dial set at 2”, a lowercase “a” will actually cut out approximately 1” to fit proportion-
ately with any other cut letter. With Real Dial Size selected, that same “a” would cut at a full 2”.
Q- How is a letter, shape, or phrase cut measured?
A- From the lowest possible point to the highest possible point.
TIP: For our complete list of frequently asked questions, plus the latest updates to the User Manual, visit
www.cricut.com
18
Other manuals for Cricut
2
Table of contents
Languages:
Other Provo Craft Cutter manuals


