Klauke ES20RMCCFM-NWR User manual

Remote controlled Bluetooth cutter
Operation instructions

Page 2
Section
Sub
-
section
Description
Page
no.
Contents 2
1.0 Tool Overview 3
1.1 Variants 4
1.2 Functions & Dimensions 5
2.0 Kit Contents 6
Part Numbers/ PAD references 7
3.0 Intended Use –Rail Industry 8
4.0 Operating Procedure
4.1 Fitting the tool collar 9
4.2 Charging the battery 10
4.3 Pairing remote control pendant 11
4.3.1 Insert battery 11
4.3.2 Press the remote pendant advance, then
select on screen
11
4.3.3 Pairing time-out 12
4.3.4 Automatic jaw opening 12
4.4 Operating the cutting jaws –
Remote operation
13
4.5 Operating the cutting jaws –
Manual operation
14
4.6 Releasing the cutting jaws 15
5.0 Integrated tool display
5.1 Overview 16
5.2 Error Codes 17
6.0 Servicing & Repairs 18
7.0 CE Certification 19/ 20
Contents

1.0 Tool Overview
Battery Cutting Tool that can be operated remotely via a Bluetooth
connection using the BTC2 remote pendant.
✓When used in conjunction with slot together or telescopic operating
rods the tool can be used for cutting applications at height. This
offers benefits from carrying out this work from ground level.
✓The tool can be manoeuvred into a convenient position to enable
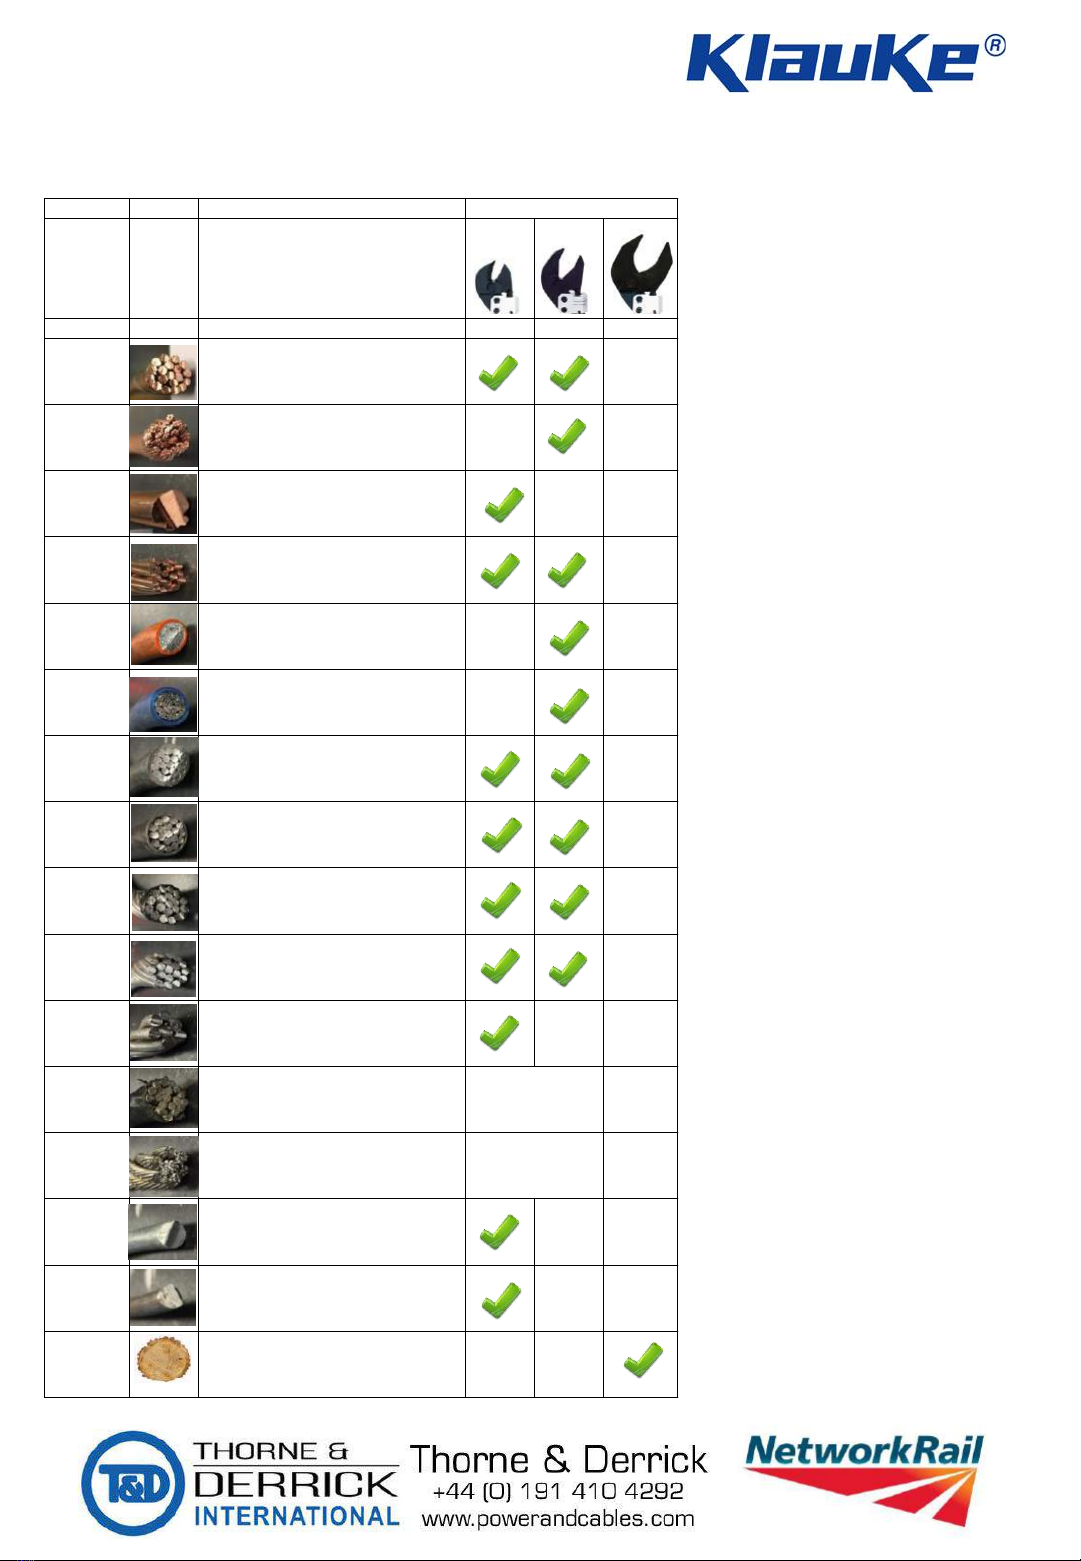
cutting of jumpers, conductor tail ends, contact wire, vegetation and
debris on or in the vicinity of power lines.
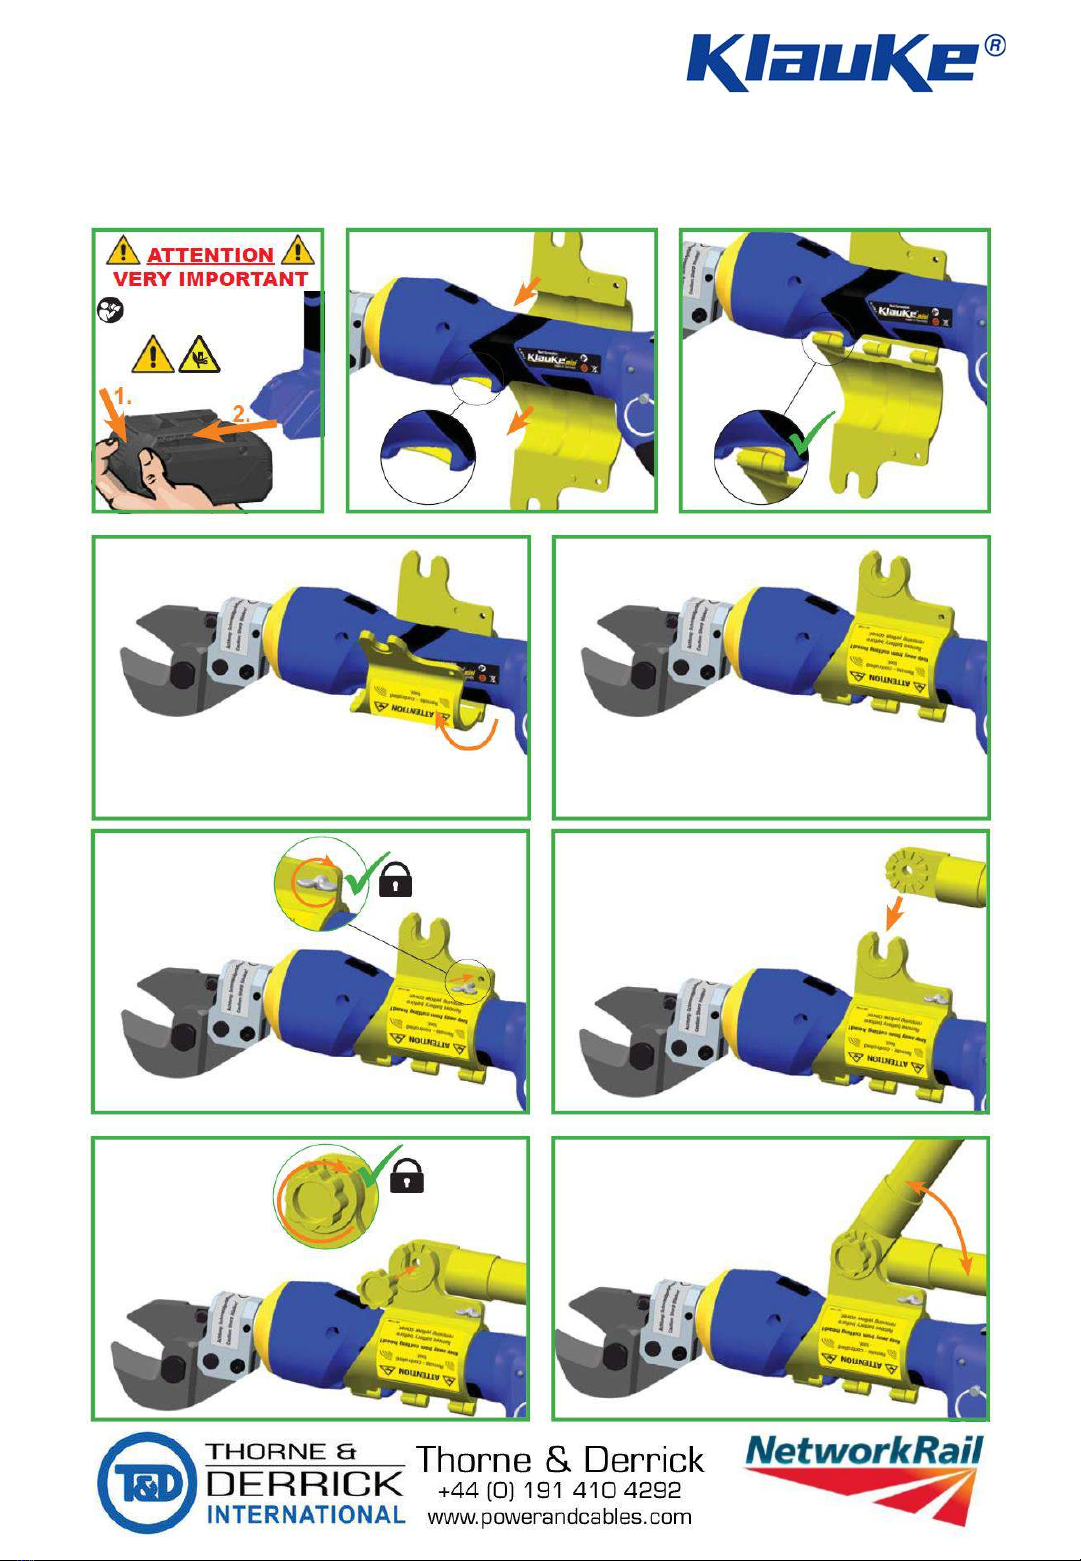
✓Each tool can be operated independently of the Bluetooth
connection by removing the yellow tool collar and selecting manual
mode via the integrated tool display. This allows the tool to be used
as a hand held battery operated cutter.
✓Each tool can only be connected to one pendant via a secure channel
ensuring that once pairing is complete no other devices can see or
operate the tool.
✓A double positive click of the pendant is required to advance the tool
ensuring that it is not operated inadvertently.
✓The tool has a balanced centre of gravity making it easy to use even
when operating remotely with insulated rods.
✓The cutting head rotates through 330oensuring that the user can
position the tool correctly for a straight clean cut.
✓The tool will automatically retract when a cutting cycle is completed.
✓Nominal operating range for Bluetooth connection maximum 15m.
✓The user can check various tool functions via the integrated
information display and select remote/ manual mode (see page 14)
✓An LED light gives workplace illumination.
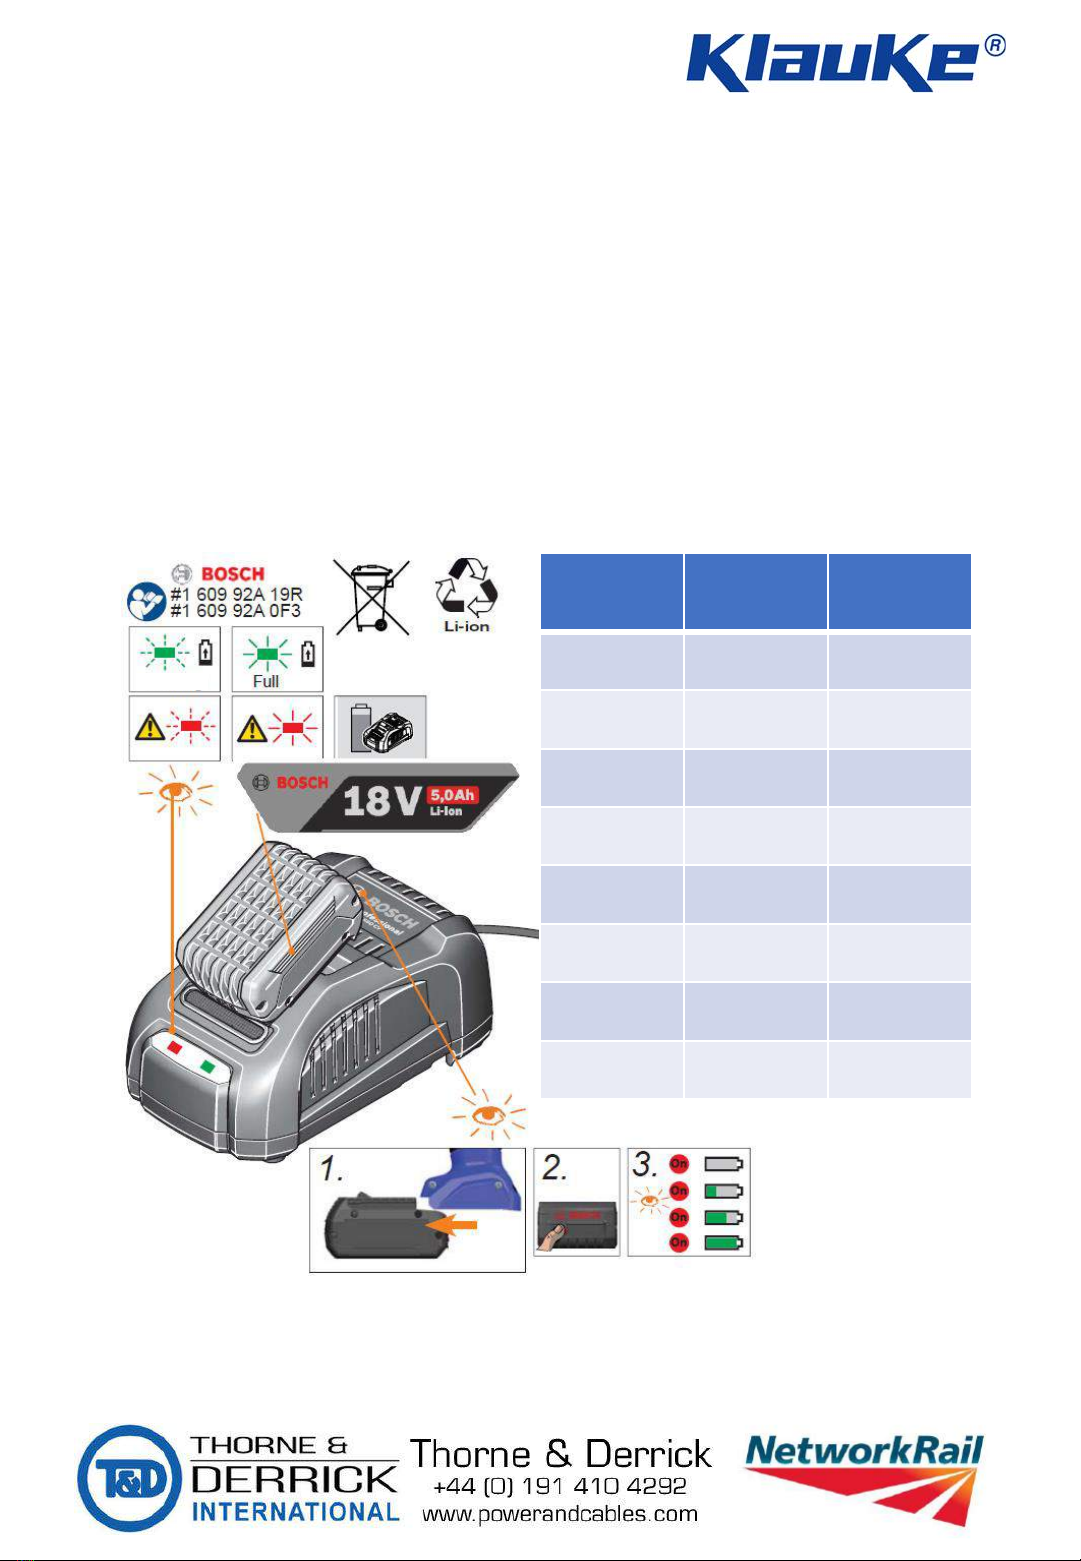
✓Available in Bosch or Makita battery platforms.
Page 3

Three tool styles are available for cutting the following (on Bosch or
Makita platforms) :-
1. ES20RMCCFM-NWR (Makita)/ ES20RMCCFB-NWR (Bosch)
for ACSR conductor up to 20mm dia, stainless steel dropper wire
& copper contact wire
2. ES32RMCCFM-NWR (Makita) / ES32RMCCFB-NWR (Bosch)
for Copper & Aluminium conductor up to 32mm dia, and copper
dropper wire
3. ES50RMCCFM-NWR (Makita) / ES50RMCCFB-NWR (Bosch)
for tree branches and other vegetation up to 50mm dia
1. 3.
2.
Page 4
1.1 Variants

Icon Key:
Operation button
Quick motor stop
Manual retraction
Electronic control
LED Service indicator
Download PDF
certificate
Rotating head
Automatic blade
retraction
Water resistant
circuit board
Integrated display
Bluetooth
2 Component grips
Torch function
Real time clock
Audible alarm
Operating temp.
Tool weight
Environmentally
friendly oil
Noise level
Vibration level
Note: Dimensions based on ES20RMC version
Page 5
1.2 Functions & dimensions

1 x Cutting tool
1 x Yellow tool collar 1 x BTC2 Remote
pendant
2 x 18V Li-Ion batteries
Makita/ Bosch
1 x mains battery charger (230V)
1 x protective carry case
Page 6
2.0 Kit Contents
1 x Top Rod Adapter
(required for attaching tool
collar to operating rods)

2.0 Kit Contents
2.1 Part Numbers / PAD references
Description
Manuf
P/N
PAD Ref
Remote cutting kit with ES20 head
(including all parts on page 6) on
Makita battery platform
ES20RMCCFM
-NWR
TBC
Remote cutting kit with ES32 head
(including all other parts on page 6)
on Makita battery platform
ES32RMCCFM
-NWR
TBC
Remote cutting kit with ES50 head
(including all other parts on page 6)
on Makita battery platform
ES50RMCCFM
-NWR
TBC
Remote cutting kit with ES20 head
(including all parts on page 6) on
Bosch battery platform
ES20RMCCFB
-NWR
TBC
Remote cutting kit with ES32 head
(including all other parts on page 6)
on Bosch battery platform
ES32RMCCFB
-NWR
TBC
Remote cutting kit with ES50 head
(including all other parts on page 6)
on Bosch battery platform.
ES50RMCCFB
-NWR
TBC
Top rod adapter
HOR
-P3625
TBC
Remote Bluetooth pendant
BTC2
TBC
Makita 18V Li
-Ion battery
RAL1
TBC
Bosch 18V Li
-Ion Battery
RALB1
TBC
Makita 230V mains charger
LGL1UK
TBC
Bosch 230V mains charger
LGLB1UK
TBC
Page 7

Note:
The remote cutter can be
used on various conductors
up to 20mm diameter (for
ES20 model)/ 32mm dia
(for ES32 model)
The ES20 has a flat
guillotine blade and can be
used on harder materials
including AWAC.
The ES32 has a sharp blade
and is only suitable for Cu
and Al materials.
The ES50 is designed for
tree clearing branches up
to 50mm dia.
Please refer to the chart on
this page for typical rail
industry applications per
tool.
Page 8
3.0 Intended Use –Rail Industry
Sample No. Image Description
ES20 ES32 ES50
1 19 x 2.1 Cu
2 19 x 7 x0.711 Cu
3 107, 120mm2 Contact Wire Cu
4 19 x 3.2 Cu
5 50mm2 Alflex (Orange Insul.)
6 50mm2 Alflex (Blue Insul.)
7 19 x 3.25 Al
8 19 x 4.22 Al PVC Covered
9 19 x 4.0 Al bare
10 19 x 3.2mm Al bare
11 Al/ Steel 7 strand (2 x St/ 5 x Al) AWAC
12 Steel Rope 19 x 1.6mm
13 Steel Bridal rope 0.7mm strands
14 Steel dropper wire 8mm
15 Steel dropper wire 4mm
16 tree branches up to 50mm diameter
Not Suitable
Not Suitable
Tools

4.1 Fitting the tool collar
REMOVE BATTERY
Page 9
4.0 Operating Procedure

4.2 Charging the battery
A fully charged battery should be used where possible.
Charging times will vary depending on the Ah rating of the
battery. Typical charging times are shown in the table below
for 18v Li-Ion Bosch batteries between 0-45oC
Battery
Capacity
80%
100%
1.3 Ah
10 mins
25 mins
1.5 Ah
10 mins
25 mins
2.0 Ah
15 mins
30 mins
2.6 Ah
15 mins
30 mins
3.0 Ah
20 mins
35 mins
4.0 Ah
25 mins
35 mins
5.0 Ah
35 mins
45 mins
6.0 Ah
35 mins
50 mins
Page 10
Charging

4.3 Pairing remote control pendant
4.3.1 Insert Battery
With the yellow tool collar already fitted, insert a fully charged
battery to the tool.
4.3.2 Press the remote pendant advance, then confirm on
screen.
Within a 2m radius of the tool, press the forward button on the
remote pendant. The tool will recognise the remote pendant (beep)
and will then request via the integrated tool screen if the detected
pendant should be paired. Select ‘yes’ via the screen toggle button.
The tool will beep twice - this will then complete pairing.
NOTE:
Only 1 pendant can be connected to the tool.
Once pairing is complete, a secure channel is
created so no other devices can connect.
Page 11
Forwards Select

4.3.3 Pairing time-out
The tool will automatically shutoff after an inactive period of:
•15 mins during the pairing process.
•30 mins after the remote has been paired.
•A series of audible and visual warnings are given before auto
shutoff occurs –see below:
4.3 Pairing the remote control pendant (cont.)
4.3.4 Automatic Jaw opening
If for any reason the cutting cycle is not completed, with no further
activation, the jaws will automatically open at 30 secs.
If for any reason the tool loses contact with the remote pendant
and does not reconnect within 20 secs, the jaws will automatically
open to allow the tool to be lowered safely to the ground.
Page 12

4.4 Operating the cutting jaws –Remote operation
When the pendant is connected successfully the screen background
will flash black & white and display ‘RC Connected’ and the tool LED
torch will illuminate.
To operate the tool:-
•Ensure you are within a 15m range of the tool
•Press the rocker switch on the pendant forwards (image) with a
rapid double-click movement
•The button must continue to be depressed for the blades to
close fully.
•The blades will automatically open when the button is released,
full pressure has been achieved or if the material to be cut is too
hard.
NOTE:
The ‘double-click’
operation has been
designed into the tool
to prevent accidental
operation.
Page 13
x2

4.5 Operating the cutting jaws –Manual operation
To operate the tool as a manual cutter:-
•Remove the battery
•Remove the yellow tool collar
•Insert a fully charged battery
•Operate trigger momentarily to activate tool –Klauke logo will
be visible on the screen
•Scroll through user menu and select ‘CURRENT USER’ . Depress
both buttons either side of the screen until the selection is
highlighted. Scroll to ‘USER2 DOUBLE CLICK’ and press operation
trigger to store selection.
•The tool is now in manual mode and can be used by depressing
the yellow tool trigger with a rapid double-click movement.
To return the tool to remote operation:-
•Remove the battery
•Fit the yellow tool collar
•Insert a fully charged battery –the battery status indicator will
be displayed
•Scroll through user menu and select ‘CURRENT USER2’.
Depress both buttons either side of the screen until the
selection is highlighted. Scroll to ‘REMOTE CONTROL’ and press
both buttons either side of the screen to store selection.
•The white LED will flash and the tool is now in remote mode.
•See page 11 (from 4.3.2) for pairing remote pendant.
Page 14

4.6 Releasing the cutting jaws
To open the cutting jaws:-
Either
•Press the rocker switch on the pendant to the back position
(image) with a single-click movement
•This will operate the release valve within the tool and the blades
will return to the home position.
or
•The blades will automatically open when full pressure has been
reached or the cutting cycle has been completed.
or
•Pull down the large black manual pressure release lever on the
rear of the tool (opposite side to the operation trigger)
Page 15

5.1 Overview
The tool features an interactive information screen where the user
can check Bluetooth connection, number of cuts completed, battery
charge level and when the next service is due. There is a menu
system and selection buttons either side of the screen.
Page 16
5.0 Integrated Tool Display
Image Push Description
Current user profile
selected
Push and hold both
buttons for 3 secs to
highlight
Push left button to
toggle through
options –
leave for 3
secs to store
Number of
operations / number
of days until next
service due
t = time used
Q =Ah used
n = number of
operations
Battery charge status

5.2 Error Codes
In the event of an error the tool will indicate via audible and visual
means (i.e. beeper/ flashing red & white LEDs). This will draw the
users attention to the tool where an error code will be displayed on
the screen along with an error message. If necessary please contact
Klauke UK Authorised Service Centre (see page 18)
Error
Code
Description
1 Overcurrent –fuse
2 Overcurrent –comparator
3 Overheat –board
4 Overheat –battery
5 Battery empty –operation stop
6 Low pressure –motor in operation
7 Low pressure –motor not in operation
8 Low Battery
9 Battery empty
10 RTC battery low (remote pendant)
11 Tool deactivated
12 Service necessary
13 RTC not found (remote pendant)
14 BT unit not found
15 Mobile unit not found
16 Pressure sensor not found
17 Burst pressure exceeded
18 Battery temp too low
Page 17

Page 19
7.0 CE Certification - Tool

Page 20
7.0 CE Certification - Bluetooth
Page 20
This manual suits for next models
5
Table of contents
Other Klauke Cutter manuals

Klauke
Klauke EMERSON ES 65RMCCFM User manual

Klauke
Klauke SDG85/2 User manual

Klauke
Klauke EMERSON EK 60UNVCFB User manual

Klauke
Klauke ES 105-L User manual

Klauke
Klauke ES 32 User manual

Klauke
Klauke NS 85 User manual

Klauke
Klauke ESG 105-L User manual

Klauke
Klauke Textron SDK 202 User manual

Klauke
Klauke SDK105 User manual

Klauke
Klauke ESG 85 Plus User manual